sensor LAND ROVER DISCOVERY 1999 Owner's Manual
[x] Cancel search | Manufacturer: LAND ROVER, Model Year: 1999, Model line: DISCOVERY, Model: LAND ROVER DISCOVERY 1999Pages: 1529, PDF Size: 34.8 MB
Page 122 of 1529

CAPACITIES, FLUIDS, LUBRICANTS AND SEALANTS
09-5
Manual
Gearbox -
R380Gate plate bolts STC 50552
Manual
Gearbox -
R380Gear case to
extension housingSTC 4404
Manual
Gearbox -
R380Extension housing
boltsSTC 50552
Manual
Gearbox -
R380Gear change lever
yoke Allen screwSTC 50552
Manual
Gearbox -
R380Gear case to centre
plateSTC 4404
Manual
Gearbox -
R380Detent plugs STC 50552
Manual
Gearbox -
R380Bias spring
adjustment plate
boltsSTC 50552
Transfer Box -
LT230SEBottom cover plate STC 4600
Transfer Box -
LT230SEBottom cover plate
boltsSTC 50552
Transfer Box -
LT230SEFront output
housing core plugSTC 3811
Transfer Box -
LT230SETransfer box to
gear case bolts -
Petrol and Diesel
enginesSTC 50552
Transfer Box -
LT230SETransfer box to
gear case studs -
Petrol and Diesel
enginesSTC 50552
Transfer Box -
LT230SERear cover STC 4600
Transfer Box -
LT230SEDifferential warning
lamp switch(es)STC 50552
Transfer Box -
LT230SEHigh/Low selector
warning lamp
switchSTC 50552
Transfer Box -
LT230SERear output shaft
housingSTC 4600
Transfer Box -
LT230SERear output shaft
housing boltsSTC 50552
Transfer Box -
LT230SEHigh/Low selector
fork set screwSTC 50552
Transfer Box -
LT230SEInterlock solenoid
selector cover - Up
to 03 MYSTC 4600
Transfer Box -
LT230SEInterlock solenoid
circlip - 03 MY
onwardsSTC 50551
Transfer Box -
LT230SENeutral sensor STC 50552
Transfer Box -
LT230SEIntermediate shaft
retaining plate boltSTC 50552Transfer Box -
LT230SESide cover STC 4600
Transfer Box -
LT230SESide cover bolts STC 50552
Transfer Box -
LT230SEDifferential lock
selector shaft
detent plugSTC 50552
Transfer Box -
LT230SEDifferential lock
selector housing
boltsSTC 50552
Transfer Box -
LT230SEFront output shaft
housingSTC 4600
Transfer Box -
LT230SEFront output shaft
housing boltsSTC 50552
Transfer Box -
LT230SEHigh/Low selector
shaft detent plugSTC 50552
Transfer Box -
LT230SEInput gear bearing
housingSTC 4600
Transfer Box -
LT230SERear cover stud nut
and boltSTC 50552
Transfer Box -
LT230SEHigh/Low cross
shaft housingSTC 4600
Transfer Box -
LT230SEHigh/Low cross
shaft housing boltsSTC 50552
Automatic
gearbox -
ZFHP22-24Torque converter
housing to engine
boltsSTC 50553
Rear Axle and
Final DriveDifferential cover to
casingSTC 3811
Rear Axle and
Final DriveDifferential cover to
casing boltsSTC 50552
Front axle Differential cover to
casingSTC 3811
Front axle Differential cover to
casing boltsSTC 50552
Front
suspensionDrive shaft to hub STC 50554
Rear
suspensionDrive shaft to hub STC 50554
Rear
suspensionSLS air compressor
boltsSTC 50552
Page 130 of 1529

MAINTENANCE
PROCEDURES 10-7
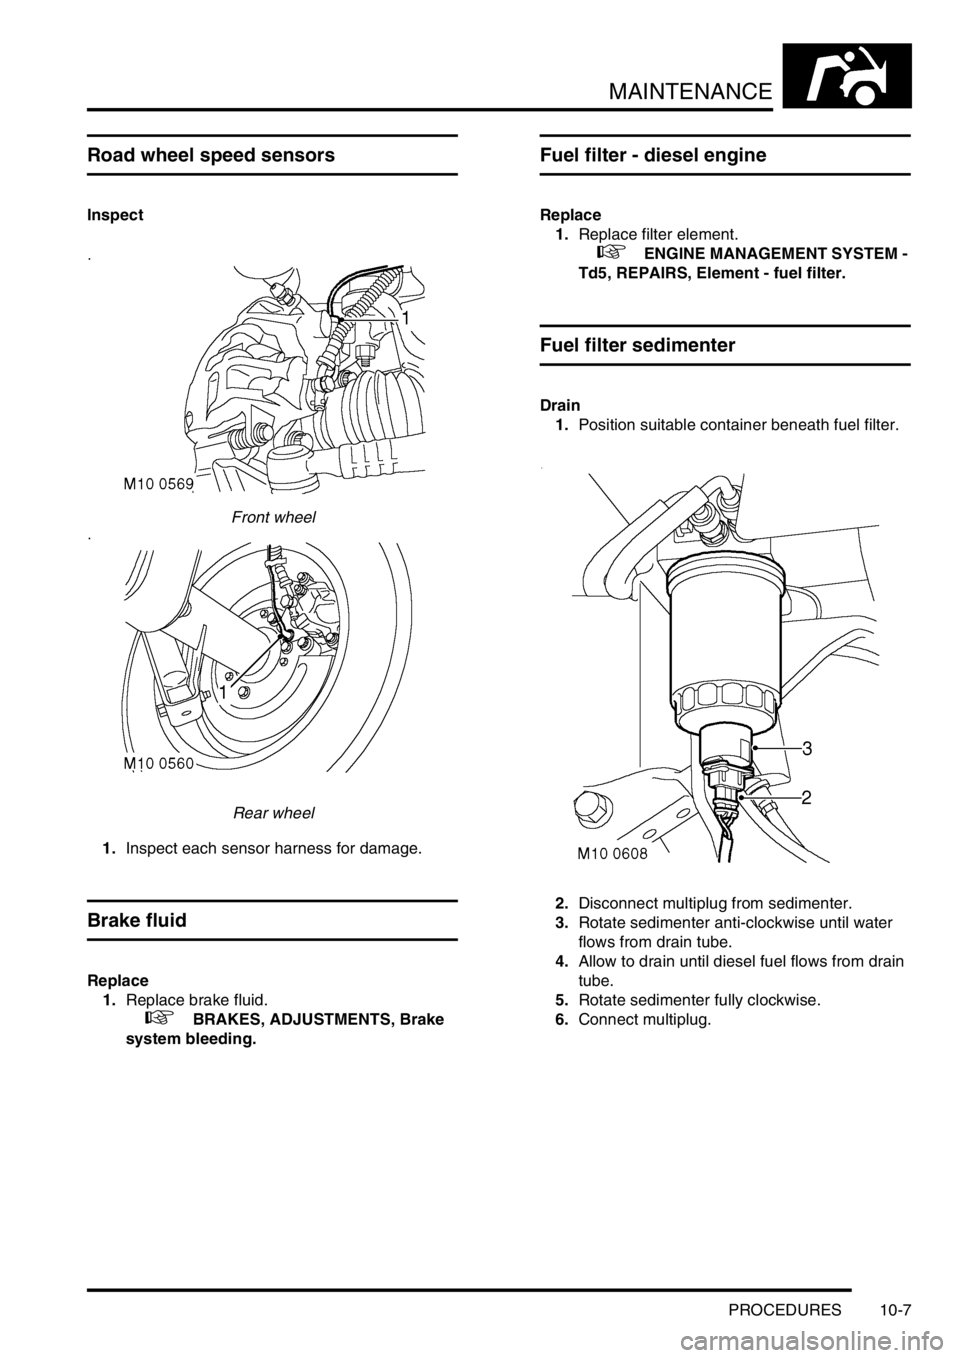
Road wheel speed sensors
Inspect
Front wheel
Rear wheel
1.Inspect each sensor harness for damage.
Brake fluid
Replace
1.Replace brake fluid.
+ BRAKES, ADJUSTMENTS, Brake
system bleeding.
Fuel filter - diesel engine
Replace
1.Replace filter element.
+ ENGINE MANAGEMENT SYSTEM -
Td5, REPAIRS, Element - fuel filter.
Fuel filter sedimenter
Drain
1.Position suitable container beneath fuel filter.
2.Disconnect multiplug from sedimenter.
3.Rotate sedimenter anti-clockwise until water
flows from drain tube.
4.Allow to drain until diesel fuel flows from drain
tube.
5.Rotate sedimenter fully clockwise.
6.Connect multiplug.
Page 131 of 1529

MAINTENANCE
10-8 PROCEDURES
Road wheels
Refit
1.Apply anti-seize compound to wheel hub
centre.
2.Refit road wheels to original hub position.
Tighten wheel nuts to 140 Nm (103 lbf.ft).
Radiator/Intercooler
Check
1.Visually check radiator/intercooler for external
obstructions, remove debris.
2.Visually check fan blades for damage.
Ambient air Temperature and pressure
sensor
Check
1.Check ambient air temperature and pressure
sensor for damage.
Doors, bonnet and fuel filler flap
Check
1.Check operation of each door, door lock,
bonnet catch and fuel filler flap. Ensure doors
close securely.
Lubricate
1.Lubricate door locks, hinges, check straps,
bonnet catch and fuel filler flap.
+ CAPACITIES, FLUIDS,
LUBRICANTS AND SEALANTS,
Lubrication.
Page 150 of 1529

MAINTENANCE
PROCEDURES 10-27
Steering rod ball joints
Check
1.Check condition of ball joints and dust covers,
and security of fixings.
+ TORQUE WRENCH SETTINGS,
Steering.
2.Attempt to move the ball joints forwards,
backwards, side to side and up and down. No
end float in any direction should be detected. If
end float is present, the ball joint must be
renewed.
Dampers and SLS height sensors
Check – Dampers
Front dampers
Rear dampers
1.Check dampers for security and signs of
leakage.
Page 151 of 1529

MAINTENANCE
10-28 PROCEDURES
Check – Height sensors
SLS height sensors
1.Check height sensors for condition and
security.
2.Check electrical harness for chafing and
damage.
Front and rear axle suspension links
Check
Rear suspension
Front suspension
1.Check condition of front and rear axle
suspension link mounting rubbers.
2.Check security of fixings.
+ TORQUE WRENCH SETTINGS,
Front suspension.
+ TORQUE WRENCH SETTINGS, Rear
suspension.
Page 160 of 1529

ENGINE - V8
DESCRIPTION AND OPERATION 12-2-5
1Core plugs
2Cylinder block
3Camshaft
4Dipstick tube, clamp and bolt
5Woodruff key
6Timing chain
7Camshaft timing gear
8Washer
9Bolt - camshaft timing gear
10Thrust plate - camshaft end-float
11Bolt - camshaft thrust plate
12Gasket - timing cover
13Timing cover
14Oil pressure switch
15Bolt
16Crankshaft front oil seal
17Oil filter element
18Crankshaft front pulley
19Washer
20Bolt - crankshaft front pulley
21Upper main bearing shell
22Upper centre main bearing shell and thrust
washer
23Crankshaft
24Woodruff key
25Crankshaft timing gear
26Lower main bearing shells
27Numbers 1, 2 and 3 main bearing caps
28Bolt - main bearing caps
29Oil pick-up pipe and strainer30'O' ring
31Bolt - oil pick-up pipe
32Gasket - sump
33Sump
34Bolt - sump
35Sump oil drain plug
36Sealing washer
37Spacer, washers and nut - oil pick-up pipe
38Number 4 main bearing cap
39Bolt - connecting rod big-end bearing cap
40Connecting rod big-end bearing shell - lower
41Connecting rod big-end bearing cap
42Number 5 - rear main bearing cap
43Cruciform seal - rear main bearing cap
44Number 5 - rear main bearing shell
45Crankshaft rear oil seal
46Crankshaft knock sensor
47Side bolt - main bearing cap
48Side Allen bolt - main bearing cap
49Dowty washers
50Connecting rod big-end bearing shell - upper
51Connecting rod
52Piston
53Gudgeon pin
54Oil control ring
55Top compression ring
562nd compression ring
57Flywheel/drive plate and starter ring gear
58Bolt - flywheel/drive plate
Page 161 of 1529

ENGINE - V8
12-2-6 DESCRIPTION AND OPERATION
Description
General
The V8 petrol engine is an eight cylinder, water cooled unit having two banks of four cylinders positioned at 90 degrees
to each other. The engine comprises five main castings - two cylinder heads, cylinder block, timing cover and the oil
sump, all of which are manufactured from aluminium alloy.
NAS market vehicles from 03 model year receive a 4.6 litre version of the V8 engine to replace the previous 4.0 litre
version.
Cylinder heads
The cylinder heads are fitted with replaceable valve guides and valve seat inserts with the combustion chambers
formed in the head. Each cylinder head is sealed to the cylinder block with a gasket. The exhaust manifolds are bolted
to the outside of each cylinder head whilst the inlet manifolds are located in the centre of the 'Vee' and are bolted to
the inside face of each head. Inlet and exhaust manifolds are sealed to the cylinder heads by means of gaskets.
Each cylinder has a single inlet and exhaust valve. The exhaust valves are of the 'carbon break' type, a recess on the
valve stem prevents a build-up of carbon in the valve guide by dislodging particles of carbon as the valve stem moves
up and down the guide. Inlet and exhaust valve stem oil seals are fitted at the top of each valve guide. Valve operation
is by means of rocker arms, push rods and hydraulic tappets. Each of the rocker arms is located on a rocker shaft
which is supported by means of pedestals bolted to the cylinder heads. A spring, positioned on either side of each
rocker arm, maintains the correct relative position of the arm to its valve stem. The rocker arms are operated directly
by the push rods which pass through drillings in the cylinder heads and cylinder block. The bottom end of each push
rod locates in a hydraulic tappet operated by the single, chain driven camshaft.
The rocker covers are bolted to the cylinder heads and are sealed to the heads by a rubber gasket. Stub pipes for
crankcase ventilation hose connections are fitted to each rocker cover, the pipe in the right hand cover incorporates
an oil separator. The engine oil filler cap is situated in the right hand cover.
Cylinder block and camshaft
The cylinder block is fitted with cast iron cylinder liners which are shrink fitted and locate on stops in the block. The
camshaft is positioned in the centre of the cylinder block and runs in one piece bearing shells which are line bored
after fitting. Camshaft end-float is controlled by a thrust plate bolted to the front of the cylinder block. A timing gear,
chain driven by the crankshaft timing gear is bolted to the front of the camshaft.
Crankshaft and main bearings
The crankshaft is carried in five main bearings. The upper main bearing shell locations are an integral part of the
cylinder block casting. The lower main bearing caps are bolted to the cylinder block on either side of the upper bearing
shell locations with an additional bolt being inserted into each cap from either side of the cylinder block. The rear
main bearing cap carries the crankshaft rear oil seal and is sealed to the cylinder block by means of cruciform shaped
seals in each side of the cap. Number four main bearing cap carries the stud fixing for the oil pick-up pipe. Lower
main bearing shells are plain whilst the upper shells have an oil feed hole and are grooved. Crankshaft end-float is
controlled by the thrust faces of the upper centre shell. The crankshaft timing gear is located on the front of the
crankshaft by means of a Woodruff key which is also used to drive the gear type oil pump. The flywheel/drive plate
carries the crankshaft position sensor reluctor ring and is dowel located and bolted to the flywheel.
Timing cover
The timing cover is bolted to the front of the cylinder block and is sealed to the block with a gasket. The disposable,
full flow oil filter canister is screwed on to the timing cover which also carries the oil pressure switch, oil pressure relief
valve and crankshaft front oil seal. The gear type oil pump is integral with the cover which also has an internal oilway
to direct oil from the oil cooler to the filter.
NOTE: Oil coolers are only fitted to vehicles up to VIN 756821.
Page 186 of 1529

ENGINE - V8
REPAIRS 12-2-31
Flywheel
$% 12.53.07
Remove
1.Remove gearbox
+ MANUAL GEARBOX - R380,
REPAIRS, Gearbox - V8.
2.Restrain flywheel.
3.Working in sequence, progressively slacken 6
bolts securing clutch cover to flywheel.
Remove bolts.
4.Remove clutch cover.
5.Remove clutch plate.
6.Release crankshaft sensor multiplug from
bracket.
7.Remove 2 bolts securing crankshaft sensor
cover. 8.Remove crankshaft sensor cover.
9.Remove 2 nuts securing crankshaft sensor.
10.Remove crankshaft sensor.
11.Remove 6 bolts securing flywheel.
12.Remove flywheel.
On early engines, balance weights are on
engine side of flywheel; replacement flywheels
will have balance weights on clutch side of
flywheel.
Refit
1.Clean mating faces of flywheel and crankshaft,
dowel and dowel hole. Ensure bolt holes in
crankshaft are clean and dry.
2.Fit flywheel to crankshaft and tighten bolts to
78 Nm (58 lbf.ft).
3.Clean crankshaft sensor and mating face.
4.Fit crankshaft sensor and tighten nuts to 6 Nm
(4.4 lbf.ft).
5.Fit crankshaft sensor cover and tighten bolts to
6 Nm (5 lbf.ft).
6.Fit crankshaft sensor multiplug to bracket.
7.Clean clutch cover, drive plate and spigot bush
in end of crankshaft. Renew worn components
as necessary.
8.If refitting existing drive plate, apply 'Molycote
FB 180' to splines.
Page 187 of 1529

ENGINE - V8
12-2-32 REPAIRS
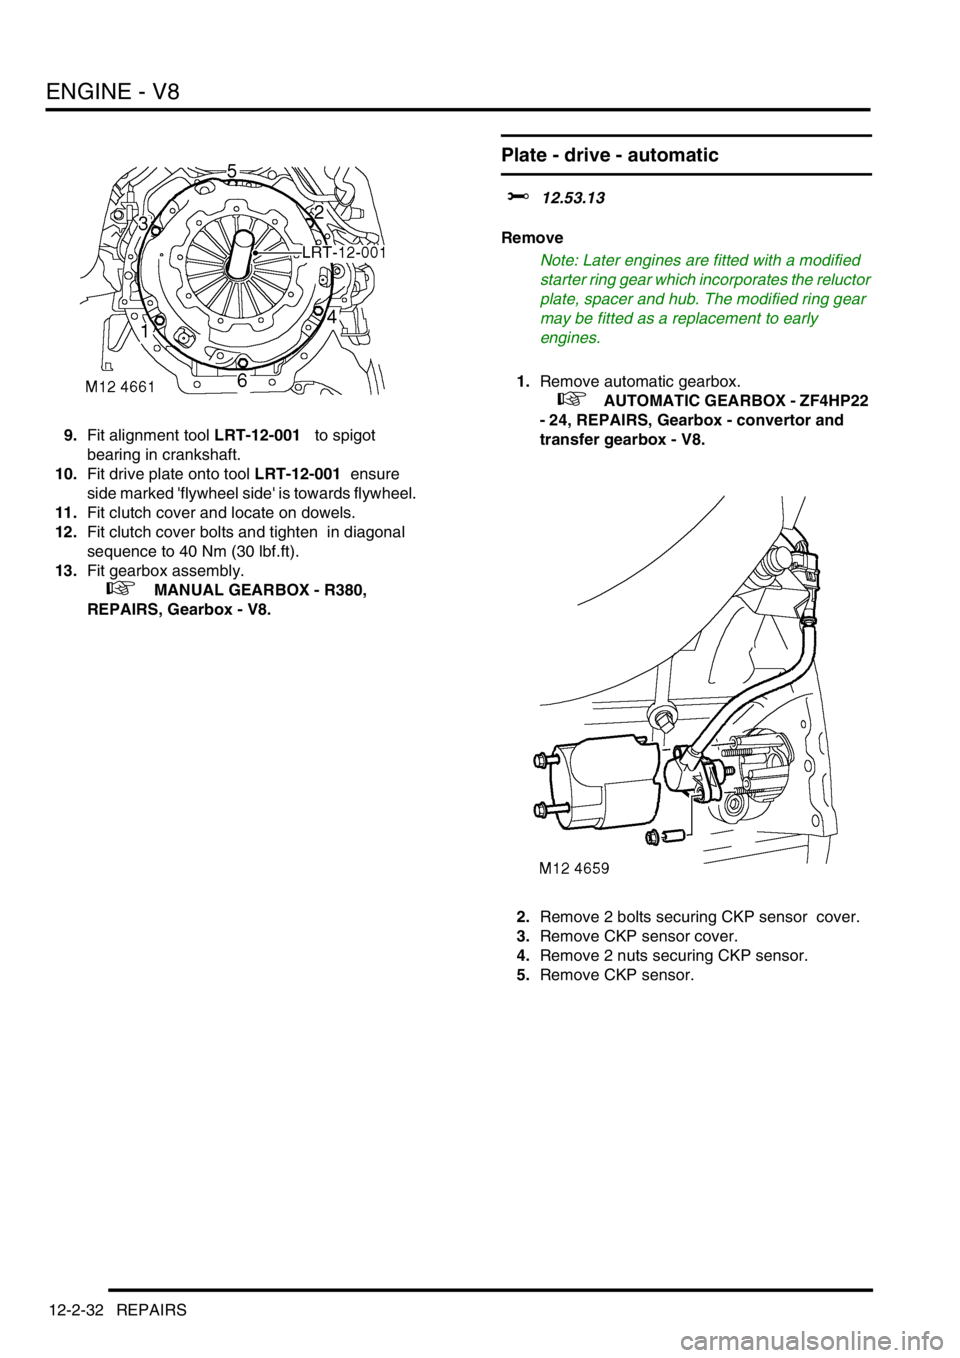
9.Fit alignment tool LRT-12-001 to spigot
bearing in crankshaft.
10.Fit drive plate onto tool LRT-12-001 ensure
side marked 'flywheel side' is towards flywheel.
11.Fit clutch cover and locate on dowels.
12.Fit clutch cover bolts and tighten in diagonal
sequence to 40 Nm (30 lbf.ft).
13.Fit gearbox assembly.
+ MANUAL GEARBOX - R380,
REPAIRS, Gearbox - V8.
Plate - drive - automatic
$% 12.53.13
Remove
Note: Later engines are fitted with a modified
starter ring gear which incorporates the reluctor
plate, spacer and hub. The modified ring gear
may be fitted as a replacement to early
engines.
1.Remove automatic gearbox.
+ AUTOMATIC GEARBOX - ZF4HP22
- 24, REPAIRS, Gearbox - convertor and
transfer gearbox - V8.
2.Remove 2 bolts securing CKP sensor cover.
3.Remove CKP sensor cover.
4.Remove 2 nuts securing CKP sensor.
5.Remove CKP sensor.
Page 188 of 1529

ENGINE - V8
REPAIRS 12-2-33
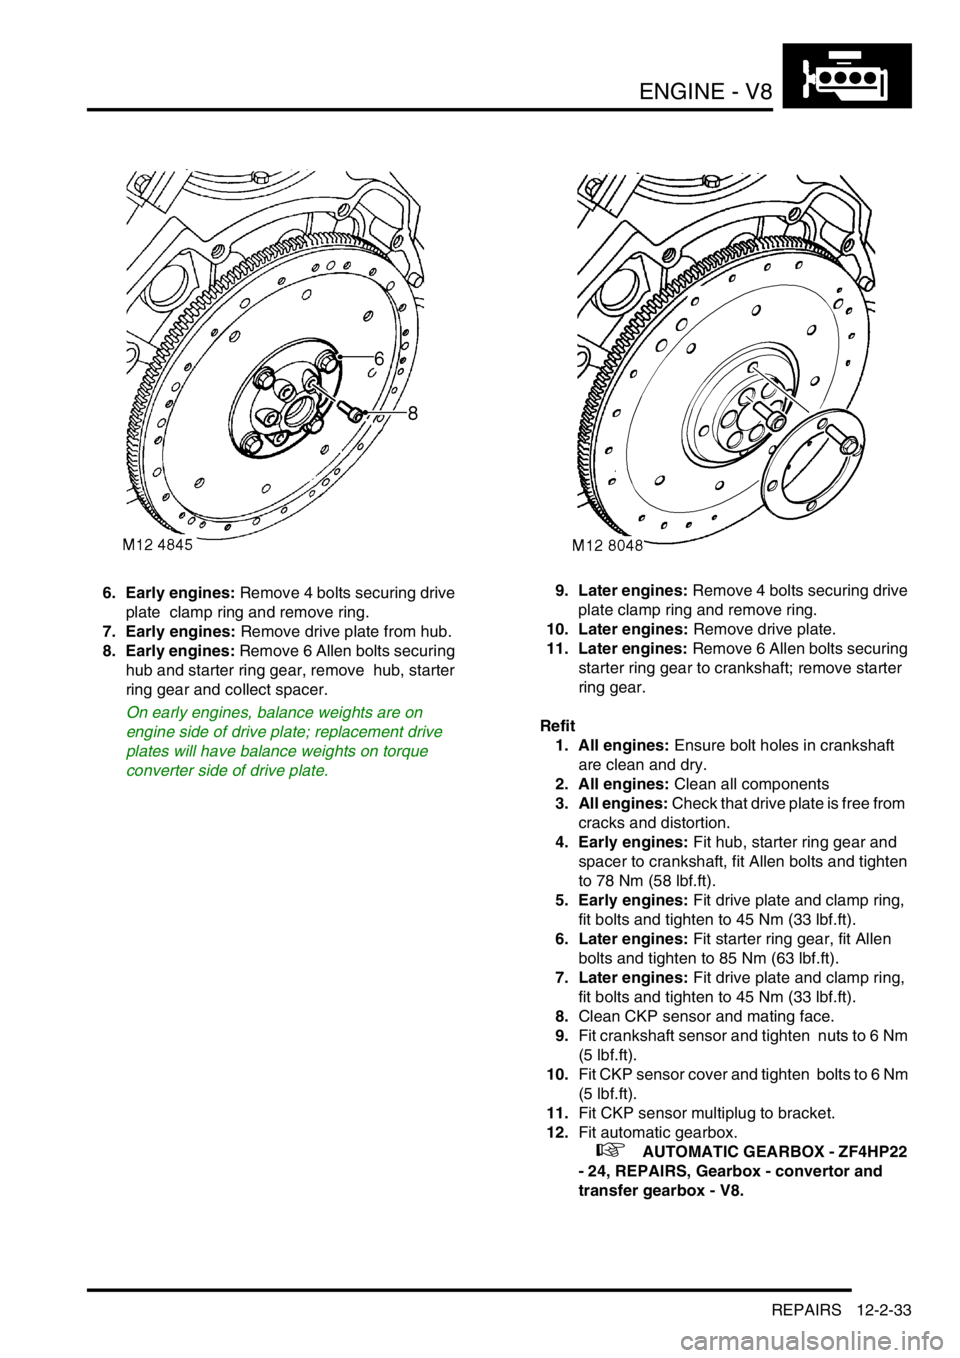
6. Early engines: Remove 4 bolts securing drive
plate clamp ring and remove ring.
7. Early engines: Remove drive plate from hub.
8. Early engines: Remove 6 Allen bolts securing
hub and starter ring gear, remove hub, starter
ring gear and collect spacer.
On early engines, balance weights are on
engine side of drive plate; replacement drive
plates will have balance weights on torque
converter side of drive plate.9. Later engines: Remove 4 bolts securing drive
plate clamp ring and remove ring.
10. Later engines: Remove drive plate.
11. Later engines: Remove 6 Allen bolts securing
starter ring gear to crankshaft; remove starter
ring gear.
Refit
1. All engines: Ensure bolt holes in crankshaft
are clean and dry.
2. All engines: Clean all components
3. All engines: Check that drive plate is free from
cracks and distortion.
4. Early engines: Fit hub, starter ring gear and
spacer to crankshaft, fit Allen bolts and tighten
to 78 Nm (58 lbf.ft).
5. Early engines: Fit drive plate and clamp ring,
fit bolts and tighten to 45 Nm (33 lbf.ft).
6. Later engines: Fit starter ring gear, fit Allen
bolts and tighten to 85 Nm (63 lbf.ft).
7. Later engines: Fit drive plate and clamp ring,
fit bolts and tighten to 45 Nm (33 lbf.ft).
8.Clean CKP sensor and mating face.
9.Fit crankshaft sensor and tighten nuts to 6 Nm
(5 lbf.ft).
10.Fit CKP sensor cover and tighten bolts to 6 Nm
(5 lbf.ft).
11.Fit CKP sensor multiplug to bracket.
12.Fit automatic gearbox.
+ AUTOMATIC GEARBOX - ZF4HP22
- 24, REPAIRS, Gearbox - convertor and
transfer gearbox - V8.