sensor LAND ROVER DISCOVERY 1999 Service Manual
[x] Cancel search | Manufacturer: LAND ROVER, Model Year: 1999, Model line: DISCOVERY, Model: LAND ROVER DISCOVERY 1999Pages: 1529, PDF Size: 34.8 MB
Page 244 of 1529
EMISSION CONTROL - V8
DESCRIPTION AND OPERATION 17-2-11
Exhaust Emission Control System
The fuel injection system provides accurately metered quantities of fuel to the combustion chambers to ensure the
most efficient air to fuel ratio under all operating conditions. A further improvement to combustion is made by
measuring the oxygen content of the exhaust gases to enable the quantity of fuel injected to be varied in accordance
with the prevailing engine operation and ambient conditions; any unsatisfactory composition of the exhaust gas is
then corrected by adjustments made to the fuelling by the ECM.
The main components of the exhaust emission system are two catalytic converters which are an integral part of the
front exhaust pipe assembly. The catalytic converters are included in the system to reduce the emission to
atmosphere of carbon monoxide (CO), oxides of nitrogen (NO
x) and hydrocarbons (HC). The active constituents of
the catalytic converters are platinum (Pt), palladium (PD) and rhodium (Rh). Catalytic converters for NAS low
emission vehicles (LEVs) from 2000MY have active constituents of palladium and rhodium only. The correct
functioning of the converters is dependent upon close control of the oxygen concentration in the exhaust gas entering
the catalyst.
The two catalytic converters are shaped differently to allow sufficient clearance between the body and transmission,
but they remain functionally identical since they have the same volume and use the same active constituents.
The basic control loop comprises the engine (controlled system), the heated oxygen sensors (measuring elements),
the engine management ECM (control) and the injectors and ignition (actuators). Other factors also influence the
calculations of the ECM, such as air flow, air intake temperature and throttle position. Additionally, special driving
conditions are compensated for, such as starting, acceleration, deceleration, overrun and full load.
The reliability of the ignition system is critical for efficient catalytic converter operation, since misfiring will lead to
irreparable damage of the catalytic converter due to the overheating that occurs when unburned combustion gases
are burnt inside it.
CAUTION: If the engine is misfiring, it should be shut down immediately and the cause rectified. Failure to do
so will result in irreparable damage to the catalytic converter.
CAUTION: Ensure the exhaust system is free from leaks. Exhaust gas leaks upstream of the catalytic
converter could cause internal damage to the catalytic converter.
CAUTION: Serious damage to the engine may occur if a lower octane number fuel than recommended is used.
Serious damage to the catalytic converter and oxygen sensors will occur if leaded fuel is used.
Air : Fuel Ratio
The theoretical ideal air:fuel ratio to ensure complete combustion and minimise emissions in a spark-ignition engine
is 14.7:1 and is referred to as the stoichiometric ratio.
The excess air factor is denoted by the Lambda symbol λ, and is used to indicate how far the air:fuel mixture ratio
deviates from the theoretical optimum during any particular operating condition.
lWhen λ = 1, the air to fuel ratio corresponds to the theoretical optimum of 14.7:1 and is the desired condition for
minimising emissions.
lWhen λ > 1, (i.e. λ = 1.05 to λ = 1.3) there is excess air available (lean mixture) and lower fuel consumption can
be attained at the cost of reduced performance. For mixtures above λ = 1.3, the mixture ceases to be ignitable.
lWhen λ < 1, (i.e. λ = 0.85 to λ = 0.95) there is an air deficiency (rich mixture) and maximum output is available,
but fuel economy is impaired.
The engine management system used with V8 engines operates in a narrower control range about the stoichiometric
ideal between λ = 0.97 to 1.03 using closed-loop control techniques. When the engine is warmed up and operating
under normal conditions, it is essential to maintain λ close to the ideal (λ = 1) to ensure the effective treatment of
exhaust gases by the three-way catalytic converters installed in the downpipes from each exhaust manifold.
Changes in the oxygen content has subsequent effects on the levels of exhaust emissions experienced. The levels
of hydrocarbons and carbon monoxide produced around the stoichiometric ideal control range are minimised, but
peak emission of oxides of nitrogen are experienced around the same range.
Page 246 of 1529
EMISSION CONTROL - V8
DESCRIPTION AND OPERATION 17-2-13
Catalytic converters for NAS low emission vehicles (LEVs) from 2000MY have active constituents of
palladium and rhodium only. The active constituents are 14PD: 1Rh and the palladium coating is used to
oxidise the carbon monoxide and hydrocarbons in the exhaust gas.
The metallic coating of platinum and palladium oxidize the carbon monoxide and hydrocarbons and convert them into
water (H
2O) and carbon dioxide (CO2). The coating of rhodium removes the oxygen from nitrogen oxide (NOx) and
converts it into nitrogen (N
2).
CAUTION: Catalytic converters contain ceramic material, which is very fragile. Avoid heavy impacts on the
converter casing.
Downstream of the catalytic converters, the exhaust front pipes merge into a single pipe terminating at a flange joint
which connects to the exhaust intermediate pipe.
WARNING: To prevent personal injury from a hot exhaust system, do not attempt to disconnect any
components until the exhaust system has cooled down.
CAUTION: Serious damage to the catalytic converter will occur if leaded fuel is used. The fuel tank filler neck
is designed to accommodate only unleaded fuel pump nozzles.
CAUTION: Serious damage to the engine may occur if a lower octane number fuel than recommended is used.
Serious damage to the catalytic converter will occur if leaded fuel is used.
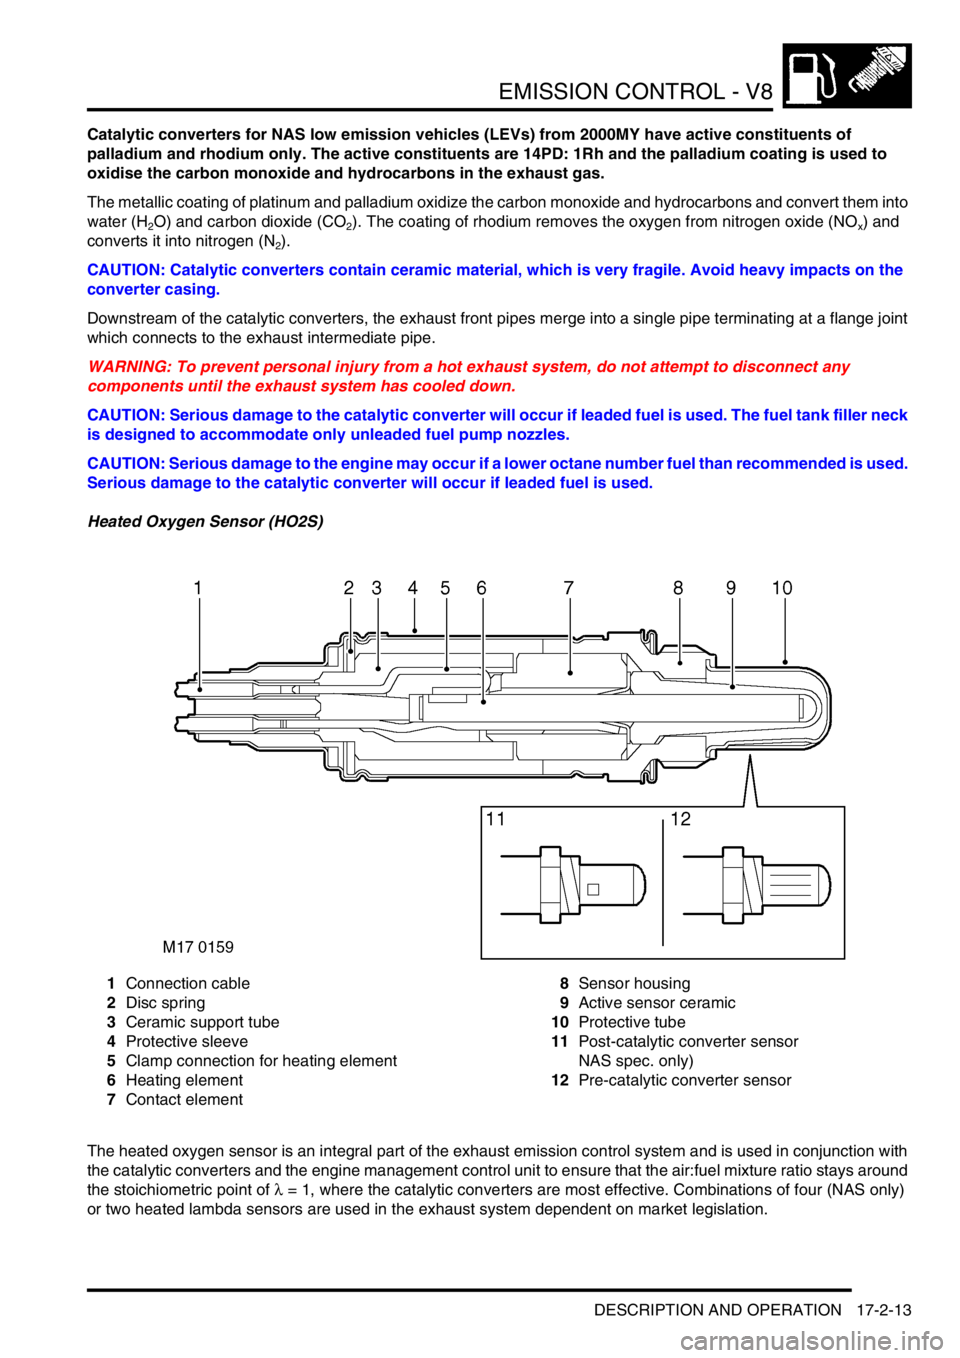
Heated Oxygen Sensor (HO2S)
1Connection cable
2Disc spring
3Ceramic support tube
4Protective sleeve
5Clamp connection for heating element
6Heating element
7Contact element8Sensor housing
9Active sensor ceramic
10Protective tube
11Post-catalytic converter sensor
NAS spec. only)
12Pre-catalytic converter sensor
The heated oxygen sensor is an integral part of the exhaust emission control system and is used in conjunction with
the catalytic converters and the engine management control unit to ensure that the air:fuel mixture ratio stays around
the stoichiometric point of λ = 1, where the catalytic converters are most effective. Combinations of four (NAS only)
or two heated lambda sensors are used in the exhaust system dependent on market legislation.
Page 247 of 1529

EMISSION CONTROL - V8
17-2-14 DESCRIPTION AND OPERATION
The heated oxygen sensor is screwed into threaded mountings welded into the top of the front exhaust pipes at
suitable locations. They are used to detect the level of residual oxygen in the exhaust gas to provide an instantaneous
indication of whether combustion is complete. By positioning sensors in the stream of exhaust gases from each
separate bank of the exhaust manifold, the engine management system is better able to control the fuelling
requirements on each bank independently of the other, so allowing much closer control of the air:fuel ratio and
optimising catalytic converter efficiency.
Two pre-catalytic converter heated oxygen sensors are mounted in the front pipes for monitoring the oxygen content
of the exhaust gas. NAS models also have two additional post-catalytic converter heated oxygen sensors in the
exhaust front pipe.
CAUTION: HO2 sensors are easily damaged by dropping, over torquing, excessive heat or contamination.
Care must be taken not to damage the sensor housing or tip.
The oxygen sensors consist of a ceramic body (Galvanic cell) which is a practically pure oxygen-ion conductor made
from a mixed oxide of zirconium and yttrium. The ceramic is then coated with gas-permeable platinum, which when
heated to a sufficiently high temperature (≥ 350° C) generates a voltage which is proportional to the oxygen content
in the exhaust gas stream.
The heated oxygen sensor is protected by an outer tube with a restricted flow opening to prevent the sensor's
ceramics from being cooled by low temperature exhaust gases at start up. The post-catalytic sensors have improved
signal quality, but a slower response rate.
The pre-catalytic and post-catalytic converter sensors are not interchangeable, and although it is possible to mount
them in transposed positions, their harness connections are of different gender and colour. It is important not to
confuse the sensor signal pins; the signal pins are gold plated, whilst the heater supply pins are tinned,
mixing them up will cause contamination and adversely affect system performance.
Each of the heated oxygen sensors have a four pin connector with the following wiring details:
lSensor signal ground (grey wire – connects to engine management ECM)
lSensor signal (black wire – connects to engine management ECM)
lHeater drive (white wire – connects to engine management ECM)
lHeater supply (white wire – connects to fuse 2, underbonnet fuse box)
The ECM connector pins for exhaust emission control are listed in the following table:
ECM Connector 2 (C635) pin-out details for exhaust emission control system
The heated oxygen sensors should be treated with extreme care, since the ceramic material within them can be easily
cracked if dropped, banged or over-torqued; the sensors should be torqued to the recommended values indicated in
the repair procedures. Apply anti-seize compound to the sensor's threads when refitting.
WARNING: Some types of anti-seize compound used in service are a health hazard. Avoid skin contact.
WARNING: To prevent personal injury from a hot exhaust system, do not attempt to disconnect any
components until the exhaust system has cooled down.
CAUTION: Do not allow anti-seize compound to come into contact with tip of sensor or enter exhaust system.
NOTE: A new HO2 sensor is supplied pre-treated with anti-seize compound.
Pin Number Function Signal Type Control
2-01 Post-cat sensor heater (RH) - NAS only Output, Drive PWM, 12 - 0V
2-07 Post-cat sensor heater (LH) - NAS only Output, Drive PWM, 12 - 0V
2-08 Post-cat sensor (RH) - NAS only Ground, Signal 0V
2-09 Pre-cat sensor (LH) Ground, Signal 0V
2-10 Pre-cat sensor (RH) Ground, Signal 0V
2-11 Post-cat sensor (LH) - NAS only Ground, Signal 0V
2-13 Pre-cat sensor heater (RH) Output, Drive PWM, 12 - 0V
2-14 Post-cat sensor (RH) - NAS only Input, Signal Analogue, 0 - 1V
2-15 Pre-cat sensor (LH) Input, Signal Analogue, 0 - 1V
2-16 Pre-cat sensor (RH) Input, Signal Analogue, 0 - 1V
2-17 Post-cat sensor (LH) - NAS only Input, Signal Analogue, 0 - 1V
2-19 Pre-cat sensor heater (LH) Output, Drive PWM, 12 - 0V
Page 249 of 1529

EMISSION CONTROL - V8
17-2-16 DESCRIPTION AND OPERATION
The ECM connectors and pins which are pertinent to evaporative emission control are listed in the following table:
Fuel Leak Detection System (vacuum type) – NAS only
The advanced evaporative loss control system equipped with a vacuum type, fuel evaporation leak detection
capability is similar to the standard evaporative loss system, but also includes additional components to enable the
engine control module (ECM) to perform a fuel evaporation leak detection test. The system includes an EVAPs
canister and purge valve, and in addition, a canister vent solenoid (CVS) valve and a fuel tank pressure sensor.
The function of the CVS valve is to block the atmospheric vent side of the EVAP canister under the control of the ECM
so that an evaporation system leak check can be performed. The test is carried out when the vehicle is stationary and
the engine is running at idle speed. The system test uses the natural rate of fuel evaporation and engine manifold
depression. Failure of the leak check will result in illumination of the Malfunction Indicator Lamp (MIL).
The fuel evaporation leak detection is part of the On-Board Diagnostics (OBD) strategy and it is able to determine
vapour leaks from holes or breaks greater than 1 mm (0.04 in.) in diameter. Any fuel evaporation system leaks which
occur between the output of the purge valve and the connection to the inlet manifold cannot be determined using this
test, but these will be detected through the fuelling adaption diagnostics.
Connector / Pin No. Function Signal type Control
C0635-23 Main relay output Output drive Switch to ground
C0635-24 Leak detection pump motor (NAS vehicles
with positive pressure type EVAP system
leak detection only)Output drive Switch to ground
C0636-3 Purge valve drive Output signal PWM 12 - 0V
C0636-6 Fuel tank pressure sensor (NAS vehicles
with vacuum type EVAP system leak
detection only)Ground 0V
C0636-30 Canister vent solenoid (CVS) valve (NAS
vehicles with vacuum type EVAP system
leak detection only) / Fuel leak detection
pump (NAS vehicles with positive pressure
type EVAP system leak detection only)Output drive Switch to ground
C0637-9 Fuel tank pressure sensor (NAS vehicles
with vacuum type EVAP system leak
detection only)Output reference 5V
C0637-12 Analogue fuel level (NAS vehicles with
positive pressure type EVAP system leak
detection only)Input Analogue 0 - 5V
C0637-14 Fuel tank pressure sensor (NAS vehicles
with vacuum type EVAP system leak
detection only)Input signal Analogue 0 - 5V
C0637-20 MIL "ON" Output drive Switch to ground
Page 251 of 1529
EMISSION CONTROL - V8
17-2-18 DESCRIPTION AND OPERATION
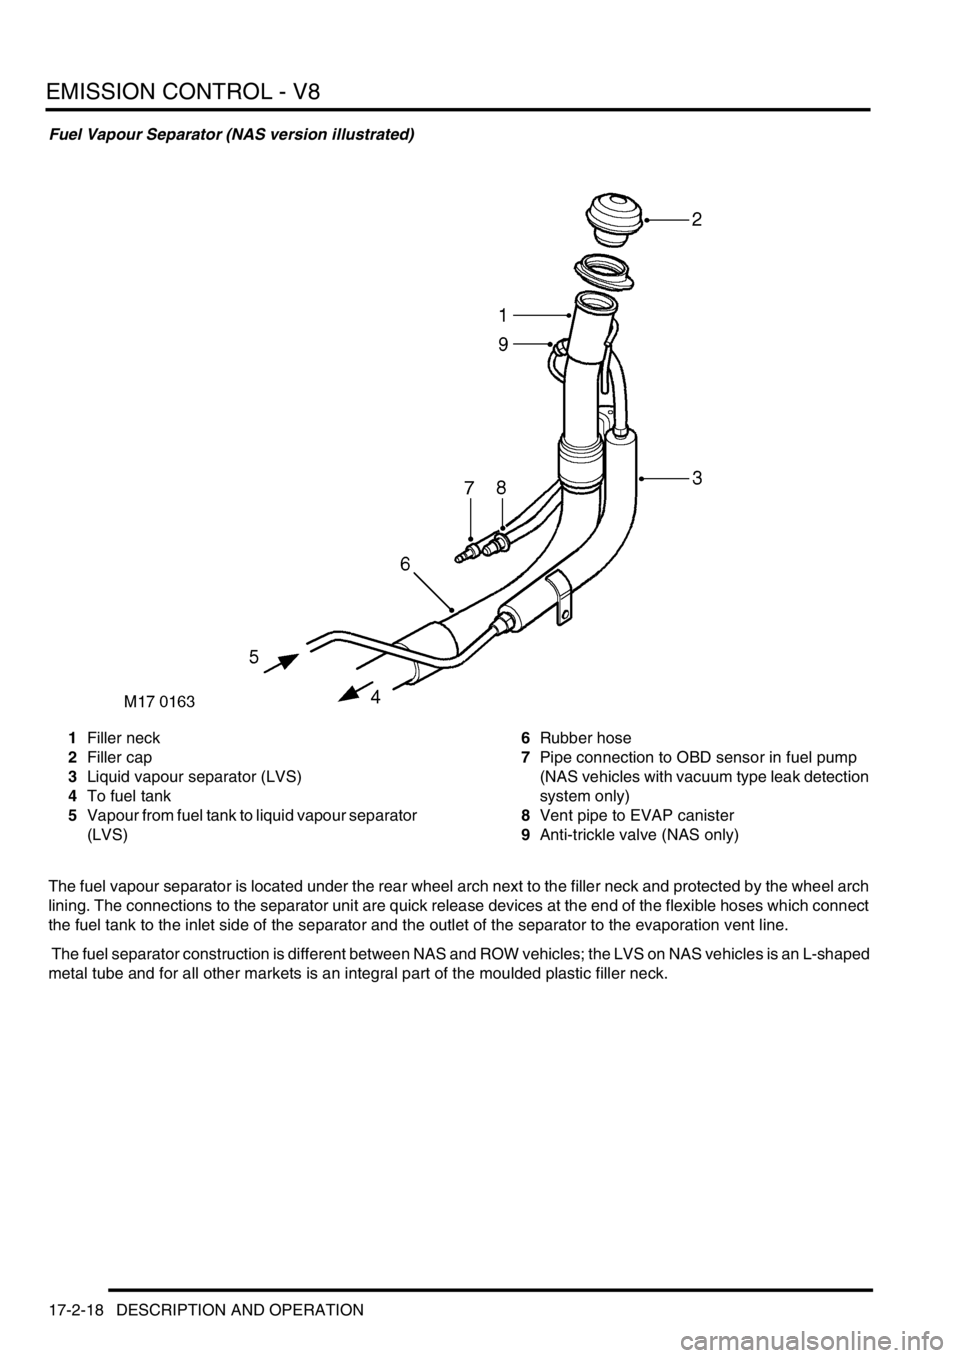
Fuel Vapour Separator (NAS version illustrated)
1Filler neck
2Filler cap
3Liquid vapour separator (LVS)
4To fuel tank
5Vapour from fuel tank to liquid vapour separator
(LVS)6Rubber hose
7Pipe connection to OBD sensor in fuel pump
(NAS vehicles with vacuum type leak detection
system only)
8Vent pipe to EVAP canister
9Anti-trickle valve (NAS only)
The fuel vapour separator is located under the rear wheel arch next to the filler neck and protected by the wheel arch
lining. The connections to the separator unit are quick release devices at the end of the flexible hoses which connect
the fuel tank to the inlet side of the separator and the outlet of the separator to the evaporation vent line.
The fuel separator construction is different between NAS and ROW vehicles; the LVS on NAS vehicles is an L-shaped
metal tube and for all other markets is an integral part of the moulded plastic filler neck.
Page 255 of 1529
EMISSION CONTROL - V8
17-2-22 DESCRIPTION AND OPERATION
The valve is normally open, allowing any build up of air pressure within the evaporation system to escape, whilst
retaining the environmentally harmful hydrocarbons in the EVAP canister. When the ECM is required to run a fuel
system test, the CVS valve is closed to seal the system. The ECM is then able to measure the pressure in the fuel
evaporative system using the fuel tank pressure sensor.
The ECM performs electrical integrity checks on the CVS valve to determine wiring or power supply faults. The ECM
can also detect a valve blockage if the signal from the fuel tank pressure sensor indicates a depressurising fuel tank
while the CVS valve should be open to atmosphere.
The following failure modes are possible:
lConnector or harness wiring fault (open or short circuit)
lValve stuck open or shut
lValve blocked
If the CVS valve malfunctions, the following fault codes may be stored in the ECM diagnostic memory, which can be
retrieved using TestBook/T4:
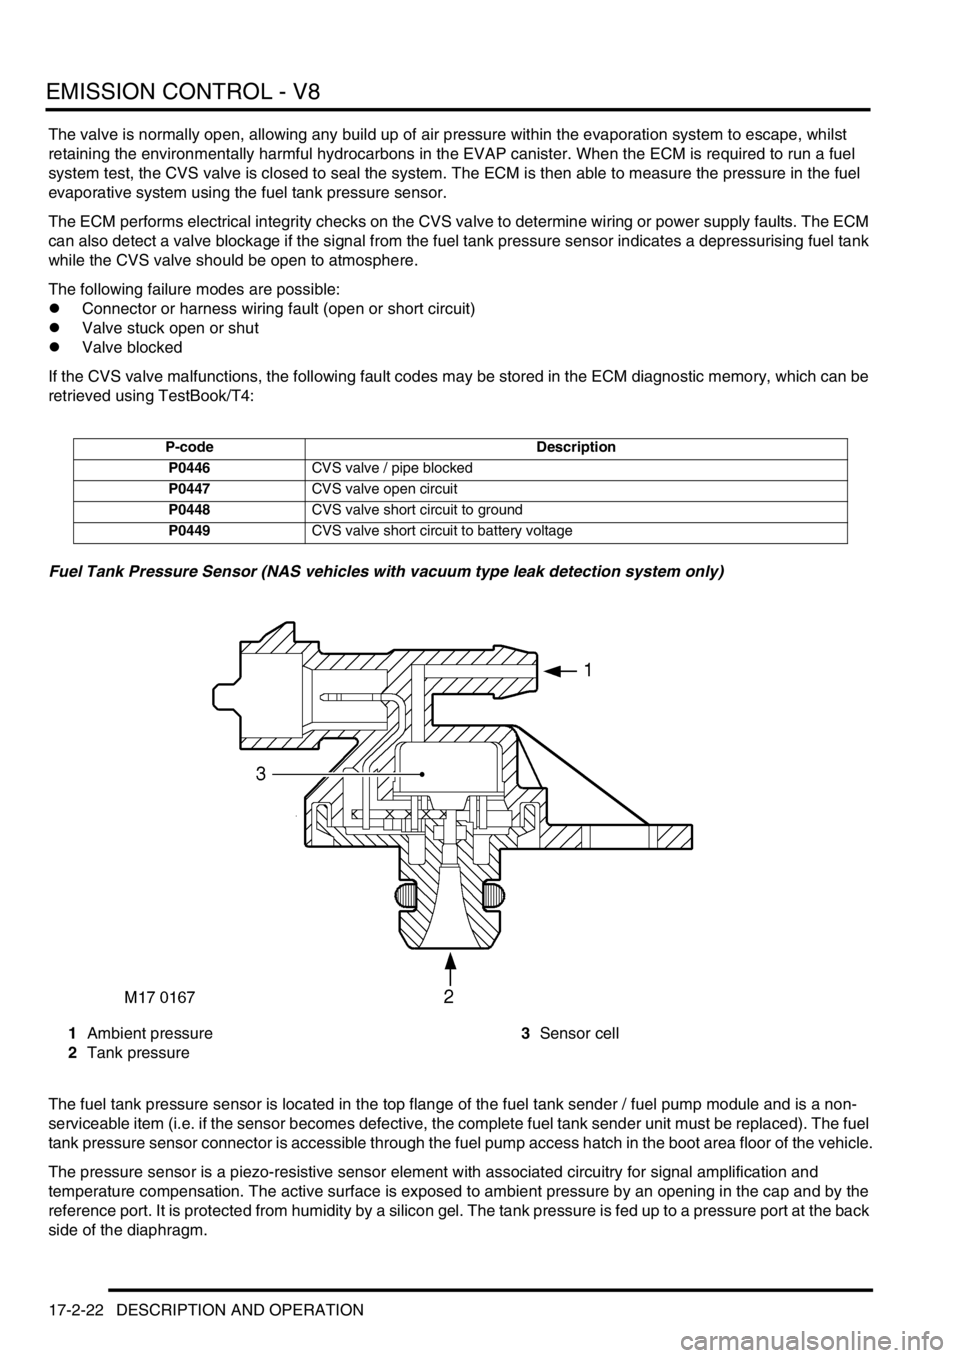
Fuel Tank Pressure Sensor (NAS vehicles with vacuum type leak detection system only)
1Ambient pressure
2Tank pressure3Sensor cell
The fuel tank pressure sensor is located in the top flange of the fuel tank sender / fuel pump module and is a non-
serviceable item (i.e. if the sensor becomes defective, the complete fuel tank sender unit must be replaced). The fuel
tank pressure sensor connector is accessible through the fuel pump access hatch in the boot area floor of the vehicle.
The pressure sensor is a piezo-resistive sensor element with associated circuitry for signal amplification and
temperature compensation. The active surface is exposed to ambient pressure by an opening in the cap and by the
reference port. It is protected from humidity by a silicon gel. The tank pressure is fed up to a pressure port at the back
side of the diaphragm.
P-code Description
P0446CVS valve / pipe blocked
P0447CVS valve open circuit
P0448CVS valve short circuit to ground
P0449CVS valve short circuit to battery voltage
Page 256 of 1529

EMISSION CONTROL - V8
DESCRIPTION AND OPERATION 17-2-23
For systems utilising the vacuum method for determining evaporation leaks, the sensor is used to monitor for a drop
in vacuum pressure. The evaporation system is sealed by the CVS valve and purge valve after a vacuum has been
previously set up from the intake manifold while the purge valve is open and the CVS valve is closed. If any holes or
leaks are present at the evaporation system joints, the vacuum pressure will gradually drop and this change in
pressure will be detected by the fuel tank pressure sensor. This system is capable of determining leaks down to 1 mm
(0.04 in.) in diameter.
The fuel tank pressure sensor is part of the NAS OBD system, a component failure will not be noticed by the driver,
but if the ECM detects a fault, it will be stored in the diagnostic memory and the MIL light will be illuminated on the
instrument pack. Possible failures are listed below:
lDamaged or blocked sensor
lHarness / connector faulty
lSensor earthing problem
lOpen circuit
lShort circuit to battery voltage
lShort circuit to ground
lECM fault
Possible failure symptoms of the fuel tank pressure sensor are listed below:
lFuel tank pressure sensor poor performance
lFuel tank pressure sensor low range fault
lFuel tank pressure sensor high range fault
If the fuel tank pressure sensor should malfunction, the following fault codes may be stored in the ECM diagnostic
memory, which can be retrieved using TestBook/T4:
P-code Description
P0451Fuel tank pressure signal stuck high within range
P0452Fuel tank pressure signal short circuit to battery voltage (out of range - High)
P0453Fuel tank pressure signal short circuit to ground or open circuit (out of range - Low)
Page 260 of 1529
EMISSION CONTROL - V8
DESCRIPTION AND OPERATION 17-2-27
The ECM connector and pins pertinent for secondary air injection are listed in the following table:
Secondary Air Injection System Components
The secondary air injection (SAI) system components (where fitted) are described below:
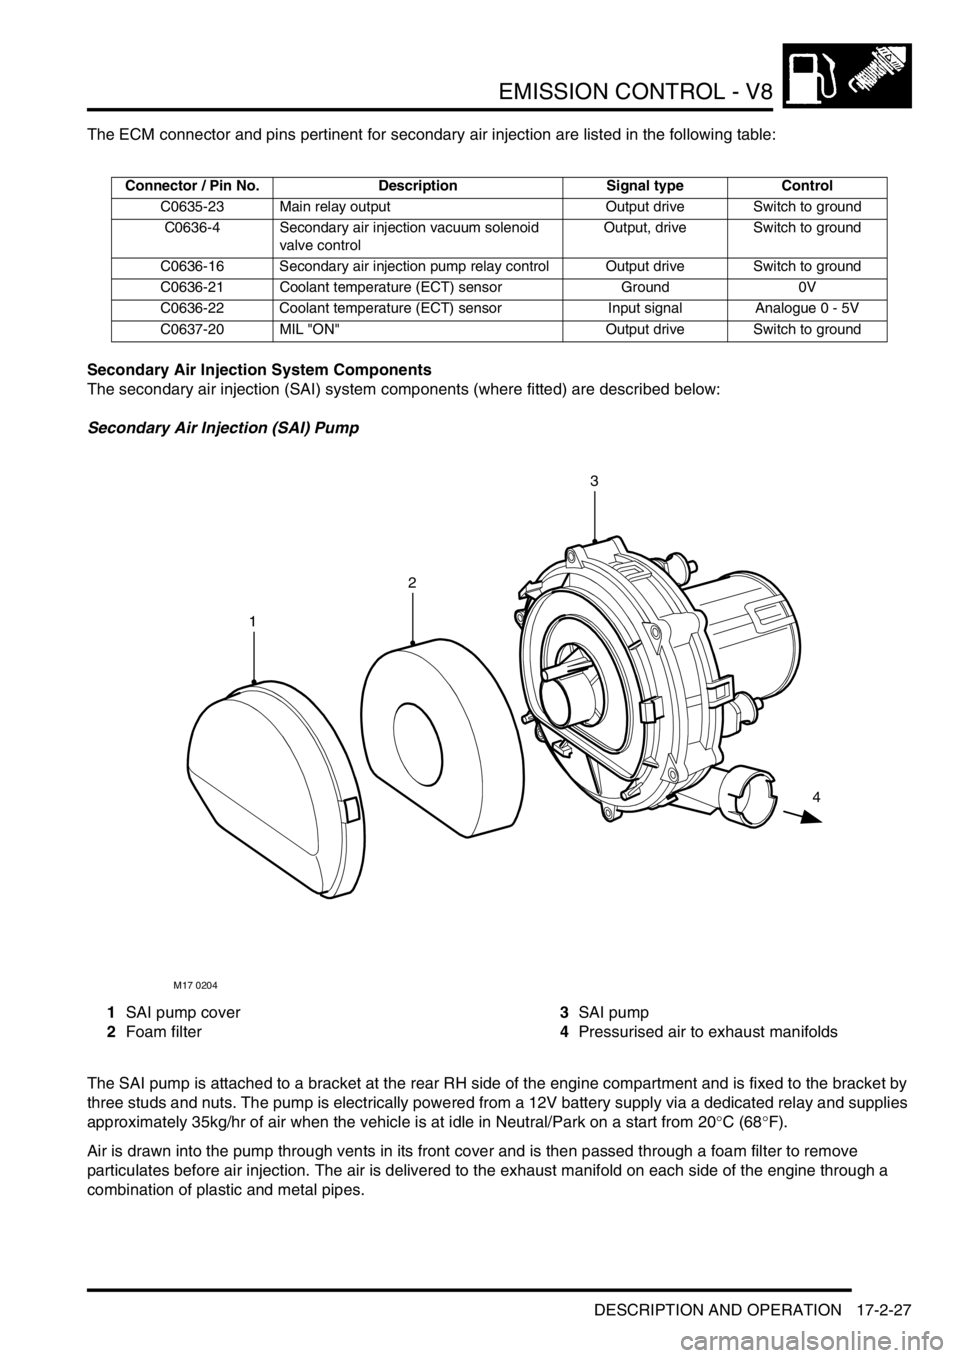
Secondary Air Injection (SAI) Pump
1SAI pump cover
2Foam filter3SAI pump
4Pressurised air to exhaust manifolds
The SAI pump is attached to a bracket at the rear RH side of the engine compartment and is fixed to the bracket by
three studs and nuts. The pump is electrically powered from a 12V battery supply via a dedicated relay and supplies
approximately 35kg/hr of air when the vehicle is at idle in Neutral/Park on a start from 20°C (68°F).
Air is drawn into the pump through vents in its front cover and is then passed through a foam filter to remove
particulates before air injection. The air is delivered to the exhaust manifold on each side of the engine through a
combination of plastic and metal pipes.
Connector / Pin No. Description Signal type Control
C0635-23 Main relay output Output drive Switch to ground
C0636-4 Secondary air injection vacuum solenoid
valve controlOutput, drive Switch to ground
C0636-16 Secondary air injection pump relay control Output drive Switch to ground
C0636-21 Coolant temperature (ECT) sensor Ground 0V
C0636-22 Coolant temperature (ECT) sensor Input signal Analogue 0 - 5V
C0637-20 MIL "ON" Output drive Switch to ground
M17 0204
1
4
2
3
Page 268 of 1529

EMISSION CONTROL - V8
DESCRIPTION AND OPERATION 17-2-35
Exhaust Emission Control Operation
The oxygen content of the exhaust gas is monitored by heated oxygen sensors using either a four sensor (NAS only)
or two sensor setup, dependent on market destination and legislative requirements. Signals from the heated oxygen
sensors are input to the engine management ECM which correspond to the level of oxygen detected in the exhaust
gas. From ECM analysis of the data, necessary changes to the air:fuel mixture and ignition timing can be made to
bring the emission levels back within acceptable limits under all operating conditions.
Changes to the air:fuel ratio are needed when the engine is operating under particular conditions such as cold starting,
idle, cruise, full throttle or altitude. In order to maintain an optimum air:fuel ratio for differing conditions, the engine
management control system uses sensors to determine data which enable it to select the ideal ratio by increasing or
decreasing the air to fuel ratio. Improved fuel economy can be arranged by increasing the quantity of air to fuel to
create a lean mixture during part-throttle conditions, however lean running conditions are not employed on closed loop
systems where the maximum is λ = 1. Improved performance can be established by supplying a higher proportion of
fuel to create a rich mixture during idle and full-throttle operation. Rich running at wide open throttle (WOT) for
performance and at high load conditions helps to keep the exhaust temperature down to protect the catalyst and
exhaust valves.
The voltage of the heated oxygen sensors at λ = 1 is between 450 and 500 mV. The voltage decreases to 100 to 500
mV if there is an increase in oxygen content (λ > 1) indicating a lean mixture. The voltage increases to 500 to 1000
mV if there is a decrease in oxygen content (λ < 1), signifying a rich mixture.
The heated oxygen sensor needs to operate at high temperatures in order to function correctly (≥ 350° C). To achieve
this the sensors are fitted with heater elements which are controlled by a pulse width modulated (PWM) signal from
the engine management ECM. The heater element warms the sensor's ceramic layer from the inside so that the
sensor is hot enough for operation. The heater elements are supplied with current immediately following engine start
and are ready for closed loop control within about 20 to 30 seconds (longer at cold ambient temperatures less than
0°C (32°F)). Heating is also necessary during low load conditions when the temperature of the exhaust gases is
insufficient to maintain the required sensor temperatures. The maximum tip temperature is 930° C.
A non-functioning heater element will delay the sensor's readiness for closed loop control and influences emissions.
A diagnostic routine is utilised to measure both sensor heater current and the heater supply voltage so its resistance
can be calculated. The function is active once per drive cycle, as long as the heater has been switched on for a pre-
defined period and the current has stabilised. The PWM duty cycle is carefully controlled to prevent thermal shock to
cold sensors.
The heated oxygen sensors age with mileage, causing an increase in the response time to switch from rich to lean
and lean to rich. This increase in response time influences the closed loop control and leads to progressively
increased emissions. The response time of the pre-catalytic converter sensors are monitored by measuring the period
of rich to lean and lean to rich switching. The ECM monitors the switching time, and if the threshold period is exceeded
(200 milliseconds), the fault will be detected and stored in the ECM as a fault code (the MIL light will be illuminated
on NAS vehicles). NAS vehicle engine calibration uses downstream sensors to compensate for aged upstream
sensors, thereby maintaining low emissions.
Diagnosis of electrical faults is continuously monitored for both the pre-catalytic converter sensors and the post-
catalytic converter sensors (NAS only). This is achieved by checking the signal against maximum and minimum
threshold for open and short circuit conditions. For NAS vehicles, should the pre- and post-catalytic converters be
inadvertently transposed, the lambda signals will go to maximum but opposite extremes and the system will
automatically revert to open loop fuelling. The additional sensors for NAS vehicles provide mandatory monitoring of
the catalyst conversion efficiency and long term fuelling adaptations.
Note that some markets do not legislate for closed loop fuelling control and in this instance no heated oxygen
sensors will be fitted to the exhaust system.
Page 269 of 1529

EMISSION CONTROL - V8
17-2-36 DESCRIPTION AND OPERATION
Failure of the closed loop control of the exhaust emission system may be attributable to one of the failure modes
indicated below:
lMechanical fitting & integrity of the sensor.
lSensor open circuit / disconnected.
lShort circuit to vehicle supply or ground.
lLambda ratio outside operating band.
lCrossed sensors.
lContamination from leaded fuel or other sources.
lChange in sensor characteristic.
lHarness damage.
lAir leak into exhaust system (cracked pipe / weld or loose fixings).
System failure will be indicated by the following symptoms:
lMIL light on (NAS and EU-3 only).
lDefault to open-loop fuelling for the defective cylinder bank.
lIf sensors are crossed, engine will run normally after initial start and then become progressively unstable with
one bank going to its maximum rich clamp and the other bank going to its maximum lean clamp – the system will
then revert to open-loop fuelling.
lHigh CO reading
lStrong smell of H
2S (rotten eggs)
lExcessive emissions
Fuel Metering
When the engine is cold, additional fuel has to be provided to the air:fuel mixture to assist starting. This supplementary
fuel enrichment continues until the combustion chamber has heated up sufficiently during the warm-up phase.
Under normal part-throttle operating conditions the fuel mixture is adjusted to provide minimum fuel emissions and
the air:fuel mixture is held close to the optimum ratio (λ = 1). The engine management system monitors the changing
engine and environmental conditions and uses the data to determine the exact fuelling requirements necessary to
maintain the air:fuel ratio close to the optimum value that is needed to ensure effective exhaust emission treatment
through the three-way catalytic converters.
During full-throttle operation the air:fuel mixture needs to be made rich to provide maximum torque. During
acceleration, the mixture is enriched by an amount according to engine temperature, engine speed, change in throttle
position and change in manifold pressure, to provide good acceleration response.
When the vehicle is braking or travelling downhill the fuel supply can be interrupted to reduce fuel consumption and
eliminate exhaust emissions during this period of operation.
If the vehicle is being used at altitude, a decrease in the air density will be encountered which needs to be
compensated for to prevent a rich mixture being experienced. Without compensation for altitude, there would be an
increase in exhaust emissions and problems starting, poor driveability and black smoke from the exhaust pipe. For
open loop systems, higher fuel consumption may also occur.
Exhaust Emission System Diagnostics
The engine management ECM contains an on-board diagnostics (OBD) system which performs a number of
diagnostic routines for detecting problems associated with the closed loop emission control system. The diagnostic
unit monitors ECM commands and system responses and also checks the individual sensor signals for plausibility,
these include:
lLambda ratio outside of operating band
lLambda heater diagnostic
lLambda period diagnostic
lPost-catalytic converter lambda adaptation diagnostic (NAS only)
lCatalyst monitoring diagnostic
Lambda Ratio Outside Operating Band
The system checks to ensure that the system is operating in a defined range around the stoichiometric point. If the
system determines that the upper or lower limits for the air:fuel ratio are being exceeded, the error is stored as a fault
code in the ECM diagnostic memory (the MIL light is illuminated on NAS vehicles).