lock LAND ROVER DISCOVERY 2002 Owners Manual
[x] Cancel search | Manufacturer: LAND ROVER, Model Year: 2002, Model line: DISCOVERY, Model: LAND ROVER DISCOVERY 2002Pages: 1672, PDF Size: 46.1 MB
Page 211 of 1672
ENGINE - TD5
12-1-72 OVERHAUL
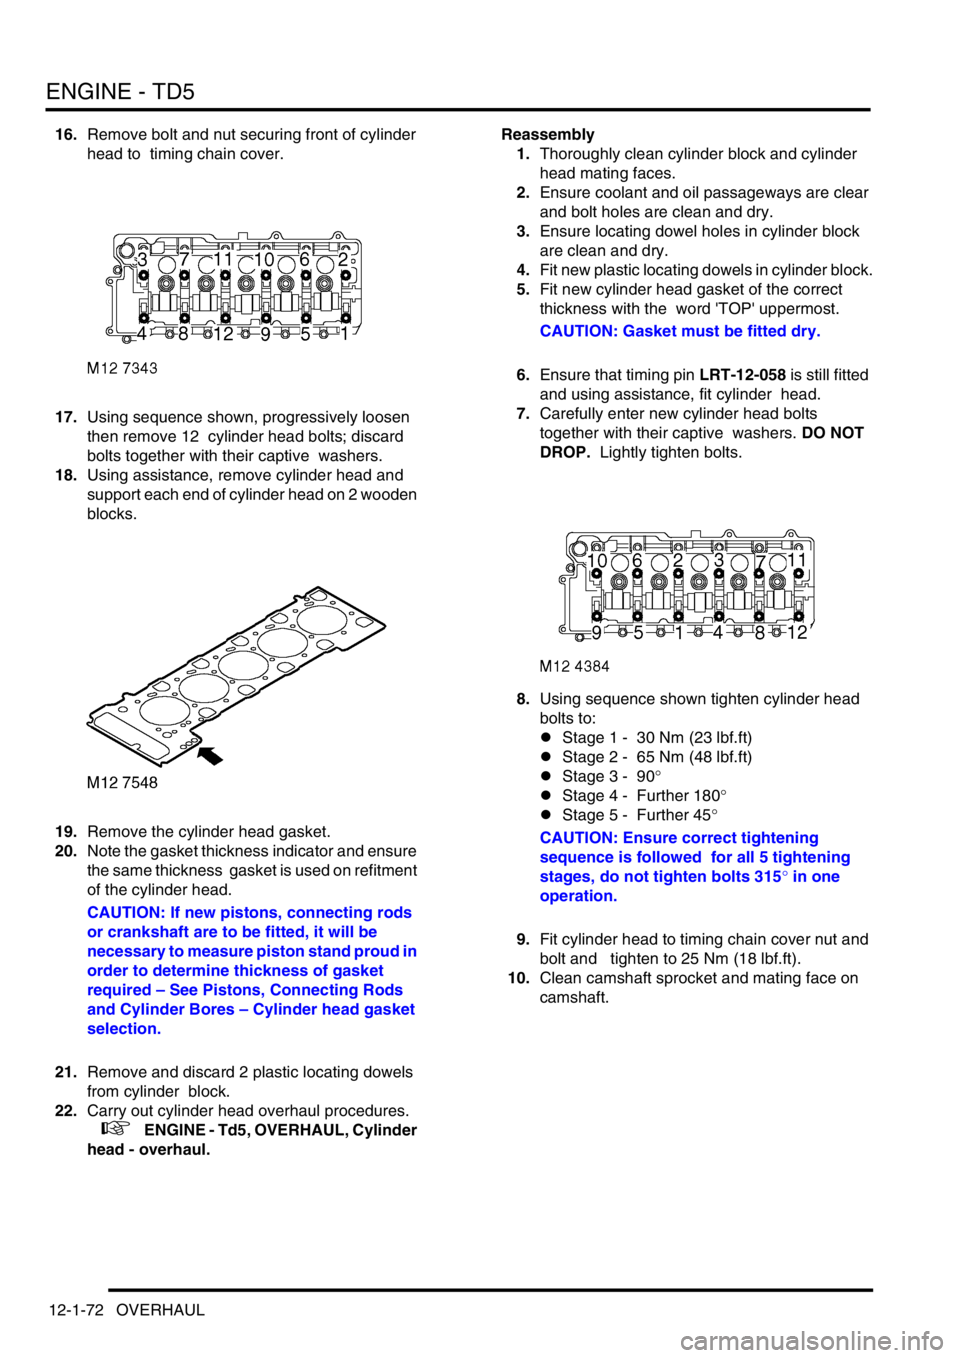
16.Remove bolt and nut securing front of cylinder
head to timing chain cover.
17.Using sequence shown, progressively loosen
then remove 12 cylinder head bolts; discard
bolts together with their captive washers.
18.Using assistance, remove cylinder head and
support each end of cylinder head on 2 wooden
blocks.
19.Remove the cylinder head gasket.
20.Note the gasket thickness indicator and ensure
the same thickness gasket is used on refitment
of the cylinder head.
CAUTION: If new pistons, connecting rods
or crankshaft are to be fitted, it will be
necessary to measure piston stand proud in
order to determine thickness of gasket
required – See Pistons, Connecting Rods
and Cylinder Bores – Cylinder head gasket
selection.
21.Remove and discard 2 plastic locating dowels
from cylinder block.
22.Carry out cylinder head overhaul procedures.
+ ENGINE - Td5, OVERHAUL, Cylinder
head - overhaul.Reassembly
1.Thoroughly clean cylinder block and cylinder
head mating faces.
2.Ensure coolant and oil passageways are clear
and bolt holes are clean and dry.
3.Ensure locating dowel holes in cylinder block
are clean and dry.
4.Fit new plastic locating dowels in cylinder block.
5.Fit new cylinder head gasket of the correct
thickness with the word 'TOP' uppermost.
CAUTION: Gasket must be fitted dry.
6.Ensure that timing pin LRT-12-058 is still fitted
and using assistance, fit cylinder head.
7.Carefully enter new cylinder head bolts
together with their captive washers. DO NOT
DROP. Lightly tighten bolts.
8.Using sequence shown tighten cylinder head
bolts to:
lStage 1 - 30 Nm (23 lbf.ft)
lStage 2 - 65 Nm (48 lbf.ft)
lStage 3 - 90
°
lStage 4 - Further 180
°
lStage 5 - Further 45°
CAUTION: Ensure correct tightening
sequence is followed for all 5 tightening
stages, do not tighten bolts 315
° in one
operation.
9.Fit cylinder head to timing chain cover nut and
bolt and tighten to 25 Nm (18 lbf.ft).
10.Clean camshaft sprocket and mating face on
camshaft.
Page 212 of 1672
ENGINE - TD5
OVERHAUL 12-1-73
11.Ensure engine is set to TDC firing - No.1
cylinder.
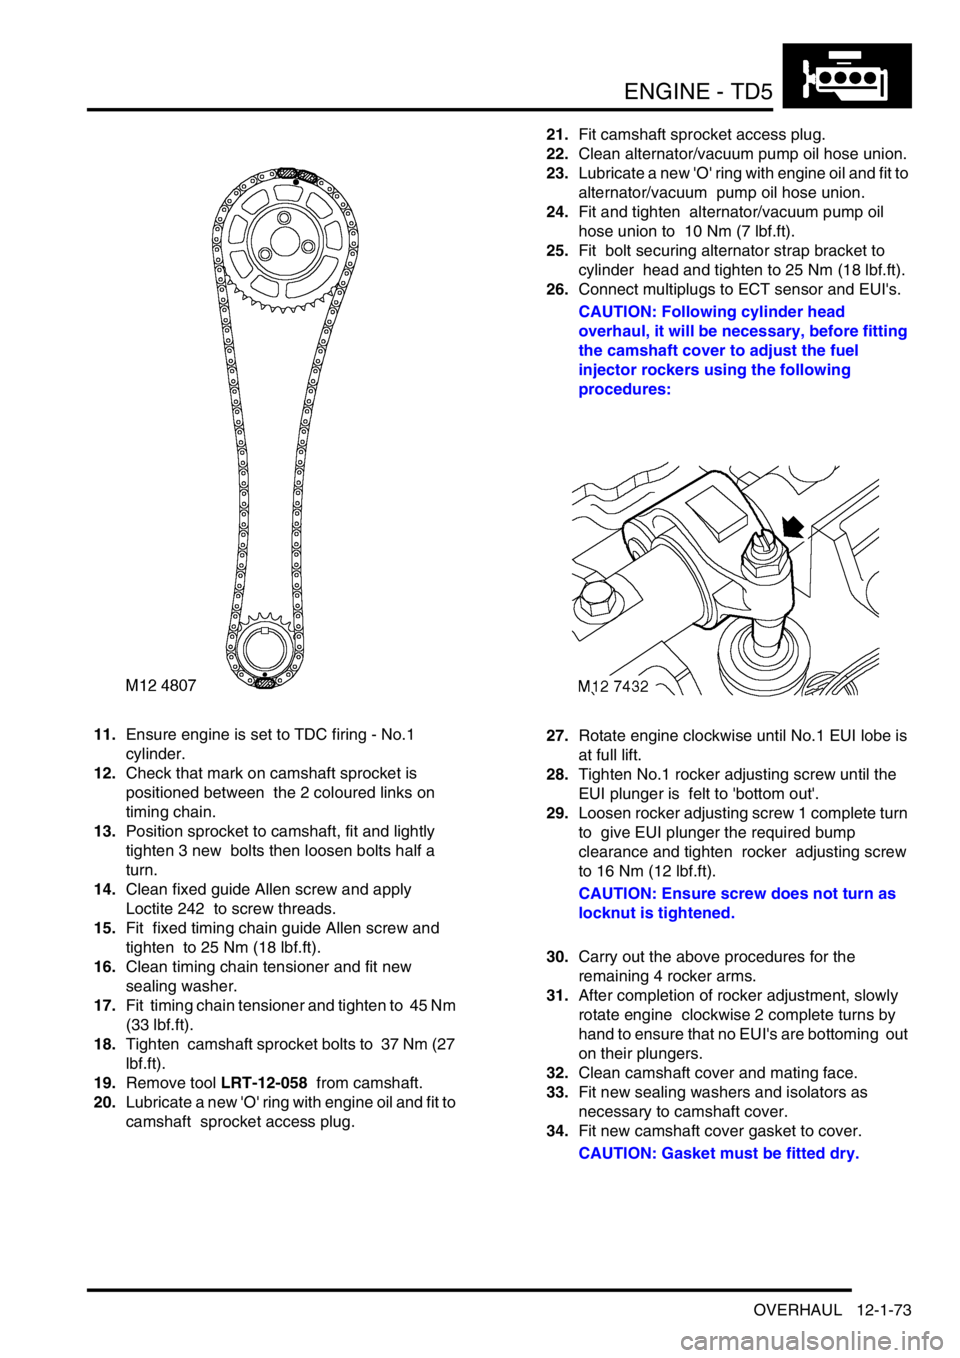
12.Check that mark on camshaft sprocket is
positioned between the 2 coloured links on
timing chain.
13.Position sprocket to camshaft, fit and lightly
tighten 3 new bolts then loosen bolts half a
turn.
14.Clean fixed guide Allen screw and apply
Loctite 242 to screw threads.
15.Fit fixed timing chain guide Allen screw and
tighten to 25 Nm (18 lbf.ft).
16.Clean timing chain tensioner and fit new
sealing washer.
17.Fit timing chain tensioner and tighten to 45 Nm
(33 lbf.ft).
18.Tighten camshaft sprocket bolts to 37 Nm (27
lbf.ft).
19.Remove tool LRT-12-058 from camshaft.
20.Lubricate a new 'O' ring with engine oil and fit to
camshaft sprocket access plug.21.Fit camshaft sprocket access plug.
22.Clean alternator/vacuum pump oil hose union.
23.Lubricate a new 'O' ring with engine oil and fit to
alternator/vacuum pump oil hose union.
24.Fit and tighten alternator/vacuum pump oil
hose union to 10 Nm (7 lbf.ft).
25.Fit bolt securing alternator strap bracket to
cylinder head and tighten to 25 Nm (18 lbf.ft).
26.Connect multiplugs to ECT sensor and EUI's.
CAUTION: Following cylinder head
overhaul, it will be necessary, before fitting
the camshaft cover to adjust the fuel
injector rockers using the following
procedures:
27.Rotate engine clockwise until No.1 EUI lobe is
at full lift.
28.Tighten No.1 rocker adjusting screw until the
EUI plunger is felt to 'bottom out'.
29.Loosen rocker adjusting screw 1 complete turn
to give EUI plunger the required bump
clearance and tighten rocker adjusting screw
to 16 Nm (12 lbf.ft).
CAUTION: Ensure screw does not turn as
locknut is tightened.
30.Carry out the above procedures for the
remaining 4 rocker arms.
31.After completion of rocker adjustment, slowly
rotate engine clockwise 2 complete turns by
hand to ensure that no EUI's are bottoming out
on their plungers.
32.Clean camshaft cover and mating face.
33.Fit new sealing washers and isolators as
necessary to camshaft cover.
34.Fit new camshaft cover gasket to cover.
CAUTION: Gasket must be fitted dry.
Page 214 of 1672
ENGINE - TD5
OVERHAUL 12-1-75
5.Loosen locknuts and fully unscrew rocker
adjusting screws; discard locknuts and screws.
6.Remove and discard 6 bolts securing rocker
shaft, release shaft from locating dowel and
remove shaft.
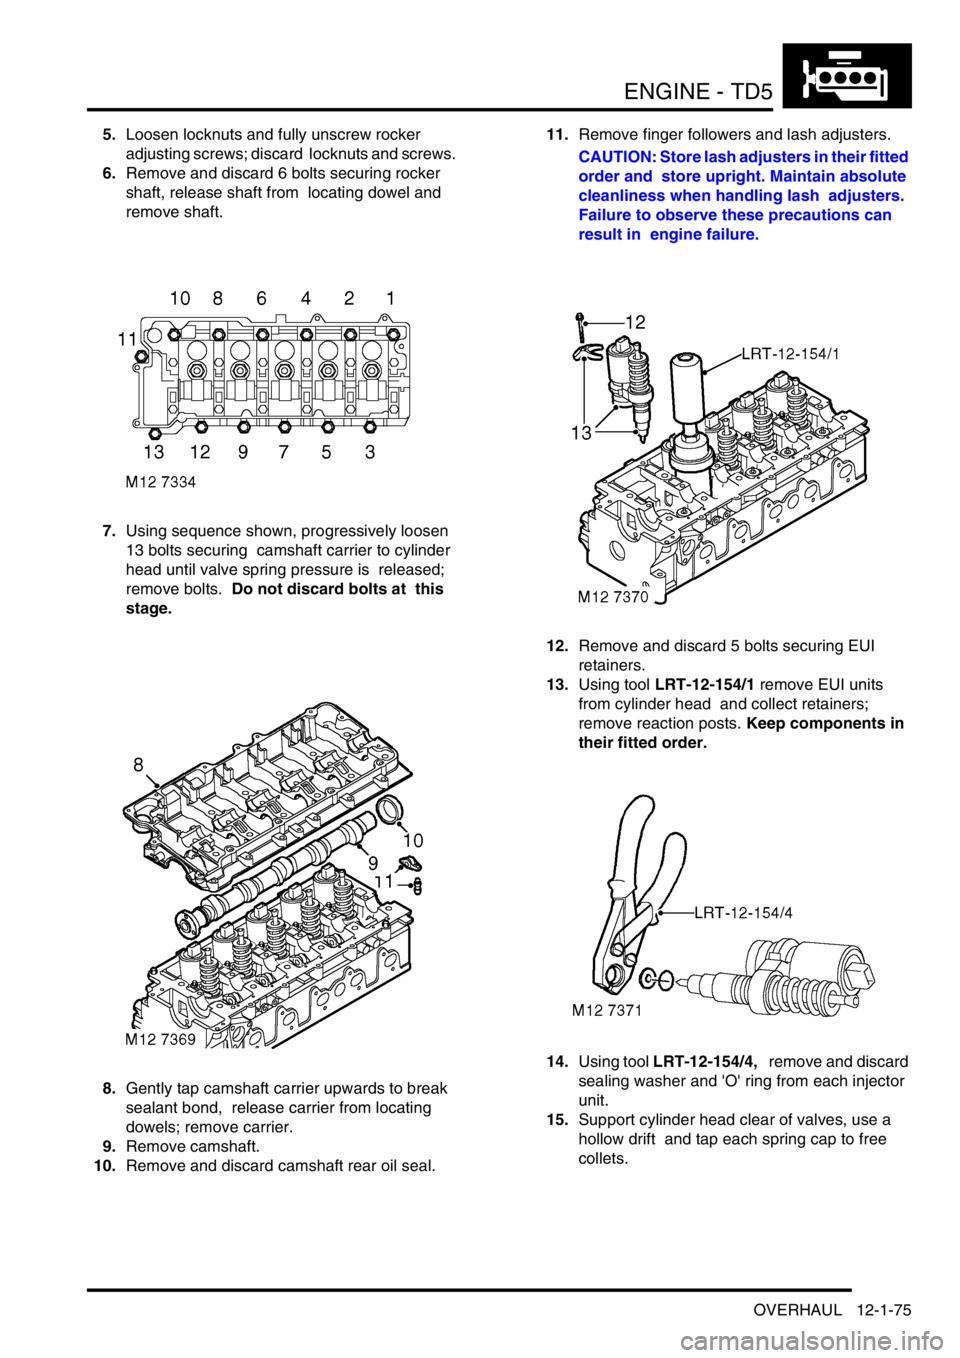
7.Using sequence shown, progressively loosen
13 bolts securing camshaft carrier to cylinder
head until valve spring pressure is released;
remove bolts. Do not discard bolts at this
stage.
8.Gently tap camshaft carrier upwards to break
sealant bond, release carrier from locating
dowels; remove carrier.
9.Remove camshaft.
10.Remove and discard camshaft rear oil seal.11.Remove finger followers and lash adjusters.
CAUTION: Store lash adjusters in their fitted
order and store upright. Maintain absolute
cleanliness when handling lash adjusters.
Failure to observe these precautions can
result in engine failure.
12.Remove and discard 5 bolts securing EUI
retainers.
13.Using tool LRT-12-154/1 remove EUI units
from cylinder head and collect retainers;
remove reaction posts. Keep components in
their fitted order.
14.Using tool LRT-12-154/4, remove and discard
sealing washer and 'O' ring from each injector
unit.
15.Support cylinder head clear of valves, use a
hollow drift and tap each spring cap to free
collets.
Page 215 of 1672
ENGINE - TD5
12-1-76 OVERHAUL
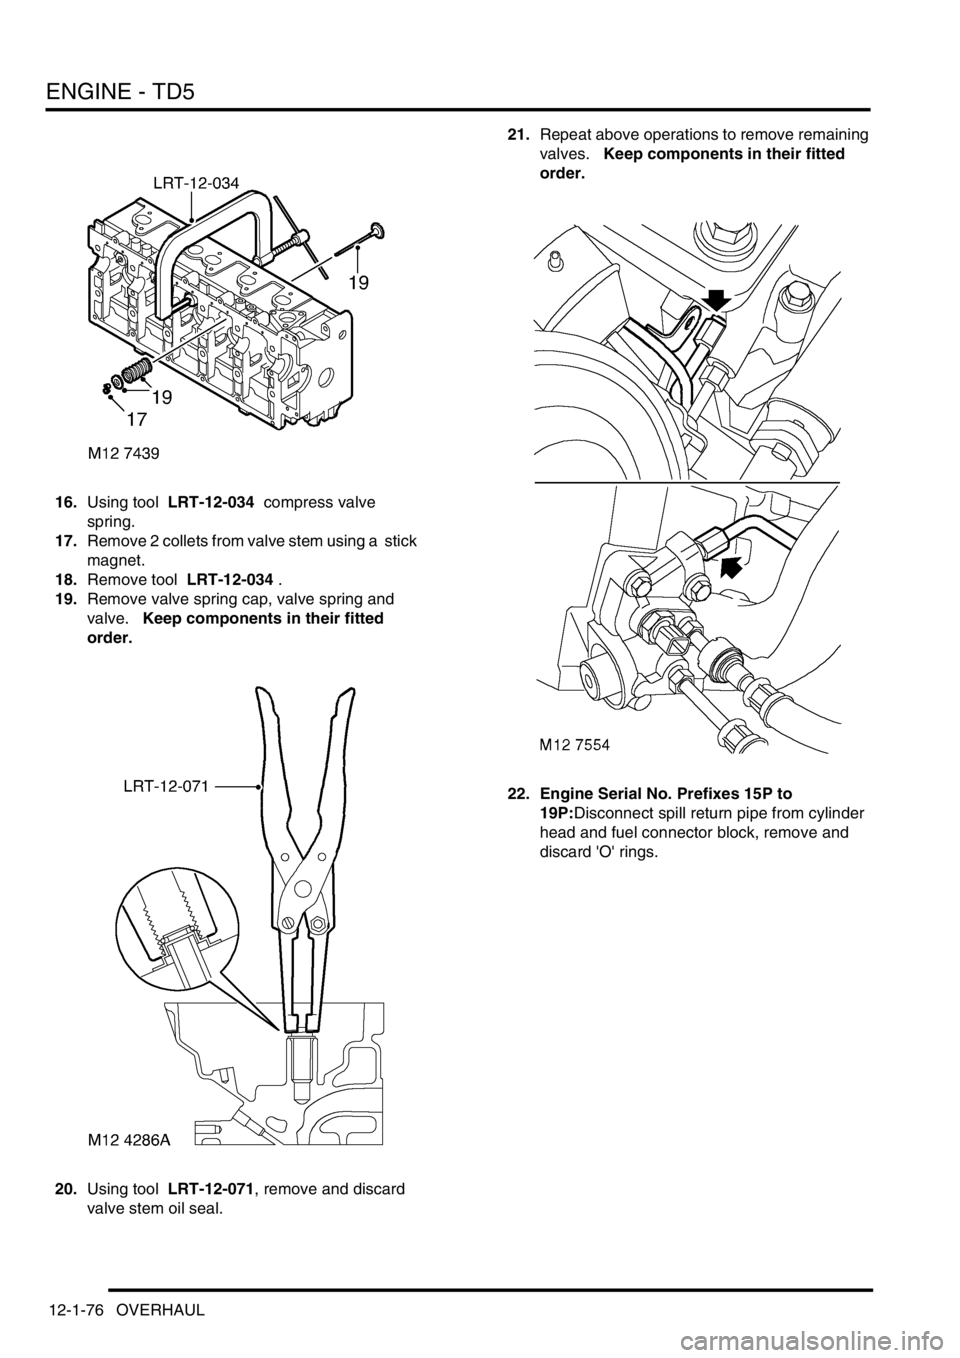
16.Using tool LRT-12-034 compress valve
spring.
17.Remove 2 collets from valve stem using a stick
magnet.
18.Remove tool LRT-12-034 .
19.Remove valve spring cap, valve spring and
valve. Keep components in their fitted
order.
20.Using tool LRT-12-071, remove and discard
valve stem oil seal. 21.Repeat above operations to remove remaining
valves. Keep components in their fitted
order.
22. Engine Serial No. Prefixes 15P to
19P:Disconnect spill return pipe from cylinder
head and fuel connector block, remove and
discard 'O' rings.
Page 216 of 1672
ENGINE - TD5
OVERHAUL 12-1-77
23.Remove 3 bolts and remove fuel connector
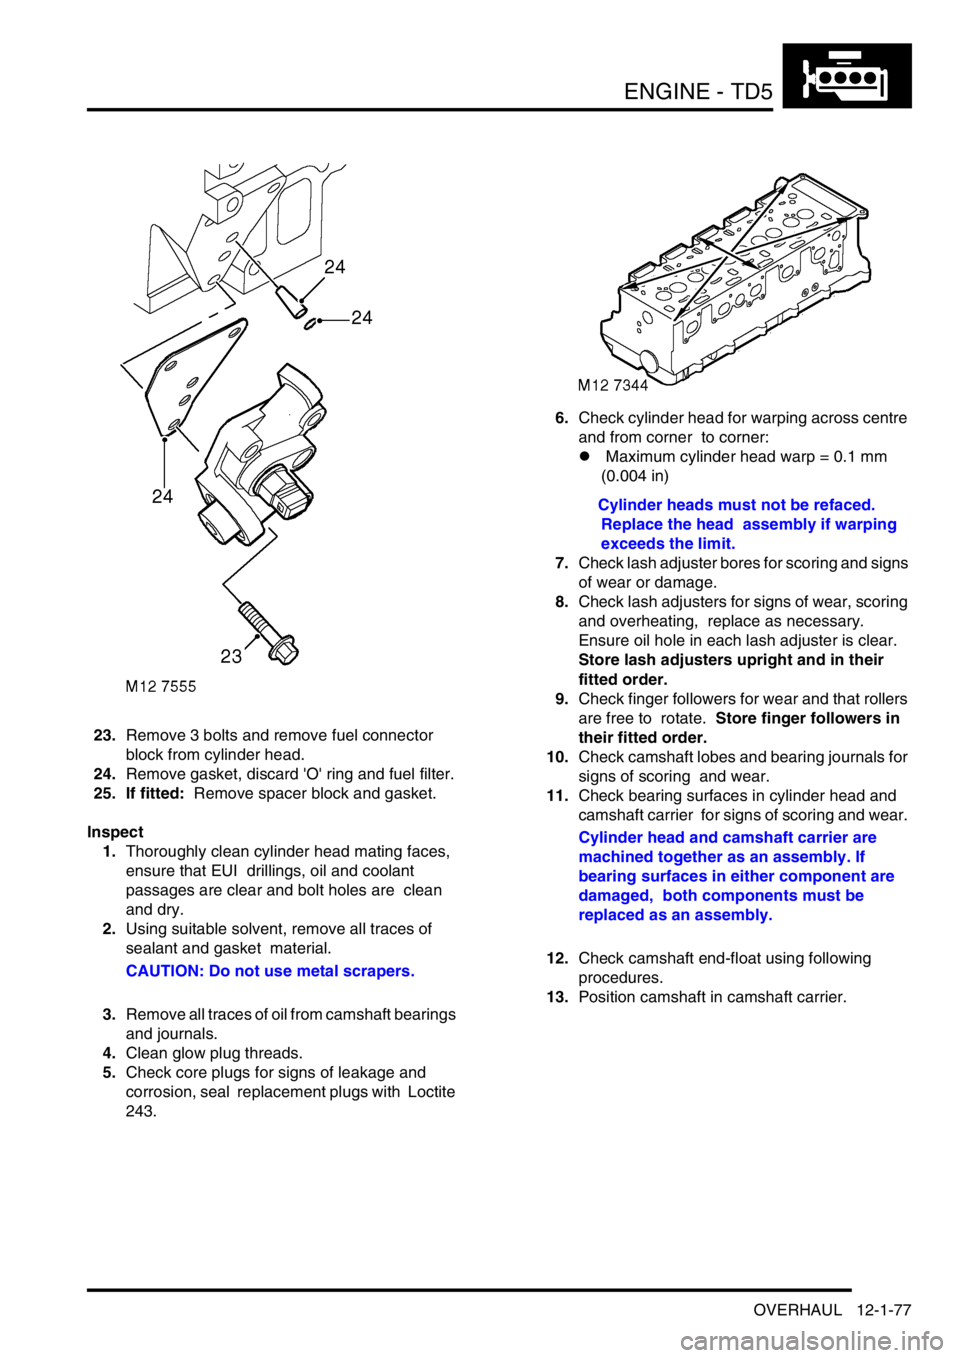
block from cylinder head.
24.Remove gasket, discard 'O' ring and fuel filter.
25. If fitted: Remove spacer block and gasket.
Inspect
1.Thoroughly clean cylinder head mating faces,
ensure that EUI drillings, oil and coolant
passages are clear and bolt holes are clean
and dry.
2.Using suitable solvent, remove all traces of
sealant and gasket material.
CAUTION: Do not use metal scrapers.
3.Remove all traces of oil from camshaft bearings
and journals.
4.Clean glow plug threads.
5.Check core plugs for signs of leakage and
corrosion, seal replacement plugs with Loctite
243.6.Check cylinder head for warping across centre
and from corner to corner:
l Maximum cylinder head warp = 0.1 mm
(0.004 in)
Cylinder heads must not be refaced.
Replace the head assembly if warping
exceeds the limit.
7.Check lash adjuster bores for scoring and signs
of wear or damage.
8.Check lash adjusters for signs of wear, scoring
and overheating, replace as necessary.
Ensure oil hole in each lash adjuster is clear.
Store lash adjusters upright and in their
fitted order.
9.Check finger followers for wear and that rollers
are free to rotate. Store finger followers in
their fitted order.
10.Check camshaft lobes and bearing journals for
signs of scoring and wear.
11.Check bearing surfaces in cylinder head and
camshaft carrier for signs of scoring and wear.
Cylinder head and camshaft carrier are
machined together as an assembly. If
bearing surfaces in either component are
damaged, both components must be
replaced as an assembly.
12.Check camshaft end-float using following
procedures.
13.Position camshaft in camshaft carrier.
Page 220 of 1672
ENGINE - TD5
OVERHAUL 12-1-81
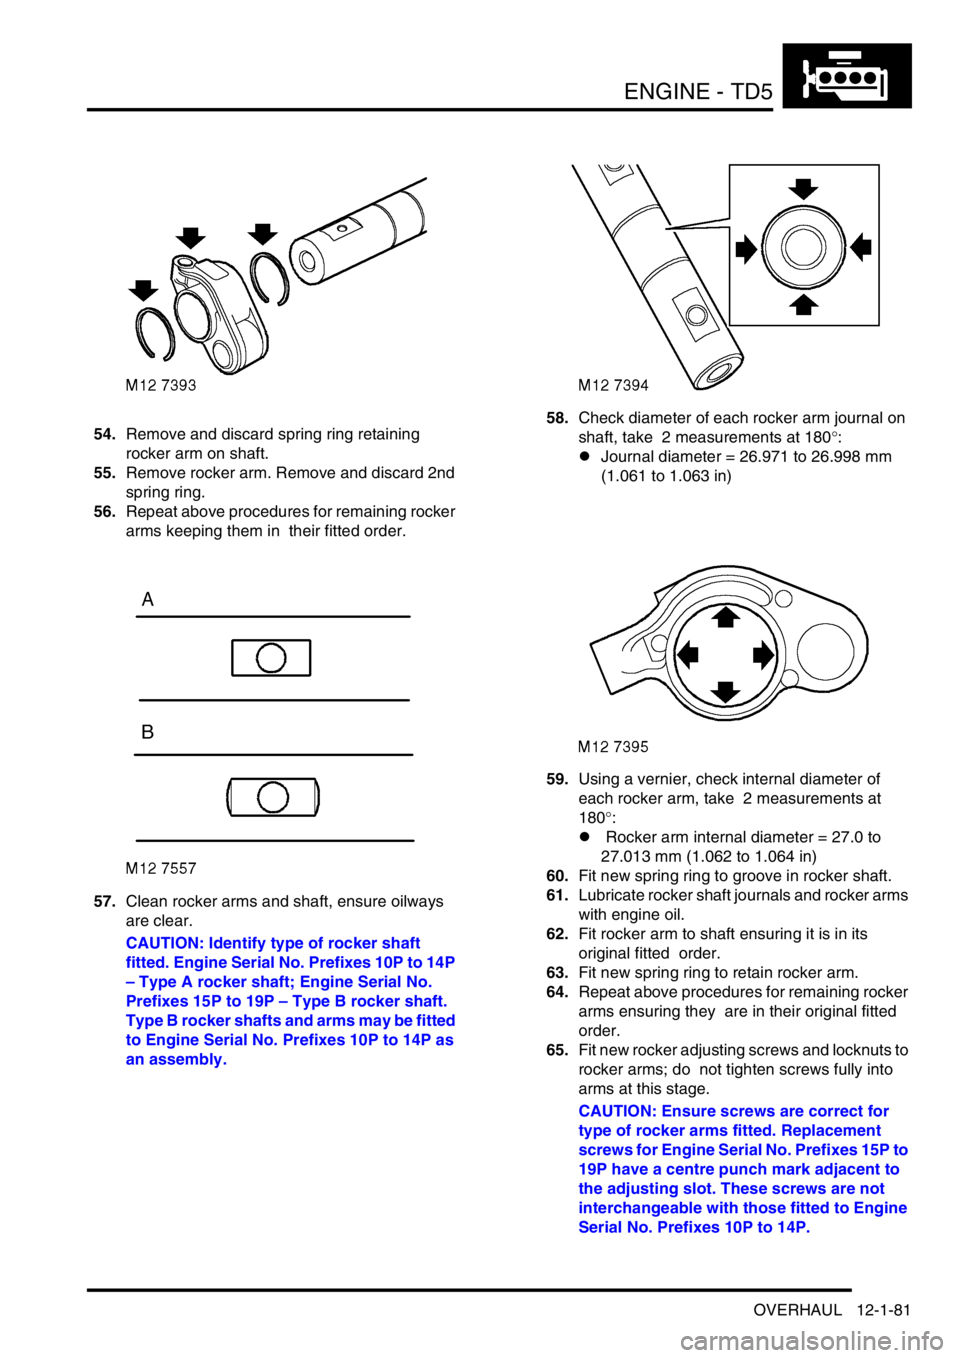
54.Remove and discard spring ring retaining
rocker arm on shaft.
55.Remove rocker arm. Remove and discard 2nd
spring ring.
56.Repeat above procedures for remaining rocker
arms keeping them in their fitted order.
57.Clean rocker arms and shaft, ensure oilways
are clear.
CAUTION: Identify type of rocker shaft
fitted. Engine Serial No. Prefixes 10P to 14P
– Type A rocker shaft; Engine Serial No.
Prefixes 15P to 19P – Type B rocker shaft.
Type B rocker shafts and arms may be fitted
to Engine Serial No. Prefixes 10P to 14P as
an assembly.58.Check diameter of each rocker arm journal on
shaft, take 2 measurements at 180°:
lJournal diameter = 26.971 to 26.998 mm
(1.061 to 1.063 in)
59.Using a vernier, check internal diameter of
each rocker arm, take 2 measurements at
180
°:
l Rocker arm internal diameter = 27.0 to
27.013 mm (1.062 to 1.064 in)
60.Fit new spring ring to groove in rocker shaft.
61.Lubricate rocker shaft journals and rocker arms
with engine oil.
62.Fit rocker arm to shaft ensuring it is in its
original fitted order.
63.Fit new spring ring to retain rocker arm.
64.Repeat above procedures for remaining rocker
arms ensuring they are in their original fitted
order.
65.Fit new rocker adjusting screws and locknuts to
rocker arms; do not tighten screws fully into
arms at this stage.
CAUTION: Ensure screws are correct for
type of rocker arms fitted. Replacement
screws for Engine Serial No. Prefixes 15P to
19P have a centre punch mark adjacent to
the adjusting slot. These screws are not
interchangeable with those fitted to Engine
Serial No. Prefixes 10P to 14P.
Page 222 of 1672

ENGINE - TD5
OVERHAUL 12-1-83
9.Using tool LRT-12-154/3, fit new sealing
washer to each injector.
10.Support each end of cylinder head on blocks of
wood ensuring blocks are clear of valves.
11.Position reaction posts in their original fitted
order.
12.Carefully fit EUI's, ensuring they are in their
original fitted order and that each retainer is
located on its dowel.
CAUTION: If new EUI's are fitted, ensure
replacements are correct. Engine Serial No.
Prefixes 10P to 14P – Push rod bushes are
coloured BLACK or BLUE. Serial No.
Prefixes 15P to 19P – Push rod bushes are
coloured GREEN.
13.Fit new retainer bolts and tighten to 32 Nm (24
lbf.ft).
If new injectors are fitted they must be
programmed for use with the ECM using
TestBook.
14.Lubricate lash adjusters and bores with engine
oil.
15.Fit lash adjusters ensuring they are in their
original fitted order.
16.Lubricate finger followers with engine oil.
17.Fit finger followers ensuring they are in their
original fitted order.
18.Lubricate cams and bearing journals on
camshaft, cylinder head and camshaft carrier
with engine oil.
19.Position camshaft in cylinder head with the
timing pin hole in the vertical position.20.Apply an even film of sealant, Part No. STC
4600 to camshaft carrier face and spread to an
even film using a roller.
CAUTION: Ensure sealant does not block
oilways (arrowed) or contaminate camshaft
bearings. Assembly and bolt tightening
must be completed within 20 minutes of
applying sealant.
21.Fit camshaft carrier ensuring it is correctly
located on dowels.
22.Fit and lightly tighten new camshaft carrier
bolts.
23.Using sequence shown, progressively tighten
bolts to 25 Nm (18 lbf.ft).
24.Lubricate a new camshaft rear oil seal with
engine oil, fit seal using a suitable mandrel.
25.Position rocker shaft on camshaft carrier
ensuring rocker shaft is located on dowel.
26.Fit new rocker shaft retaining bolts and working
from the centre outwards, tighten rocker shaft
bolts to 32 Nm (24 lbf.ft).
27.Fit injector harness and connect multiplugs.
28.Clean fuel connector block and mating face.
29.Lubricate a new fuel filter 'O' ring with engine
oil.
Page 223 of 1672

ENGINE - TD5
12-1-84 OVERHAUL
30.Fit new fuel filter, 'O' ring, and gasket.
CAUTION: Gasket must be fitted dry.
31. If fitted: Fit fuel connector spacer block and
gasket.
32.Fit fuel connector block, fit bolts and tighten to
25 Nm (18 lbf.ft).
33.Clean glow plugs.
34.Fit glow plugs to cylinder head and tighten to
16 Nm (12 lbf.ft).
35.Fit new cylinder head gasket.
+ ENGINE - Td5, OVERHAUL, Gasket
- cylinder head.
36. Engine Serial No. Prefixes 15P to
19P:Lubricate new 'O' rings with engine oil and
fit to spill return pipe, fit pipe and tighten
connectors to 20 Nm (15 lbf.ft).
37.Before fitting the camshaft cover, the fuel
injector rockers must be adjusted following the
procedures given in Cylinder head gasket -
Refit.
+ ENGINE - Td5, OVERHAUL, Gasket
- cylinder head.
Gasket - engine sump
$% 12.60.38.01
Disassembly
1.Remove 2 bolts securing centrifuge oil drain
pipe to sump, remove and discard gasket.
2.Using sequence shown and noting their fitted
positions, remove 20 bolts securing sump to
cylinder block.
3.Release sump from locating dowels, remove
sump; remove and discard gasket.
Reassembly
1.Clean sump and mating faces, ensure bolt
holes in cylinder block are clean and dry.
2.Using suitable solvent, remove all traces of
sealant from joint faces of timing chain cover
and crankshaft rear oil seal housing.
3.Clean centrifuge oil drain pipe and mating
faces.
Page 225 of 1672

ENGINE - TD5
12-1-86 OVERHAUL
Seal - crankshaft - rear - manual models
$% 12.21.20.01
Disassembly
1.Remove flywheel.
+ ENGINE - Td5, OVERHAUL,
Flywheel.
2.Remove sump gasket.
+ ENGINE - Td5, OVERHAUL, Gasket
- engine sump.
3.Remove 5 bolts securing crankshaft rear oil
seal housing to cylinder block.
4.Release crankshaft rear oil seal housing from
locating dowels, discard rear oil seal and
housing.
Reassembly
1.Clean crankshaft oil seal housing mating face
on cylinder block, ensure bolt and dowel holes
are clean and dry. Remove all traces of oil from
oil seal running surface on crankshaft.
2.Position seal protector LRT-12-061 over
crankshaft boss. Fit new oil seal and housing
and remove tool LRT-12-061.
CAUTION: Oil seal must be fitted dry.3.Fit oil seal housing bolts and using sequence
shown, tighten to 9 Nm (7 lbf.ft).
4.Fit sump gasket.
+ ENGINE - Td5, OVERHAUL, Gasket
- engine sump.
5.Fit flywheel.
+ ENGINE - Td5, OVERHAUL,
Flywheel.
Page 226 of 1672

ENGINE - TD5
OVERHAUL 12-1-87
Seal - crankshaft - rear - automatic
models
$% 12.21.20.01
Disassembly
1.Remove sump gasket.
+ ENGINE - Td5, OVERHAUL, Gasket
- engine sump.
2.Remove drive plate.
+ ENGINE - Td5, OVERHAUL, Drive
plate.
3.Remove 5 bolts securing crankshaft rear oil
seal housing to cylinder block.
4.Release crankshaft rear oil seal housing from
locating dowels, discard rear oil seal and
housing.
Reassembly
1.Clean crankshaft oil seal housing mating face
on cylinder block, ensure bolt and dowel holes
are clean and dry. Remove all traces of oil from
oil seal running surface on crankshaft.2.Position seal protector LRT-12-061 over
crankshaft boss. Fit new oil seal and housing
and remove tool LRT-12-061.
CAUTION: Oil seal must be fitted dry.
3.Fit oil seal housing bolts and using sequence
shown, tighten to 9 Nm (7 lbf.ft).
4.Fit sump gasket.
+ ENGINE - Td5, OVERHAUL, Gasket
- engine sump.
5.Fit drive plate.
+ ENGINE - Td5, OVERHAUL, Drive
plate.