light LAND ROVER DISCOVERY 2002 Workshop Manual
[x] Cancel search | Manufacturer: LAND ROVER, Model Year: 2002, Model line: DISCOVERY, Model: LAND ROVER DISCOVERY 2002Pages: 1672, PDF Size: 46.1 MB
Page 1139 of 1672
EXTERIOR FITTINGS
76-2-2 REPAIRS
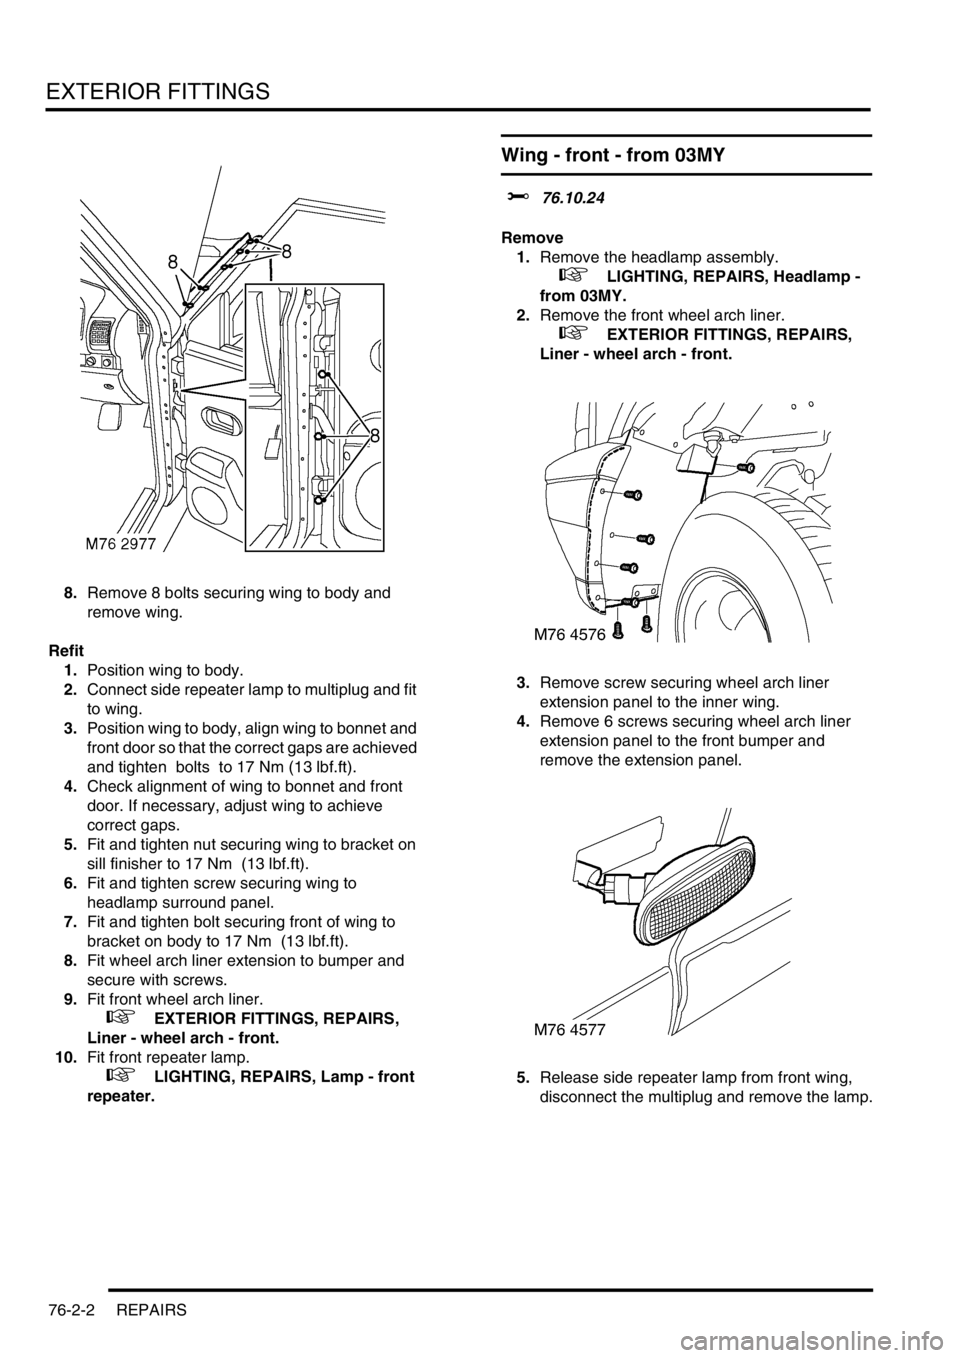
8.Remove 8 bolts securing wing to body and
remove wing.
Refit
1.Position wing to body.
2.Connect side repeater lamp to multiplug and fit
to wing.
3.Position wing to body, align wing to bonnet and
front door so that the correct gaps are achieved
and tighten bolts to 17 Nm (13 lbf.ft).
4.Check alignment of wing to bonnet and front
door. If necessary, adjust wing to achieve
correct gaps.
5.Fit and tighten nut securing wing to bracket on
sill finisher to 17 Nm (13 lbf.ft).
6.Fit and tighten screw securing wing to
headlamp surround panel.
7.Fit and tighten bolt securing front of wing to
bracket on body to 17 Nm (13 lbf.ft).
8.Fit wheel arch liner extension to bumper and
secure with screws.
9.Fit front wheel arch liner.
+ EXTERIOR FITTINGS, REPAIRS,
Liner - wheel arch - front.
10.Fit front repeater lamp.
+ LIGHTING, REPAIRS, Lamp - front
repeater.
Wing - front - from 03MY
$% 76.10.24
Remove
1.Remove the headlamp assembly.
+ LIGHTING, REPAIRS, Headlamp -
from 03MY.
2.Remove the front wheel arch liner.
+ EXTERIOR FITTINGS, REPAIRS,
Liner - wheel arch - front.
3.Remove screw securing wheel arch liner
extension panel to the inner wing.
4.Remove 6 screws securing wheel arch liner
extension panel to the front bumper and
remove the extension panel.
5.Release side repeater lamp from front wing,
disconnect the multiplug and remove the lamp.
Page 1141 of 1672

EXTERIOR FITTINGS
76-2-4 REPAIRS
12.Fit front wheel arch liner extension panel to the
front bumper and secure with screws.
13.Fit and tighten screw securing front wheel arch
liner extension panel to the inner wing.
14.Fit the front wheel arch liner.
+ EXTERIOR FITTINGS, REPAIRS,
Liner - wheel arch - front.
15.Fit the headlamp assembly.
+ LIGHTING, REPAIRS, Headlamp -
from 03MY.
Rear folding step
$% 76.10.41
Remove
1.Remove 2 bolts securing step and damper
assembly to chassis.
2.Remove step and damper assembly.
3.Remove 2 patch lock nuts securing damper to
step and discard nuts.
4.Remove damper from step.
Refit
1.Fit damper to step and secure with new patch
lock nuts. Tighten nuts to 17 Nm (13 lbf.ft).
2.Position step and damper assembly to chassis
and secure with bolts. Tighten bolts to 45 Nm
(33 lbf.ft).
Page 1145 of 1672
EXTERIOR FITTINGS
76-2-8 REPAIRS
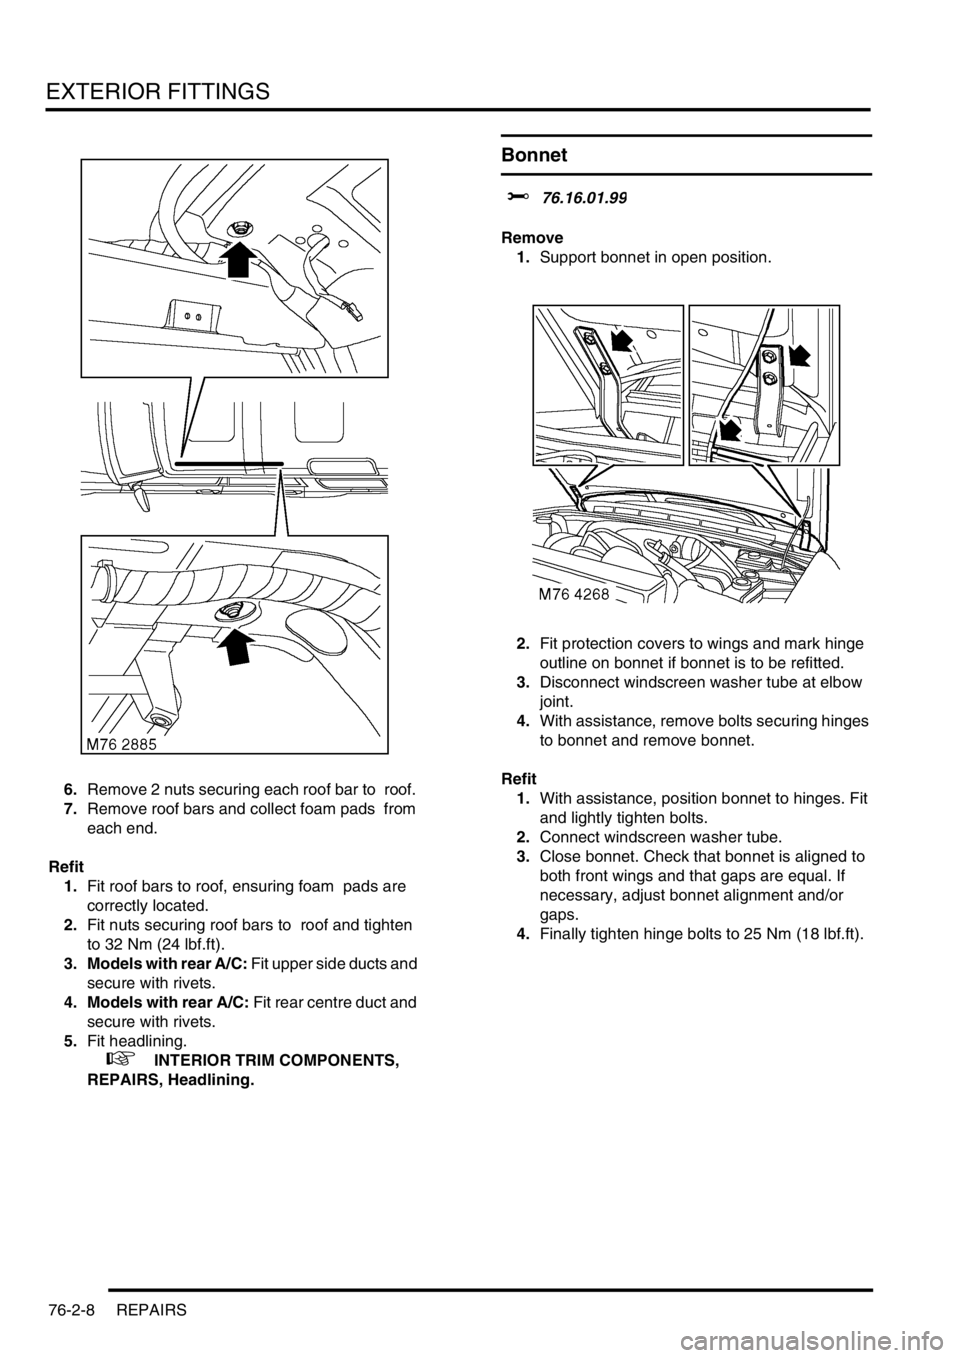
6.Remove 2 nuts securing each roof bar to roof.
7.Remove roof bars and collect foam pads from
each end.
Refit
1.Fit roof bars to roof, ensuring foam pads are
correctly located.
2.Fit nuts securing roof bars to roof and tighten
to 32 Nm (24 lbf.ft).
3. Models with rear A/C: Fit upper side ducts and
secure with rivets.
4. Models with rear A/C: Fit rear centre duct and
secure with rivets.
5.Fit headlining.
+ INTERIOR TRIM COMPONENTS,
REPAIRS, Headlining.
Bonnet
$% 76.16.01.99
Remove
1.Support bonnet in open position.
2.Fit protection covers to wings and mark hinge
outline on bonnet if bonnet is to be refitted.
3.Disconnect windscreen washer tube at elbow
joint.
4.With assistance, remove bolts securing hinges
to bonnet and remove bonnet.
Refit
1.With assistance, position bonnet to hinges. Fit
and lightly tighten bolts.
2.Connect windscreen washer tube.
3.Close bonnet. Check that bonnet is aligned to
both front wings and that gaps are equal. If
necessary, adjust bonnet alignment and/or
gaps.
4.Finally tighten hinge bolts to 25 Nm (18 lbf.ft).
Page 1149 of 1672

EXTERIOR FITTINGS
76-2-12 REPAIRS
3.Remove 2 nuts securing bumper valance side
mountings to body.
4.Remove 4 nuts securing bumper to crush cans
and remove bumper from body.
5.Remove 3 screws securing bumper to front
cross bar.
6. Models with headlamp wash: Position
container to collect screen washer fluid and
disconnect hose from headlamp washer pump.
Refit
1. Models with headlamp wash: Connect hose
to headlamp washer pump. Refill washer
reservoir with fluid.
2.With assistance position bumper to body.
3.Fit and tighten 3 screws securing bumper to
front cross bar.
4.Tighten nuts securing bumper to crush cans to
13 Nm (10 lbf.ft).
5.Tighten nuts securing bumper to side
mountings to 13 Nm (10 lbf.ft).
6.Connect multiplugs to fog lamps.
7.Fit wheel arch liner extensions and secure with
screws.
Bumper assembly - rear - from 03MY
$% 76.22.15
Remove
1.Remove both rear tail lamps.
+ LIGHTING, REPAIRS, Lamp - tail/
flasher - bumper.
2.Disconnect park distance control harness
multiplug.
3.Release rear lamp harness clips.
M76 4566
Page 1150 of 1672

EXTERIOR FITTINGS
REPAIRS 76-2-13
4.Remove 2 bolts securing bumper.
5.With assistance remove bumper.
NOTE: Do not carry out further dismantling if
component is removed for access only.
6.Remove 7 bolts and 5 screws securing closing
panel and remove panel.7.Disconnect 4 park distance control sensor
harness multiplugs and remove 6 clips
retaining harness.
8.Release 3 clips retaining harness and remove
harness.
9.Noting their fitted positions, release and
remove 4 park distance control sensors and
sensor housings.
Refit
1.Fit sensor housings to bumper, ensuring lugs
on housings are aligned with cut-outs in
bumper.
2.Fit and secure sensors to housings.
3.Fit harness, secure with clips and connect
multiplugs
4.Fit closing panel and secure with bolts and
screws.
5.With assistance, fit bumper assembly to body.
6.Fit bolts securing bumper and tighten to 45 Nm
(33 lbf.ft).
7.Secure rear lamp harness clips and connect
park distance control sensor harness multiplug.
8.Fit both rear tail lamps.
+ LIGHTING, REPAIRS, Lamp - tail/
flasher - bumper.
Page 1151 of 1672

EXTERIOR FITTINGS
76-2-14 REPAIRS
Trim finisher - bumper - front - from 03MY
$% 76.22.19
Remove
1.Remove 5 screws securing front bumper
finisher to bumper and position the finisher
aside.
2.Release clip securing washer hose to
headlamp washer jet and disconnect the hose.
3.Remove the bumper finisher.
NOTE: Do not carry out further dismantling if
component is removed for access only.
4.Remove clip securing headlamp washer jet to
bumper finisher and remove the washer jet.
Refit
1.Fit and secure headlamp washer jet to bumper
finisher.
2.Position bumper finisher to bumper, fit washer
hose to washer jet and secure with clip.
3.Fit bumper finisher to bumper and secure with
screws.
Bumper assembly - rear - up to 03MY
$% 76.22.52
Remove
1.Remove both rear tail lamps.
+ LIGHTING, REPAIRS, Lamp - tail/
flasher - bumper.
2.Release 2 clips securing rear lamp harnesses
to rear bumper.
3.Remove 2 bolts securing rear bumper to
chassis and collect 2 plates.
4.With assistance, remove bumper assembly.
NOTE: Do not carry out further dismantling if
component is removed for access only.
Page 1153 of 1672
EXTERIOR FITTINGS
76-2-16 REPAIRS
Grille - front - up to 03MY
$% 76.55.03
Remove
1.Remove repeater lamps.
+ LIGHTING, REPAIRS, Lamp - front
repeater.
2.Via access hole in wheel arch liners, remove
screws securing headlamp finishers.
3.Remove headlamp finishers from grille.
4.Remove 2 screws securing lower corners of
grille.
5.Remove 3 scrivets and remove grille.
Refit
1.Fit grille and secure with scrivets and screws.
2.Fit headlamp finishers and secure with screws.
3.Fit repeater lamps.
+ LIGHTING, REPAIRS, Lamp - front
repeater.
Grille - front - from 03MY
$% 76.55.03
Remove
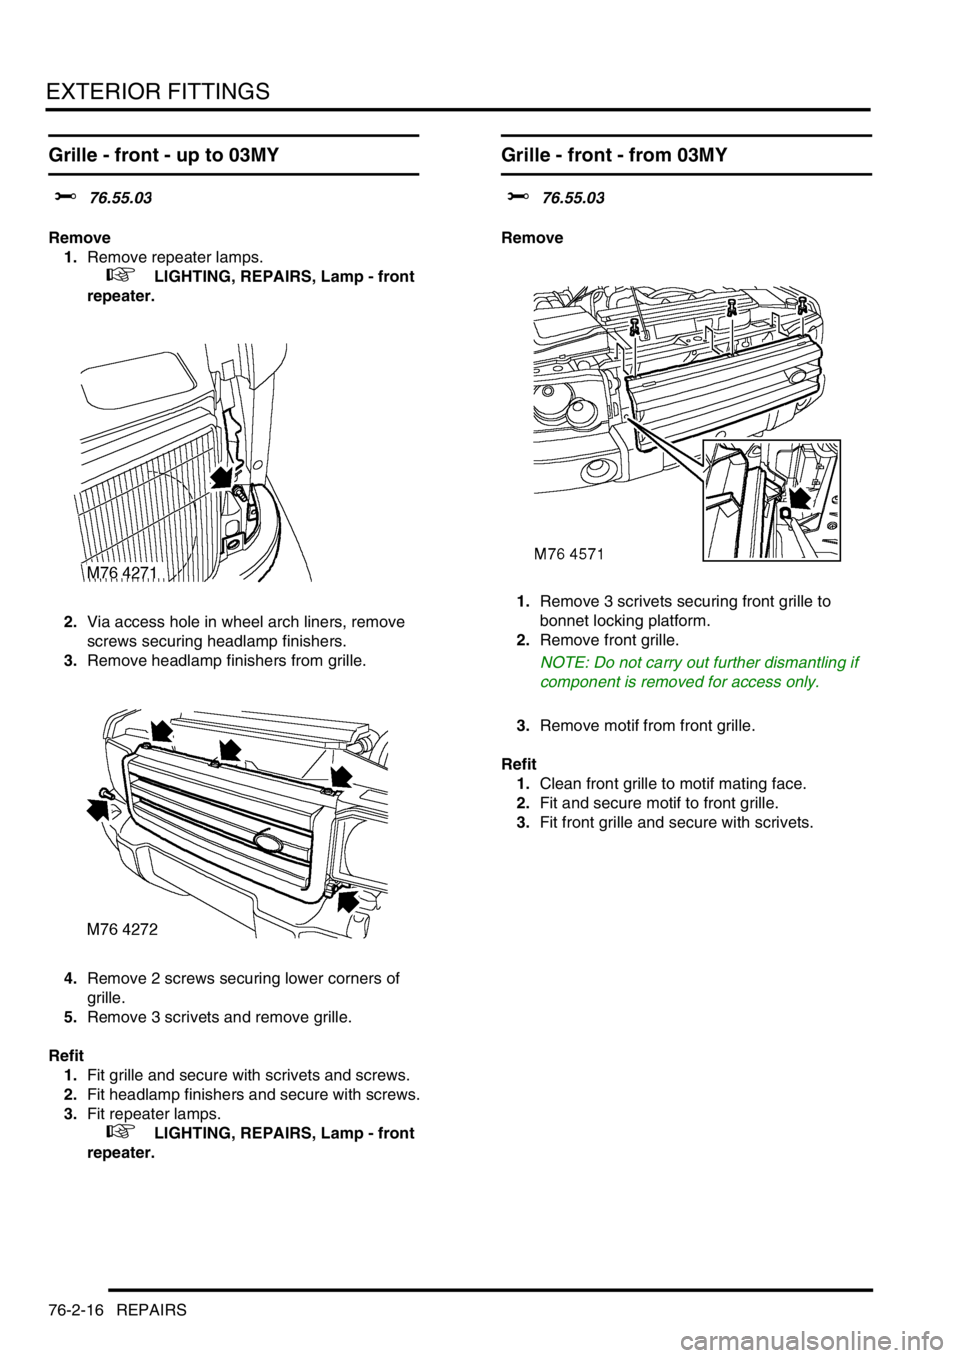
1.Remove 3 scrivets securing front grille to
bonnet locking platform.
2.Remove front grille.
NOTE: Do not carry out further dismantling if
component is removed for access only.
3.Remove motif from front grille.
Refit
1.Clean front grille to motif mating face.
2.Fit and secure motif to front grille.
3.Fit front grille and secure with scrivets.
Page 1154 of 1672
INTERIOR TRIM COMPONENTS
REPAIRS 76-3-1
INTERIOR TRIM COMPONENTS REPAIRS
Trim casing - tail door speaker
$% 76.13.11
Remove
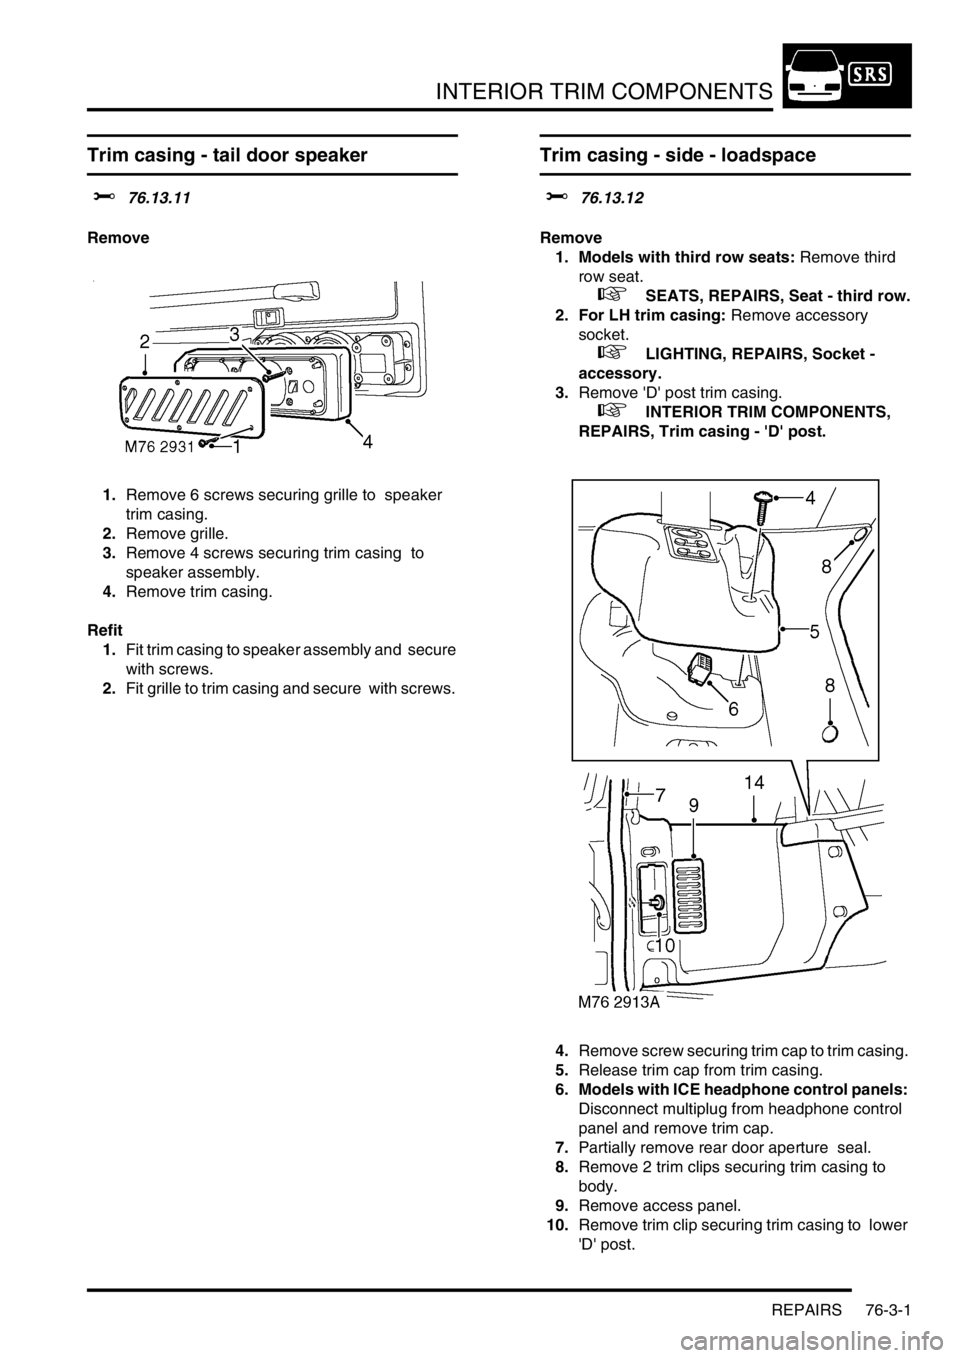
1.Remove 6 screws securing grille to speaker
trim casing.
2.Remove grille.
3.Remove 4 screws securing trim casing to
speaker assembly.
4.Remove trim casing.
Refit
1.Fit trim casing to speaker assembly and secure
with screws.
2.Fit grille to trim casing and secure with screws.
Trim casing - side - loadspace
$% 76.13.12
Remove
1. Models with third row seats: Remove third
row seat.
+ SEATS, REPAIRS, Seat - third row.
2. For LH trim casing: Remove accessory
socket.
+ LIGHTING, REPAIRS, Socket -
accessory.
3.Remove 'D' post trim casing.
+ INTERIOR TRIM COMPONENTS,
REPAIRS, Trim casing - 'D' post.
4.Remove screw securing trim cap to trim casing.
5.Release trim cap from trim casing.
6. Models with ICE headphone control panels:
Disconnect multiplug from headphone control
panel and remove trim cap.
7.Partially remove rear door aperture seal.
8.Remove 2 trim clips securing trim casing to
body.
9.Remove access panel.
10.Remove trim clip securing trim casing to lower
'D' post.
Page 1155 of 1672
INTERIOR TRIM COMPONENTS
76-3-2 REPAIRS
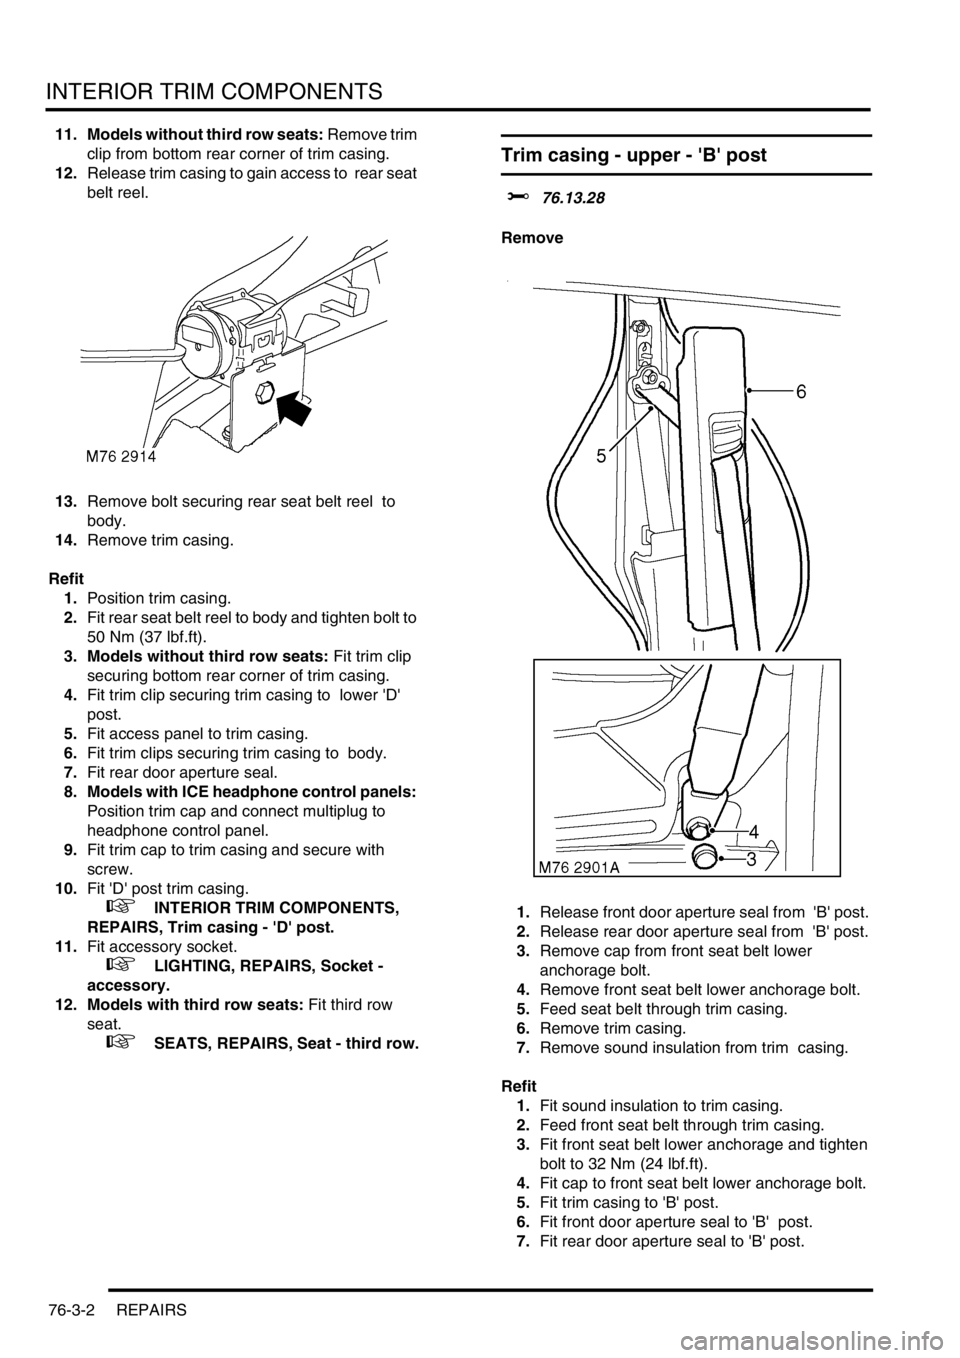
11. Models without third row seats: Remove trim
clip from bottom rear corner of trim casing.
12.Release trim casing to gain access to rear seat
belt reel.
13.Remove bolt securing rear seat belt reel to
body.
14.Remove trim casing.
Refit
1.Position trim casing.
2.Fit rear seat belt reel to body and tighten bolt to
50 Nm (37 lbf.ft).
3. Models without third row seats: Fit trim clip
securing bottom rear corner of trim casing.
4.Fit trim clip securing trim casing to lower 'D'
post.
5.Fit access panel to trim casing.
6.Fit trim clips securing trim casing to body.
7.Fit rear door aperture seal.
8. Models with ICE headphone control panels:
Position trim cap and connect multiplug to
headphone control panel.
9.Fit trim cap to trim casing and secure with
screw.
10.Fit 'D' post trim casing.
+ INTERIOR TRIM COMPONENTS,
REPAIRS, Trim casing - 'D' post.
11.Fit accessory socket.
+ LIGHTING, REPAIRS, Socket -
accessory.
12. Models with third row seats: Fit third row
seat.
+ SEATS, REPAIRS, Seat - third row.
Trim casing - upper - 'B' post
$% 76.13.28
Remove
1.Release front door aperture seal from 'B' post.
2.Release rear door aperture seal from 'B' post.
3.Remove cap from front seat belt lower
anchorage bolt.
4.Remove front seat belt lower anchorage bolt.
5.Feed seat belt through trim casing.
6.Remove trim casing.
7.Remove sound insulation from trim casing.
Refit
1.Fit sound insulation to trim casing.
2.Feed front seat belt through trim casing.
3.Fit front seat belt lower anchorage and tighten
bolt to 32 Nm (24 lbf.ft).
4.Fit cap to front seat belt lower anchorage bolt.
5.Fit trim casing to 'B' post.
6.Fit front door aperture seal to 'B' post.
7.Fit rear door aperture seal to 'B' post.
Page 1158 of 1672

INTERIOR TRIM COMPONENTS
REPAIRS 76-3-5
5. Models with base trim: Remove rubber mat
from centre console and remove cover plate
from switch pack.
6. Models with base trim: Remove 4 screws
securing switch pack to centre console,
disconnect multiplugs and remove switch pack.7. Models with veneer trim: Release veneered
console cover and remove cigar lighter
element. Disconnect multiplugs from switch
pack and remove veneered console cover.
8.Remove 2 bolts securing forward edge of
console to transmission tunnel.