ECU LAND ROVER DISCOVERY 2002 Workshop Manual
[x] Cancel search | Manufacturer: LAND ROVER, Model Year: 2002, Model line: DISCOVERY, Model: LAND ROVER DISCOVERY 2002Pages: 1672, PDF Size: 46.1 MB
Page 522 of 1672

ENGINE MANAGEMENT SYSTEM - V8
DESCRIPTION AND OPERATION 18-2-65
When cruise is requested, the cruise control ECU provides voltage to the vacuum pump assembly and provides a
pulsed earth signal. The pulse period is dependent on the difference between the vehicle set speed and the actual
road speed. Removing the earth path switches off the pump.
Several fault codes can be generated:
Fault codes
1"Output power LOW when HIGH is expected" is flagged when Pin C0239-11 is shorted to earth.
This could be due to an external fault or an internal ECU fault and will be set if pin C0239-11 is LOW for longer
than 240 milliseconds, while in cruise mode.
2"Output power HIGH when LOW is expected" is flagged when Pin C0239-11 is shorted to battery voltage.
This could be due to an external fault or internal ECU fault and will be set if pin C0239-11 is HIGH for longer than
250 milliseconds while not in cruise mode.
3"Output pump LOW, when High is expected" is flagged when Pin C0239-7 is shorted to earth.
This could be due to an external fault or an internal ECU fault. This fault will be set if pin C0239-11 is HIGH for
longer than 7.5 milliseconds while pin C0239-7 is LOW for longer than 2.5 milliseconds while decelerating under
control of cruise.
4"Output pump HIGH, when LOW is expected" is flagged when Pin C0239-7 is shorted to battery voltage.
This could be due to an external fault or an internal ECU fault. This fault will be set if pin C0239-7 is LOW for
longer than 7.5 milliseconds of the last 8 pulses when the pump is switched on while accelerating under the
control of cruise.
5Output valve LOW, when HIGH is expected is flagged when Pin C0239-7 is shorted to battery voltage.
This could be due to an external fault or an internal ECU fault and will be set if pin C0239-17 is LOW for longer
than 2.5 milliseconds while pin C0239-7 is HIGH for longer than 2.5 milliseconds and pin C0239-11 is also HIGH
for longer than 7.5 milliseconds, while decelerating under control of the cruise control ECU.
6Output valve HIGH, when LOW is expected is flagged when Pin C0239-17 is shorted to battery voltage.
This could be an external fault or an internal ECU fault. The fault will be set if pin C0239-17 remains HIGH for
longer than 35 milliseconds after the vacuum control valve is switched on, while accelerating under control of
the cruise control ECU.
TestBook can be used to determine the fault codes present as well as the general status of the system.
Pneumatic actuator
The cruise control ECU controls the position of the throttle disc by regulating the amount of vacuum applied by the
vacuum pump to the pneumatic actuator. The pneumatic actuator is an air tight bellow coupled to the pneumatic pump
via a vacuum pipe. The pump evacuates the air inside the bellow and pipe, which collapses the bellow. This pulls on
a cable, which moves the throttle disc to the desired position. On vehicles from 03 model year, the cruise control
vacuum pump and pneumatic actuator assembly is fitted with a heat shield to protect the components from heat from
the exhaust manifold.
Page 523 of 1672

ENGINE MANAGEMENT SYSTEM - V8
18-2-66 DESCRIPTION AND OPERATION
Operation - cruise control
Cruise control activation
Cruise control is a passive system. The driver must activate it. Switching on the cruise control master switch located
on the instrument panel activates cruise control. An LED in the switch illuminates, indicating cruise control is
available. The driver must accelerate the vehicle to the desired speed using the accelerator pedal. When the desired
speed is reached, pressing the SET+ switch activates cruise control. Cruise control will only activate if the following
conditions are met:
lVehicle speed is between 28 - 125 mph (45 - 200 km/h).
lThe brake pedal is not pressed.
lThe clutch pedal is not pressed (manual gearbox only).
lThe gearbox is not in park, reverse or neutral (automatic gearbox only).
Function
The cruise control ECU receives the set signal and determines the vehicle speed provided by the SLABS ECU. The
cruise control ECU activates the vacuum pump assembly to move the pneumatic actuator and the linkage to the
throttle disc to maintain set road speed. It does this by controlling the vacuum to the pneumatic actuator.
Cruise control cancellation
Cancelling cruise control enables the driver to regain control of the vehicle speed by using the accelerator pedal.
Cruise control is cancelled if any of the following conditions occur:
lThe brake pedal is pressed.
lThe RES switch button is pressed.
lThe clutch pedal is pressed (manual gearbox only).
lThe cruise control master switch is turned off.
lThe gearbox is placed in park, neutral, or reverse (automatic gearbox only).
Function
The cruise control ECU cancels cruise control operation by opening a vacuum control valve in the vacuum pump
assembly. This releases the throttle linkage from the control of the pneumatic actuator and returns it to the control of
the accelerator pedal.
The set speed will be stored in the cruise control ECU unless:
lThe cruise control master switch is turned off.
lThe ignition switch is turned off.
If cruise control is deactivated using either of the above methods, the set speed will be erased from the memory of
the cruise control ECU.
Cruise control resume
Cruise control can be resumed at the previously set speed, provided the set speed has not been erased from the
cruise control ECU memory as described above. To resume cruise control operation to the previously set speed,
depress the RES switch once when the following conditions are met:
lA set speed is stored in the cruise control ECU.
lVehicle speed is between 28 - 125 mph (45 - 200 km/h).
lThe brake pedal is not pressed.
lThe clutch pedal is not pressed (manual gearbox only).
lThe gearbox is not in park, reverse or neutral (automatic gearbox only).
Page 524 of 1672

ENGINE MANAGEMENT SYSTEM - V8
DESCRIPTION AND OPERATION 18-2-67
Function
The cruise control ECU activates the vacuum pump assembly to move the pneumatic actuator. This moves the
throttle to the set speed by adjusting the position of the throttle disc.
Accelerating while cruise control is active
There are three ways of increasing vehicle speed when cruise control is active:
lTemporarily increase vehicle speed (e.g. when overtaking another vehicle).
lIncrease vehicle set speed in 1 mph (1.5 km/h) increments.
lIncrease vehicle set speed.
To temporarily increase vehicle speed press the accelerator pedal until the desired speed is reached. When the
accelerator pedal is released, the vehicle coasts back to the set speed. When it reaches the set speed, cruise control
operation continues.
To increase the vehicle set speed in 1 mph (1.5 km/h) increments, tap the SET+ switch. Each tap on the switch
increases vehicle speed.
To increase the vehicle set speed, press and hold the SET+ switch until the desired set speed is reached.
The vehicle set speed will increase if the following conditions are met:
lThe vehicle is under cruise control operation.
lVehicle speed is between 28 - 125 mph (45 - 200 km/h).
lThe brake pedal is not pressed.
lThe clutch pedal is not pressed (manual gearbox only).
lThe gearbox is not in park, reverse or neutral (automatic gearbox only).
Function
The vehicle responds as follows:
lIf the driver accelerates using the accelerator pedal, vehicle speed increases overriding pneumatic actuator
position. When the driver releases the accelerator pedal, the vehicle returns to the set speed.
lIf the SET+ switch is tapped, the driver increases the stored speed and vehicle speed by 1 mph (1.5 km/h) per
tap on the switch.
lIf the driver presses and holds the SET+ switch, the vehicle speed increases until the SET+ switch is released.
This becomes the new set speed for the cruise control ECU.
Switching off cruise control
Switching off cruise control allows the driver to regain control of vehicle speed. It erases the set road speed from the
cruise control ECU memory.
To switch off cruise control, press the cruise control master switch to the off position.
Function
When the cruise control master switch is turned off, the cruise control ECU switches off power to the vacuum pump
assembly. The vacuum dump valve opens releasing the vacuum in the pneumatic actuator, returning the throttle disc
to driver control via the accelerator pedal.
Page 529 of 1672

ENGINE MANAGEMENT SYSTEM - V8
18-2-72 REPAIRS
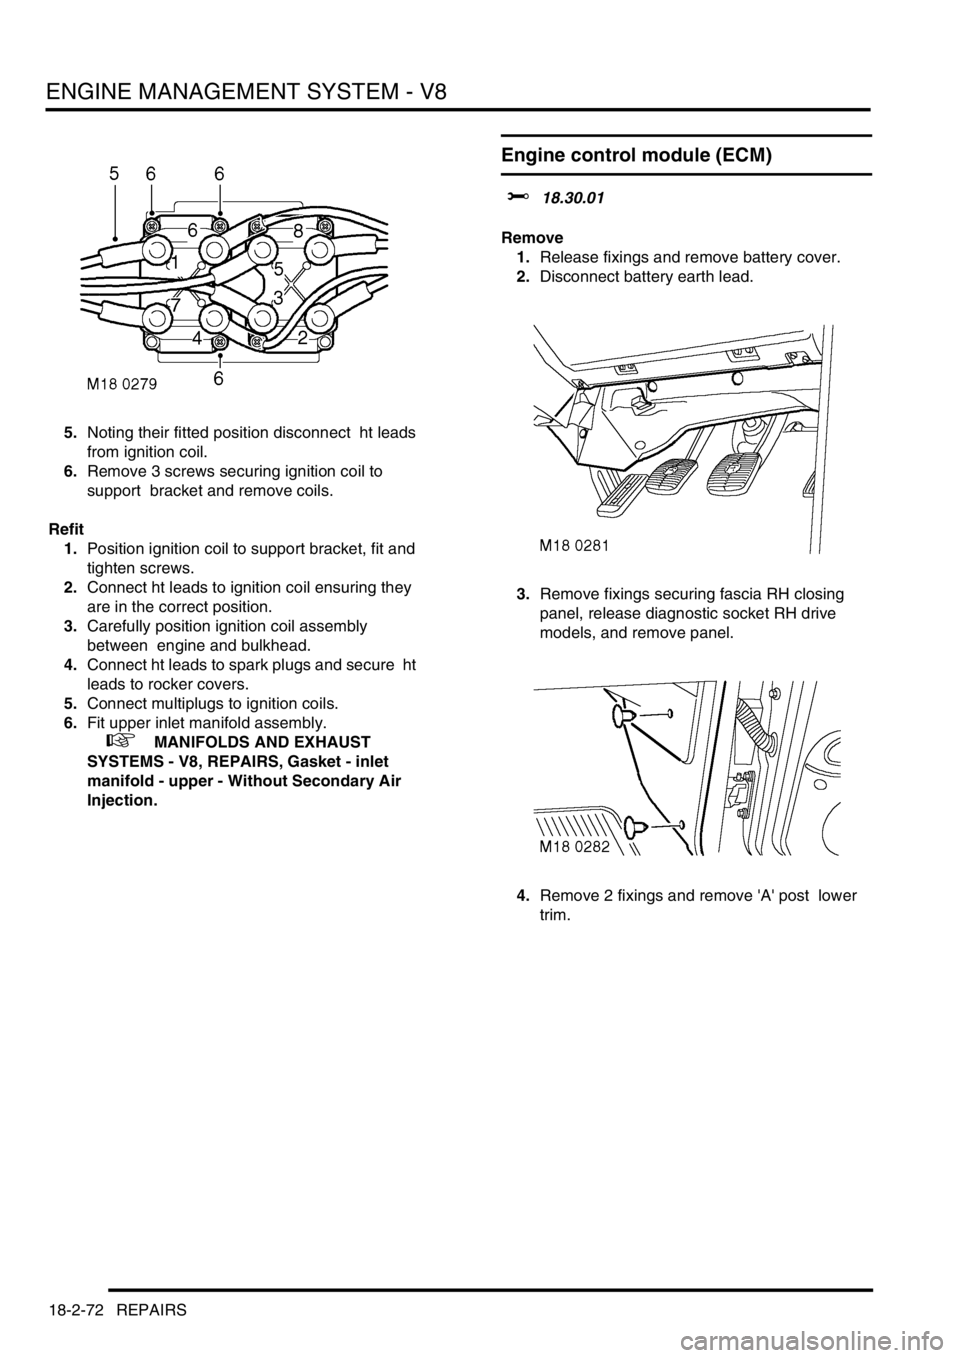
5.Noting their fitted position disconnect ht leads
from ignition coil.
6.Remove 3 screws securing ignition coil to
support bracket and remove coils.
Refit
1.Position ignition coil to support bracket, fit and
tighten screws.
2.Connect ht leads to ignition coil ensuring they
are in the correct position.
3.Carefully position ignition coil assembly
between engine and bulkhead.
4.Connect ht leads to spark plugs and secure ht
leads to rocker covers.
5.Connect multiplugs to ignition coils.
6.Fit upper inlet manifold assembly.
+ MANIFOLDS AND EXHAUST
SYSTEMS - V8, REPAIRS, Gasket - inlet
manifold - upper - Without Secondary Air
Injection.
Engine control module (ECM)
$% 18.30.01
Remove
1.Release fixings and remove battery cover.
2.Disconnect battery earth lead.
3.Remove fixings securing fascia RH closing
panel, release diagnostic socket RH drive
models, and remove panel.
4.Remove 2 fixings and remove 'A' post lower
trim.
Page 530 of 1672

ENGINE MANAGEMENT SYSTEM - V8
REPAIRS 18-2-73
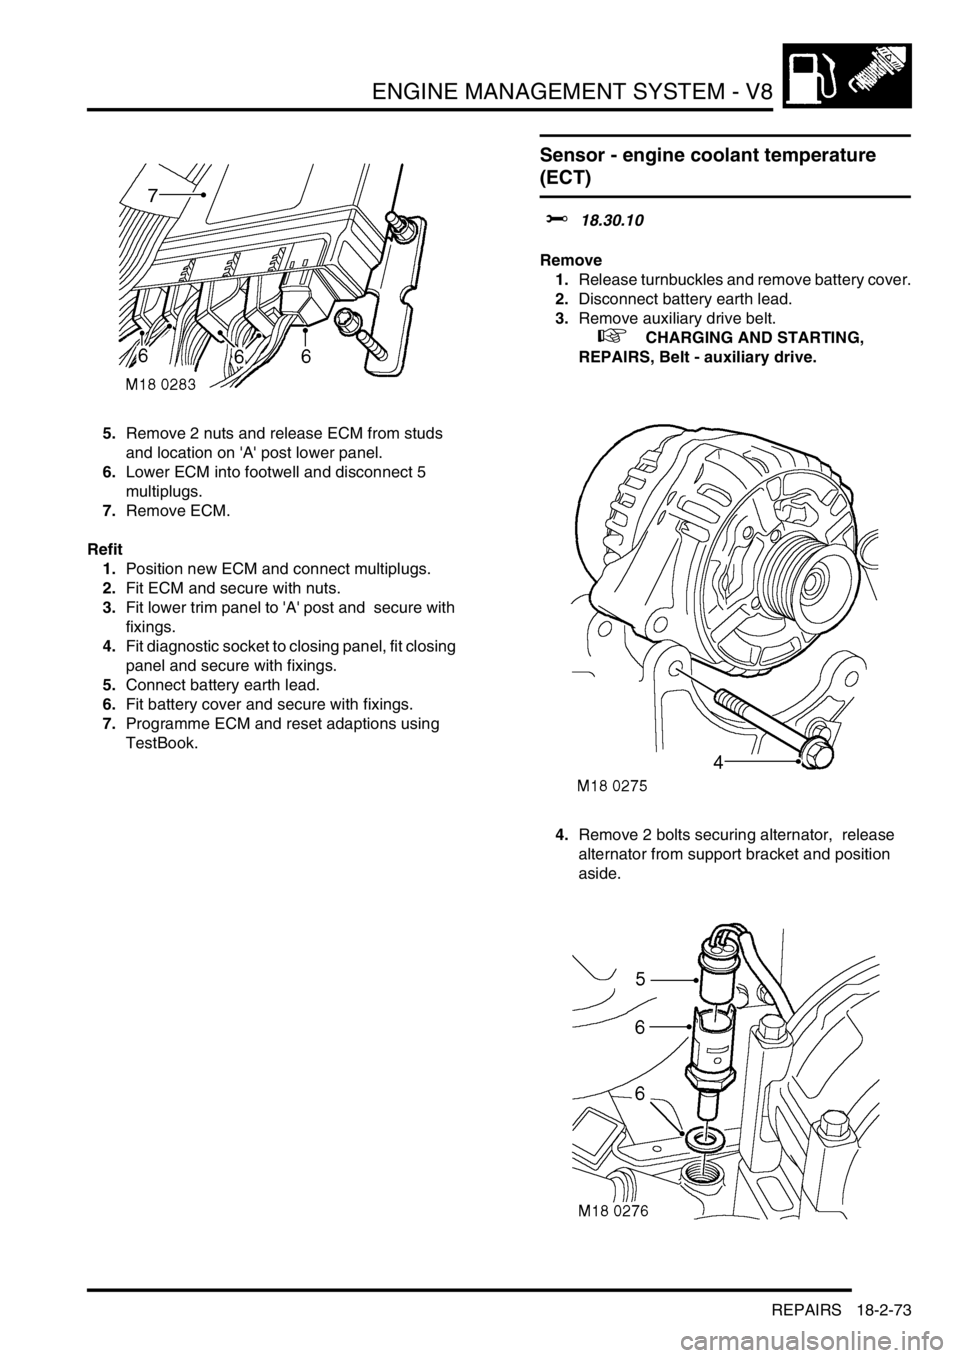
5.Remove 2 nuts and release ECM from studs
and location on 'A' post lower panel.
6.Lower ECM into footwell and disconnect 5
multiplugs.
7.Remove ECM.
Refit
1.Position new ECM and connect multiplugs.
2.Fit ECM and secure with nuts.
3.Fit lower trim panel to 'A' post and secure with
fixings.
4.Fit diagnostic socket to closing panel, fit closing
panel and secure with fixings.
5.Connect battery earth lead.
6.Fit battery cover and secure with fixings.
7.Programme ECM and reset adaptions using
TestBook.
Sensor - engine coolant temperature
(ECT)
$% 18.30.10
Remove
1.Release turnbuckles and remove battery cover.
2.Disconnect battery earth lead.
3.Remove auxiliary drive belt.
+ CHARGING AND STARTING,
REPAIRS, Belt - auxiliary drive.
4.Remove 2 bolts securing alternator, release
alternator from support bracket and position
aside.
Page 531 of 1672

ENGINE MANAGEMENT SYSTEM - V8
18-2-74 REPAIRS
5.Disconnect multiplug from ECT sensor.
6.Remove sensor from inlet manifold and discard
sealing washer.
Refit
1.Clean sealant from threads in manifold.
2.Apply Loctite 577 to sensor threads.
3.Fit new sealing washer to ECT sensor and
tighten sensor to 10 Nm (7 lbf.ft).
4.Connect multiplug to ECT sensor.
5.Position alternator, fit bolts and tighten to 45
Nm (33 lbf.ft).
6.Fit auxiliary drive belt.
+ CHARGING AND STARTING,
REPAIRS, Belt - auxiliary drive.
7.Top up cooling system.
8.Connect battery earth lead.
9.Fit battery cover and secure with fixings.
Sensor - crankshaft position (CKP)
$% 18.30.12
Remove
1.Release fixings and remove battery cover.
2.Disconnect battery earth lead.
3.Raise front of vehicle.
WARNING: Do not work on or under a
vehicle supported only by a jack. Always
support the vehicle on safety stands.
4.Release fixings and remove underbelly panel.
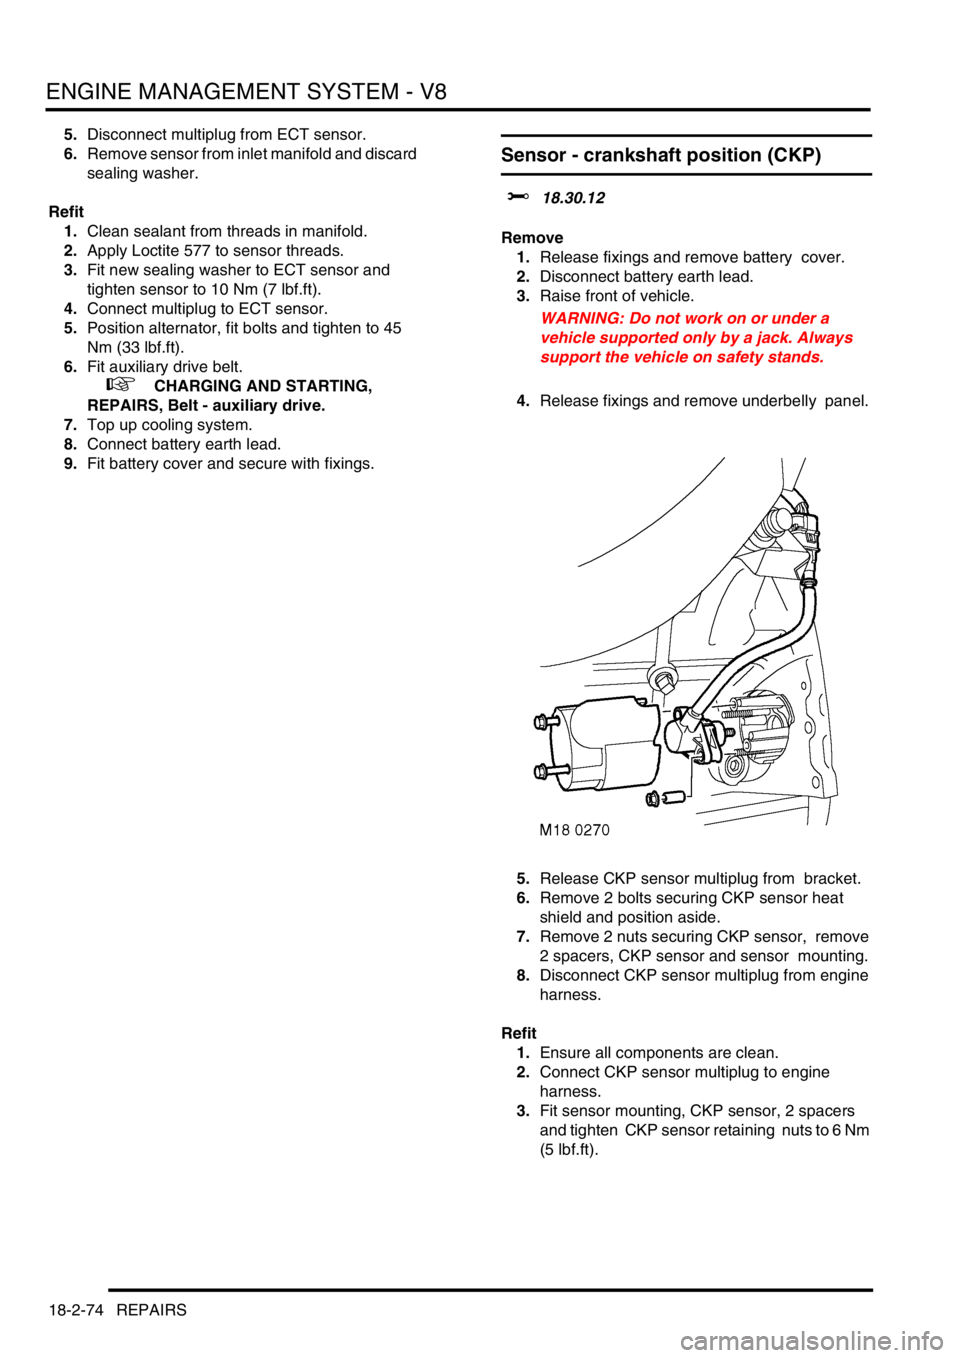
5.Release CKP sensor multiplug from bracket.
6.Remove 2 bolts securing CKP sensor heat
shield and position aside.
7.Remove 2 nuts securing CKP sensor, remove
2 spacers, CKP sensor and sensor mounting.
8.Disconnect CKP sensor multiplug from engine
harness.
Refit
1.Ensure all components are clean.
2.Connect CKP sensor multiplug to engine
harness.
3.Fit sensor mounting, CKP sensor, 2 spacers
and tighten CKP sensor retaining nuts to 6 Nm
(5 lbf.ft).
Page 532 of 1672

ENGINE MANAGEMENT SYSTEM - V8
REPAIRS 18-2-75
4.Fit CKP sensor heat shield and secure with
bolts.
5.Fit underbelly panel and secure with fixings.
6.Remove stand(s) and lower vehicle.
7.Connect battery earth lead.
8.Fit battery cover and secure the fixings.
9.Reset adaptions using TestBook.
Sensor - radiator temperature
$% 18.30.20
Remove
1.Disconnect battery earth lead.
2.Position container to collect coolant spillage.
3.Disconnect multiplug from sensor.
4.Remove sensor and discard sealing washer.
Refit
1.Fit new sealing washer to sensor.
2.Fit and tighten sensor.
3.Connect multiplug to sensor.
4.Refill cooling system.
5.Connect battery earth lead.
Page 533 of 1672

ENGINE MANAGEMENT SYSTEM - V8
18-2-76 REPAIRS
Sensor - camshaft position (CMP)
$% 18.30.24
Remove
1.Release fixings and remove battery cover.
2.Disconnect battery earth lead.
3.Raise front of vehicle.
WARNING: Do not work on or under a
vehicle supported only by a jack. Always
support the vehicle on safety stands.
4.Release fixings and remove underbelly panel.
5.Remove engine oil filter.
+ ENGINE - V8, REPAIRS, Filter - oil.
6.Disconnect engine harness from CMP sensor
and release CMP sensor multiplug from
bracket.
7.Remove bolt from clamp securing CMP sensor
to timing gear cover.
8.Remove clamp and CMP sensor. Discard 'O'
ring from CMP sensor.
Refit
1.Ensure CMP sensor is clean, fit new 'O' ring
and sensor to cover.
2.Fit clamp to CMP sensor and tighten bolt to 8
Nm (6 lbf.ft).
3.Fit sensor multiplug to bracket and connect
engine harness to multiplug.
4.Fit engine oil filter.
+ ENGINE - V8, REPAIRS, Filter - oil.
5.Fit underbelly panel and secure with fixings.
6.Lower vehicle and connect battery earth lead.
7.Fit battery cover and secure with fixings.
Knock sensor (KS)
$% 18.30.28
Remove
1.Release fixings and remove battery cover.
2.Disconnect battery earth lead.
3.Raise front of vehicle.
WARNING: Do not work on or under a
vehicle supported only by a jack. Always
support the vehicle on safety stands.
4.Remove fixings securing underbelly panel and
remove panel.
5.Disconnect multiplug from KS.
6.Remove nut securing KS to cylinder block and
remove KS.
Refit
1.Clean mating faces of KS and cylinder block.
2.Fit KS to cylinder block and tighten nut to 22
Nm (16 lbf.ft).
3.Connect multiplug to KS.
4.Fit underbelly panel and secure with fixings.
5.Remove stand(s) and lower vehicle.
6.Connect battery earth lead.
7.Fit battery cover and secure the fixings.
Page 534 of 1672

ENGINE MANAGEMENT SYSTEM - V8
REPAIRS 18-2-77
Air cleaner assembly
$% 19.10.01
Remove
1.Remove 2 nuts securing air intake ducting.
2.Remove both parts of air intake ducting.
3.Release 2 clips securing MAF sensor, release
2 clips securing air intake hose.
Note: Pre 03 MY air intake hose illustrated.
4.Release air intake hose and position aside. 5.Remove and discard MAF sensor 'O' ring.
6.Release air cleaner assembly from 3
grommets and remove assembly.
Refit
1.Position air cleaner assembly and secure in
grommets.
2.Fit new 'O' ring to MAF sensor.
3.Position air intake hose, secure MAF sensor
clips and tighten intake hose clips.
CAUTION: Ensure MAF sensor 'O' ring is
not displaced during fitting.
4.Fit air intake ducting and secure with nuts.
Page 535 of 1672

ENGINE MANAGEMENT SYSTEM - V8
18-2-78 REPAIRS
Element - air filter
$% 19.10.10
Remove
1.Release 2 clips and disconnect MAF sensor
from air filter cover, remove and discard 'O'
ring.
2.Release 2 clips and remove cover from air
filter.
3.Remove air filter element.
Refit
1.Clean air filter body and cover.
2.Fit new air filter element.
3.Position air cleaner cover and secure clips.
CAUTION: Ensure clips are correctly
located on cover.
4.Fit a new MAF sensor 'O' ring, position MAF
sensor and secure clips.
CAUTION: Ensure 'O' ring is not displaced
during fitting.
Cable - throttle
$% 19.20.06
Remove
1.Release 3 fasteners and remove drivers side
closing panel and move aside.
2.Release inner cable from throttle pedal.
3.Release outer cable from bulkhead.