ECU LAND ROVER DISCOVERY 2002 Workshop Manual
[x] Cancel search | Manufacturer: LAND ROVER, Model Year: 2002, Model line: DISCOVERY, Model: LAND ROVER DISCOVERY 2002Pages: 1672, PDF Size: 46.1 MB
Page 572 of 1672

FUEL DELIVERY SYSTEM - V8
DESCRIPTION AND OPERATION 19-2-7
The fuel pump is a 'self priming' wet type pump which is immersed in fuel in the tank. The fuel pump operates at all
times when the ignition switch is in position II. If the engine is not started, the ECU will 'time-out' after 2 seconds and
de-energise the fuel pump relay to protect the pump. The pump receives a feed from the battery via fuse 10 in the
engine compartment fusebox and the fuel pump relay. The relay is energised by the ECM when the ignition switch is
moved to position II.
The fuel pump is retained with a locking ring and sealed with a rubber seal. The locking ring requires a special tool
for removal and fitment. An access panel for the fuel pump is located in the loadspace floor below the loadspace
carpet. The access panel is sealed to the floor with a rubber seal and retained by six self-tapping screws.
The fuel gauge sender is integral with the fuel pump. The sender is submerged in the fuel and is operated by a float
which moves with the fuel level in the tank.
Fuel pump
The fuel pump assembly comprises a top cover which locates the fuel pressure regulator, electrical connector and
fuel pipe coupling. The top cover is attached to a plastic cup shaped housing by two metal springs. The housing
locates the pump and the fuel gauge sender unit.
The lower part of the housing is the swirl pot, which maintains a constant fuel level at the fuel pick-up. A feed pipe
from the pump to the coupling connection and a return pipe from the regulator connect between the top cover and the
housing.
A coarse filter is attached to the base of the housing and prevents the ingress of large contaminants into the swirl pot.
A gauze filter prevents particles entering the fuel pump.
Surrounding the pump is a large fine paper filter element which further protects the fuel pressure regulator, engine
and injectors from particulate contamination. The paper filter is not a serviceable item and removes the requirement
for an external in-line filter.
A non-return valve is located in the base of the housing. When the fuel tank is full, fuel pressure keeps the valve lifted
from its seat allowing fuel to flow into the swirl pot. As the tank level reduces, the fuel pressure in the tank reduces
causing the valve to close. When the valve is closed fuel is retained in the swirl pot, ensuring that the swirl pot remains
full and maintains a constant supply to the fuel pump.
A four pin electrical connector is located on the top cover of the pump and provides power feed and return for fuel
pump and fuel gauge rotary potentiometer operation. A single quick release coupling connects the fuel feed pipe to
the outer top surface of the pump.
Two metal springs are attached to the top cover and the housing of the pump. When the pump is installed it seats on
the lower surface inside the tank. The springs exert a downward pressure on the pump and ensure that the pump is
located positively at the bottom of the fuel tank.
The fuel pump has a maximum current draw of 6.5 A at 12.5 V.
On NAS vehicles with vacuum type EVAP system leak detection capability only, the fuel pump top cover is fitted with
an On Board Diagnostics (OBD) pressure sensor. This sensor has a three pin electrical connector which provides a
connection between the sensor and the ECM. The sensor is sealed in the top cover with an 'O' ring and secured with
a clip. The sensor monitors tank pressure during OBD tests of the fuel evaporation system integrity. A hose is
connected to the sensor and is routed across the top of the fuel tank and terminates at the top of the fuel filler tube.
The pipe is open to atmosphere and provides atmospheric pressure for the sensor operation.
+ ENGINE MANAGEMENT SYSTEM - V8, DESCRIPTION AND OPERATION, Description - engine
management.
Page 575 of 1672

FUEL DELIVERY SYSTEM - V8
19-2-10 DESCRIPTION AND OPERATION
Operation
When the ignition switch is moved to position II, the fuel pump relay in the engine compartment fusebox is energised
by the ECM. Battery voltage is supplied from the fuel pump relay to the fuel pump which operates. If engine cranking
is not detected by the ECU within a thirty second period, the ECU will 'time-out', de-energising the fuel pump relay.
+ ENGINE MANAGEMENT SYSTEM - V8, DESCRIPTION AND OPERATION, Description - engine
management.
The fuel pump draws fuel from the swirl pot and pumps it along the fuel feed pipe to the injector fuel rail on the engine.
When the pressure in the fuel feed line reaches 3.5 bar (50 lbf.in
2) the fuel pressure regulator opens and relieves
pressure by directing fuel back into the swirl pot. The pressure regulator is constantly opening and closing to maintain
the pressure in the fuel feed pipe and the fuel rail at 3.5 bar (50 lbf.in
2).
The pressure is felt at each of the eight injectors connected to the fuel rail. The ECM controls the injection timing and
energises each injector to allow a metered amount of fuel at pump pressure to be injected into the inlet tract of the
inlet manifold. The atomised fuel from the injector is mixed with air from the inlet manifold before passing into the
cylinder.
Page 578 of 1672

FUEL DELIVERY SYSTEM - V8
REPAIRS 19-2-13
REPAIRS
Switch - inertia - fuel cut-off
$% 19.22.09
Remove
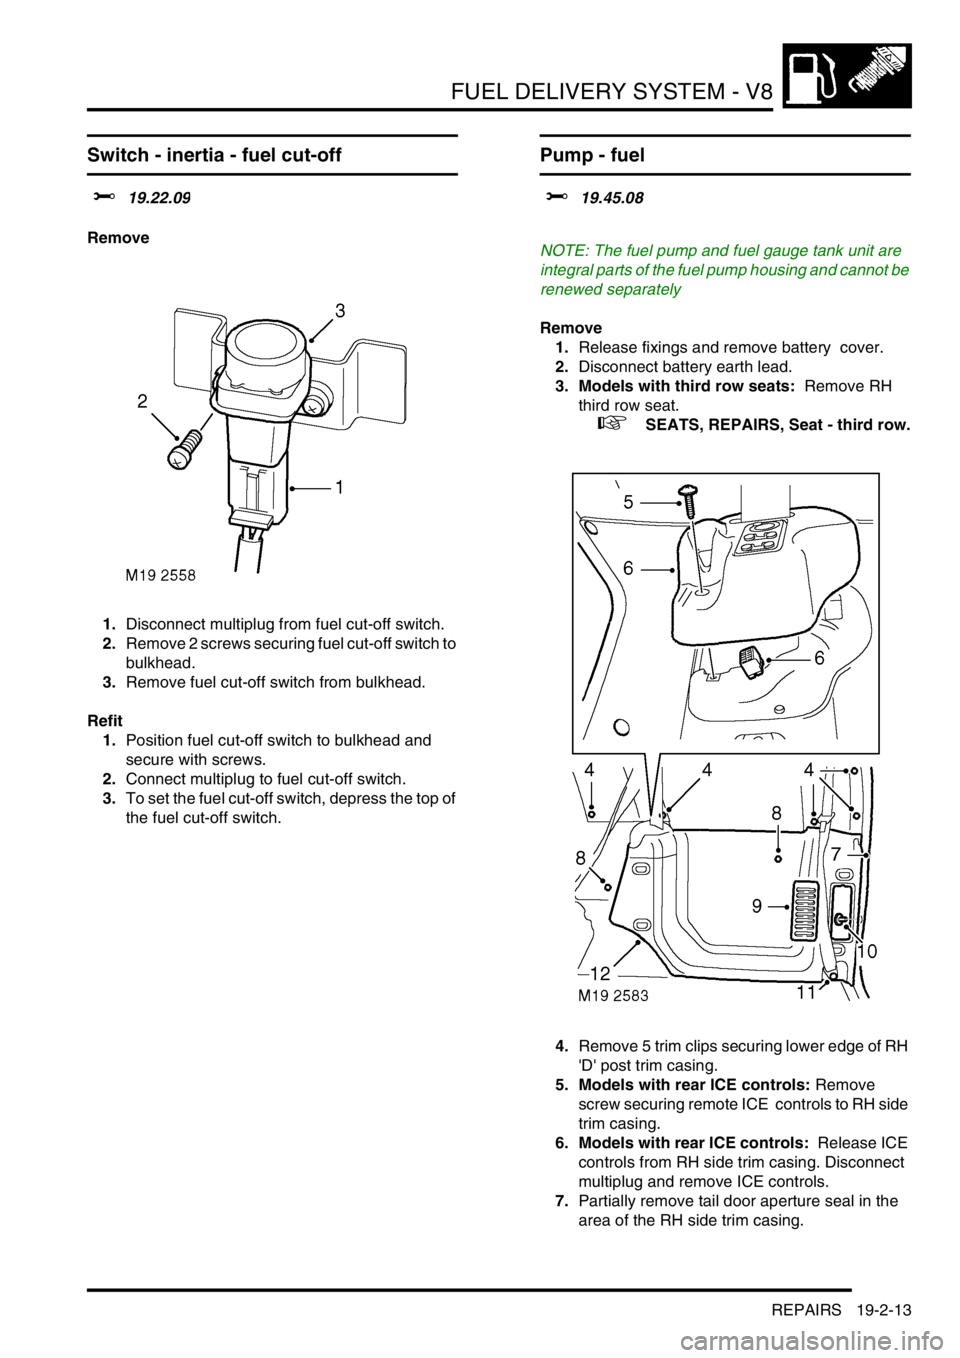
1.Disconnect multiplug from fuel cut-off switch.
2.Remove 2 screws securing fuel cut-off switch to
bulkhead.
3.Remove fuel cut-off switch from bulkhead.
Refit
1.Position fuel cut-off switch to bulkhead and
secure with screws.
2.Connect multiplug to fuel cut-off switch.
3.To set the fuel cut-off switch, depress the top of
the fuel cut-off switch.
Pump - fuel
$% 19.45.08
NOTE: The fuel pump and fuel gauge tank unit are
integral parts of the fuel pump housing and cannot be
renewed separately
Remove
1.Release fixings and remove battery cover.
2.Disconnect battery earth lead.
3. Models with third row seats: Remove RH
third row seat.
+ SEATS, REPAIRS, Seat - third row.
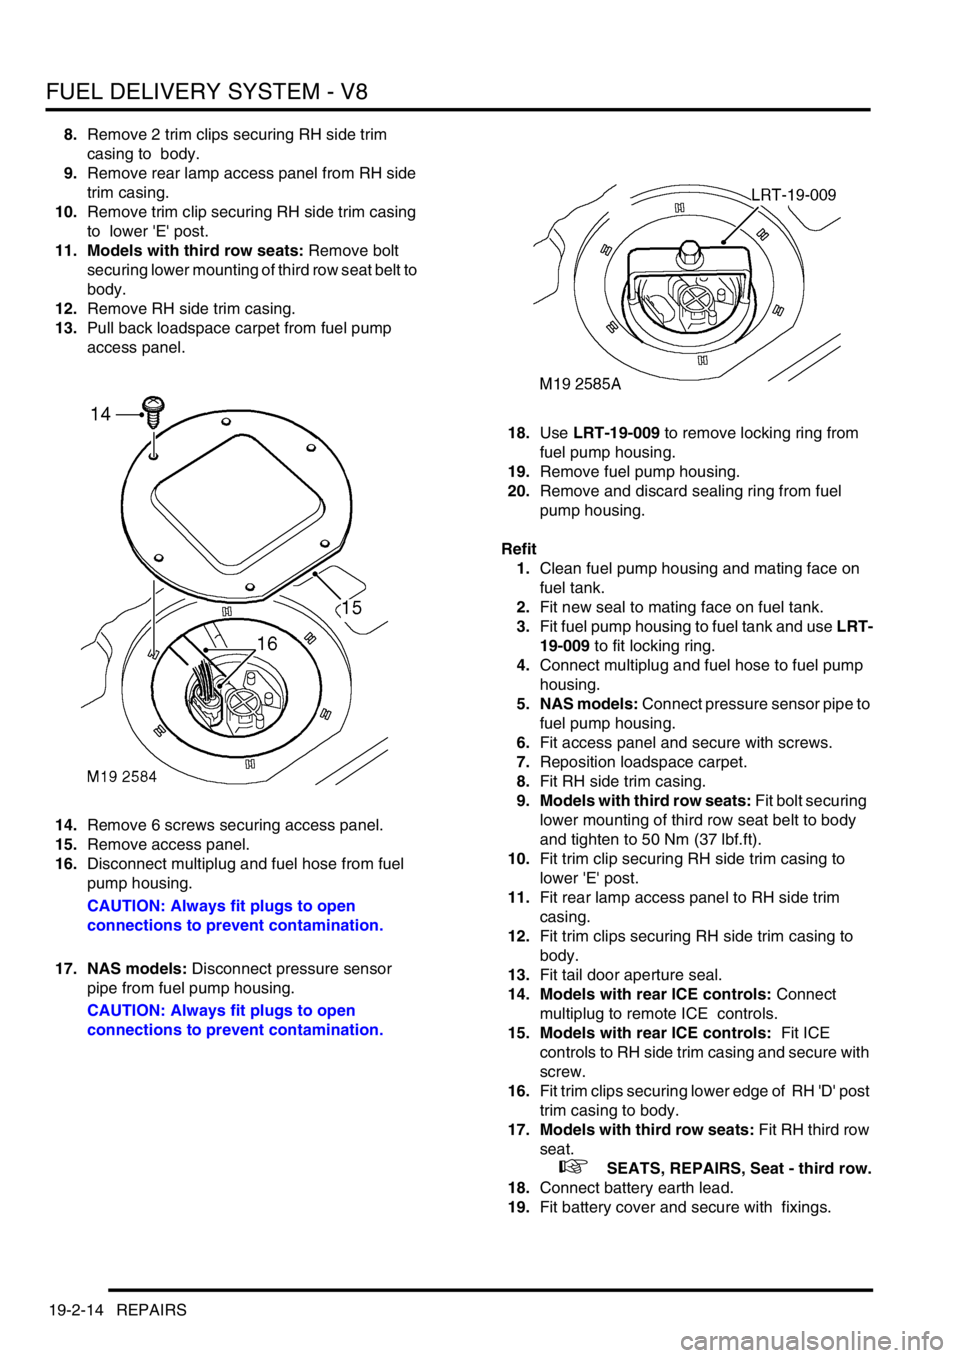
4.Remove 5 trim clips securing lower edge of RH
'D' post trim casing.
5. Models with rear ICE controls: Remove
screw securing remote ICE controls to RH side
trim casing.
6. Models with rear ICE controls: Release ICE
controls from RH side trim casing. Disconnect
multiplug and remove ICE controls.
7.Partially remove tail door aperture seal in the
area of the RH side trim casing.
Page 579 of 1672

FUEL DELIVERY SYSTEM - V8
19-2-14 REPAIRS
8.Remove 2 trim clips securing RH side trim
casing to body.
9.Remove rear lamp access panel from RH side
trim casing.
10.Remove trim clip securing RH side trim casing
to lower 'E' post.
11. Models with third row seats: Remove bolt
securing lower mounting of third row seat belt to
body.
12.Remove RH side trim casing.
13.Pull back loadspace carpet from fuel pump
access panel.
14.Remove 6 screws securing access panel.
15.Remove access panel.
16.Disconnect multiplug and fuel hose from fuel
pump housing.
CAUTION: Always fit plugs to open
connections to prevent contamination.
17. NAS models: Disconnect pressure sensor
pipe from fuel pump housing.
CAUTION: Always fit plugs to open
connections to prevent contamination.18.Use LRT-19-009 to remove locking ring from
fuel pump housing.
19.Remove fuel pump housing.
20.Remove and discard sealing ring from fuel
pump housing.
Refit
1.Clean fuel pump housing and mating face on
fuel tank.
2.Fit new seal to mating face on fuel tank.
3.Fit fuel pump housing to fuel tank and use LRT-
19-009 to fit locking ring.
4.Connect multiplug and fuel hose to fuel pump
housing.
5. NAS models: Connect pressure sensor pipe to
fuel pump housing.
6.Fit access panel and secure with screws.
7.Reposition loadspace carpet.
8.Fit RH side trim casing.
9. Models with third row seats: Fit bolt securing
lower mounting of third row seat belt to body
and tighten to 50 Nm (37 lbf.ft).
10.Fit trim clip securing RH side trim casing to
lower 'E' post.
11.Fit rear lamp access panel to RH side trim
casing.
12.Fit trim clips securing RH side trim casing to
body.
13.Fit tail door aperture seal.
14. Models with rear ICE controls: Connect
multiplug to remote ICE controls.
15. Models with rear ICE controls: Fit ICE
controls to RH side trim casing and secure with
screw.
16.Fit trim clips securing lower edge of RH 'D' post
trim casing to body.
17. Models with third row seats: Fit RH third row
seat.
+ SEATS, REPAIRS, Seat - third row.
18.Connect battery earth lead.
19.Fit battery cover and secure with fixings.
Page 580 of 1672

FUEL DELIVERY SYSTEM - V8
REPAIRS 19-2-15
Tank - fuel
$% 19.55.01
Remove
1.Drain fuel tank.
+ FUEL DELIVERY SYSTEM - V8,
ADJUSTMENTS, Fuel tank - drain.
2.Raise rear of vehicle.
WARNING: Do not work on or under a
vehicle supported only by a jack. Always
support the vehicle on safety stands.
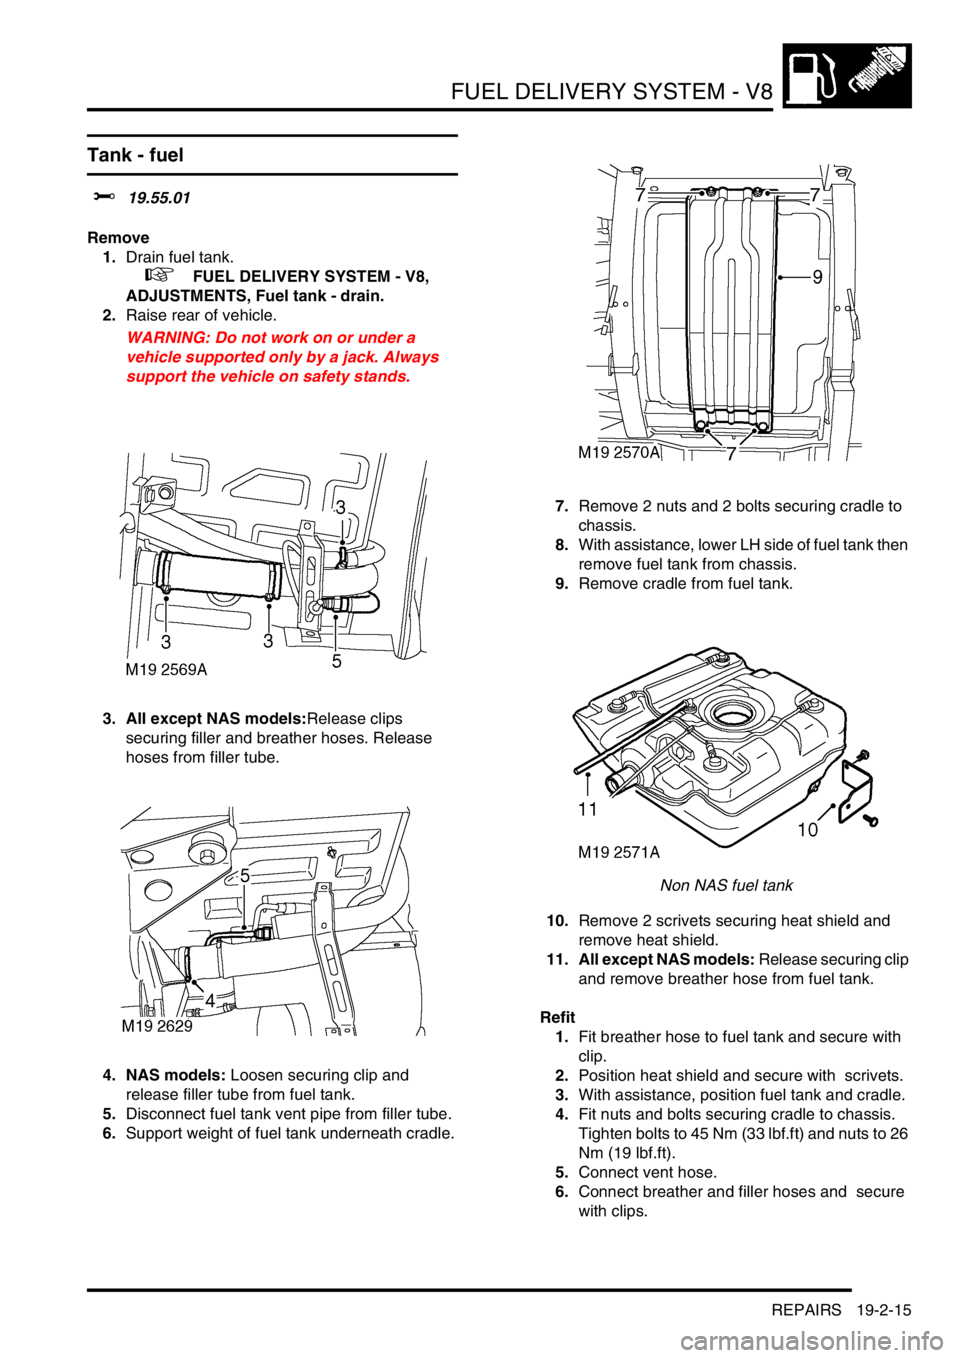
3. All except NAS models:Release clips
securing filler and breather hoses. Release
hoses from filler tube.
4. NAS models: Loosen securing clip and
release filler tube from fuel tank.
5.Disconnect fuel tank vent pipe from filler tube.
6.Support weight of fuel tank underneath cradle. 7.Remove 2 nuts and 2 bolts securing cradle to
chassis.
8.With assistance, lower LH side of fuel tank then
remove fuel tank from chassis.
9.Remove cradle from fuel tank.
Non NAS fuel tank
10.Remove 2 scrivets securing heat shield and
remove heat shield.
11. All except NAS models: Release securing clip
and remove breather hose from fuel tank.
Refit
1.Fit breather hose to fuel tank and secure with
clip.
2.Position heat shield and secure with scrivets.
3.With assistance, position fuel tank and cradle.
4.Fit nuts and bolts securing cradle to chassis.
Tighten bolts to 45 Nm (33 lbf.ft) and nuts to 26
Nm (19 lbf.ft).
5.Connect vent hose.
6.Connect breather and filler hoses and secure
with clips.
Page 581 of 1672

FUEL DELIVERY SYSTEM - V8
19-2-16 REPAIRS
Filler tube - fuel
$% 19.55.07
Remove
1.Raise rear of vehicle.
WARNING: Do not work on or under a
vehicle supported only by a jack. Always
support the vehicle on safety stands.
2.Ensure fuel tank is less than half full. If not,
drain fuel tank to less than half full.
+ FUEL DELIVERY SYSTEM - V8,
ADJUSTMENTS, Fuel tank - drain.
3.Remove filler cap.
Non NAS installation
4.Drill out rivet securing lower part of mud flap
support bracket and release bracket .
5. All except NAS models: Disconnect filler
hose, breather hose and vent pipe from filler
tube.
NAS installation
6. NAS models: Loosen securing clip and
release filler tube from fuel tank.7. NAS models: Disconnect vent pipes from filler
tube.
8. Release filler tube from grommet in body and
remove from under rear wing. Collect grommet.
9. NAS models: Remove cable tie securing
pressure sensor pipe to filler tube and remove
filler tube.
Refit
1. NAS models: Position filler tube to pressure
sensor pipe and secure with new cable tie.
2. Fit grommet to body, position filler tube under
rear wing and secure in grommet.
3. NAS models: Connect filler tube to fuel tank
and secure with clip. Connect vent pipes to filler
tube.
4. All except NAS models: Connect filler hose
and breather hose to filler tube and secure with
clips. Connect vent pipe to filler tube.
5. Position support bracket to mud flap and
secure with new rivet.
6.If applicable, refill fuel tank with extracted fuel.
7.Fit filler cap.
8.Remove stand(s) and lower vehicle.
Page 582 of 1672

FUEL DELIVERY SYSTEM - V8
REPAIRS 19-2-17
Solenoid - fuel filler flap release
$% 19.55.17
Remove
1.Remove loadspace RH side trim casing.
+ INTERIOR TRIM COMPONENTS,
REPAIRS, Trim casing - side - loadspace.
2.Remove 2 nuts and release solenoid from
body panel.
3.Disconnect multiplug and remove solenoid.
Refit
1.Position solenoid and connect multiplug.
2.Position solenoid to panel and tighten nuts.
3.Fit loadspace RH side trim casing.
+ INTERIOR TRIM COMPONENTS,
REPAIRS, Trim casing - side - loadspace.
Switch - fuel filler flap release - up to
03MY
$% 19.55.23
Remove
1.Carefully remove switch.
2.Disconnect multiplug from switch.
3.Remove switch.
Refit
1.Connect multiplug switch.
2.Position switch and push to secure.
Page 583 of 1672

FUEL DELIVERY SYSTEM - V8
19-2-18 REPAIRS
Switch - fuel filler flap release - from
03MY
$% 19.55.23
Remove
1.Remove 2 screws securing instrument cowl to
fascia and release the cowl from the retaining
clips.
2.Disconnect multiplug from the fuel filler flap
release switch.
3.Remove the fuel filler flap release switch from
the instrument cowl.
Refit
1.Fit and secure the fuel filler flap release switch
to the instrument cowl and connect the
multiplug.
2.Fit the instrument cowl to the fascia and secure
with screws.
Page 591 of 1672

COOLING SYSTEM - TD5
26-1-8 DESCRIPTION AND OPERATION
The coolant pump is attached on the left hand side of the engine, behind the PAS pump. A cast housing, bolted to the
cylinder block provides a common attachment point for both pumps. The housing has galleries which connect the
coolant pump to the cylinder block and the oil cooler housing. The coolant pump comprises a shaft, a housing and a
cover.
The shaft, which passes through the alloy housing, is supported at each end by bearings. Seals at each end of the
shaft protect the bearings from the coolant. The forward end of the shaft has two lugs which engage with the PAS
pump shaft. The opposite end of the shaft is fitted with an impeller which draws coolant from the feed pipe and
circulates it through galleries in the cylinder block. The shaft is driven by the auxiliary drive belt at the same rotational
speed as the crankshaft by a pulley attached to the PAS pump.
The pump is sealed in the cast housing with two 'O' rings. An outer cover is positioned over the pump and secured
with six bolts and sealed to the pump with an 'O' ring. The cover provides the attachment for the feed pipe connecting
hose.
Page 592 of 1672

COOLING SYSTEM - TD5
DESCRIPTION AND OPERATION 26-1-9
Viscous fan
1Idler pulley drive attachment
2Fan blades
3Bi-metallic coil
4Body
The viscous fan provides a means of controlling the speed of the fan relative to the operating temperature of the
engine. The fan rotation draws air through the radiator, reducing engine coolant temperatures when the vehicle is
stationary or moving slowly.
The viscous fan is attached to an idler pulley at the front of the engine which is driven at crankshaft speed by the
auxiliary drive belt. The fan is secured to the pulley by a nut. The nut is positively attached to the fan spindle which
is supported on bearings in the fan body. The viscous drive comprises a circular drive plate attached to the spindle
and driven from the idler pulley. The drive plate and body have interlocking annular grooves with a small clearance
which provides the drive when silicone fluid enters the fluid chamber. A bi-metallic coil is fitted externally on the
forward face of the body. The coil is connected to and operates a valve in the body. The valve operates on a valve
plate with ports that connect the reservoir to the fluid chamber. The valve plate also has return ports which, when the
valve is closed, scoop fluid from the fluid chamber and push it into the reservoir under centrifugal force.
Silicone fluid is retained in a reservoir at the front of the body. When the engine is off and the fan is stationary, the
silicone fluid level stabilises between the reservoir and the fluid chamber. This will result in the fan operating when the
engine is started, but the drive will be removed quickly after the fan starts rotating and the fan will 'freewheel'.
At low radiator temperatures, the fan operation is not required and the bi-metallic coil keeps the valve closed,
separating the silicone fluid from the drive plate. This allows the fan to 'freewheel' reducing the load on the engine,
improving fuel consumption and reducing noise generated by the rotation of the fan.
When the radiator temperature increases, the bi-metallic coil reacts and moves the valve, allowing silicone fluid to
flow into the fluid chamber. The resistance to shear of the silicone fluid creates drag on the drive plate and provides
drive to the body and the fan blades.