torque LAND ROVER DISCOVERY 2002 Repair Manual
[x] Cancel search | Manufacturer: LAND ROVER, Model Year: 2002, Model line: DISCOVERY, Model: LAND ROVER DISCOVERY 2002Pages: 1672, PDF Size: 46.1 MB
Page 815 of 1672

AUTOMATIC GEARBOX - ZF4HP22 - 24
44-18 DESCRIPTION AND OPERATION
With time, the components in a gearbox wear and the duration of the gear shifts tends to increase, which has an
adverse effect on the brake clutches. To counteract this, the EAT ECU applies a pressure adaptation to each shift.
To calculate the adaptations, the EAT ECU monitors the pressure modulation used, and time taken, for each shift. If
a subsequent shift of the same type, in terms of throttle position and engine speed, has a longer duration, the EAT
ECU stores an adaptation for that type of shift in a volatile memory. The adaptation is then included in future pressure
calculations for that type of shift, to restore shift duration to the nominal.
Kickdown
The EAT ECU monitors the input of the throttle position sensor to determine when kickdown is required. When it
detects a kickdown situation, the EAT ECU immediately initiates a down shift provided the target gear will not cause
the engine speed limit to be exceeded.
Torque converter lock-up
The EAT ECU energises the lock-up solenoid valve to engage the lock-up clutch. Lock-up clutch operation is
dependent on throttle position, engine speed, operating mode and the range selected on the transfer box.
High range
Unique lock-up maps, similar to the shift maps, are incorporated in the economy and sport modes for all forward gears.
Engagement and disengagement of the lock-up clutch is dependent on throttle position and engine speed.
Low range
To enhance off road control, particularly when manoeuvring at low speeds, torque converter lock-up does not occur
when there is any degree of throttle opening. When the throttle is closed above a preset engine speed, the lock-up
clutch engages to provide maximum engine braking.
Increased load/reduced torque compensation
To aid performance and driveability in the high range economy mode, the EAT ECU has three adaptive shift and lock-
up maps. These maps delay upshifts and torque converter lock-up similar to the sport mode if the inputs from the
engine indicate:
lA sustained high load on the engine, such as occurs when the vehicle is ascending a steep gradient or towing a
trailer.
lA lower than normal engine torque, such as occurs at altitude or high ambient temperatures.
The EAT ECU monitors the engine inputs and selects the most appropriate adaptive map for the prevailing conditions.
Diagnostics
While the ignition is on, the EAT ECU diagnoses the system for faults. The extent of the diagnostic capability at any
particular time depends on the prevailing operating conditions, e.g. it is not possible to check torque converter lock-
up while the vehicle is stationary, or to check for a short circuit to earth if the circuit concerned is already at a low
potential.
If a fault is detected, the EAT ECU immediately stores a fault code and the values of three operating parameters
associated with the fault. Depending on the fault, there are four possible effects:
lThe fault has little effect on gearbox operation or vehicle emissions. The driver will probably not notice any
change and the warning lamps remain extinguished.
lThe fault has little effect on gearbox operation but may effect vehicle emissions. On NAS vehicles, if the fault is
detected on a second consecutive drive cycle, the MIL illuminates.
lAll gears are available but kickdown does not function. The sport and manual warning lamps flash. The MIL
remains extinguished.
lLimp home mode is selected and vehicle performance is greatly reduced. The sport and manual warning lamps
flash. In all markets, if the fault is detected on a second consecutive drive cycle, the MIL illuminates.
Page 816 of 1672

AUTOMATIC GEARBOX - ZF4HP22 - 24
DESCRIPTION AND OPERATION 44-19
After the detection of a fault, the effects remain active for the remainder of the drive cycle. In subsequent drive cycles,
as soon as the EAT ECU diagnoses the fault is no longer present, it resumes normal control of the gearbox. The
conditions required to diagnose that the fault is no longer present depend on the fault. Some faults require the engine
to be started, others require only that the ignition is switched on.
After a fault has not recurred for forty warm-up cycles, the fault is deleted from the EAT ECU memory. Only five
different faults can be stored in the memory at any one time. If a further fault occurs, the fault with the lowest priority
will be replaced by the new fault.
Mechanical limp home
In the mechanical limp home mode, gear engagement is controlled by the manual valve. The gearbox is fixed in 4th
gear if the fault occurs while the vehicle is moving, or 3rd gear if the fault occurs while the vehicle is stationary. 3rd
gear is also engaged if a vehicle is brought to a stop and the selector lever is moved out of, and back into, D. Neutral
and reverse gear are also available.
Fault effects and warning indications
Fault code,
OBD II
(TestBook)Fault description Effect Warning lamp
illumination
MIL Sport/
Manual
P0705
(14, 23)* Gear position switch,
incorrect outputsMaintains current gear in low range, limp home
mode in high range. Shift pressure to maximum,
harsh gear shifts/engagement.On On
P0721
(21)* Downshift safety
monitor prevented
downshift which would
have caused engine
overspeedMaintains current gear in low range, limp home
mode in high range. Shift pressure to maximum,
harsh gear shifts/engagement.On On
P0722
(22)* Torque converter
slippingMaintains current gear in low range, limp home
mode in high range. Shift pressure to maximum,
harsh gear shifts/engagement.On On
P0731
(29)* Ratio monitoring,
implausible 1st gear ratioNo apparent effect On On
P0732
(30)* Ratio monitoring,
implausible 2nd gear
ratioNo apparent effect On Off
P0733
(31)* Ratio monitoring,
implausible 3rd gear
ratioNo apparent effect On Off
P0734
(32)* Ratio monitoring,
implausible 4th gear ratioNo apparent effect On Off
P0741
(5)* Torque converter lock-
up clutch faultMay affect driveability. On Off
P0743
(7, 25)* Torque converter lock-
up solenoid (MV 3), open
or short circuitLimp home mode in low and high ranges. Shift
pressure to maximum, harsh gear shifts/
engagement.On On
P0748
(10, 28)* Pressure regulating
solenoid (MV 4), open or
short circuitLimp home mode in low and high ranges. Shift
pressure to maximum, harsh gear shifts/
engagement.On On
P0753
(8, 26)* Shift solenoid (MV 1),
open or short circuitLimp home mode in low and high ranges. Shift
pressure to maximum, harsh gear shifts/
engagement.On On
P0758
(9, 27)* Shift solenoid (MV 2),
open or short circuitLimp home mode in low and high ranges. Shift
pressure to maximum, harsh gear shifts/
engagement.On On
P1562
(24)* Battery supply below
9V while engine runningMaintains current gear in low range, limp home
mode in range. Shift pressure to maximum, harsh
gear shifts/engagement.Off On
Page 817 of 1672

AUTOMATIC GEARBOX - ZF4HP22 - 24
44-20 DESCRIPTION AND OPERATION
P1601
(4)* ECU, EEPROM
checksumLimp home mode in low and high ranges. Shift
pressure to maximum, harsh gear shifts/
engagement.On On
P1606
(3)* EEPROM No apparent effect On†Off
P1606
(6)* Watchdog No apparent effect On On
P1612
(2)* Solenoid valves power
supply relay, sticking
closed or open circuitLimp home mode in low and high ranges. Shift
pressure to maximum, harsh gear shifts/
engagement.On On
P1613
(1)* Solenoid valves power
supply relay, sticking
open or short circuitLimp home mode in low and high ranges. Shift
pressure to maximum, harsh gear shifts/
engagement.On On
P1705
(39)Transmission high/low
range, implausible inputNo apparent effect On Off
P1810
(12, 13)Sport/Manual warning
lamp circuit faultLamp fails bulb check or is permanently
illuminated. No effect on gearbox operation.On Off
P1841
(16)* CAN bus fault Maintains current gear in low range, limp home
mode in high range. Shift pressure to maximum,
harsh gear shifts/engagement.On On
P1842
(15)* CAN level monitoring Maintains current gear in low range, limp home
mode in range. Shift pressure to maximum, harsh
gear shifts/engagement.On On
P1843
(17)* CAN time-out
monitoringMaintains current gear in low range, limp home
mode in high range. Shift pressure to maximum,
harsh gear shifts/engagement.On On
P1884
(11)* CAN message: Engine
friction invalidNo apparent effect. On Off
P1884
(18)* CAN message: Throttle
position invalidSubstitute throttle angle of 50% adopted. No
kickdown. Operates in economy modes only.On On
P1884
(19)CAN message: Engine
temperature invalidSubstitute engine temperature derived from other
inputs. No apparent effect.On Off
P1884
(20)CAN message: Road
speed invalidNo apparent effect On Off
P1884
(33, 34)* CAN message: Engine
torque invalidSubstitute engine torque of derived from other
inputs. May affect shift quality.On Off
P1884
(35)* CAN message: Engine
speed invalidMaintains current gear in low range, limp home
mode in high range. Shift pressure to maximum,
harsh gear shifts/engagement.On On
P1884
(37)CAN message: Engine
air intake temperature
invalidNo apparent effect. On Off
P1844
(38)Altitude shift control
invalidNo reduced torque compensation, possible
reduction in performance/ driveability at altitude
or high ambient temperatures.On Off
* = Emissions (OBD II) relevant
†On = MIL illuminates immediately (in all other faults, MIL On = illuminates in the 2nd consecutive drive cycle if fault still
present)Fault code,
OBD II
(TestBook)Fault description Effect Warning lamp
illumination
MIL Sport/
Manual
Page 818 of 1672

AUTOMATIC GEARBOX - ZF4HP22 - 24
ADJUSTMENTS 44-21
ADJUST ME NTS
Cable - selector
$% 44.30.04
Check
1.Position vehicle on ramp.
2.Select position 'P'.
3.Loosen selector cable trunnion nut.
4.Ensure that gearbox selector lever is in 'P'
position, (fully forward) and tighten trunnion
nut.
5.Lower ramp.
Stall test
$% 44.30.13
Testing
1.Chock the wheels and fully apply the
handbrake.
2.Start the engine and run it until it reaches
normal operating temperature.
3.Apply the footbrake and select 'D'.
4.Fully depress the accelerator pedal and note
the tachometer reading. The figures should be
as given below. Do not carry out stall test for
longer than 10 seconds, and DO NOT repeat
until 30 minutes have elapsed.
lV8: 2200 to 2400 rev/min
lDiesel: 2600 to 2800 rev/min
5.A reading below 1300 rev/min indicates a
torque converter fault, ie stator free-wheel.
6.A reading between 1300 and 2200 rev/min (V8)
or between 1300 and 2600 rev/min (Diesel)
indicates reduced engine power.
7.A reading above 2400 rev/min (V8) or above
2800 rev/min (Diesel) indicates clutch slip.
NOTE: The figures quoted above were
measured at sea level with an ambient
temperature of 20
°C (68°F). At higher altitudes
or higher ambient temperatures, these figures
will be reduced.
Page 824 of 1672

AUTOMATIC GEARBOX - ZF4HP22 - 24
REPAIRS 44-27
11.Drain transfer gearbox oil.
+ MAINTENANCE, PROCEDURES,
Transfer box.
12.Remove front propeller shaft
+ PROPELLER SHAFTS, REPAIRS,
Propeller shaft - front.
13.Remove rear propeller shaft
+ PROPELLER SHAFTS, REPAIRS,
Propeller shaft - rear.
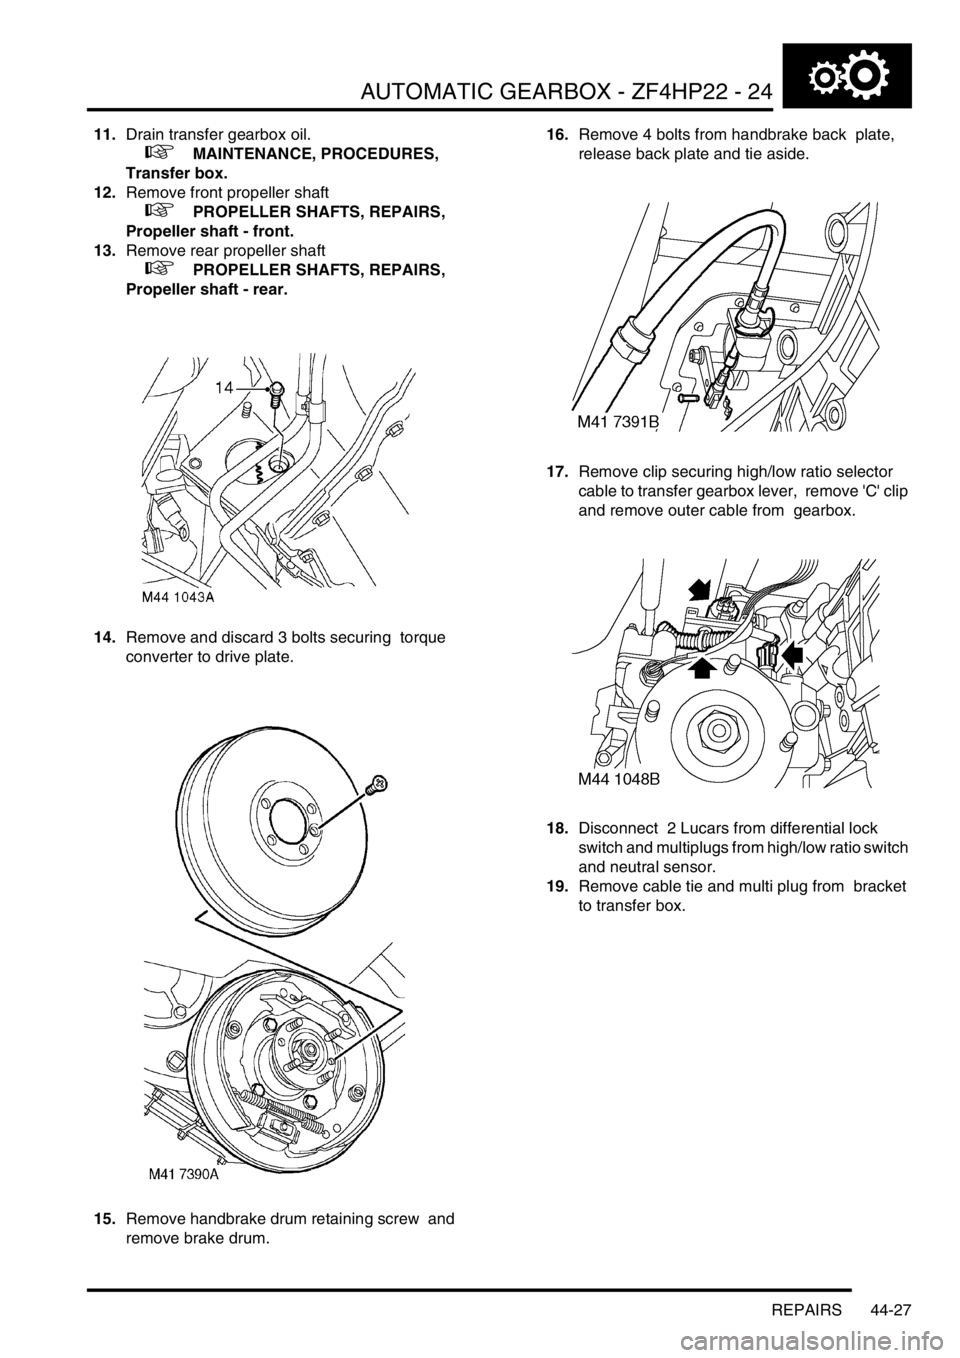
14.Remove and discard 3 bolts securing torque
converter to drive plate.
15.Remove handbrake drum retaining screw and
remove brake drum. 16.Remove 4 bolts from handbrake back plate,
release back plate and tie aside.
17.Remove clip securing high/low ratio selector
cable to transfer gearbox lever, remove 'C' clip
and remove outer cable from gearbox.
18.Disconnect 2 Lucars from differential lock
switch and multiplugs from high/low ratio switch
and neutral sensor.
19.Remove cable tie and multi plug from bracket
to transfer box.
Page 826 of 1672

AUTOMATIC GEARBOX - ZF4HP22 - 24
REPAIRS 44-29
27.Loosen gearbox oil cooler pipe unions, release
pipes from gearbox and discard 'O' rings.
CAUTION: Always fit plugs to open
connections to prevent contamination.
28.Remove 'C' clip securing selector cable to
gearbox bracket.
29.Remove nut securing selector lever to inhibitor
switch and release lever.
30.Disconnect multiplug from inhibitor switch.
31.Loosen gearbox multi plug locking ring and
disconnect plug. 32.Remove 6 remaining gearbox housing bolts.
33.With assistance remove automatic gearbox
from engine.
34.Fit suitable strap to retain torque converter.
Refit
1.Clean gearbox to engine mating faces.
2.Remove torque converter retaining strap.
3.With assistance position gearbox to engine.
4.Fit but do not tighten six bolts securing gearbox
housing to engine.
5.Connect multiplug to gearbox and tighten
locking ring.
6.Connect multiplug to inhibitor switch.
7.Position selector lever to inhibitor switch and
tighten nut to 25 Nm (18 lbf.ft).
8.Position selector cable to gearbox and secure
with 'C' clip.
9.Clean oil pipe unions and fit new 'O' rings.
10.Position and tighten pipe unions to gearbox.
11.Position and tighten oil cooler pipe clamps.
12.Position and tighten oil cooler pipe clips to
engine sump and alternator bracket.
13.Position engine RH and LH rear mountings
and tighten bolts to 85 Nm (63 lbf.ft) and nuts to
85 Nm (63 lbf.ft).
Page 827 of 1672

AUTOMATIC GEARBOX - ZF4HP22 - 24
44-30 REPAIRS
14.Secure gearbox breather pipes to bulkhead
clip.
15.Connect multiplugs to high/low ratio switch and
neutral sensor. Connect Lucars to differential
lock switch.
16.Position cable tie and multi plug to transfer box
bracket.
17.Connect high/low ratio cable to transfer box
and secure with retaining clips.
18.Position hand brake back plate and tighten
bolts to 75 Nm (55 lbf.ft).
19.Fit hand brake drum and tighten screw.
20.Remove bolts securing tool LRT-99-008A to
gearbox.
21.Rotate engine to align torque converter, fit new
bolts and tighten to 50 Nm (37 lbf.ft).
22.Fit rear propeller shaft.
+ PROPELLER SHAFTS, REPAIRS,
Propeller shaft - rear.
23.Fit front propeller shaft.
+ PROPELLER SHAFTS, REPAIRS,
Propeller shaft - front.
24.Fill transfer gearbox with oil.
+ MAINTENANCE, PROCEDURES,
Transfer box.
25.Fill automatic gearbox with oil.
+ MAINTENANCE, PROCEDURES,
Automatic gearbox.
26.Position intermediate silencer and secure to
mounting rubbers.
27.Clean silencer and tail pipe mating faces.
28.Position new gasket to tail pipe and tighten
nuts to 25 Nm (18 lbf.ft).
29.Fit exhaust front pipe.
+ MANIFOLDS AND EXHAUST
SYSTEMS - Td5, REPAIRS, Pipe - front.
30.Fit bolt securing closing plate to gearbox
housing and tighten to 7 Nm (5.2 lbf.ft).
31.Fit upper bolts securing gearbox housing to
engine and tighten to 50 Nm (37 lbf.ft).
32.Fit starter motor.
+ CHARGING AND STARTING,
REPAIRS, Starter motor - diesel.
33.Tighten remaining gearbox housing to engine
bolts to 50 Nm (37 lbf.ft).
34.Connect battery earth lead.
35.Fit battery cover and secure with fixings.
36.Check and adjust selector cable.
+ AUTOMATIC GEARBOX - ZF4HP22
- 24, ADJUSTMENTS, Cable - selector.
Gearbox - convertor and transfer
gearbox - V8
$% 44.20.04.99
Remove
1.Release fixings and remove battery cover.
2.Disconnect battery earth lead.
3.Raise vehicle on a ramp.
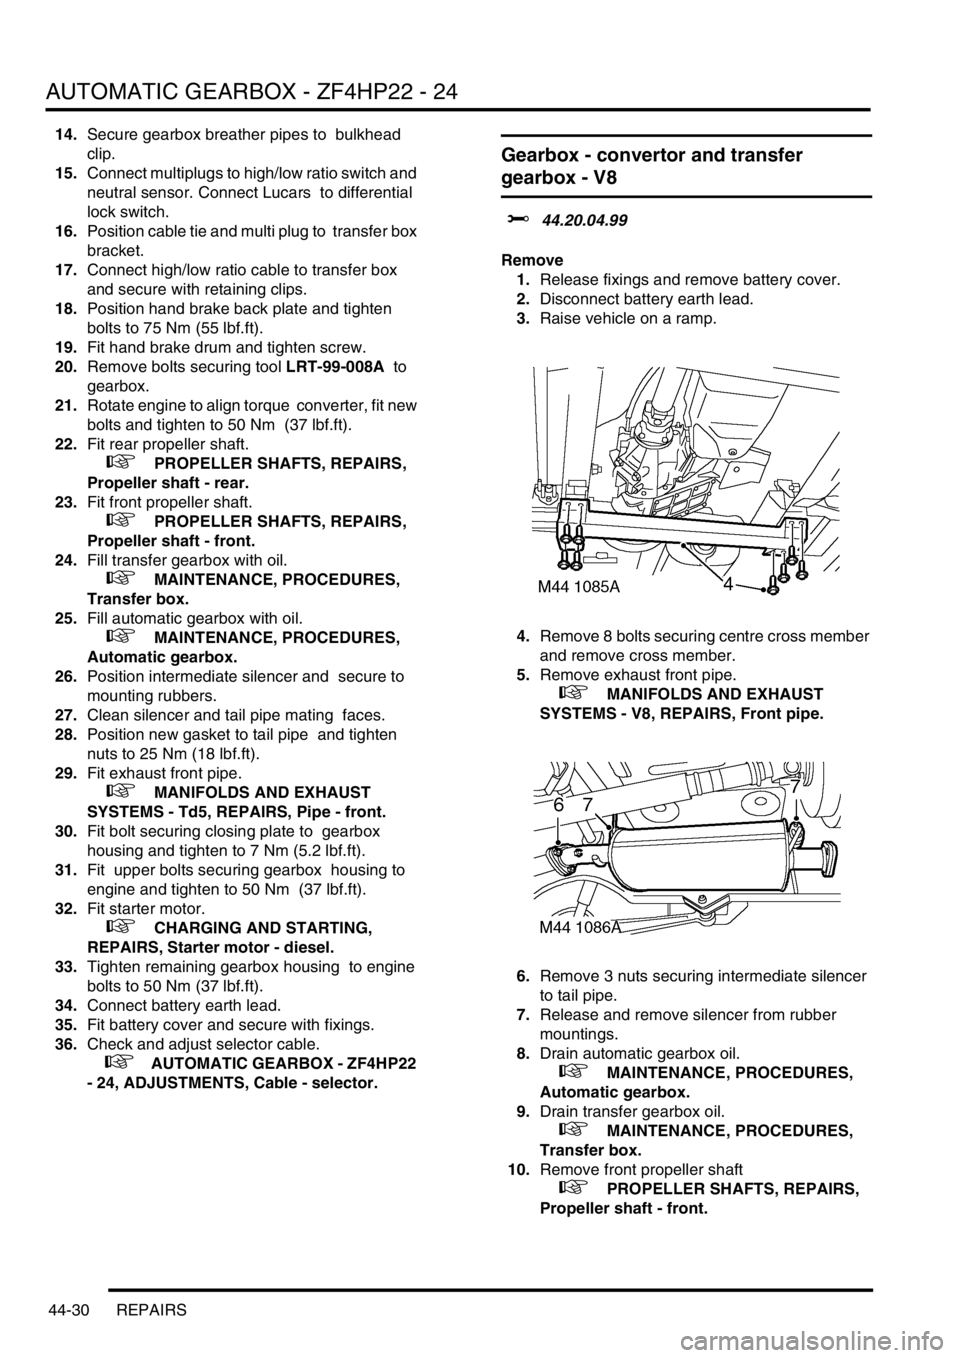
4.Remove 8 bolts securing centre cross member
and remove cross member.
5.Remove exhaust front pipe.
+ MANIFOLDS AND EXHAUST
SYSTEMS - V8, REPAIRS, Front pipe.
6.Remove 3 nuts securing intermediate silencer
to tail pipe.
7.Release and remove silencer from rubber
mountings.
8.Drain automatic gearbox oil.
+ MAINTENANCE, PROCEDURES,
Automatic gearbox.
9.Drain transfer gearbox oil.
+ MAINTENANCE, PROCEDURES,
Transfer box.
10.Remove front propeller shaft
+ PROPELLER SHAFTS, REPAIRS,
Propeller shaft - front.
Page 828 of 1672

AUTOMATIC GEARBOX - ZF4HP22 - 24
REPAIRS 44-31
11.Remove rear propeller shaft
+ PROPELLER SHAFTS, REPAIRS,
Propeller shaft - rear.
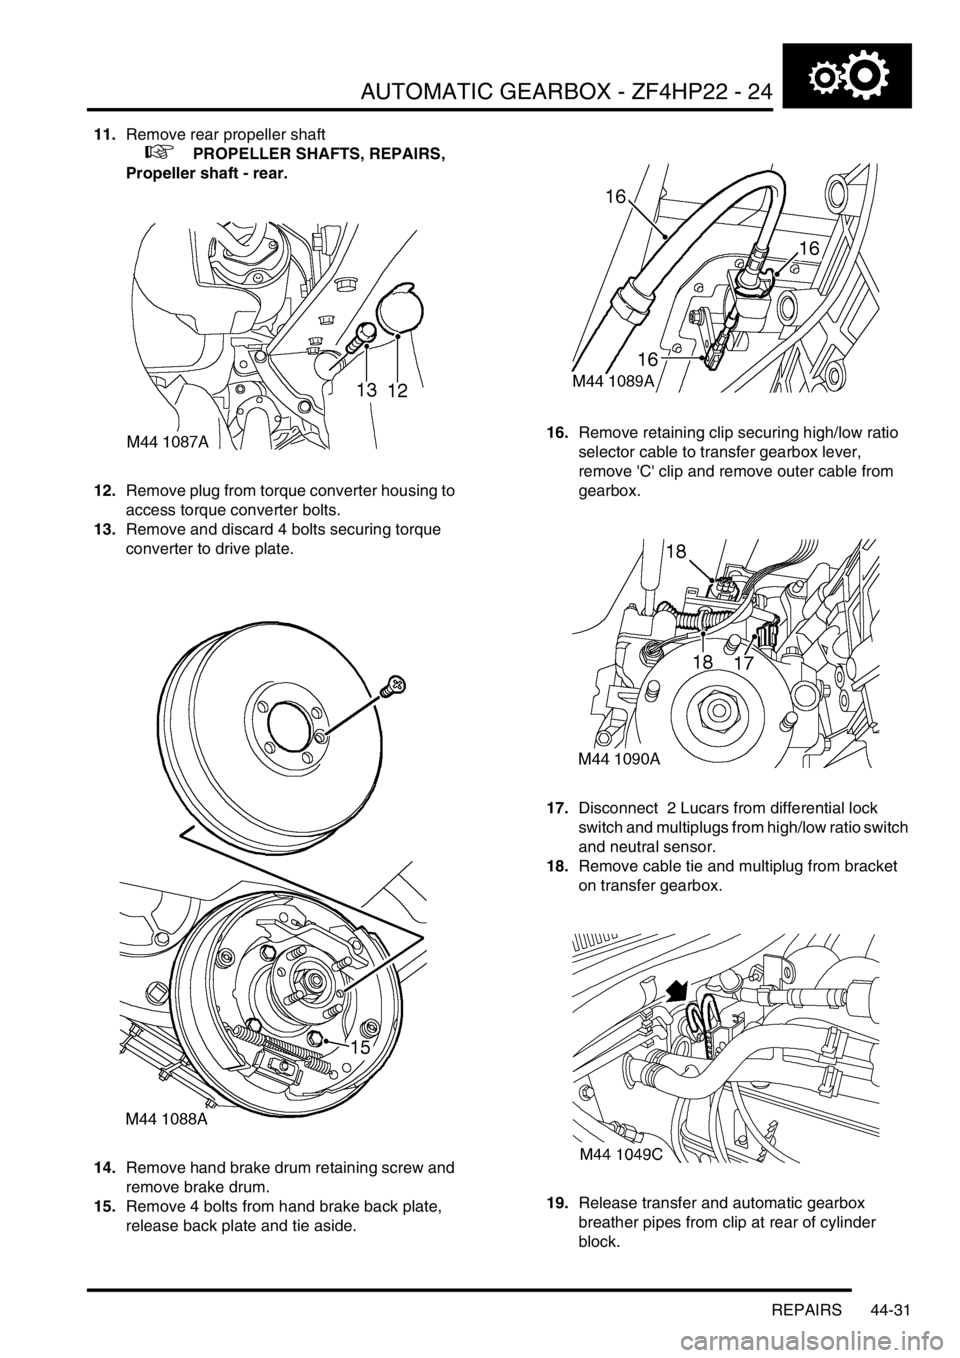
12.Remove plug from torque converter housing to
access torque converter bolts.
13.Remove and discard 4 bolts securing torque
converter to drive plate.
14.Remove hand brake drum retaining screw and
remove brake drum.
15.Remove 4 bolts from hand brake back plate,
release back plate and tie aside. 16.Remove retaining clip securing high/low ratio
selector cable to transfer gearbox lever,
remove 'C' clip and remove outer cable from
gearbox.
17.Disconnect 2 Lucars from differential lock
switch and multiplugs from high/low ratio switch
and neutral sensor.
18.Remove cable tie and multiplug from bracket
on transfer gearbox.
19.Release transfer and automatic gearbox
breather pipes from clip at rear of cylinder
block.
Page 830 of 1672

AUTOMATIC GEARBOX - ZF4HP22 - 24
REPAIRS 44-33
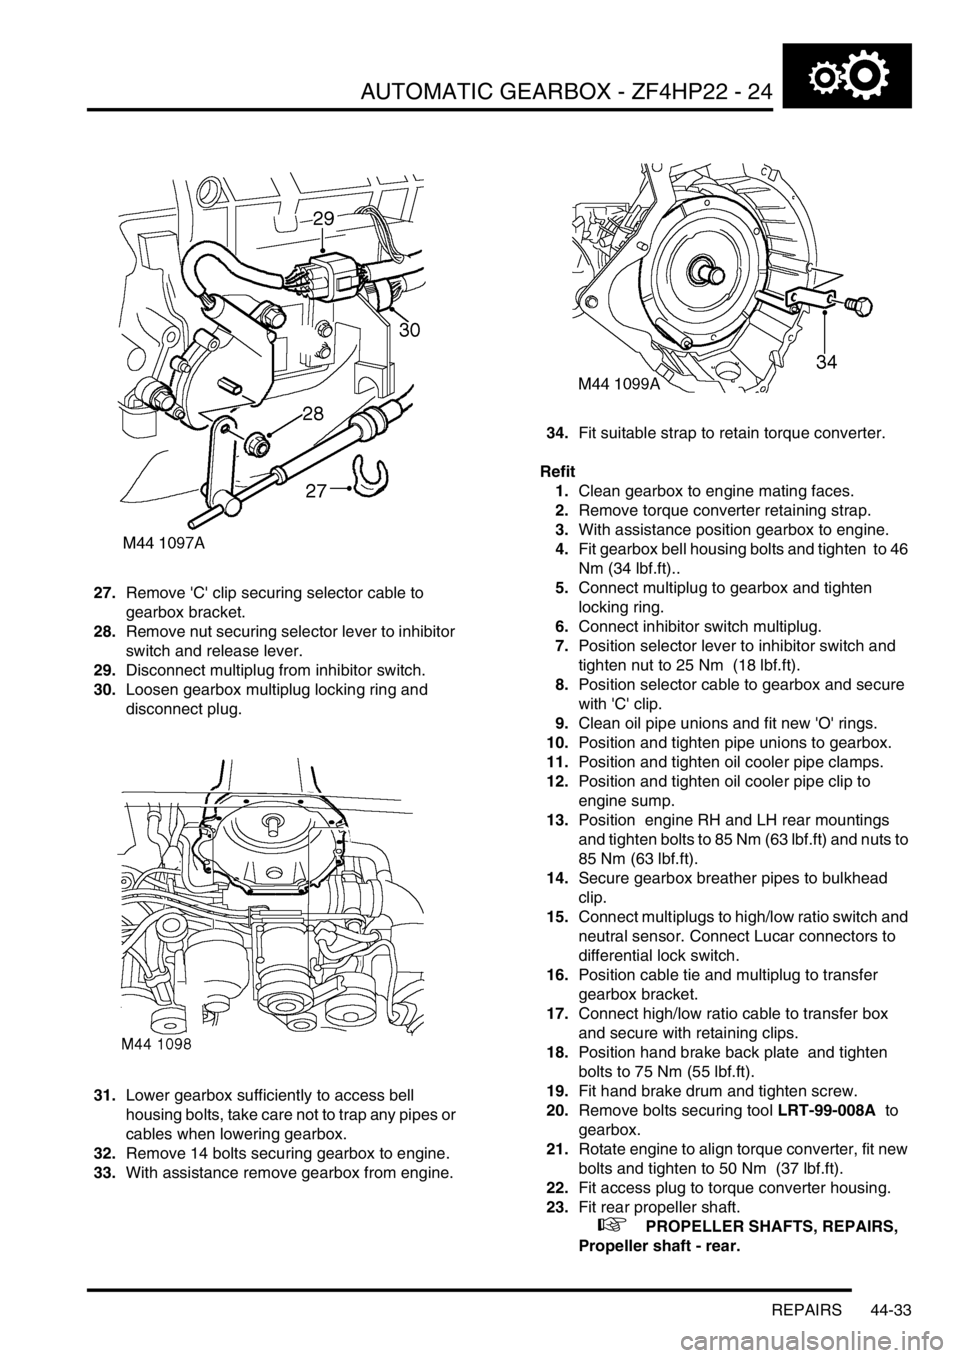
27.Remove 'C' clip securing selector cable to
gearbox bracket.
28.Remove nut securing selector lever to inhibitor
switch and release lever.
29.Disconnect multiplug from inhibitor switch.
30.Loosen gearbox multiplug locking ring and
disconnect plug.
31.Lower gearbox sufficiently to access bell
housing bolts, take care not to trap any pipes or
cables when lowering gearbox.
32.Remove 14 bolts securing gearbox to engine.
33.With assistance remove gearbox from engine.34.Fit suitable strap to retain torque converter.
Refit
1.Clean gearbox to engine mating faces.
2.Remove torque converter retaining strap.
3.With assistance position gearbox to engine.
4.Fit gearbox bell housing bolts and tighten to 46
Nm (34 lbf.ft)..
5.Connect multiplug to gearbox and tighten
locking ring.
6.Connect inhibitor switch multiplug.
7.Position selector lever to inhibitor switch and
tighten nut to 25 Nm (18 lbf.ft).
8.Position selector cable to gearbox and secure
with 'C' clip.
9.Clean oil pipe unions and fit new 'O' rings.
10.Position and tighten pipe unions to gearbox.
11.Position and tighten oil cooler pipe clamps.
12.Position and tighten oil cooler pipe clip to
engine sump.
13.Position engine RH and LH rear mountings
and tighten bolts to 85 Nm (63 lbf.ft) and nuts to
85 Nm (63 lbf.ft).
14.Secure gearbox breather pipes to bulkhead
clip.
15.Connect multiplugs to high/low ratio switch and
neutral sensor. Connect Lucar connectors to
differential lock switch.
16.Position cable tie and multiplug to transfer
gearbox bracket.
17.Connect high/low ratio cable to transfer box
and secure with retaining clips.
18.Position hand brake back plate and tighten
bolts to 75 Nm (55 lbf.ft).
19.Fit hand brake drum and tighten screw.
20.Remove bolts securing tool LRT-99-008A to
gearbox.
21.Rotate engine to align torque converter, fit new
bolts and tighten to 50 Nm (37 lbf.ft).
22.Fit access plug to torque converter housing.
23.Fit rear propeller shaft.
+ PROPELLER SHAFTS, REPAIRS,
Propeller shaft - rear.
Page 831 of 1672

AUTOMATIC GEARBOX - ZF4HP22 - 24
44-34 REPAIRS
24.Fit front propeller shaft.
+ PROPELLER SHAFTS, REPAIRS,
Propeller shaft - front.
25.Fill transfer gearbox with oil.
+ MAINTENANCE, PROCEDURES,
Transfer box.
26.Fill automatic gearbox with oil.
+ MAINTENANCE, PROCEDURES,
Automatic gearbox.
27.Position intermediate silencer and secure to
mounting rubbers.
28.Clean silencer and tail pipe mating faces.
29.Position new gasket to tail pipe and tighten nuts
to 40 Nm (30 lbf.ft).
30.Fit exhaust front pipe.
+ MANIFOLDS AND EXHAUST
SYSTEMS - V8, REPAIRS, Front pipe.
31.Position centre cross member, fit bolts and
tighten to 26 Nm (19 lbf.ft).
32.Connect battery earth lead.
33.Fit battery cover and secure fixings.
34.Check and adjust selector cable.
+ AUTOMATIC GEARBOX - ZF4HP22
- 24, ADJUSTMENTS, Cable - selector.
Torque converter and oil seal
$% 44.17.07
Remove
1.Remove automatic gearbox.
l
+ AUTOMATIC GEARBOX -
ZF4HP22 - 24, REPAIRS, Gearbox -
convertor and transfer gearbox - Diesel.
l
+ AUTOMATIC GEARBOX -
ZF4HP22 - 24, REPAIRS, Gearbox -
convertor and transfer gearbox - V8.
2.Remove retaining strap from torque convertor.
3.Fit tool LRT-44-010 to torque converter and
remove torque converter from gearbox.
4.Remove tool LRT-44-010 from converter.
5.Remove oil seal from converter housing.