check engine LAND ROVER FREELANDER 2001 Owner's Manual
[x] Cancel search | Manufacturer: LAND ROVER, Model Year: 2001, Model line: FREELANDER, Model: LAND ROVER FREELANDER 2001Pages: 1007, PDF Size: 23.47 MB
Page 178 of 1007
ENGINE - K SERIES KV6
ADJUSTMENTS 12-3-1
ENGIN E - K SERIES KV6 ADJUST ME NTS
Engine oil pressure check
$% 12.90.09.01
Check
1.Remove oil pressure switch.
+ ENGINE - K SERIES KV6, REPAIRS,
Switch - oil pressure.
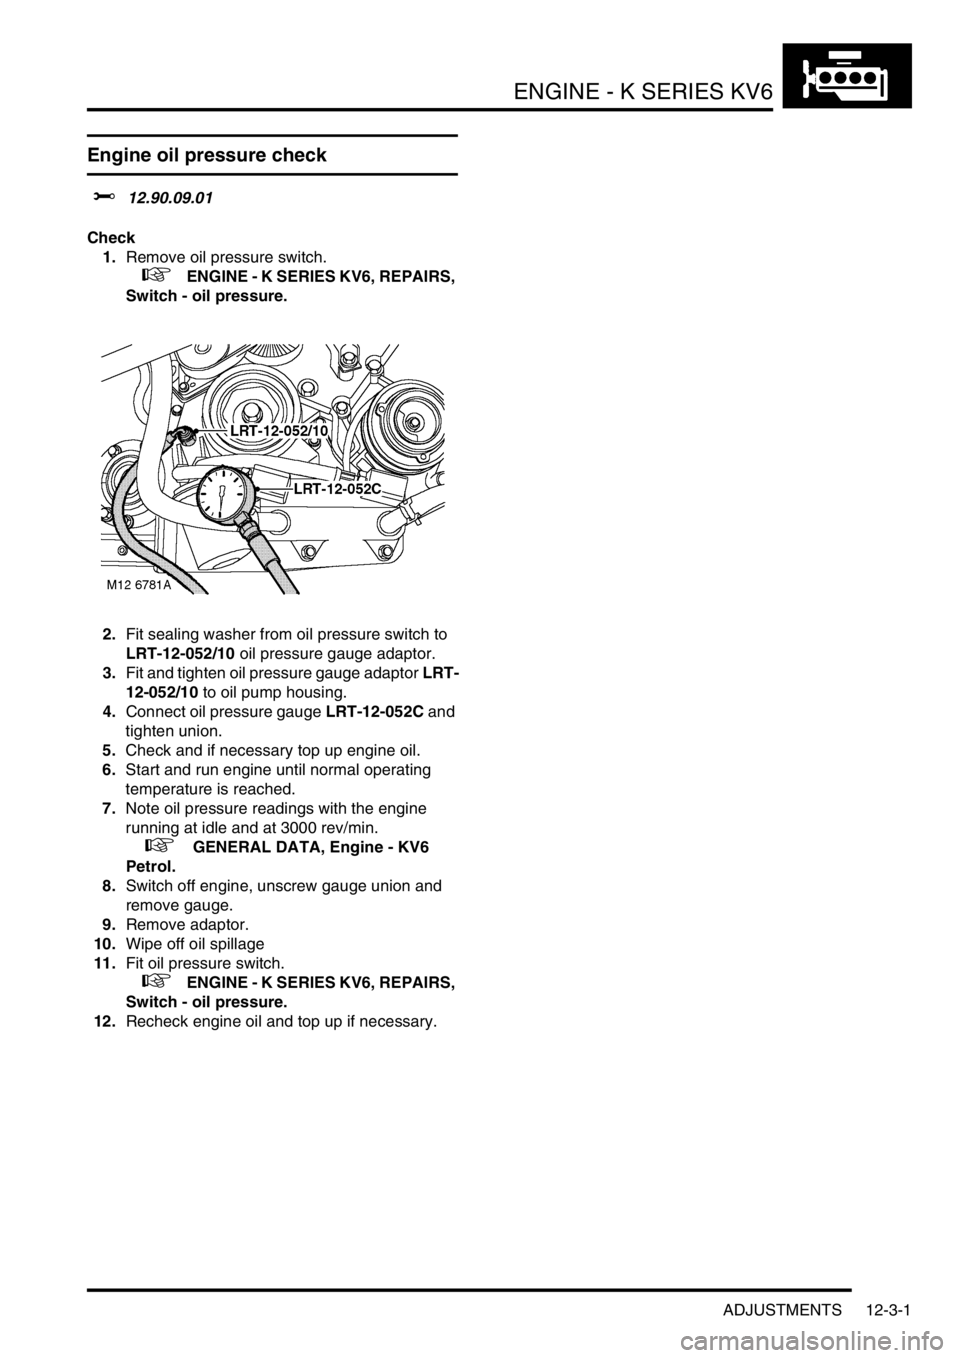
2.Fit sealing washer from oil pressure switch to
LRT-12-052/10 oil pressure gauge adaptor.
3.Fit and tighten oil pressure gauge adaptor LRT-
12-052/10 to oil pump housing.
4.Connect oil pressure gauge LRT-12-052C and
tighten union.
5.Check and if necessary top up engine oil.
6.Start and run engine until normal operating
temperature is reached.
7.Note oil pressure readings with the engine
running at idle and at 3000 rev/min.
+ GENERAL DATA, Engine - KV6
Petrol.
8.Switch off engine, unscrew gauge union and
remove gauge.
9.Remove adaptor.
10.Wipe off oil spillage
11.Fit oil pressure switch.
+ ENGINE - K SERIES KV6, REPAIRS,
Switch - oil pressure.
12.Recheck engine oil and top up if necessary.
Page 189 of 1007
ENGINE - K SERIES KV6
12-3-12 REPAIRS
Crankshaft rear oil seal
$% 12.21.20
Remove
1.Remove torque converter drive plate.
+ ENGINE - K SERIES KV6, REPAIRS,
Torque converter drive plate.
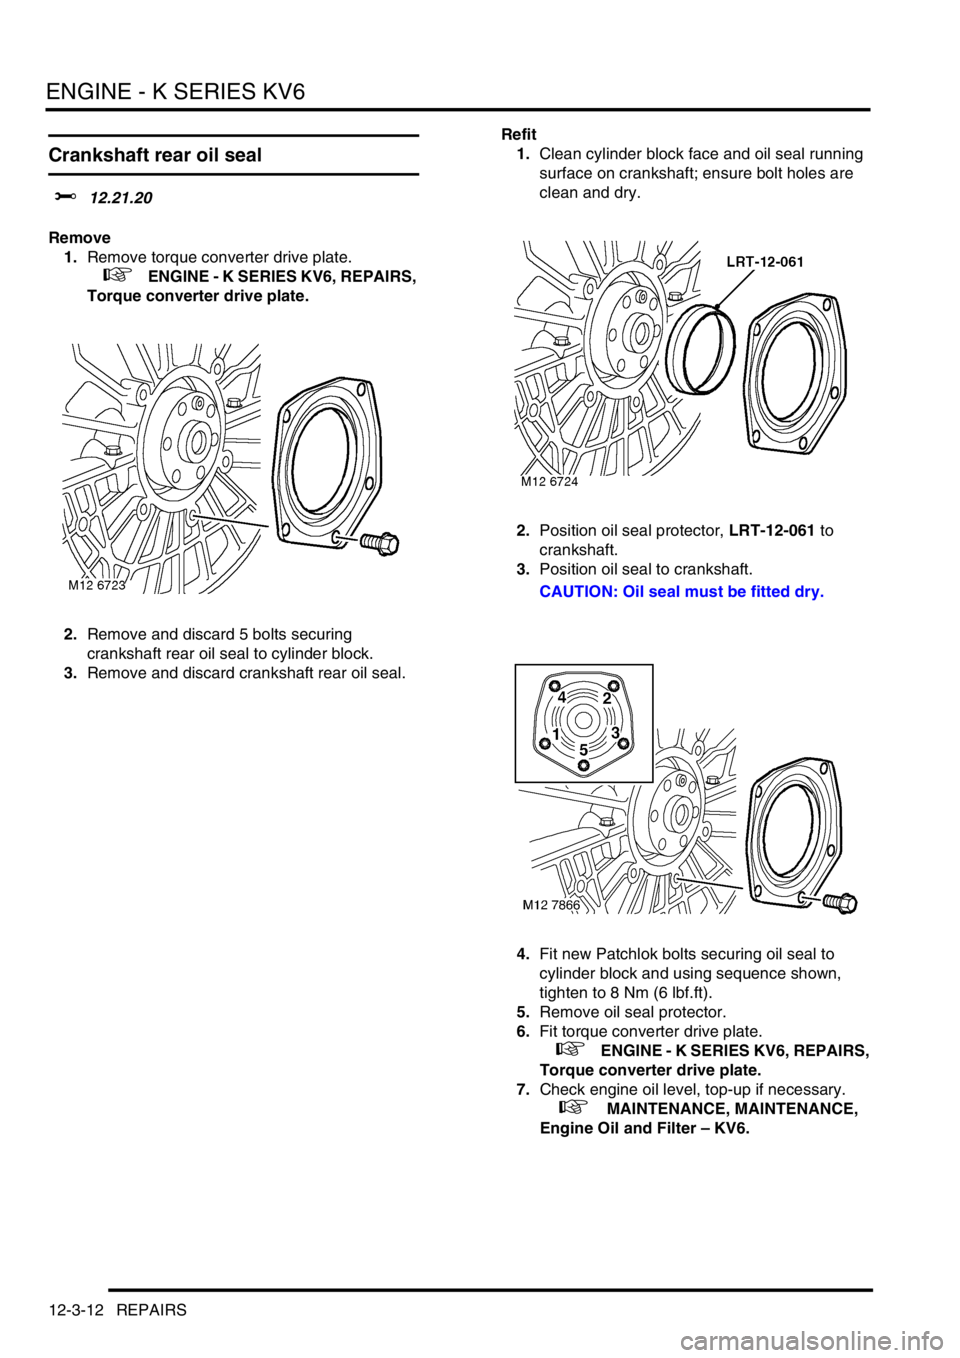
2.Remove and discard 5 bolts securing
crankshaft rear oil seal to cylinder block.
3.Remove and discard crankshaft rear oil seal.Refit
1.Clean cylinder block face and oil seal running
surface on crankshaft; ensure bolt holes are
clean and dry.
2.Position oil seal protector, LRT-12-061 to
crankshaft.
3.Position oil seal to crankshaft.
CAUTION: Oil seal must be fitted dry.
4.Fit new Patchlok bolts securing oil seal to
cylinder block and using sequence shown,
tighten to 8 Nm (6 lbf.ft).
5.Remove oil seal protector.
6.Fit torque converter drive plate.
+ ENGINE - K SERIES KV6, REPAIRS,
Torque converter drive plate.
7.Check engine oil level, top-up if necessary.
+ MAINTENANCE, MAINTENANCE,
Engine Oil and Filter – KV6.
Page 192 of 1007
ENGINE - K SERIES KV6
REPAIRS 12-3-15
Refit
1.Clean cylinder head mating face.
CAUTION: Use suitable gasket removal
spray and a plastic scraper.
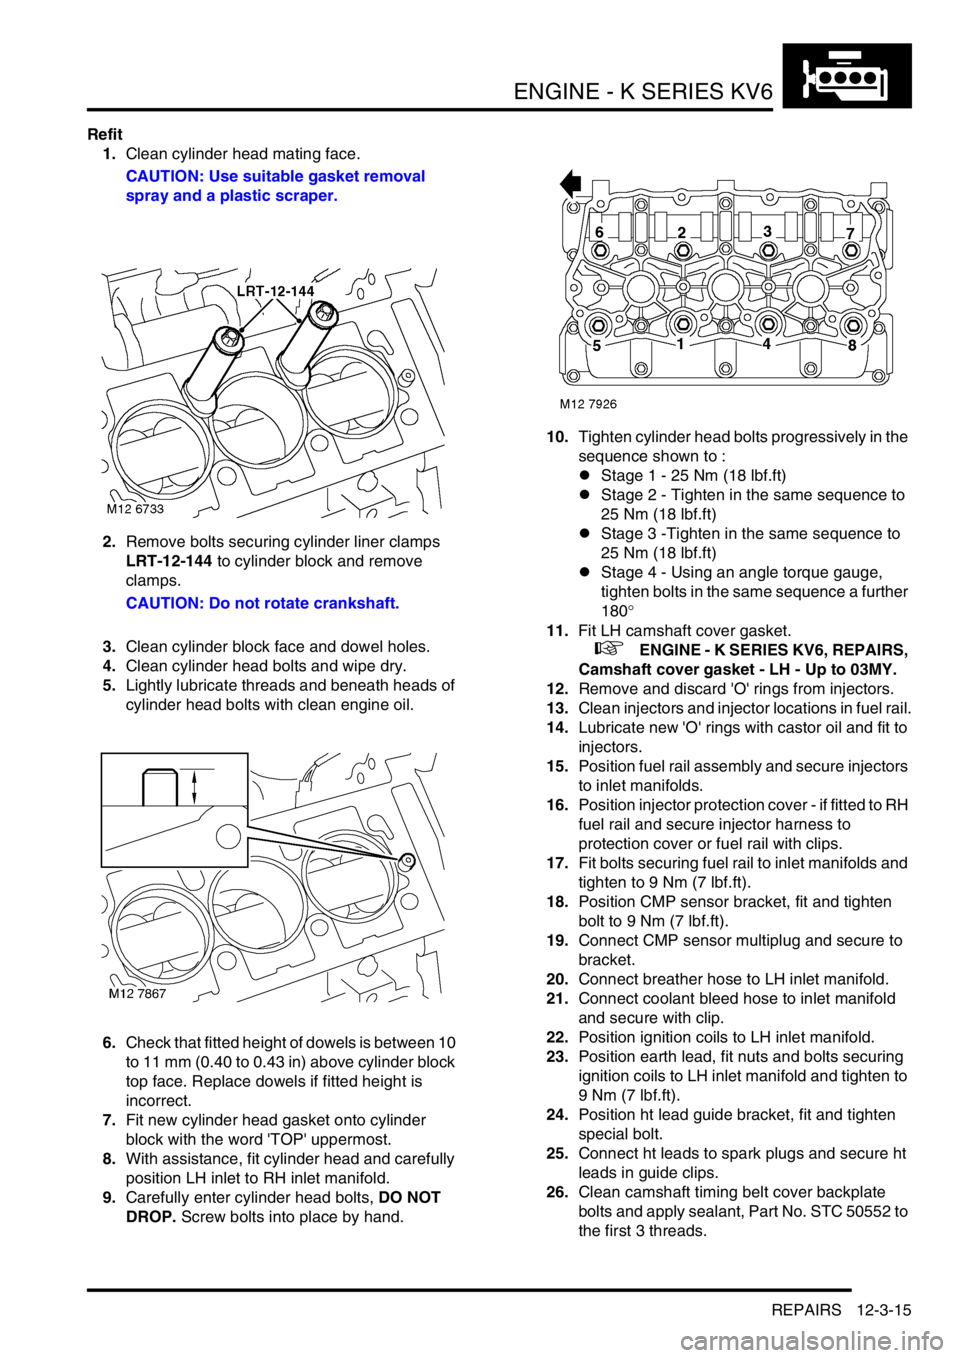
2.Remove bolts securing cylinder liner clamps
LRT-12-144 to cylinder block and remove
clamps.
CAUTION: Do not rotate crankshaft.
3.Clean cylinder block face and dowel holes.
4.Clean cylinder head bolts and wipe dry.
5.Lightly lubricate threads and beneath heads of
cylinder head bolts with clean engine oil.
6.Check that fitted height of dowels is between 10
to 11 mm (0.40 to 0.43 in) above cylinder block
top face. Replace dowels if fitted height is
incorrect.
7.Fit new cylinder head gasket onto cylinder
block with the word 'TOP' uppermost.
8.With assistance, fit cylinder head and carefully
position LH inlet to RH inlet manifold.
9.Carefully enter cylinder head bolts, DO NOT
DROP. Screw bolts into place by hand.10.Tighten cylinder head bolts progressively in the
sequence shown to :
lStage 1 - 25 Nm (18 lbf.ft)
lStage 2 - Tighten in the same sequence to
25 Nm (18 lbf.ft)
lStage 3 -Tighten in the same sequence to
25 Nm (18 lbf.ft)
lStage 4 - Using an angle torque gauge,
tighten bolts in the same sequence a further
180°
11.Fit LH camshaft cover gasket.
+ ENGINE - K SERIES KV6, REPAIRS,
Camshaft cover gasket - LH - Up to 03MY.
12.Remove and discard 'O' rings from injectors.
13.Clean injectors and injector locations in fuel rail.
14.Lubricate new 'O' rings with castor oil and fit to
injectors.
15.Position fuel rail assembly and secure injectors
to inlet manifolds.
16.Position injector protection cover - if fitted to RH
fuel rail and secure injector harness to
protection cover or fuel rail with clips.
17.Fit bolts securing fuel rail to inlet manifolds and
tighten to 9 Nm (7 lbf.ft).
18.Position CMP sensor bracket, fit and tighten
bolt to 9 Nm (7 lbf.ft).
19.Connect CMP sensor multiplug and secure to
bracket.
20.Connect breather hose to LH inlet manifold.
21.Connect coolant bleed hose to inlet manifold
and secure with clip.
22.Position ignition coils to LH inlet manifold.
23.Position earth lead, fit nuts and bolts securing
ignition coils to LH inlet manifold and tighten to
9 Nm (7 lbf.ft).
24.Position ht lead guide bracket, fit and tighten
special bolt.
25.Connect ht leads to spark plugs and secure ht
leads in guide clips.
26.Clean camshaft timing belt cover backplate
bolts and apply sealant, Part No. STC 50552 to
the first 3 threads.
Page 193 of 1007
ENGINE - K SERIES KV6
12-3-16 REPAIRS
27.Position backplate, fit and tighten bolts to 9 Nm.
28.Fit camshaft timing belt.
+ ENGINE - K SERIES KV6, REPAIRS,
Camshaft timing belt.
29.Fit LH exhaust manifold gasket.
+ MANIFOLDS & EXHAUST SYSTEMS
- K SERIES KV6, REPAIRS, Gasket - exhaust
manifold - LH - Non NAS.
+ MANIFOLDS & EXHAUST SYSTEMS
- K SERIES KV6, REPAIRS, Gasket(s) -
exhaust manifold - LH - NAS.
30.Fit inlet manifold chamber.
+ MANIFOLDS & EXHAUST SYSTEMS
- K SERIES KV6, REPAIRS, Seals - inlet
manifold chamber - up to 03MY.
31.Fill cooling system.
+ COOLING SYSTEM - K SERIES KV6,
ADJUSTMENTS, Coolant - drain and refill.
32.Check engine oil level and top-up if necessary.
+ MAINTENANCE, MAINTENANCE,
Engine Oil and Filter – KV6.
Cylinder head gasket - RH
$% 12.29.03
Remove
1.Disconnect battery earth lead.
2.Drain cooling system.
+ COOLING SYSTEM - K SERIES KV6,
ADJUSTMENTS, Coolant - drain and refill.
3.Remove inlet manifold chamber.
+ MANIFOLDS & EXHAUST SYSTEMS
- K SERIES KV6, REPAIRS, Seals - inlet
manifold chamber - up to 03MY.
4.Remove RH exhaust manifold gasket.
+ MANIFOLDS & EXHAUST SYSTEMS
- K SERIES KV6, REPAIRS, Gasket - exhaust
manifold - RH - Non NAS.
+ MANIFOLDS & EXHAUST SYSTEMS
- K SERIES KV6, REPAIRS, Gasket(s) -
exhaust manifold - RH - KV6 - NAS.
5.Remove camshaft timing belt.
+ ENGINE - K SERIES KV6, REPAIRS,
Camshaft timing belt.
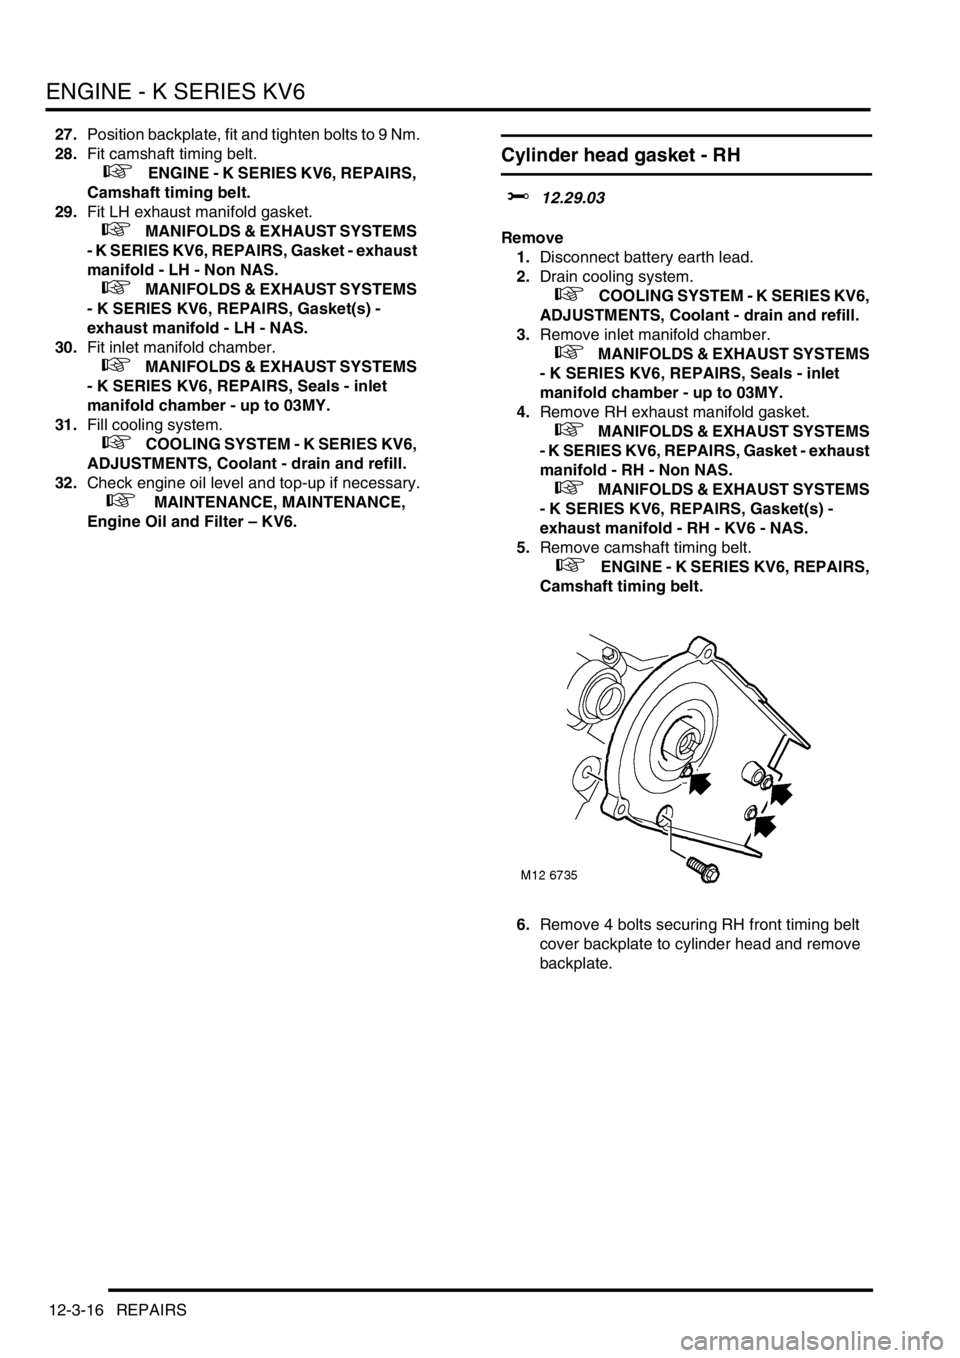
6.Remove 4 bolts securing RH front timing belt
cover backplate to cylinder head and remove
backplate.
Page 195 of 1007
ENGINE - K SERIES KV6
12-3-18 REPAIRS
13.Release injectors from manifolds and carefully
lay fuel rail and injectors aside.
CAUTION: Always fit plugs to open
connections to prevent contamination.
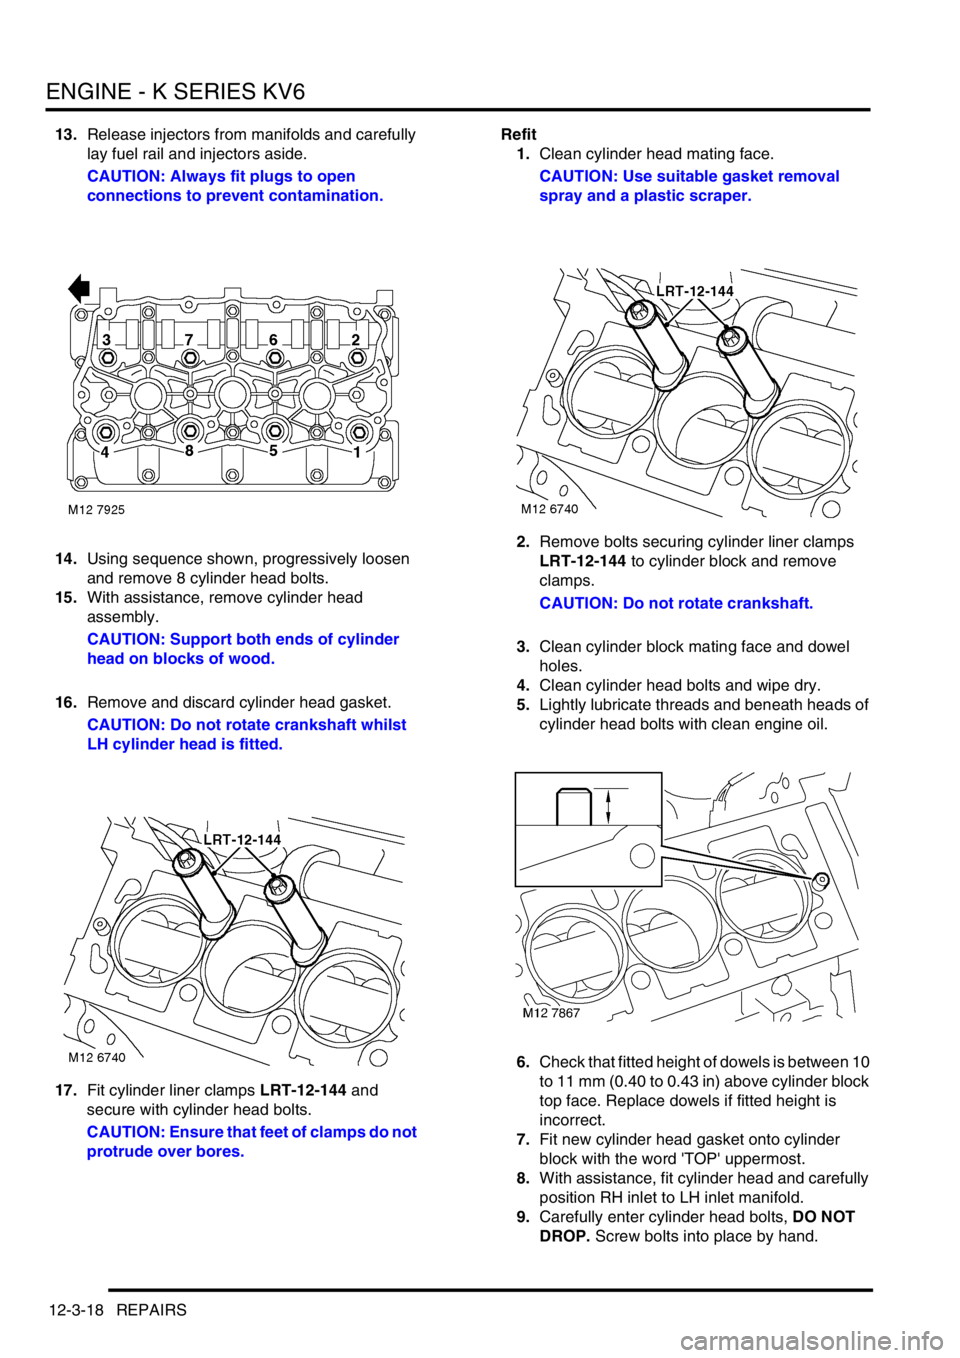
14.Using sequence shown, progressively loosen
and remove 8 cylinder head bolts.
15.With assistance, remove cylinder head
assembly.
CAUTION: Support both ends of cylinder
head on blocks of wood.
16.Remove and discard cylinder head gasket.
CAUTION: Do not rotate crankshaft whilst
LH cylinder head is fitted.
17.Fit cylinder liner clamps LRT-12-144 and
secure with cylinder head bolts.
CAUTION: Ensure that feet of clamps do not
protrude over bores.Refit
1.Clean cylinder head mating face.
CAUTION: Use suitable gasket removal
spray and a plastic scraper.
2.Remove bolts securing cylinder liner clamps
LRT-12-144 to cylinder block and remove
clamps.
CAUTION: Do not rotate crankshaft.
3.Clean cylinder block mating face and dowel
holes.
4.Clean cylinder head bolts and wipe dry.
5.Lightly lubricate threads and beneath heads of
cylinder head bolts with clean engine oil.
6.Check that fitted height of dowels is between 10
to 11 mm (0.40 to 0.43 in) above cylinder block
top face. Replace dowels if fitted height is
incorrect.
7.Fit new cylinder head gasket onto cylinder
block with the word 'TOP' uppermost.
8.With assistance, fit cylinder head and carefully
position RH inlet to LH inlet manifold.
9.Carefully enter cylinder head bolts, DO NOT
DROP. Screw bolts into place by hand.
Page 196 of 1007
ENGINE - K SERIES KV6
REPAIRS 12-3-19
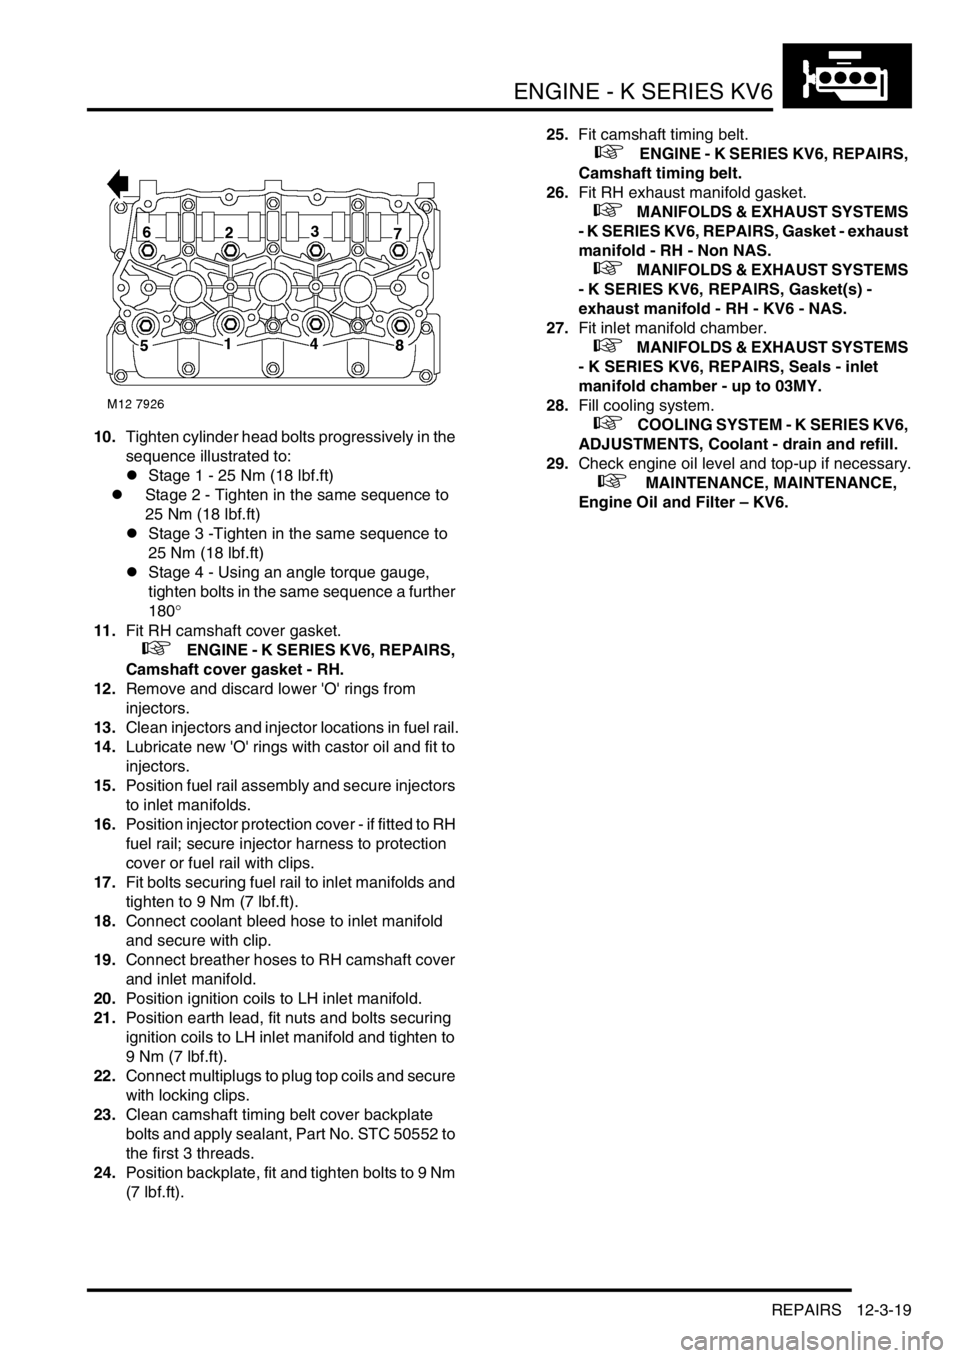
10.Tighten cylinder head bolts progressively in the
sequence illustrated to:
lStage 1 - 25 Nm (18 lbf.ft)
lStage 2 - Tighten in the same sequence to
25 Nm (18 lbf.ft)
lStage 3 -Tighten in the same sequence to
25 Nm (18 lbf.ft)
lStage 4 - Using an angle torque gauge,
tighten bolts in the same sequence a further
180°
11.Fit RH camshaft cover gasket.
+ ENGINE - K SERIES KV6, REPAIRS,
Camshaft cover gasket - RH.
12.Remove and discard lower 'O' rings from
injectors.
13.Clean injectors and injector locations in fuel rail.
14.Lubricate new 'O' rings with castor oil and fit to
injectors.
15.Position fuel rail assembly and secure injectors
to inlet manifolds.
16.Position injector protection cover - if fitted to RH
fuel rail; secure injector harness to protection
cover or fuel rail with clips.
17.Fit bolts securing fuel rail to inlet manifolds and
tighten to 9 Nm (7 lbf.ft).
18.Connect coolant bleed hose to inlet manifold
and secure with clip.
19.Connect breather hoses to RH camshaft cover
and inlet manifold.
20.Position ignition coils to LH inlet manifold.
21.Position earth lead, fit nuts and bolts securing
ignition coils to LH inlet manifold and tighten to
9 Nm (7 lbf.ft).
22.Connect multiplugs to plug top coils and secure
with locking clips.
23.Clean camshaft timing belt cover backplate
bolts and apply sealant, Part No. STC 50552 to
the first 3 threads.
24.Position backplate, fit and tighten bolts to 9 Nm
(7 lbf.ft).25.Fit camshaft timing belt.
+ ENGINE - K SERIES KV6, REPAIRS,
Camshaft timing belt.
26.Fit RH exhaust manifold gasket.
+ MANIFOLDS & EXHAUST SYSTEMS
- K SERIES KV6, REPAIRS, Gasket - exhaust
manifold - RH - Non NAS.
+ MANIFOLDS & EXHAUST SYSTEMS
- K SERIES KV6, REPAIRS, Gasket(s) -
exhaust manifold - RH - KV6 - NAS.
27.Fit inlet manifold chamber.
+ MANIFOLDS & EXHAUST SYSTEMS
- K SERIES KV6, REPAIRS, Seals - inlet
manifold chamber - up to 03MY.
28.Fill cooling system.
+ COOLING SYSTEM - K SERIES KV6,
ADJUSTMENTS, Coolant - drain and refill.
29.Check engine oil level and top-up if necessary.
+ MAINTENANCE, MAINTENANCE,
Engine Oil and Filter – KV6.
Page 198 of 1007
ENGINE - K SERIES KV6
REPAIRS 12-3-21
Refit
1.Clean mating surfaces of camshaft cover and
carrier.
2.Clean inside of camshaft cover. If necessary,
wash oil separator elements in solvent and
blow dry.
3.Position new gasket to camshaft carrier with
arrows on gasket pointing towards inlet
manifold.
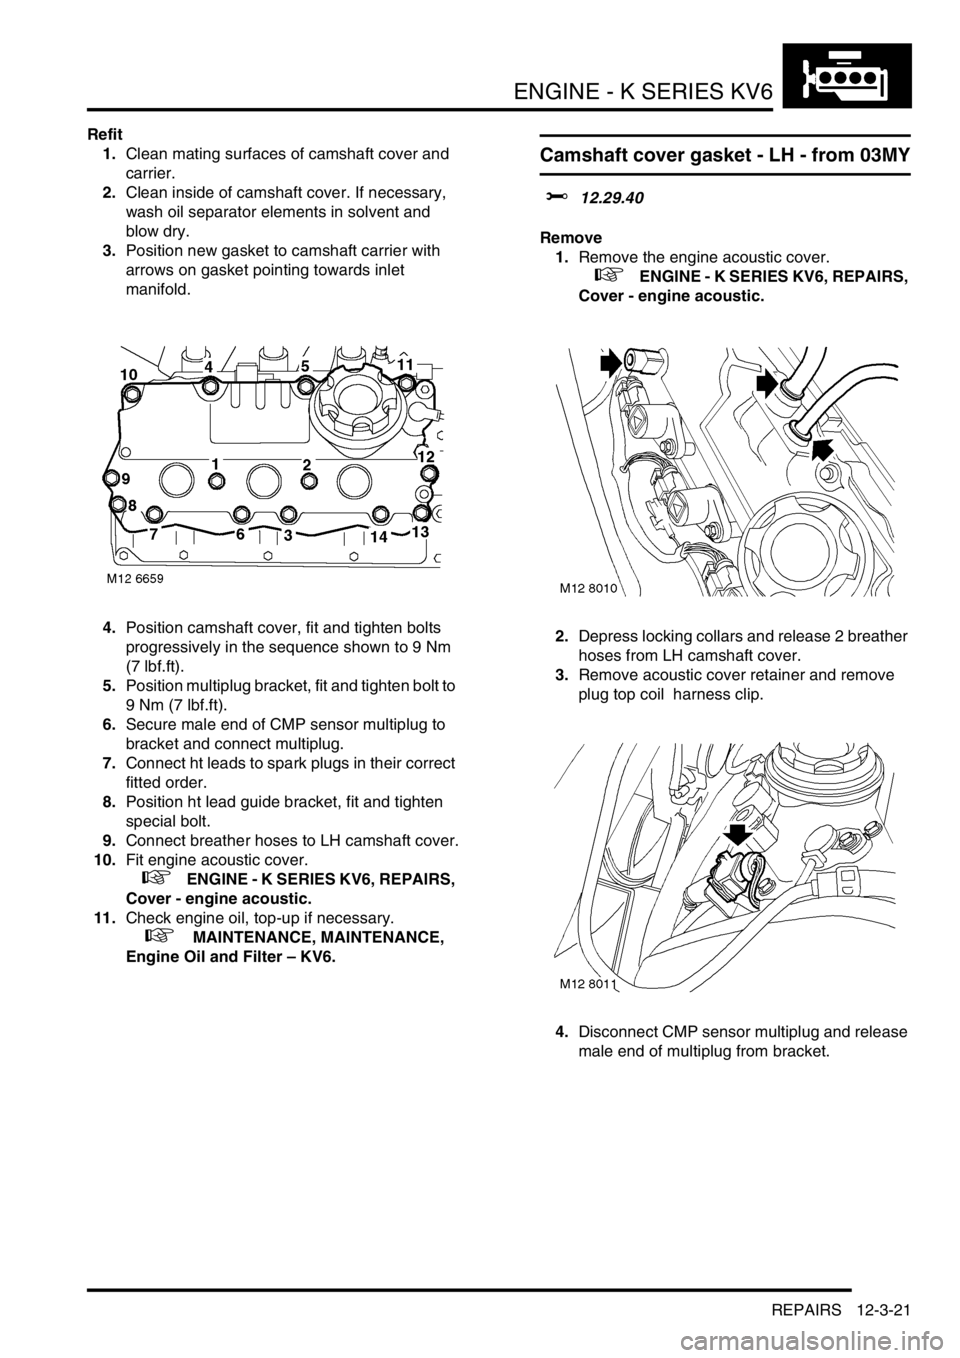
4.Position camshaft cover, fit and tighten bolts
progressively in the sequence shown to 9 Nm
(7 lbf.ft).
5.Position multiplug bracket, fit and tighten bolt to
9 Nm (7 lbf.ft).
6.Secure male end of CMP sensor multiplug to
bracket and connect multiplug.
7.Connect ht leads to spark plugs in their correct
fitted order.
8.Position ht lead guide bracket, fit and tighten
special bolt.
9.Connect breather hoses to LH camshaft cover.
10.Fit engine acoustic cover.
+ ENGINE - K SERIES KV6, REPAIRS,
Cover - engine acoustic.
11.Check engine oil, top-up if necessary.
+ MAINTENANCE, MAINTENANCE,
Engine Oil and Filter – KV6.
Camshaft cover gasket - LH - from 03MY
$% 12.29.40
Remove
1.Remove the engine acoustic cover.
+ ENGINE - K SERIES KV6, REPAIRS,
Cover - engine acoustic.
2.Depress locking collars and release 2 breather
hoses from LH camshaft cover.
3.Remove acoustic cover retainer and remove
plug top coil harness clip.
4.Disconnect CMP sensor multiplug and release
male end of multiplug from bracket.
Page 199 of 1007
ENGINE - K SERIES KV6
12-3-22 REPAIRS
5.Remove bolt securing multiplug bracket which
also retains front HO2S multiplug, move
bracket and multiplug aside.
6.Withdraw multiplug lock and disconnect
multiplug from each plug top coil.
7.Remove bolt securing each plug top coil to
camshaft cover and remove 3 plug top coils.
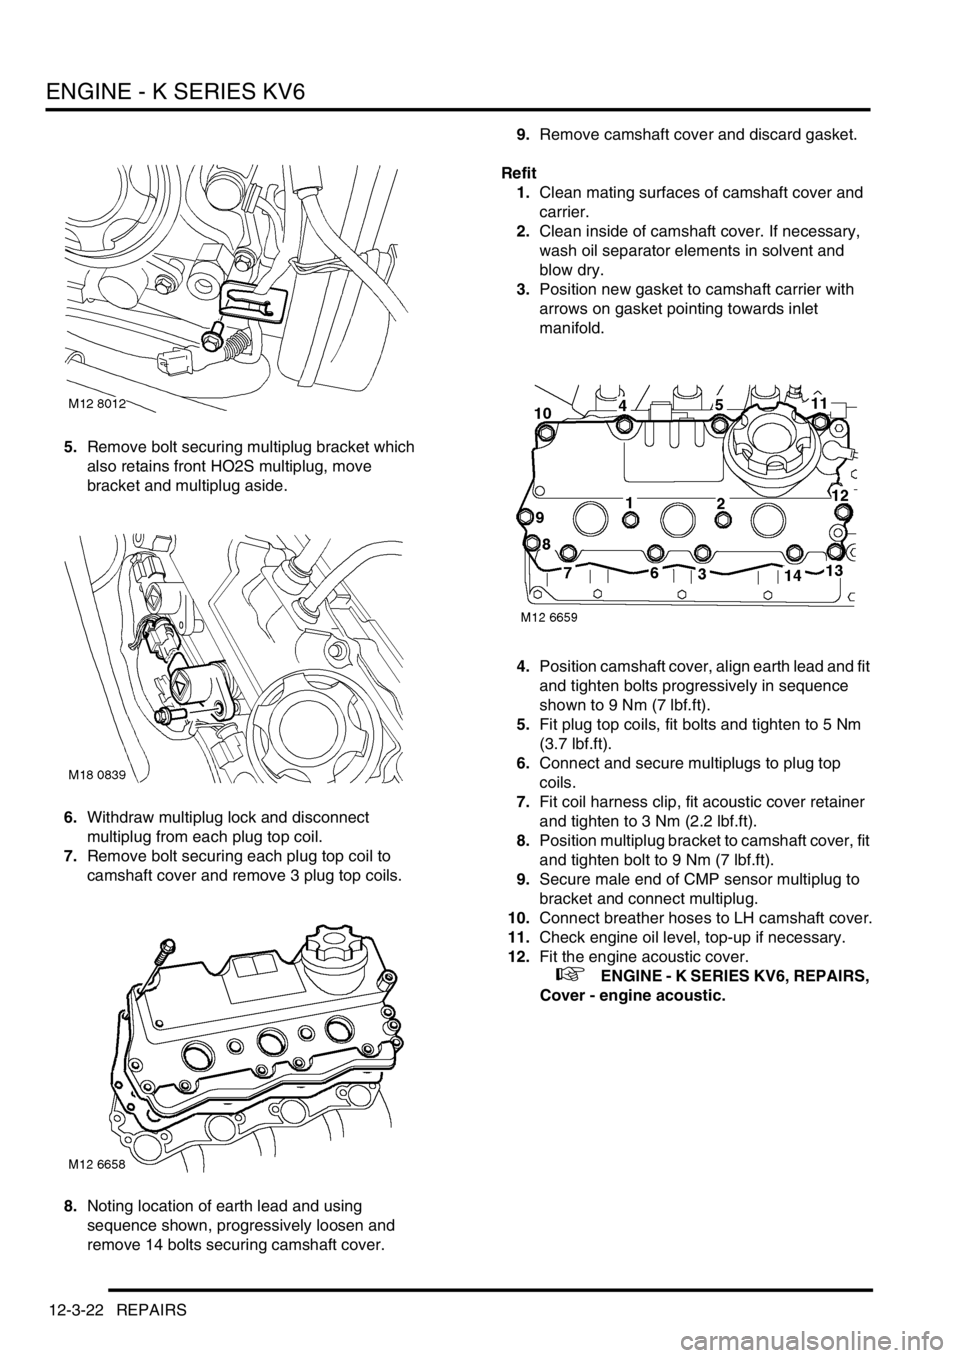
8.Noting location of earth lead and using
sequence shown, progressively loosen and
remove 14 bolts securing camshaft cover.9.Remove camshaft cover and discard gasket.
Refit
1.Clean mating surfaces of camshaft cover and
carrier.
2.Clean inside of camshaft cover. If necessary,
wash oil separator elements in solvent and
blow dry.
3.Position new gasket to camshaft carrier with
arrows on gasket pointing towards inlet
manifold.
4.Position camshaft cover, align earth lead and fit
and tighten bolts progressively in sequence
shown to 9 Nm (7 lbf.ft).
5.Fit plug top coils, fit bolts and tighten to 5 Nm
(3.7 lbf.ft).
6.Connect and secure multiplugs to plug top
coils.
7.Fit coil harness clip, fit acoustic cover retainer
and tighten to 3 Nm (2.2 lbf.ft).
8.Position multiplug bracket to camshaft cover, fit
and tighten bolt to 9 Nm (7 lbf.ft).
9.Secure male end of CMP sensor multiplug to
bracket and connect multiplug.
10.Connect breather hoses to LH camshaft cover.
11.Check engine oil level, top-up if necessary.
12.Fit the engine acoustic cover.
+ ENGINE - K SERIES KV6, REPAIRS,
Cover - engine acoustic.
Page 201 of 1007
ENGINE - K SERIES KV6
12-3-24 REPAIRS
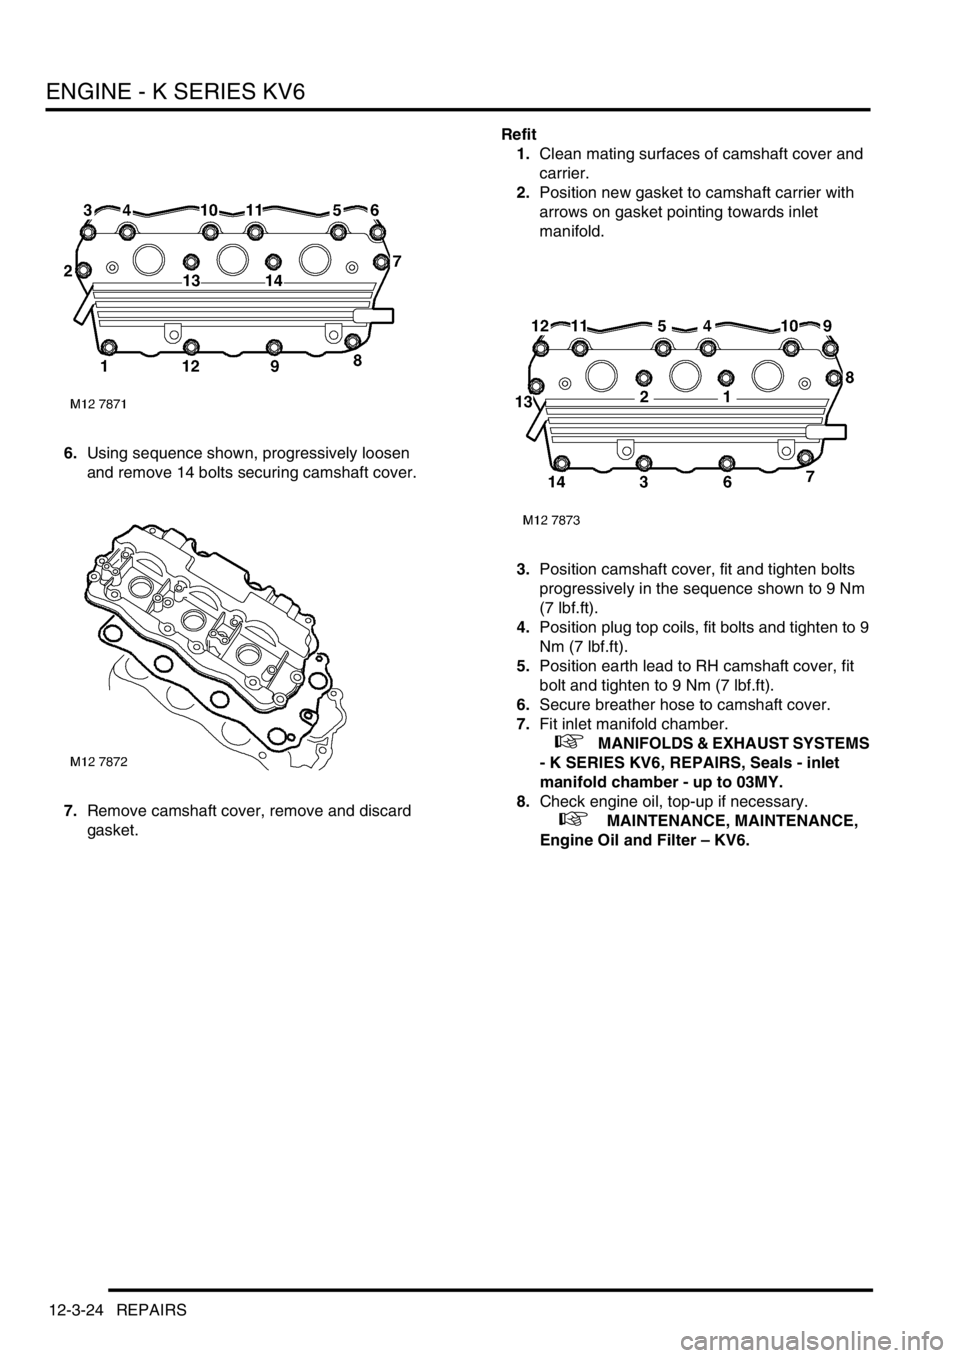
6.Using sequence shown, progressively loosen
and remove 14 bolts securing camshaft cover.
7.Remove camshaft cover, remove and discard
gasket.Refit
1.Clean mating surfaces of camshaft cover and
carrier.
2.Position new gasket to camshaft carrier with
arrows on gasket pointing towards inlet
manifold.
3.Position camshaft cover, fit and tighten bolts
progressively in the sequence shown to 9 Nm
(7 lbf.ft).
4.Position plug top coils, fit bolts and tighten to 9
Nm (7 lbf.ft).
5.Position earth lead to RH camshaft cover, fit
bolt and tighten to 9 Nm (7 lbf.ft).
6.Secure breather hose to camshaft cover.
7.Fit inlet manifold chamber.
+ MANIFOLDS & EXHAUST SYSTEMS
- K SERIES KV6, REPAIRS, Seals - inlet
manifold chamber - up to 03MY.
8.Check engine oil, top-up if necessary.
+ MAINTENANCE, MAINTENANCE,
Engine Oil and Filter – KV6.
Page 211 of 1007

ENGINE - K SERIES KV6
12-3-34 REPAIRS
38.With assistant depressing the brake pedal,
tighten front hub nuts to 400 Nm (295 lbf.ft).
39.Stake nut to shaft.
40.Fit front road wheels, fit and tighten nuts to 115
Nm (85 lbf.ft).
41.Lower vehicle on ramp.
42.Connect brake servo vacuum hose to inlet
manifold chamber.
43.Connect coolant hose to underside of
expansion tank and secure with clip.
44.Connect expansion tank hose to inlet manifold
and secure clip.
45.Connect top hose to radiator and secure with
clip. Position hose in bracket.
46.Connect heater feed and return hoses and
secure with clips.
47.Connect throttle inner cable to throttle cam and
secure outer cable in abutment bracket, if fitted.
48.Secure throttle cable in clips on harness
brackets, if fitted.
49.Adjust throttle cable, if fitted.
+ FUEL DELIVERY SYSTEM -
PETROL, ADJUSTMENTS, Throttle cable -
check and adjust - KV6.
50.Connect hose to purge control valve.
51.Connect fuel hose to fuel rail pipe, fit rubber
sleeve over hose connector.
52.Connect gearbox harness multiplugs and
secure multiplugs in mounting bracket clips.
53.Connect Lucar connector to starter solenoid.
54.Position earth lead to gearbox housing, fit and
tighten bolt to 25 Nm (18 lbf.ft).
55.Position engine harness to 'E' box mounting
bracket and secure with clips.
56.Connect earth header multiplug.
57.Connect multiplug to underbonnet fuse box.
58.Position battery and starter motor lead to
underbonnet fuse box, fit and tighten bolts to 8
Nm (6 lbf.ft).
59.Fit underbonnet fuse box cover.
60.Position 'E' box, secure in retaining clip, fit and
tighten nut to 9 Nm (7 lbf.ft).
61.Position carrier in 'E' box and secure with clips.
62.Position and secure air duct and harness
rubber sleeve in 'E' box.
63.Connect multiplugs securing main harness to
engine harness.
64.Position ECM harness and multiplug to 'E' box,
align harness clamp and secure screws to 'E'
box.
65.Fit engine ECM.
+ ENGINE MANAGEMENT SYSTEM -
SIEMENS, REPAIRS, Engine control module
(ECM) - Non NAS.
66.Fit battery carrier.
+ CHARGING AND STARTING,
REPAIRS, Carrier - battery.67.Fill cooling system.
+ COOLING SYSTEM - K SERIES KV6,
ADJUSTMENTS, Coolant - drain and refill.
68.Connect battery earth lead.
69.Fill gearbox with fluid.
+ AUTOMATIC GEARBOX - JATCO,
ADJUSTMENTS, Gearbox fluid - drain &
refill.
70.Fit engine acoustic cover.
+ ENGINE - K SERIES KV6, REPAIRS,
Cover - engine acoustic.