light LAND ROVER FREELANDER 2001 Manual Online
[x] Cancel search | Manufacturer: LAND ROVER, Model Year: 2001, Model line: FREELANDER, Model: LAND ROVER FREELANDER 2001Pages: 1007, PDF Size: 23.47 MB
Page 936 of 1007
LIGHTING
REPAIRS 86-2-5
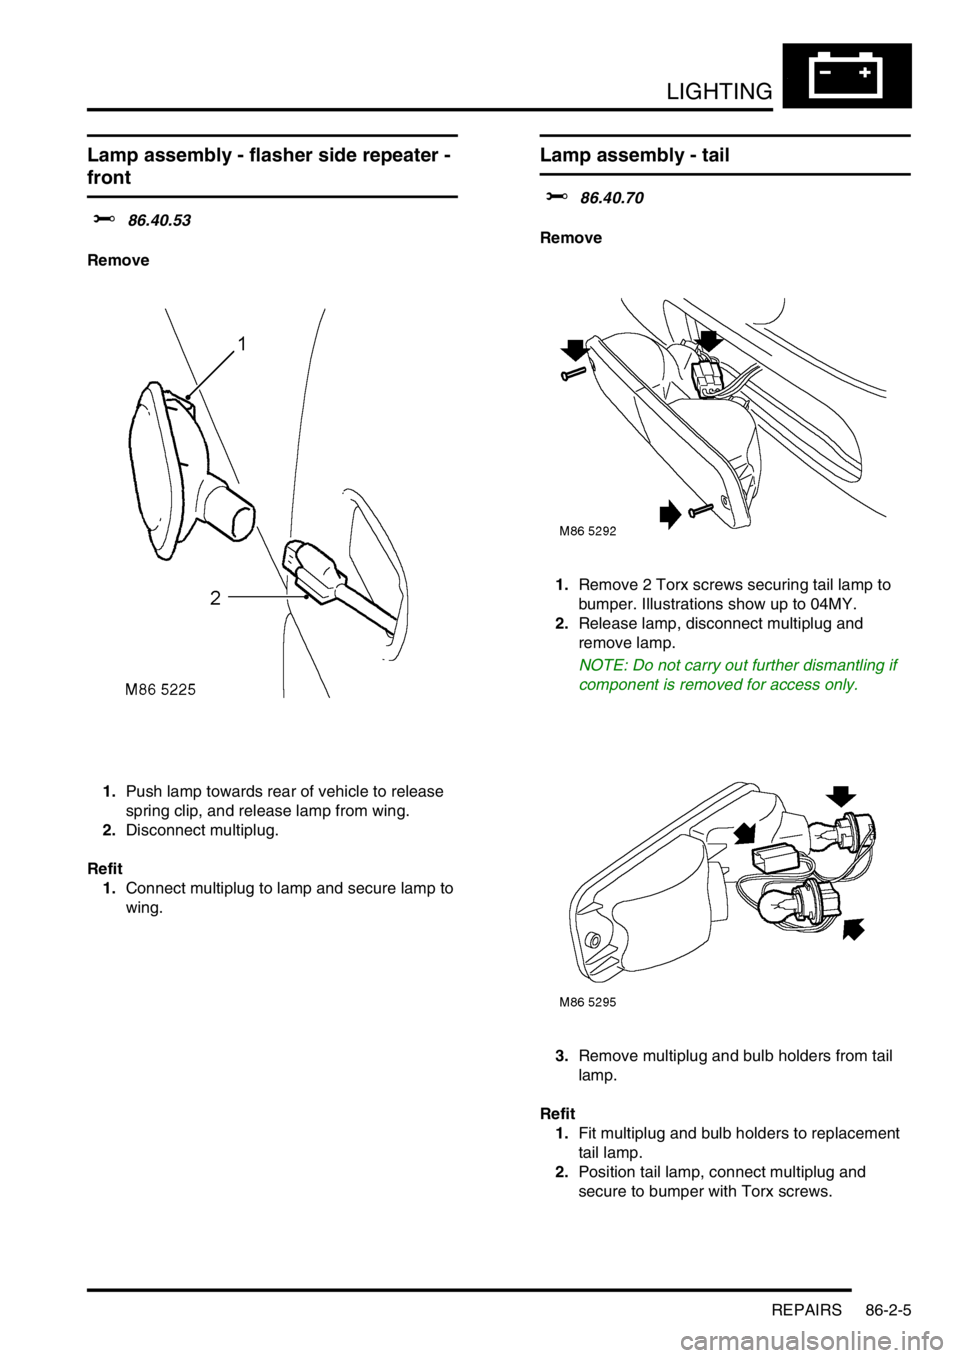
Lamp assembly - flasher side repeater -
front
$% 86.40.53
Remove
1.Push lamp towards rear of vehicle to release
spring clip, and release lamp from wing.
2.Disconnect multiplug.
Refit
1.Connect multiplug to lamp and secure lamp to
wing.
Lamp assembly - tail
$% 86.40.70
Remove
1.Remove 2 Torx screws securing tail lamp to
bumper. Illustrations show up to 04MY.
2.Release lamp, disconnect multiplug and
remove lamp.
NOTE: Do not carry out further dismantling if
component is removed for access only.
3.Remove multiplug and bulb holders from tail
lamp.
Refit
1.Fit multiplug and bulb holders to replacement
tail lamp.
2.Position tail lamp, connect multiplug and
secure to bumper with Torx screws.
Page 937 of 1007
LIGHTING
86-2-6 REPAIRS
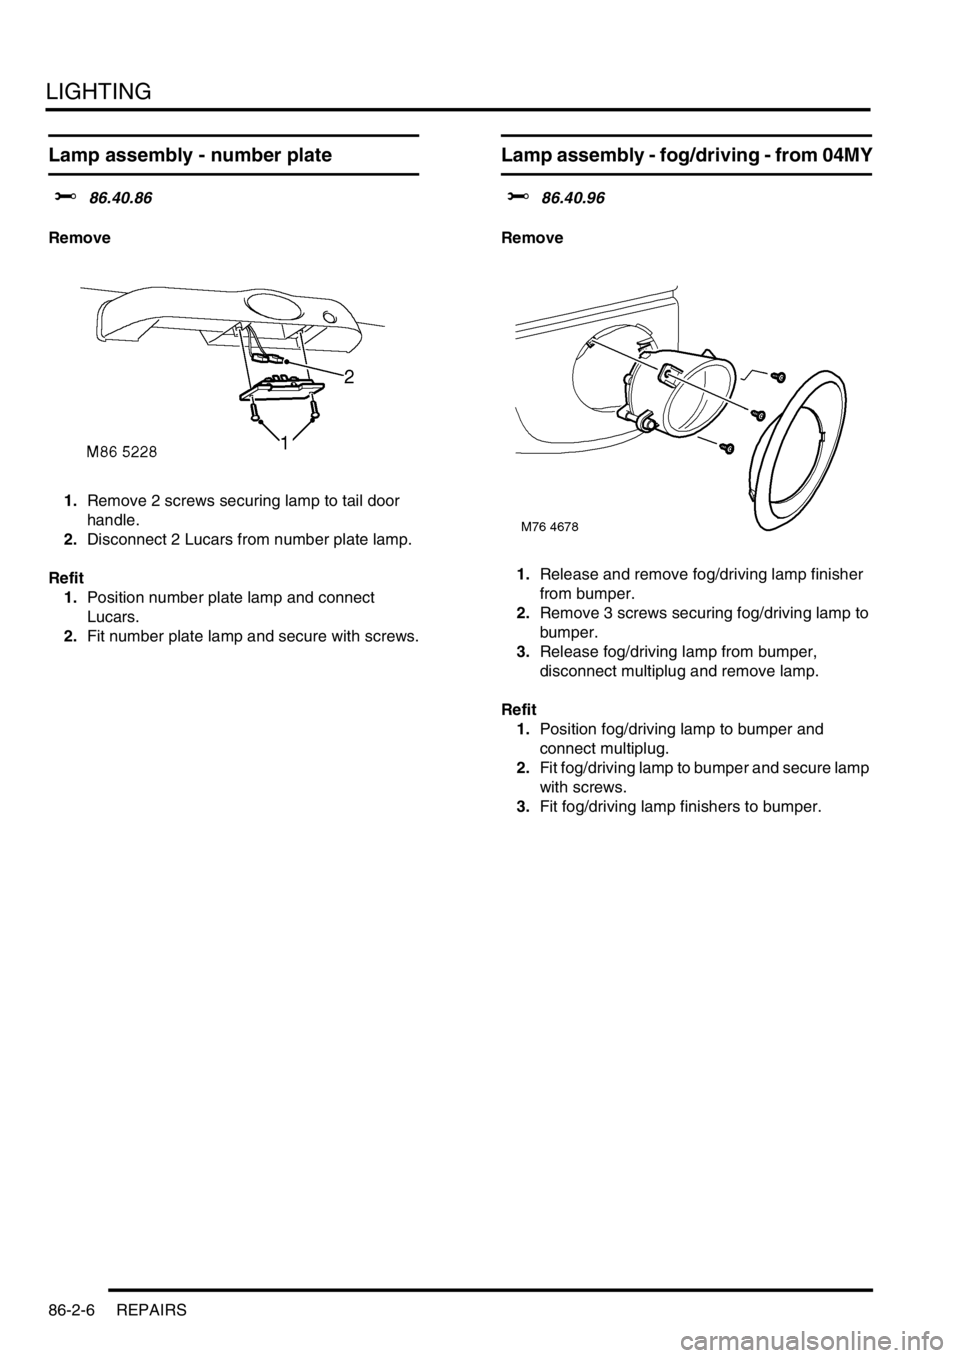
Lamp assembly - number plate
$% 86.40.86
Remove
1.Remove 2 screws securing lamp to tail door
handle.
2.Disconnect 2 Lucars from number plate lamp.
Refit
1.Position number plate lamp and connect
Lucars.
2.Fit number plate lamp and secure with screws.
Lamp assembly - fog/driving - from 04MY
$% 86.40.96
Remove
1.Release and remove fog/driving lamp finisher
from bumper.
2.Remove 3 screws securing fog/driving lamp to
bumper.
3.Release fog/driving lamp from bumper,
disconnect multiplug and remove lamp.
Refit
1.Position fog/driving lamp to bumper and
connect multiplug.
2.Fit fog/driving lamp to bumper and secure lamp
with screws.
3.Fit fog/driving lamp finishers to bumper.
Page 938 of 1007
LIGHTING
REPAIRS 86-2-7
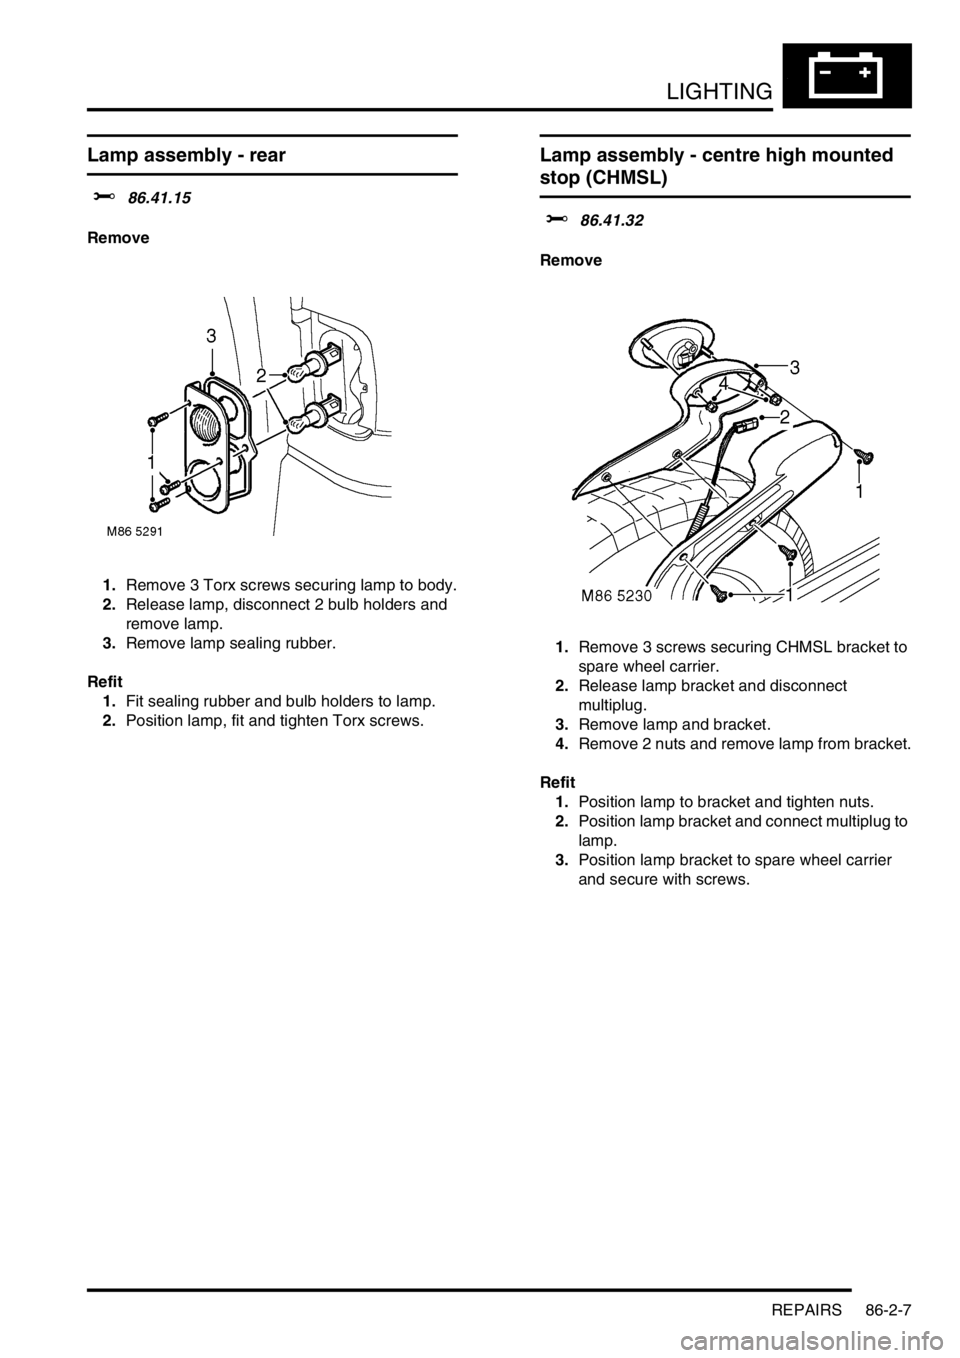
Lamp assembly - rear
$% 86.41.15
Remove
1.Remove 3 Torx screws securing lamp to body.
2.Release lamp, disconnect 2 bulb holders and
remove lamp.
3.Remove lamp sealing rubber.
Refit
1.Fit sealing rubber and bulb holders to lamp.
2.Position lamp, fit and tighten Torx screws.
Lamp assembly - centre high mounted
stop (CHMSL)
$% 86.41.32
Remove
1.Remove 3 screws securing CHMSL bracket to
spare wheel carrier.
2.Release lamp bracket and disconnect
multiplug.
3.Remove lamp and bracket.
4.Remove 2 nuts and remove lamp from bracket.
Refit
1.Position lamp to bracket and tighten nuts.
2.Position lamp bracket and connect multiplug to
lamp.
3.Position lamp bracket to spare wheel carrier
and secure with screws.
Page 939 of 1007
LIGHTING
86-2-8 REPAIRS
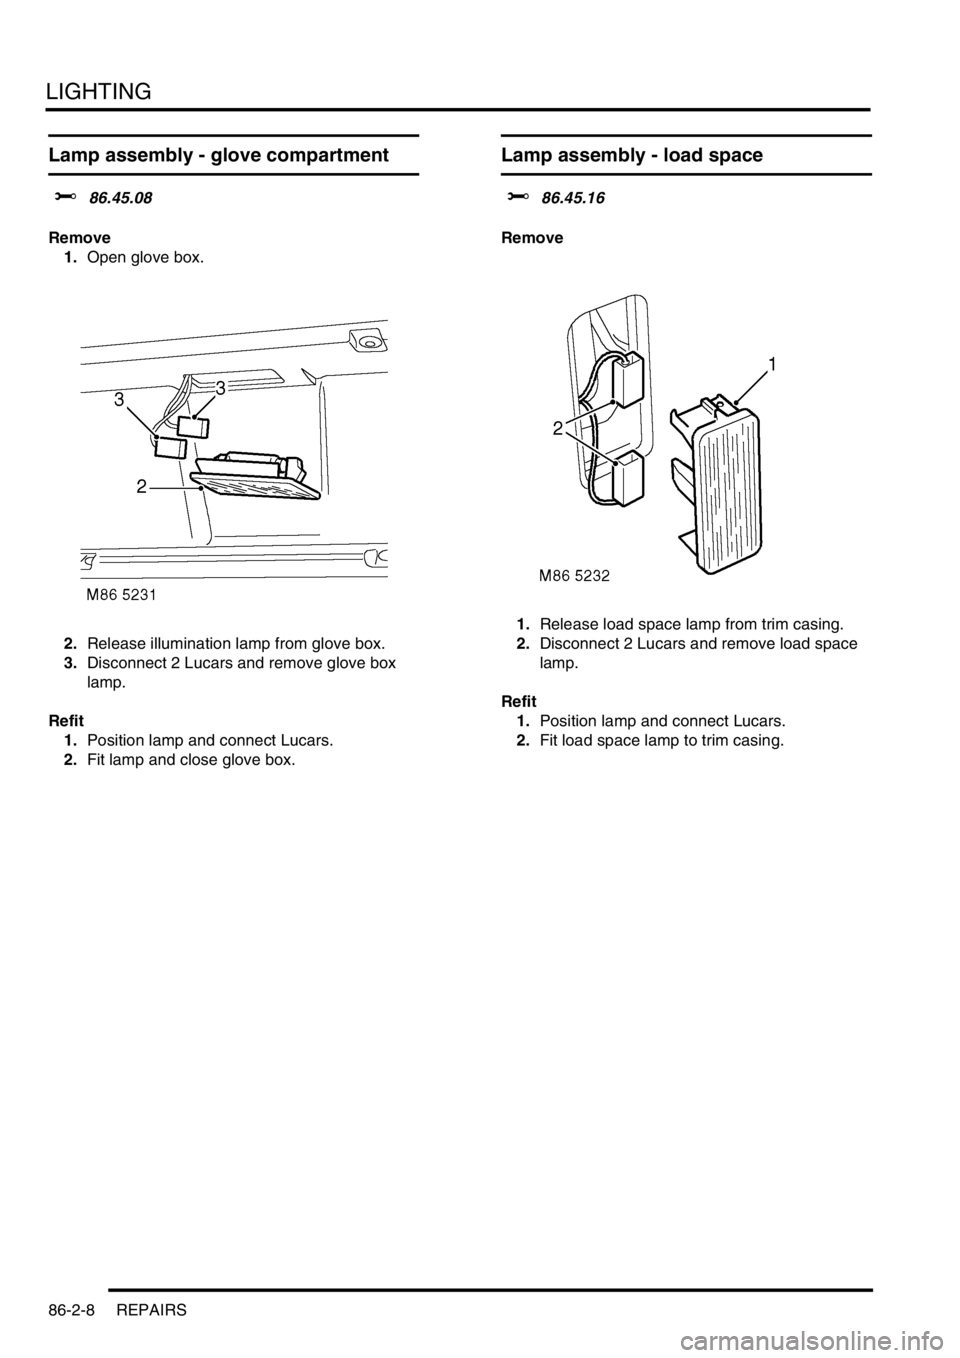
Lamp assembly - glove compartment
$% 86.45.08
Remove
1.Open glove box.
2.Release illumination lamp from glove box.
3.Disconnect 2 Lucars and remove glove box
lamp.
Refit
1.Position lamp and connect Lucars.
2.Fit lamp and close glove box.
Lamp assembly - load space
$% 86.45.16
Remove
1.Release load space lamp from trim casing.
2.Disconnect 2 Lucars and remove load space
lamp.
Refit
1.Position lamp and connect Lucars.
2.Fit load space lamp to trim casing.
Page 940 of 1007
LIGHTING
REPAIRS 86-2-9
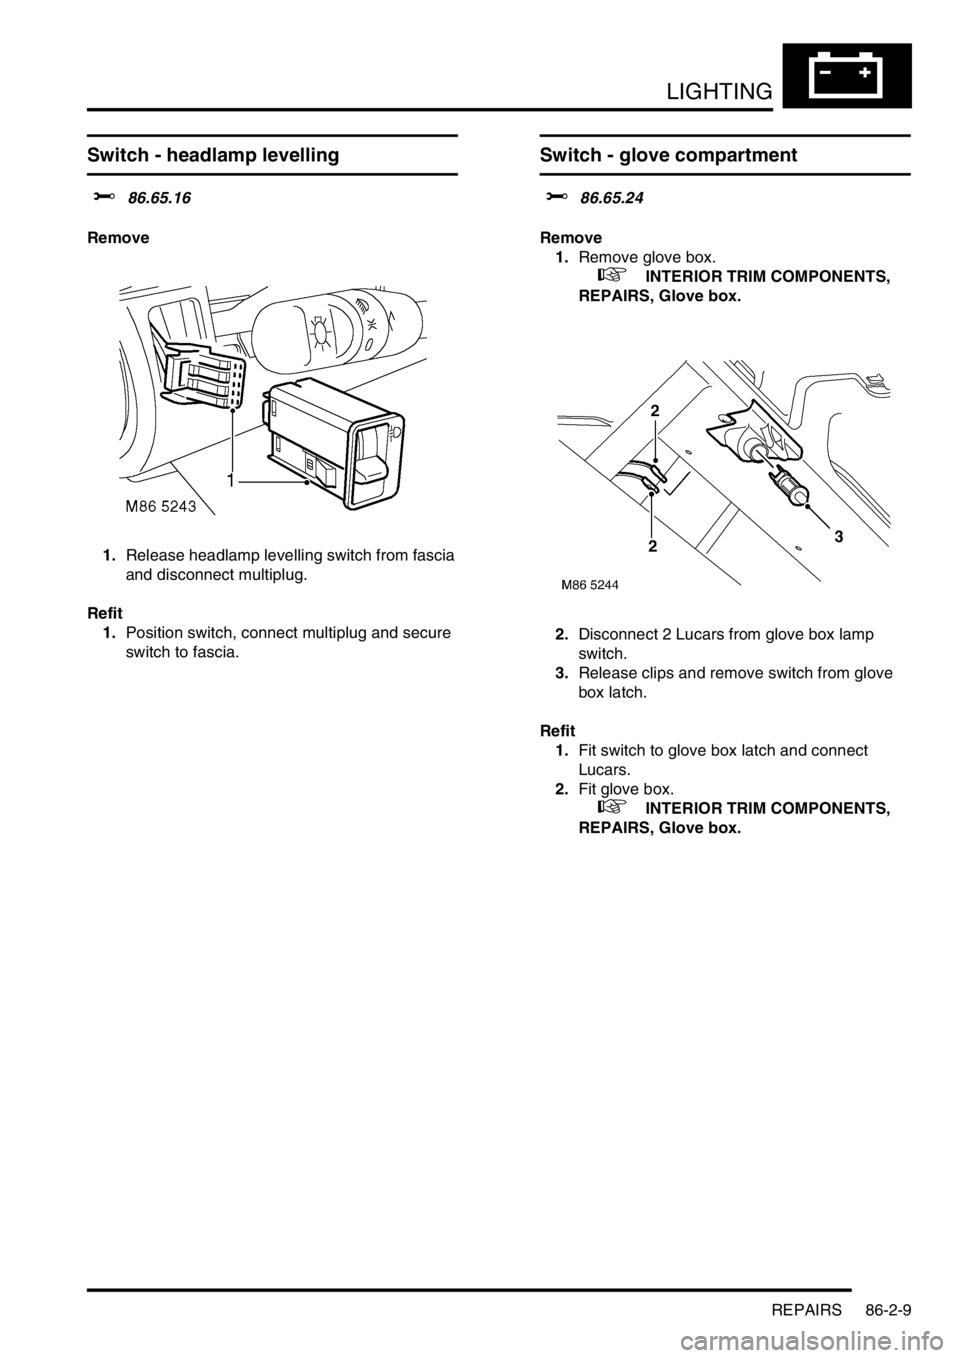
Switch - headlamp levelling
$% 86.65.16
Remove
1.Release headlamp levelling switch from fascia
and disconnect multiplug.
Refit
1.Position switch, connect multiplug and secure
switch to fascia.
Switch - glove compartment
$% 86.65.24
Remove
1.Remove glove box.
+ INTERIOR TRIM COMPONENTS,
REPAIRS, Glove box.
2.Disconnect 2 Lucars from glove box lamp
switch.
3.Release clips and remove switch from glove
box latch.
Refit
1.Fit switch to glove box latch and connect
Lucars.
2.Fit glove box.
+ INTERIOR TRIM COMPONENTS,
REPAIRS, Glove box.
Page 941 of 1007
LIGHTING
86-2-10 REPAIRS
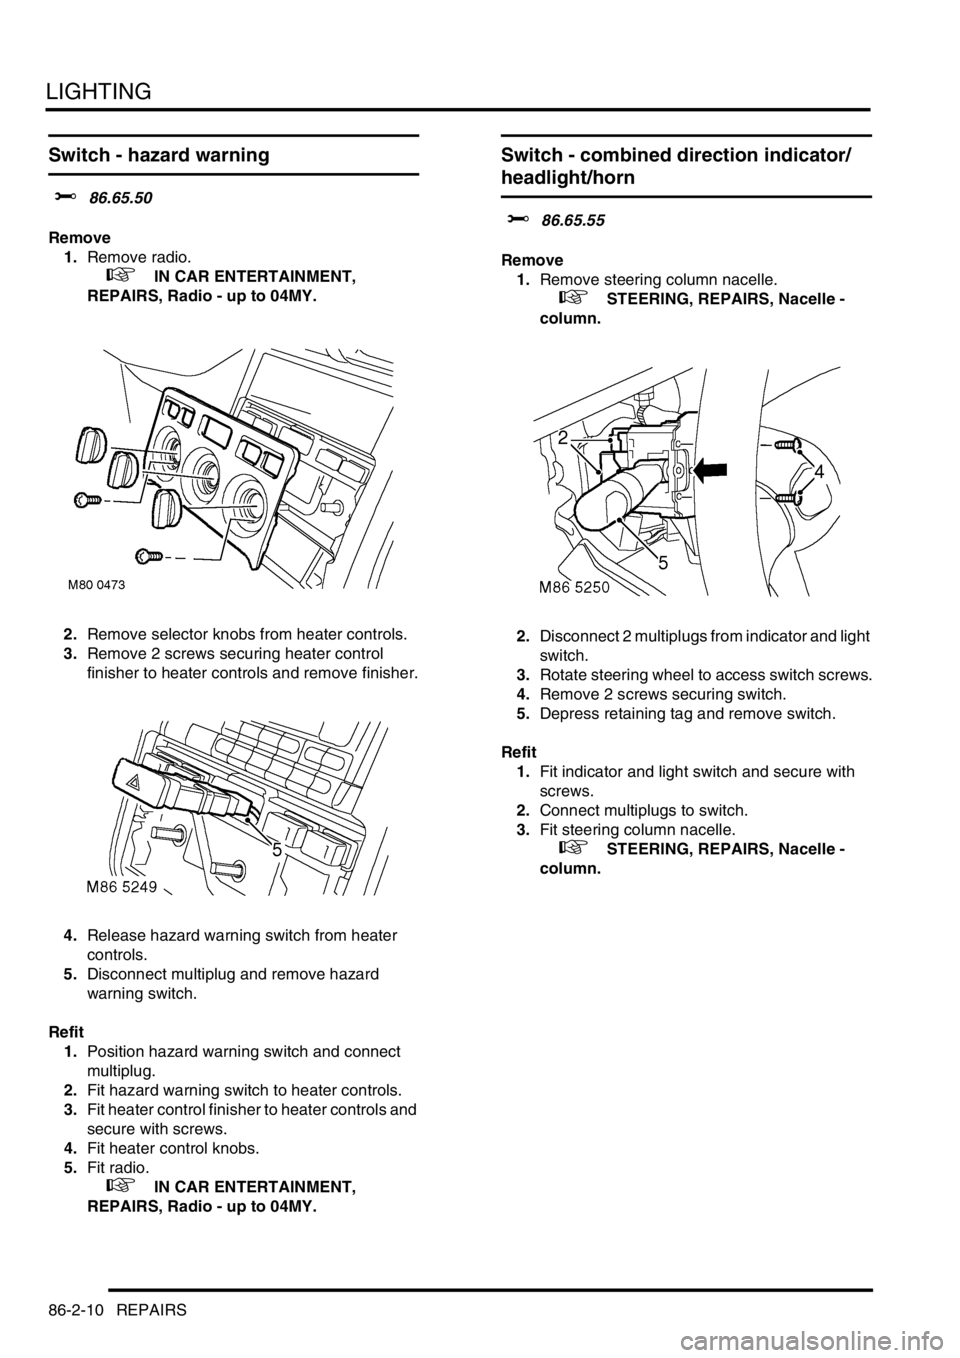
Switch - hazard warning
$% 86.65.50
Remove
1.Remove radio.
+ IN CAR ENTERTAINMENT,
REPAIRS, Radio - up to 04MY.
2.Remove selector knobs from heater controls.
3.Remove 2 screws securing heater control
finisher to heater controls and remove finisher.
4.Release hazard warning switch from heater
controls.
5.Disconnect multiplug and remove hazard
warning switch.
Refit
1.Position hazard warning switch and connect
multiplug.
2.Fit hazard warning switch to heater controls.
3.Fit heater control finisher to heater controls and
secure with screws.
4.Fit heater control knobs.
5.Fit radio.
+ IN CAR ENTERTAINMENT,
REPAIRS, Radio - up to 04MY.
Switch - combined direction indicator/
headlight/horn
$% 86.65.55
Remove
1.Remove steering column nacelle.
+ STEERING, REPAIRS, Nacelle -
column.
2.Disconnect 2 multiplugs from indicator and light
switch.
3.Rotate steering wheel to access switch screws.
4.Remove 2 screws securing switch.
5.Depress retaining tag and remove switch.
Refit
1.Fit indicator and light switch and secure with
screws.
2.Connect multiplugs to switch.
3.Fit steering column nacelle.
+ STEERING, REPAIRS, Nacelle -
column.
Page 942 of 1007
LIGHTING
REPAIRS 86-2-11
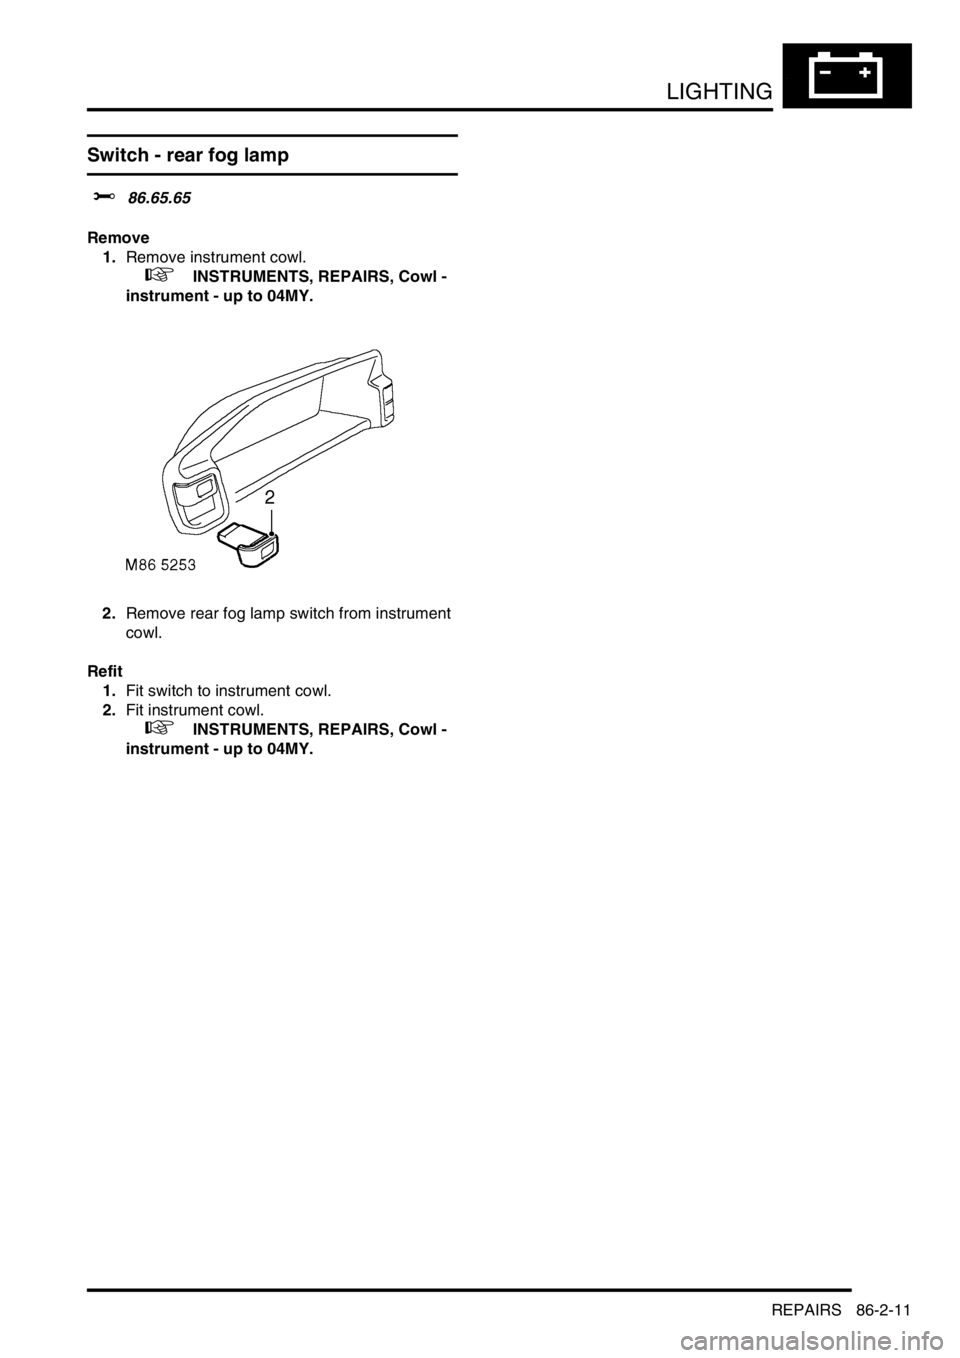
Switch - rear fog lamp
$% 86.65.65
Remove
1.Remove instrument cowl.
+ INSTRUMENTS, REPAIRS, Cowl -
instrument - up to 04MY.
2.Remove rear fog lamp switch from instrument
cowl.
Refit
1.Fit switch to instrument cowl.
2.Fit instrument cowl.
+ INSTRUMENTS, REPAIRS, Cowl -
instrument - up to 04MY.
Page 963 of 1007
WINDOWS
86-5-6 REPAIRS
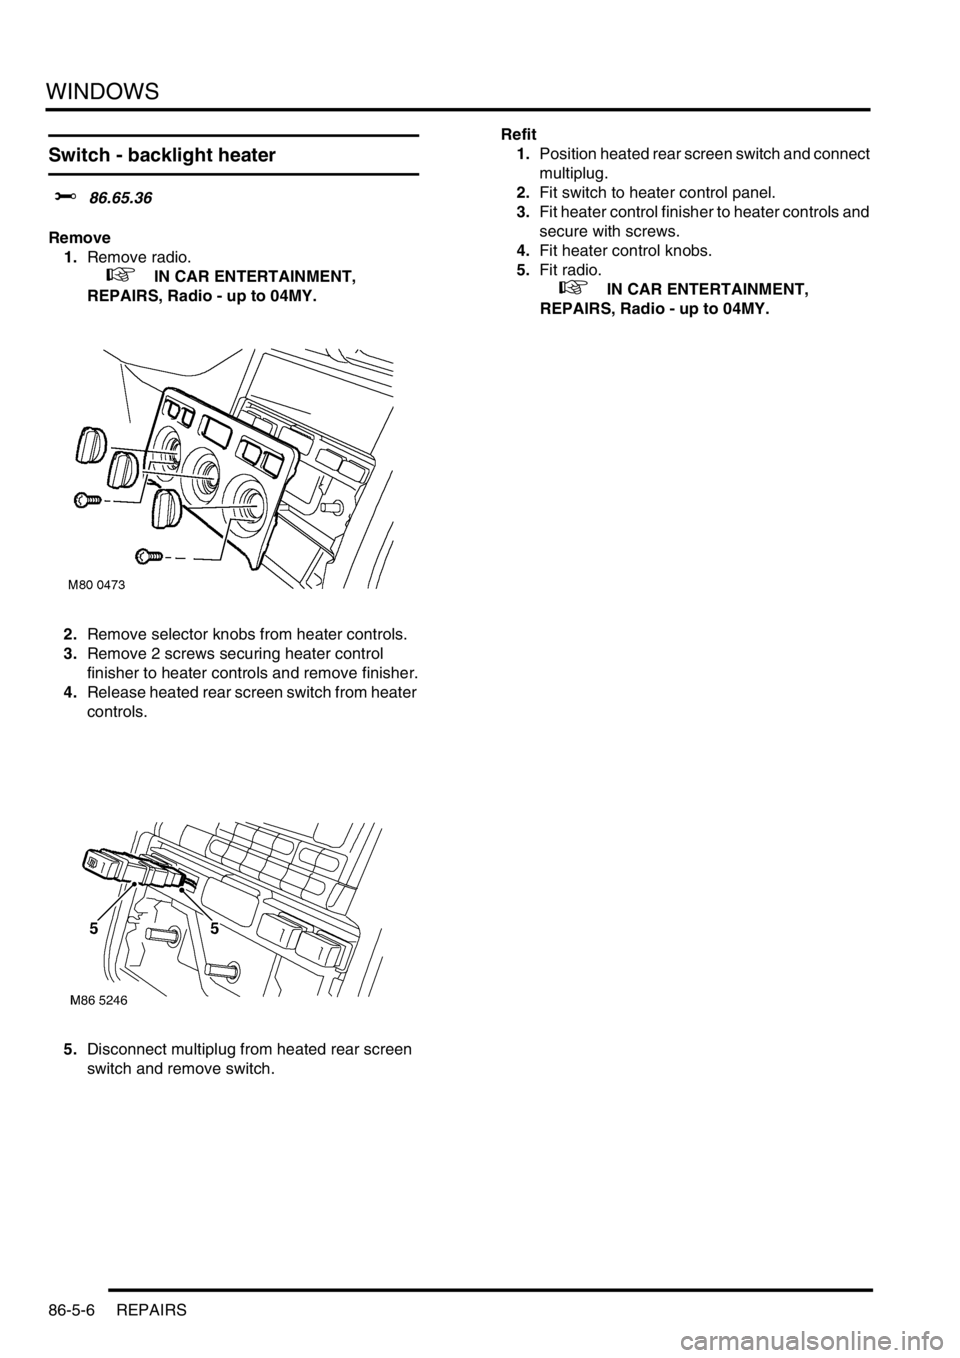
Switch - backlight heater
$% 86.65.36
Remove
1.Remove radio.
+ IN CAR ENTERTAINMENT,
REPAIRS, Radio - up to 04MY.
2.Remove selector knobs from heater controls.
3.Remove 2 screws securing heater control
finisher to heater controls and remove finisher.
4.Release heated rear screen switch from heater
controls.
5.Disconnect multiplug from heated rear screen
switch and remove switch.Refit
1.Position heated rear screen switch and connect
multiplug.
2.Fit switch to heater control panel.
3.Fit heater control finisher to heater controls and
secure with screws.
4.Fit heater control knobs.
5.Fit radio.
+ IN CAR ENTERTAINMENT,
REPAIRS, Radio - up to 04MY.
Page 981 of 1007

HARNESSES
86-7-6 REPAIRS
53.Release fuse box, disconnect 11 multiplugs
and remove fuse box.
54.Disconnect multiplug from steering column
switch.
55.Release harness clip from steering column.
56.Disconnect multiplug from throttle position
sensor.
57.Disconnect multiplugs from brake light switch
and brake pedal position switch.58.Disconnect multiplug from airbag ECU.
59.Remove airbag ECU securing bolt and release
earth lead.
60.Remove nut from earth header and release
header from floor tunnel.
Page 985 of 1007

HARNESSES
86-7-10 REPAIRS
90.Remove 4 screws from rear bumper lamps,
release lamps and disconnect multiplugs.
91.Release harness clips and pull harness into
luggage compartment.
92.Release main harness retaining clips and pull
harness into vehicle interior.
93.Remove main harness.Refit
1.Lay main harness in vehicle.
2.Locate rear section and secure in retaining
clips.
3.Feed harness to rear bumper lamps, secure in
clips and grommets.
4.Connect multiplugs to rear bumper lamps, fit
rear lamps and secure with screws.
5.Fit LH rear earth header and secure with nut.
6.Connect multiplugs to LH tail lamp.
7.Position RH tail lamp and connect multiplugs.
8.Fit RH tail lamp and secure with Torx screws.
9.Fit RH rear earth header and secure with nut.
10.Connect multiplug to towing electrics.
11.Connect rear screen washer tube.
12.Connect tail door harness multiplugs.
13.Connect and fit rear window lift and wash/wipe
relays.
14.Position harness into luggage compartment.
15.Connect both rear ABS speed sensor
multiplugs and secure harness grommets.
16.Connect multiplug to fuel pump.
17.Fit fuel pump access cover and secure with
screws.
18.Fit luggage compartment carpet.
+ INTERIOR TRIM COMPONENTS,
REPAIRS, Carpet - luggage compartment.
19.Connect multiplugs at the base of 'B/C' Posts.
20.Fit all harness clips to interior of vehicle.
21.Fit multiplugs and earth header to LH lower 'A'
post.
22.Fit earth header to RH lower 'A' post.
23.Connect multiplug to window lift ECU.
24.Fit face level vent ducting.
25.Fit steering column to bracket and secure with
nuts.
26.Fit rear heater ducting and secure with nut.
27.Secure harness to rear heater ducting with
clips.
28.Position mounting bracket and secure relays.
29.Connect Lucar to handbrake switch.
30. Manual gearbox only: Connect multiplug to
gear lever hill descent switch.
31.Connect multiplug to accelerometer.
32. Automatic gearbox only: Connect multiplugs
to gear selector.
33.Connect heated oxygen sensor multiplug.
34.Fit earth header to floor tunnel and secure with
nut.
35.Fit earth lead to airbag ECU and secure with
bolt.
36.Connect multiplug to airbag ECU.
37.Connect multiplugs to brake light switch and
brake pedal position switch.
38.Connect multiplug to throttle position sensor.
39.Fit harness clip to steering column.
40.Connect multiplug to steering column switch.