glove box LAND ROVER FREELANDER 2001 Workshop Manual
[x] Cancel search | Manufacturer: LAND ROVER, Model Year: 2001, Model line: FREELANDER, Model: LAND ROVER FREELANDER 2001Pages: 1007, PDF Size: 23.47 MB
Page 17 of 1007

CONTENTS
14 CONTENTS
INTERIOR TRIM COMPONENTS ............................................................. 76-3-1
REPAIRS
Sun visor ......................................................................................................................................... 76-3-1
Trim casing - rear quarter - lower - 3 door ...................................................................................... 76-3-1
Trim casing - rear quarter - lower - 5 door ...................................................................................... 76-3-2
Trim casing - rear quarter - upper - 3 door ..................................................................................... 76-3-3
Trim casing - rear quarter - upper - 5 door ..................................................................................... 76-3-4
Trim finisher - 'A' post - upper - renew ............................................................................................ 76-3-5
Trim finisher - 'B/C' post - upper - renew ........................................................................................ 76-3-6
Trim finisher - 'B' post - lower - 5 door ............................................................................................ 76-3-7
Trim casing - body side - rear - 3 door............................................................................................ 76-3-8
Console - front - up to 04MY........................................................................................................... 76-3-9
Console assembly - front - from 04MY ........................................................................................... 76-3-11
Console - rear ................................................................................................................................. 76-3-12
Cup holder - fascia - from 04MY ..................................................................................................... 76-3-13
Fascia - up to 04MY........................................................................................................................ 76-3-14
Fascia - from 04MY ........................................................................................................................ 76-3-19
Drink tray assembly - fascia - up to 04MY ...................................................................................... 76-3-23
Stowage box - fascia ...................................................................................................................... 76-3-23
Carpet - luggage compartment ....................................................................................................... 76-3-24
Glove box........................................................................................................................................ 76-3-25
Headlining - 3 door ......................................................................................................................... 76-3-25
Headlining - 5 door ......................................................................................................................... 76-3-27
SCREENS ................................................................................................. 76-4-1
REPAIRS
Windscreen ..................................................................................................................................... 76-4-1
Glass - body side - rear .................................................................................................................. 76-4-3
SEATS ....................................................................................................... 76-5-1
REPAIRS
Front seat ....................................................................................................................................... 76-5-1
Rear seat - LH ............................................................................................................................... 76-5-1
Rear seat - RH ............................................................................................................................... 76-5-2
Cushion & squab - rear seat - bench type - 3 door ........................................................................ 76-5-2
Cover - one piece - front seat cushion ........................................................................................... 76-5-3
Cover - rear seat cushion - RH ..................................................................................................... 76-5-4
Cover - rear seat cushion - LH........................................................................................................ 76-5-6
Cover - cushion - rear single seat - 3 door .................................................................................... 76-5-7
Finisher - seat base - front - each .................................................................................................. 76-5-8
Finisher - cushion side - front seat ................................................................................................. 76-5-9
Manual mechanism - lumbar support - front seat .......................................................................... 76-5-9
Latch - rear squab - RH ................................................................................................................. 76-5-11
Latch - rear squab - LH ................................................................................................................... 76-5-11
Cover - squab - front seat .............................................................................................................. 76-5-12
Cover - squab - rear seat - side - LH .............................................................................................. 76-5-13
Cover - squab - rear seat - RH ...................................................................................................... 76-5-14
Cover - squab - rear single seat - 3 door ....................................................................................... 76-5-16
Page 513 of 1007
STEERING
57-20 REPAIRS
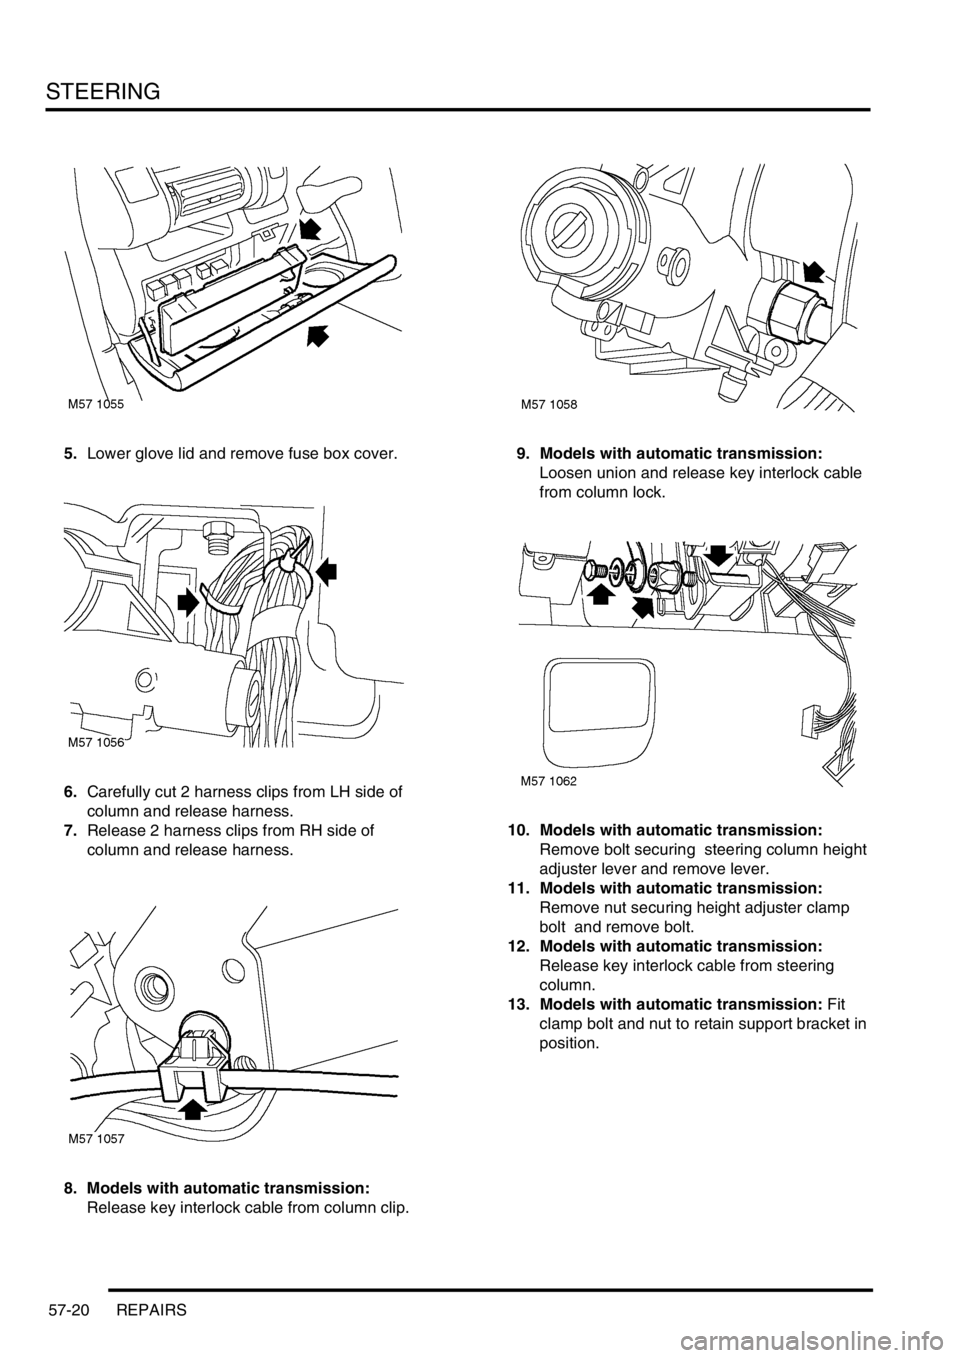
5.Lower glove lid and remove fuse box cover.
6.Carefully cut 2 harness clips from LH side of
column and release harness.
7.Release 2 harness clips from RH side of
column and release harness.
8. Models with automatic transmission:
Release key interlock cable from column clip.9. Models with automatic transmission:
Loosen union and release key interlock cable
from column lock.
10. Models with automatic transmission:
Remove bolt securing steering column height
adjuster lever and remove lever.
11. Models with automatic transmission:
Remove nut securing height adjuster clamp
bolt and remove bolt.
12. Models with automatic transmission:
Release key interlock cable from steering
column.
13. Models with automatic transmission: Fit
clamp bolt and nut to retain support bracket in
position.
Page 515 of 1007
STEERING
57-22 REPAIRS
Refit
1.Remove column from vice.
2.Fit new cable ties to steering column.
3. Models with automatic transmission: Fit key
interlock cable clip.
4.Position steering column to vehicle, locate
steering column on PAS rack, aligning column
coupling with PAS rack input flag.
5.Locate steering column on studs fit nuts but do
not tighten at this stage.
6.Fit bolts and snubber to pivot mountings and
tighten bolts to 14 Nm (10 lbf.ft).
7.Tighten nuts to 14 Nm (10 lbf.ft).
8.Fit and tighten PAS rack pinion clamp bolt to 32
Nm (24 lbf.ft).
CAUTION: Nuts and bolts must be tightened
with weight of vehicle on suspension.
9. Models with automatic transmission:
Remove clamp bolt from height adjuster and
position key interlock cable.
10. Models with automatic transmission: Fit
height adjuster clamp bolt and tighten nut to 10
Nm (7.5 lbf.ft). Ensure bolt and plastic stop are
correctly located in slot in column bracket.
11. Models with automatic transmission: Fit
height adjuster lever and tighten bolt 12 Nm (9
lbf.ft). Ensure lever is in the fully up position
before tightening bolt. Hold clamp bolt nut to
prevent nut rotation.
12. Models with automatic transmission:
Remove starter key from column lock.
13. Models with automatic transmission: Align
key interlock cable to column lock and tighten
union to 4 Nm (3 lbf.ft).
14. Models with automatic
transmission:Position lock to steering column
assembly and fit shear bolts. Do not tighten
shear bolts at this stage.
15. Models with automatic transmission: Insert
starter key, check operation of steering lock
and that key turns freely.
16. Models with automatic transmission:
Ensure correct operation of key interlock cable.
17. Models with automatic transmission:
Remove starter key from column lock.
18. Models with automatic transmission:
Tighten shear bolts fully and shear heads off.
19. Models with automatic transmission: Fit
passive coil.
20. Models with automatic transmission:
Position ignition switch to column, fit and
tighten screws.
21. Models with automatic transmission:
Secure key interlock cable in clip.
22. Models with automatic transmission:
Ensure key interlock cable is correctly fitted.23.Fit side support bolt and tighten to 10 Nm (7.5
lbf.ft).
24.Position harness and secure cable ties.
25.Fit fusebox cover and close glove box lid.
26.Connect multiplugs to column switch and
passive coil.
27.Fit aperture trim and secure with screws.
28. Fit steering column multi purpose switch.
+ LIGHTING, REPAIRS, Switch -
combined direction indicator/headlight/
horn.
29.Connect battery earth lead.
Page 675 of 1007
INTERIOR TRIM COMPONENTS
76-3-14 REPAIRS
Fascia - up to 04MY
$% 76.46.23
Remove
1.Remove front console.
+ INTERIOR TRIM COMPONENTS,
REPAIRS, Console - front - up to 04MY.
2.Remove rotary coupler.
+ RESTRAINT SYSTEMS, REPAIRS,
Rotary coupler - (SRS) air bag system.
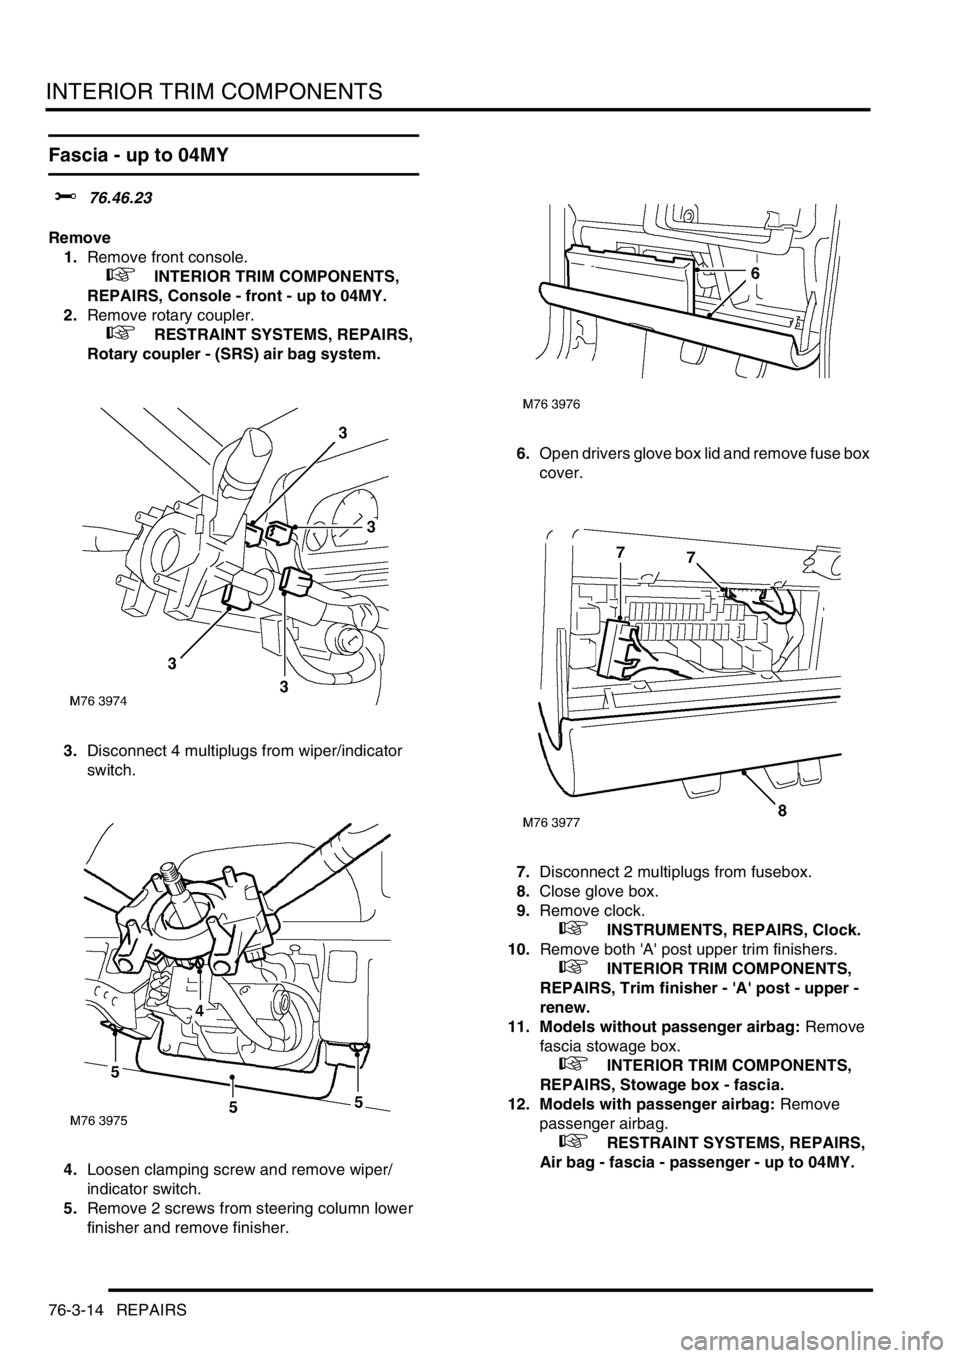
3.Disconnect 4 multiplugs from wiper/indicator
switch.
4.Loosen clamping screw and remove wiper/
indicator switch.
5.Remove 2 screws from steering column lower
finisher and remove finisher.6.Open drivers glove box lid and remove fuse box
cover.
7.Disconnect 2 multiplugs from fusebox.
8.Close glove box.
9.Remove clock.
+ INSTRUMENTS, REPAIRS, Clock.
10.Remove both 'A' post upper trim finishers.
+ INTERIOR TRIM COMPONENTS,
REPAIRS, Trim finisher - 'A' post - upper -
renew.
11. Models without passenger airbag: Remove
fascia stowage box.
+ INTERIOR TRIM COMPONENTS,
REPAIRS, Stowage box - fascia.
12. Models with passenger airbag: Remove
passenger airbag.
+ RESTRAINT SYSTEMS, REPAIRS,
Air bag - fascia - passenger - up to 04MY.
Page 677 of 1007
INTERIOR TRIM COMPONENTS
76-3-16 REPAIRS
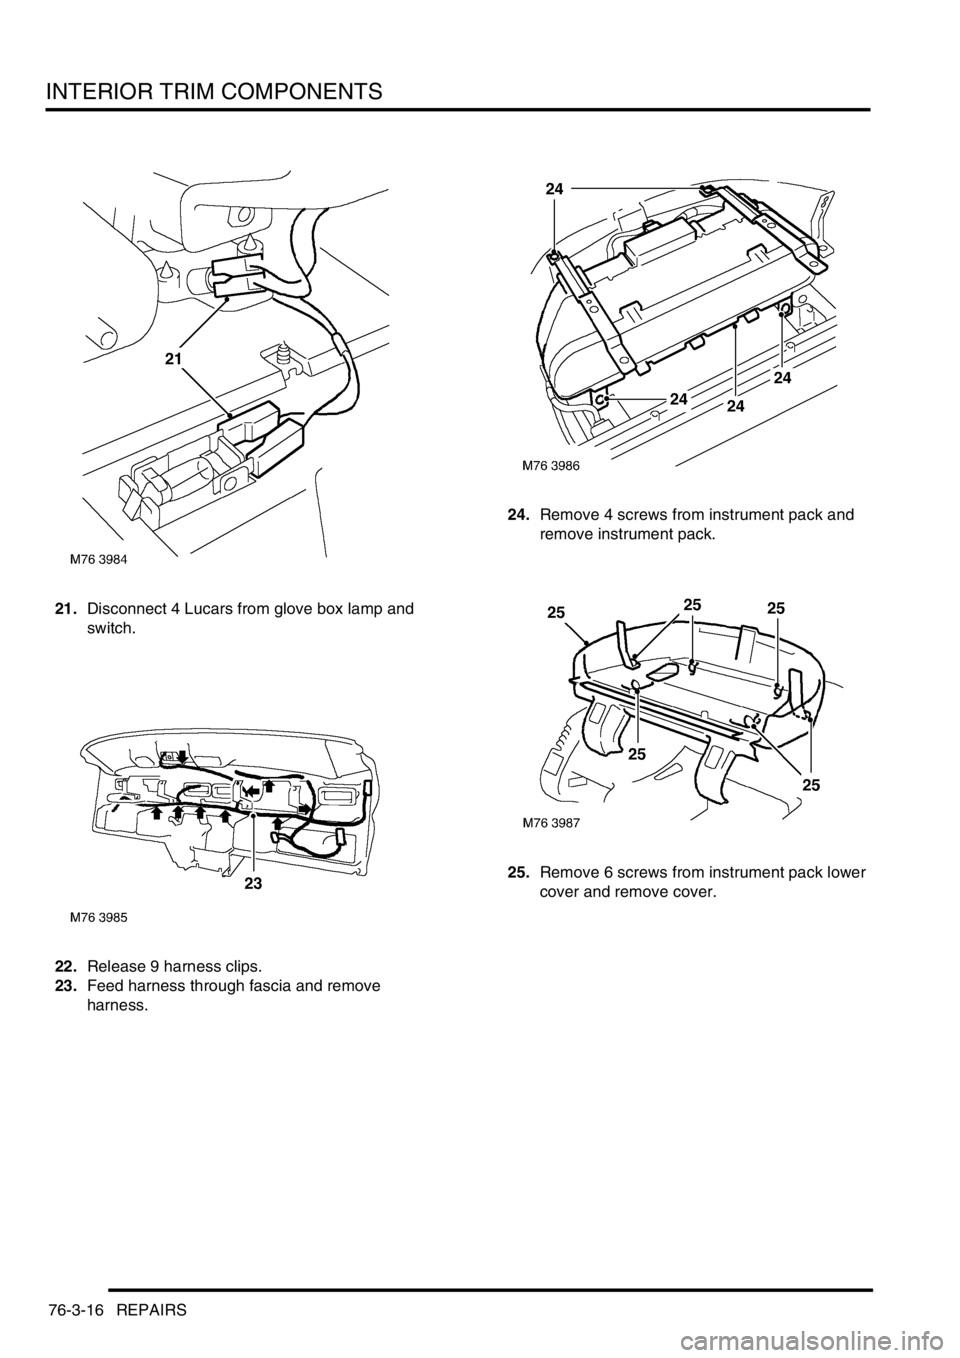
21.Disconnect 4 Lucars from glove box lamp and
switch.
22.Release 9 harness clips.
23.Feed harness through fascia and remove
harness.24.Remove 4 screws from instrument pack and
remove instrument pack.
25.Remove 6 screws from instrument pack lower
cover and remove cover.
Page 678 of 1007
INTERIOR TRIM COMPONENTS
REPAIRS 76-3-17
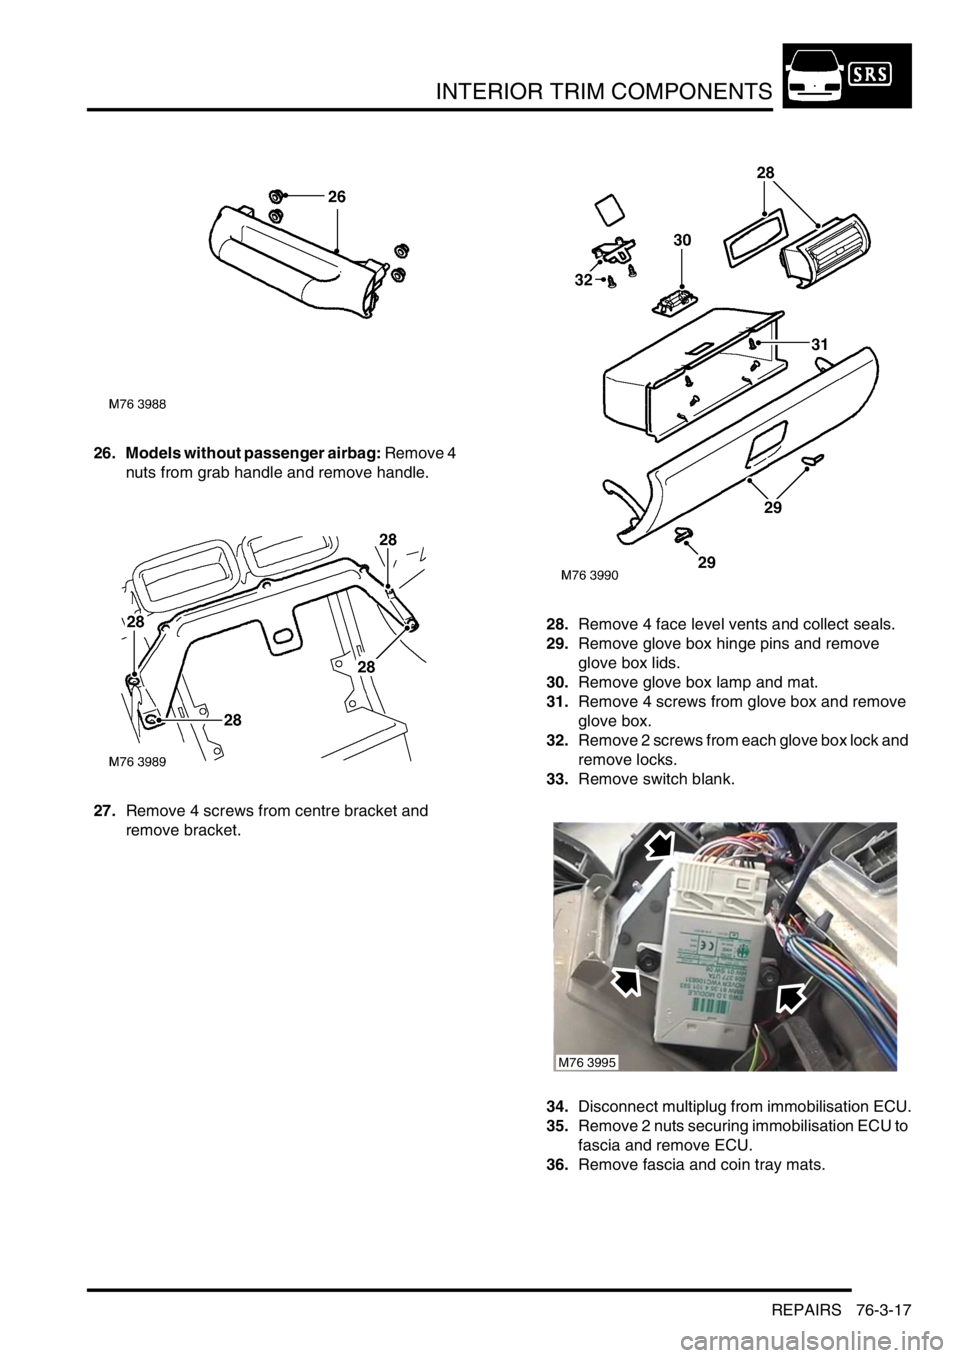
26. Models without passenger airbag: Remove 4
nuts from grab handle and remove handle.
27.Remove 4 screws from centre bracket and
remove bracket.28.Remove 4 face level vents and collect seals.
29.Remove glove box hinge pins and remove
glove box lids.
30.Remove glove box lamp and mat.
31.Remove 4 screws from glove box and remove
glove box.
32.Remove 2 screws from each glove box lock and
remove locks.
33.Remove switch blank.
34.Disconnect multiplug from immobilisation ECU.
35.Remove 2 nuts securing immobilisation ECU to
fascia and remove ECU.
36.Remove fascia and coin tray mats.
M76 3995
Page 679 of 1007

INTERIOR TRIM COMPONENTS
76-3-18 REPAIRS
Refit
1.Fit fascia and coin tray mats.
2.Fit immobilisation ECU to fascia and secure
with nuts.
3.Connect multiplug to immobilisation ECU.
4.Fit switch blank.
5.Fit glove box locks to fascia and secure with
screws.
6.Fit glove box and secure with screws.
7.Fit glove box lamp and mat.
8.Fit glove box lids and secure hinge pins.
9.Fit face level vents and seals to fascia.
10.Fit centre bracket and secure with screws.
11. Models without passenger airbag: Fit grab
handle and secure with nuts.
12.Fit instrument pack lower cover and secure with
screws.
13.Fit instrument pack to fascia and secure with
screws.
14.Fit fascia harness to fascia and secure with
clips.
15.Connect Lucars to glove box lamp and switch.
16.Connect multiplugs to mirror switch and
headlamp levelling switch.
17.Fit mirror switch and headlamp levelling switch.
18.Connect multiplugs to instrument pack.
19.Fit instrument pack upper cover and secure
with screws.
20.Connect multiplugs to switches on instrument
bezel finisher, fit bezel and secure with screws.
21.With assistance fit fascia to vehicle and secure
with bolts.22.Connect fascia harness multiplugs to main
harness.
23. Models with passenger airbag: Fit passenger
airbag.
+ RESTRAINT SYSTEMS, REPAIRS,
Air bag - fascia - passenger - up to 04MY.
24. Models without passenger airbag: Fit fascia
stowage box.
+ INTERIOR TRIM COMPONENTS,
REPAIRS, Stowage box - fascia.
25.Fit 'A' post upper trim finishers.
+ INTERIOR TRIM COMPONENTS,
REPAIRS, Trim finisher - 'A' post - upper -
renew.
26.Fit clock.
+ INSTRUMENTS, REPAIRS, Clock.
27.Open drivers glove box lid and remove fuse box
cover.
28.Connect multiplugs to fusebox.
29.Fit fusebox cover and close glove box lid.
30.Fit steering column lower cover and secure with
screws.
31.Fit wiper/indicator switch and tighten clamping
screw.
32.Connect multiplugs to wiper/indicator switch.
33.Fit rotary coupler.
+ RESTRAINT SYSTEMS, REPAIRS,
Rotary coupler - (SRS) air bag system.
34.Fit front console.
+ INTERIOR TRIM COMPONENTS,
REPAIRS, Console - front - up to 04MY.
Page 680 of 1007
INTERIOR TRIM COMPONENTS
REPAIRS 76-3-19
Fascia - from 04MY
$% 76.46.23
Remove
1.Remove instrument pack.
+ INSTRUMENTS, REPAIRS,
Instrument panel - from 04MY.
2.Remove the Radio/CD module.
+ IN CAR ENTERTAINMENT,
REPAIRS, Radio/CD - from 04MY.
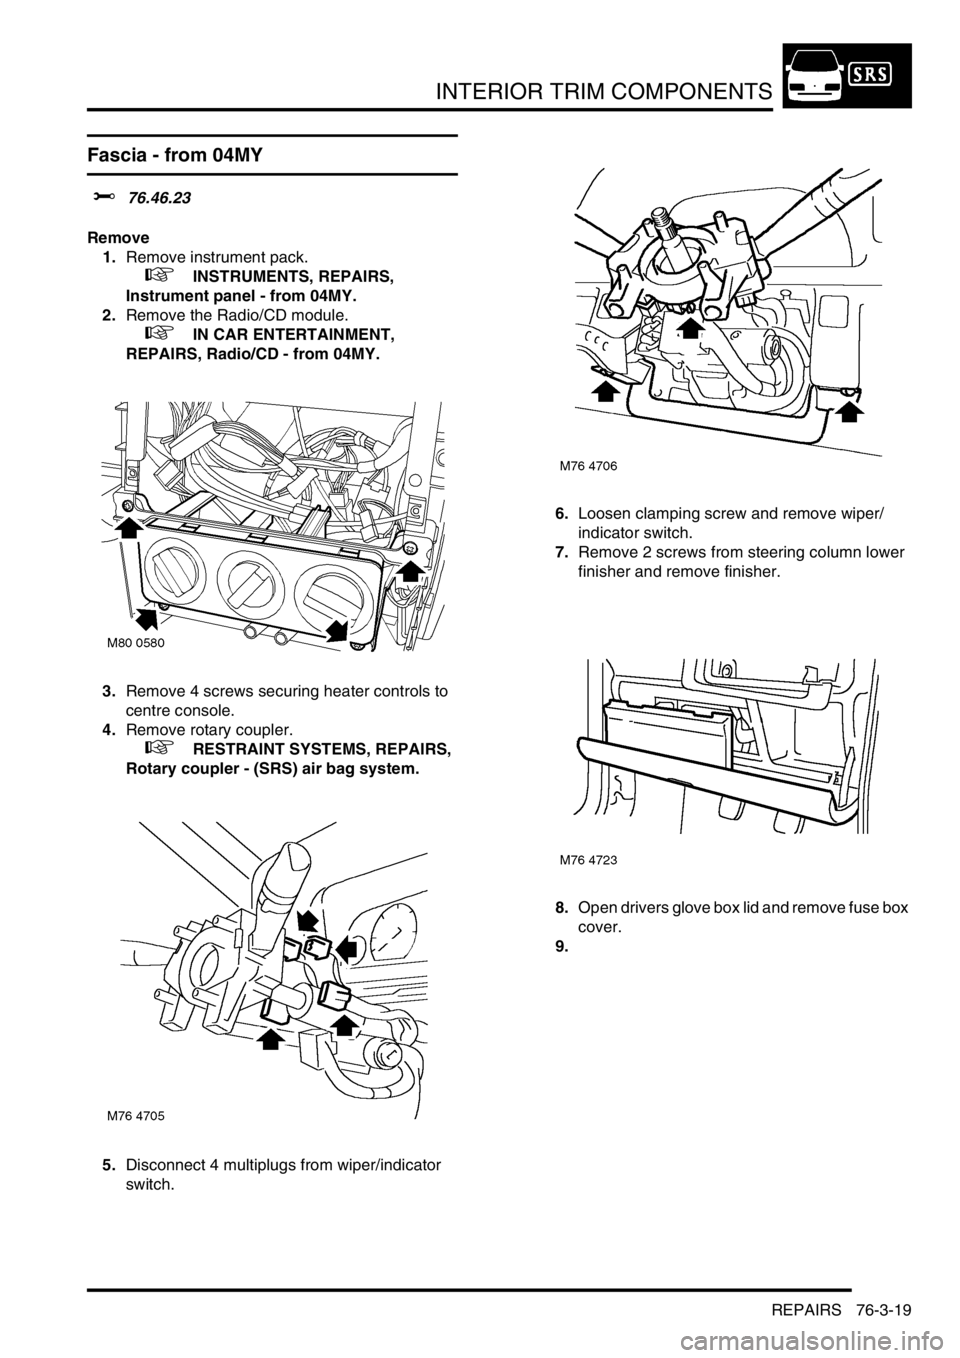
3.Remove 4 screws securing heater controls to
centre console.
4.Remove rotary coupler.
+ RESTRAINT SYSTEMS, REPAIRS,
Rotary coupler - (SRS) air bag system.
5.Disconnect 4 multiplugs from wiper/indicator
switch.6.Loosen clamping screw and remove wiper/
indicator switch.
7.Remove 2 screws from steering column lower
finisher and remove finisher.
8.Open drivers glove box lid and remove fuse box
cover.
9.
Page 681 of 1007

INTERIOR TRIM COMPONENTS
76-3-20 REPAIRS
10.Disconnect 2 multiplugs from fuse box.
11.Close glove box.
12.Remove clock.
+ INSTRUMENTS, REPAIRS, Clock.
13.Remove hazard warning switch.
+ DRIVER CONTROLS, REPAIRS,
Switch - hazard warning - from 04MY.
14.Remove both 'A' post upper trim finishers.
+ INTERIOR TRIM COMPONENTS,
REPAIRS, Trim finisher - 'A' post - upper -
renew.
15.Remove passenger airbag.
+ RESTRAINT SYSTEMS, REPAIRS,
Air bag - fascia - passenger - from 04MY.
16.Disconnect 2 multiplugs from fascia harness.17.Remove 14 bolts securing fascia.
18.With assistance remove fascia.
NOTE: Do not carry out further dismantling if
component is removed for access only.
19.Disconnect 4 multiplugs from fascia switch
assembly.
20.Remove 4 switches from fascia switch carrier.
M76 4722
M76 4714
Page 682 of 1007
INTERIOR TRIM COMPONENTS
REPAIRS 76-3-21
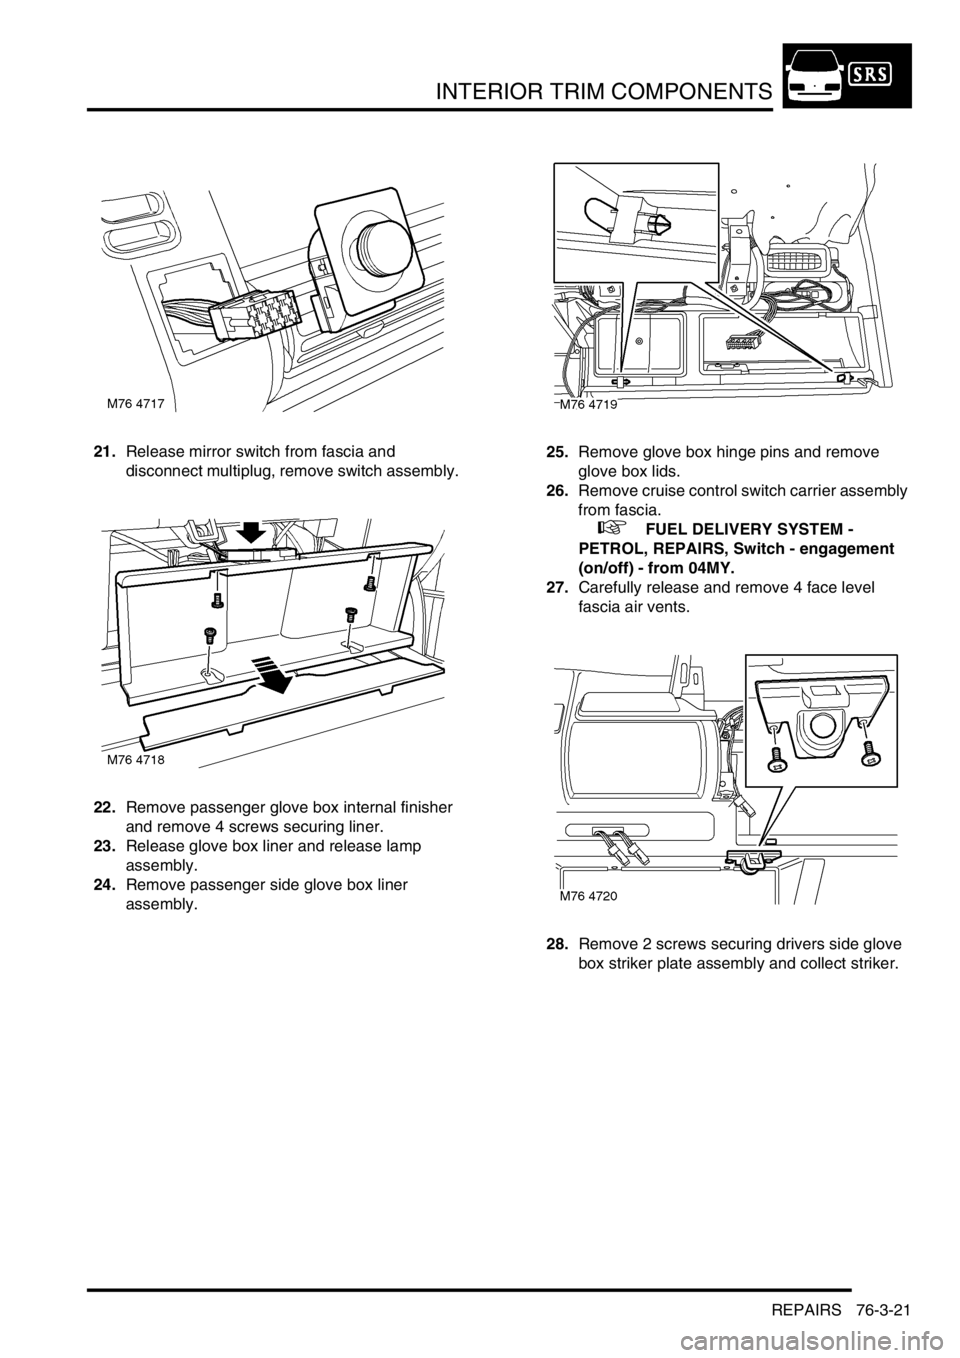
21.Release mirror switch from fascia and
disconnect multiplug, remove switch assembly.
22.Remove passenger glove box internal finisher
and remove 4 screws securing liner.
23.Release glove box liner and release lamp
assembly.
24.Remove passenger side glove box liner
assembly.25.Remove glove box hinge pins and remove
glove box lids.
26.Remove cruise control switch carrier assembly
from fascia.
+ FUEL DELIVERY SYSTEM -
PETROL, REPAIRS, Switch - engagement
(on/off) - from 04MY.
27.Carefully release and remove 4 face level
fascia air vents.
28.Remove 2 screws securing drivers side glove
box striker plate assembly and collect striker.