Lexus CT200h 2012 Navigation Manual (in English)
Manufacturer: LEXUS, Model Year: 2012, Model line: CT200h, Model: Lexus CT200h 2012Pages: 436, PDF Size: 28.25 MB
Page 361 of 436
361
1. CONNECTED SERVICES
CT200h_Navi_OM76078E_(EE)
14.02.06 12:30
9
CONNECTED SERVICES
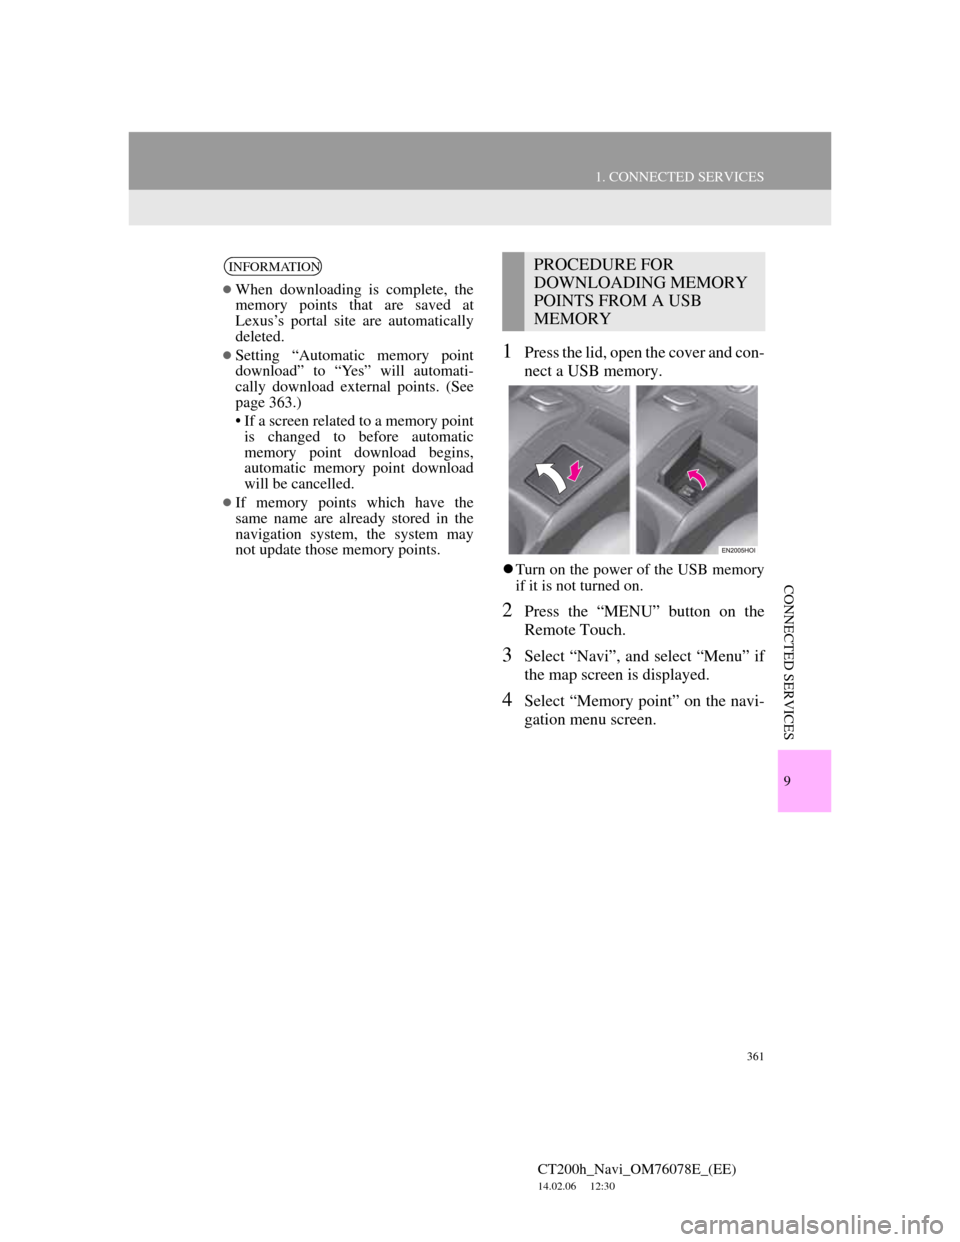
1Press the lid, open the cover and con-
nect a USB memory.
Turn on the power of the USB memory
if it is not turned on.
2Press the “MENU” button on the
Remote Touch.
3Select “Navi”, and select “Menu” if
the map screen is displayed.
4Select “Memory point” on the navi-
gation menu screen.
INFORMATION
When downloading is complete, the
memory points that are saved at
Lexus’s portal site are automatically
deleted.
Setting “Automatic memory point
download” to “Yes” will automati-
cally download external points. (See
page 363.)
• If a screen related to a memory point
is changed to before automatic
memory point download begins,
automatic memory point download
will be cancelled.
If memory points which have the
same name are already stored in the
navigation system, the system may
not update those memory points.
PROCEDURE FOR
DOWNLOADING MEMORY
POINTS FROM A USB
MEMORY
Page 362 of 436
362
1. CONNECTED SERVICES
CT200h_Navi_OM76078E_(EE)
14.02.06 12:30
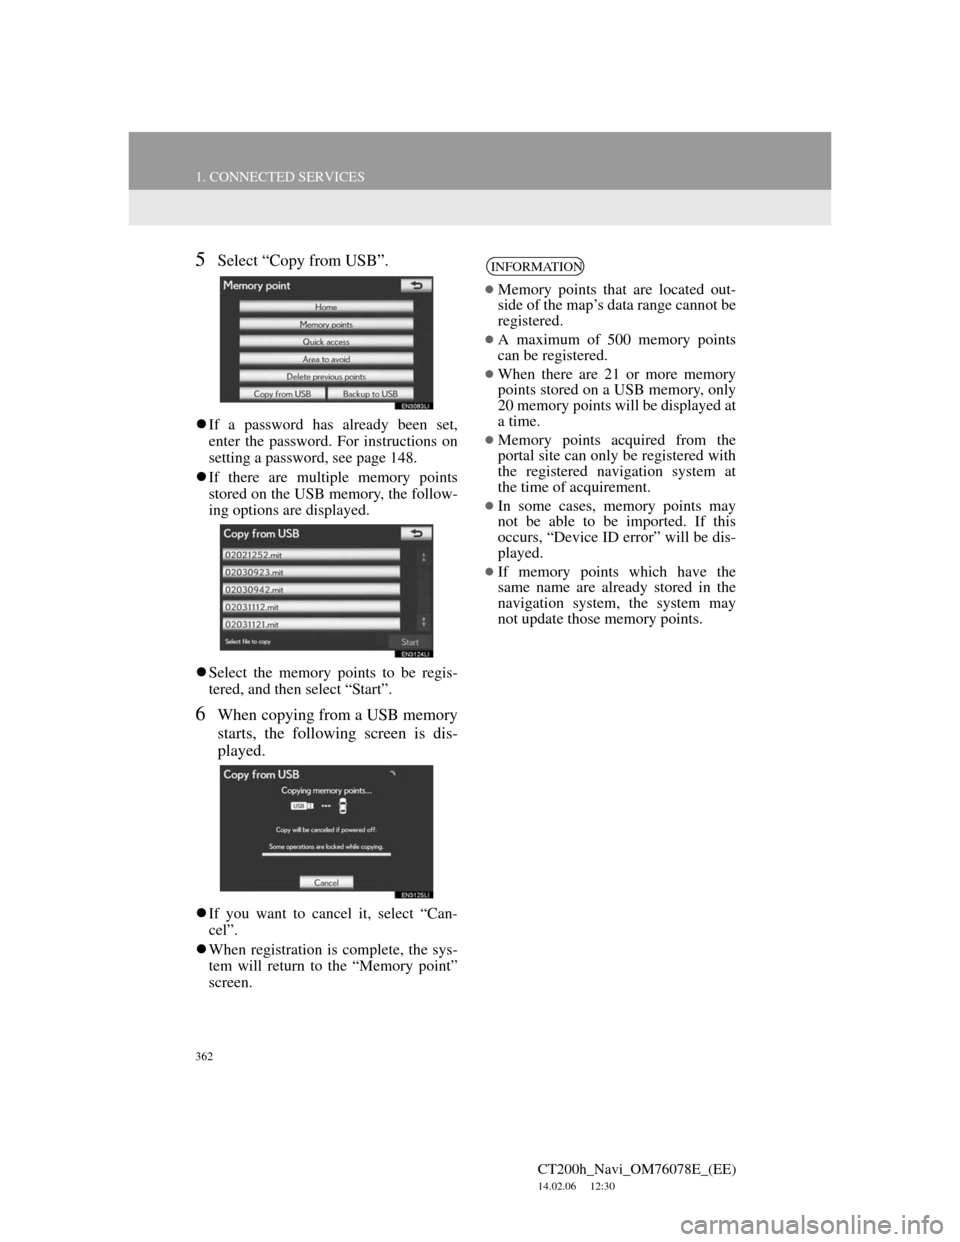
5Select “Copy from USB”.
If a password has already been set,
enter the password. For instructions on
setting a password, see page 148.
If there are multiple memory points
stored on the USB memory, the follow-
ing options are displayed.
Select the memory points to be regis-
tered, and then select “Start”.
6When copying from a USB memory
starts, the following screen is dis-
played.
If you want to cancel it, select “Can-
cel”.
When registration is complete, the sys-
tem will return to the “Memory point”
screen.
INFORMATION
Memory points that are located out-
side of the map’s data range cannot be
registered.
A maximum of 500 memory points
can be registered.
When there are 21 or more memory
points stored on a USB memory, only
20 memory points will be displayed at
a time.
Memory points acquired from the
portal site can only be registered with
the registered navigation system at
the time of acquirement.
In some cases, memory points may
not be able to be imported. If this
occurs, “Device ID error” will be dis-
played.
If memory points which have the
same name are already stored in the
navigation system, the system may
not update those memory points.
Page 363 of 436
363
CT200h_Navi_OM76078E_(EE)
14.02.06 12:30
9
CONNECTED SERVICES
2. SETUP
1. ONLINE SEARCH SETTINGS
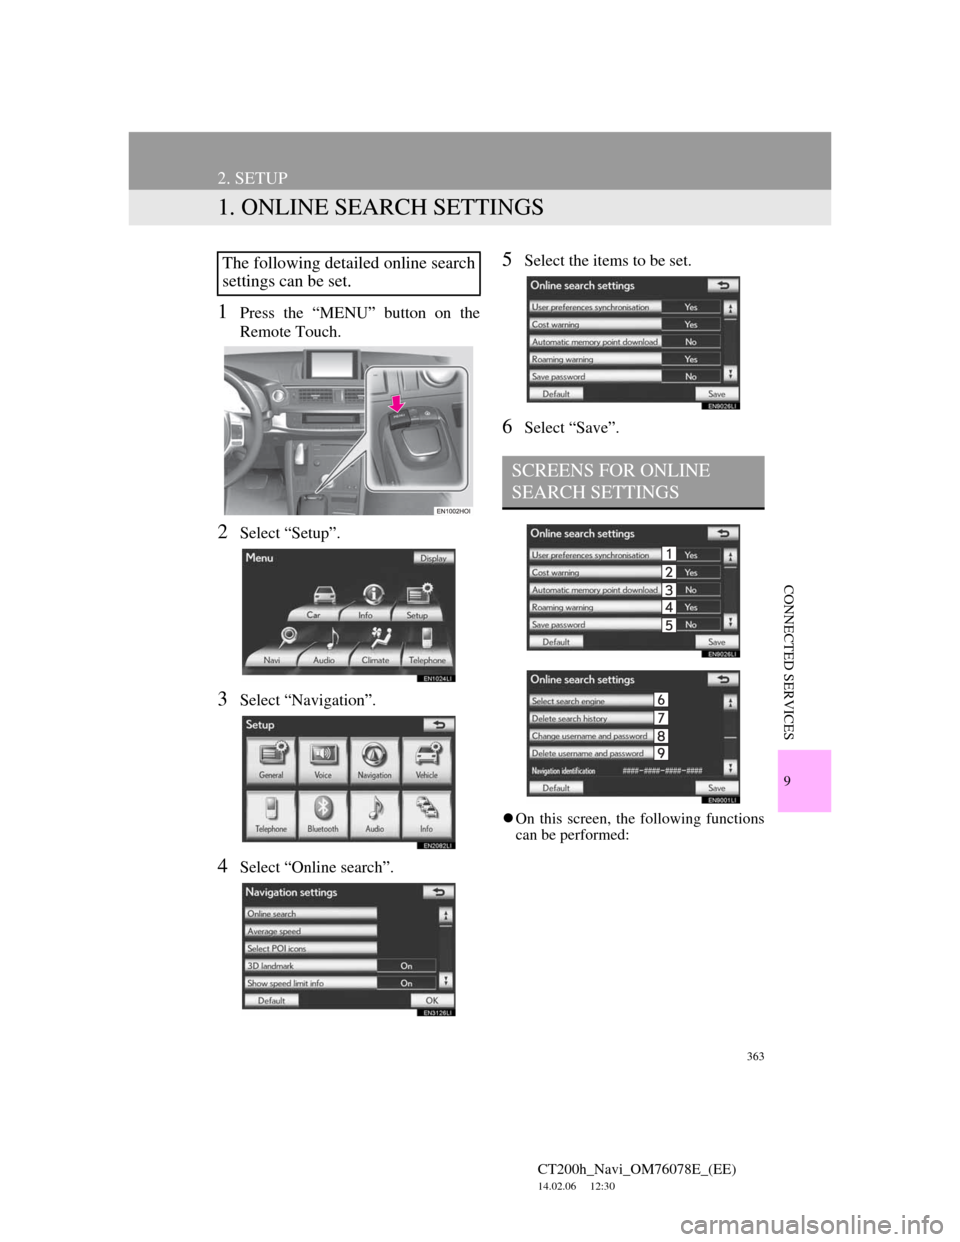
1Press the “MENU” button on the
Remote Touch.
2Select “Setup”.
3Select “Navigation”.
4Select “Online search”.
5Select the items to be set.
6Select “Save”.
On this screen, the following functions
can be performed:
The following detailed online search
settings can be set.
SCREENS FOR ONLINE
SEARCH SETTINGS
Page 364 of 436
364
2. SETUP
CT200h_Navi_OM76078E_(EE)
14.02.06 12:30
To reset all setup items, select
“Default”.
No.Function
The navigation “Cost warn-
ing”, “Automatic memory
point download”, “Roaming
warning” and “Save pass-
word” settings synchronisa-
tion with the portal site
settings can be set on or off by
selecting “Yes” or “No”.
When connecting, the cost
warning display can be set on
or off by selecting “Yes” or
“No”.
When the navigation system is
started up, the automatic
downloading of POIs can be
set on or off by selecting “Yes”
or “No”. For POIs to be auto-
matically downloaded, cellu-
lar phone auto connection
needs to be set to “On”.
When connecting in a roaming
area, the display of the roam-
ing warning can be set on or
off by selecting “Yes” or
“No”.
When connecting to the portal
site, the required portal user-
name and password can be re-
membered by selecting “Yes”
or “No”. When “Yes” is select-
ed, the username and pass-
word does not need to be input
when accessing the portal site.
The desired search engine can
be selected. (See “SELECT-
ING A SEARCH ENGINE”
on page 365.)
Online search history can be
deleted. (See “DELETING
SEARCH HISTORY” on page
365.)
When a different user uses the
navigation system, the user-
name and password can be
changed. (See “CHANGING
USERNAME AND PASS-
WORD” on page 366.)
Your portal site username and
password can be deleted from
the navigation system. (See
“DELETING USERNAME
AND PASSWORD” on page
366.)
No.Function
Page 365 of 436
365
2. SETUP
CT200h_Navi_OM76078E_(EE)
14.02.06 12:30
9
CONNECTED SERVICES
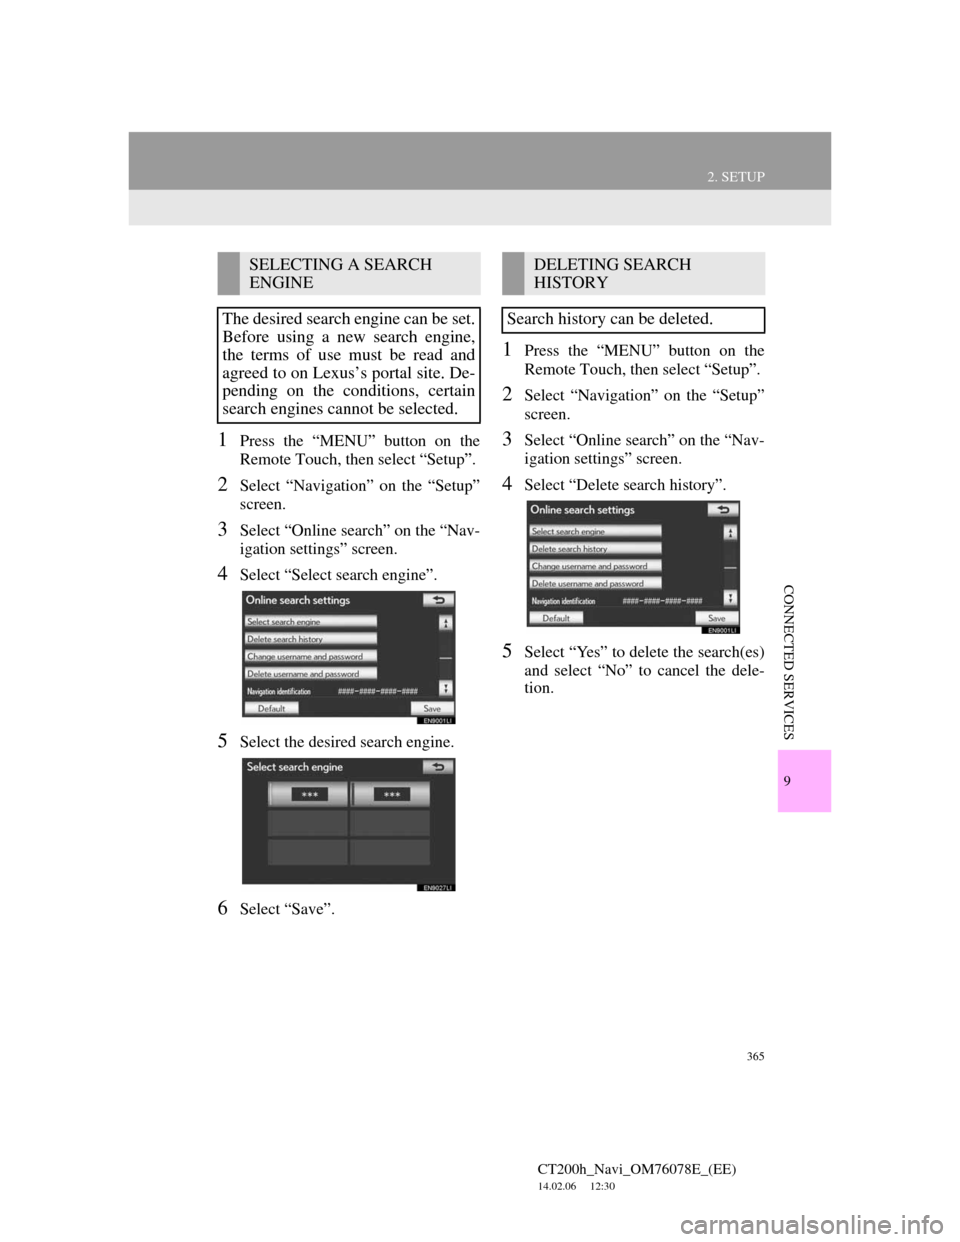
1Press the “MENU” button on the
Remote Touch, then select “Setup”.
2Select “Navigation” on the “Setup”
screen.
3Select “Online search” on the “Nav-
igation settings” screen.
4Select “Select search engine”.
5Select the desired search engine.
6Select “Save”.
1Press the “MENU” button on the
Remote Touch, then select “Setup”.
2Select “Navigation” on the “Setup”
screen.
3Select “Online search” on the “Nav-
igation settings” screen.
4Select “Delete search history”.
5Select “Yes” to delete the search(es)
and select “No” to cancel the dele-
tion.
SELECTING A SEARCH
ENGINE
The desired search engine can be set.
Before using a new search engine,
the terms of use must be read and
agreed to on Lexus’s portal site. De-
pending on the conditions, certain
search engines cannot be selected.DELETING SEARCH
HISTORY
Search history can be deleted.
Page 366 of 436
366
2. SETUP
CT200h_Navi_OM76078E_(EE)
14.02.06 12:30
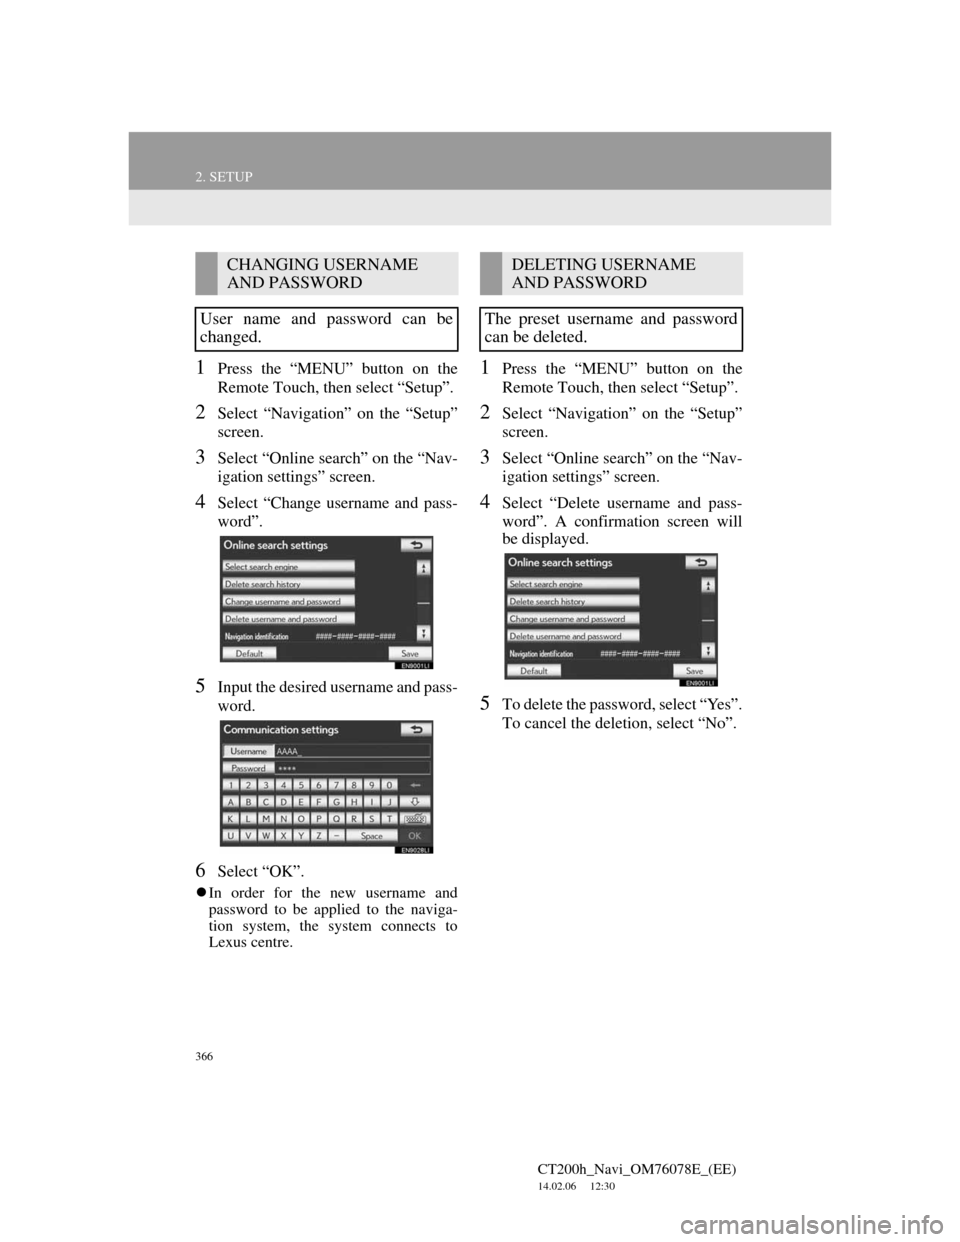
1Press the “MENU” button on the
Remote Touch, then select “Setup”.
2Select “Navigation” on the “Setup”
screen.
3Select “Online search” on the “Nav-
igation settings” screen.
4Select “Change username and pass-
word”.
5Input the desired username and pass-
word.
6Select “OK”.
In order for the new username and
password to be applied to the naviga-
tion system, the system connects to
Lexus centre.
1Press the “MENU” button on the
Remote Touch, then select “Setup”.
2Select “Navigation” on the “Setup”
screen.
3Select “Online search” on the “Nav-
igation settings” screen.
4Select “Delete username and pass-
word”. A confirmation screen will
be displayed.
5To delete the password, select “Yes”.
To cancel the deletion, select “No”.
CHANGING USERNAME
AND PASSWORD
User name and password can be
changed.DELETING USERNAME
AND PASSWORD
The preset username and password
can be deleted.
Page 367 of 436
10
367
1
2
3
4
5
6
7
CT200h_Navi_OM76078E_(EE)
14.02.06 12:30
8
9
10
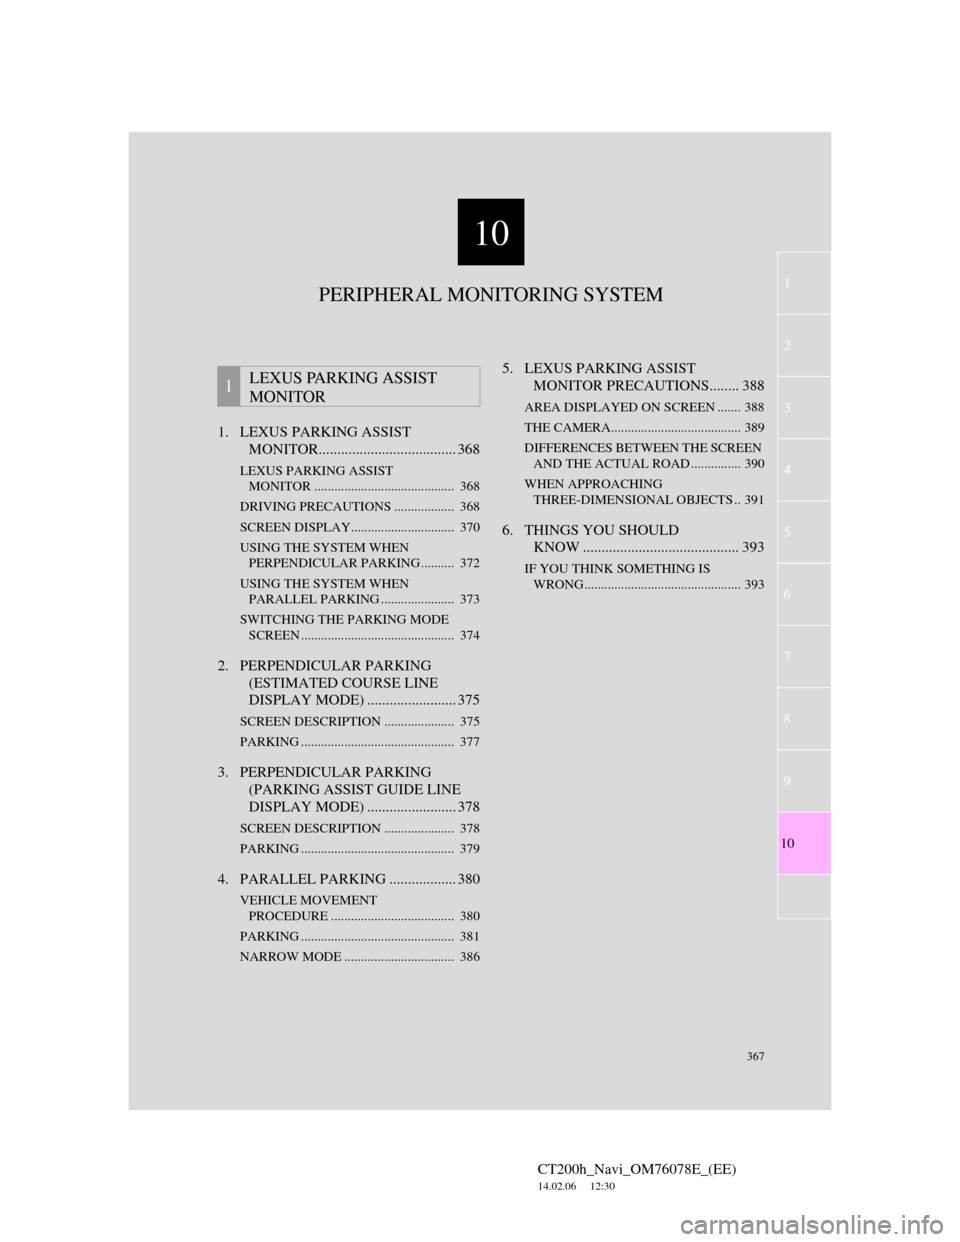
1. LEXUS PARKING ASSIST
MONITOR..................................... 368
LEXUS PARKING ASSIST
MONITOR .......................................... 368
DRIVING PRECAUTIONS .................. 368
SCREEN DISPLAY............................... 370
USING THE SYSTEM WHEN
PERPENDICULAR PARKING .......... 372
USING THE SYSTEM WHEN
PARALLEL PARKING ...................... 373
SWITCHING THE PARKING MODE
SCREEN .............................................. 374
2. PERPENDICULAR PARKING
(ESTIMATED COURSE LINE
DISPLAY MODE) ........................ 375
SCREEN DESCRIPTION ..................... 375
PARKING .............................................. 377
3. PERPENDICULAR PARKING
(PARKING ASSIST GUIDE LINE
DISPLAY MODE) ........................ 378
SCREEN DESCRIPTION ..................... 378
PARKING .............................................. 379
4. PARALLEL PARKING .................. 380
VEHICLE MOVEMENT
PROCEDURE ..................................... 380
PARKING .............................................. 381
NARROW MODE ................................. 386
5. LEXUS PARKING ASSIST
MONITOR PRECAUTIONS........ 388
AREA DISPLAYED ON SCREEN ....... 388
THE CAMERA....................................... 389
DIFFERENCES BETWEEN THE SCREEN
AND THE ACTUAL ROAD ............... 390
WHEN APPROACHING
THREE-DIMENSIONAL OBJECTS .. 391
6. THINGS YOU SHOULD
KNOW .......................................... 393
IF YOU THINK SOMETHING IS
WRONG............................................... 393
1LEXUS PARKING ASSIST
MONITOR
PERIPHERAL MONITORING SYSTEM
Page 368 of 436
368
CT200h_Navi_OM76078E_(EE)
14.02.06 12:30
1. LEXUS PARKING ASSIST MONITOR
1. LEXUS PARKING ASSIST MONITOR
LEXUS PARKING ASSIST
MONITOR
The parking assist monitor assists the
driver by displaying an image of the
view behind the vehicle while back-
ing up, for example while parking.
The parking assist monitor assists
with the following 2 backing-up op-
erations:
(1) Perpendicular parking (parking in
a garage, etc.)
(2) Parallel parking (parking at the
side of the road, etc.)
INFORMATION
The screen illustrations used in this
text are intended as examples, and
may differ from the image that is
actually displayed on the screen.
DRIVING PRECAUTIONS
When backing up, be sure to visually
check all around the vehicle both di-
rectly and using the mirrors before
proceeding. If you do not, you may
hit another vehicle, and could possi-
bly cause an accident.
Pay attention to the following pre-
cautions when using the parking as-
sist monitor.
CAUTION
The parking assist monitor is a sup-
plemental device intended to assist
the driver when backing up. Never
depend on the parking assist monitor
entirely when backing up. Always
make sure your intended path is clear.
Use caution, just as you would when
backing up any vehicle.
Never back up while looking only at
the screen.
The image shown on the screen may
differ from the actual state, and you
could collide with another vehicle or
obstacles if backing up looking only
at the screen, possibly causing an
accident. When backing up, be sure to
check in front of and behind the vehi-
cle, both directly and with mirrors.
Be sure to back up slowly, depressing
the brake pedal to control vehicle
speed.
If you seem likely to hit nearby vehi-
cles, obstacles, people or mount the
shoulder, depress the brake pedal to
stop the vehicle, then disable the
assist system by selecting on
the screen to cancel the system.
Page 369 of 436
369
1. LEXUS PARKING ASSIST MONITOR
CT200h_Navi_OM76078E_(EE)
14.02.06 12:30
10
PERIPHERAL MONITORING SYSTEM
CAUTION
The instructions given are only guide-
lines. When and how much to turn the
steering wheel will vary according to
traffic conditions, road surface condi-
tions, vehicle condition, etc. when
parking. It is necessary to be fully
aware of this before using the parking
assist system.
When parking, be sure to check that
the parking space will accommodate
your vehicle before maneuvering into
it.
Do not use system in the following
cases:
• On icy or slick road surfaces, or in
snow
• When using tyre chains or emer-
gency tyre(s)
• When the back door is not closed
completely
• On roads that are not flat or straight,
such as curves or slopes.
In low temperatures, the screen may
darken or the image may become
faint. The image could distort when
the vehicle is moving, or you may
become unable to see the image on
the screen. Be sure to visually check
all around the vehicle both directly
and using the mirrors before proceed-
ing.
CAUTION
If the tyre sizes are changed, the posi-
tion of the guide lines displayed on
the screen may change.
The camera uses a special lens. The
distances between objects and pedes-
trians that appear in the image dis-
played on the screen will differ from
the actual distances. (See page 390.)
Page 370 of 436
370
1. LEXUS PARKING ASSIST MONITOR
CT200h_Navi_OM76078E_(EE)
14.02.06 12:30
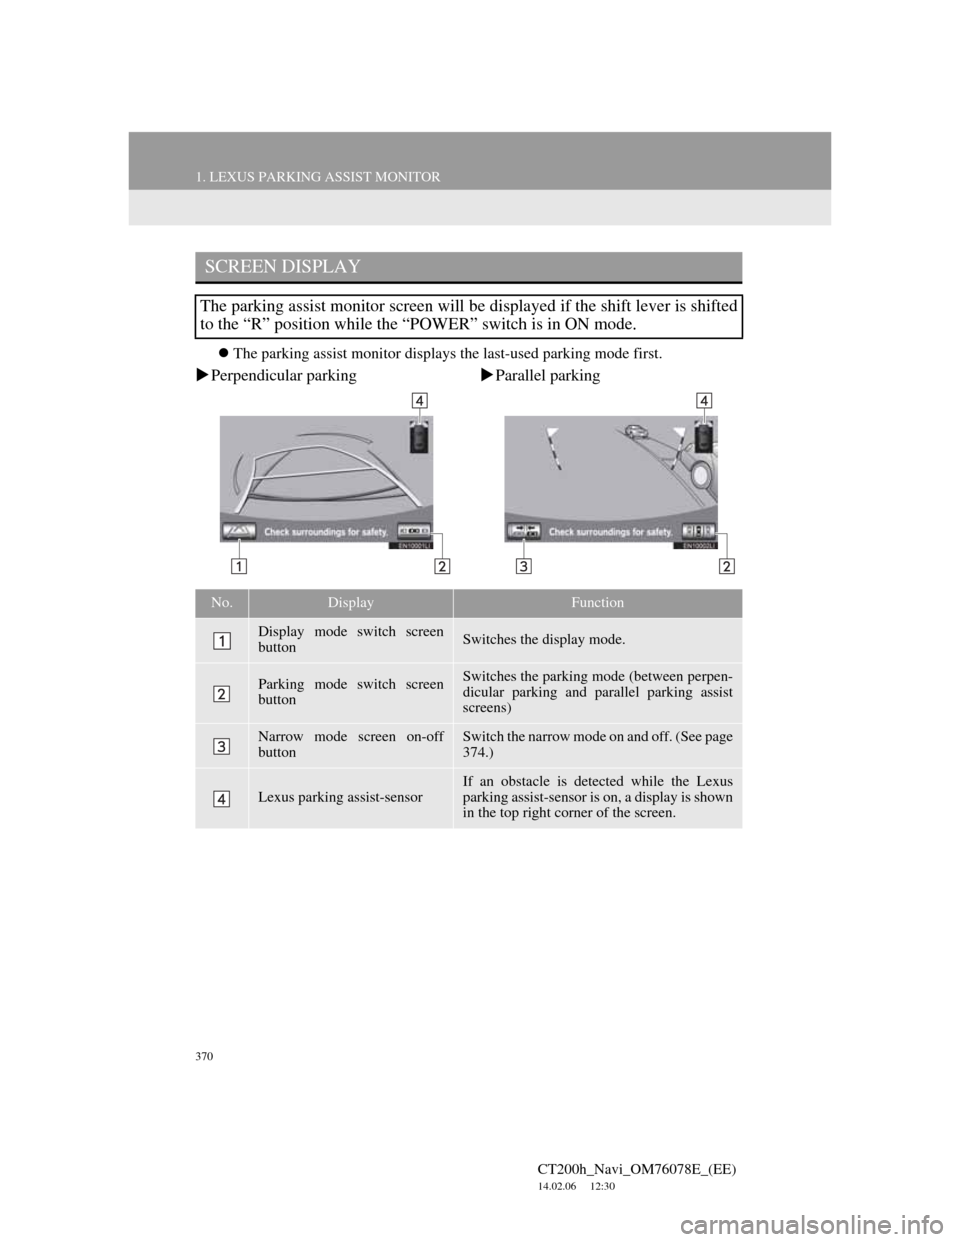
The parking assist monitor displays the last-used parking mode first.
Perpendicular parkingParallel parking
SCREEN DISPLAY
The parking assist monitor screen will be displayed if the shift lever is shifted
to the “R” position while the “POWER” switch is in ON mode.
No.DisplayFunction
Display mode switch screen
buttonSwitches the display mode.
Parking mode switch screen
buttonSwitches the parking mode (between perpen-
dicular parking and parallel parking assist
screens)
Narrow mode screen on-off
buttonSwitch the narrow mode on and off. (See page
374.)
Lexus parking assist-sensor
If an obstacle is detected while the Lexus
parking assist-sensor is on, a display is shown
in the top right corner of the screen.