key Lexus CT200h 2012 Navigation Manual (in English)
[x] Cancel search | Manufacturer: LEXUS, Model Year: 2012, Model line: CT200h, Model: Lexus CT200h 2012Pages: 436, PDF Size: 28.25 MB
Page 23 of 436
23
1
QUICK GUIDE
CT200h_Navi_OM76078E_(EE)
14.02.06 12:29
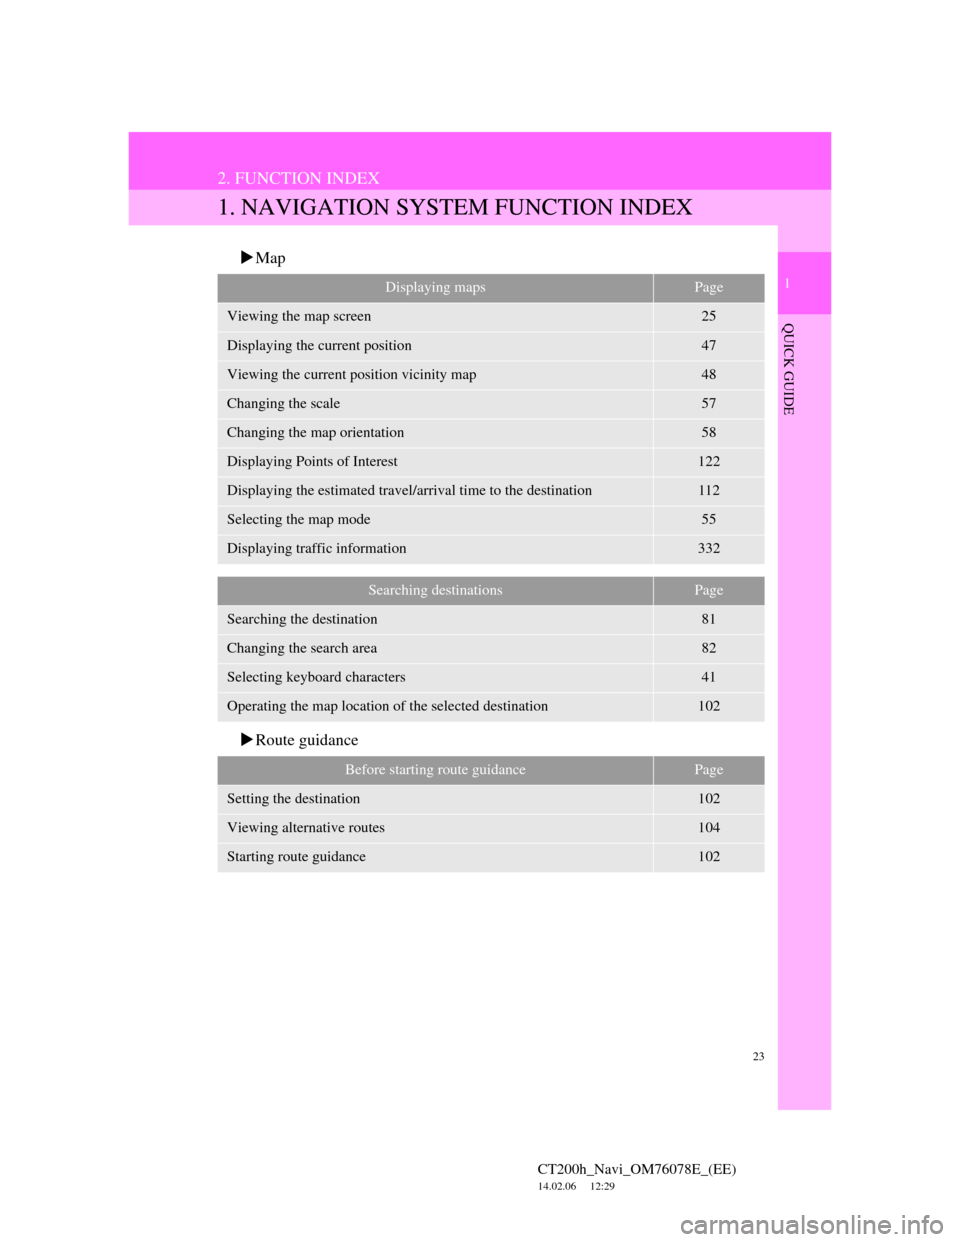
2. FUNCTION INDEX
1. NAVIGATION SYSTEM FUNCTION INDEX
Map
Route guidance
Displaying mapsPage
Viewing the map screen25
Displaying the current position47
Viewing the current position vicinity map48
Changing the scale57
Changing the map orientation58
Displaying Points of Interest122
Displaying the estimated travel/arrival time to the destination112
Selecting the map mode55
Displaying traffic information332
Searching destinationsPage
Searching the destination81
Changing the search area82
Selecting keyboard characters41
Operating the map location of the selected destination102
Before starting route guidancePage
Setting the destination102
Viewing alternative routes104
Starting route guidance102
Page 40 of 436
40
1. BASIC INFORMATION BEFORE OPERATION
CT200h_Navi_OM76078E_(EE)
14.02.06 12:29
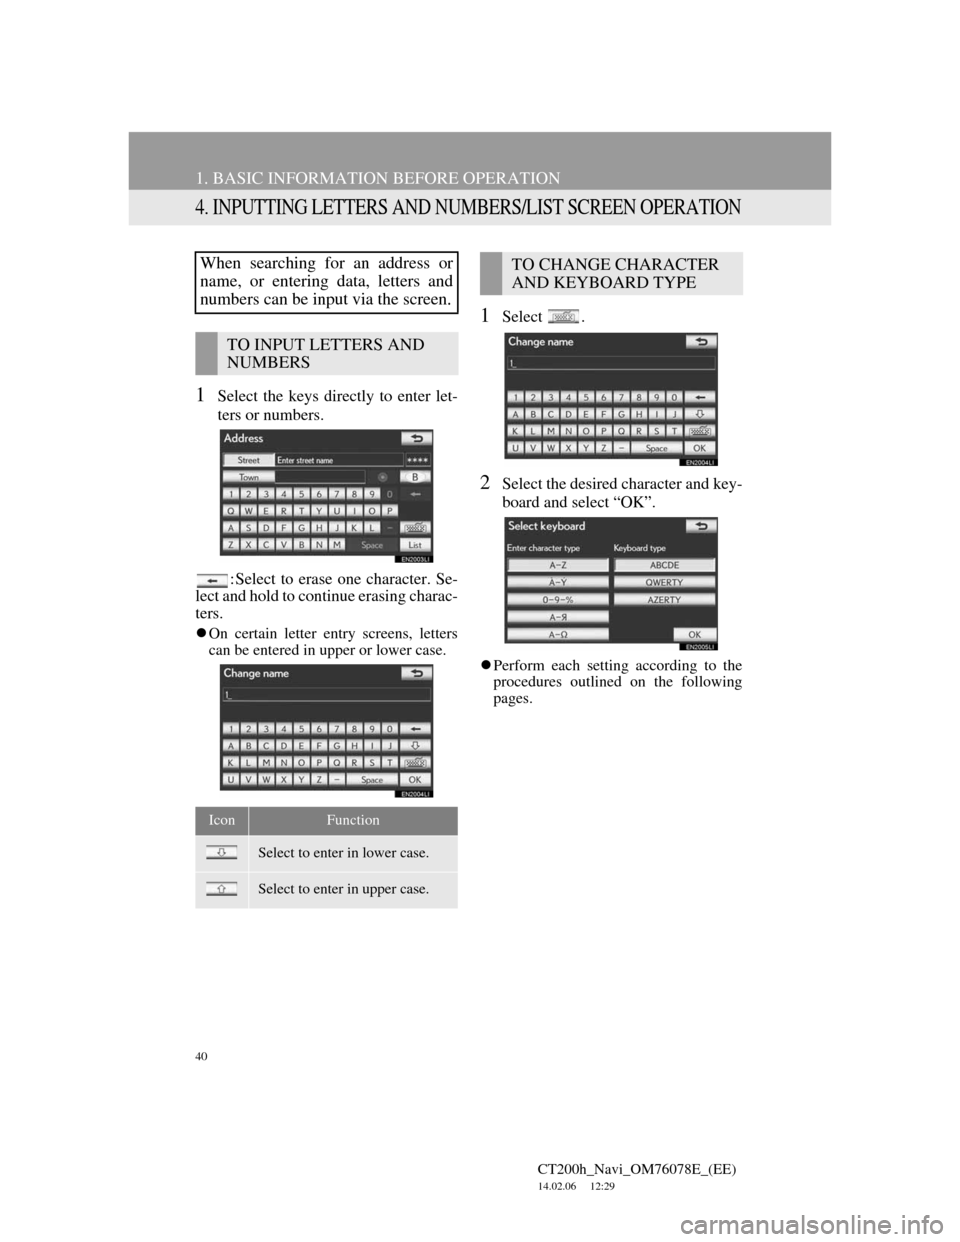
4. INPUTTING LETTERS AND NUMBERS/LIST SCREEN OPERATION
1Select the keys directly to enter let-
ters or numbers.
: Select to erase one character. Se-
lect and hold to continue erasing charac-
ters.
On certain letter entry screens, letters
can be entered in upper or lower case.
1Select .
2Select the desired character and key-
board and select “OK”.
Perform each setting according to the
procedures outlined on the following
pages.
When searching for an address or
name, or entering data, letters and
numbers can be input via the screen.
TO INPUT LETTERS AND
NUMBERS
IconFunction
Select to enter in lower case.
Select to enter in upper case.
TO CHANGE CHARACTER
AND KEYBOARD TYPE
Page 41 of 436
41
1. BASIC INFORMATION BEFORE OPERATION
2
BASIC FUNCTION
CT200h_Navi_OM76078E_(EE)
14.02.06 12:29
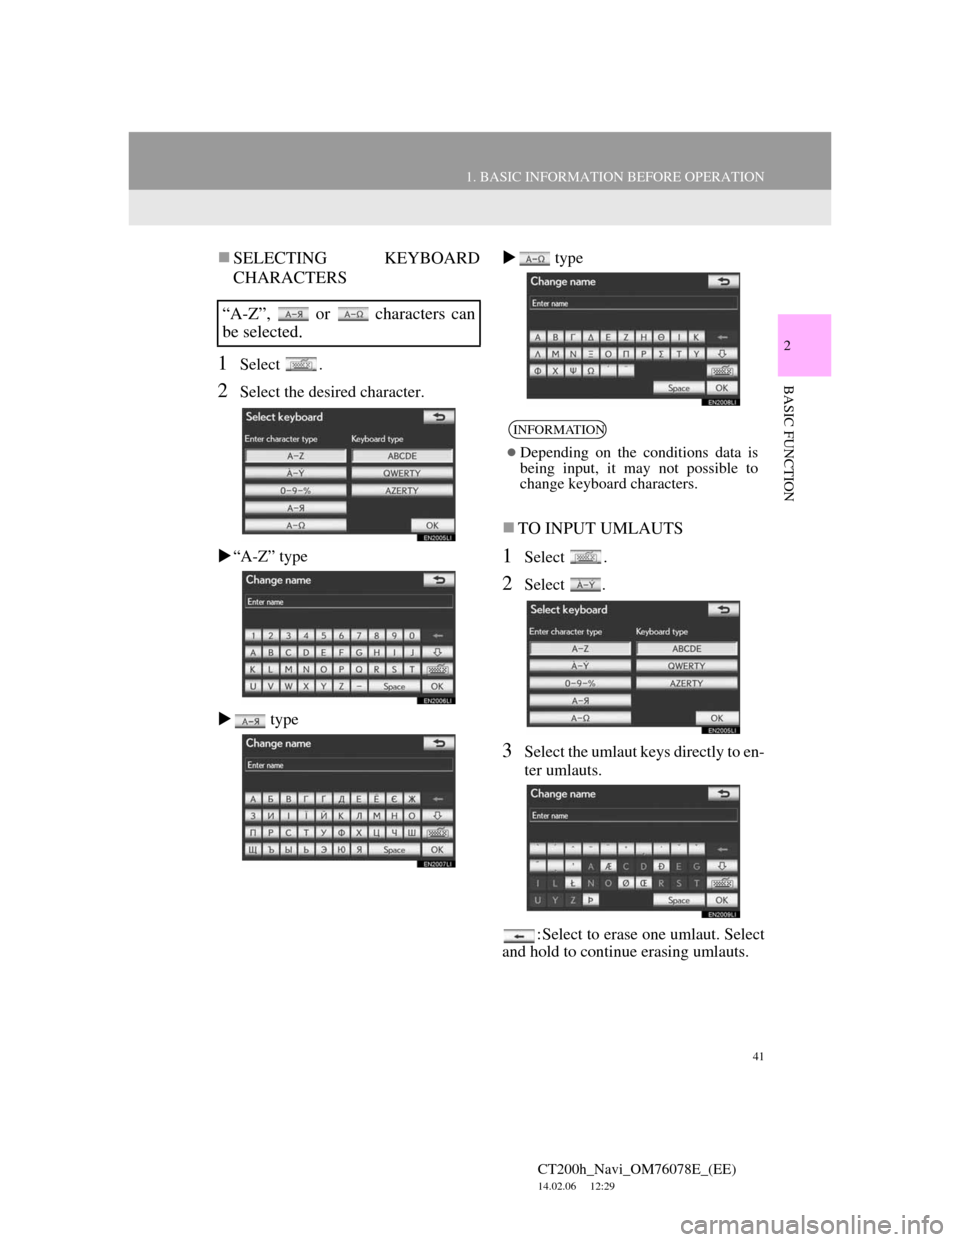
SELECTING KEYBOARD
CHARACTERS
1Select .
2Select the desired character.
“A-Z” type
type type
TO INPUT UMLAUTS
1Select .
2Select .
3Select the umlaut keys directly to en-
ter umlauts.
: Select to erase one umlaut. Select
and hold to continue erasing umlauts.
“A-Z”, or characters can
be selected.
INFORMATION
Depending on the conditions data is
being input, it may not possible to
change keyboard characters.
Page 42 of 436
42
1. BASIC INFORMATION BEFORE OPERATION
CT200h_Navi_OM76078E_(EE)
14.02.06 12:29
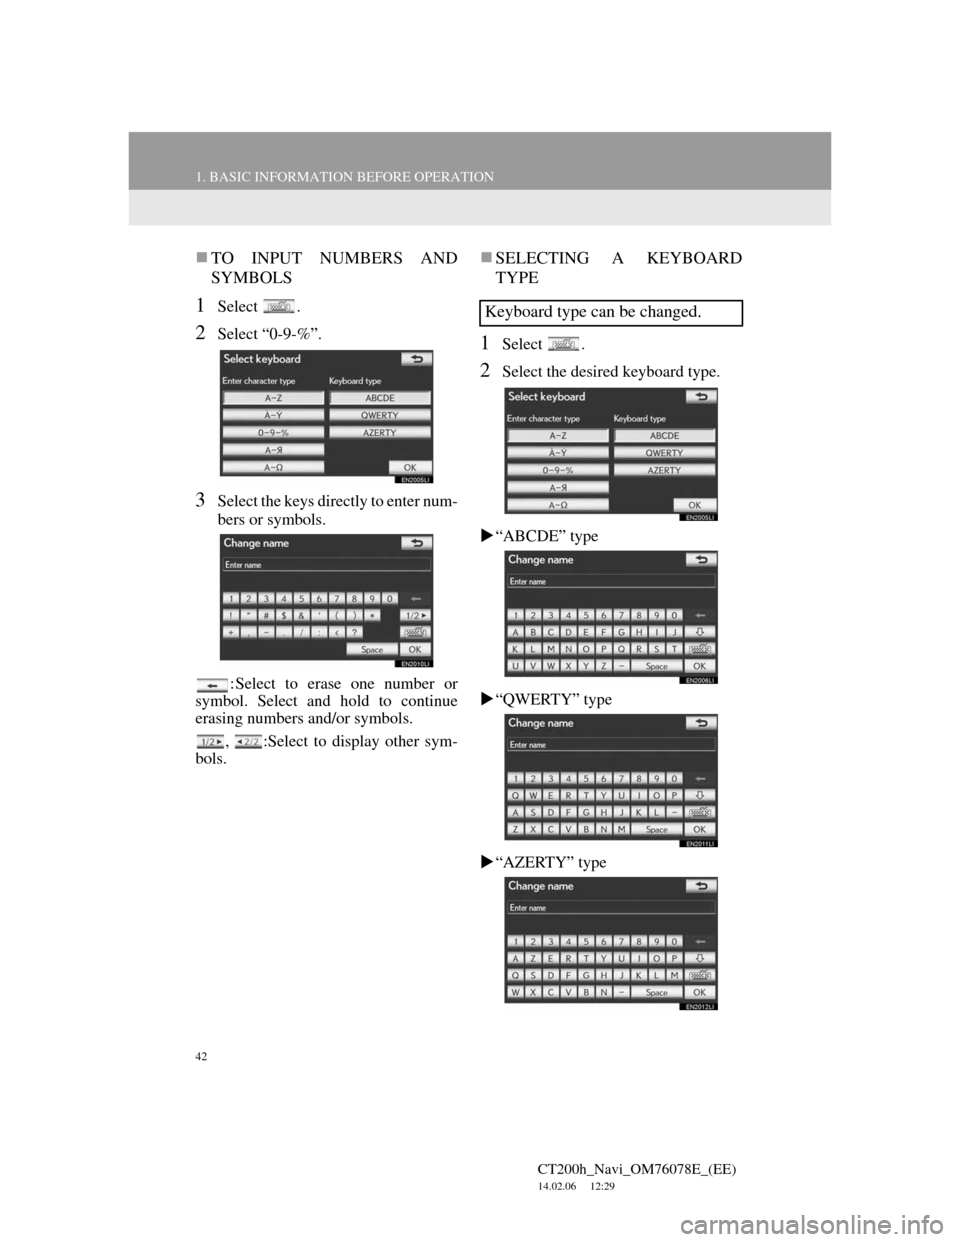
TO INPUT NUMBERS AND
SYMBOLS
1Select .
2Select “0-9-%”.
3Select the keys directly to enter num-
bers or symbols.
: Select to erase one number or
symbol. Select and hold to continue
erasing numbers and/or symbols.
, :Select to display other sym-
bols.
SELECTING A KEYBOARD
TYPE
1Select .
2Select the desired keyboard type.
“ABCDE” type
“QWERTY” type
“AZERTY” type
Keyboard type can be changed.
Page 79 of 436
79
1. DESTINATION SEARCH
3
NAVIGATION SYSTEM
CT200h_Navi_OM76078E_(EE)
14.02.06 12:29
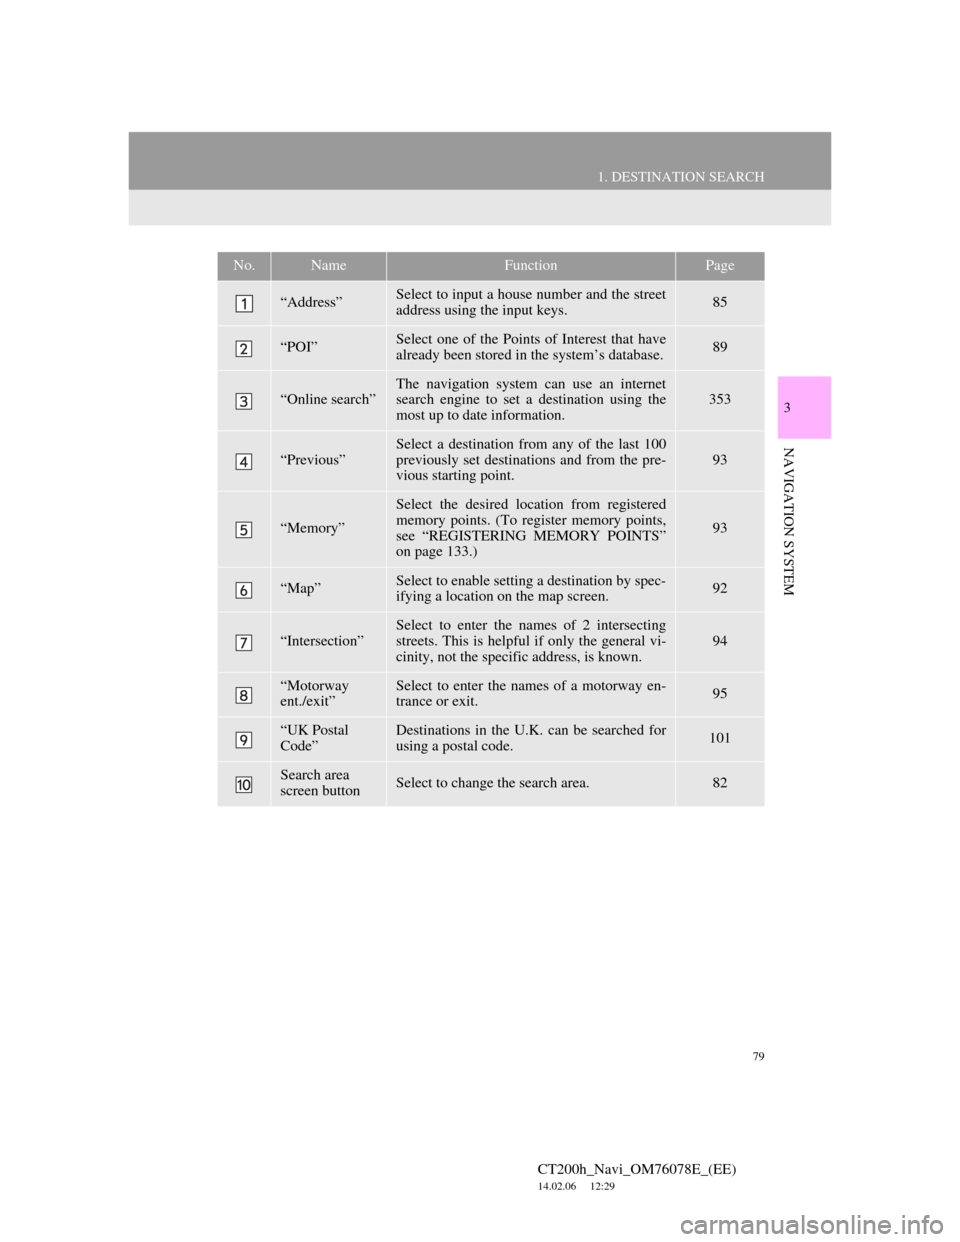
No.NameFunctionPage
“Address”Select to input a house number and the street
address using the input keys.85
“POI”Select one of the Points of Interest that have
already been stored in the system’s database.89
“Online search”
The navigation system can use an internet
search engine to set a destination using the
most up to date information.
353
“Previous”Select a destination from any of the last 100
previously set destinations and from the pre-
vious starting point.93
“Memory”
Select the desired location from registered
memory points. (To register memory points,
see “REGISTERING MEMORY POINTS”
on page 133.)
93
“Map”Select to enable setting a destination by spec-
ifying a location on the map screen.92
“Intersection”Select to enter the names of 2 intersecting
streets. This is helpful if only the general vi-
cinity, not the specific address, is known.94
“Motorway
ent./exit”Select to enter the names of a motorway en-
trance or exit.95
“UK Postal
Code”Destinations in the U.K. can be searched for
using a postal code.101
Search area
screen buttonSelect to change the search area.82
Page 83 of 436
83
1. DESTINATION SEARCH
3
NAVIGATION SYSTEM
CT200h_Navi_OM76078E_(EE)
14.02.06 12:29
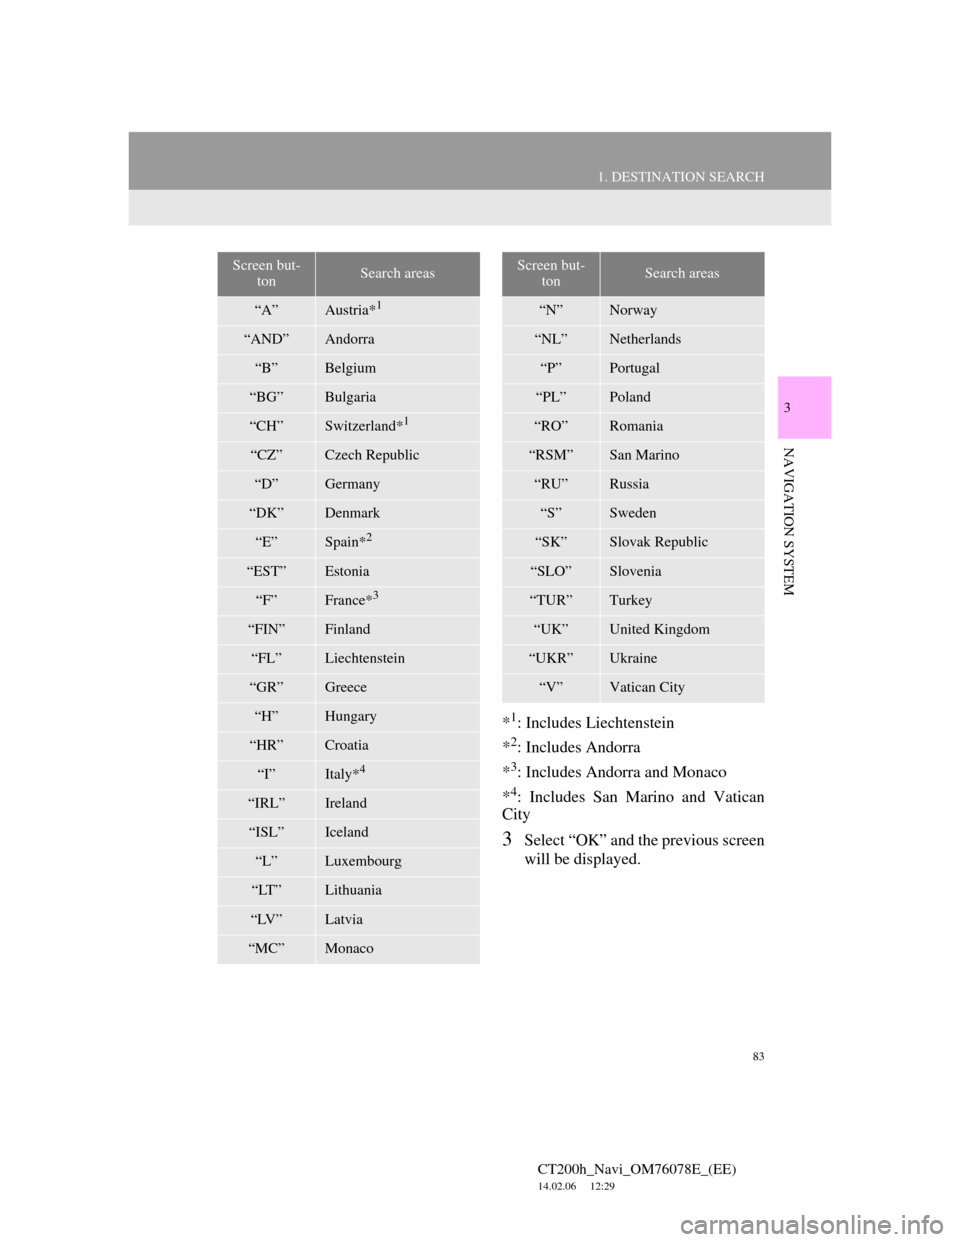
*1: Includes Liechtenstein
*
2: Includes Andorra
*
3: Includes Andorra and Monaco
*
4: Includes San Marino and Vatican
City
3Select “OK” and the previous screen
will be displayed.
Screen but-
tonSearch areas
“A”Austria*1
“AND”Andorra
“B”Belgium
“BG”Bulgaria
“CH”Switzerland*1
“CZ”Czech Republic
“D”Germany
“DK”Denmark
“E”Spain*2
“EST”Estonia
“F”France*3
“FIN”Finland
“FL”Liechtenstein
“GR”Greece
“H”Hungary
“HR”Croatia
“I”Italy*4
“IRL”Ireland
“ISL”Iceland
“L”Luxembourg
“LT”Lithuania
“LV”Latvia
“MC”Monaco
“N”Norway
“NL”Netherlands
“P”Portugal
“PL”Poland
“RO”Romania
“RSM”San Marino
“RU”Russia
“S”Sweden
“SK”Slovak Republic
“SLO”Slovenia
“TUR”Turkey
“UK”United Kingdom
“UKR”Ukraine
“V”Vatican City
Screen but-
tonSearch areas
Page 85 of 436
85
1. DESTINATION SEARCH
3
NAVIGATION SYSTEM
CT200h_Navi_OM76078E_(EE)
14.02.06 12:29
1Press the “MENU” button on the
Remote Touch. (See “Remote
Touch” on page 12.)
2Select “Navi”, and select “Menu” if
the map screen is displayed.
3Select “Destination” on the naviga-
tion menu screen.
4Select “Address” on the “Destina-
tion” screen.
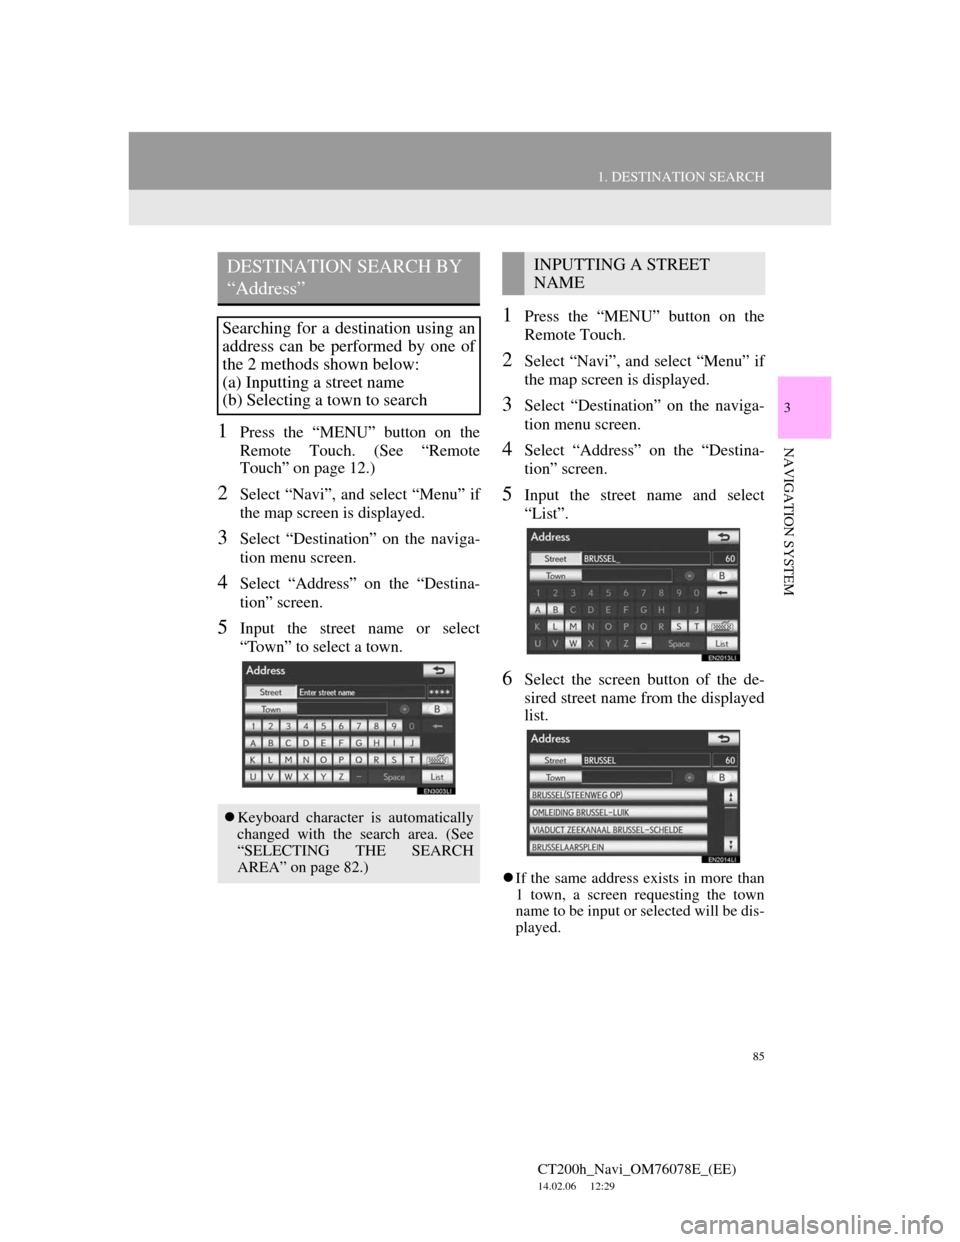
5Input the street name or select
“Town” to select a town.
1Press the “MENU” button on the
Remote Touch.
2Select “Navi”, and select “Menu” if
the map screen is displayed.
3Select “Destination” on the naviga-
tion menu screen.
4Select “Address” on the “Destina-
tion” screen.
5Input the street name and select
“List”.
6Select the screen button of the de-
sired street name from the displayed
list.
If the same address exists in more than
1 town, a screen requesting the town
name to be input or selected will be dis-
played.
DESTINATION SEARCH BY
“Address”
Searching for a destination using an
address can be performed by one of
the 2 methods shown below:
(a) Inputting a street name
(b) Selecting a town to search
Keyboard character is automatically
changed with the search area. (See
“SELECTING THE SEARCH
AREA” on page 82.)
INPUTTING A STREET
NAME
Page 89 of 436
89
1. DESTINATION SEARCH
3
NAVIGATION SYSTEM
CT200h_Navi_OM76078E_(EE)
14.02.06 12:29
1Press the “MENU” button on the
Remote Touch. (See “Remote
Touch” on page 12.)
2Select “Navi”, and select “Menu” if
the map screen is displayed.
3Select “Destination” on the naviga-
tion menu screen.
4Select “POI” on the “Destination”
screen.
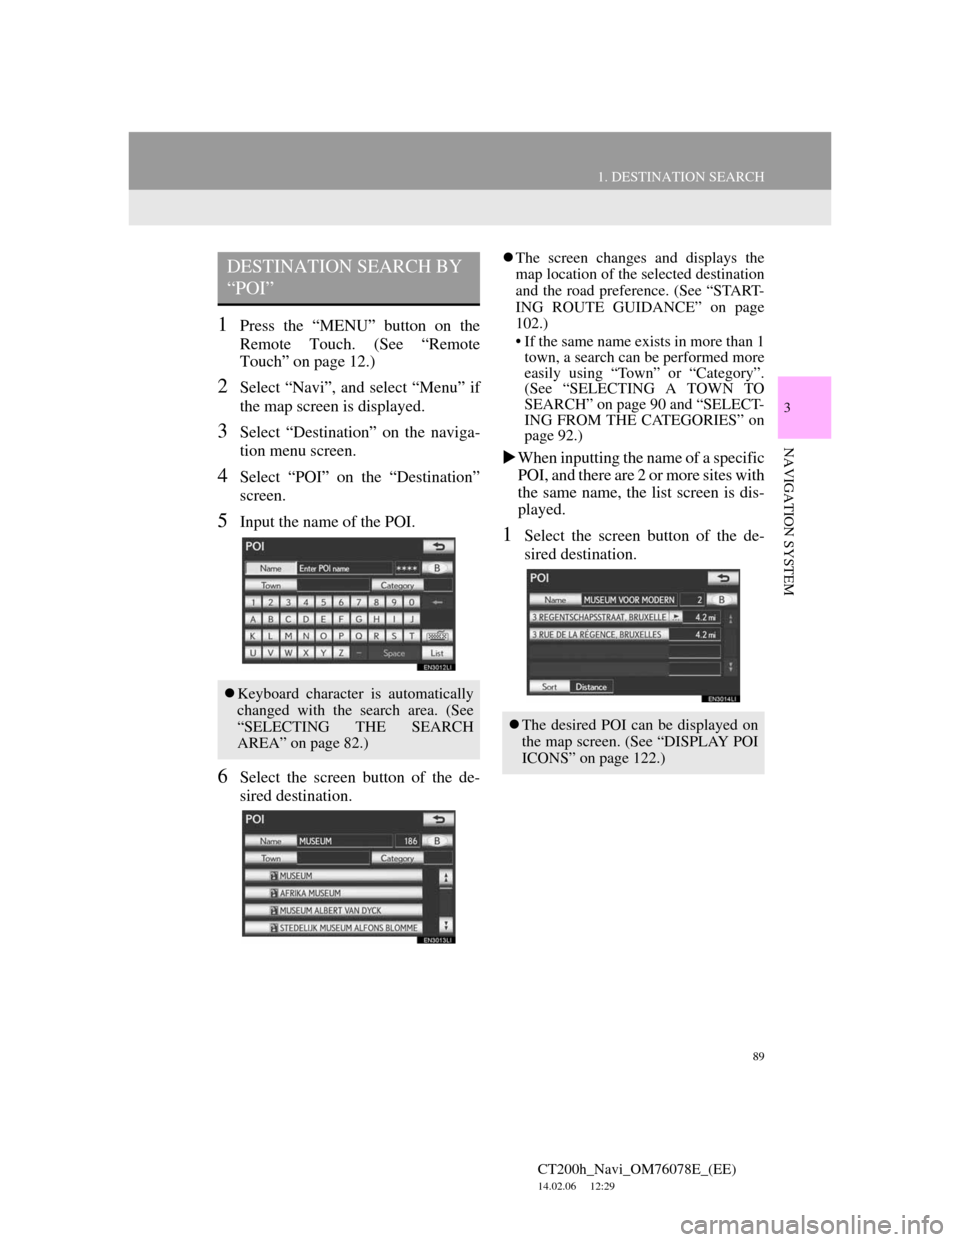
5Input the name of the POI.
6Select the screen button of the de-
sired destination.
The screen changes and displays the
map location of the selected destination
and the road preference. (See “START-
ING ROUTE GUIDANCE” on page
102.)
• If the same name exists in more than 1
town, a search can be performed more
easily using “Town” or “Category”.
(See “SELECTING A TOWN TO
SEARCH” on page 90 and “SELECT-
ING FROM THE CATEGORIES” on
page 92.)
When inputting the name of a specific
POI, and there are 2 or more sites with
the same name, the list screen is dis-
played.
1Select the screen button of the de-
sired destination.
DESTINATION SEARCH BY
“POI”
Keyboard character is automatically
changed with the search area. (See
“SELECTING THE SEARCH
AREA” on page 82.)
The desired POI can be displayed on
the map screen. (See “DISPLAY POI
ICONS” on page 122.)
Page 94 of 436
94
1. DESTINATION SEARCH
CT200h_Navi_OM76078E_(EE)
14.02.06 12:29
1Press the “MENU” button on the
Remote Touch. (See “Remote
Touch” on page 12.)
2Select “Navi”, and select “Menu” if
the map screen is displayed.
3Select “Destination” on the naviga-
tion menu screen.
4Select “Intersection” on the second
page of the “Destination” screen.
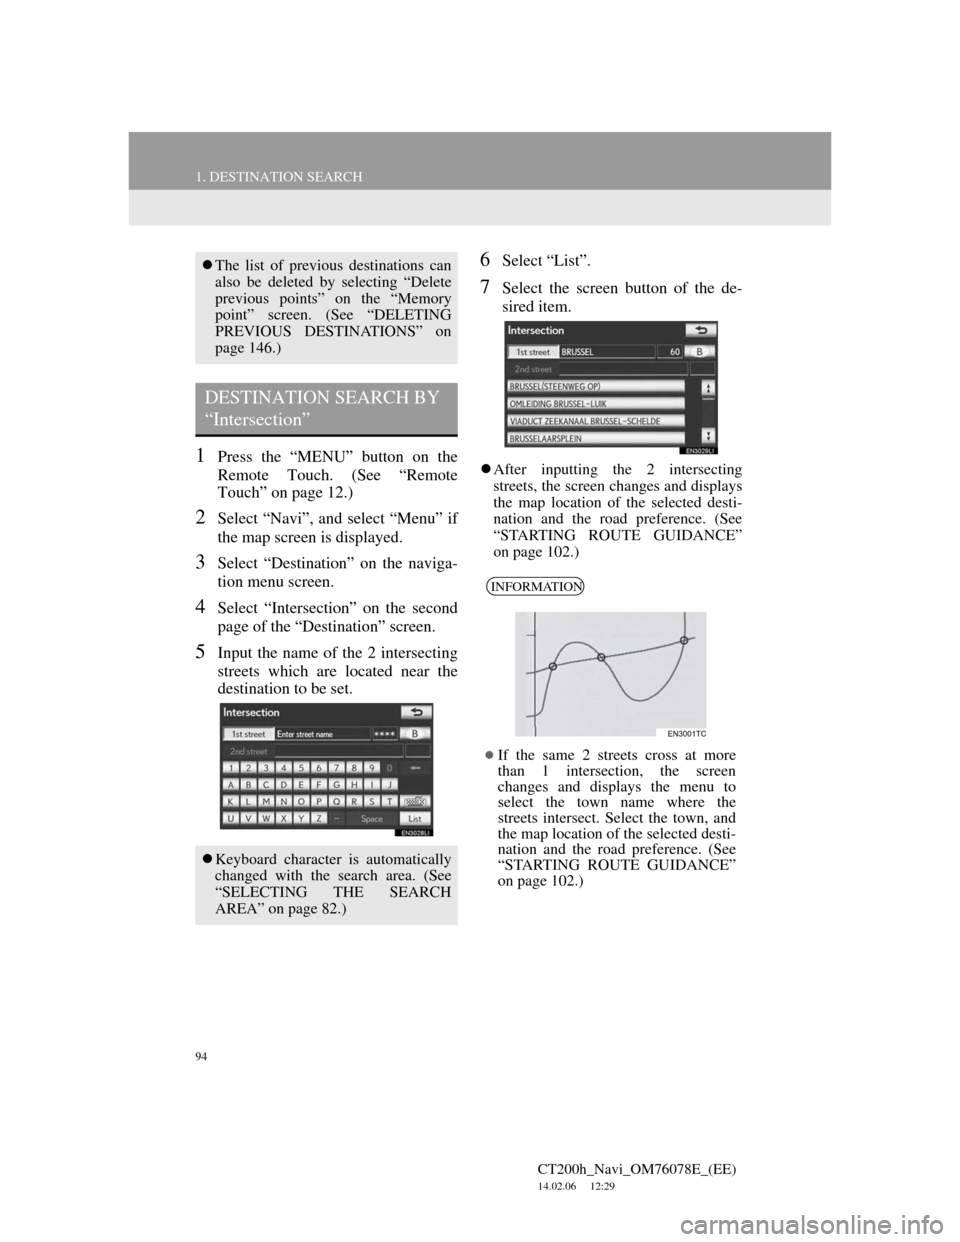
5Input the name of the 2 intersecting
streets which are located near the
destination to be set.
6Select “List”.
7Select the screen button of the de-
sired item.
After inputting the 2 intersecting
streets, the screen changes and displays
the map location of the selected desti-
nation and the road preference. (See
“STARTING ROUTE GUIDANCE”
on page 102.)
The list of previous destinations can
also be deleted by selecting “Delete
previous points” on the “Memory
point” screen. (See “DELETING
PREVIOUS DESTINATIONS” on
page 146.)
DESTINATION SEARCH BY
“Intersection”
Keyboard character is automatically
changed with the search area. (See
“SELECTING THE SEARCH
AREA” on page 82.)
INFORMATION
If the same 2 streets cross at more
than 1 intersection, the screen
changes and displays the menu to
select the town name where the
streets intersect. Select the town, and
the map location of the selected desti-
nation and the road preference. (See
“STARTING ROUTE GUIDANCE”
on page 102.)
Page 95 of 436
95
1. DESTINATION SEARCH
3
NAVIGATION SYSTEM
CT200h_Navi_OM76078E_(EE)
14.02.06 12:29
1Press the “MENU” button on the
Remote Touch. (See “Remote
Touch” on page 12.)
2Select “Navi”, and select “Menu” if
the map screen is displayed.
3Select “Destination” on the naviga-
tion menu screen.
4Select “Motorway ent./exit” on the
second page of the “Destination”
screen.
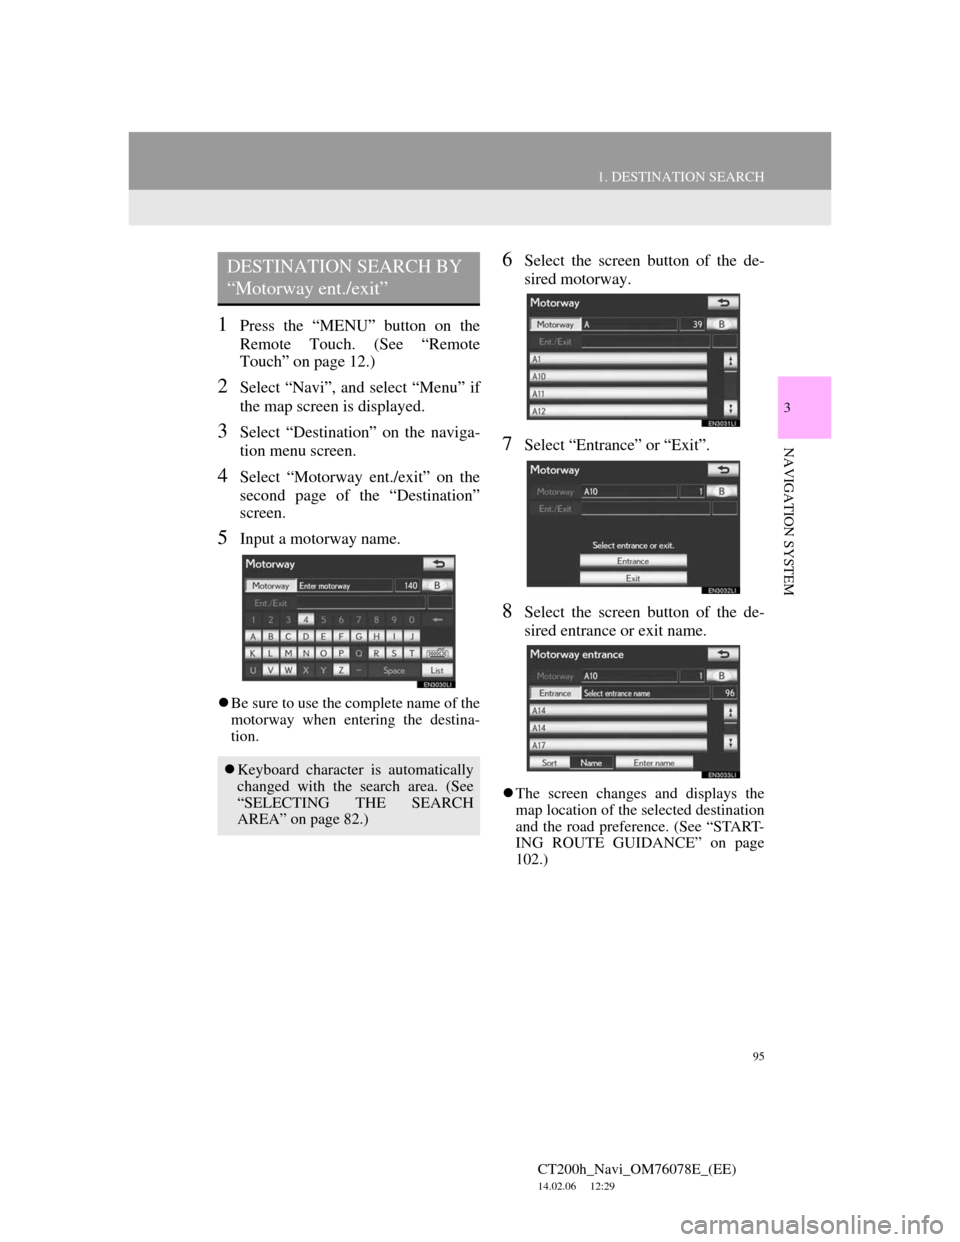
5Input a motorway name.
Be sure to use the complete name of the
motorway when entering the destina-
tion.
6Select the screen button of the de-
sired motorway.
7Select “Entrance” or “Exit”.
8Select the screen button of the de-
sired entrance or exit name.
The screen changes and displays the
map location of the selected destination
and the road preference. (See “START-
ING ROUTE GUIDANCE” on page
102.)
DESTINATION SEARCH BY
“Motorway ent./exit”
Keyboard character is automatically
changed with the search area. (See
“SELECTING THE SEARCH
AREA” on page 82.)