key Lexus CT200h 2012 (in English) Owner's Guide
[x] Cancel search | Manufacturer: LEXUS, Model Year: 2012, Model line: CT200h, Model: Lexus CT200h 2012Pages: 710
Page 164 of 710

164
1-8. Safety information
CT200h_OM_OM76067E_(EE)
Deactivating the front seat passenger airbag, front passenger knee
airbag and front passenger side airbag
Insert the mechanical key into
the cylinder and rotate to the
“OFF” position.
The “OFF” indicator light turns
on (only when the “POWER”
switch is in ON mode).
“PASSENGER AIRBAG” indicator information
If any of the following problems occur, it is possible that there is a malfunc-
tion in the system. Have the vehicle inspected by any authorized Lexus
dealer or repairer, or another duly qualified and equipped professional.
Neither “ON” nor “OFF” comes on.
The indicator does not change when the airbag manual on-off switch is
switched to “ON” or “OFF” position.
Page 170 of 710

170
1-8. Safety information
CT200h_OM_OM76067E_(EE)Key of letters inserted in the above table:
U: Suitable for “universal” category child restraint system
approved for the use in this mass group.
UF: Suitable for forward facing “universal” category child
restraint system approved for the use in this mass group.
L1: Suitable for “LEXUS G 0+, BABY SAFE PLUS” (0 to 13 kg
[0 to 28 lb.]) approved for the use in this mass group.
L2: Suitable for “LEXUS G 0+, BABY SAFE PLUS with SEAT
BELT FIXATION, BASE PLATFORM” (0 to 13 kg [0 to
28 lb.]) approved for the use in this mass group.
L3: Suitable for “LEXUS DUO+” (without ISOFIX, 9 to 18 kg
[20 to 39 lb.]) approved for the use in this mass group.
L4: Suitable for “LEXUS KID” (15 to 36 kg [34 to 79 lb.])
approved for the use in this mass group.
L5: Suitable for “LEXUS KIDFIX” (15 to 36 kg [34 to 79 lb.])
approved for the use in this mass group.
X: Not suitable seat position for children in this mass group.
*1: When you use a child restraint system in this position, adjust
the seat back and fix it at the most upright lock position.
*2: When you use a child restraint system in this position, remove
the head restraint.
Other child restraint system which is different from the system
mentioned in the table can be used.
But the suitability of the systems must be carefully checked with
the child restraint system manufacturer concerned and the seller of
those seats.
Page 172 of 710

172
1-8. Safety information
CT200h_OM_OM76067E_(EE)(1) For the CRS which do not carry the ISO/XX size class identi-
fication (A to G), for the applicable mass group, the car man-
ufacturer shall indicate the vehicle specific ISOFIX child
restraint system(s) recommended for each position.
Key of letters inserted in the above table:
IUF: Suitable for ISOFIX forward-facing child restraints systems
of universal category approved for the use in this mass group.
X: ISOFIX position not suitable for ISOFIX child restraint sys-
tems in this mass group and/or this size class.
*1: When you use a child restraint system in this position, remove
the head restraint.
The child restraint systems mentioned in the table may not be
available outside of the EU area.
Other child restraint systems different from the systems mentioned
in the table can be used, but the suitability of the systems must be
carefully checked with the child restraint system manufacturer and
retailer.
Page 186 of 710

186
CT200h_OM_OM76067E_(EE)
2-1. Driving procedures
Driving the vehicle
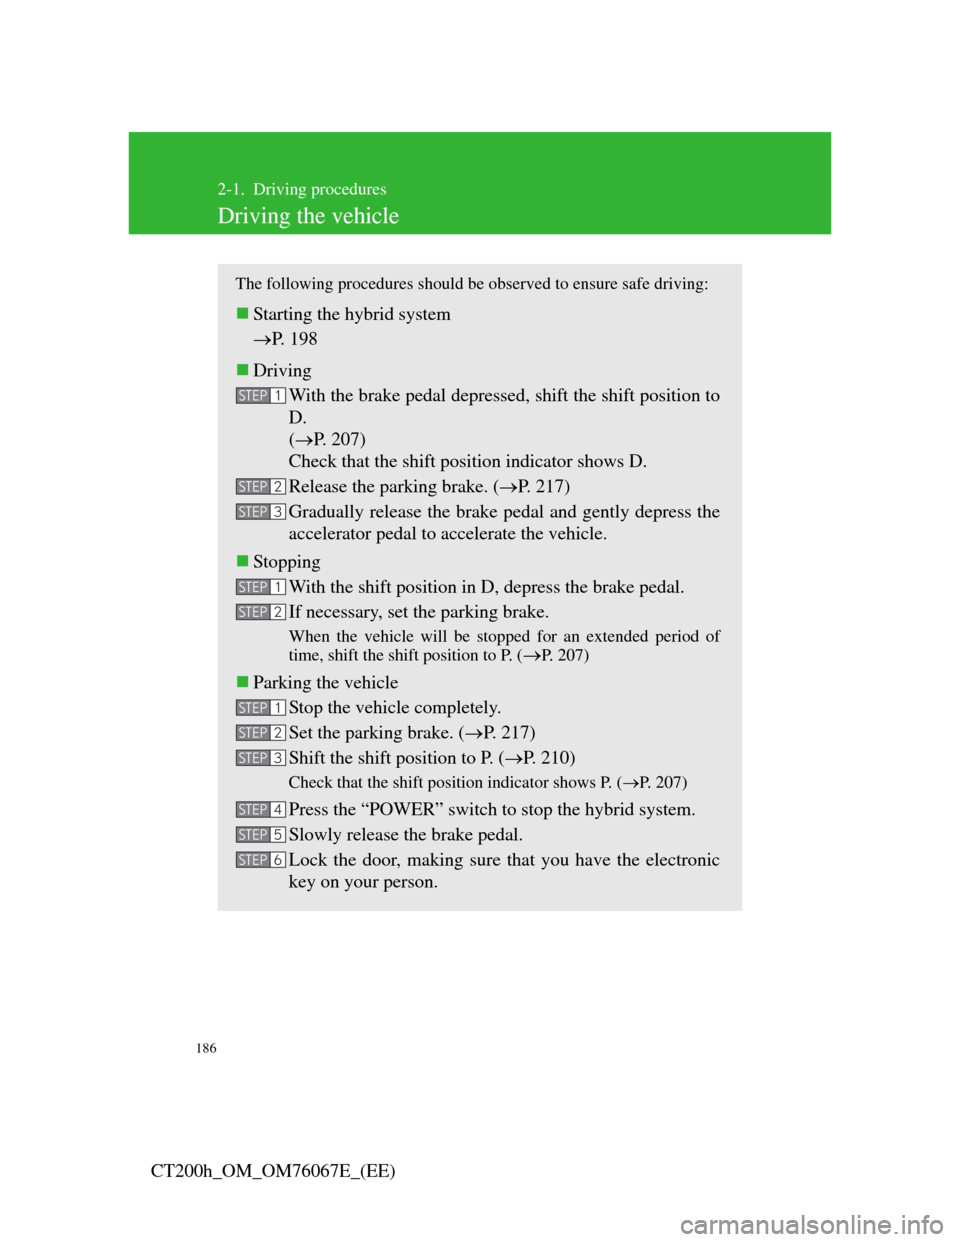
The following procedures should be observed to ensure safe driving:
Starting the hybrid system
P. 198
Driving
With the brake pedal depressed, shift the shift position to
D.
(P. 207)
Check that the shift position indicator shows D.
Release the parking brake. (P. 217)
Gradually release the brake pedal and gently depress the
accelerator pedal to accelerate the vehicle.
Stopping
With the shift position in D, depress the brake pedal.
If necessary, set the parking brake.
When the vehicle will be stopped for an extended period of
time, shift the shift position to P. (
P. 207)
Parking the vehicle
Stop the vehicle completely.
Set the parking brake. (P. 217)
Shift the shift position to P. (P. 2 1 0 )
Check that the shift position indicator shows P. (P. 207)
Press the “POWER” switch to stop the hybrid system.
Slowly release the brake pedal.
Lock the door, making sure that you have the electronic
key on your person.
STEP1
STEP2
STEP3
STEP1
STEP2
STEP1
STEP2
STEP3
STEP4
STEP5
STEP6
Page 198 of 710

198
2-1. Driving procedures
CT200h_OM_OM76067E_(EE)
Power (ignition) switch
Performing the following operations when carrying the electronic key
on your person starts the hybrid system or changes “POWER” switch
modes.
Starting the hybrid system
Check that the parking brake is set.
Firmly depress the brake pedal.
Check that the “POWER” switch indicator turns green. If the
indicator does not turn green, the hybrid system cannot be
started.
When the shift position is N, the hybrid system cannot start.
Shift the shift position to P when starting the hybrid system.
(P. 210)
Press the “POWER” switch.
Continue depressing the
brake pedal until the hybrid
system is completely started.
The hybrid system can be
started from any “POWER”
switch mode.
STEP1
STEP2
STEP3
Page 201 of 710

201
2-1. Driving procedures
2
When driving
CT200h_OM_OM76067E_(EE)
Electronic key battery depletion
P. 8 7
When the ambient temperature is low, such as during winter driving condi-
tions
It may take time until the “READY” indicator to come on.
Conditions affecting operation
P. 8 6
Notes for the entry function (vehicles with smart entry & start system)
P. 6 9
Note for the push-button start system (vehicles with push-button start sys-
tem)
P. 8 1
If the hybrid system does not start
The immobilizer system may not have been deactivated. (P. 135)
When the “POWER” switch indicator flashes in amber
The system may be malfunctioning. Have the vehicle inspected by any
authorized Lexus dealer or repairer, or another duly qualified and equipped
professional immediately.
Page 202 of 710

202
2-1. Driving procedures
CT200h_OM_OM76067E_(EE)
If the “READY” indicator does not come on
If the “READY” indicator does not come on when you press the “POWER”
switch with the shift position in P and the brake pedal depressed, contact
any authorized Lexus dealer or repairer, or another duly qualified and
equipped professional immediately.
If the hybrid system is malfunctioning
P. 5 7 3
If the electronic key battery is depleted
P. 5 2 7
Operation of the “POWER” switch
When operating the “POWER” switch, one short, firm press is enough.
If the switch is pressed improperly, the hybrid system may not start or
the “POWER” switch mode may not change. It is not necessary to press
and hold the switch.
If attempting to restart the hybrid system immediately after turning the
“POWER” switch off, the hybrid system may not start in some cases.
After turning the “POWER” switch off, please wait a few seconds before
restarting the hybrid system.
Automatically P position selection function
P. 2 1 3
When the P position control system malfunctions
The “POWER” switch will not be able to be turned off. In such a case, the
switch can be turned off after applying the parking brake.
Have the vehicle inspected by any authorized Lexus dealer or repairer, or
another duly qualified and equipped professional immediately.
Page 325 of 710

325
3-1. Using the air conditioning system and defogger
3
Interior features
CT200h_OM_OM76067E_(EE)
Registering air conditioning settings to electronic keys (vehicles with smart
entry & start system)
Unlocking the vehicle using an electronic key and turning the “POWER”
switch to ON mode will recall that key’s registered air conditioning set-
tings.
When the “POWER” switch is turned off, the current air conditioning
settings will automatically be registered to the electronic key that was
used to unlock the vehicle.
The system may not operate correctly if more than one electronic key is in
the vicinity or if the smart entry & start system is used to unlock a passenger
door.
Settings for the electronic key and the corresponding door can be changed.
Contact any authorized Lexus dealer or repairer, or another duly qualified
and equipped professional.
Page 399 of 710

397
3-3. Using the Bluetooth® audio system
3
Interior features
CT200h_OM_OM76067E_(EE)Select “Confirm” using a voice command or .
A passkey is displayed and heard, and a voice guidance instruction
for inputting the passkey into the portable player is heard.
Input the passkey into the portable player.
Refer to the manual that comes with the portable player for the
operation of the portable player.
Guidance for registration completion is heard.
If the portable player has a Bluetooth
® phone, the phone can be
registered at the same time. A voice guidance instruction to regis-
ter a Bluetooth
® phone is heard.
Select “Yes” or “No” using a voice command or .
(Bluetooth
® phone P. 413)
STEP5
STEP6
STEP7
Page 400 of 710

398
3-3. Using the Bluetooth® audio system
CT200h_OM_OM76067E_(EE)
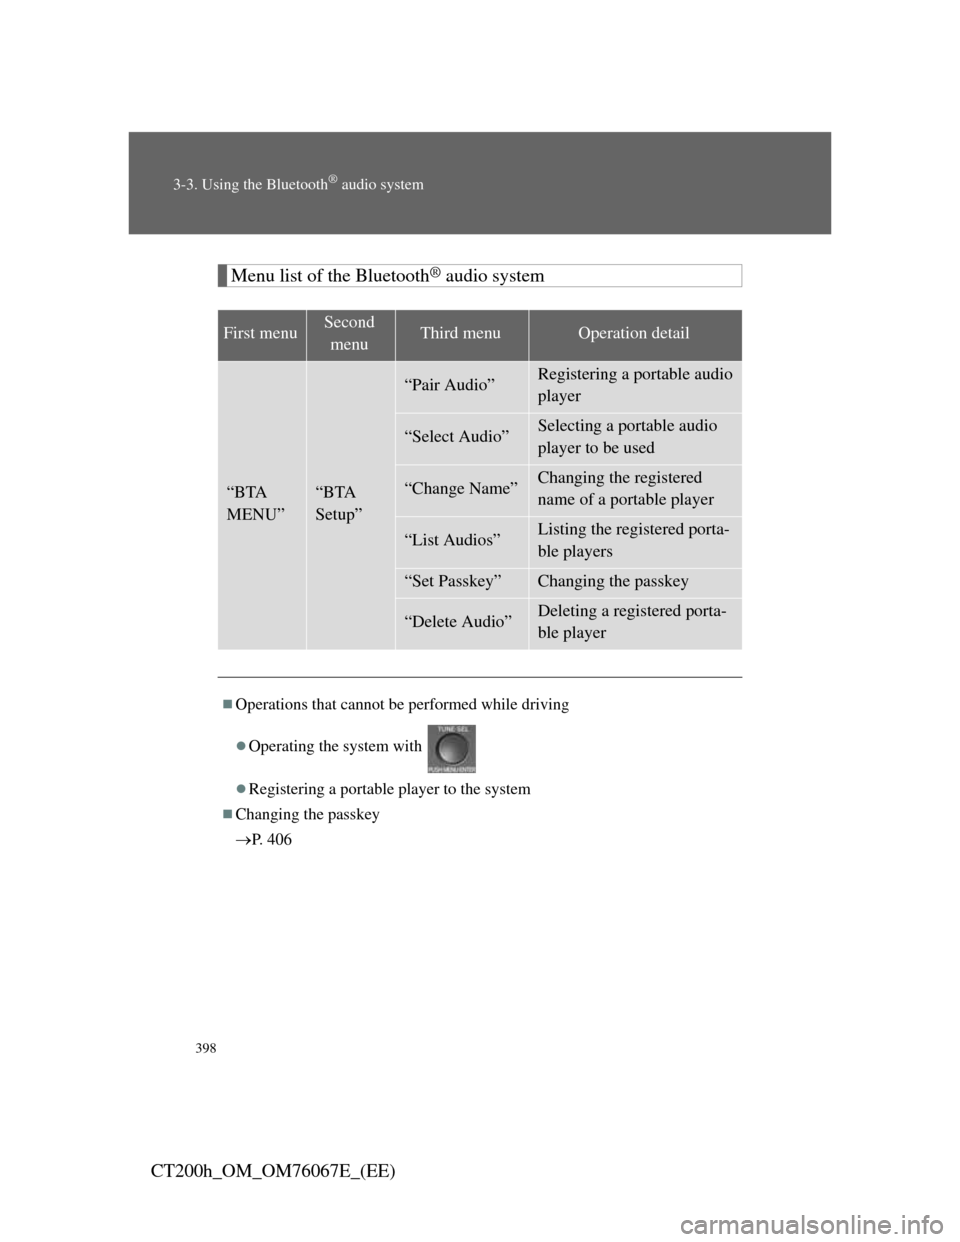
Menu list of the Bluetooth® audio system
First menuSecond
menuThird menuOperation detail
“BTA
MENU”“BTA
Setup”
“Pair Audio”Registering a portable audio
player
“Select Audio”Selecting a portable audio
player to be used
“Change Name”Changing the registered
name of a portable player
“List Audios”Listing the registered porta-
ble players
“Set Passkey”Changing the passkey
“Delete Audio”Deleting a registered porta-
ble player
Operations that cannot be performed while driving
Operating the system with
Registering a portable player to the system
Changing the passkey
P. 4 0 6