sensor Lexus CT200h 2016 Owner's Manual (in English)
[x] Cancel search | Manufacturer: LEXUS, Model Year: 2016, Model line: CT200h, Model: Lexus CT200h 2016Pages: 632, PDF Size: 8.5 MB
Page 36 of 632

361-1. For safe use
CT200h_OM_OM76197U_(U)
WA R N I N G
■People with medical conditions
Obtain medical advice and wear the seat belt in the proper way. (P. 3 2 )
■When children are in the vehicle
Do not allow children to play with the seat belt. If the seat belt becomes twisted around
a child’s neck, it may lead to choking or othe r serious injuries that could result in death.
If this occurs and the child cannot be released from the seat belt, scissors should be
used to cut the belt.
■Seat belt pretensioners
●Do not place anything, such as a cushion, on the front passenger’s seat. Doing so will
disperse the passenger’s weight, which prevents the sensor from detecting the pas-
senger’s weight properly. As a result, the seat belt pretensioner for the front passen-
ger’s seat may not activate in the event of a collision.
●If the pretensioner has activated, the SRS warning light will come on . In that case, the
seat belt cannot be used again and must be replaced at your Lexus dealer.
■Adjustable shoulder anchor
Always make sure the shoulder belt is positioned across the center of your shoulder.
The belt should be kept away from your neck, but not falling off your shoulder. Failure to
do so could reduce the amount of protection in an accident and cause death or serious
injuries in the event of a sudden stop, sudden swerve or accident. ( P. 3 2 )
■Seat belt damage and wear
●Do not damage the seat belts by allowing th e belt, plate, or buckle to be jammed in
the door.
●Inspect the seat belt system periodically. Check for cuts, fraying, and loose parts. Do
not use a damaged seat belt until it is replaced. Damaged seat belts cannot protect an
occupant from death or serious injury.
●Ensure that the belt and plate are locked and the belt is not twisted.
If the seat belt does not function correctly, immediately contact your Lexus dealer.
●Replace the seat assembly, including the belts, if your vehicle has been involved in a
serious accident, even if there’s no obvious damage.
●Do not attempt to install, remove, modify, disassemble or dispose of the seat belts.
Have any necessary repairs carried out by your Lexus dealer. Inappropriate handling
may lead to incorrect operation.
■Using a seat belt extender
●Do not wear the seat belt extender if you can fasten the seat belt without the extender.
●Do not use the seat belt extender when in stalling a child restraint system because the
belt will not securely hold th e child restraint system, increasing the risk of death or
serious injury in the event of an accident.
●The personalized extender may not be safe on another vehicle, when used by another
person, or at a different seating position other than the one originally intended.
Page 39 of 632
391-1. For safe use
CT200h_OM_OM76197U_(U)
1
For safety and security
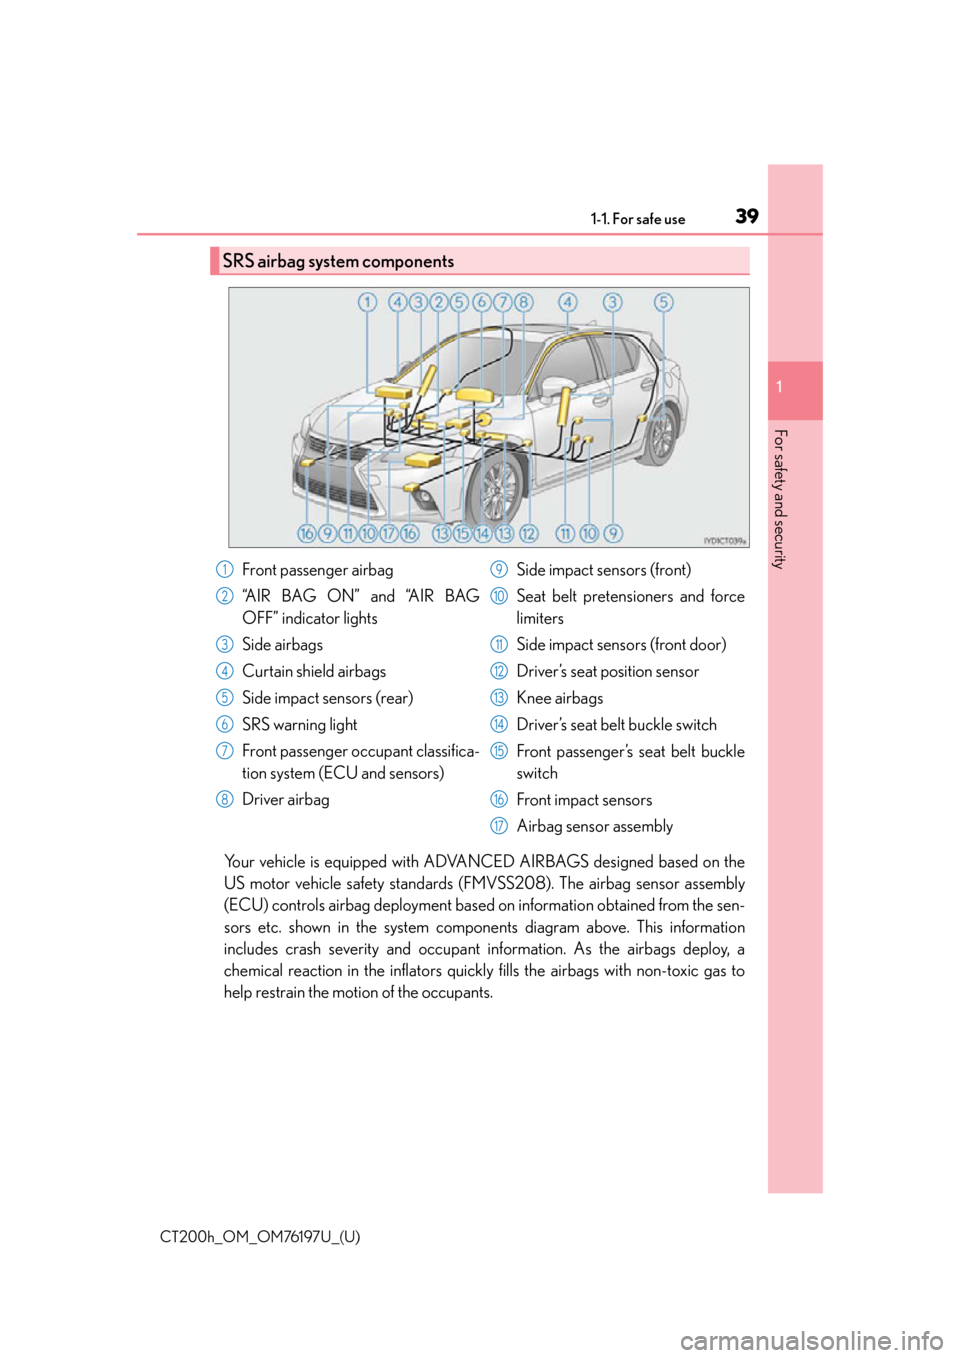
Your vehicle is equipped with ADVANCED AIRBAGS designed based on the
US motor vehicle safety standards (FMVSS208). The airbag sensor assembly
(ECU) controls airbag deployment based on information obtained from the sen-
sors etc. shown in the system compon ents diagram above. This information
includes crash severity and occupant information. As the airbags deploy, a
chemical reaction in the inflators quickly fills the airbags with non-toxic gas to
help restrain the moti on of the occupants.
SRS airbag system components
Front passenger airbag
“AIR BAG ON” and “AIR BAG
OFF” indicator lights
Side airbags
Curtain shield airbags
Side impact sensors (rear)
SRS warning light
Front passenger occupant classifica-
tion system (ECU and sensors)
Driver airbag Side impact sensors (front)
Seat belt pretensioners and force
limiters
Side impact sensors (front door)
Driver’s seat position sensor
Knee airbags
Driver’s seat belt buckle switch
Front passenger’s seat belt buckle
switch
Front impact sensors
Airbag sensor assembly1
2
3
4
5
6
7
8
9
10
11
12
13
14
15
16
17
Page 42 of 632
421-1. For safe use
CT200h_OM_OM76197U_(U)
WA R N I N G
■SRS airbag precautions
●Do not hang coat hangers or other hard objects on the coat hooks. All of these items
could become projectiles and may cause death or serious injury, should the SRS cur-
tain shield ai rbags deploy.
●If a vinyl cover is put on the area where the SRS knee airbag will deploy, be sure to
remove it.
●Do not use seat accessories which cover th e parts where the SRS side airbags inflate
as they may interfere with inflation of th e airbags. Such accessories may prevent the
side airbags from activating correctly, disa ble the system or cause the side airbags to
inflate accidentally, resulting in death or serious injury.
●Do not strike or apply signif icant levels of force to the area of the SRS airbag compo-
nents.
Doing so can cause the SRS airbags to malfunction.
●Do not touch any of the component parts immediately after the SRS airbags have
deployed (inflated) as they may be hot.
●If breathing becomes difficult after the SRS airbags have deployed, open a door or
window to allow fresh air in, or leave the vehicl e if it is safe to do so. Wash off any resi-
due as soon as possible to prevent skin irritation.
●If the areas where the SRS airbags are stored, such as the steering wheel pad and
front and rear pillar garnishes, are damaged or cracked, have them replaced by your
Lexus dealer.
●Do not place anything, such as a cushion, on the front passenger’s seat. Doing so will
disperse the passenger’s weight, which prevents the sensor from detecting the pas-
senger’s weight properly. As a result, th e SRS front airbags for the front passenger
may not deploy in the event of a collision.
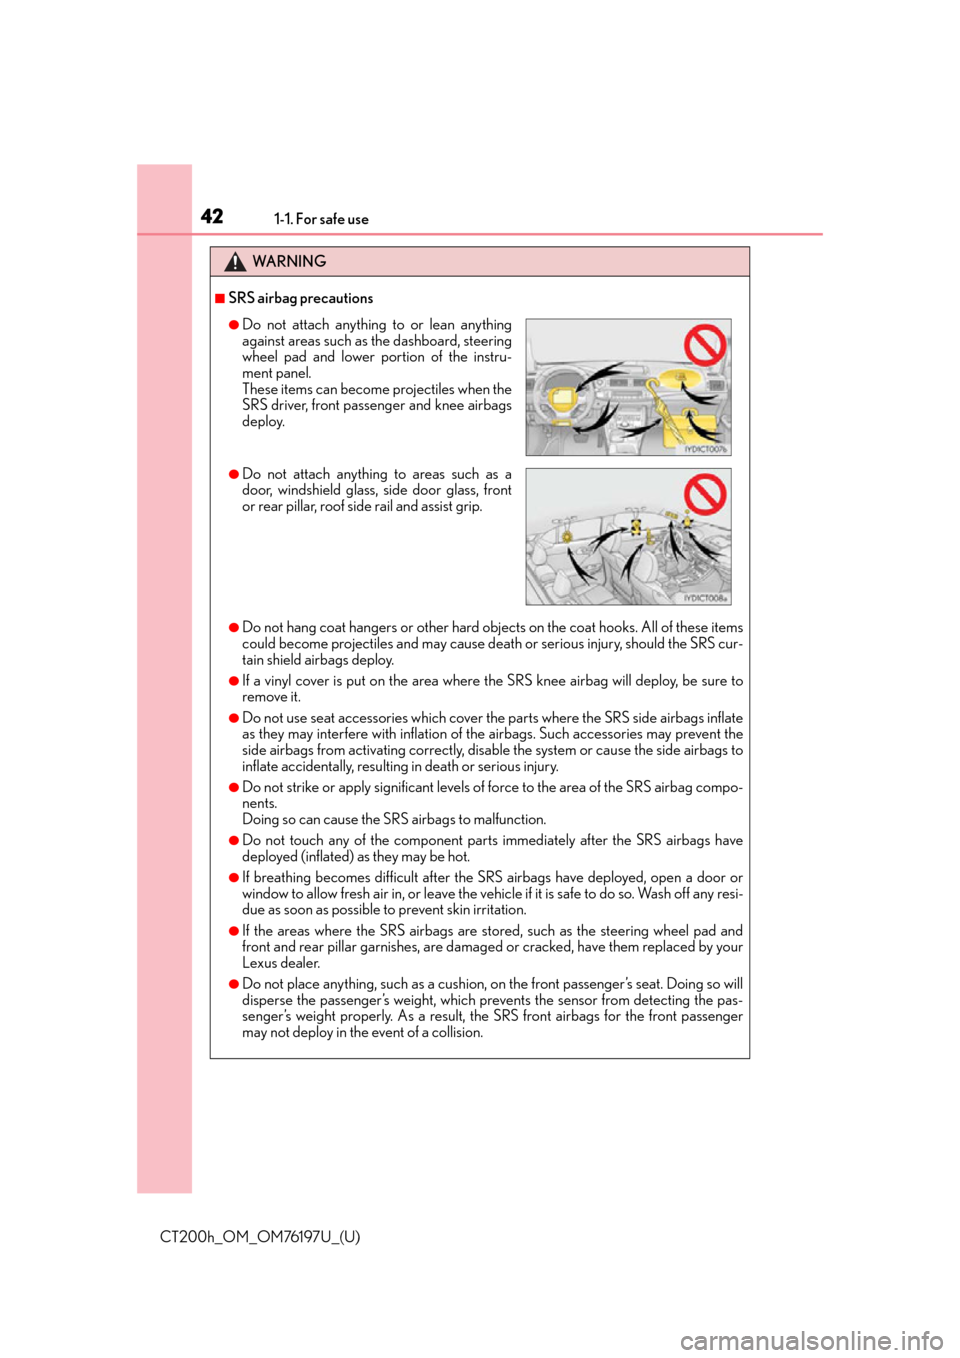
●Do not attach anything to or lean anything
against areas such as the dashboard, steering
wheel pad and lower portion of the instru-
ment panel.
These items can become projectiles when the
SRS driver, front passenger and knee airbags
deploy.
●Do not attach anything to areas such as a
door, windshield glass, side door glass, front
or rear pillar, roof side rail and assist grip.
Page 70 of 632
701-2. Hybrid system
CT200h_OM_OM76197U_(U)
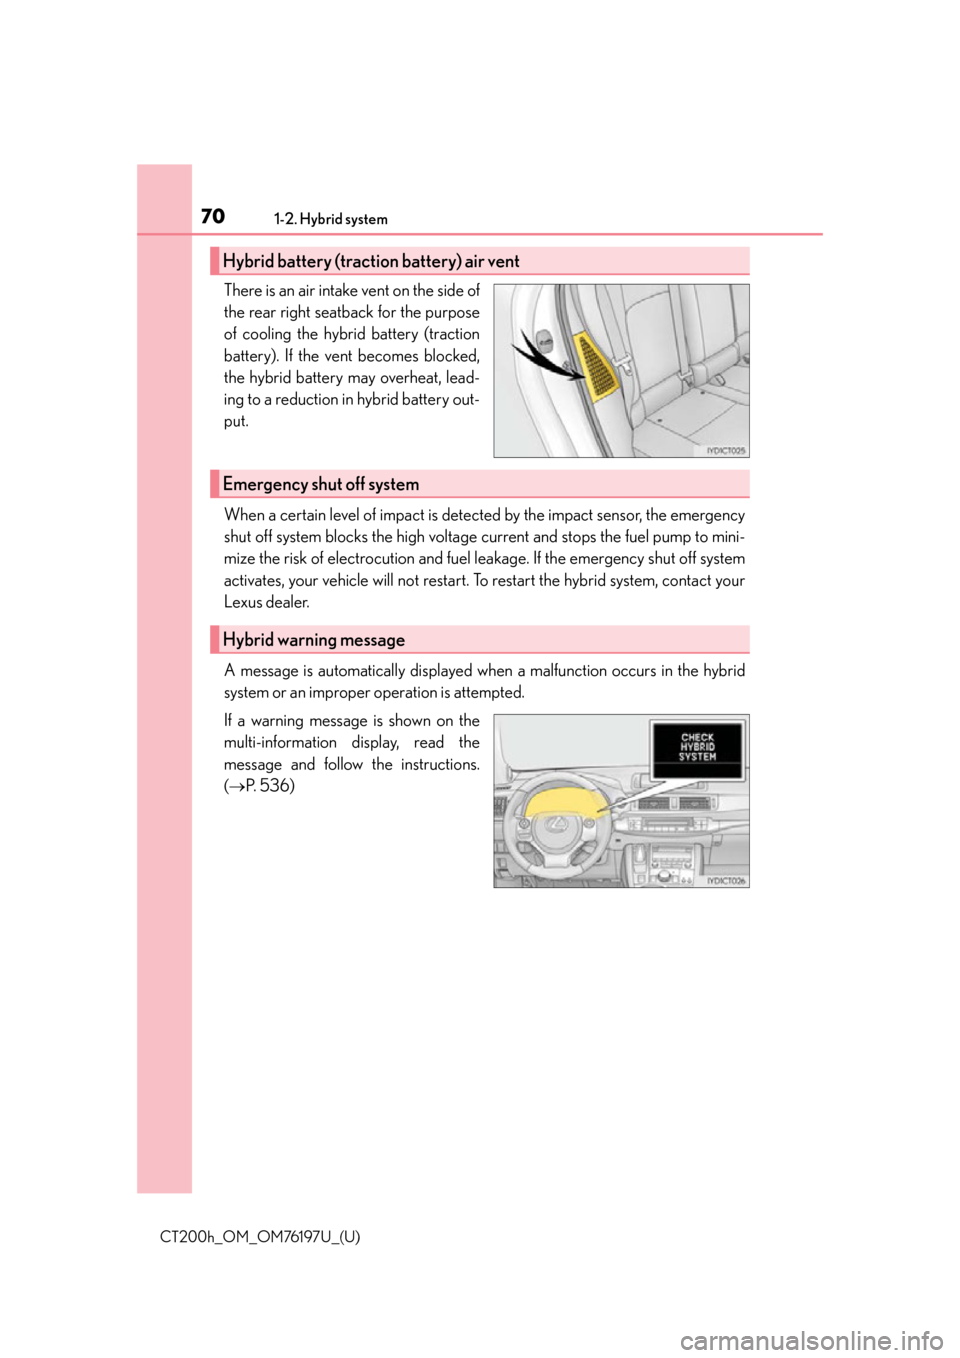
There is an air intake vent on the side of
the rear right seatback for the purpose
of cooling the hybrid battery (traction
battery). If the vent becomes blocked,
the hybrid battery may overheat, lead-
ing to a reduction in hybrid battery out-
put.
When a certain level of impact is detected by the impact sensor, the emergency
shut off system blocks the high voltage current and stops the fuel pump to mini-
mize the risk of electrocution and fuel leakage. If the emergency shut off system
activates, your vehicle will not restart. To restart the hybrid system, contact your
Lexus dealer.
A message is automatically displayed when a malfunction occurs in the hybrid
system or an improper operation is attempted.
If a warning message is shown on the
multi-information display, read the
message and follow the instructions.
( P. 5 3 6 )
Hybrid battery (traction battery) air vent
Emergency shut off system
Hybrid warning message
Page 105 of 632
105
CT200h_OM_OM76197U_(U)3-2. Opening, closing
and locking the doors
3
Operation of each component
Side doors
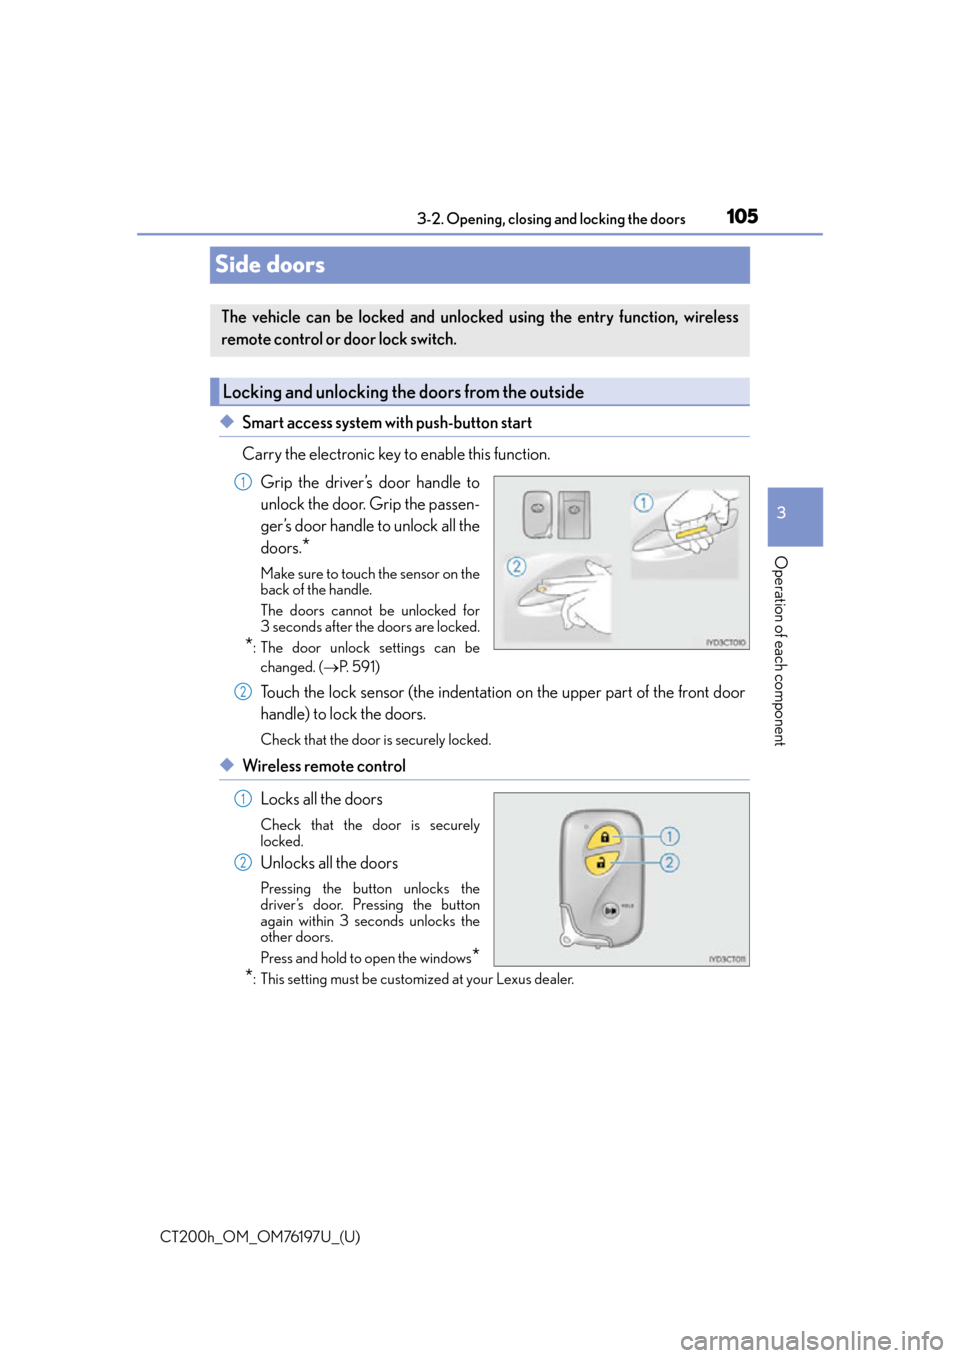
◆Smart access system with push-button start
Carry the electronic key to enable this function.
Grip the driver’s door handle to
unlock the door. Grip the passen-
ger’s door handle to unlock all the
doors.
*
Make sure to touch the sensor on the
back of the handle.
The doors cannot be unlocked for
3 seconds after the doors are locked.
*: The door unlock settings can bechanged. ( P. 5 9 1 )
Touch the lock sensor (the indentation on the upper part of the front door
handle) to lock the doors.
Check that the door is securely locked.
◆Wireless remote control
Locks all the doors
Check that the door is securely
locked.
Unlocks all the doors
Pressing the button unlocks the
driver’s door. Pressing the button
again within 3 seconds unlocks the
other doors.
Press and hold to open the windows
*
*
: This setting must be customized at your Lexus dealer.
The vehicle can be locked and unlock ed using the entry function, wireless
remote control or door lock switch.
Locking and unlocking the doors from the outside
1
2
1
2
Page 106 of 632
106
CT200h_OM_OM76197U_(U)3-2. Opening, closing and locking the doors
■Operation signals
Doors:
A buzzer sounds and the emergency flashers
flash to indicate that the doors have been
locked/unlocked. (Locked: Once; Unlocked: Twice)
Windows:
A buzzer sounds to indicate that the windows are opening.
■Security feature
If a door is not opened within approximately 60 seconds after the vehicle is unlocked, the
security feature automatically locks the vehicle again.
■Welcome light illumination control
The side marker, parking, tail and license plat e lights automatically turn on at night when
the doors are unlocked using the entry functi on or wireless remote control if the light
switch is in the “AUTO” position.
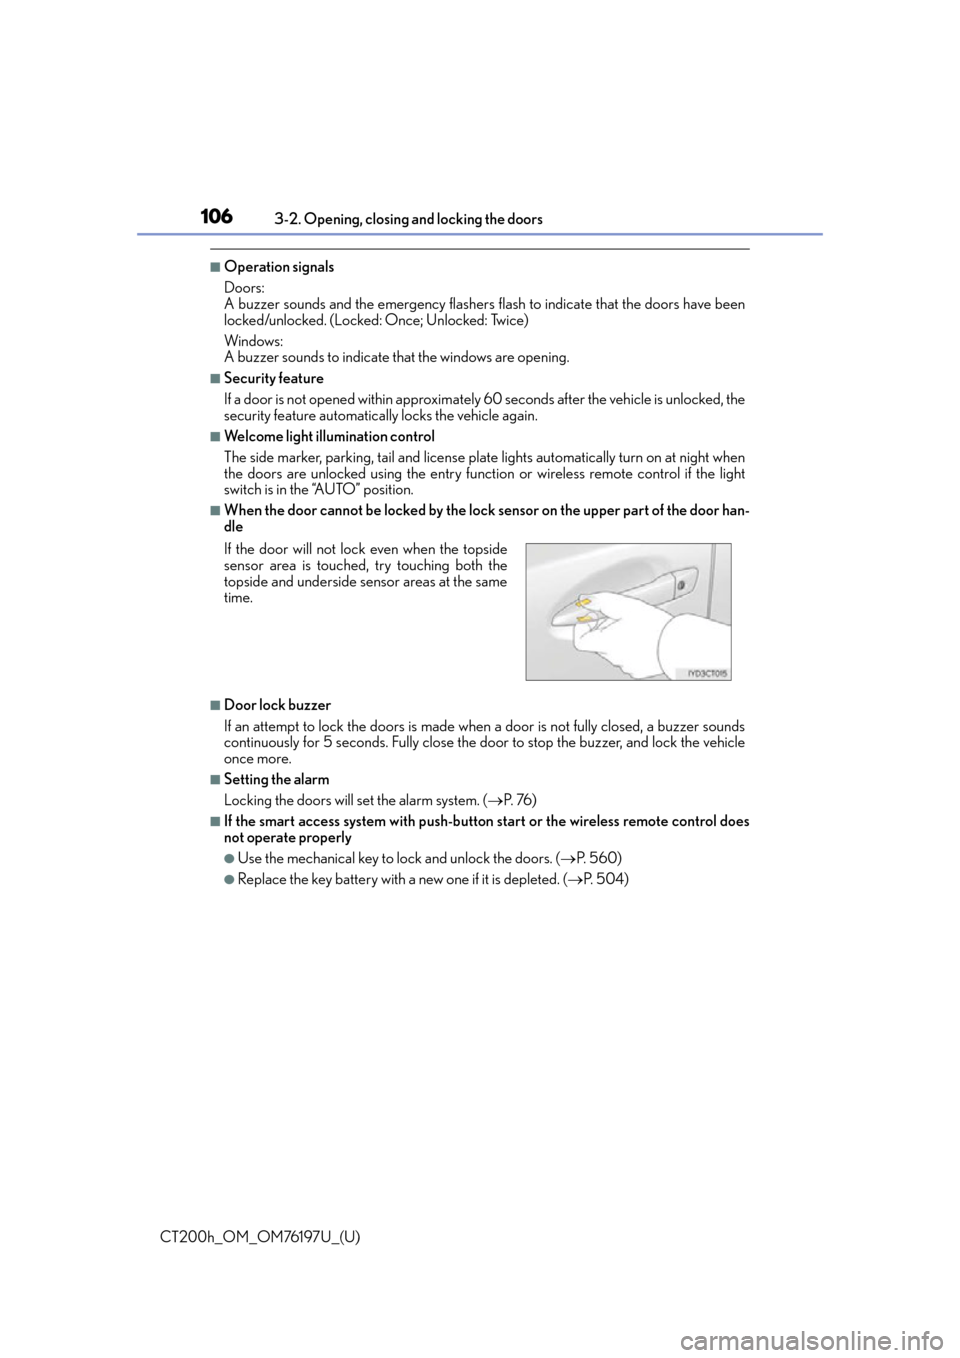
■When the door cannot be locked by the lock sensor on the upper part of the door han-
dle
■Door lock buzzer
If an attempt to lock the doors is made when a door is not fully closed, a buzzer sounds
continuously for 5 seconds. Fully close the door to stop the buzzer, and lock the vehicle
once more.
■Setting the alarm
Locking the doors will set the alarm system. ( P. 76 )
■If the smart access system with push-butto n start or the wireless remote control does
not operate properly
●Use the mechanical key to lock and unlock the doors. ( P. 5 6 0 )
●Replace the key battery with a new one if it is depleted. ( P. 5 0 4 )
If the door will not lock even when the topside
sensor area is touched, try touching both the
topside and underside sensor areas at the same
time.
Page 116 of 632

116
CT200h_OM_OM76197U_(U)3-2. Opening, closing and locking the doors
●When the electronic key is in contact wi
th, or is covered by the following metallic
objects
• Cards to which aluminum foil is attached
• Cigarette boxes that have aluminum foil inside
• Metallic wallets or bags
•Coins
•Hand warmers made of metal
• Media such as CDs and DVDs
●When other wireless key (that emit radio waves) is being used nearby
●When carrying the electronic key together with the following devices that emit radio
waves
• Another vehicle’s electronic key or a wireless key that emits radio waves
• Personal computers or personal digital assistants (PDAs)
• Digital audio players
• Portable game systems
●If window tint with a metallic content or me tallic objects are attached to the rear win-
dow
■Note for the entry function
●Even when the electronic key is within the effective range (detection areas), the system
may not operate properly in the following cases:
• The electronic key is too close to the window or outside door handle, near the
ground, or in a high place when the doors are locked or unlocked.
• The electronic key is near the ground or in a high place, or too close to the rear
bumper center when the back door is opened.
• The electronic key is on the instrument panel, luggage room, floor, or in the door
pockets or glove box when the hybrid system is started or power switch modes are
changed.
●Do not leave the electronic key on top of th e instrument panel or near the door pockets
when exiting the vehicle. Depending on the radio wave reception conditions, it may be
detected by the antenna outs ide the cabin and the door will become lockable from the
outside, possibly trapping the el ectronic key inside the vehicle.
●As long as the electronic key is within the effective range, the doors may be locked or
unlocked by anyone.
●Even if the electronic key is not inside the ve hicle, it may be possible to start the hybrid
system if the electronic key is near the window.
●The doors may unlock if a large amount of wa ter splashes on the door handle, such as in
the rain or in a car wash when the electronic key is within the effective range. (The door
will automatically be locked after approximately 60 seconds if the doors are not
opened and closed.)
●If the wireless remote control is used to lo ck the doors when the electronic key is near
the vehicle, there is a possibility that the door may not be unlocked by the entry func-
tion. (Use the wireless remote control to unlock the doors.)
●Touching the door lock sensor while wearin g gloves may delay or prevent lock opera-
tion. Remove the gloves and touch the lock sensor again.
●When the lock operation is performed using the lock sensor, recognition signals will be
shown up to two consecutive times. After th is, no recognition signals will be given.
●If the door handle becomes wet while the el ectronic key is within the effective range,
the door may lock and unlock repeatedly. Place the key in a position 6 ft. (2 m) or more
separate from the vehicle while the vehicle is being washed. (Take care to ensure that
the key is not stolen.)
Page 117 of 632

CT200h_OM_OM76197U_(U)
1173-2. Opening, closing and locking the doors
3
Operation of each component
●If the electronic key is insi de the vehicle and a door handle becomes wet during a car
wash, a message may be shown on the mult i-information display and a buzzer will
sound outside the vehicle. To turn off the alarm, lock all the doors.
●The lock sensor may not work properly if it comes into contact with ice, snow, mud, etc.
Clean the lock sensor and attempt to operate it again, or use the lock sensor on the
lower part of the door handle.
●A sudden approach to the effective range or door handle may prevent the doors from
being unlocked. In this case, return the door handle to the original position and check
that the doors unlock before pulling the door handle again.
●If there is another electronic key in the detection area, it may take slightly longer to
unlock the doors after the door handle is gripped.
●Fingernails may scrape against the door duri ng operation of the door handle. Be care-
ful not to injure fingernails or damage the surface of the door.
■When the vehicle is not driven for extended periods
●To prevent theft of the vehicle, do not leave the electronic key within 6 ft. (2 m) of the
vehicle.
●The smart access system with push-button start can be deactivated in advance.
( P. 5 9 1 )
■To operate the system properly
Make sure to carry the electronic key when operating the system. Do not get the elec-
tronic key too close to the vehicle when op erating the system from the outside of the
vehicle.
Depending on the position and holding condition of the electronic key, the key may not
be detected correctly and the system may not operate properly. (The alarm may go off
accidentally, or the door lock prevention may not operate.)
■If the smart access system with push-button start does not operate properly
●Locking and unlocking the doors: Use the mechanical key. (P. 5 6 0 )
●Starting the hybrid system: P. 5 6 1
■Customization
Settings (e.g. smart access system with push-button start) can be changed.
(Customizable features: P. 5 9 1 )
■If the smart access system with push-butto n start has been deactivated in a customized
setting
●Locking and unlocking the doors:
Use the wireless remote control or mechanical key. ( P. 105, 560)
●Starting the hybrid system and changing power switch modes: P. 5 6 1
●Stopping the hybrid system: P. 1 5 7
Page 134 of 632
1343-4. Adjusting the steering wheel and mirrors
CT200h_OM_OM76197U_(U)
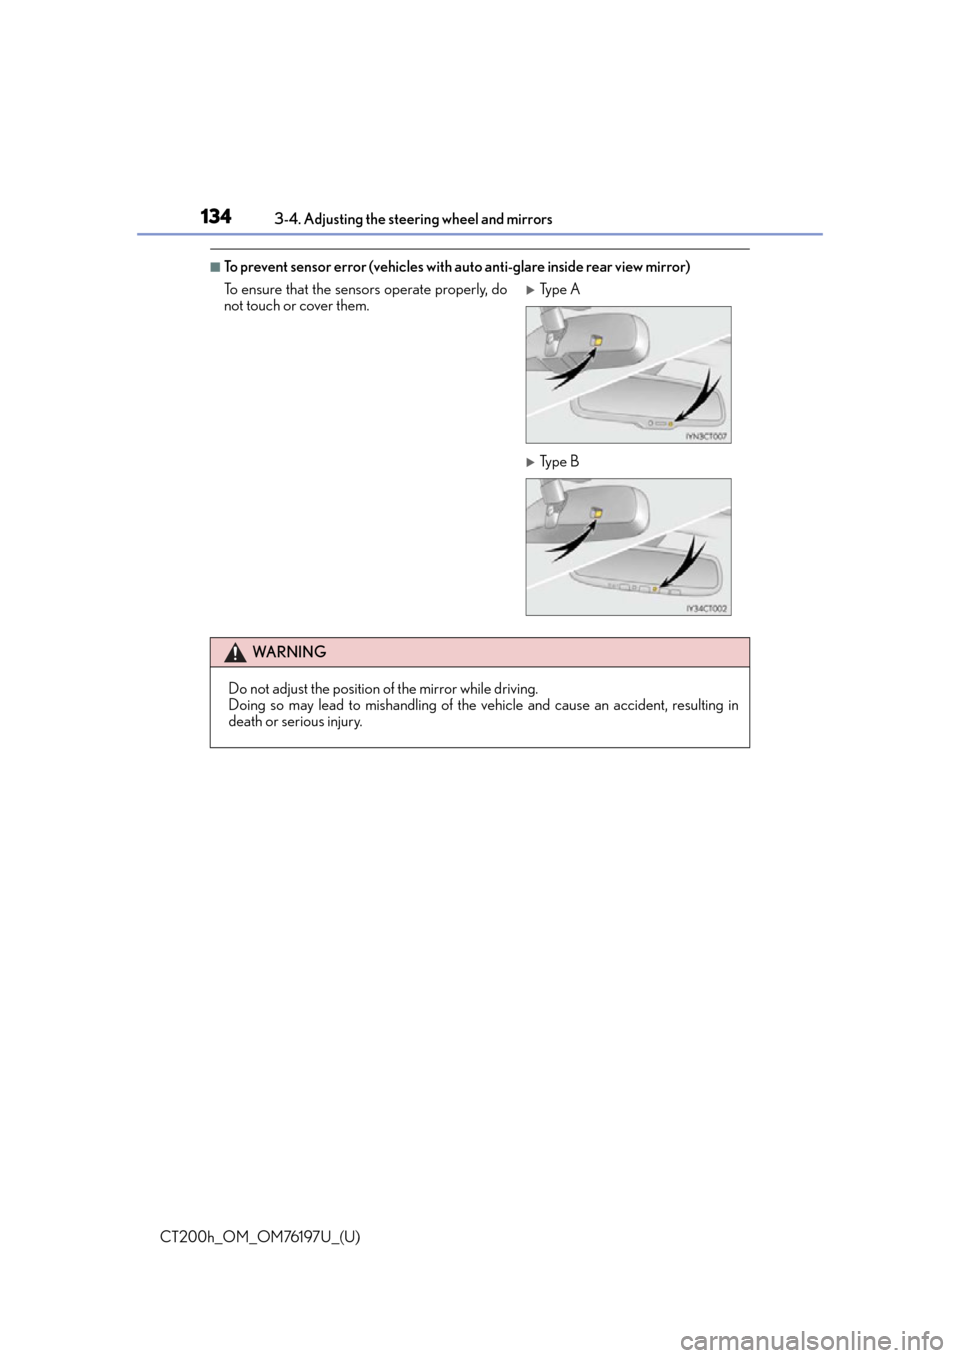
■To prevent sensor error (vehicles with auto anti-glare inside rear view mirror)
To ensure that the sens ors operate properly, do
not touch or cover them.
Ty p e A
Ty p e B
WA R N I N G
Do not adjust the position of the mirror while driving.
Doing so may lead to mishandling of the vehicle and cause an accident, resulting in
death or serious injury.
Page 171 of 632
CT200h_OM_OM76197U_(U)
1714-3. Operating the lights and wipers
4
Driving
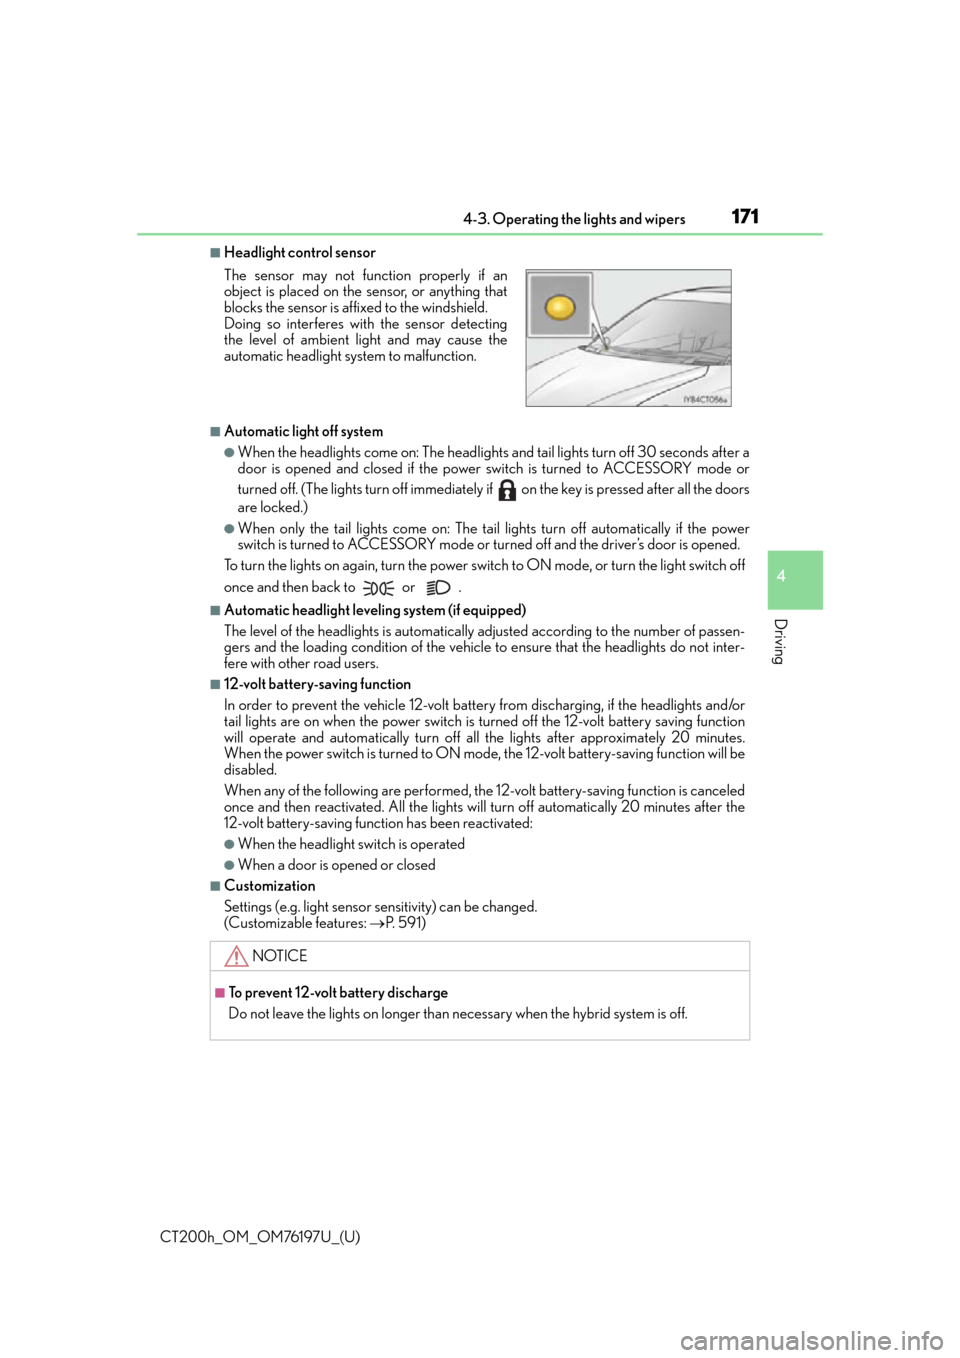
■Headlight control sensor
■Automatic light off system
●When the headlights come on: The headlights and tail lights turn off 30 seconds after a
door is opened and closed if the power switch is turned to ACCESSORY mode or
turned off. (The lights turn off immediately if on the key is pressed after all the doors
are locked.)
●When only the tail lights come on: The tail lights turn off automatically if the power
switch is turned to ACCESSORY mode or turned off and the driver’s door is opened.
To turn the lights on again, turn the power switch to ON mode, or turn the light switch off
once and then back to or .
■Automatic headlight leveling system (if equipped)
The level of the headlights is automatically ad justed according to the number of passen-
gers and the loading condition of the vehicle to ensure that the headlights do not inter-
fere with other road users.
■12-volt battery-saving function
In order to prevent the vehicle 12-volt battery from discharging, if the headlights and/or
tail lights are on when the power switch is turned off the 12-volt battery saving function
will operate and automatically turn off all the lights after approximately 20 minutes.
When the power switch is turned to ON mode, the 12-volt battery-saving function will be
disabled.
When any of the following are performed, the 12-volt battery-saving function is canceled
once and then reactivated. All the lights w ill turn off automatically 20 minutes after the
12-volt battery-saving function has been reactivated:
●When the headlight switch is operated
●When a door is opened or closed
■Customization
Settings (e.g. light sensor se nsitivity) can be changed.
(Customizable features: P. 5 9 1 )
The sensor may not function properly if an
object is placed on the sensor, or anything that
blocks the sensor is affixed to the windshield.
Doing so interferes with the sensor detecting
the level of ambient light and may cause the
automatic headlight system to malfunction.
NOTICE
■To prevent 12-volt battery discharge
Do not leave the lights on longer than necessary when the hybrid system is off.