LEXUS ES300 2005 Repair Manual
Manufacturer: LEXUS, Model Year: 2005, Model line: ES300, Model: LEXUS ES300 2005Pages: 969, PDF Size: 24.08 MB
Page 871 of 969
RADIATOR CAP INSPECTION ┬▒ EG007-05 March 28, 2005
Page 6 of 7
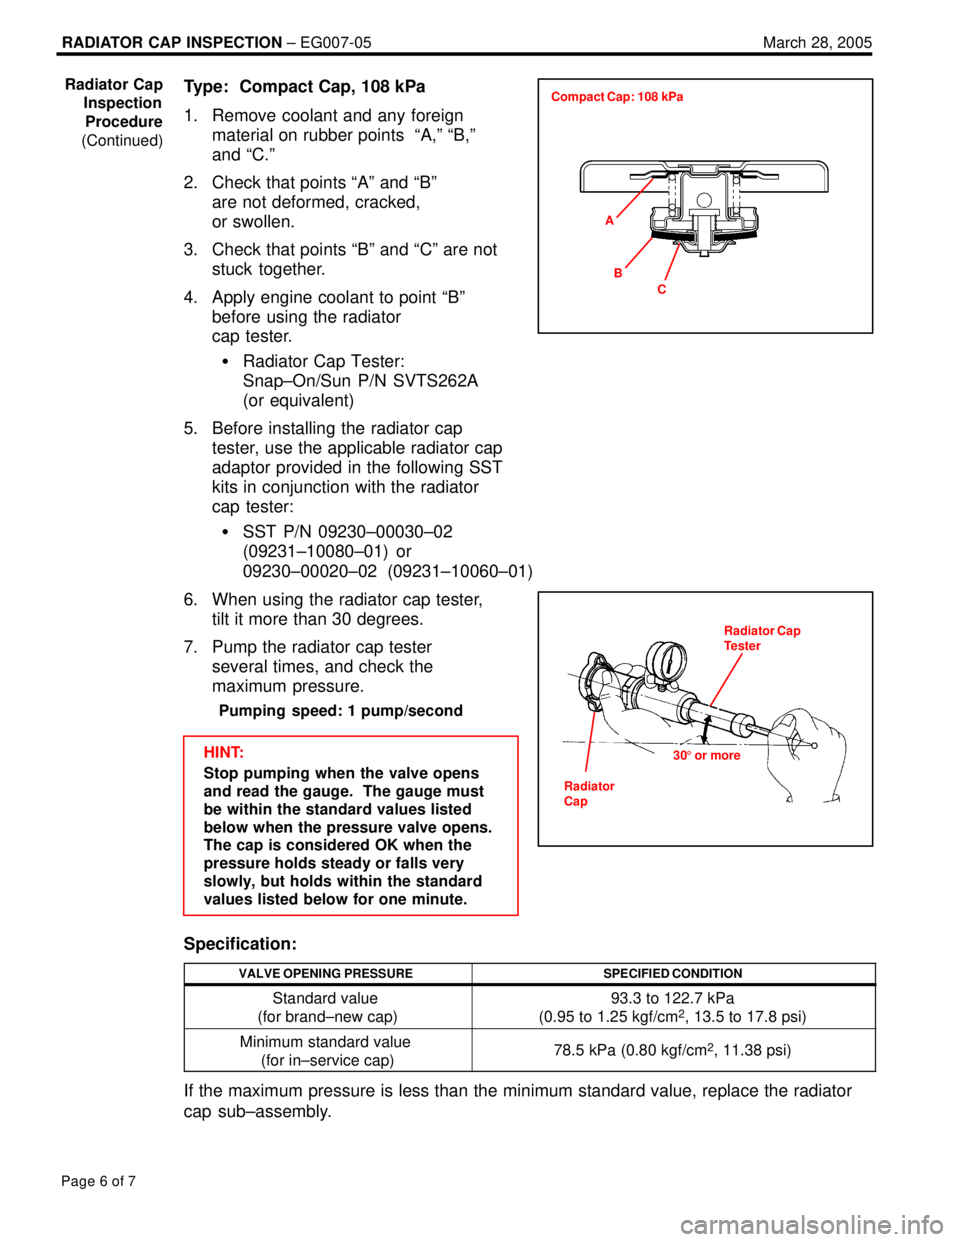
Type: Compact Cap, 108 kPa
1. Remove coolant and any foreign
material on rubber points ªA,º ªB,º
and ªC.º
2. Check that points ªAº and ªBº
are not deformed, cracked,
or swollen.
3. Check that points ªBº and ªCº are not
stuck together.
4. Apply engine coolant to point ªBº
before using the radiator
cap tester.
�Radiator Cap Tester:
Snap┬▒On/Sun P/N SVTS262A
(or equivalent)
5. Before installing the radiator cap
tester, use the applicable radiator cap
adaptor provided in the following SST
kits in conjunction with the radiator
cap tester:
�SST P/N 09230┬▒00030┬▒02
(09231┬▒10080┬▒01) or
09230┬▒00020┬▒02 (09231┬▒10060┬▒01)
6. When using the radiator cap tester,
tilt it more than 30 degrees.
7. Pump the radiator cap tester
several times, and check the
maximum pressure.
Pumping speed: 1 pump/second
HINT:
Stop pumping when the valve opens
and read the gauge. The gauge must
be within the standard values listed
below when the pressure valve opens.
The cap is considered OK when the
pressure holds steady or falls very
slowly, but holds within the standard
values listed below for one minute.
Specification:
VALVE OPENING PRESSURESPECIFIED CONDITION
Standard value
(for brand┬▒new cap)93.3 to 122.7 kPa
(0.95 to 1.25 kgf/cm2, 13.5 to 17.8 psi)
Minimum standard value
(for in┬▒service cap)78.5 kPa (0.80 kgf/cm2, 11.38 psi)
If the maximum pressure is less than the minimum standard value, replace the radiator
cap sub┬▒assembly.
Radiator Cap
Inspection
Procedure
(Continued)
A
C B Compact Cap: 108 kPa
Radiator Cap
Tester
305 or more
Radiator
Cap
Page 872 of 969
RADIATOR CAP INSPECTION ┬▒ EG007-05 March 28, 2005
Page 7 of 7
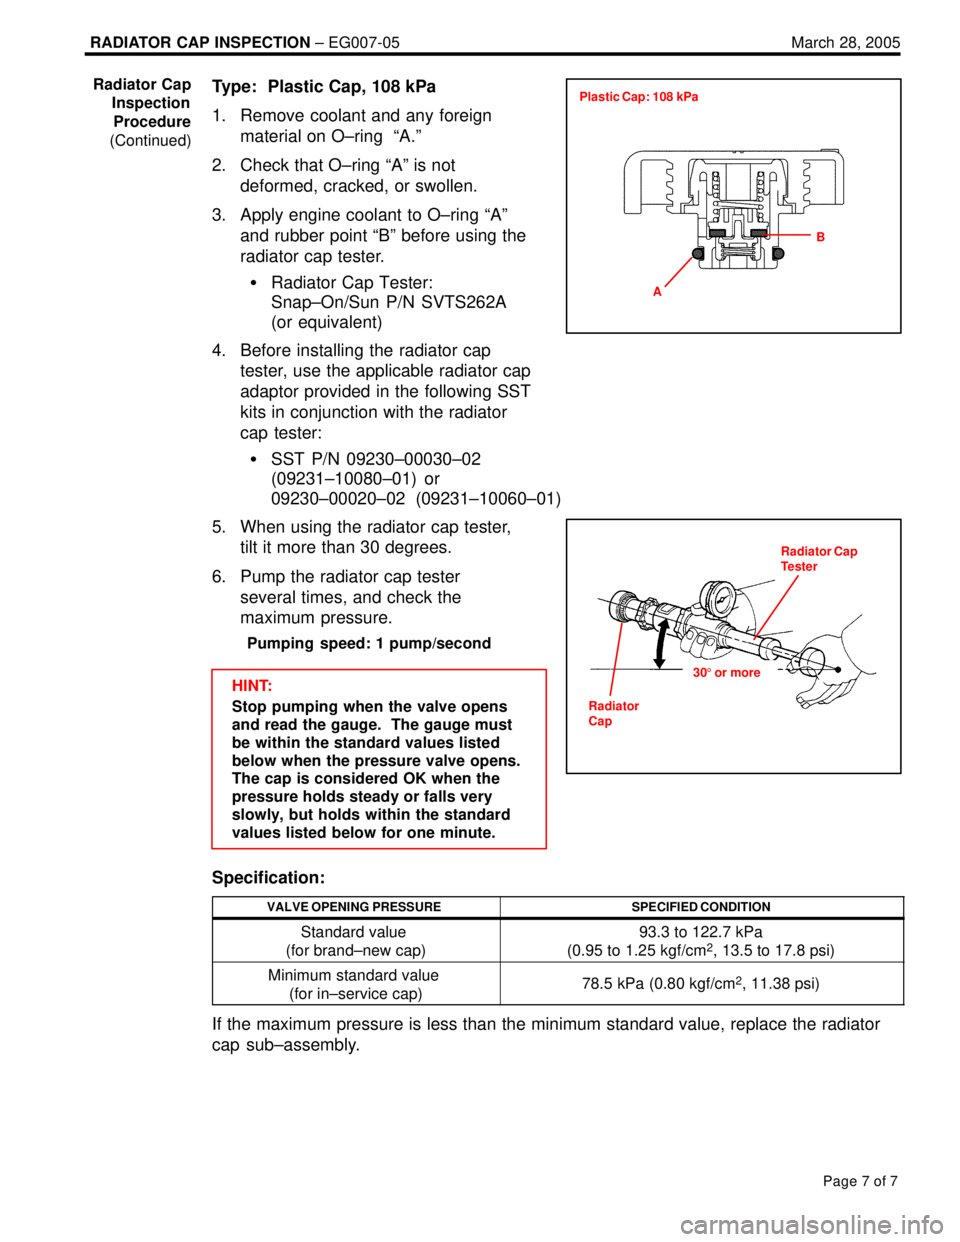
Type: Plastic Cap, 108 kPa
1. Remove coolant and any foreign
material on O±ring ªA.º
2. Check that O±ring ªAº is not
deformed, cracked, or swollen.
3. Apply engine coolant to O±ring ªAº
and rubber point ªBº before using the
radiator cap tester.
�Radiator Cap Tester:
Snap┬▒On/Sun P/N SVTS262A
(or equivalent)
4. Before installing the radiator cap
tester, use the applicable radiator cap
adaptor provided in the following SST
kits in conjunction with the radiator
cap tester:
�SST P/N 09230┬▒00030┬▒02
(09231┬▒10080┬▒01) or
09230┬▒00020┬▒02 (09231┬▒10060┬▒01)
5. When using the radiator cap tester,
tilt it more than 30 degrees.
6. Pump the radiator cap tester
several times, and check the
maximum pressure.
Pumping speed: 1 pump/second
HINT:
Stop pumping when the valve opens
and read the gauge. The gauge must
be within the standard values listed
below when the pressure valve opens.
The cap is considered OK when the
pressure holds steady or falls very
slowly, but holds within the standard
values listed below for one minute.
Specification:
VALVE OPENING PRESSURESPECIFIED CONDITION
Standard value
(for brand┬▒new cap)93.3 to 122.7 kPa
(0.95 to 1.25 kgf/cm2, 13.5 to 17.8 psi)
Minimum standard value
(for in┬▒service cap)78.5 kPa (0.80 kgf/cm2, 11.38 psi)
If the maximum pressure is less than the minimum standard value, replace the radiator
cap sub┬▒assembly.
Radiator Cap
Inspection
Procedure
(Continued)
A
B Plastic Cap: 108 kPa
Radiator Cap
Tester
305 or more
Radiator
Cap
Page 873 of 969

Lexus Supports ASE CertificationPage 1 of 2
Title:
MAIN BEARING JOURNAL DIAMETER
STAMPING LOCATION REVISION
Models:
'04 ┬▒ '05 ES 330 & RX 330
Technical Service
Information Bulletin
October 14, 2004
EG011-04
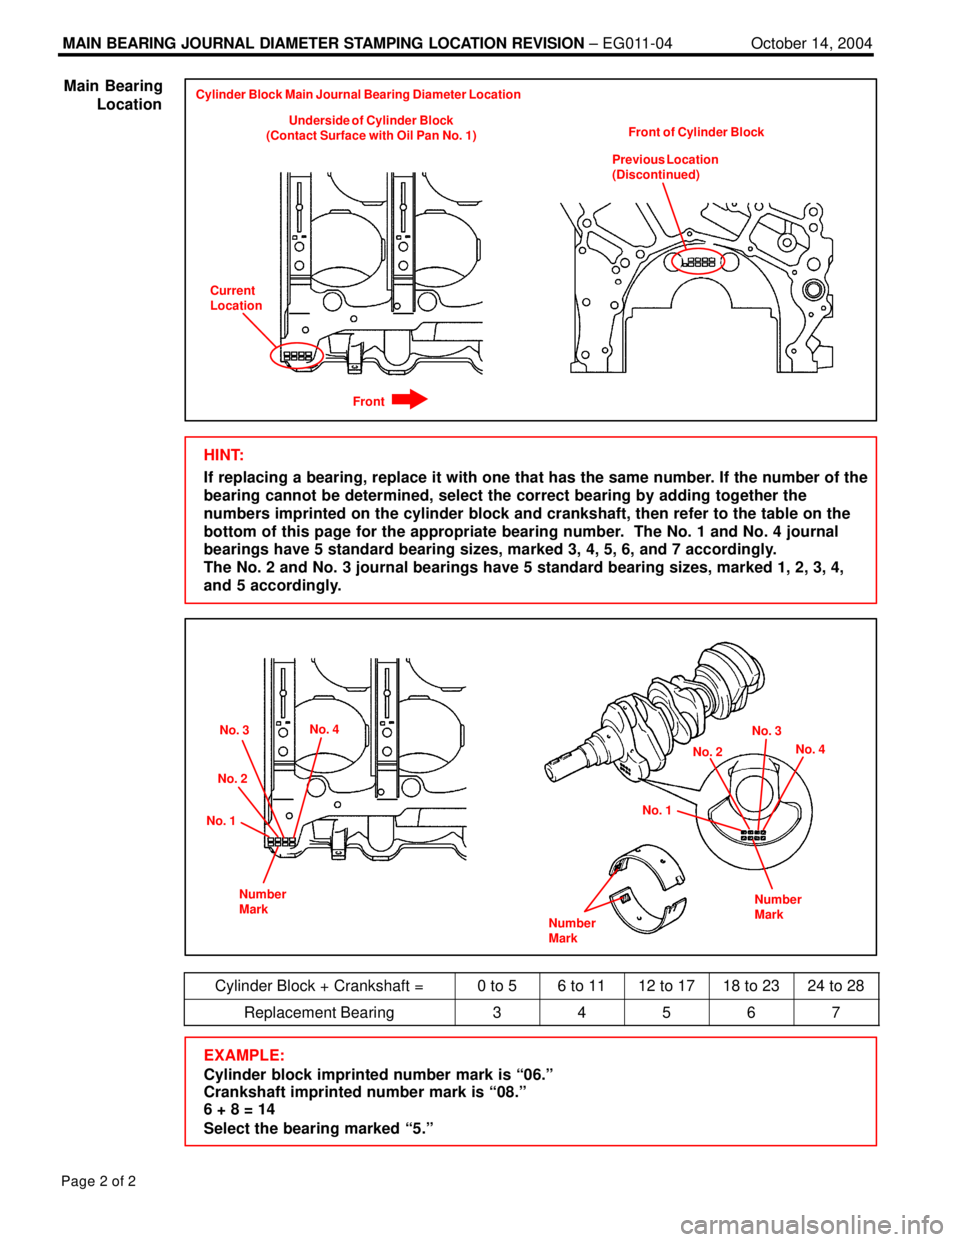
The main bearing journal diameter stamp location has been changed on some 2004 and
2005 model year vehicles with 3MZ┬▒FE engines. The stamping on the front of the block
has been discontinued. Review this TSB for the stamping location.
�2004 ┬▒ 2005 model year ES 330 and RX 330 vehicles meeting the
following specifications:
�3MZ┬▒FE equipped vehicles with engine serial numbers starting after 0138096.
OP CODEDESCRIPTIONTIMEOFPT1T2
N/ANot Applicable to Warranty┬▒┬▒┬▒┬▒
ENGINE
Introduction
Applicable
Vehicles
Warranty
Information
Page 874 of 969
MAIN BEARING JOURNAL DIAMETER STAMPING LOCATION REVISION ┬▒ EG011-04October 14, 2004
Page 2 of 2
Underside of Cylinder Block
(Contact Surface with Oil Pan No. 1)Front of Cylinder Block Cylinder Block Main Journal Bearing Diameter Location
Current
LocationPrevious Location
(Discontinued)
Front
HINT:
If replacing a bearing, replace it with one that has the same number. If the number of the
bearing cannot be determined, select the correct bearing by adding together the
numbers imprinted on the cylinder block and crankshaft, then refer to the table on the
bottom of this page for the appropriate bearing number. The No. 1 and No. 4 journal
bearings have 5 standard bearing sizes, marked 3, 4, 5, 6, and 7 accordingly.
The No. 2 and No. 3 journal bearings have 5 standard bearing sizes, marked 1, 2, 3, 4,
and 5 accordingly.
No. 1No. 2No. 3No. 4
Number
Mark
No. 1No. 2No. 3
No. 4
Number
Mark
Number
Mark
Cylinder Block + Crankshaft =0 to 56 to 1112 to 1718 to 2324 to 28
Replacement Bearing34567
EXAMPLE:
Cylinder block imprinted number mark is ª06.º
Crankshaft imprinted number mark is ª08.º
6 + 8 = 14
Select the bearing marked ª5.º Main Bearing
Location
Page 875 of 969
Lexus Supports ASE CertificationPage 1 of 3
Technical Service
Information Bulletin
October 14, 2004
EG012-04Title:
ENTERING VIN DURING ECM (PCM)
REPLACEMENT AND/OR DTC P0630
Models:
All '04 ┬▒ '06 Models
TSIB REVISION NOTICE:
�June 3, 2005: Content has been updated to include 2004 and 2006 model year
vehicles. Step 4 of the VIN Write Procedure (page 2) and step 3 of the VIN Read
Procedure (page 3) have been clarified to include RX 400h vehicles.
Previous versions of this TSB should be discarded.
All 2005 and subsequent model year Lexus vehicles have the VIN (Vehicle Identification
Number) stored in the Electronic Control Module (ECM) (SAE term: Powertrain Control
Module/PCM) non┬▒volatile memory. The VIN is accessible on the data stream using the
Lexus Diagnostic Tester and can also be written to a new ECM (PCM) using a ªVIN
Read/Write┬║ utility.
Service ECMs (supply parts) are shipped without the VIN; therefore, as part of the ECM
(PCM) replacement procedure, the VIN must be written to the replacement ECM (PCM)
using the Diagnostic Tester utility function. Failure to write the VIN to the ECM (PCM) will
result in a M.I.L. ªONº condition and set DTC P0630: VIN Not Programmed or Mismatch ±
ECM (PCM).
It is very important to remember to enter the VIN on these vehicles. Vehicles with missing
VINs are subject to failing some state and local vehicle emissions Inspection and
Maintenance programs.
NOTE:
2004 model year vehicles which have been flash reprogrammed may contain updated
2005 model year OBD II logic. These vehicles will require VIN entry into the ECM (PCM)
after reprogramming.
�2004 model year vehicles that have been flash reprogrammed.
�All 2005 ┬▒ 2006 model year vehicles.
OP CODEDESCRIPTIONTIMEOFPT1T2
N/ANot Applicable to Warranty┬▒┬▒┬▒┬▒
ENGINE
Introduction
Applicable
Vehicles
Warranty
Information
Page 876 of 969
ENTERING VIN DURING ECM REPLACEMENT AND/OR DTC P0630 ┬▒ EG012-04 Revised October 14, 2004
Page 2 of 3
ITEM
NO.SPECIAL SERVICE TOOLS (SSTs)PART NUMBERQTYDRW**
1
Lexus Diagnostic Tester Kit*
NOTE:
�All components from this kit/set are required
�12 Megabyte Diagnostic Tester Program Card
(P/N 01002593┬▒005) with version 12.2a Software
(or later) is requiredLEX22003618
2
CAN Interface Module Kit*
NOTE:
�All components from this kit/set are required0100274418
* Essential SSTs.
** Refers to drawer number in SST Storage System.
NOTE:
Additional Diagnostic Tester Kits, CAN Interface Modules, Program Cards, or other
SSTs may be ordered by calling SPX/OTC at 1-800-933-8335.
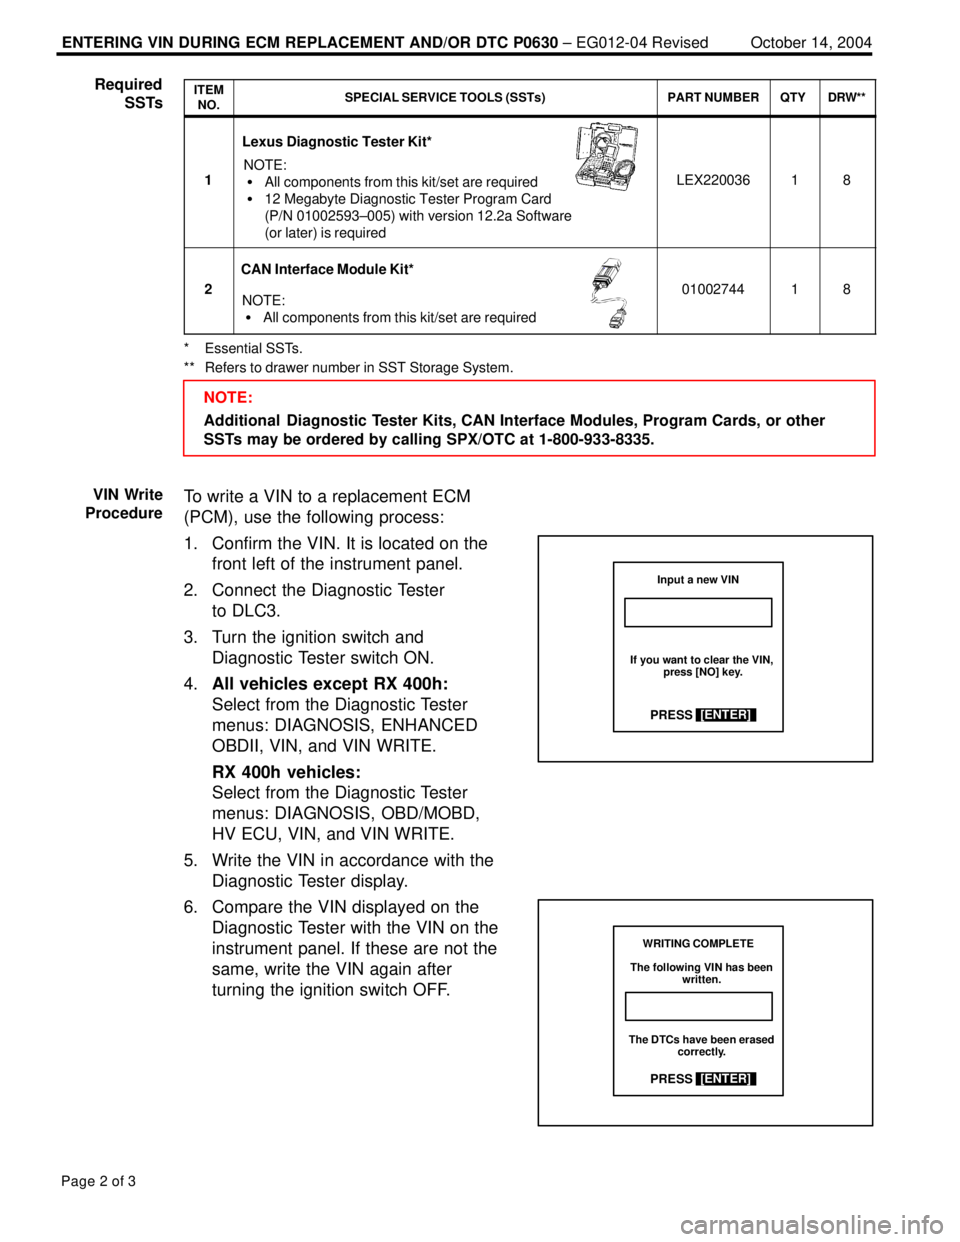
To write a VIN to a replacement ECM
(PCM), use the following process:
1. Confirm the VIN. It is located on the
front left of the instrument panel.
2. Connect the Diagnostic Tester
to DLC3.
3. Turn the ignition switch and
Diagnostic Tester switch ON.
4.All vehicles except RX 400h:
Select from the Diagnostic Tester
menus: DIAGNOSIS, ENHANCED
OBDII, VIN, and VIN WRITE.
RX 400h vehicles:
Select from the Diagnostic Tester
menus: DIAGNOSIS, OBD/MOBD,
HV ECU, VIN, and VIN WRITE.
5. Write the VIN in accordance with the
Diagnostic Tester display.
6. Compare the VIN displayed on the
Diagnostic Tester with the VIN on the
instrument panel. If these are not the
same, write the VIN again after
turning the ignition switch OFF.
Required
SSTs
VIN Write
Procedure
Input a new VIN
PRESS[ENTER]
If you want to clear the VIN,
press [NO] key.
WRITING COMPLETE
PRESS[ENTER]
The following VIN has been
written.
The DTCs have been erased
correctly.
Page 877 of 969

ENTERING VIN DURING ECM REPLACEMENT AND/OR DTC P0630 ┬▒ EG012-04 Revised October 14, 2004
Page 3 of 3
1. Connect the Diagnostic Tester
to DLC3.
2. Turn the ignition switch and
Diagnostic Tester switch ON.
3.All vehicles except RX 400h:
Select from the Diagnostic Tester
menus: DIAGNOSIS, ENHANCED
OBDII, VIN, and VIN READ.
RX 400h vehicles:
Select from the Diagnostic Tester
menus: DIAGNOSIS, OBD/MOBD,
HV ECU, VIN, and VIN READ.
4. Check the VIN displayed on the
Diagnostic Tester.
HINT:
For further explanations, refer to the
Technical Information System (TIS),
appropriate model repair manual:
Diagnostics: SFI System: Registration.
VIN Read
Procedure
[ VIN ]
PRESS[EXIT]
*********************************
*********************************
VIN Is Displayed
Page 878 of 969

Lexus Supports ASE CertificationPage 1 of 2
Title:
M.I.L. ON" DTC P0171, P0174,
P2195, OR P2197
Models:
'05 ┬▒ '06 ES 330
Technical Service
Information Bulletin
November 17, 2005
EG019-05
Under certain driving conditions, some 2005 and 2006 model year ES 330 vehicles may
exhibit a M.I.L. ªONº condition with at least one of the following DTCs:
�P0171 (System Too Lean [Bank 1])
�P0174 (System Too Lean [Bank 2])
�P2195 (Oxygen [A/F] Sensor Signal Stuck Lean [Bank 1, Sensor 1])
�P2197 (Oxygen [A/F] Sensor Signal Stuck Lean [Bank 2, Sensor 1])
The Air Fuel (A/F) sensor manufacturing process has been improved to correct this
condition. The following repair procedures should be used to properly diagnose and
repair the affected vehicles.
�2005 ┬▒ 2006 model year ES 330 vehicles produced BEFORE the Production Change
Effective VIN shown below.
MODELENGINEPRODUCTION CHANGE EFFECTIVE VIN
ES 3303MZ┬▒FEJTHBA3#G#65148433
MODELENGINEPREVIOUS
PART NUMBERCURRENT
PART NUMBERPART NAMEQTY
ES 3303MZ FE
89467┬▒33100SameSensor, Air Fuel Ratio
(Bank 1)1
ES 3303MZ┬▒FE
89467┬▒33110SameSensor, Air Fuel Ratio
(Bank 2)1
OP CODEDESCRIPTIONTIMEOFPT1T2
895131R & R A/F Sensor0.689467┬▒33100
89467┬▒331108A71
Applicable Warranty*:
This repair is covered under the Lexus Comprehensive Warranty. This warranty is
in effect for 48 months or 50,000 miles, whichever occurs first, from the vehicle's
in-service date.
* Warranty application is limited to correction of a problem based upon a customer's specific complaint.
ENGINE
Introduction
Applicable
Vehicles
Production
Change
Information
Parts
Information
Warranty
Information
Page 879 of 969
M.I.L. ªONº DTC P0171, P0174, P2195, OR P2197 ± EG019-05 November 17, 2005
Page 2 of 2
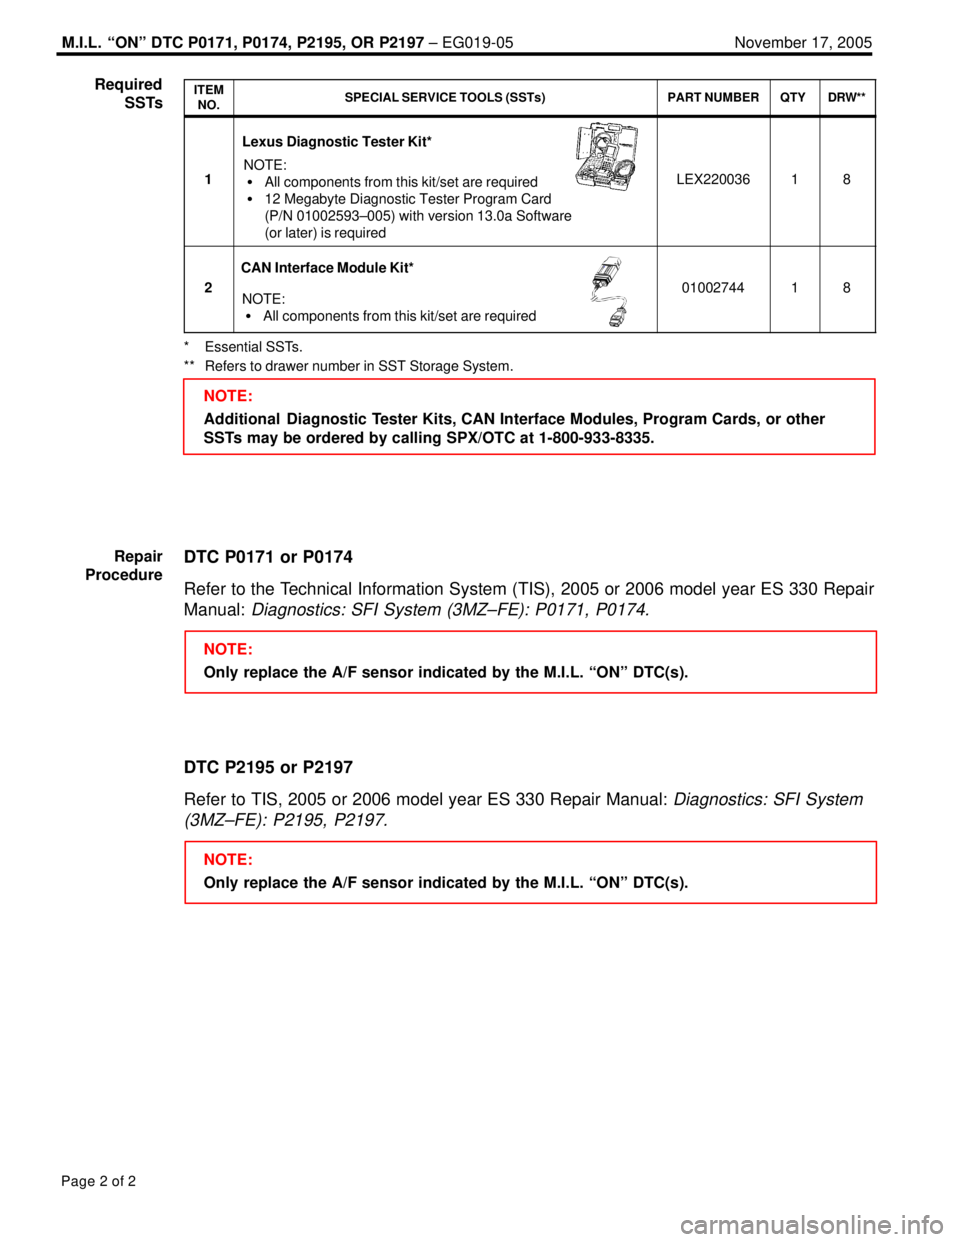
ITEM
NO.SPECIAL SERVICE TOOLS (SSTs)PART NUMBERQTYDRW**
1
Lexus Diagnostic Tester Kit*
NOTE:
�All components from this kit/set are required
�12 Megabyte Diagnostic Tester Program Card
(P/N 01002593┬▒005) with version 13.0a Software
(or later) is requiredLEX22003618
2
CAN Interface Module Kit*
NOTE:
�All components from this kit/set are required0100274418
* Essential SSTs.
** Refers to drawer number in SST Storage System.
NOTE:
Additional Diagnostic Tester Kits, CAN Interface Modules, Program Cards, or other
SSTs may be ordered by calling SPX/OTC at 1-800-933-8335.
DTC P0171 or P0174
Refer to the Technical Information System (TIS), 2005 or 2006 model year ES 330 Repair
Manual:
Diagnostics: SFI System (3MZ┬▒FE): P0171, P0174.
NOTE:
Only replace the A/F sensor indicated by the M.I.L. ªONº DTC(s).
DTC P2195 or P2197
Refer to TIS, 2005 or 2006 model year ES 330 Repair Manual:
Diagnostics: SFI System
(3MZ┬▒FE): P2195, P2197.
NOTE:
Only replace the A/F sensor indicated by the M.I.L. ªONº DTC(s). Required
SSTs
Repair
Procedure
Page 880 of 969
Lexus Supports ASE CertificationPage 1 of 2
Title:
PASSENGER AIRBAG INDICATOR LAMP
Models:
'04 ┬▒ '05 ES 330 & RX 330
Technical Service
Information Bulletin
February 22, 2005
EL002-05
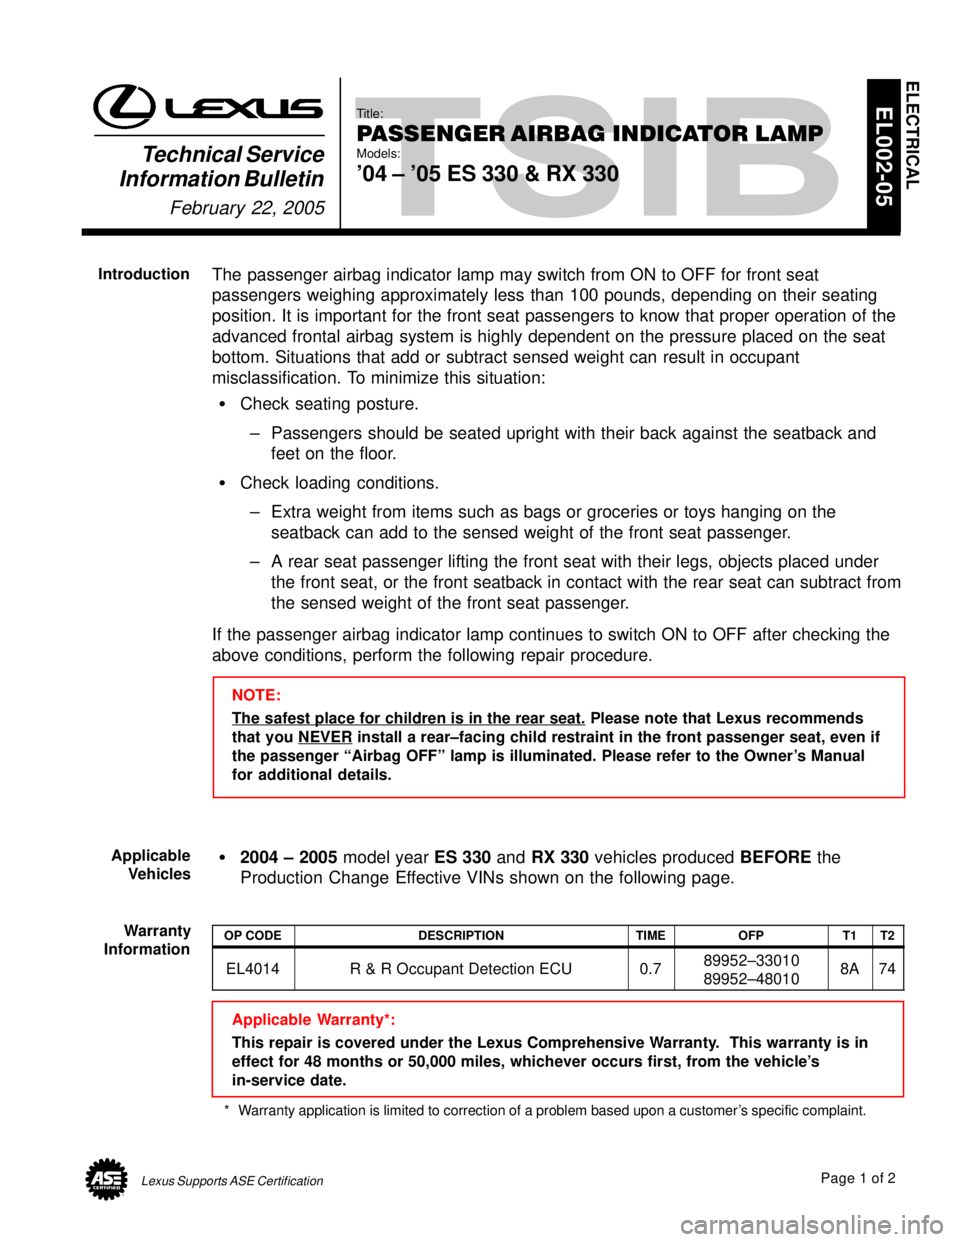
The passenger airbag indicator lamp may switch from ON to OFF for front seat
passengers weighing approximately less than 100 pounds, depending on their seating
position. It is important for the front seat passengers to know that proper operation of the
advanced frontal airbag system is highly dependent on the pressure placed on the seat
bottom. Situations that add or subtract sensed weight can result in occupant
misclassification. To minimize this situation:
�Check seating posture.
┬▒ Passengers should be seated upright with their back against the seatback and
feet on the floor.
�Check loading conditions.
┬▒ Extra weight from items such as bags or groceries or toys hanging on the
seatback can add to the sensed weight of the front seat passenger.
┬▒ A rear seat passenger lifting the front seat with their legs, objects placed under
the front seat, or the front seatback in contact with the rear seat can subtract from
the sensed weight of the front seat passenger.
If the passenger airbag indicator lamp continues to switch ON to OFF after checking the
above conditions, perform the following repair procedure.
NOTE:
The safest place for children is in the rear seat.
Please note that Lexus recommends
that you NEVER
install a rear┬▒facing child restraint in the front passenger seat, even if
the passenger ªAirbag OFFº lamp is illuminated. Please refer to the Owner's Manual
for additional details.
�2004 ┬▒ 2005 model year ES 330 and RX 330 vehicles produced BEFORE the
Production Change Effective VINs shown on the following page.
OP CODEDESCRIPTIONTIMEOFPT1T2
EL4014R & R Occupant Detection ECU0.789952┬▒33010
89952┬▒480108A74
Applicable Warranty*:
This repair is covered under the Lexus Comprehensive Warranty. This warranty is in
effect for 48 months or 50,000 miles, whichever occurs first, from the vehicle's
in-service date.
* Warranty application is limited to correction of a problem based upon a customer's specific complaint.
ELECTRICAL
Introduction
Applicable
Vehicles
Warranty
Information