light Lexus GS350 2017 Quick Guide
[x] Cancel search | Manufacturer: LEXUS, Model Year: 2017, Model line: GS350, Model: Lexus GS350 2017Pages: 100, PDF Size: 3.95 MB
Page 34 of 100

33
GS350_200t_QG_OM30G01U_(U)
When AUTO mode is selected, the sensor
sensitivity can be adjusted by turning the
switch ring.
Increases the sensitivity
Decreases the sensitivity
Washer/wiper dual operationWipers will automatically operate a
couple of times after the washer
squirts.
Vehicles with headlight cleaners:
When the headlights are on and the
lever is pulled and held, the headlight
cleaners will operate once. After this,
the headlight cleaners will operate
every 5th time the lever is pulled.
6
7
8
Page 43 of 100

42
GS350_200t_QG_OM30G01U_(U)
Intuitive Parking Assist (if equipped)
■Turning the system on and off
Turns the intuitive parking assist on/off
When on, the indicator light comes on to
inform the driver that the system is oper-
ational.
The distance from your vehicle to nearby obstacles when parallel parking or maneuver-
ing into a garage is measured by the sensors and communicated via the multi-informa-
tion display, Remote Touch screen and a buzzer. Always check the surrounding area
when using this system.
Page 48 of 100

47
GS350_200t_QG_OM30G01U_(U)
Tire Pressure Warning System
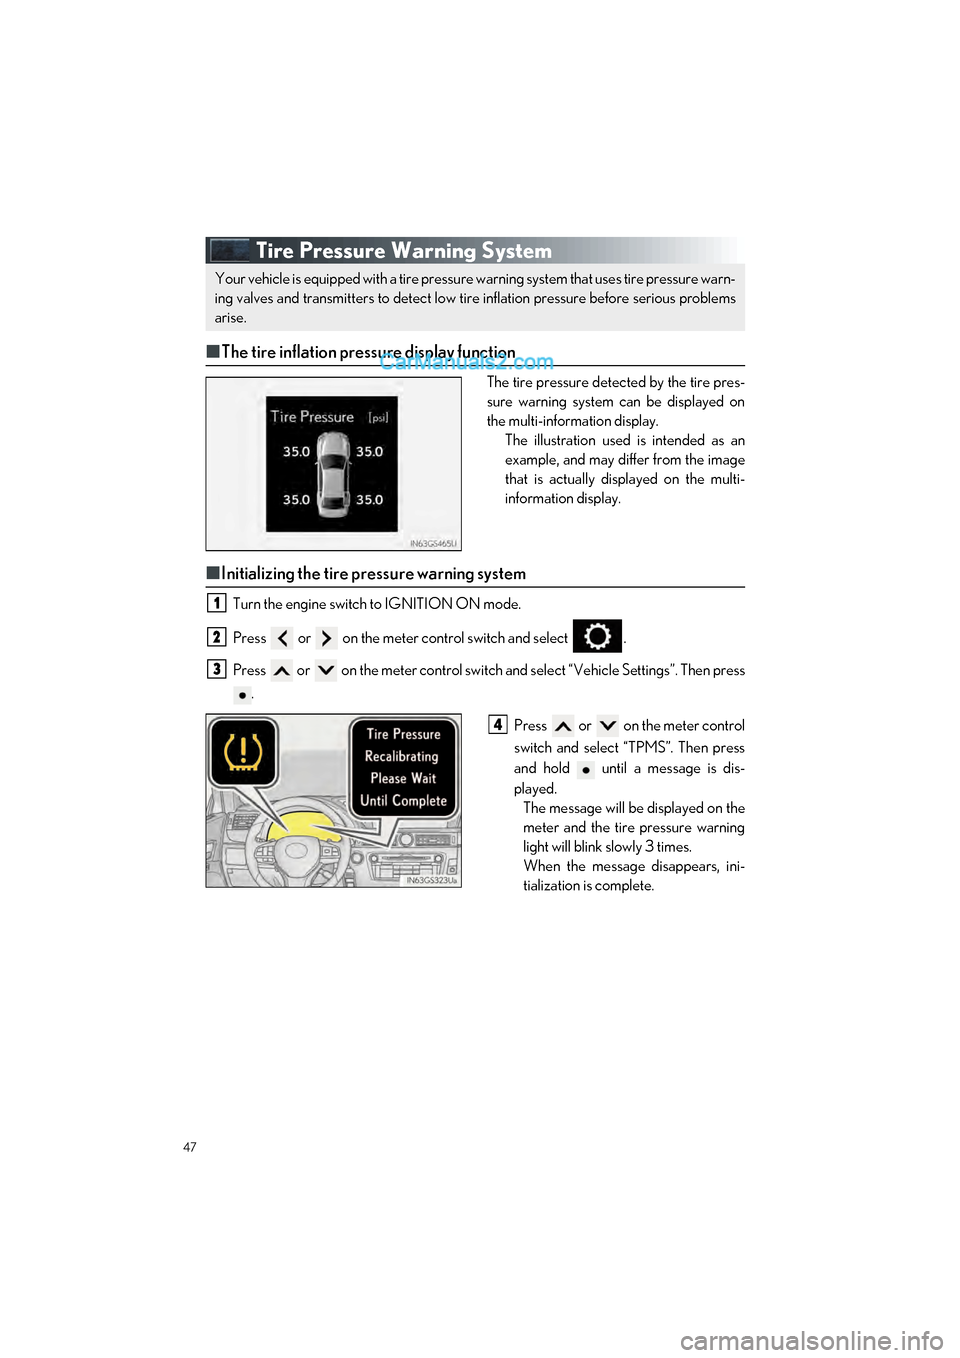
■The tire inflation pressure display function
The tire pressure detected by the tire pres-
sure warning system can be displayed on
the multi-information display.
The illustration used is intended as an
example, and may differ from the image
that is actually displayed on the multi-
information display.
■Initializing the tire pressure warning system
Turn the engine switch to IGNITION ON mode.
Press or on the meter control switch and select .
Press or on the meter control switch an d select “Vehicle Settings”. Then press
.
Press or on the meter control
switch and select “TPMS”. Then press
and hold until a message is dis-
played.The message will be displayed on the
meter and the tire pressure warning
light will blink slowly 3 times.
When the message disappears, ini-
tialization is complete.
Your vehicle is equipped with a tire pressure warning system that uses tire pressure warn-
ing valves and transmitters to detect low ti re inflation pressure before serious problems
arise.
1
2
3
4
Page 71 of 100

70
GS350_200t_QG_OM30G01U_(U)
Seat Heaters/Seat Ventilators (if equipped)
■Front seat heaters and ventilators (if equipped)/rear seat heaters (if
equipped)
Seat heater switches
The indicator light (yellow) on the switch co mes on when the seat heater is operating.
Seat ventilator switches (front seats only)
The indicator light (green) on the switch come s on when the seat ventilator is operating.
Level indicator lights
The seat heater temperature level or the seat ventilator fan speed level (for front seats
only) is displayed.
“AUTO” indicator lights
Seat heaters heat the side grips of the seats, respectively. Seat ventilators maintain good
airflow by blowing air from the seats.
Front seats Rear seats
1
2
3
4
Page 72 of 100

71
GS350_200t_QG_OM30G01U_(U)
●Modes and indicators
The mode can be changed by pressing the switch.
*: When automatic mode is selected, the level automatically changes depending on the air
conditioning settings.
■Seat heaters (without seat ventilators) (if equipped)
Seat heater switches
Level indicator lights
The seat heater temperature level is
displayed.
● Modes and indicators
The mode changes each time the switch is pressed as follows:
*: The mode changes automatically depending on the amount of time that has elapsed.
The amount of time until the mode changes varies depending on the interior tempera-
ture when the seat heater was operated and other factors.
Mode“AUTO” indicator lightLevel indicator lights
OffOffOff
Automatic*On3 to 1, or off
HiOff3
MidOff2
LoOff1
1
2
ModeLevel indicator lightsAutomatic operation*
OffOff
Hi3Hi Mid Lo
Mid2Mid Lo
Lo1Lo
Page 73 of 100

72
GS350_200t_QG_OM30G01U_(U)
■Seat ventilators (without seat heaters) (if equipped)
Seat ventilator switches
Level indicator lights
The seat ventilator fan speed level is
displayed.
● Modes and indicators
The mode changes each time the switch is pressed as follows:1
2
ModeLevel indicator lights
OffOff
Hi3
Mid2
Lo1
If the driving mode select switch is switched to Eco drive mode in cold temperatures, the
seat heater may be automatically operated to assist heating performance. ( P.43)
Page 79 of 100

78
GS350_200t_QG_OM30G01U_(U)
Portable Audio Device Ports
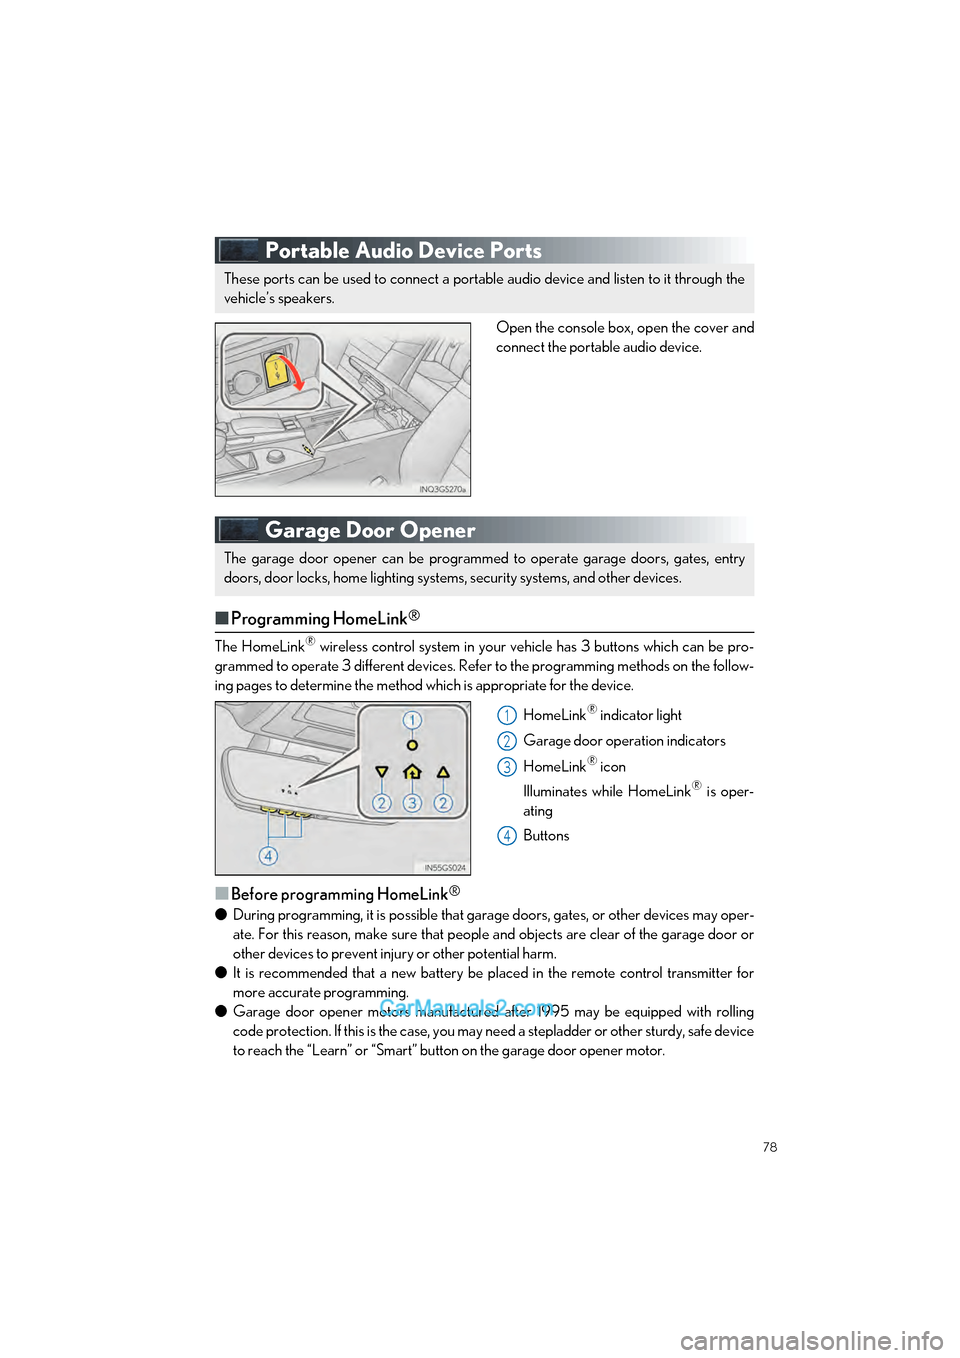
Open the console box, open the cover and
connect the portable audio device.
Garage Door Opener
■Programming HomeLink®
The HomeLink® wireless control system in your vehicle has 3 buttons which can be pro-
grammed to operate 3 different devices. Refe r to the programming methods on the follow-
ing pages to determine the method which is appropriate for the device.
HomeLink
® indicator light
Garage door operation indicators
HomeLink
® icon
Illuminates while HomeLink
® is oper-
ating
Buttons
■Before programming HomeLink®
● During programming, it is possible that garage doors, gates, or other devices may oper-
ate. For this reason, make sure that people and objects are clear of the garage door or
other devices to prevent inju ry or other potential harm.
● It is recommended that a new battery be placed in the remote control transmitter for
more accurate programming.
● Garage door opener motors manufactured after 1995 may be equipped with rolling
code protection. If this is the case, you may need a stepladder or other sturdy, safe device
to reach the “Learn” or “Smart” button on the garage door opener motor.
These ports can be used to connect a portable audio device and listen to it through the
vehicle’s speakers.
The garage door opener can be programmed to operate garage doors, gates, entry
doors, door locks, home lighting system s, security systems, and other devices.
1
2
3
4
Page 80 of 100

79
GS350_200t_QG_OM30G01U_(U)
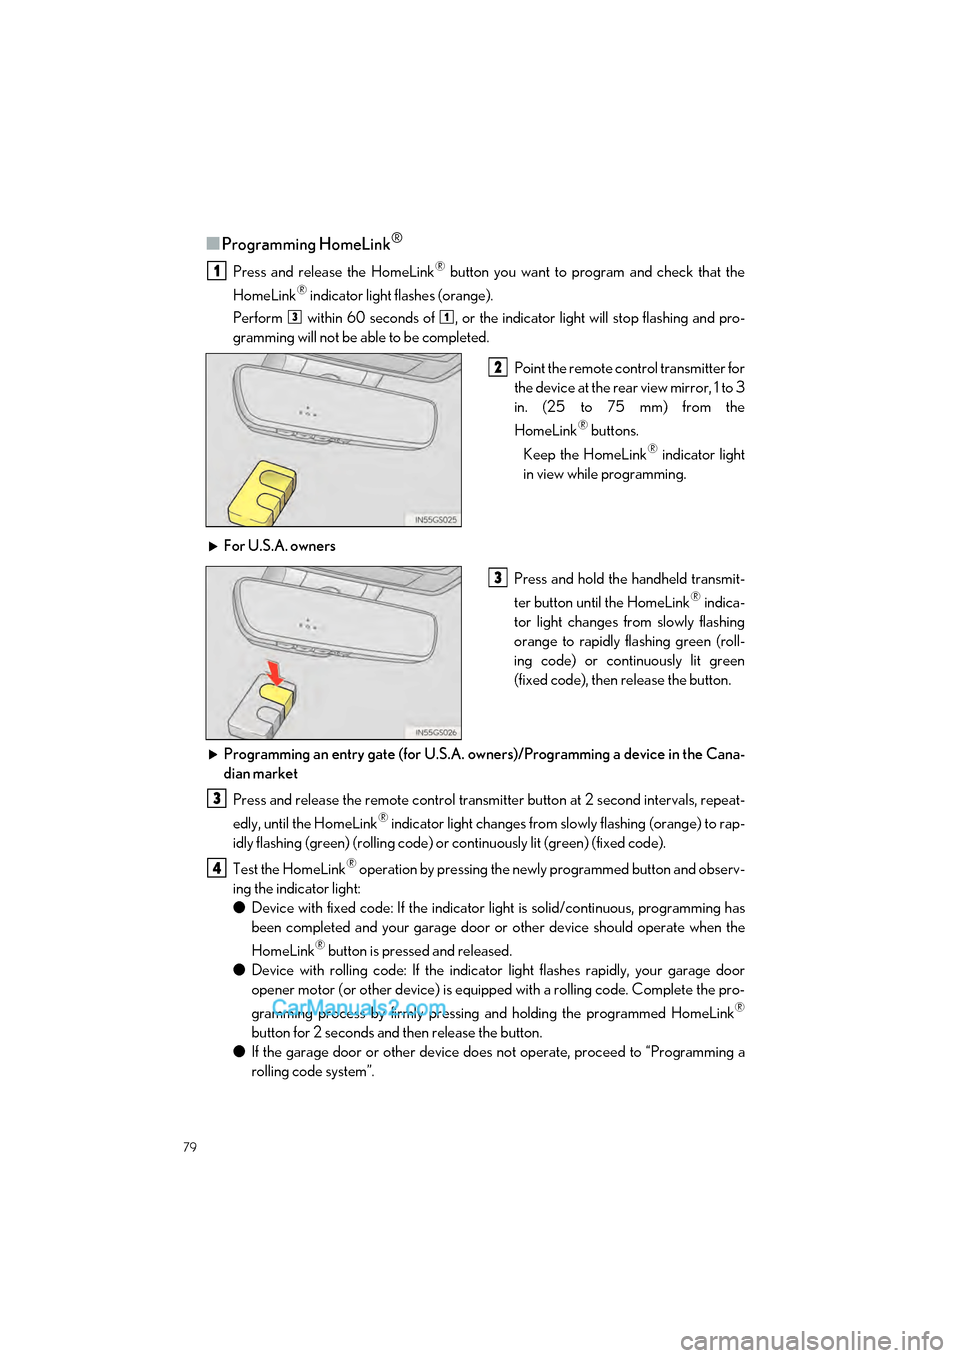
■Programming HomeLink®
Press and release the HomeLink® button you want to program and check that the
HomeLink
® indicator light flashes (orange).
Perform within 60 seconds of , or the indicator light will stop flashing and pro-
gramming will not be able to be completed.
Point the remote control transmitter for
the device at the rear view mirror, 1 to 3
in. (25 to 75 mm) from the
HomeLink
® buttons.
Keep the HomeLink
® indicator light
in view while programming.
For U.S.A. owners Press and hold the handheld transmit-
ter button until the HomeLink
® indica-
tor light changes from slowly flashing
orange to rapidly flashing green (roll-
ing code) or continuously lit green
(fixed code), then release the button.
Programming an entry gate (for U.S.A. owners)/Programming a device in the Cana-
dian market Press and release the remote control transmitter button at 2 second intervals, repeat-
edly, until the HomeLink
® indicator light changes from slowly flashing (orange) to rap-
idly flashing (green) (rolling code) or continuously lit (green) (fixed code).
Test the HomeLink
® operation by pressing the newly programmed button and observ-
ing the indicator light:
● Device with fixed code: If the indicator light is solid/continuous, programming has
been completed and your garage door or other device should operate when the
HomeLink
® button is pressed and released.
● Device with rolling code: If the indicator light flashes rapidly, your garage door
opener motor (or other device) is equipped with a rolling code. Complete the pro-
gramming process by firmly pressing and holding the programmed HomeLink
®
button for 2 seconds and then release the button.
● If the garage door or other device does not operate, proceed to “Programming a
rolling code system”.
1
31
2
3
3
4
Page 82 of 100

81
GS350_200t_QG_OM30G01U_(U)
■Enabling 2-way communication with a garage door (only available for compat-
ible devices)
When enabled, 2-way communication allows you to check the status of the opening and
closing of a garage door through indicators in your vehicle.
2-way communication is only available if the garage door opener motor used is a compati-
ble device. (To check device compatibility, refer to www.HomeLink.com.)
Within 5 seconds after programming the garage door opener has been completed, if
the garage door opener motor is trained to HomeLink
®, both garage door operation
indicators will flash rapidly (green) and the light on the garage door opener motor will
blink twice, indicating that 2- way communication is enabled.
If the indicators do not flash, perform and within the first 10 presses of the
HomeLink
® button after programming has been completed.
Press a programmed HomeLink
® button to operate a garage door.
Within 1 minute of pressing the HomeLink
® button, after the garage door operation
has stopped, press the “Learn” or “Smart” button on the garage door opener motor.
Within 5 seconds of the establishment of 2-way communication with the garage door
opener, both garage door operation indicators in the vehicle will flash rapidly (green)
and the light on the garage d oor opener motor will blink tw ice, indicating that 2-way
communication is enabled.
■Reprogramming a single HomeLink® button
When the following procedure is performed, buttons which already have devices registered
to them can be overwritten:
With one hand, press and hold the desired HomeLink
® button.
When the HomeLink
® indicator starts flashing (orange), continue to hold the
HomeLink
® button and perform “Programming HomeLink®” (it takes 20 seconds
for the HomeLink
® indicator to start flashing).
■ Operating HomeLink®
Press the appropriate HomeLink® button. The HomeLink® indicator light should turn on.
1
23
2
3
1
2
1
Page 83 of 100

82
GS350_200t_QG_OM30G01U_(U)
Lexus Enform Safety Connect (if equipped)
■System components
“SOS” button
LED light indicators
Microphone
■Services
Subscribers have the following Sa fety Connect services available:
● Automatic Collision Notification
*
In case of either airbag deployment or seve re rear-end collision, the system is designed
to automatically call the response center. The responding agent receives the vehicle’s
location and attempts to speak with the vehicle occupants to assess the level of emer-
gency. If the occupants are unable to communicate, the agent automatically treats the
call as an emergency, contacts the nearest emergency services provider to describe the
situation, and requests that assistance be sent to the location.
*: U.S. Patent No. 7,508,298 B2
Safety Connect is a subscription-based telematics service that uses Global Positioning
System (GPS) data and embedded cellular technology to provide safety and security
features to subscribers. Safety Connect is supported by Lexus’ designated response
center, which operates 24 hours per day, 7 days per week.
Safety Connect service is available by subs cription on select, telematics hardware-
equipped vehicles.
1
2
3