Lexus GS450h 2012 Navigation manual
Manufacturer: LEXUS, Model Year: 2012, Model line: GS450h, Model: Lexus GS450h 2012Pages: 257, PDF Size: 30.79 MB
Page 61 of 257
60
2. SETUP
GS450h/250 (EE) NAVI 30C48E
13.12.17 15:42
*: Vehicles without a 12.3-inch display
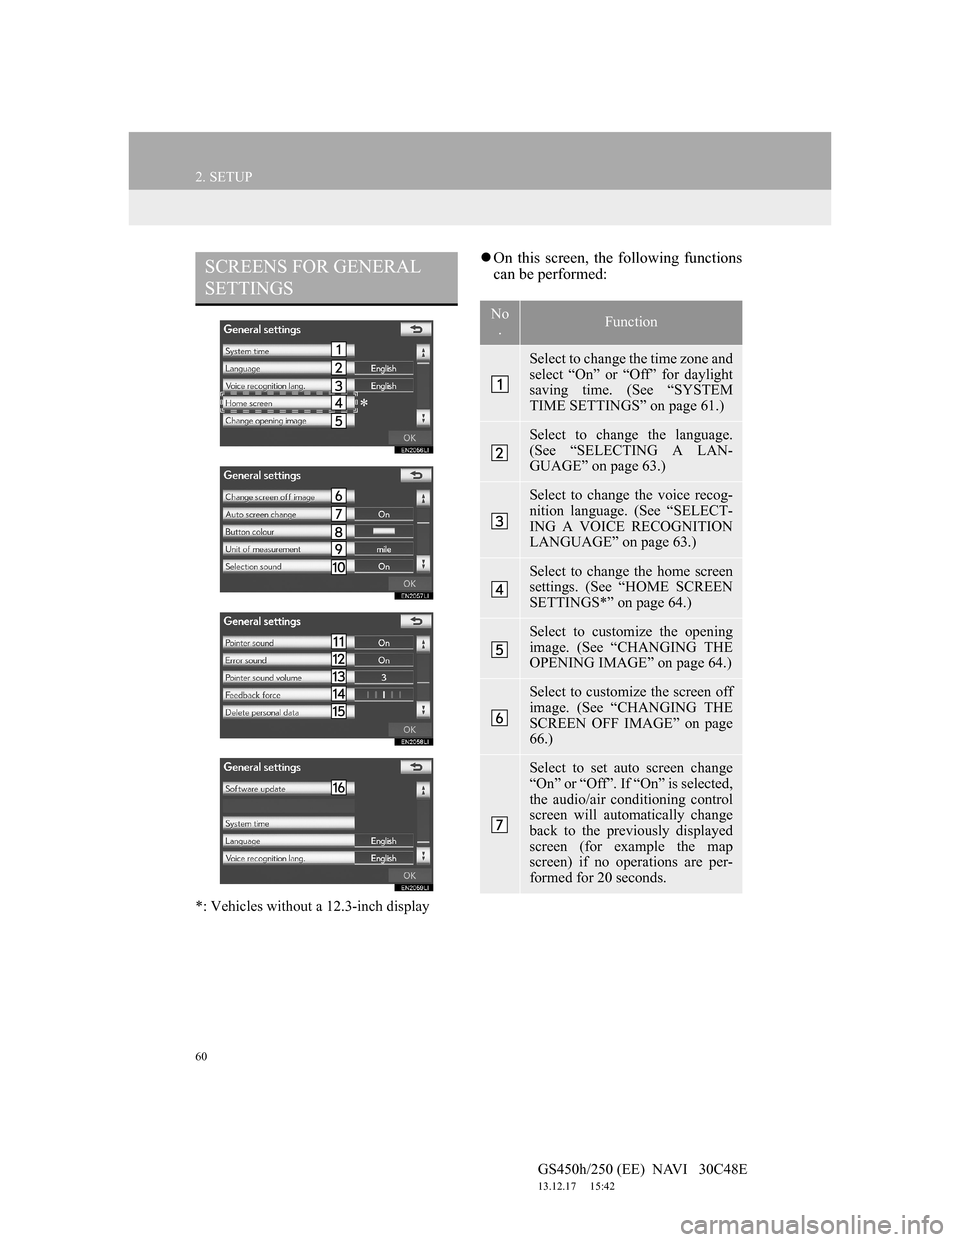
On this screen, the following functions
can be performed:SCREENS FOR GENERAL
SETTINGS
*
No
.Function
Select to change the time zone and
select “On” or “Off” for daylight
saving time. (See “SYSTEM
TIME SETTINGS” on page 61.)
Select to change the language.
(See “SELECTING A LAN-
GUAGE” on page 63.)
Select to change the voice recog-
nition language. (See “SELECT-
ING A VOICE RECOGNITION
LANGUAGE” on page 63.)
Select to change the home screen
settings. (See “HOME SCREEN
SETTINGS*” on page 64.)
Select to customize the opening
image. (See “CHANGING THE
OPENING IMAGE” on page 64.)
Select to customize the screen off
image. (See “CHANGING THE
SCREEN OFF IMAGE” on page
66.)
Select to set auto screen change
“On” or “Off”. If “On” is selected,
the audio/air conditioning control
screen will automatically change
back to the previously displayed
screen (for example the map
screen) if no operations are per-
formed for 20 seconds.
Page 62 of 257
61
2. SETUP
GS450h/250 (EE) NAVI 30C48E
13.12.17 15:42
2
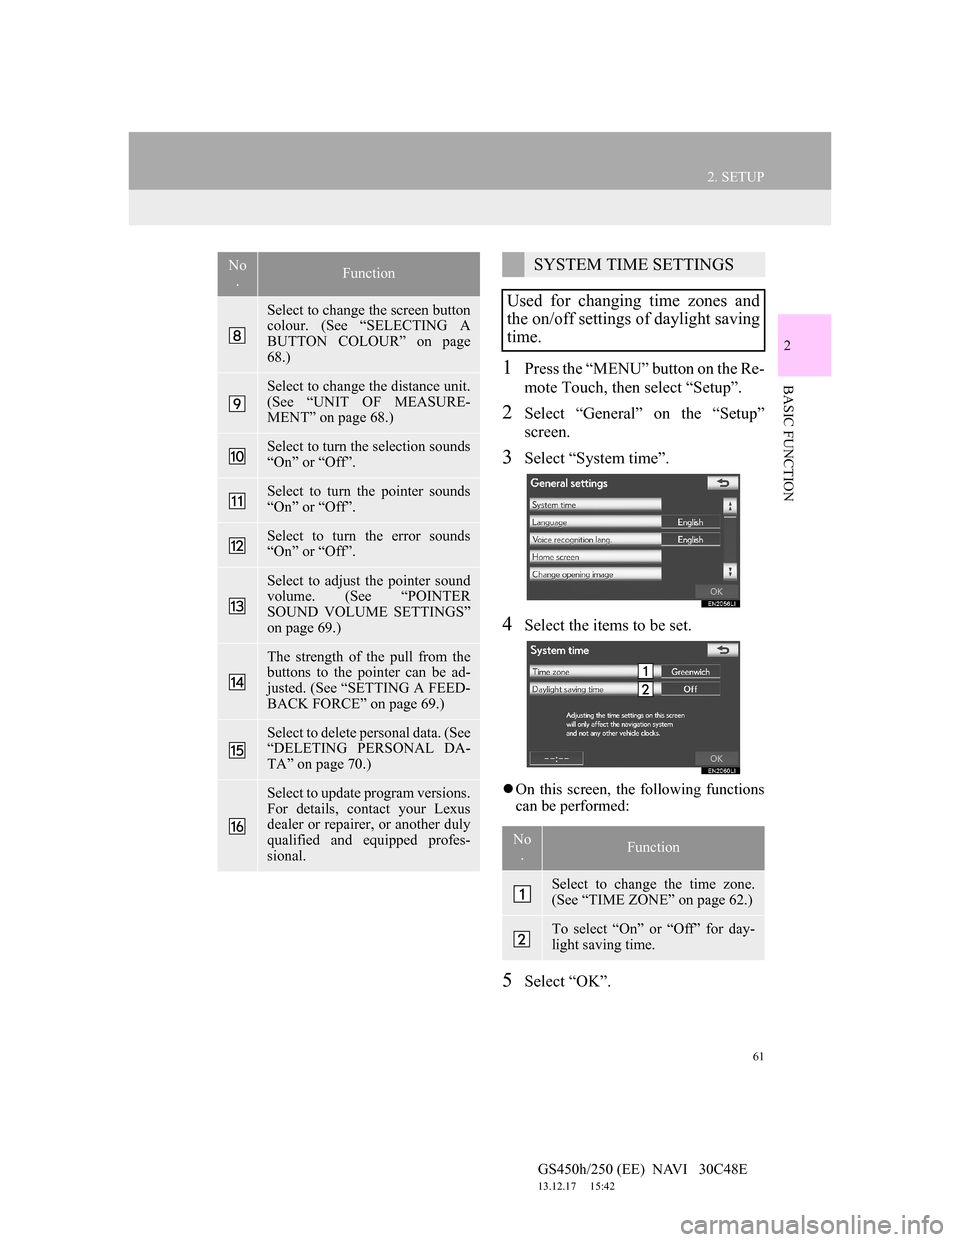
BASIC FUNCTION1Press the “MENU” button on the Re-
mote Touch, then select “Setup”.
2Select “General” on the “Setup”
screen.
3Select “System time”.
4Select the items to be set.
On this screen, the following functions
can be performed:
5Select “OK”.
Select to change the screen button
colour. (See “SELECTING A
BUTTON COLOUR” on page
68.)
Select to change the distance unit.
(See “UNIT OF MEASURE-
MENT” on page 68.)
Select to turn the selection sounds
“On” or “Off”.
Select to turn the pointer sounds
“On” or “Off”.
Select to turn the error sounds
“On” or “Off”.
Select to adjust the pointer sound
volume. (See “POINTER
SOUND VOLUME SETTINGS”
on page 69.)
The strength of the pull from the
buttons to the pointer can be ad-
justed. (See “SETTING A FEED-
BACK FORCE” on page 69.)
Select to delete personal data. (See
“DELETING PERSONAL DA-
TA” on page 70.)
Select to update program versions.
For details, contact your Lexus
dealer or repairer, or another duly
qualified and equipped profes-
sional.
No
.FunctionSYSTEM TIME SETTINGS
Used for changing time zones and
the on/off settings of daylight saving
time.
No
.Function
Select to change the time zone.
(See “TIME ZONE” on page 62.)
To select “On” or “Off” for day-
light saving time.
Page 63 of 257
62
2. SETUP
GS450h/250 (EE) NAVI 30C48E
13.12.17 15:42
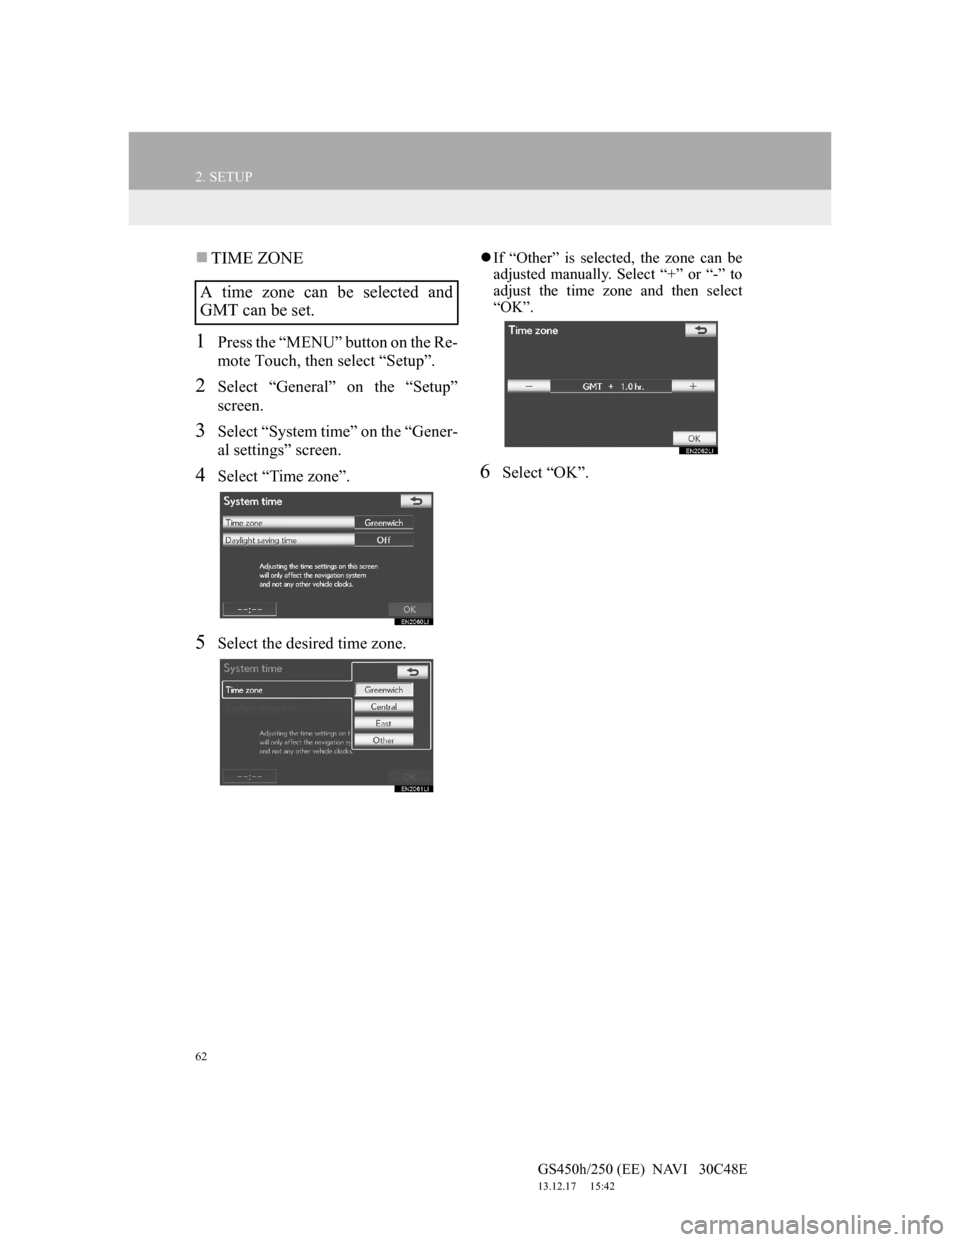
TIME ZONE
1Press the “MENU” button on the Re-
mote Touch, then select “Setup”.
2Select “General” on the “Setup”
screen.
3Select “System time” on the “Gener-
al settings” screen.
4Select “Time zone”.
5Select the desired time zone.
If “Other” is selected, the zone can be
adjusted manually. Select “+” or “-” to
adjust the time zone and then select
“OK”.
6Select “OK”.
A time zone can be selected and
GMT can be set.
Page 64 of 257
63
2. SETUP
GS450h/250 (EE) NAVI 30C48E
13.12.17 15:42
2
BASIC FUNCTION
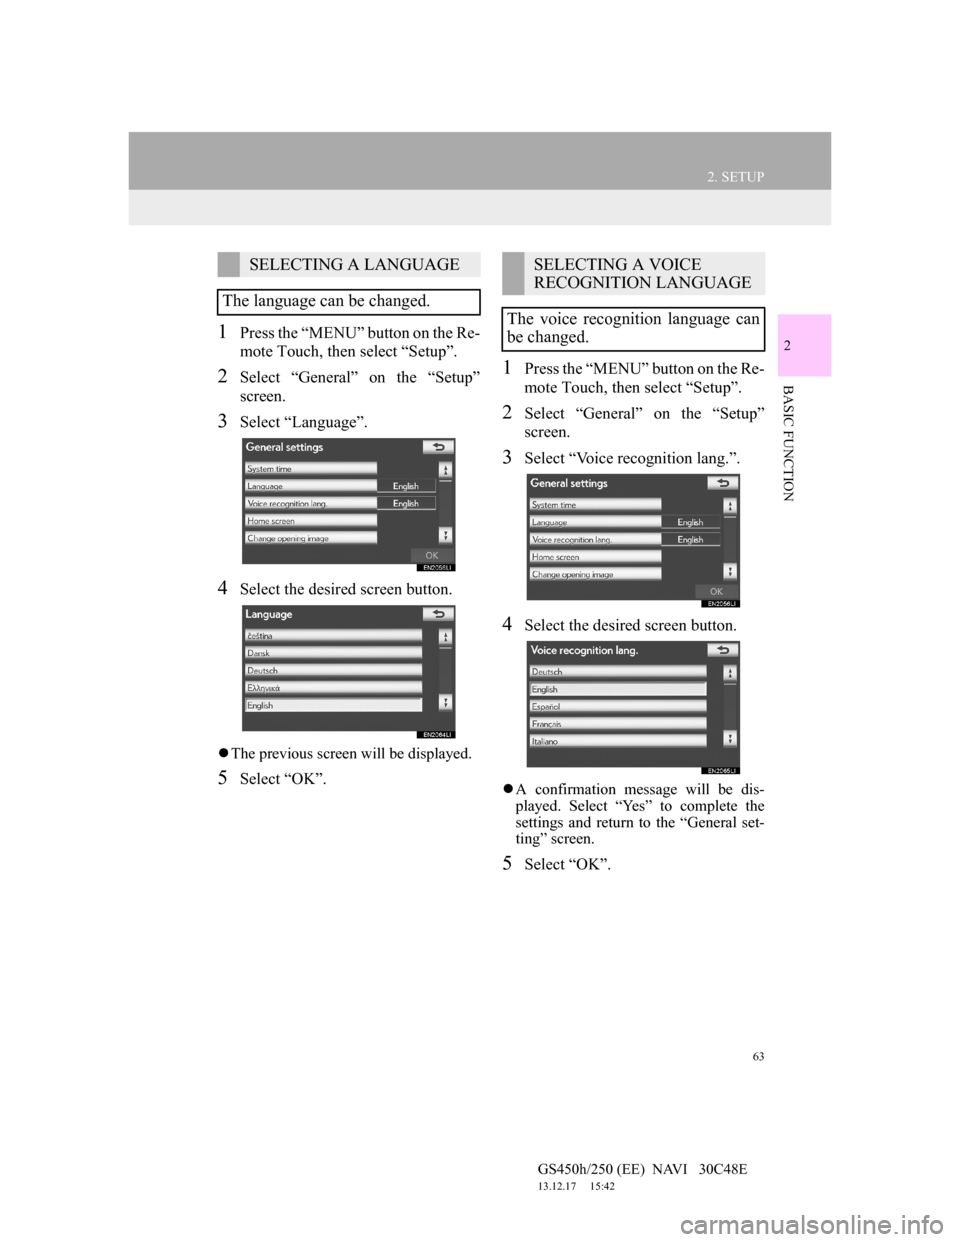
1Press the “MENU” button on the Re-
mote Touch, then select “Setup”.
2Select “General” on the “Setup”
screen.
3Select “Language”.
4Select the desired screen button.
The previous screen will be displayed.
5Select “OK”.
1Press the “MENU” button on the Re-
mote Touch, then select “Setup”.
2Select “General” on the “Setup”
screen.
3Select “Voice recognition lang.”.
4Select the desired screen button.
A confirmation message will be dis-
played. Select “Yes” to complete the
settings and return to the “General set-
ting” screen.
5Select “OK”.
SELECTING A LANGUAGE
The language can be changed.SELECTING A VOICE
RECOGNITION LANGUAGE
The voice recognition language can
be changed.
Page 65 of 257
64
2. SETUP
GS450h/250 (EE) NAVI 30C48E
13.12.17 15:42
*: Vehicles without a 12.3-inch display
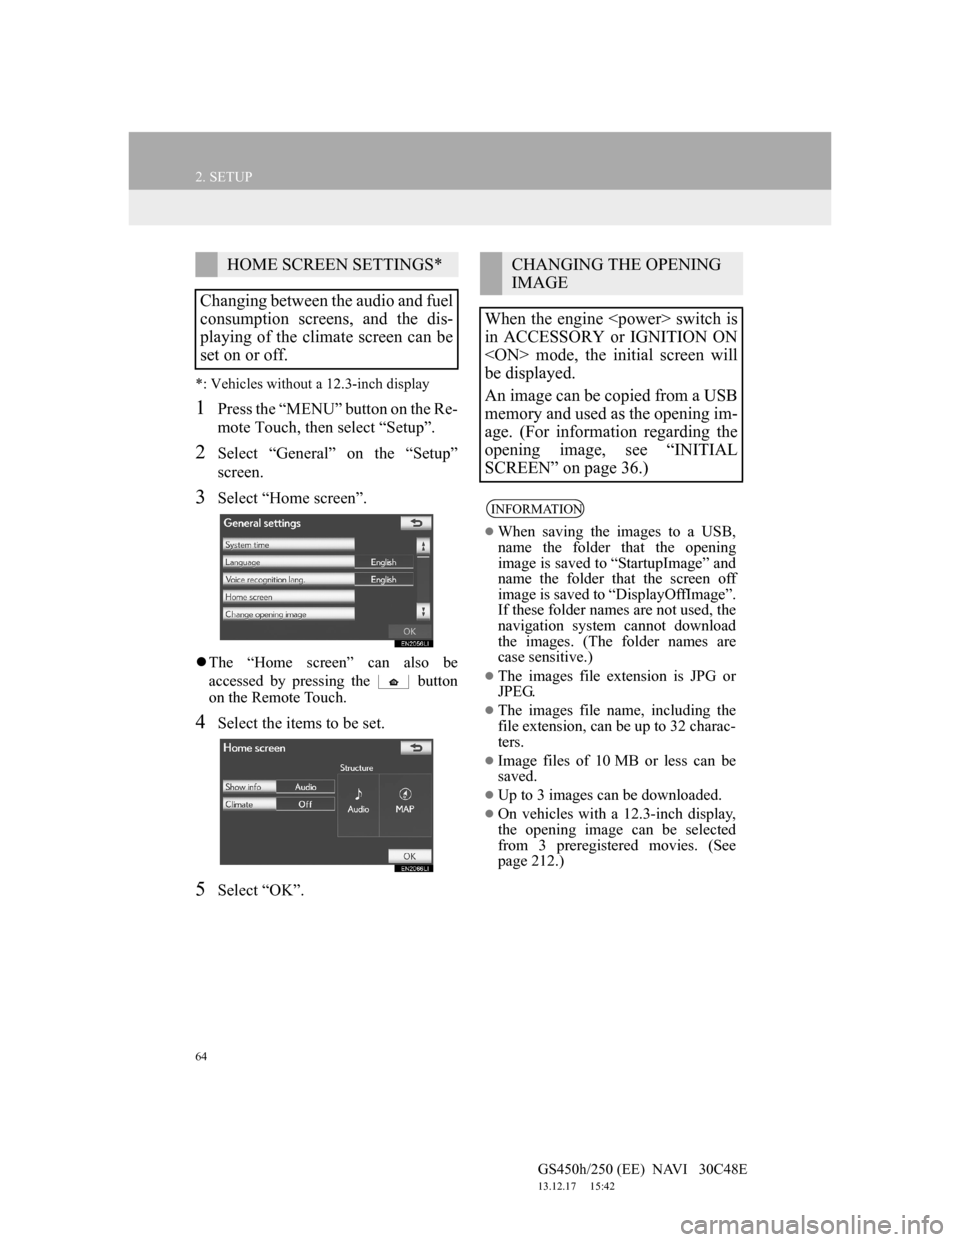
1Press the “MENU” button on the Re-
mote Touch, then select “Setup”.
2Select “General” on the “Setup”
screen.
3Select “Home screen”.
The “Home screen” can also be
accessed by pressing the button
on the Remote Touch.
4Select the items to be set.
5Select “OK”.
HOME SCREEN SETTINGS*
Changing between the audio and fuel
consumption screens, and the dis-
playing of the climate screen can be
set on or off.CHANGING THE OPENING
IMAGE
When the engine
in ACCESSORY or IGNITION ON
be displayed.
An image can be copied from a USB
memory and used as the opening im-
age. (For information regarding the
opening image, see “INITIAL
SCREEN” on page 36.)
INFORMATION
When saving the images to a USB,
name the folder that the opening
image is saved to “StartupImage” and
name the folder that the screen off
image is saved to “DisplayOffImage”.
If these folder names are not used, the
navigation system cannot download
the images. (The folder names are
case sensitive.)
The images file extension is JPG or
JPEG.
The images file name, including the
file extension, can be up to 32 charac-
ters.
Image files of 10 MB or less can be
saved.
Up to 3 images can be downloaded.
On vehicles with a 12.3-inch display,
the opening image can be selected
from 3 preregistered movies. (See
page 212.)
Page 66 of 257
65
2. SETUP
GS450h/250 (EE) NAVI 30C48E
13.12.17 15:42
2
BASIC FUNCTION
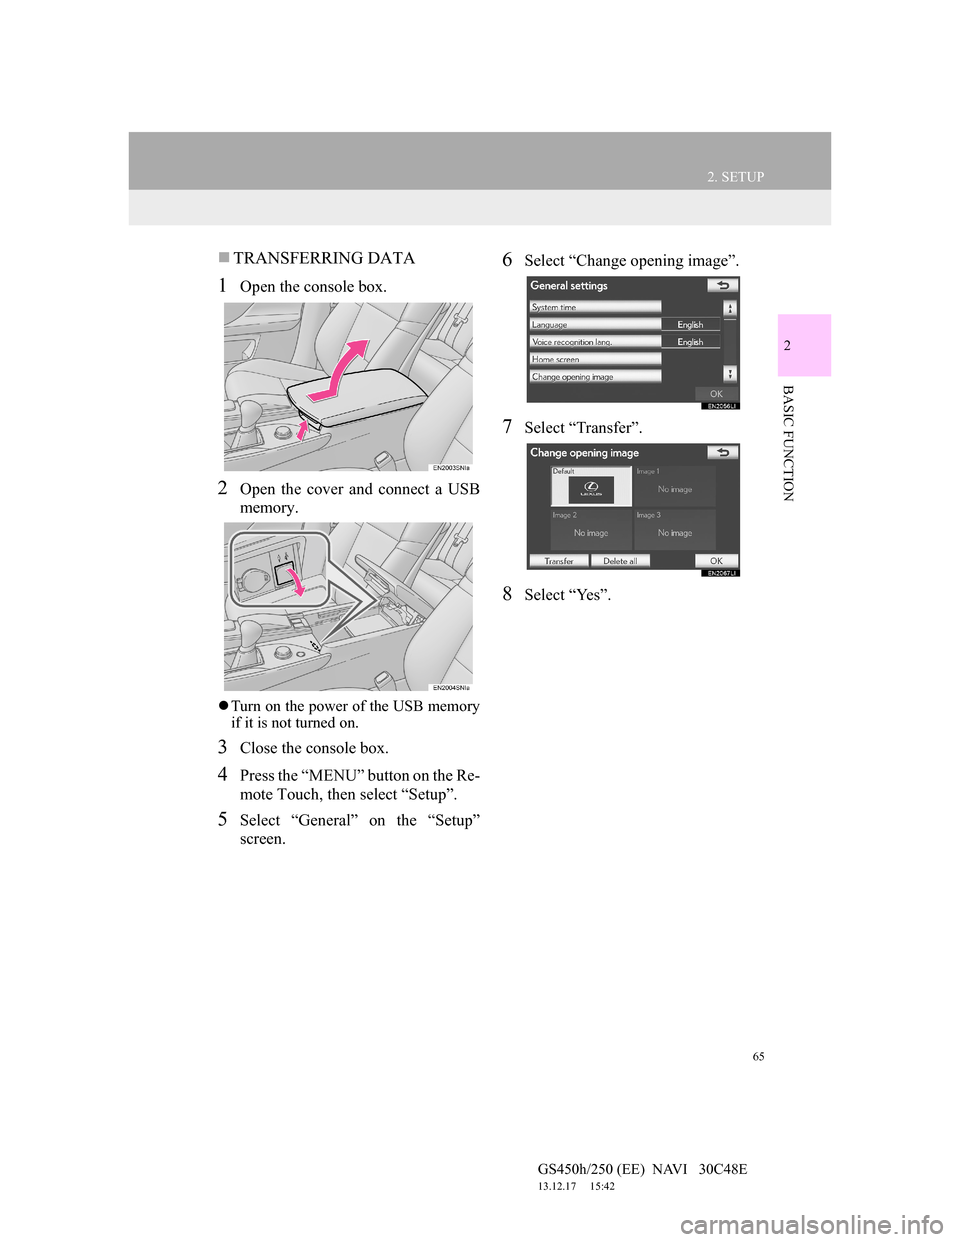
TRANSFERRING DATA
1Open the console box.
2Open the cover and connect a USB
memory.
Turn on the power of the USB memory
if it is not turned on.
3Close the console box.
4Press the “MENU” button on the Re-
mote Touch, then select “Setup”.
5Select “General” on the “Setup”
screen.
6Select “Change opening image”.
7Select “Transfer”.
8Select “Yes”.
Page 67 of 257
66
2. SETUP
GS450h/250 (EE) NAVI 30C48E
13.12.17 15:42
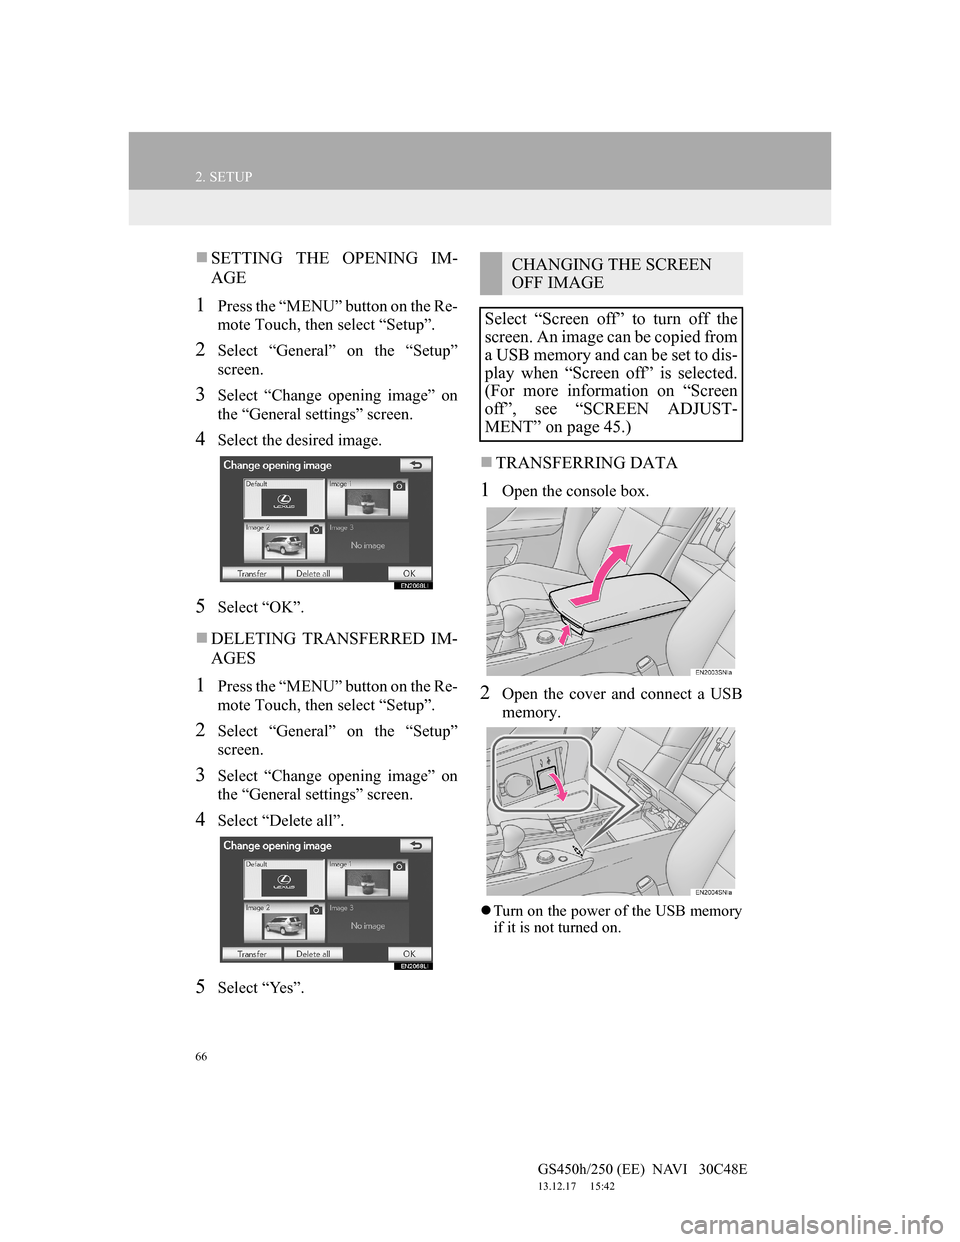
SETTING THE OPENING IM-
AGE
1Press the “MENU” button on the Re-
mote Touch, then select “Setup”.
2Select “General” on the “Setup”
screen.
3Select “Change opening image” on
the “General settings” screen.
4Select the desired image.
5Select “OK”.
DELETING TRANSFERRED IM-
AGES
1Press the “MENU” button on the Re-
mote Touch, then select “Setup”.
2Select “General” on the “Setup”
screen.
3Select “Change opening image” on
the “General settings” screen.
4Select “Delete all”.
5Select “Yes”.
TRANSFERRING DATA
1Open the console box.
2Open the cover and connect a USB
memory.
Turn on the power of the USB memory
if it is not turned on.
CHANGING THE SCREEN
OFF IMAGE
Select “Screen off” to turn off the
screen. An image can be copied from
a USB memory and can be set to dis-
play when “Screen off” is selected.
(For more information on “Screen
off”, see “SCREEN ADJUST-
MENT” on page 45.)
Page 68 of 257
67
2. SETUP
GS450h/250 (EE) NAVI 30C48E
13.12.17 15:42
2
BASIC FUNCTION
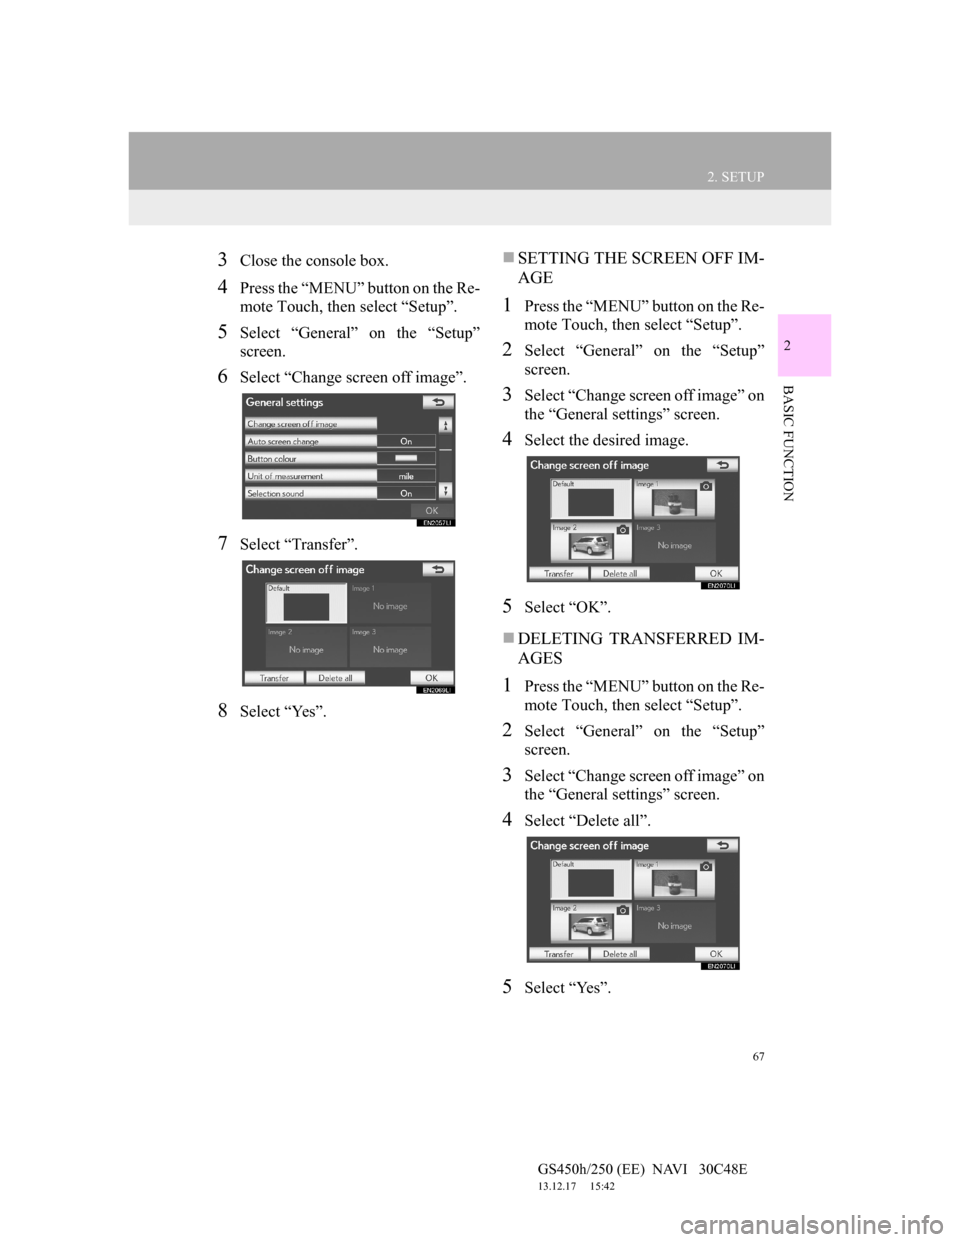
3Close the console box.
4Press the “MENU” button on the Re-
mote Touch, then select “Setup”.
5Select “General” on the “Setup”
screen.
6Select “Change screen off image”.
7Select “Transfer”.
8Select “Yes”.
SETTING THE SCREEN OFF IM-
AGE
1Press the “MENU” button on the Re-
mote Touch, then select “Setup”.
2Select “General” on the “Setup”
screen.
3Select “Change screen off image” on
the “General settings” screen.
4Select the desired image.
5Select “OK”.
DELETING TRANSFERRED IM-
AGES
1Press the “MENU” button on the Re-
mote Touch, then select “Setup”.
2Select “General” on the “Setup”
screen.
3Select “Change screen off image” on
the “General settings” screen.
4Select “Delete all”.
5Select “Yes”.
Page 69 of 257
68
2. SETUP
GS450h/250 (EE) NAVI 30C48E
13.12.17 15:42
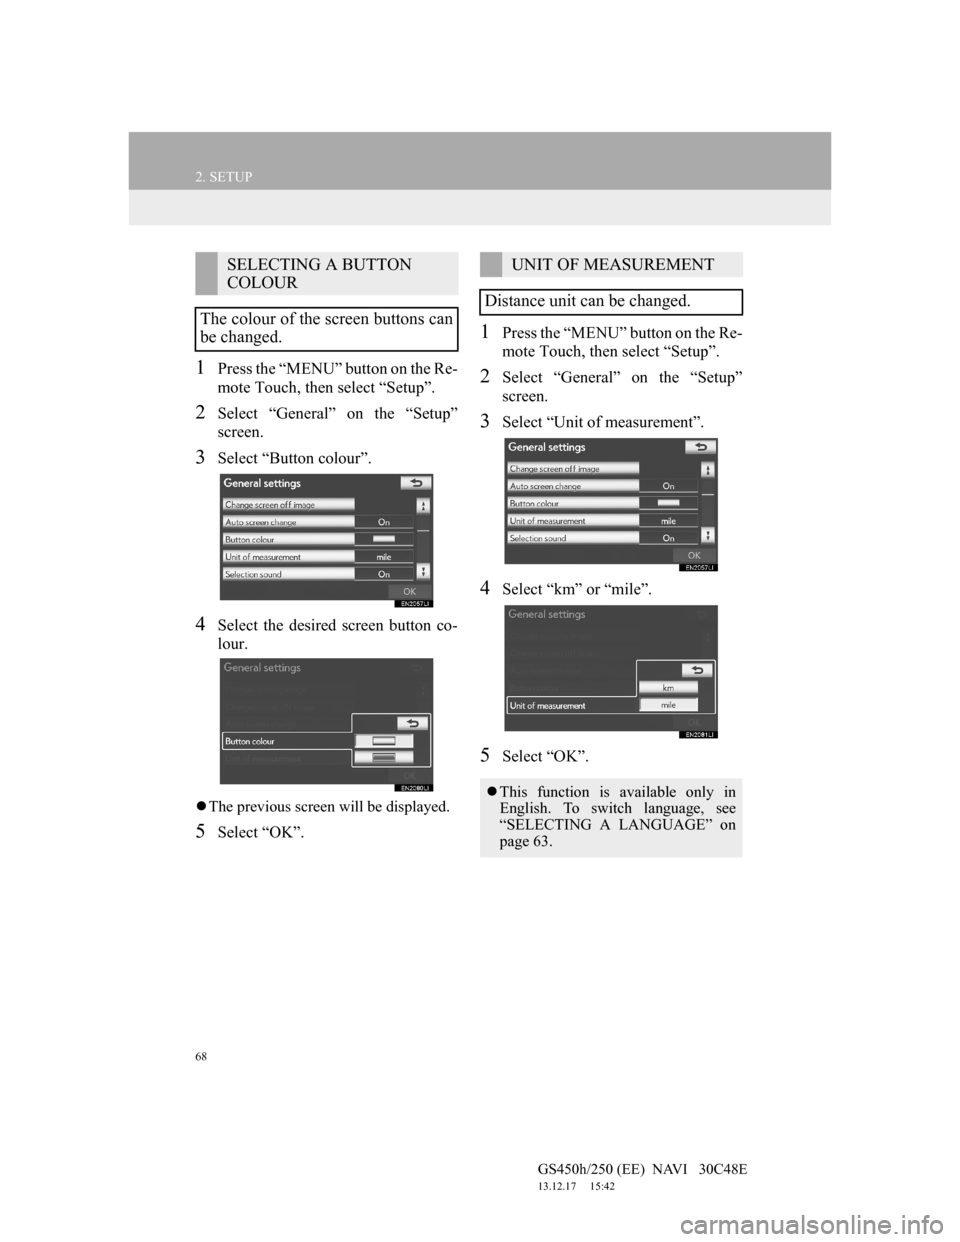
1Press the “MENU” button on the Re-
mote Touch, then select “Setup”.
2Select “General” on the “Setup”
screen.
3Select “Button colour”.
4Select the desired screen button co-
lour.
The previous screen will be displayed.
5Select “OK”.
1Press the “MENU” button on the Re-
mote Touch, then select “Setup”.
2Select “General” on the “Setup”
screen.
3Select “Unit of measurement”.
4Select “km” or “mile”.
5Select “OK”.
SELECTING A BUTTON
COLOUR
The colour of the screen buttons can
be changed.UNIT OF MEASUREMENT
Distance unit can be changed.
This function is available only in
English. To switch language, see
“SELECTING A LANGUAGE” on
page 63.
Page 70 of 257
69
2. SETUP
GS450h/250 (EE) NAVI 30C48E
13.12.17 15:42
2
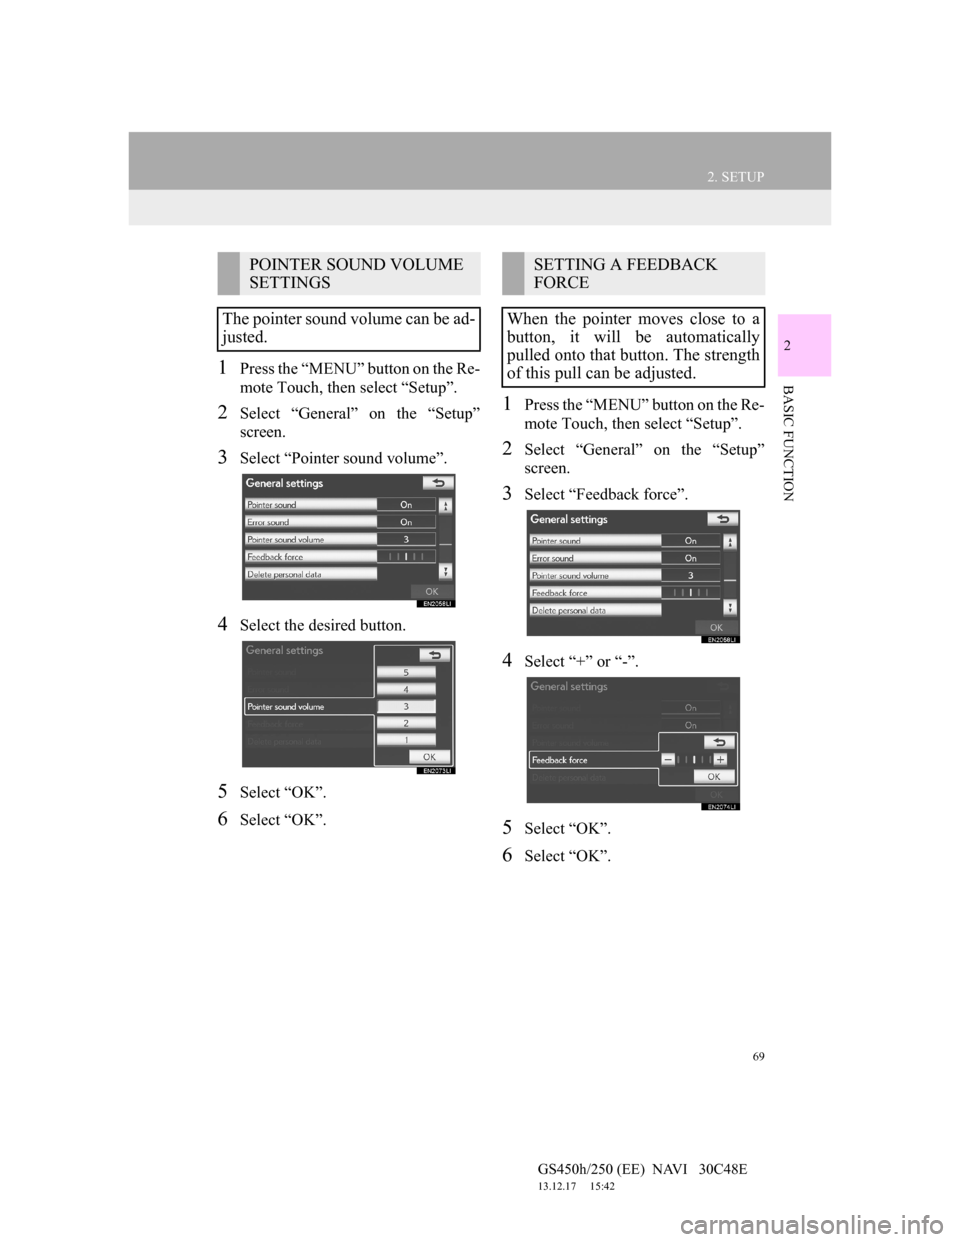
BASIC FUNCTION1Press the “MENU” button on the Re-
mote Touch, then select “Setup”.
2Select “General” on the “Setup”
screen.
3Select “Pointer sound volume”.
4Select the desired button.
5Select “OK”.
6Select “OK”.
1Press the “MENU” button on the Re-
mote Touch, then select “Setup”.
2Select “General” on the “Setup”
screen.
3Select “Feedback force”.
4Select “+” or “-”.
5Select “OK”.
6Select “OK”.
POINTER SOUND VOLUME
SETTINGS
The pointer sound volume can be ad-
justed.SETTING A FEEDBACK
FORCE
When the pointer moves close to a
button, it will be automatically
pulled onto that button. The strength
of this pull can be adjusted.