Lock Lexus GX460 2021 Owner's Manual /
[x] Cancel search | Manufacturer: LEXUS, Model Year: 2021, Model line: GX460, Model: Lexus GX460 2021Pages: 628, PDF Size: 12.51 MB
Page 467 of 628
GX460_OM_OM60T19U_(U)
4676-3. Do-it-yourself maintenance
6
Maintenance and care
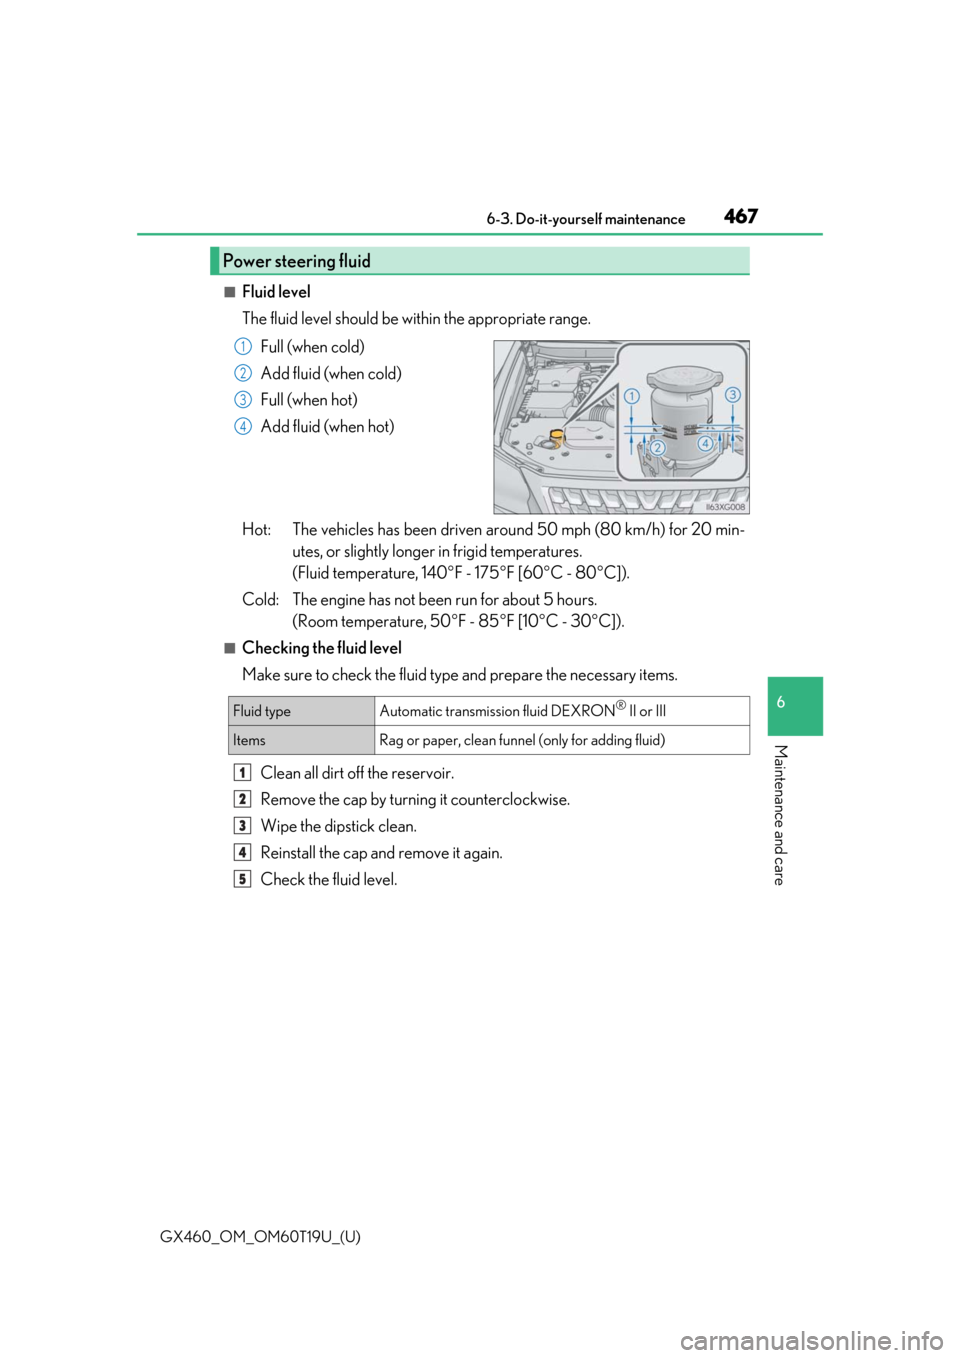
■Fluid level
The fluid level should be within the appropriate range.Full (when cold)
Add fluid (when cold)
Full (when hot)
Add fluid (when hot)
Hot: The vehicles has been driven around 50 mph (80 km/h) for 20 min- utes, or slightly longer in frigid temperatures.
(Fluid temperature, 140 F - 175 F [60 C - 80 C]).
Cold: The engine has not been run for about 5 hours. (Room temperature, 50 F - 85 F [10 C - 30 C]).
■Checking the fluid level
Make sure to check the fluid type and prepare the necessary items.
Clean all dirt off the reservoir.
Remove the cap by turnin g it counterclockwise.
Wipe the dipstick clean.
Reinstall the cap and remove it again.
Check the fluid level.
Power steering fluid
1
2
3
4
Fluid typeAutomatic transmission fluid DEXRON® II or III
ItemsRag or paper, clean funnel (only for adding fluid)
1
2
3
4
5
Page 469 of 628
GX460_OM_OM60T19U_(U)
4696-3. Do-it-yourself maintenance
6
Maintenance and care
■Before recharging
When recharging, the battery produces hydrogen gas which is flammable and explosive.
Therefore, observe the following before recharging:
●If recharging with the battery installed on the vehicle, be sure to disconnect the ground
cable.
●Make sure the power switch on the charger is off when connecting and disconnecting
the charger cables to the battery.
■After recharging/reconnecting the battery
The engine may not start. Follow the procedure below to initialize the system.
Shift the shift lever to P
Open and close any of the doors.
Restart the engine.
●Unlocking the doors using the smart access system with push-button start may not be
possible immediately after reconnecting the battery. If this happens, use the wireless
remote control or the mechanical key to lock/unlock the doors.
●Start the engine with the engine switch in ACCESSORY mode. The engine may not
start with the engine switch turned off. However, the engine will operate normally from
the second attempt.
●The engine switch mode is recorded by the vehicle. If the battery is reconnected, the
vehicle will return the engine switch mode to the status it was in before the battery was
disconnected. Make sure to turn off the engine before disconnect the battery. Take
extra care when connecting the battery if the engine switch mode prior to discharge is
unknown.
If the system will not start even after mult iple attempts, contact your Lexus dealer.
WARNING
■Chemicals in the battery
Batteries contain poisonous and corrosive sulfuric acid and may produce hydrogen
gas which is flammable and explosive. To reduce the risk of death or serious injury, take
the following precautions while working on or near battery:
●Do not cause sparks by touching the battery terminals with tools.
●Do not smoke or light a match near the battery.
●Avoid contact with eyes, skin and clothes.
●Never inhale or swallow electrolyte.
●Wear protective safety glasses when working near the battery.
●Keep children away from the battery.
■Where to safely charge the battery
Always charge the battery in an open area . Do not charge the battery in a garage or
closed room where there is not sufficient ventilation.
1
2
3
Page 501 of 628
GX460_OM_OM60T19U_(U)
5016-3. Do-it-yourself maintenance
6
Maintenance and care
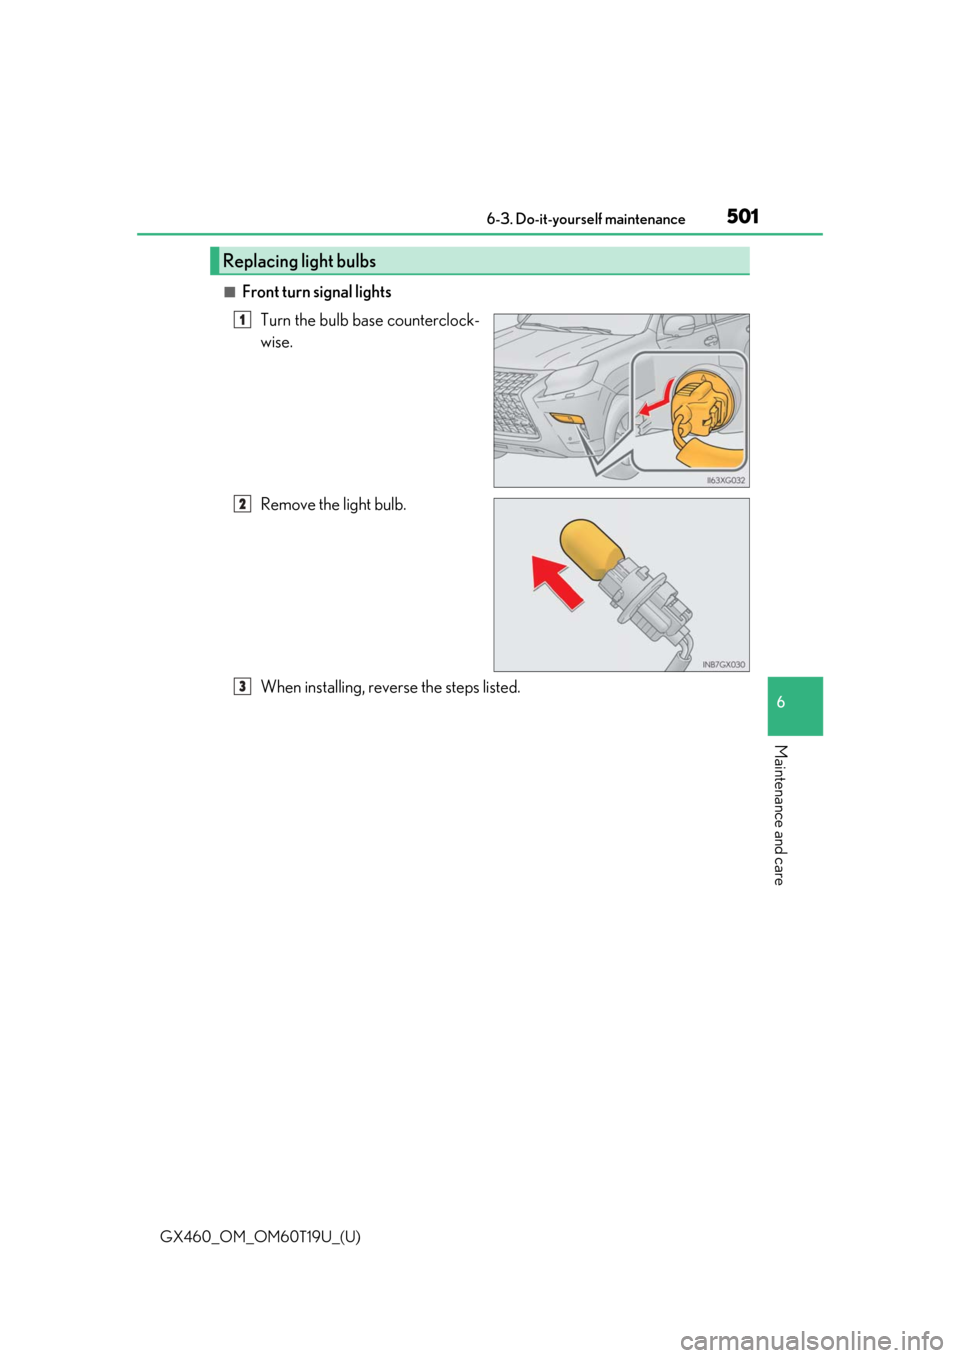
■Front turn signal lightsTurn the bulb base counterclock-
wise.
Remove the light bulb.
When installing, reverse the steps listed.
Replacing light bulbs
1
2
3
Page 503 of 628
GX460_OM_OM60T19U_(U)
5036-3. Do-it-yourself maintenance
6
Maintenance and care
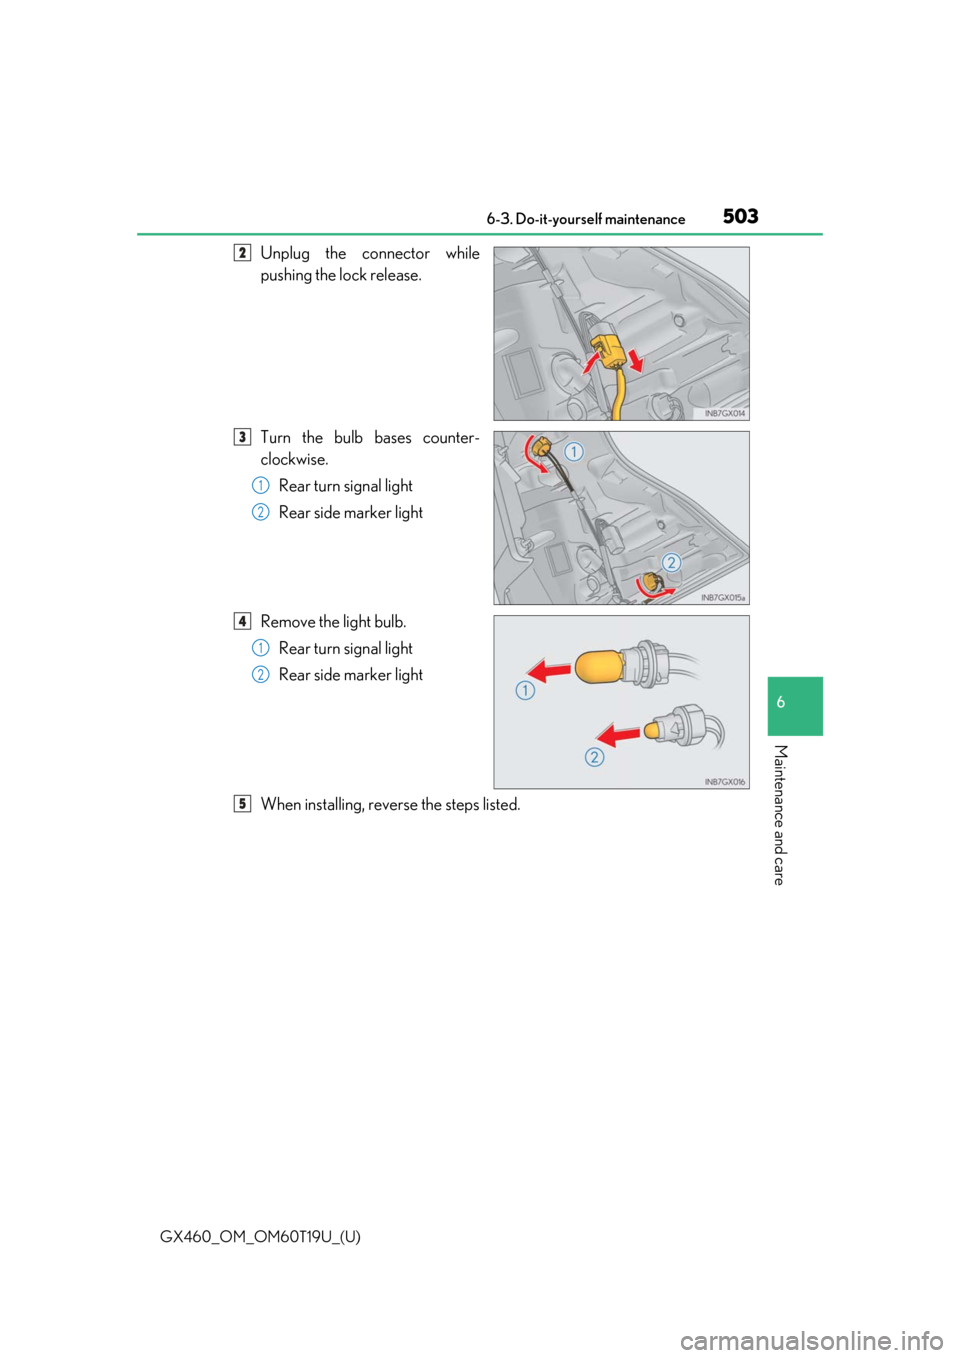
Unplug the connector while
pushing the lock release.
Turn the bulb bases counter-
clockwise.Rear turn signal light
Rear side marker light
Remove the light bulb. Rear turn signal light
Rear side marker light
When installing, reverse the steps listed.2
3
1
2
4
1
2
5
Page 504 of 628
504
GX460_OM_OM60T19U_(U)6-3. Do-it-yourself maintenance
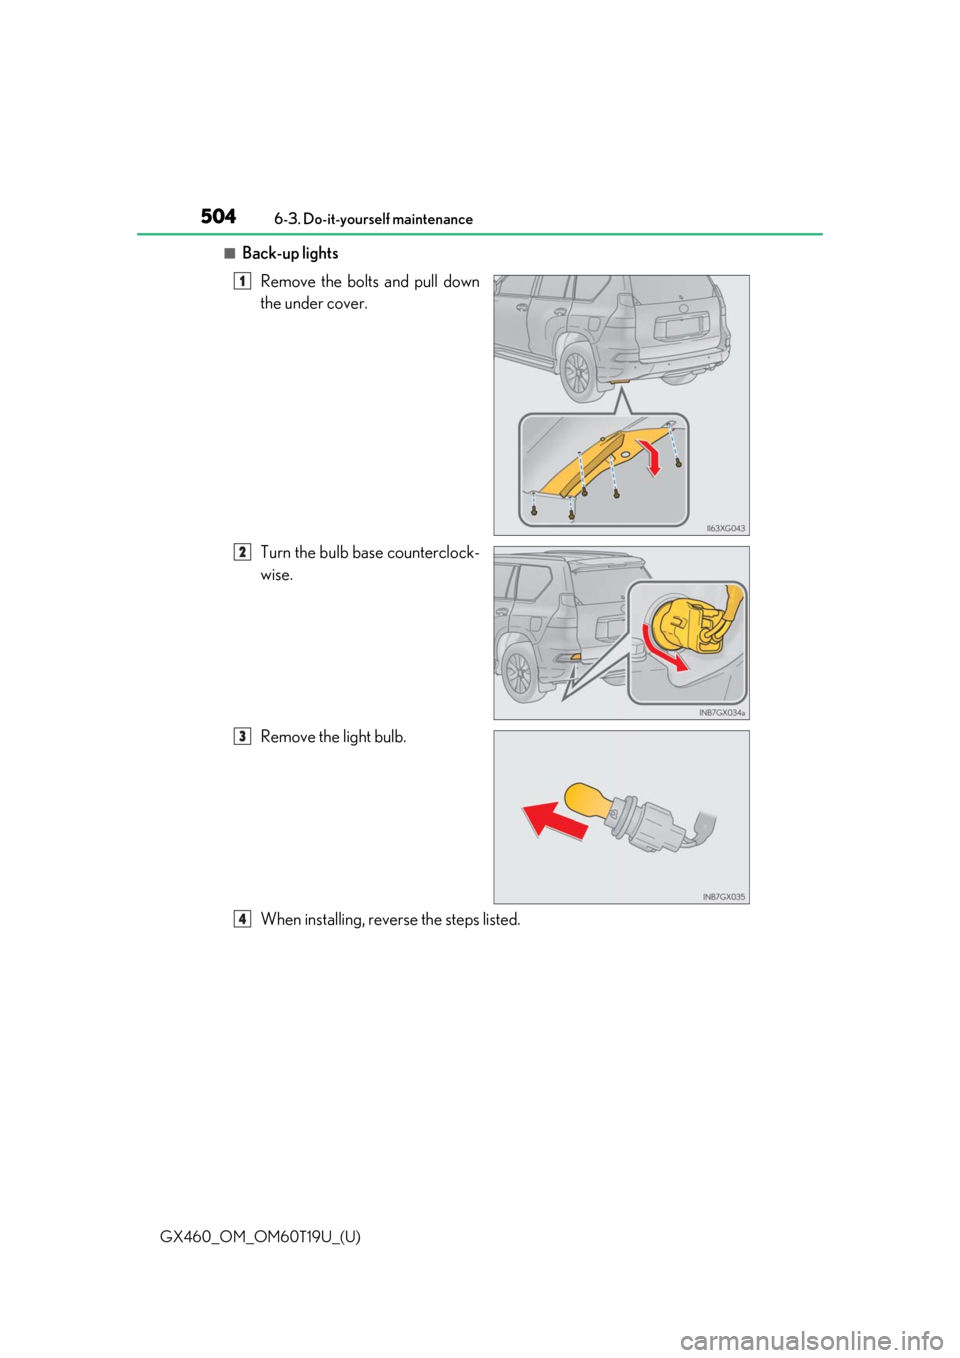
■Back-up lights
Remove the bolts and pull down
the under cover.
Turn the bulb base counterclock-
wise.
Remove the light bulb.
When installing, reverse the steps listed.
1
2
3
4
Page 505 of 628
GX460_OM_OM60T19U_(U)
5056-3. Do-it-yourself maintenance
6
Maintenance and care
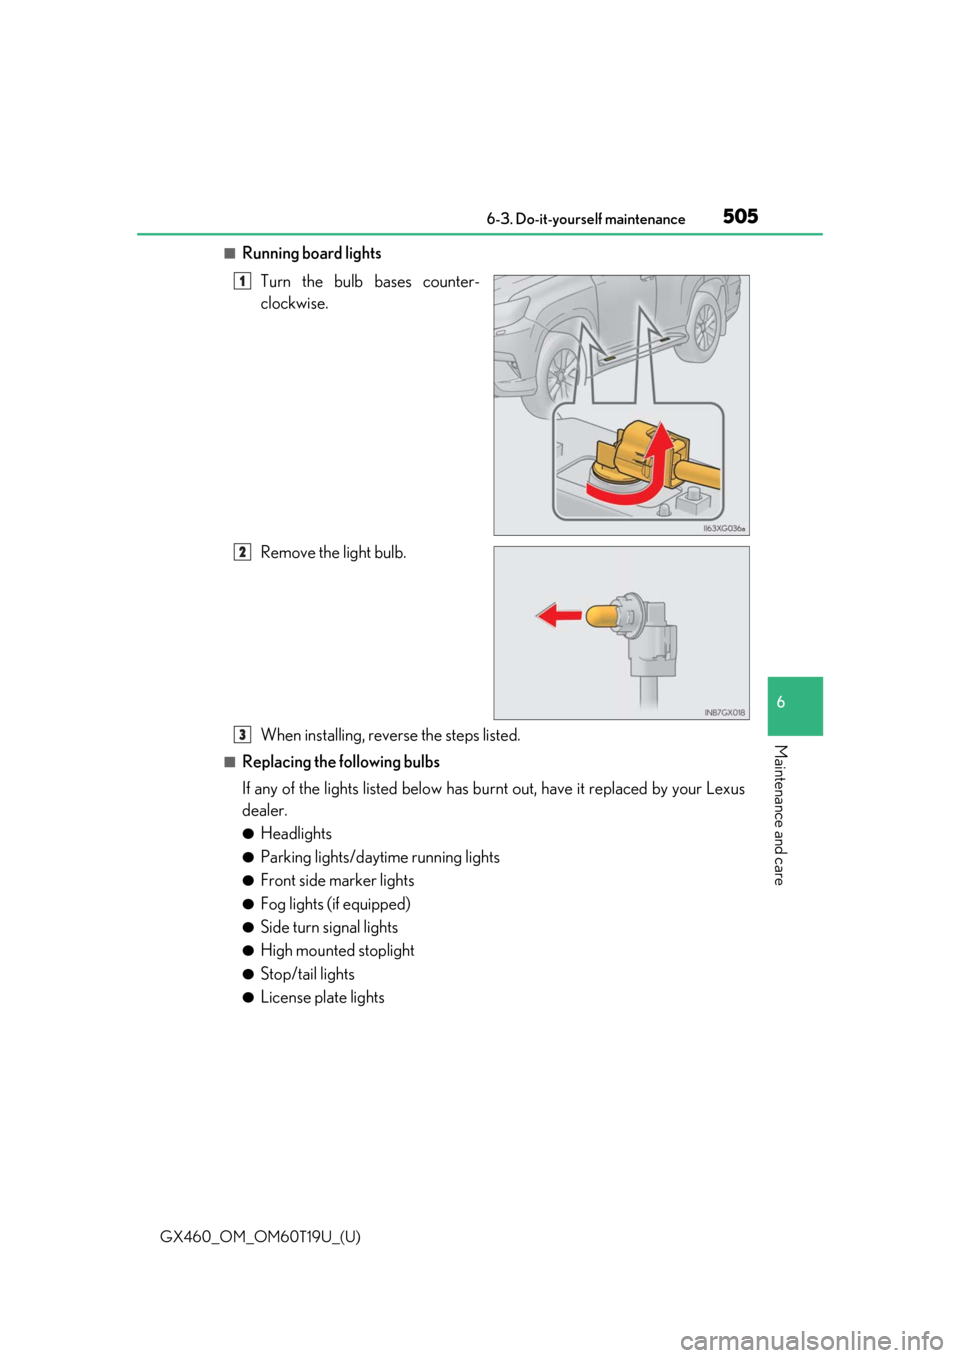
■Running board lightsTurn the bulb bases counter-
clockwise.
Remove the light bulb.
When installing, reverse the steps listed.
■Replacing the following bulbs
If any of the lights listed below has burnt out, have it replaced by your Lexus
dealer.
●Headlights
●Parking lights/daytime running lights
●Front side marker lights
●Fog lights (if equipped)
●Side turn signal lights
●High mounted stoplight
●Stop/tail lights
●License plate lights
1
2
3
Page 506 of 628

506
GX460_OM_OM60T19U_(U)6-3. Do-it-yourself maintenance
■LED lights
The headlights, parking lights/daytime running
lights, front side marker lights, fog lights,
side turn signal lights, high mounted stoplig ht, stop/tail lights and license plate lights con-
sist of a number of LEDs. If any of the LEDs burn out, take your vehicle to your Lexus
dealer to have the light replaced.
■Condensation build-up on the inside of the lens
Temporary condensation build-up on the inside of the headlight lens does not indicate a
malfunction. Contact your Lexus dealer for mo re information in the following situations:
●Large drops of water are built up on the inside of the lens.
●Water has built up inside the headlight.
WARNING
■Replacing light bulbs
●Turn off the headlights. Do not attempt to replace the bulb immediately after turning
off the headlights.
The bulbs become very hot and may cause burns.
●Do not touch the glass portion of the light bu lb with bare hands. When it is unavoid-
able to hold the glass portion, use and hold with a clean dry cloth to avoid getting
moisture and oils on the bulb.
Also, if the bulb is sc ratched or dropped, it may blow out or crack.
●Fully install light bulbs and any parts used to secure them. Failure to do so may result
in heat damage, fire, or water entering th e headlight unit. This may damage the head-
lights or cause condensation to build up on the lens.
●Do not attempt to repair or disassemble light bulbs, connectors, electric circuits or
component parts.
Doing so may result in death or se rious injury due to electric shock.
■To prevent damage or fire
●Make sure bulbs are fully seated and locked.
●Check the wattage of the bulb before installing to prevent heat damage.
Page 513 of 628
5137-2. Steps to take in an emergency
GX460_OM_OM60T19U_(U)
7
When trouble arises
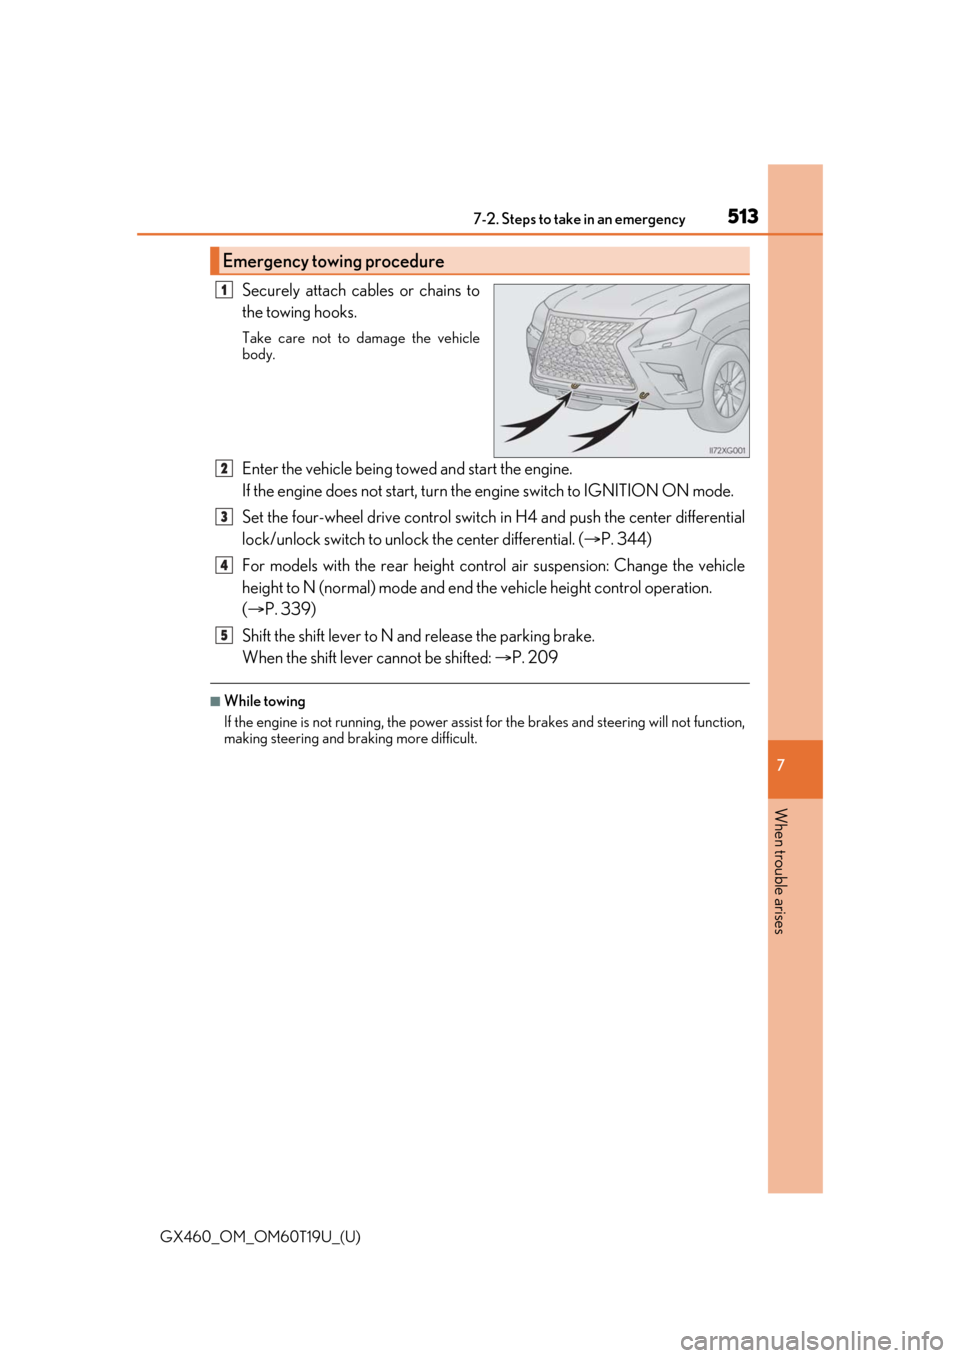
Securely attach cables or chains to
the towing hooks.
Take care not to damage the vehicle
body.
Enter the vehicle being towed and start the engine.
If the engine does not start, turn th e engine switch to IGNITION ON mode.
Set the four-wheel drive control switch in H4 and push the center differential
lock/unlock switch to unlock the center differential. (P. 344)
For models with the rear height cont rol air suspension: Change the vehicle
height to N (normal) mode and end th e vehicle height control operation.
( P. 339)
Shift the shift lever to N and release the parking brake.
When the shift lever cannot be shifted: P. 209
■While towing
If the engine is not running, the power assist for the brakes and steering will not function,
making steering and br aking more difficult.
Emergency towing procedure
1
2
3
4
5
Page 514 of 628
5147-2. Steps to take in an emergency
GX460_OM_OM60T19U_(U)
WARNING
Observe the following precautions.
Failure to do so may result in death or serious injury.
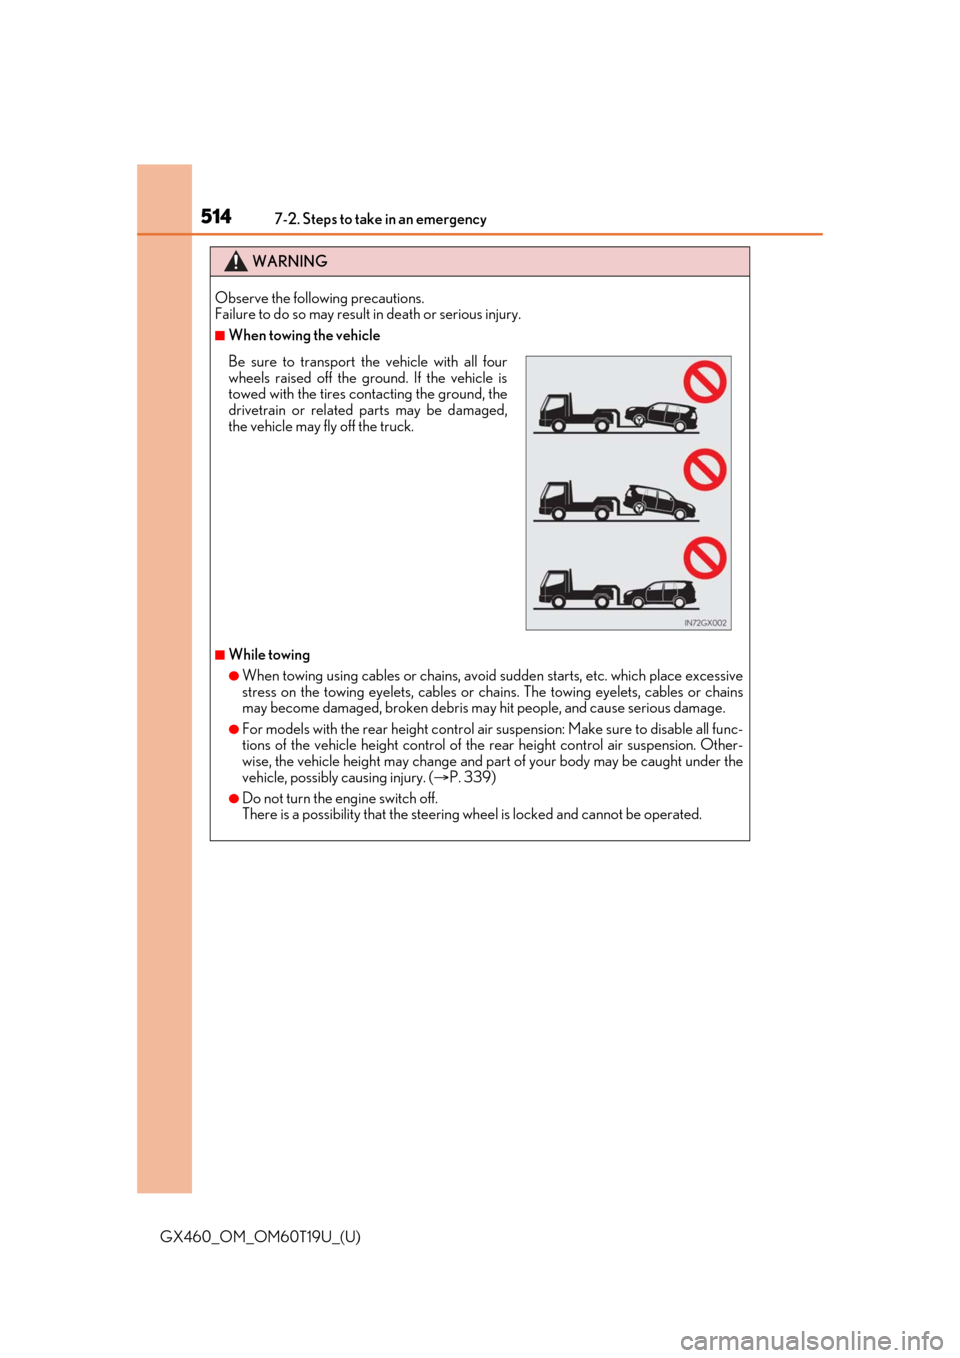
■When towing the vehicle
■While towing
●When towing using cables or chains, avoid sudden starts, etc. which place excessive
stress on the towing eyelets, cables or chains. The towing eyelets, cables or chains
may become damaged, broken debris ma y hit people, and cause serious damage.
●For models with the rear height control air suspension: Make sure to disable all func-
tions of the vehicle height control of the rear height control air suspension. Other-
wise, the vehicle height may change and part of your body may be caught under the
vehicle, possibly causing injury. ( P. 339)
●Do not turn the engine switch off.
There is a possibility that the steering wheel is locked and cannot be operated.
Be sure to transport the vehicle with all four
wheels raised off the ground. If the vehicle is
towed with the tires contacting the ground, the
drivetrain or related parts may be damaged,
the vehicle may fly off the truck.
Page 515 of 628
5157-2. Steps to take in an emergency
GX460_OM_OM60T19U_(U)
7
When trouble arises
NOTICE
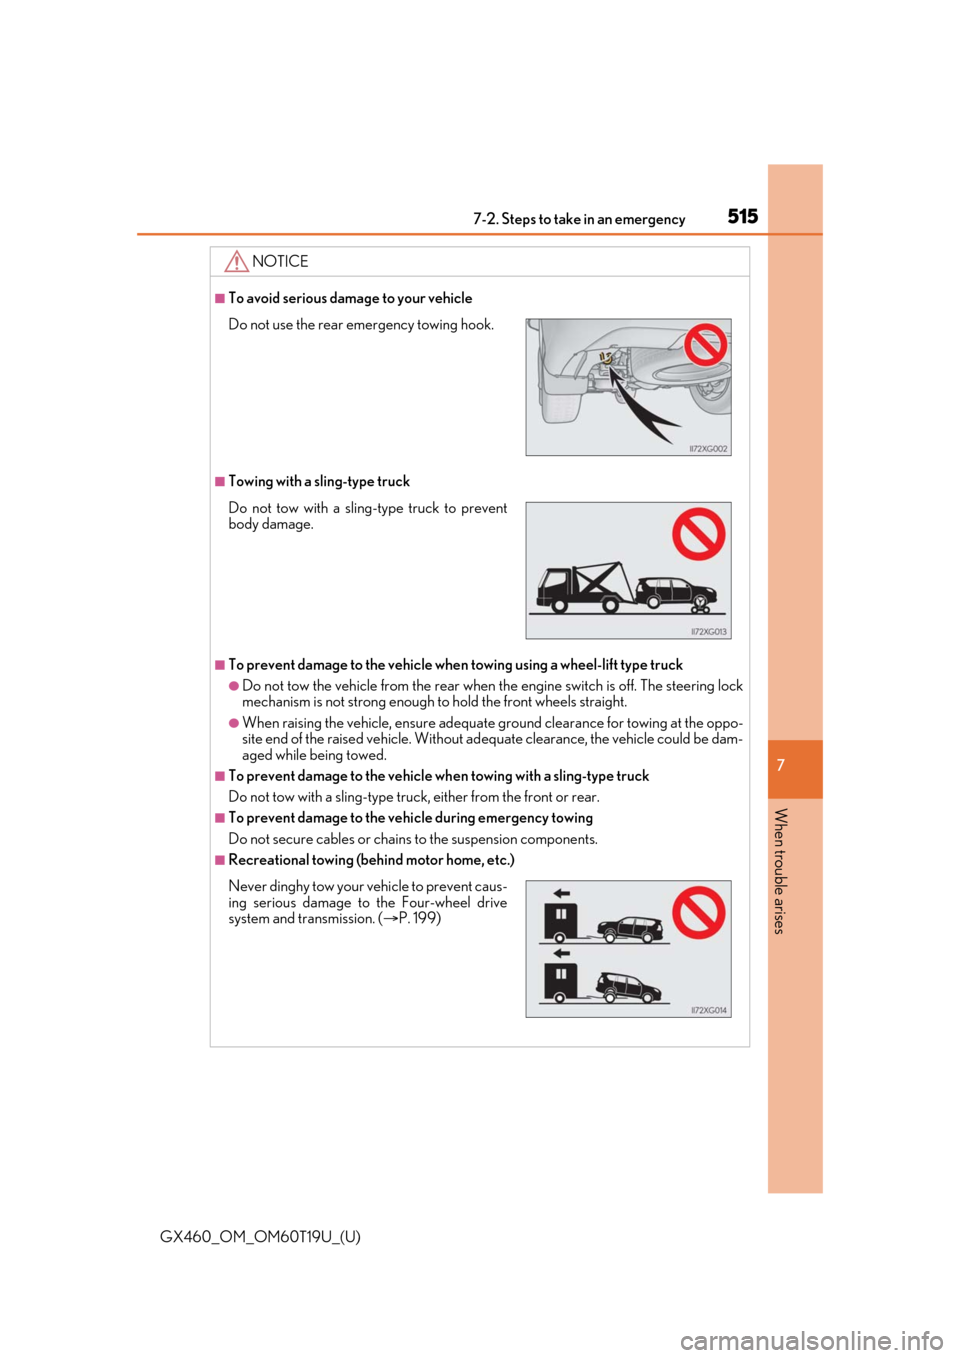
■To avoid serious damage to your vehicle
■Towing with a sling-type truck
■To prevent damage to the vehicle when towing using a wheel-lift type truck
●Do not tow the vehicle from the rear when the engine switch is off. The steering lock
mechanism is not strong enough to hold the front wheels straight.
●When raising the vehicle, ensure adequate ground cleara nce for towing at the oppo-
site end of the raised vehicle. Without ad equate clearance, the vehicle could be dam-
aged while being towed.
■To prevent damage to the vehicle wh en towing with a sling-type truck
Do not tow with a sling-type truck, either from the front or rear.
■To prevent damage to the vehi cle during emergency towing
Do not secure cables or chains to the suspension components.
■Recreational towing (behind motor home, etc.)
Do not use the rear emergency towing hook.
Do not tow with a sling-type truck to prevent
body damage.
Never dinghy tow your vehicle to prevent caus-
ing serious damage to the Four-wheel drive
system and transmission. ( P. 199)