light Lexus GX460 2021 Owner's Manual /
[x] Cancel search | Manufacturer: LEXUS, Model Year: 2021, Model line: GX460, Model: Lexus GX460 2021Pages: 628, PDF Size: 12.51 MB
Page 480 of 628

480
GX460_OM_OM60T19U_(U)6-3. Do-it-yourself maintenance
■When registering ID codes
●ID code registration is performed while driving at a vehicle speed of approximately 25
mph (40 km/h) or more.
●Before performing ID code registration, make
sure that no wheels with tire pressure
warning valve and transmitters installed are near the vehicle.
●Initialize the tire pressure warning system after ID code registration. Initialization is dis-
abled if the system was init ialized before registration.
●After ID code registration, the tires are hot by driving. Initialize the tire pressure warn-
ing system after the tires become cold.
●ID codes can be registered by yourself, bu t depending on the driving conditions and
driving environment, registration may take some time to complete.
■Canceling the change wheel set mode
●If turning the engine switch off when in th e change wheel set mode before driving, the
change wheel set mode is canceled.
●After driving when in the ch ange wheel set mode, the change wheel set mode cannot
be canceled. To cancel the mode, perform th e procedure for ID code registration again
and turn the engine switch off before driving.
●If the change wheel set mode is canceled, the ID codes that have already been regis-
tered are communicated. When communication is finished, the tire pressure warning
light will turn off.
■When ID code registration has failed
●Registration may take long time or the ID codes may not be registered in the following
situations.
• When the vehicle is moved ba ckward during registration.
Registration is started again from the beginning and it may take longer than usual.
• When another vehicle is running the side of the vehicle such as in heavy traffic. It may take longer to detect the vehicle’s tire pressure warning valves and transmit-
ters.
• If tire pressure warning valves an d transmitters are in the vehicle.
The ID codes may not be registered.
●When performing registration , drive on a paved road if possible. Depending on the
driving environment and conditio n of the tires, registration will be completed in approx-
imately 10 to 30 minutes.
• If registration is not comple te after driving approximately 30 minutes, continue driv-
ing for a while.
• If registration is not complete after driving approximately 1 hour, park the vehicle in a safe place for approximately 20 minutes. Then drive straight (with occasional left
and right turns) at approximat ely 25 mph (40 km/h) or more
* for approximately 10
to 30 minutes.
If registration is still not complete, have the vehicle inspected by your Lexus dealer.
*: Except when making a left/right turn
●When the tire pressure warning light does not blink slowly 3 times, the ID code will not
be registered and the system will not operate properly. Perform registration again.
Page 482 of 628

482
GX460_OM_OM60T19U_(U)6-3. Do-it-yourself maintenance
WARNING
■Tire pressure warning system operation
The tire pressure warning system may not provide warning immediat
ely if a tire bursts
or if sudden air leakage occurs.
■When inspecting or replacing tires
Observe the following precautions to preven t accidents. Failure to do so may cause
damage to parts of the drive train as well as dangerous handling characteristics, which
may lead to an accident result ing in death or serious injury.
●Do not mix tires of different makes, models or tread patterns.
Also, do not mix tires of remarkably different treadwear.
●Do not use tire sizes other than those recommended by Lexus.
●Do not mix differently constructed tires (radial, bias-belted or bias-ply tires).
●Do not mix summer, all season and snow tires.
●Do not use tires that have been used on another vehicle.
Do not use tires if you do not know how they were used previously.
■When initializing the tire pressure warning system
Do not initialize tire inflatio n pressure without first adjustin g the tire inflation pressure to
the specified level. Otherwise, the tire pre ssure warning light may not come on even if
the tire inflation pressure is low, or it ma y come on when the tire inflation pressure is
actually normal.
Page 496 of 628

496
GX460_OM_OM60T19U_(U)6-3. Do-it-yourself maintenance
■After a fuse is replaced
●If the lights do not turn on even after the fuse has been replaced, a bulb may need
replacement. (
P. 499)
●If the replaced fuse blows again, have th e vehicle inspected by your Lexus dealer.
■If there is an overload in a circuit
The fuses are designed to blow, protecting the wiring harness from damage.
WARNING
■To prevent system breakdowns and vehicle fire
Observe the following precautions.
Failure to do so may cause damage to th e vehicle, and possibly a fire or injury.
●Never use a fuse of a higher amperage rati ng than indicated, or use any other object
in place of a fuse.
●Always use a genuine Lexus fuse or equivalent.
Never replace a fuse with a wi re, even as a temporary fix.
●Do not modify the fuses or the fuse boxes.
NOTICE
■Before replacing fuses
Have the cause of electrical overload dete rmined and repaired by your Lexus dealer,
as soon as possible.
Page 497 of 628
497
GX460_OM_OM60T19U_(U)6-3. Do-it-yourself maintenance
6
Maintenance and care
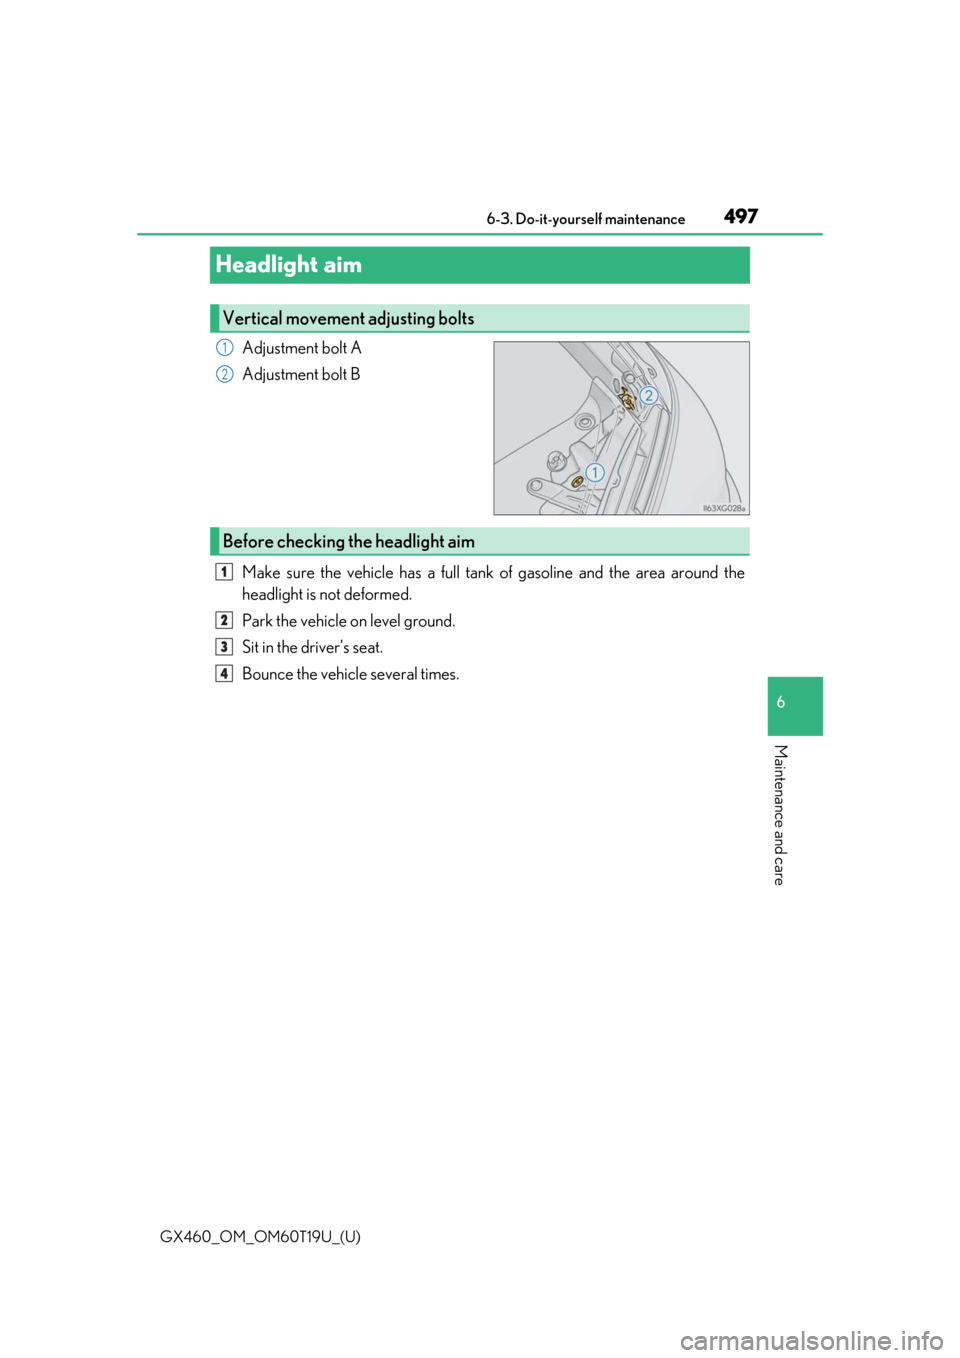
Headlight aim
Adjustment bolt A
Adjustment bolt B
Make sure the vehicle has a full tank of gasoline and the area around the
headlight is not deformed.
Park the vehicle on level ground.
Sit in the driver’s seat.
Bounce the vehicle several times.
Vertical movement adjusting bolts
1
2
Before checking the headlight aim
1
2
3
4
Page 498 of 628
498
GX460_OM_OM60T19U_(U)6-3. Do-it-yourself maintenance
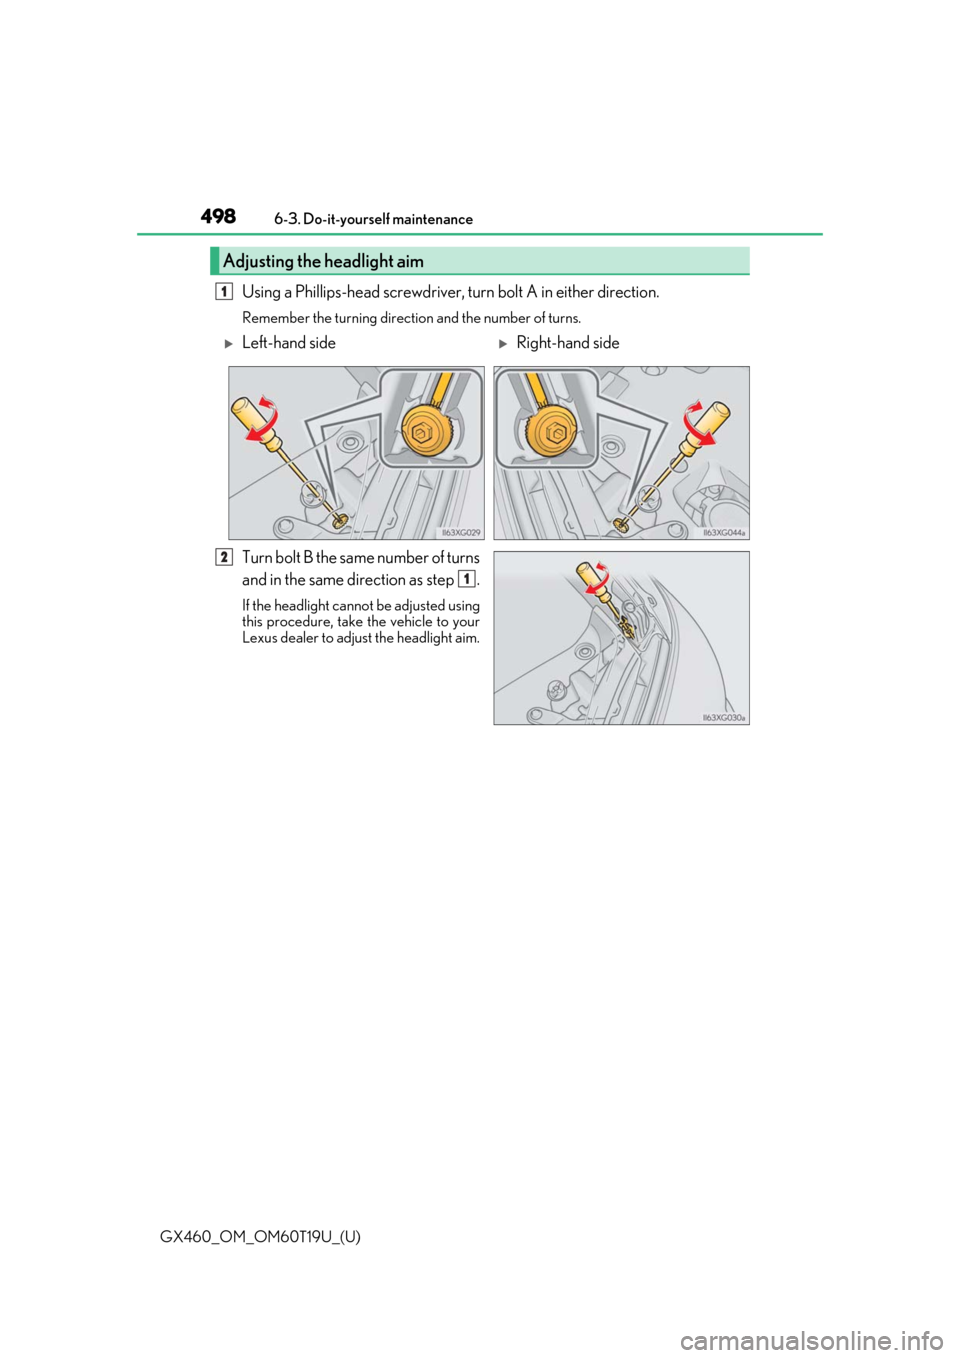
Using a Phillips-head screwdriver, turn bolt A in either direction.
Remember the turning directio
n and the number of turns.
Turn bolt B the same number of turns
and in the same direction as step .
If the headlight cannot be adjusted using
this procedure, take the vehicle to your
Lexus dealer to adjust the headlight aim.
Adjusting the headlight aim
1
Left-hand sideRight-hand side
2
1
Page 499 of 628
499
GX460_OM_OM60T19U_(U)6-3. Do-it-yourself maintenance
6
Maintenance and care
Light bulbs
Check the wattage and color of the light bulb being replaced. (
P. 569)
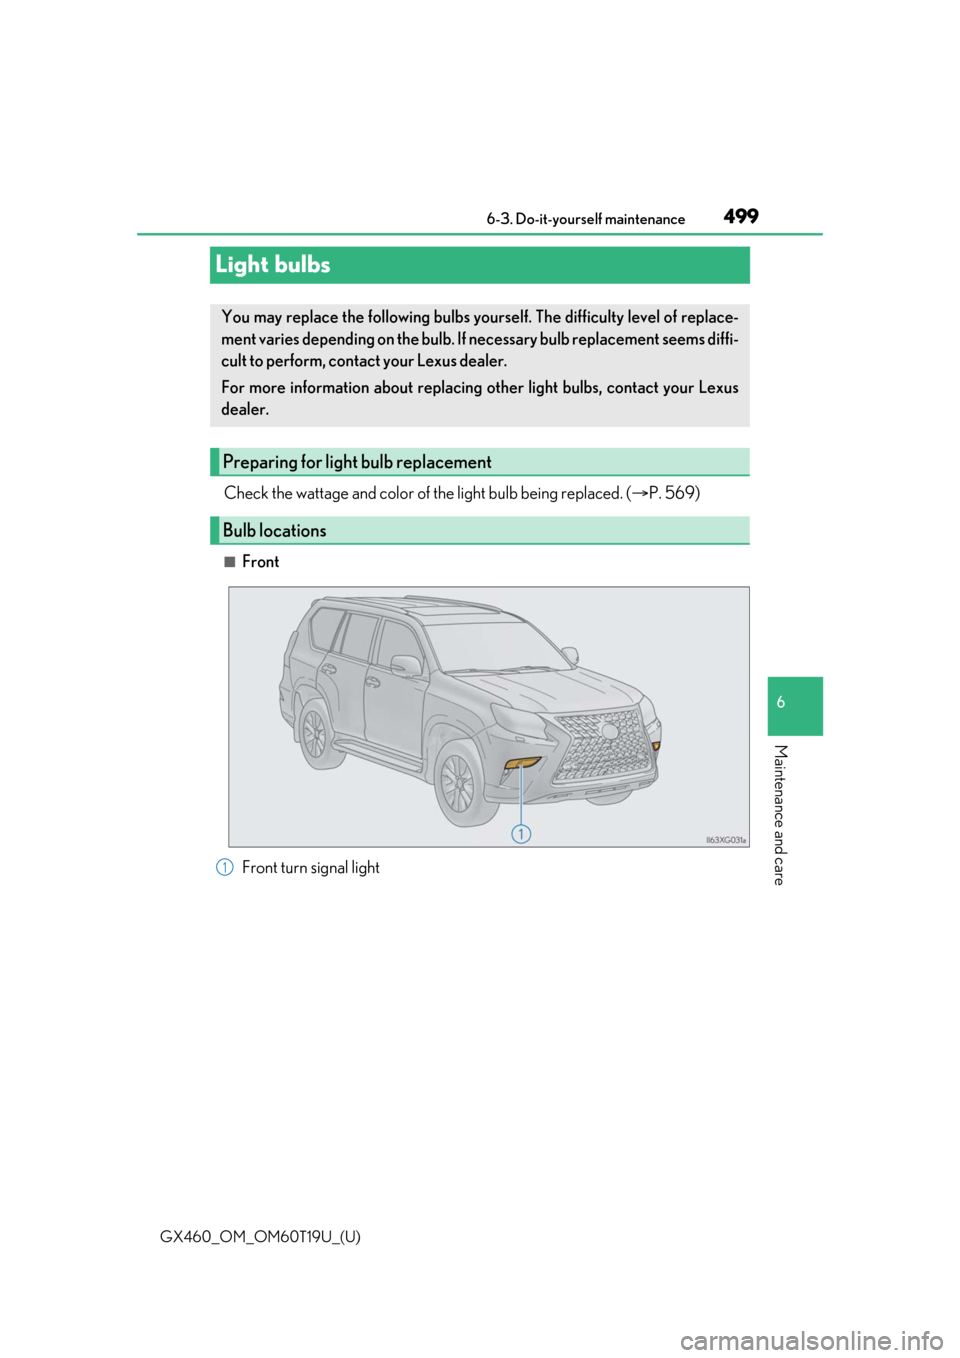
■Front
Front turn signal light
You may replace the following bulbs your self. The difficulty level of replace-
ment varies depending on the bulb. If necessary bulb replacement seems diffi-
cult to perform, contact your Lexus dealer.
For more information about replacing other light bulbs, contact your Lexus
dealer.
Preparing for light bulb replacement
Bulb locations
1
Page 500 of 628
500
GX460_OM_OM60T19U_(U)6-3. Do-it-yourself maintenance
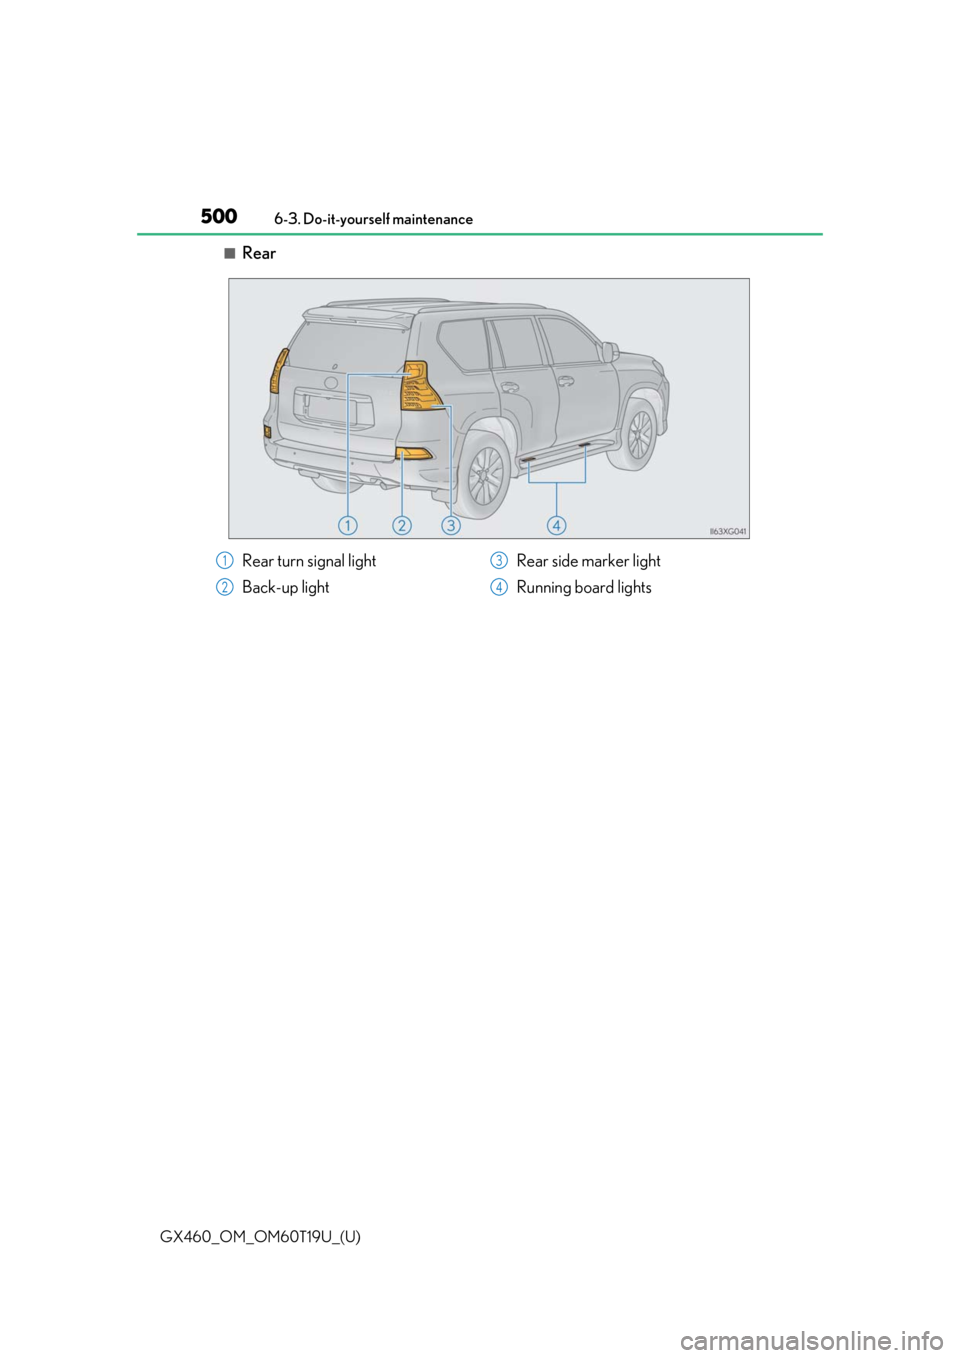
■Rear
Rear turn signal light
Back-up light
Rear side marker light
Running board lights1
2
3
4
Page 501 of 628
GX460_OM_OM60T19U_(U)
5016-3. Do-it-yourself maintenance
6
Maintenance and care
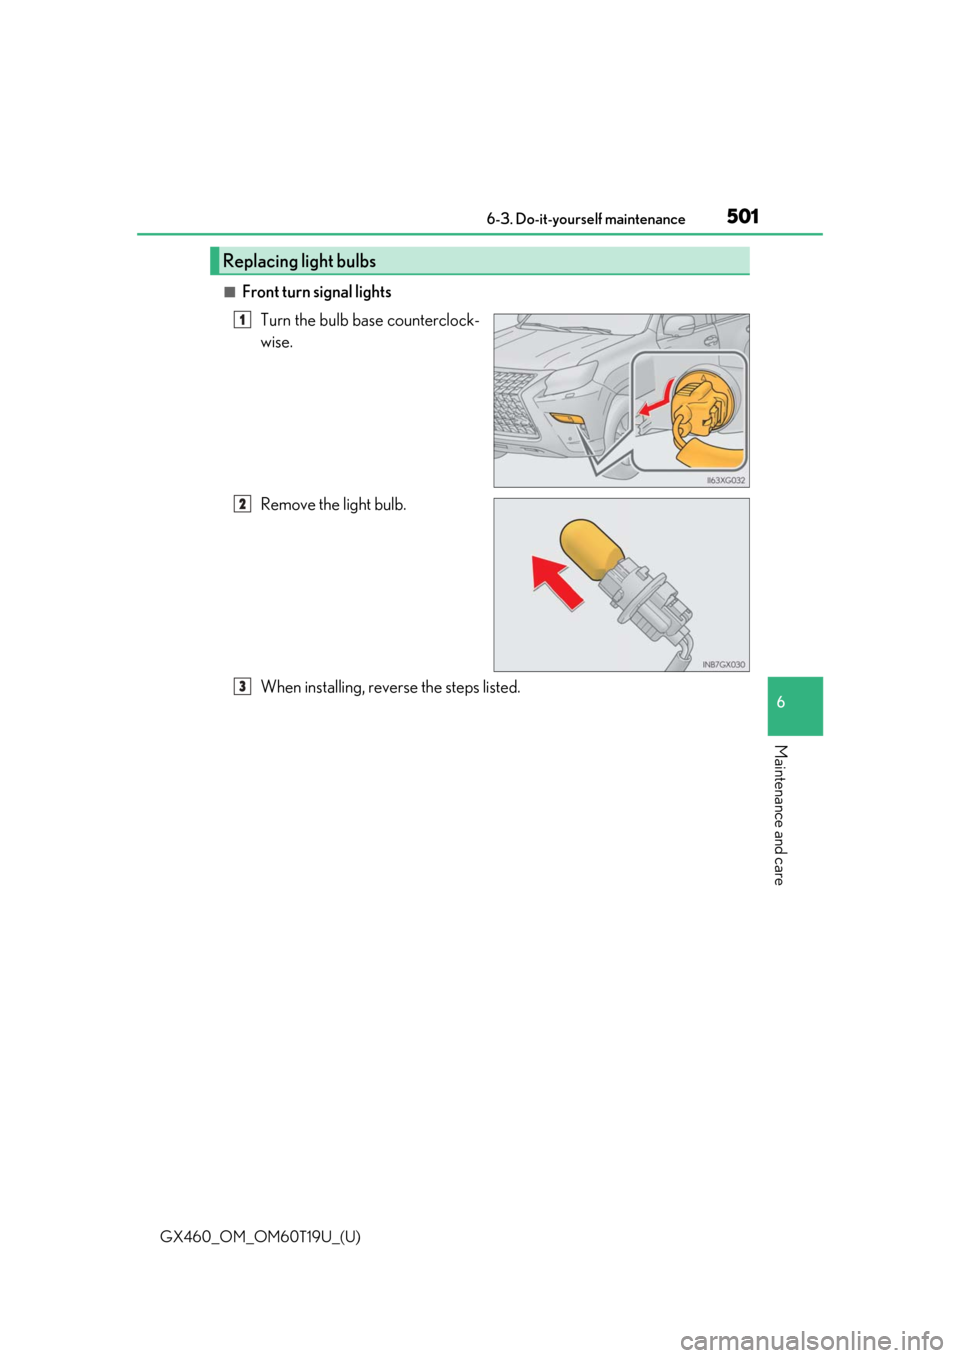
■Front turn signal lightsTurn the bulb base counterclock-
wise.
Remove the light bulb.
When installing, reverse the steps listed.
Replacing light bulbs
1
2
3
Page 502 of 628
502
GX460_OM_OM60T19U_(U)6-3. Do-it-yourself maintenance
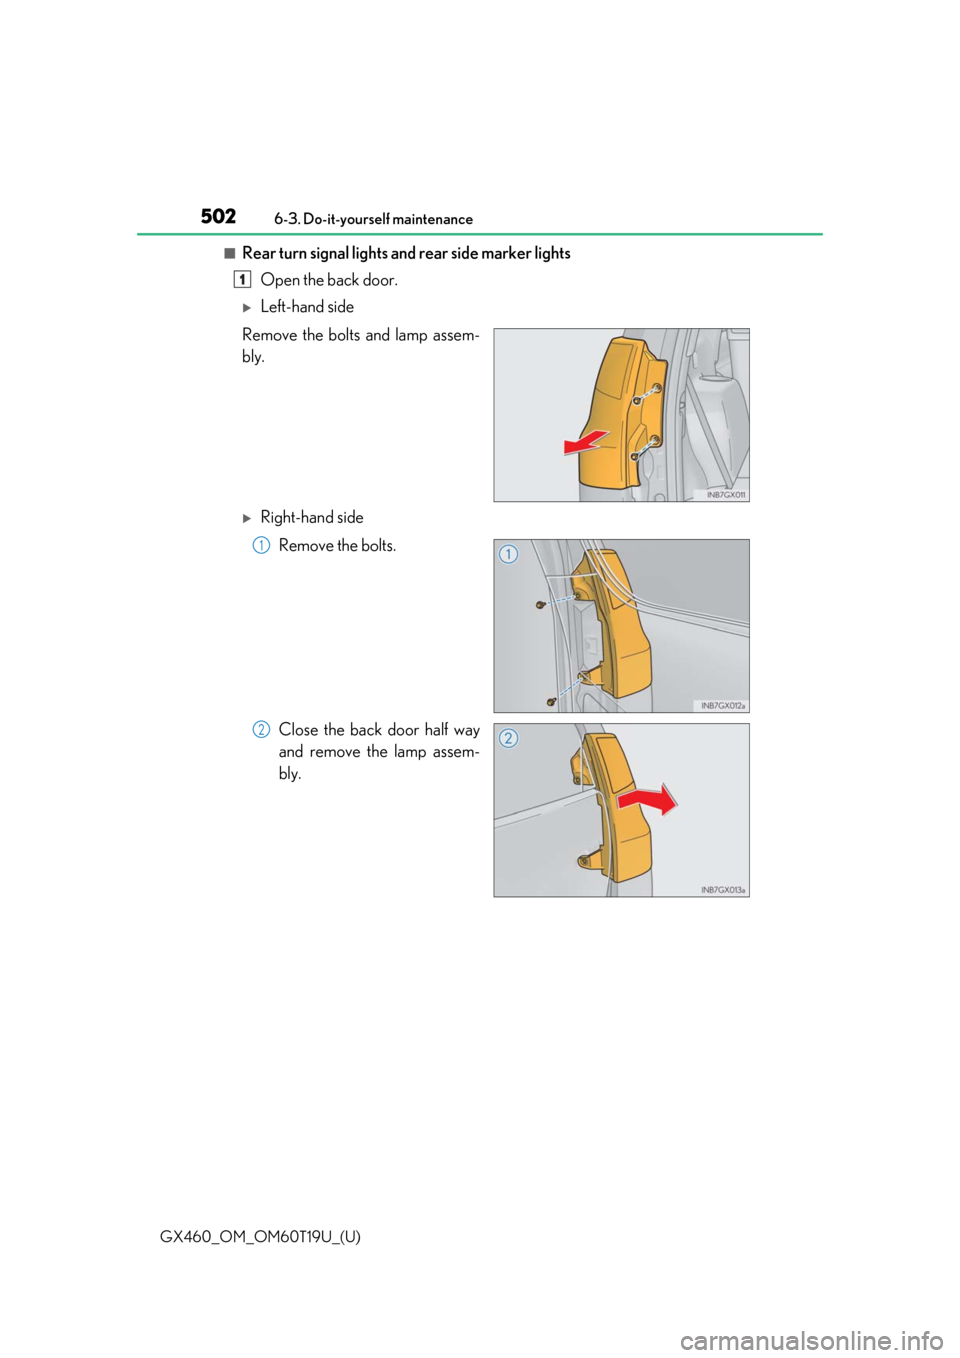
■Rear turn signal lights an
d rear side marker lights
Open the back door.
Left-hand side
Remove the bolts and lamp assem-
bly.
Right-hand side Remove the bolts.
Close the back door half way
and remove the lamp assem-
bly.
1
1
2
Page 503 of 628
GX460_OM_OM60T19U_(U)
5036-3. Do-it-yourself maintenance
6
Maintenance and care
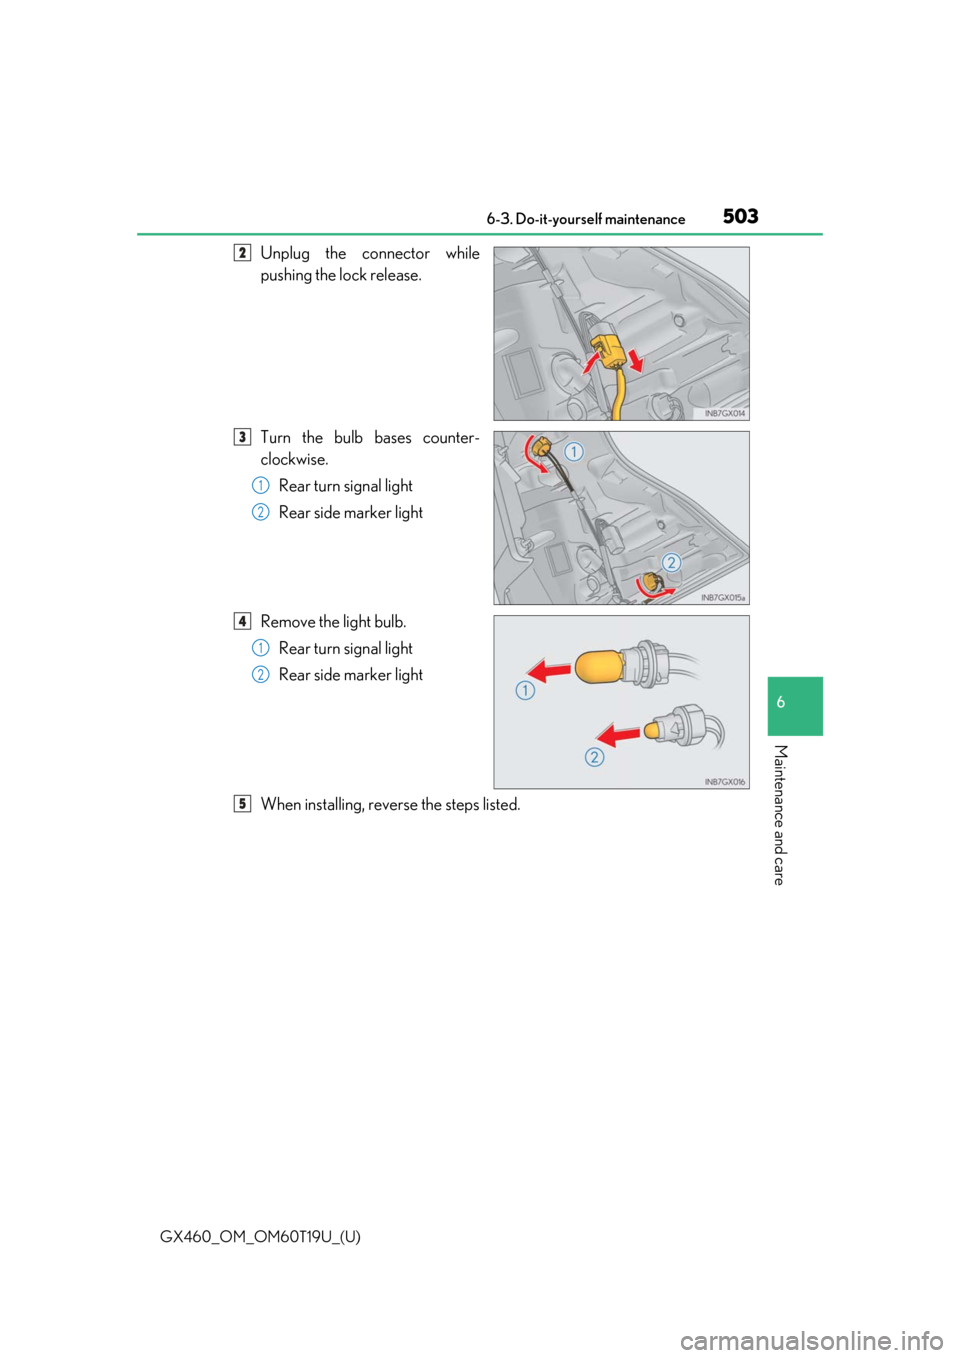
Unplug the connector while
pushing the lock release.
Turn the bulb bases counter-
clockwise.Rear turn signal light
Rear side marker light
Remove the light bulb. Rear turn signal light
Rear side marker light
When installing, reverse the steps listed.2
3
1
2
4
1
2
5