light Lexus GX460 2021 Owner's Manual /
[x] Cancel search | Manufacturer: LEXUS, Model Year: 2021, Model line: GX460, Model: Lexus GX460 2021Pages: 628, PDF Size: 12.51 MB
Page 524 of 628

5247-2. Steps to take in an emergency
GX460_OM_OM60T19U_(U)
WARNING
■If both the ABS and the brake system warning lights remain on
Stop your vehicle in a safe place immediat ely and contact your Lexus dealer. The vehi-
cle will become extremely unstable during br aking, and the ABS system may fail, which
could cause an accident resultin g in death or serious injury.
■If the tire pressure warning light comes on
Be sure to observe the following precautions. Failure to do so could cause loss of vehi-
cle control and result in death or serious injury.
●Stop your vehicle in a safe place as soon as possible. Adjust the tire inflation pressure
immediately.
●If the tire pressure warning light comes on even after tire inflation pressure adjust-
ment, it is probable that you have a flat tire. Check the tires. If the tire is flat, change to
the spare tire and have the flat tire repaired by the nearest Lexus dealer.
●Avoid abrupt maneuvering and braking. If the vehicle tires deteriorate, you could lose
control of the steering wheel or the brakes.
■If a blowout or sudden air leakage should occur
The tire pressure warning system may not activate immediately.
Page 525 of 628

5257-2. Steps to take in an emergency
GX460_OM_OM60T19U_(U)
7
When trouble arises
WARNING
■Maintenance of the tires
Each tire, including the spare (if provided), should be checked monthly when cold and
inflated to the inflation pressure recomm ended by the vehicle manufacturer on the
vehicle placard or tire inflation pressure label (tire and load information label). (If your
vehicle has tires of a different size than the size indicated on the vehicle placard or tire
inflation pressure label [tire and load in formation label], you should determine the
proper tire inflation pressure for those tires.)
As an added safety feature, your vehicle ha s been equipped with a tire pressure moni-
toring system (TPMS-tire pressure warning system) that illuminates a low tire pressure
telltale (tire pressure warning light) when on e or more of your tires is significantly
under-inflated. Accordingly, when the low ti re pressure telltale (tire pressure warning
light) illuminates, you should stop and check your tires as soon as possible, and inflate
them to the proper pressure. Driving on a si gnificantly under-inflated tire causes the
tire to overheat and can lead to tire failure . Under-inflation also reduces fuel efficiency
and tire tread life, and may affect the vehicle’s handling and stopping ability.
Please note that the TPMS (tire pressure wa rning system) is not a substitute for proper
tire maintenance, and it is th e driver’s responsibility to ma intain correct tire pressure,
even if under-inflation has not reached the le vel to trigger illumination of the TPMS low
tire pressure telltale (tir e pressure warning light).
Your vehicle has also been equipped with a TPMS (tire pressure warning system) mal-
function indicator to indicate when the system is not operating properly. The TPMS
(tire pressure warning system) malfunction indi cator is combined with the low tire pres-
sure telltale (tire pressure warning light). When the system detects a malfunction, the
telltale will flash for approximately one mi nute and then remain continuously illumi-
nated. This sequence will cont inue upon subsequent vehicle start-ups as long as the
malfunction exists. When the malfunction in dicator is illuminated, the system may not
be able to detect or signal low tire pressure as intended.
TPMS (tire pressure warning system) malfun ctions may occur for a variety of reasons,
including the installation of replacement or alternate tires or wheels on the vehicle that
prevent the TPMS (tire pressure warning system) from functioning properly. Always
check the TPMS (tire pressure warning system) malfunction telltale after replacing one
or more tires or wheels on your vehicle to ensure that the replacement or alternate
tires and wheels allow the TPMS (tire pressu re warning system) to continue to function
properly.
Page 527 of 628

527
GX460_OM_OM60T19U_(U)
7
When trouble arises
7-2. Steps to take in an emergency
If a warning message is displayed
Multi-information display
Handling method
Follow the instructions of the mes-
sage on the multi-information dis-
play.
If any of the warning lights comes on ag ain after the following actions have been
performed, contact your Lexus dealer.
The warning lights and warning buzzers operate as follows depending on the
content of the message. If a message indicates the need for inspection by a
dealer, have the vehicle inspected by your Lexus dealer immediately.
*: A buzzer sounds the first time a message is shown on the multi-information display.
The multi-information display shows warn ings of system malfunctions, incor-
rectly performed operations, and messag es that indicate a need for mainte-
nance. When a message is shown, perform the correction procedure
appropriate to the message.
1
2
Messages and warnings
Warning lightWarning buzzer
*Warning
Sounds
• Indicates an important situation, such as when a sys- tem related to driving is malfunctioning or that dan-
ger may result if the correction procedure is not
performed
• Indicates a situation, such as when damage to the
vehicle or danger may result
Comes on or flashesSounds
Indicates an important situat ion, such as when the sys-
tems shown on the multi-information display may be
malfunctioning
Does not sound
• Indicates a condition, such as malfunction of electri-
cal components, their condition, or indicates the
need for maintenance
• Indicates a situation, such as when an operation has
been performed incorrectly, or indicates how to per-
form an operation correctly
Page 528 of 628

5287-2. Steps to take in an emergency
GX460_OM_OM60T19U_(U)
■Warning messages
The warning messages explained below may differ from the actual messages according
to operation conditions an d vehicle specifications.
■Warning buzzer
In some cases, the buzzer ma y not be heard due to being in a noisy location or audio
sound.
■If “ENGINE OIL LOW”/“Engine Oil Level Low Add or Replace” is shown
The engine oil level is low. Check the level of the engine oil, and add if necessary.
This message may appear if the vehicle is stopped on a slope. Move the vehicle to a level
surface and check to see if the message disappears.
■If “AUTO POWER OFF TO CONSERVE BATTE RY”/“Auto power off to conserve bat-
tery” is shown
Power was turned off due to the automatic power off function. Next time when starting
the engine, increase the engine speed slightly and maintain that level for approximately 5
minutes to recharge the battery.
■If “ENGINE OIL PRES SURE LOW”/“Oil Pressure Low Stop in a Safe Place See
Owner’s Manual” is shown
Indicates abnormal engine oil pressure.
Immediately stop the vehicle in a safe place and contact your Lexus dealer. Continuing to
drive the vehicle may be dangerous.
■If “HIGH TRANSMISSION FLUID TEMPERAT URE”/“High Transmission Fluid Temp
See Owner’s Manual” is shown.
It indicates that the automatic transmission fluid temperature is too high.
Immediately stop the vehicle in a safe place, shift the shift lever to P and wait until the
warning message disappear. If the warning message disappears, you may start the vehi-
cle again. If the warning message does not disappear, contact your Lexus dealer.
■If “Check Transmissi on System” is shown.
The automatic transmission system is malfunctioning.
Have the vehicle inspected by your Lexus dealer.
■If “ACCELERATOR AND BRAKE PEDA LS DEPRESSED SIMULTANEOUSLY”/
“Accelerator and Brake Pedals Pressed Simultaneously” is shown on the multi-informa-
tion display
The accelerator and brake pedal are being depressed simultaneously. ( P. 169)
Release the accelerator pedal and depress the brake pedal.
■If “HEADLIGHT SYSTEM MALFUNCTION VISIT YOUR DEALER”/“Headlight Sys-
tem Malfunction Visit Your Dealer” is displayed
The following systems may be malfunctioning. Have the vehicle inspected by your Lexus
dealer immediately.
●The LED headlight system
●The automatic headlight leveling system
●Automatic High Beam
Page 537 of 628
5377-2. Steps to take in an emergency
GX460_OM_OM60T19U_(U)
7
When trouble arises
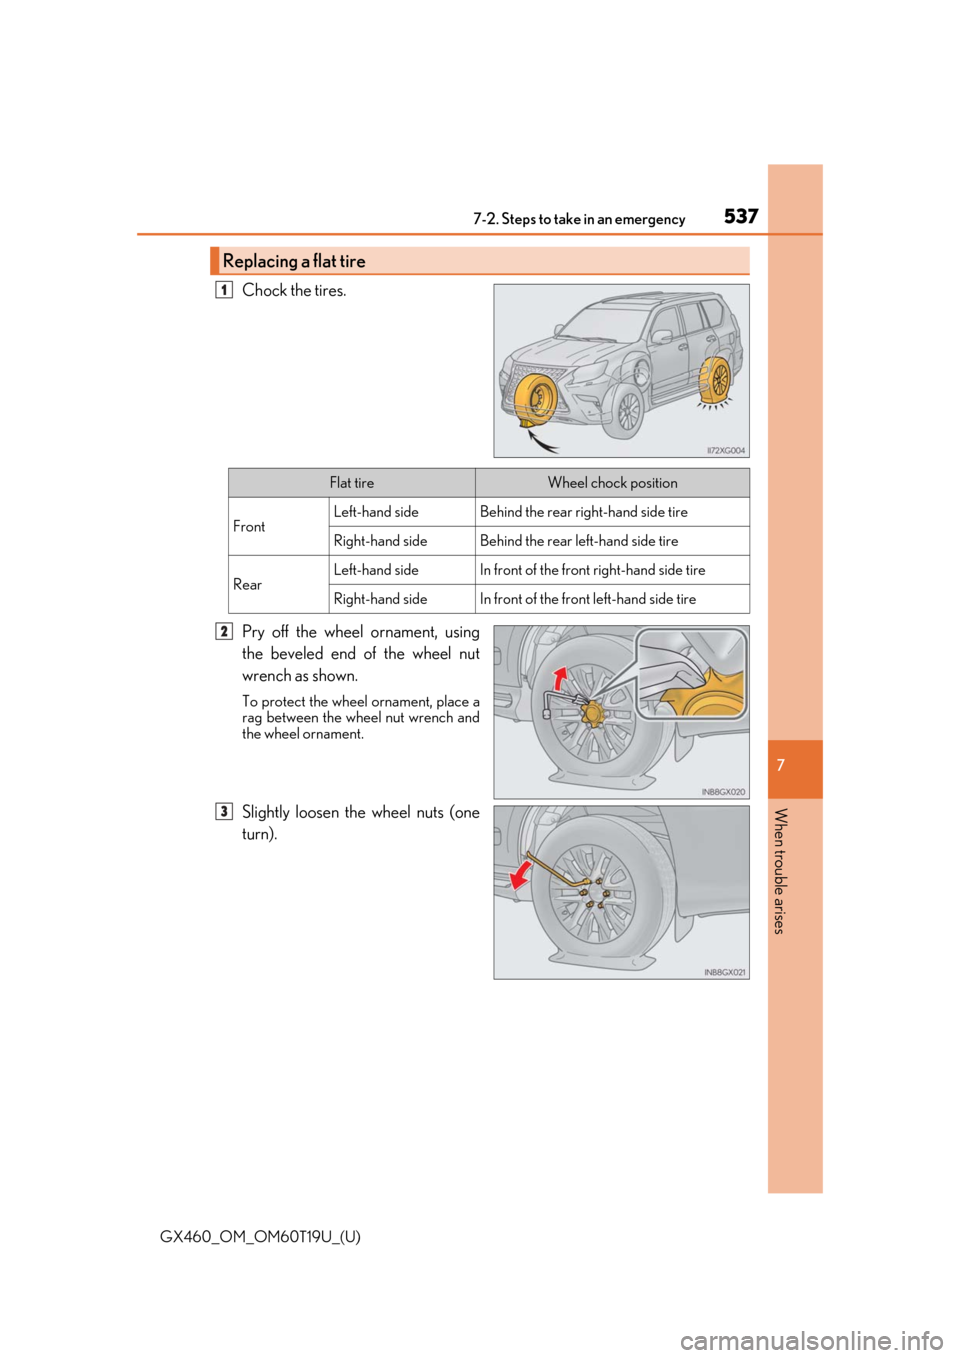
Chock the tires.
Pry off the wheel ornament, using
the beveled end of the wheel nut
wrench as shown.
To protect the wheel ornament, place a
rag between the wheel nut wrench and
the wheel ornament.
Slightly loosen the wheel nuts (one
turn).
Replacing a flat tire
1
Flat tireWheel chock position
FrontLeft-hand sideBehind the rear right-hand side tire
Right-hand sideBehind the rear left-hand side tire
RearLeft-hand sideIn front of the front right-hand side tire
Right-hand sideIn front of the front left-hand side tire
2
3
Page 539 of 628
5397-2. Steps to take in an emergency
GX460_OM_OM60T19U_(U)
7
When trouble arises
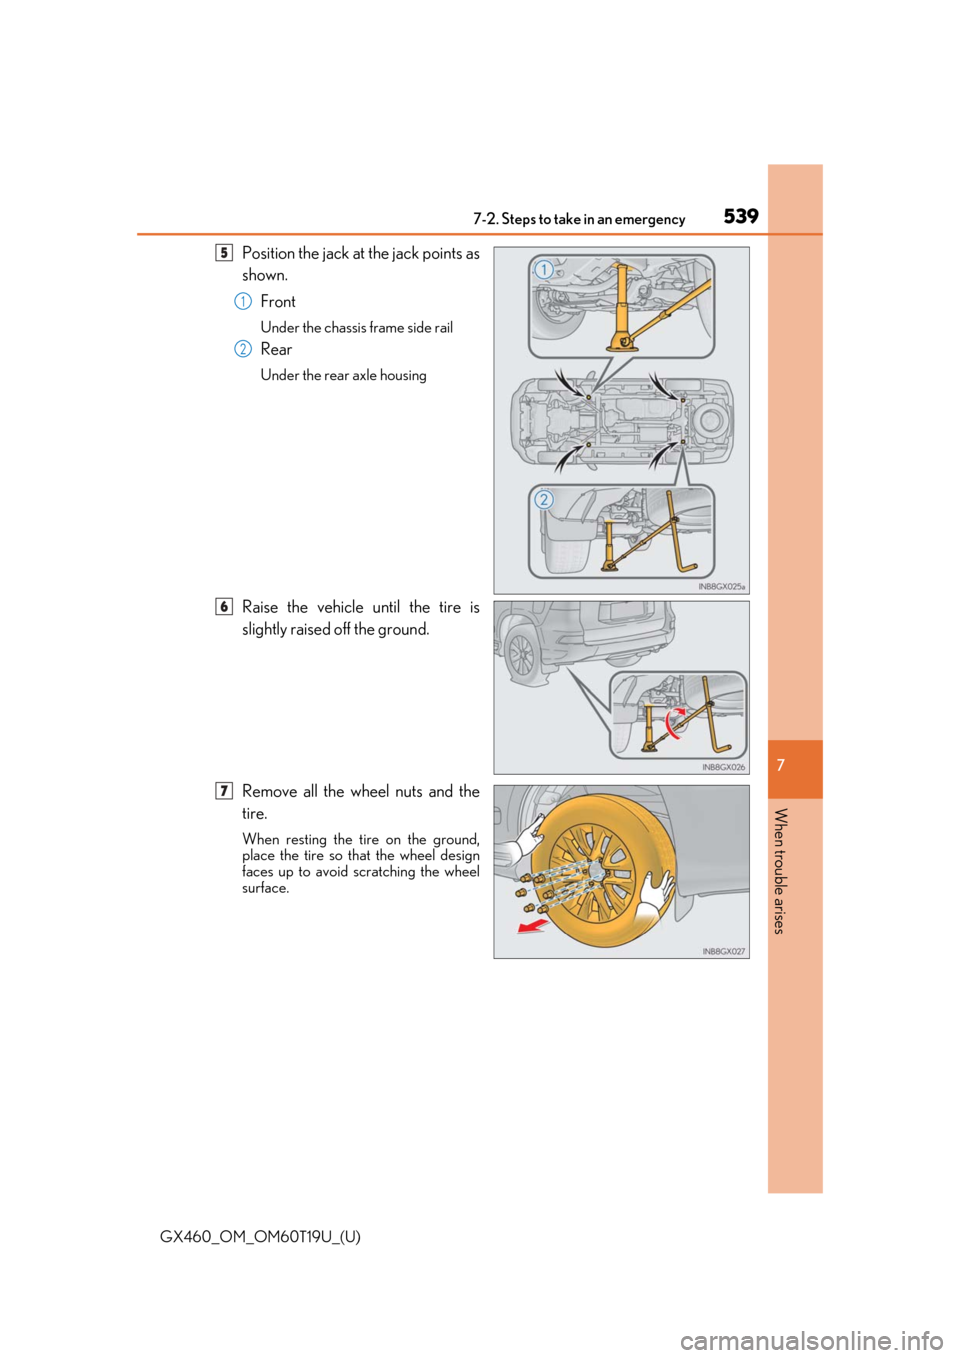
Position the jack at the jack points as
shown. Front
Under the chassis frame side rail
Rear
Under the rear axle housing
Raise the vehicle until the tire is
slightly raised off the ground.
Remove all the wheel nuts and the
tire.
When resting the tire on the ground,
place the tire so that the wheel design
faces up to avoid scratching the wheel
surface.
5
1
2
6
7
Page 545 of 628
545
GX460_OM_OM60T19U_(U)
7
When trouble arises
7-2. Steps to take in an emergency
If the engine will not start
One of the following may be the cause of the problem:
●There may not be sufficient fuel in the vehicle’s tank.
Refuel the vehicle.
●The engine may be flooded.
Try to restart the engine again following correct starting procedures.
( P. 200)
●There may be a malfunction in th e engine immobilizer system. (P. 77)
One of the following may be the cause of the problem:
●The battery may be discharged. ( P. 550)
●The battery terminal connections may be loose or corroded.
The engine starting system may be malfun ctioning due to an electrical problem
such as an open circuit or a blown fuse. However, an interim measure is available
to start the engine. ( P. 546)
If the engine will not start even though correct starting procedures are being
followed ( P. 200), consider each of the following points:
The engine will not start even when the starter motor operates nor-
mally.
The starter motor turns over slowly , the interior lights and headlights
are dim, or the horn does not sound or sounds at a low volume.
The starter motor does not turn over.
Page 546 of 628

5467-2. Steps to take in an emergency
GX460_OM_OM60T19U_(U)
One of the following may be the cause of the problem:
●One or both of the battery terminals may be disconnected.
●The battery may be discharged. (P. 550)
●There may be a malfunction in the steering lock system.
Contact your Lexus dealer if the problem cannot be repaired, or if repair procedures
are unknown.
When the engine does not start, the follo wing steps can be used as an interim
measure to start the engine if the engine switch is functioning normally.
Set the parking brake.
Shift the shift lever to P.
Turn the engine switch to the ACCESSORY mode.
Press and hold the engine switch for about 15 seconds while depressing the
brake pedal firmly.
Even if the engine can be started using the above steps, the system may be mal-
functioning. Have the vehicle in spected by your Lexus dealer.
The starter motor does not turn over, the interior lights and headlights
do not turn on, or the horn does not sound.
Emergency start function
1
2
3
4
Page 551 of 628
5517-2. Steps to take in an emergency
GX460_OM_OM60T19U_(U)
7
When trouble arises
Start the engine of the second vehicle. Increase the engine speed slightly and
maintain at that level for approximatel y 5 minutes to recharge the battery of
your vehicle.
Open and close any of the doors of your vehicle with the engine switch off.
Maintain the engine speed of the second vehicle and start the engine of your
vehicle by turning the engine switch to IGNITION ON mode.
Once your vehicle’s engine has started, remove the jumper cables in the exact
reverse order in which they were connected.
Once the engine starts, have the vehicle checked at your Lexus dealer as soon
as possible.
■Starting the engine when the battery is discharged
The engine cannot be started by push-starting.
■To prevent battery discharge
●Turn off the headlights and the audio system while the engine is off.
●Turn off any unnecessary electrical components when the vehicle is running at a low
speed for an extended period , such as in heavy traffic.
■Charging the battery
The electricity stored in the battery will disc harge gradually even when the vehicle is not
in use, due to natural discharge and the draini ng effects of certain electrical appliances. If
the vehicle is left for a long time, the battery may discharge, and the engine may be
unable to start. (The battery recharges automatically during driving.)
■When recharging or replacing the battery
●In some cases, it may not be possible to un lock the doors using the smart access system
with push-button start when the battery is discharged. Use the wireless remote control
or the mechanical key to lock or unlock the doors.
●The engine may not start on the first attempt after the battery has recharged but will
start normally after the second attempt. This is not a malfunction.
●The engine switch mode is memorized by the vehicle. When the battery is recon-
nected, the system will return to the mode it was in before the battery was discharged.
Before disconnecting the battery, turn the engine switch off. If you are unsure what
mode the engine switch was in before the battery discharged, be especially careful
when reconnecting the battery.
4
5
6
7
Page 552 of 628
5527-2. Steps to take in an emergency
GX460_OM_OM60T19U_(U)
WARNING
■Avoiding battery fires or explosions
Observe the following precautions to prevent accidentally igniting the flammable gas
that may be emitted from the battery:
●Make sure the jumper cable is connected to the correct terminal and that it is not
unintentionally in contact with any other than the intended terminal.
●Do not allow the + and - clamps of the jump er cables to come into contact with each
other.
●Do not smoke, use matches, cigarette lighters or allow open flame near the battery.
■Battery precautions
The battery contains poisonous and corrosive acidic electrolyte, while related parts
contain lead and lead compounds. Observ e the following precautions when handling
the battery:
●When working with the battery, always wear safety glasses and take care not to allow
any battery fluids (acid) to come into cont act with skin, clothing or the vehicle body.
●Do not lean over the battery.
●In the event that battery fluid comes into contact with the skin or eyes, immediately
wash the affected area with water and seek medical attention.
Place a wet sponge or cloth over the affected area until medical attention can be
received.
●Always wash your hands afte r handling the battery support, terminals, and other bat-
tery-related parts.
●Do not allow childre n near the battery.
NOTICE
■When handling jumper cables
When connecting the jumper cables, ensure that they do not become entangled in the
cooling fans or belt.