reset Lexus IS200t 2017 Navigation Manual
[x] Cancel search | Manufacturer: LEXUS, Model Year: 2017, Model line: IS200t, Model: Lexus IS200t 2017Pages: 342, PDF Size: 20.48 MB
Page 52 of 342
52
2. NETWORK SETTINGS
IS_NAVI_EE
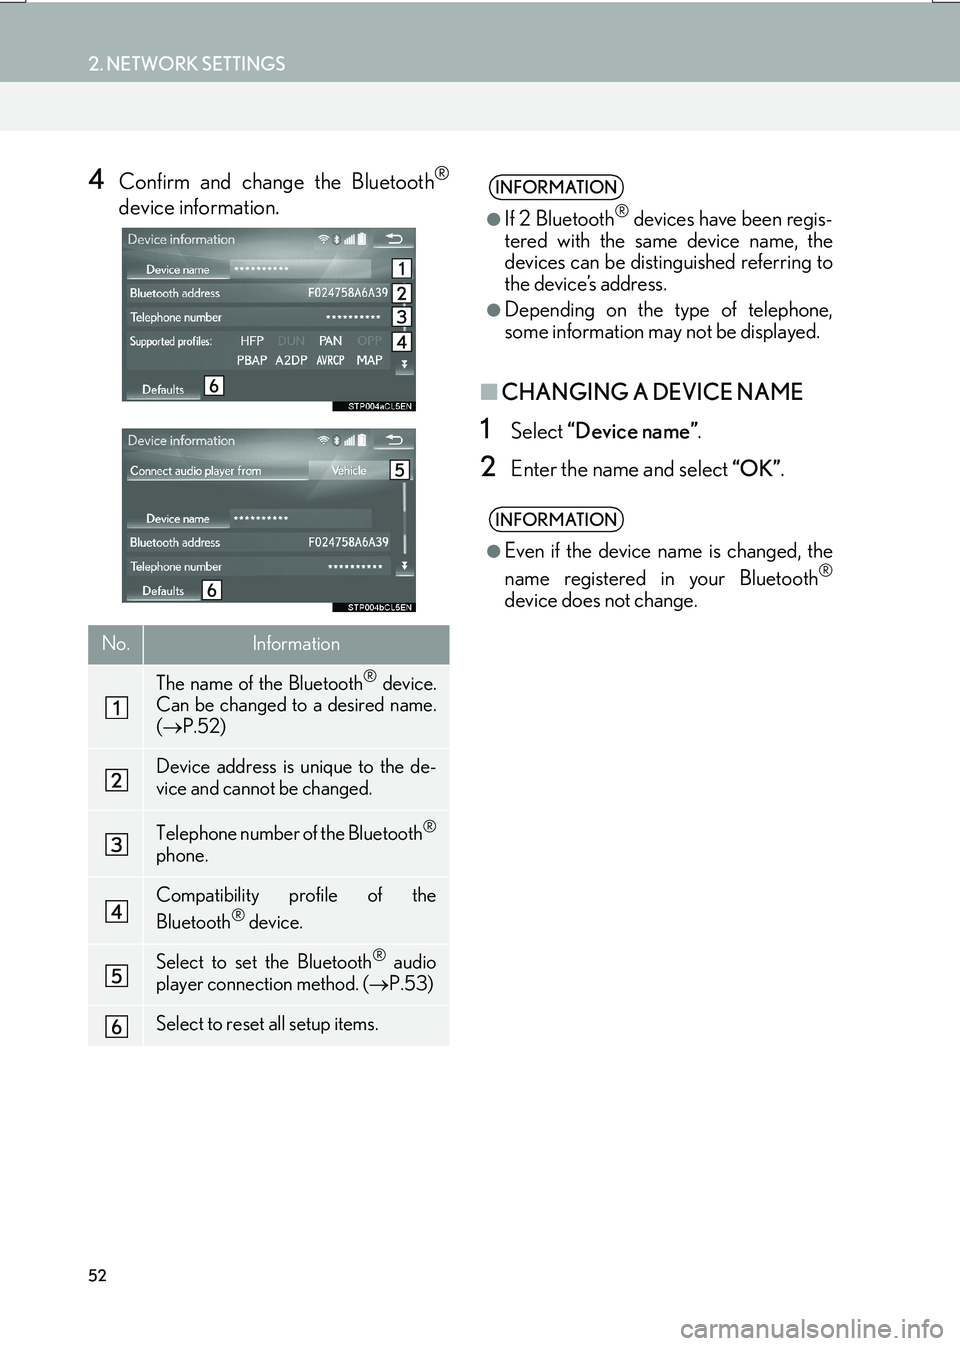
4Confirm and change the Bluetooth®
device information.
■CHANGING A DEVICE NAME
1Select “Device name” .
2Enter the name and select “OK”.
No.Information
The name of the Bluetooth® device.
Can be changed to a desired name.
( → P.52)
Device address is unique to the de-
vice and cannot be changed.
Telephone number of the Bluetooth®
phone.
Compatibility profile of the
Bluetooth® device.
Select to set the Bluetooth® audio
player connection method. ( →P.53)
Select to reset all setup items.
INFORMATION
●
If 2 Bluetooth® devices have been regis-
tered with the same device name, the
devices can be distinguished referring to
the device’s address.
●Depending on the type of telephone,
some information may not be displayed.
INFORMATION
●
Even if the device name is changed, the
name registered in your Bluetooth®
device does not change.
Page 53 of 342
53
2. NETWORK SETTINGS
IS_NAVI_EE
BASIC FUNCTION
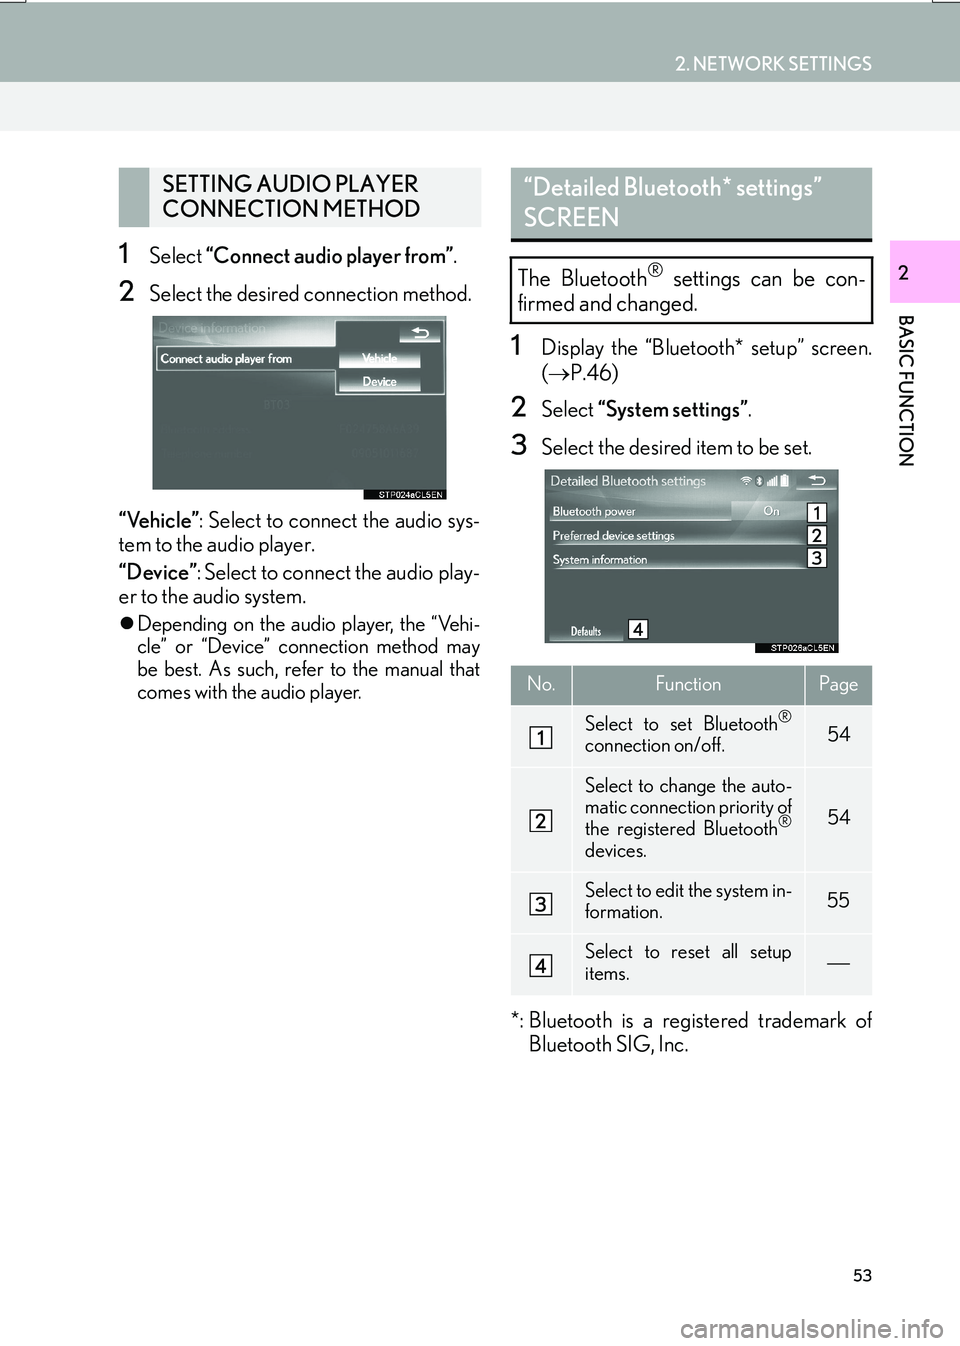
21Select “Connect audio player from” .
2Select the desired connection method.
“Vehicle” : Select to connect the audio sys-
tem to the audio player.
“Device” : Select to connect the audio play-
er to the audio system.
�z Depending on the audio player, the “Vehi-
cle” or “Device” connection method may
be best. As such, refer to the manual that
comes with the audio player.
1Display the “Bluetooth* setup” screen.
(→ P.46)
2Select “System settings” .
3Select the desired item to be set.
*: Bluetooth is a registered trademark of Bluetooth SIG, Inc.
SETTING AUDIO PLAYER
CONNECTION METHOD“Detailed Bluetooth* settings”
SCREEN
The Bluetooth® settings can be con-
firmed and changed.
No.FunctionPage
Select to set Bluetooth®
connection on/off.54
Select to change the auto-
matic connection priority of
the registered Bluetooth
®
devices.
54
Select to edit the system in-
formation.55
Select to reset all setup
items.
Page 54 of 342
54
2. NETWORK SETTINGS
IS_NAVI_EE
1Select “Bluetooth* power” .
When “Bluetooth* power” is on :
The Bluetooth
® device is automatically
connected when the engine
is in ACCESSORY or IGNITION ON
When “Bluetooth* power” is off :
The Bluetooth
® device is disconnected,
and the system will not connect to it next
time.
*: Bluetooth is a registered trademark of Bluetooth SIG, Inc.
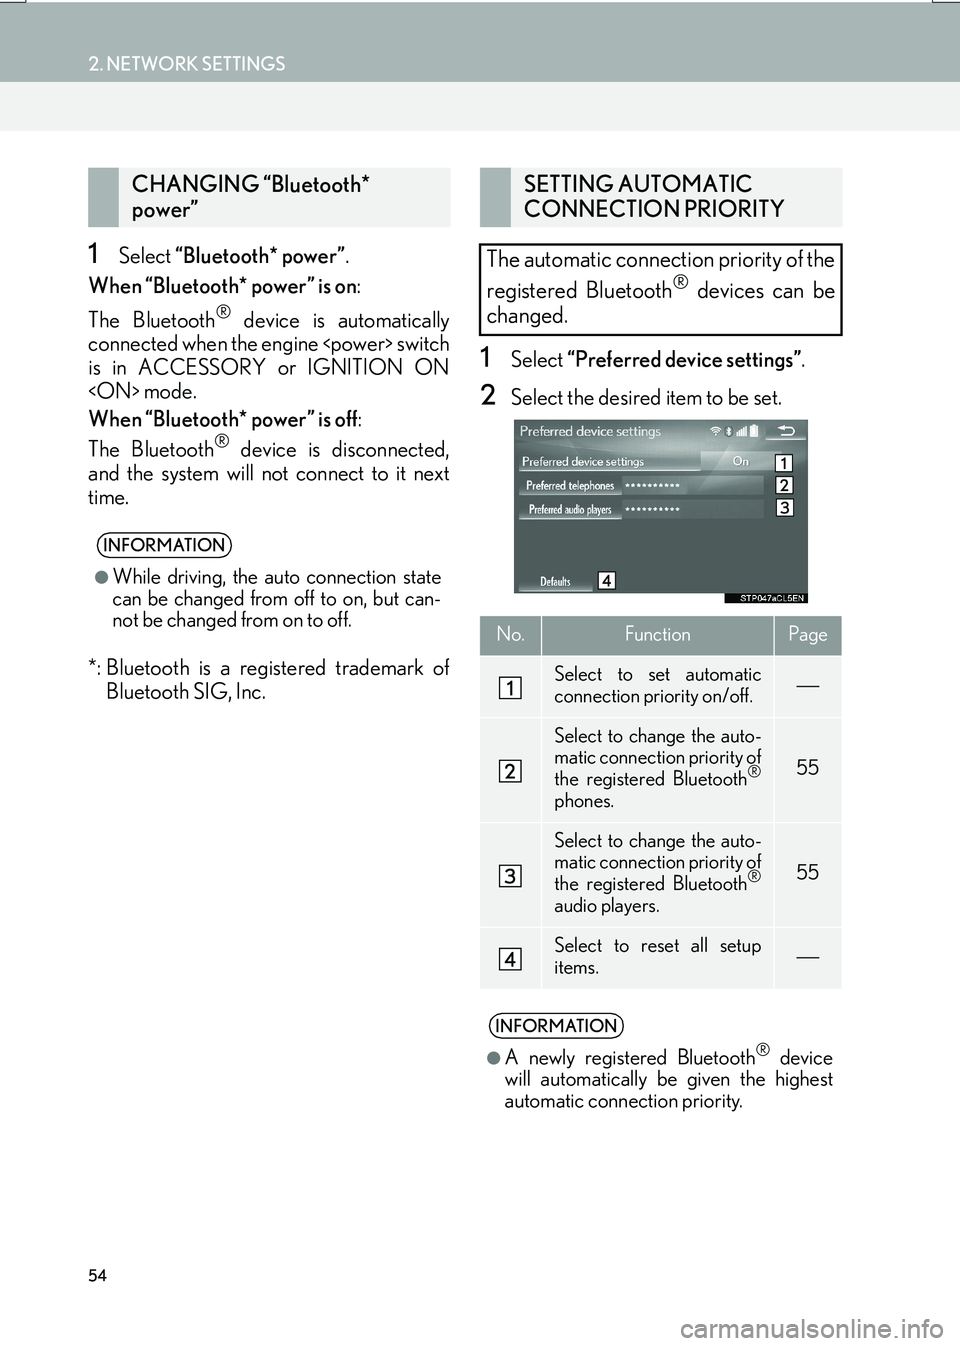
1Select “Preferred device settings” .
2Select the desired item to be set.
CHANGING “Bluetooth*
power”
INFORMATION
●
While driving, the auto connection state
can be changed from off to on, but can-
not be changed from on to off.
SETTING AUTOMATIC
CONNECTION PRIORITY
The automatic connection priority of the
registered Bluetooth
® devices can be
changed.
No.FunctionPage
Select to set automatic
connection priority on/off.
Select to change the auto-
matic connection priority of
the registered Bluetooth
®
phones.
55
Select to change the auto-
matic connection priority of
the registered Bluetooth
®
audio players.
55
Select to reset all setup
items.
INFORMATION
●
A newly registered Bluetooth® device
will automatically be given the highest
automatic connection priority.
Page 56 of 342
56
2. NETWORK SETTINGS
IS_NAVI_EE
■EDITING THE SYSTEM NAME
1Select “System name” .
2Enter a name and select “OK”.
■EDITING THE PIN CODE
1Select “System PIN code” .
2Enter a PIN code and select “OK”.
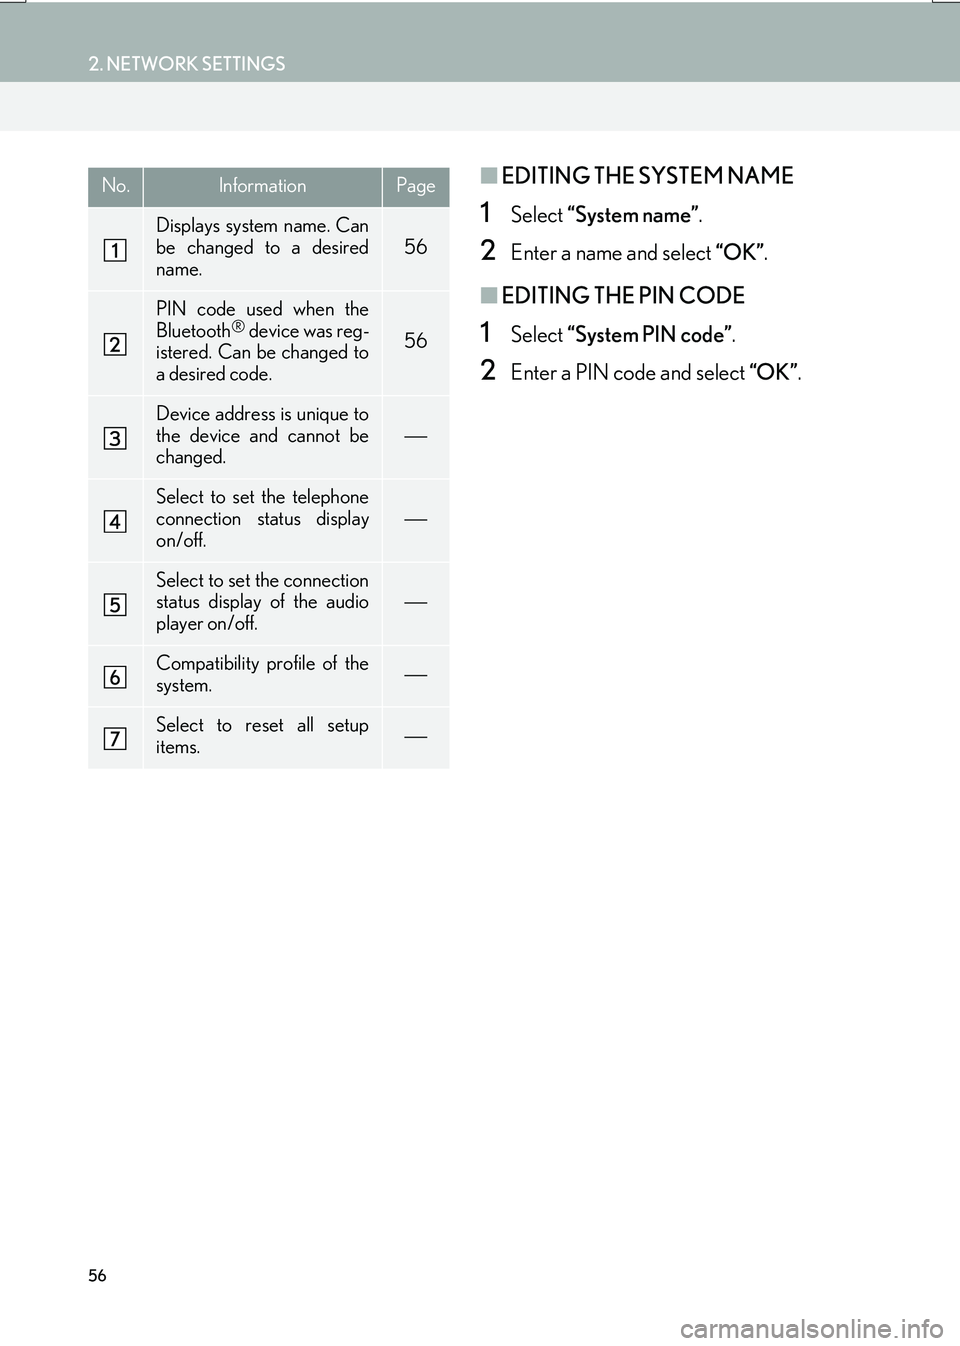
No.InformationPage
Displays system name. Can
be changed to a desired
name.
56
PIN code used when the
Bluetooth® device was reg-
istered. Can be changed to
a desired code.56
Device address is unique to
the device and cannot be
changed.
Select to set the telephone
connection status display
on/off.
Select to set the connection
status display of the audio
player on/off.
Compatibility profile of the
system.
Select to reset all setup
items.
Page 62 of 342

62
2. NETWORK SETTINGS
IS_NAVI_EE
1Display the “Wi-Fi* settings” screen.
(→ P.60)
2Select “Easy setup” .
3Select “PIN code” or “Push button” as
determined by the device.
4Operate the Wi-Fi® device to connect.
1Display the “Wi-Fi* settings” screen.
( → P.60)
2Select “Detailed Wi-Fi* settings” .
3Select the items to be set.
*: Wi-Fi is a registered mark of the Wi-Fi Alliance
®.
CONNECTING QUICKLY
If a Wi-Fi
® device is Wi-Fi Protected
Setup compatible, it can be connect-
ed to more quickly.
DETAILED Wi-Fi® SETTINGS
No.Function
Select to change the listing order of
your preferred networks and to de-
lete networks from the list. ( →P.63)
Select to set automatic connection
to network on/off. When set to on,
the system will automatically con-
nect to the preferred networks that
have been registered.
Select to set the automatic connec-
tion message notification display on/
off.
Select to reset all setup items.
Page 72 of 342
72
3. OTHER SETTINGS
IS_NAVI_EE
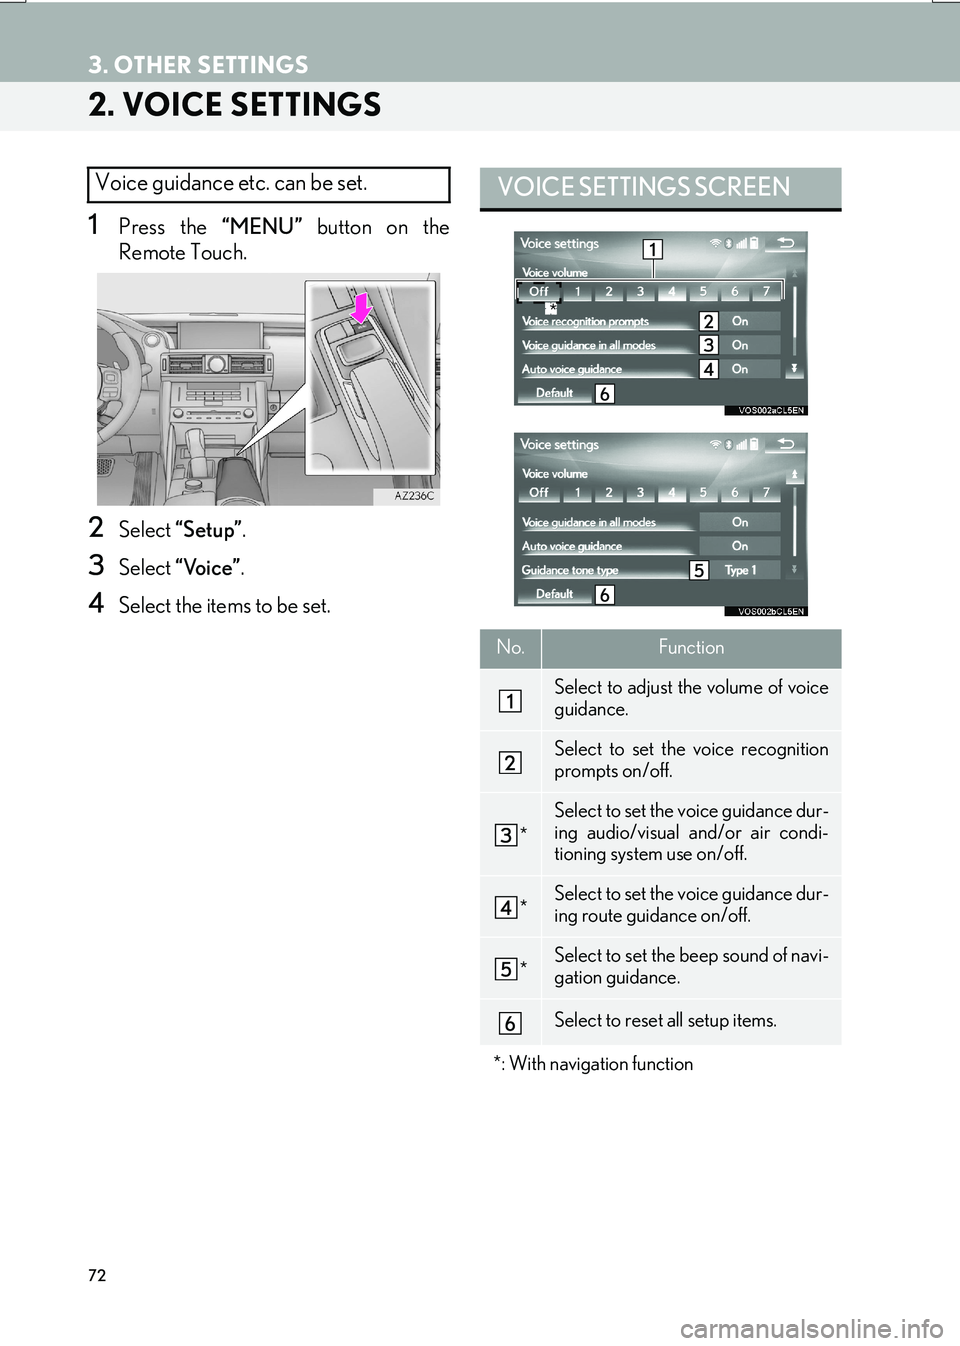
2. VOICE SETTINGS
1Press the “MENU” button on the
Remote Touch.
2Select “Setup” .
3Select “Voice” .
4Select the items to be set.
Voice guidance etc. can be set. VOICE SETTINGS SCREEN
No.Function
Select to adjust the volume of voice
guidance.
Select to set the voice recognition
prompts on/off.
*
Select to set the voice guidance dur-
ing audio/visual and/or air condi-
tioning system use on/off.
*Select to set the voice guidance dur-
ing route guidance on/off.
*Select to set the beep sound of navi-
gation guidance.
Select to reset all setup items.
*: With navigation function
*
Page 74 of 342
74
3. OTHER SETTINGS
IS_NAVI_EE
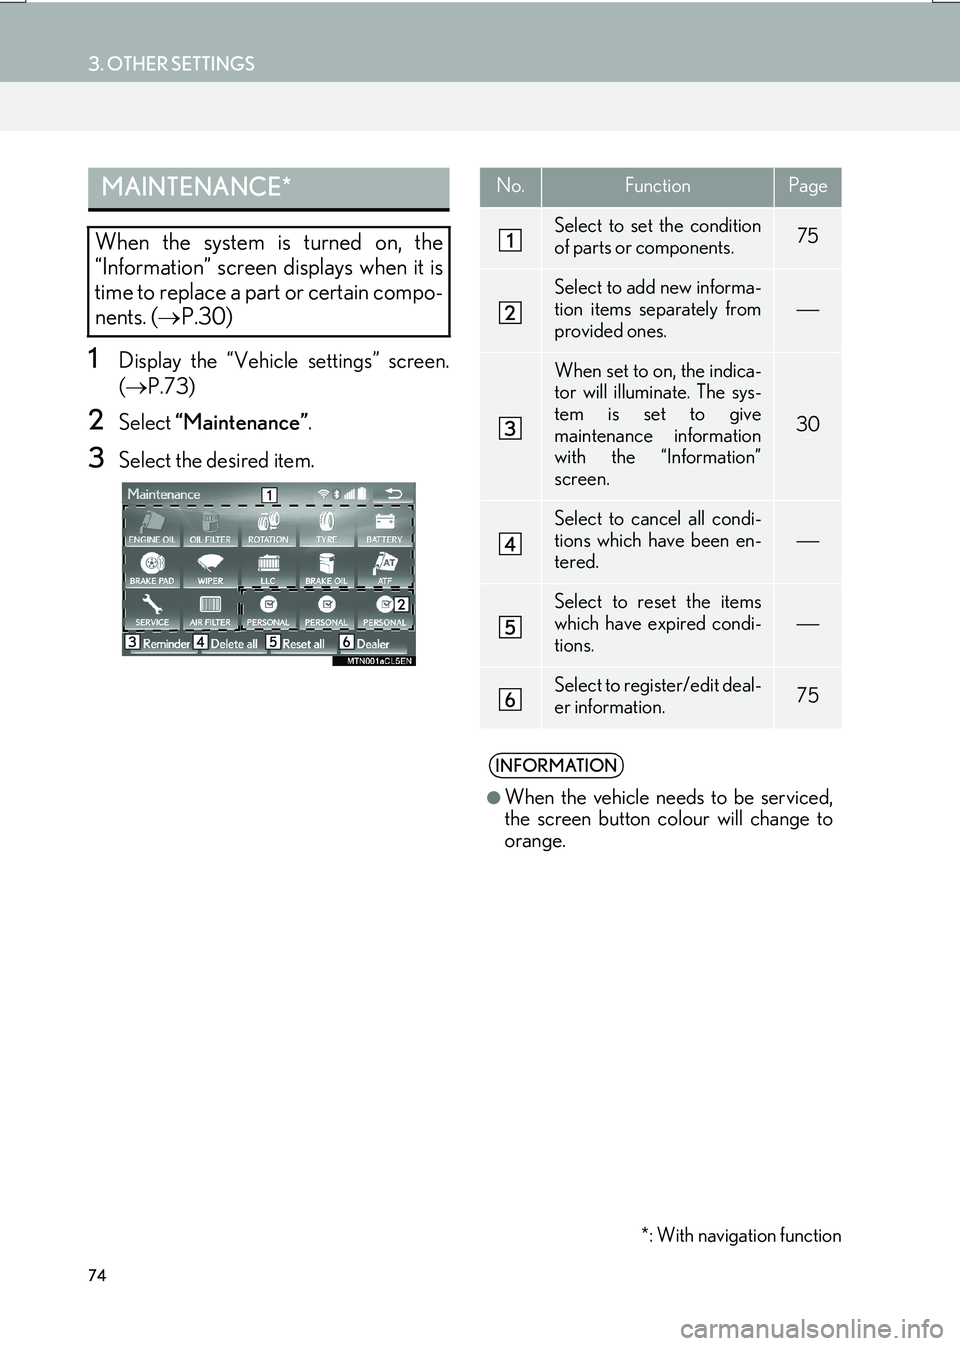
1Display the “Vehicle settings” screen.
(→ P.73)
2Select “Maintenance” .
3Select the desired item.
MAINTENANCE*
When the system is turned on, the
“Information” screen displays when it is
time to replace a part or certain compo-
nents. (→P.30)
No.FunctionPage
Select to set the condition
of parts or components.75
Select to add new informa-
tion items separately from
provided ones.
When set to on, the indica-
tor will illuminate. The sys-
tem is set to give
maintenance information
with the “Information”
screen.
30
Select to cancel all condi-
tions which have been en-
tered.
Select to reset the items
which have expired condi-
tions.
Select to register/edit deal-
er information.75
INFORMATION
●
When the vehicle needs to be serviced,
the screen button colour will change to
orange.
*: With navigation function
Page 75 of 342
75
3. OTHER SETTINGS
IS_NAVI_EE
BASIC FUNCTION
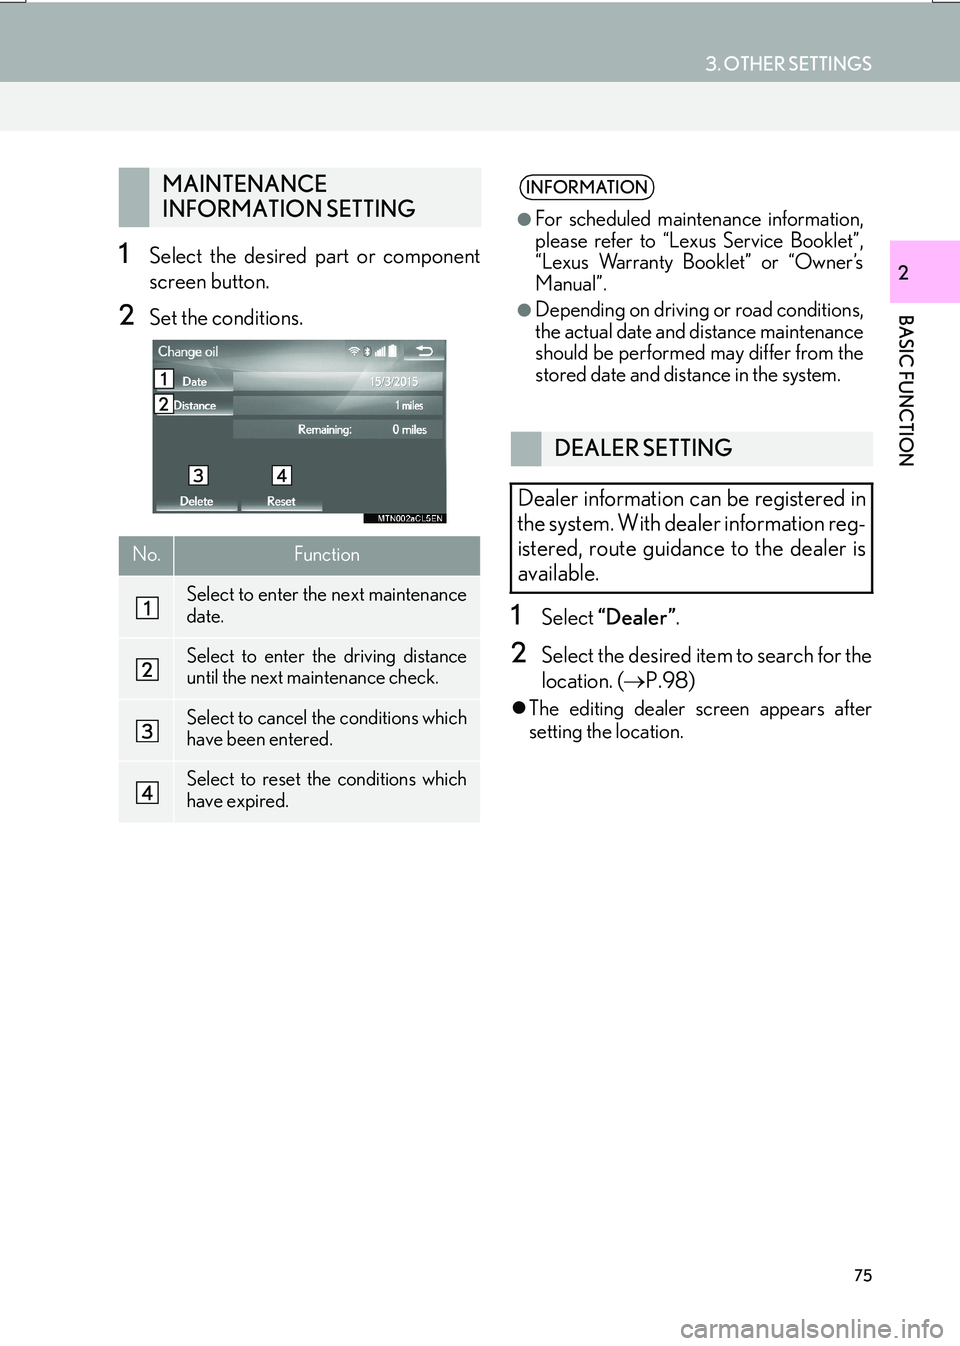
21Select the desired part or component
screen button.
2Set the conditions.
1Select “Dealer” .
2Select the desired item to search for the
location. ( →P.98)
�zThe editing dealer screen appears after
setting the location.
MAINTENANCE
INFORMATION SETTING
No.Function
Select to enter the next maintenance
date.
Select to enter the driving distance
until the next maintenance check.
Select to cancel the conditions which
have been entered.
Select to reset the conditions which
have expired.
INFORMATION
●
For scheduled maintenance information,
please refer to “Lexus Service Booklet”,
“Lexus Warranty Booklet” or “Owner’s
Manual”.
●Depending on driving or road conditions,
the actual date and distance maintenance
should be performed may differ from the
stored date and distance in the system.
DEALER SETTING
Dealer information can be registered in
the system. With dealer information reg-
istered, route guidance to the dealer is
available.
Page 101 of 342
101
2. DESTINATION SEARCH
IS_NAVI_EE
NAVIGATION SYSTEM
3
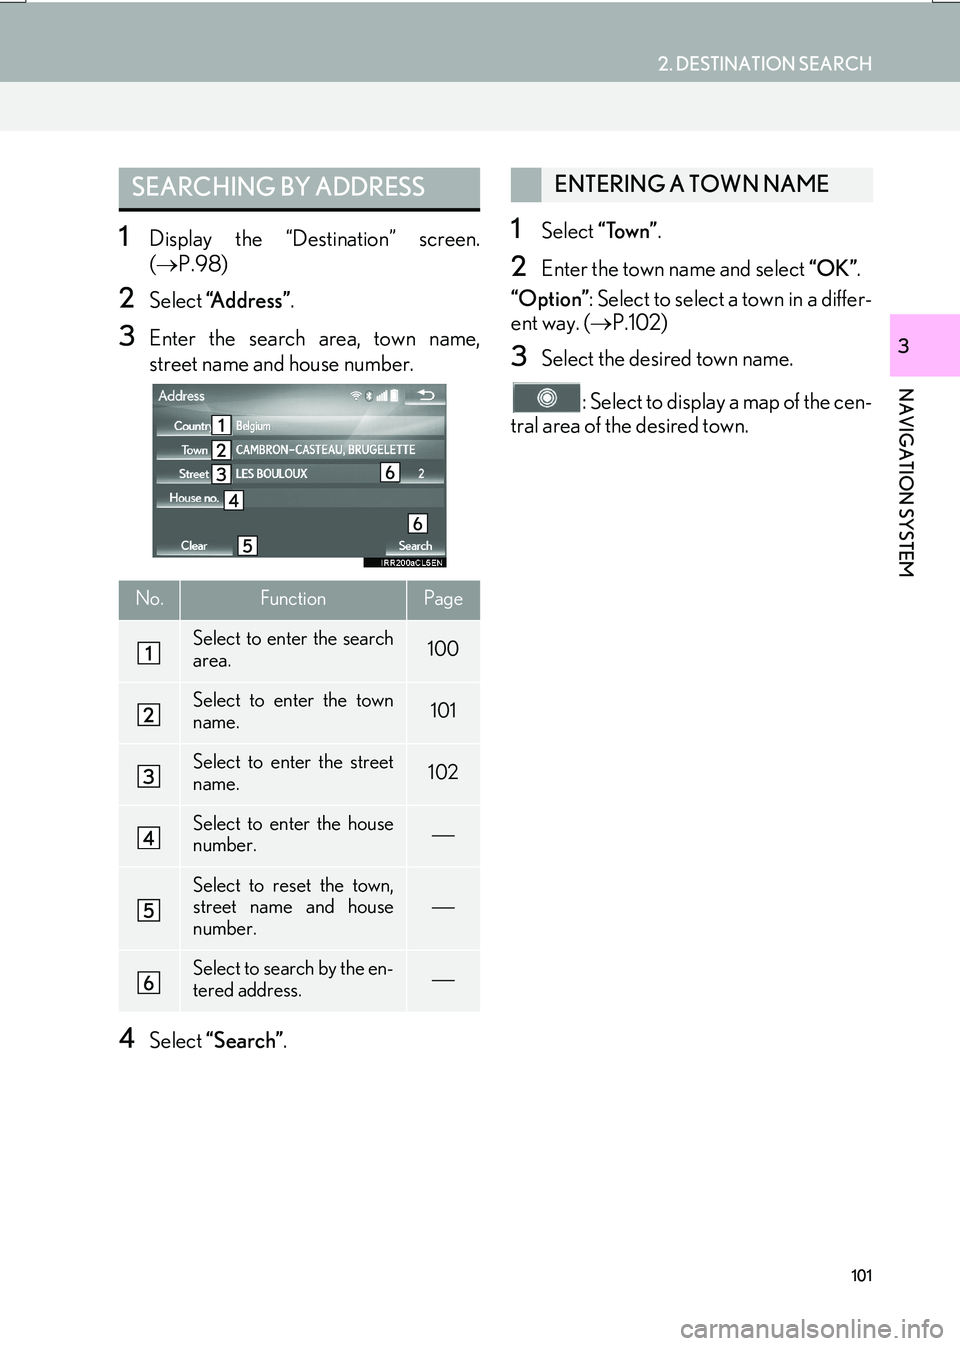
1Display the “Destination” screen.
(→ P.98)
2Select “Address” .
3Enter the search area, town name,
street name and house number.
4Select “Search” .
1Select “Town” .
2Enter the town name and select “OK”.
“Option” : Select to select a town in a differ-
ent way. ( →P.102)
3Select the desired town name.
: Select to display a map of the cen-
tral area of the desired town.
SEARCHING BY ADDRESS
No.FunctionPage
Select to enter the search
area.100
Select to enter the town
name.101
Select to enter the street
name.102
Select to enter the house
number.
Select to reset the town,
street name and house
number.
Select to search by the en-
tered address.
ENTERING A TOWN NAME
Page 126 of 342

126
4. MY MEMORY
IS_NAVI_EE
1Display the “My memory” screen.
(→ P.124)
2Select “Quick access” .
3Select the desired item.
1Select “Register” .
2Select the desired item to search for the
location. (→P.98)
3Select a position for this quick access.
4Select “OK” when the editing quick ac-
cess screen appears. ( →P.127)
SETTING UP QUICK ACCESS
If quick access has been registered, that
information can be recalled by using the
quick access screen buttons on the
“Destination” screen. ( →P.100)
No.FunctionPage
Select to register quick ac-
cess.126
Select to edit quick access.127
Select to delete quick ac-
cess.127
REGISTERING QUICK
ACCESS
INFORMATION
●
Up to 5 preset destinations can be regis-
tered.