head Lexus IS220d 2011 Repair Manual
[x] Cancel search | Manufacturer: LEXUS, Model Year: 2011, Model line: IS220d, Model: Lexus IS220d 2011Pages: 609, PDF Size: 14.63 MB
Page 475 of 609
454
4-3. Do-it-yourself maintenance
IS250/220d/200d_EE
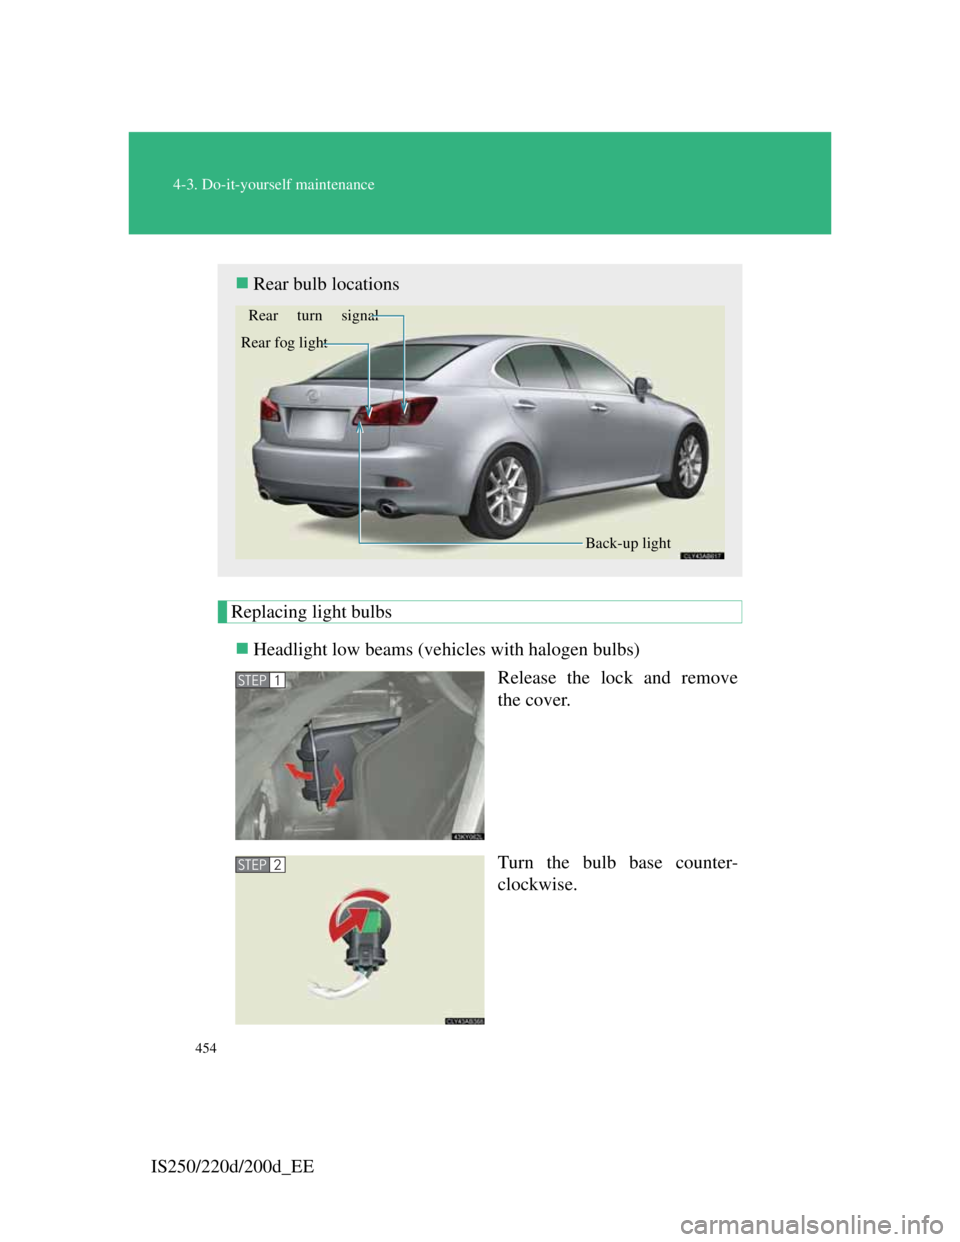
Replacing light bulbs
Headlight low beams (vehicles with halogen bulbs)
Release the lock and remove
the cover.
Turn the bulb base counter-
clockwise.
Rear bulb locations
Rear fog lightRear turn signal
Back-up light
STEP1
STEP2
Page 476 of 609
455
4-3. Do-it-yourself maintenance
4
Maintenance and care
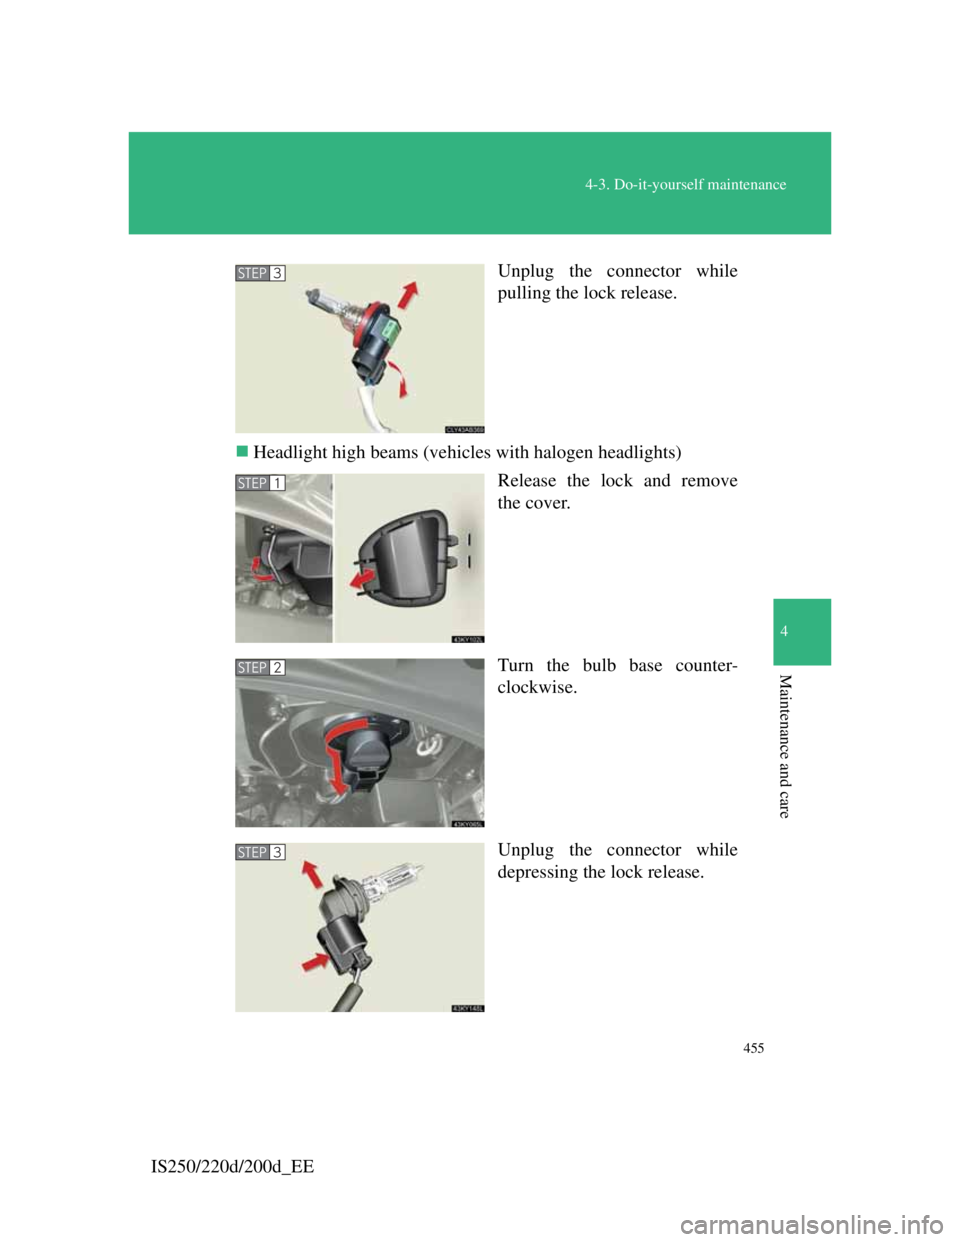
IS250/220d/200d_EEUnplug the connector while
pulling the lock release.
Headlight high beams (vehicles with halogen headlights)
Release the lock and remove
the cover.
Turn the bulb base counter-
clockwise.
Unplug the connector while
depressing the lock release.
STEP3
STEP1
STEP2
STEP3
Page 477 of 609
456
4-3. Do-it-yourself maintenance
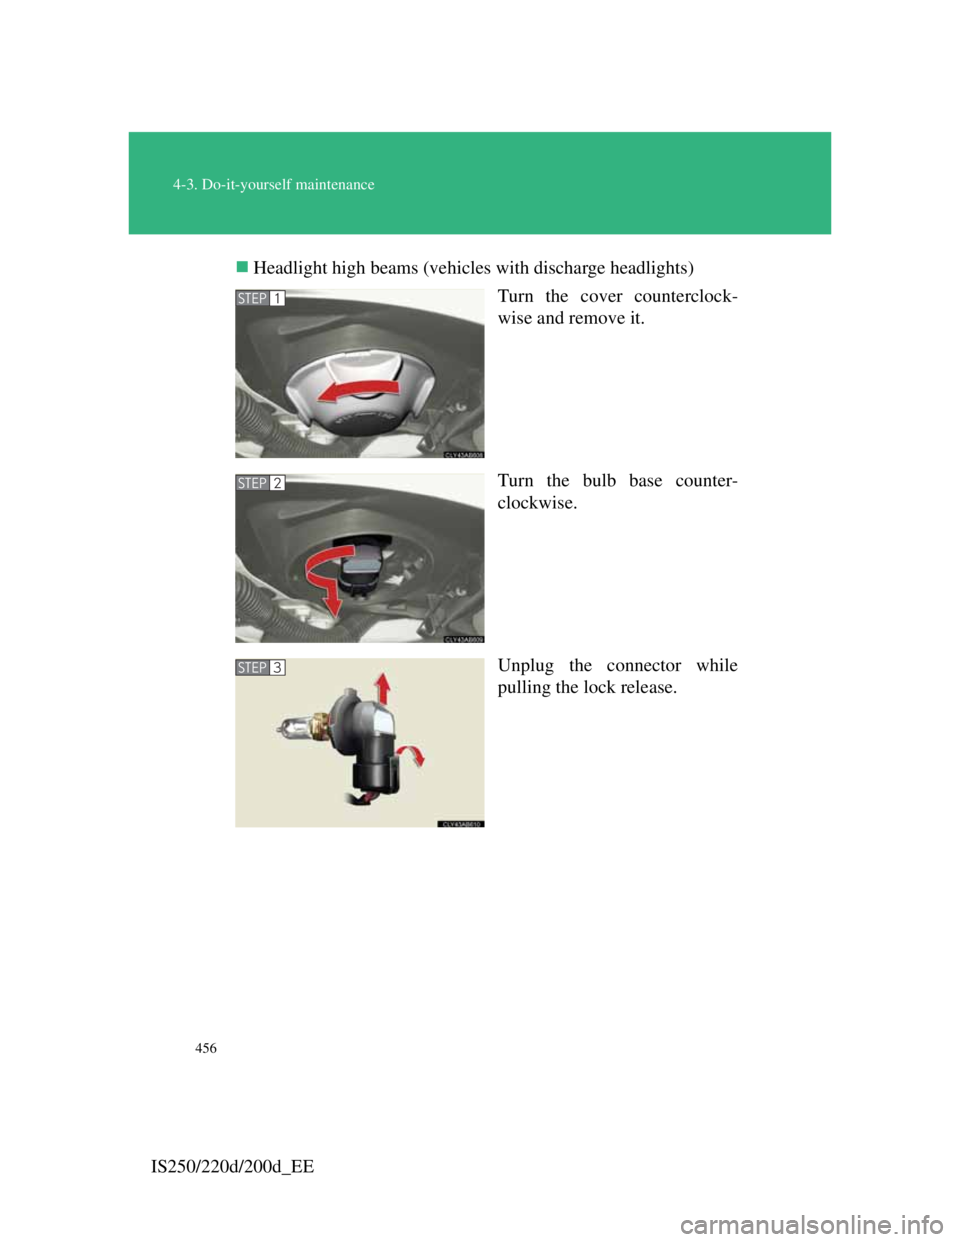
IS250/220d/200d_EEHeadlight high beams (vehicles with discharge headlights)
Turn the cover counterclock-
wise and remove it.
Turn the bulb base counter-
clockwise.
Unplug the connector while
pulling the lock release.
STEP1
STEP2
STEP3
Page 478 of 609
457
4-3. Do-it-yourself maintenance
4
Maintenance and care
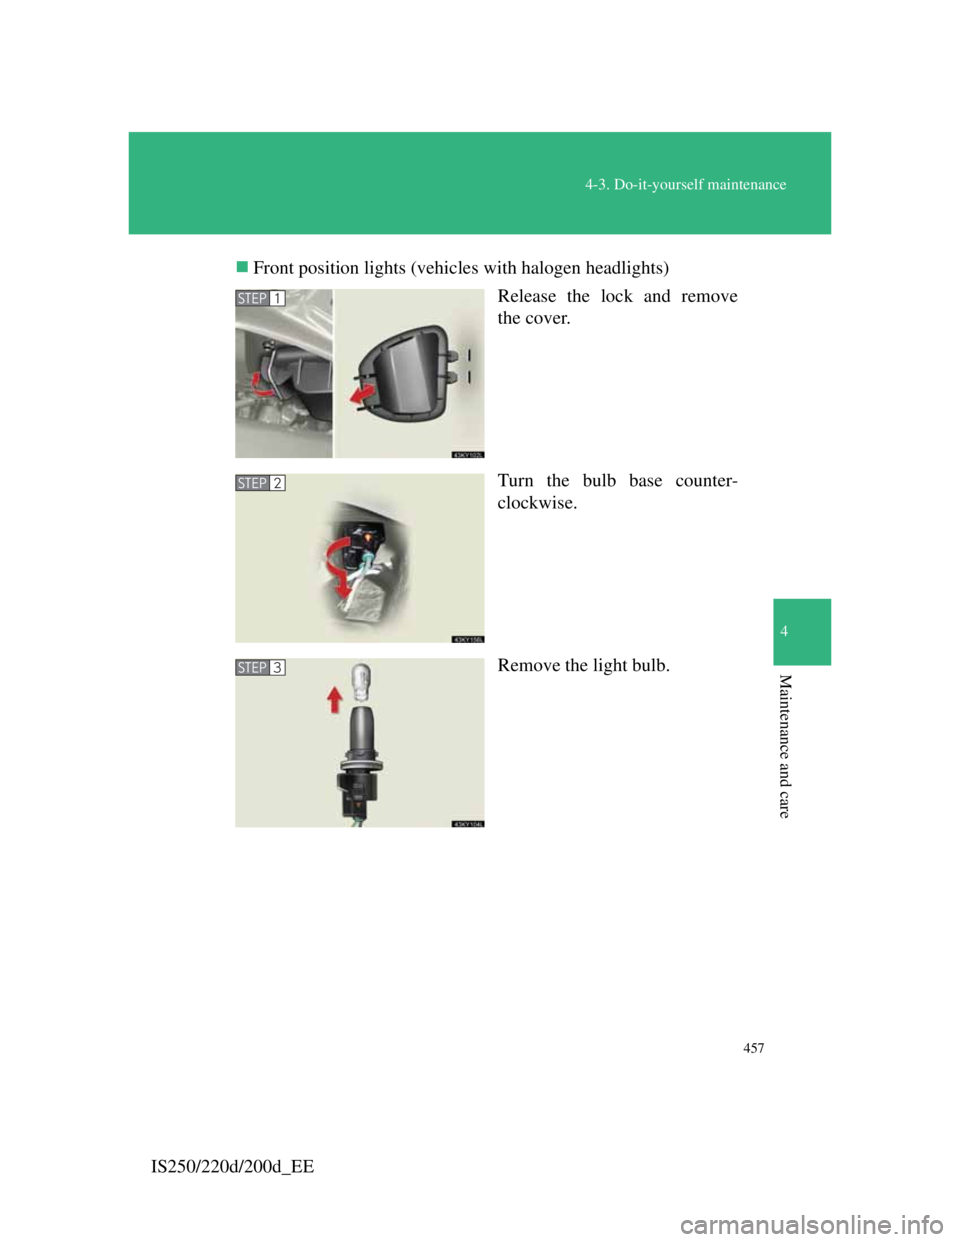
IS250/220d/200d_EEFront position lights (vehicles with halogen headlights)
Release the lock and remove
the cover.
Turn the bulb base counter-
clockwise.
Remove the light bulb.
STEP1
STEP2
STEP3
Page 480 of 609
459
4-3. Do-it-yourself maintenance
4
Maintenance and care
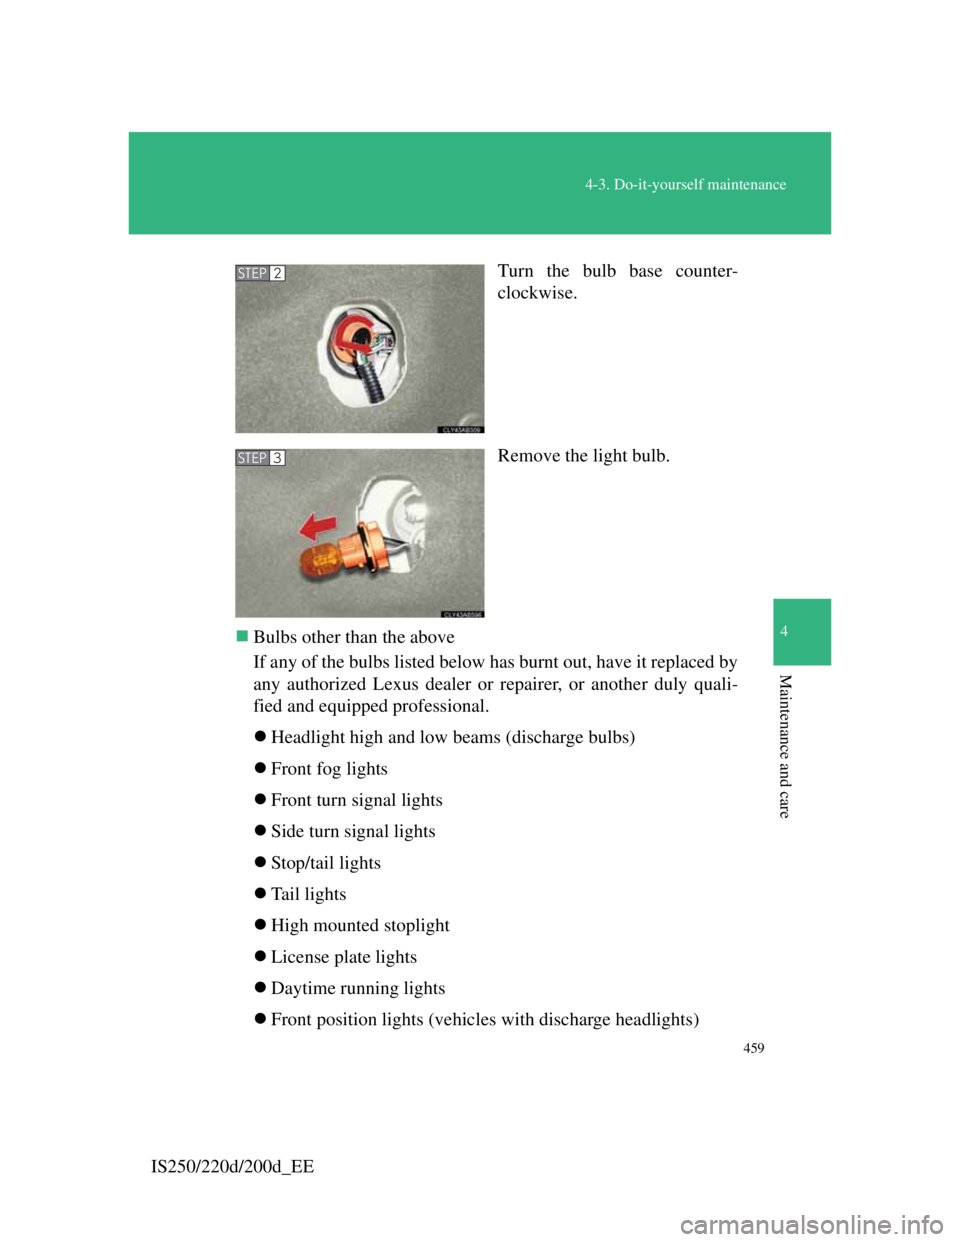
IS250/220d/200d_EETurn the bulb base counter-
clockwise.
Remove the light bulb.
Bulbs other than the above
If any of the bulbs listed below has burnt out, have it replaced by
any authorized Lexus dealer or repairer, or another duly quali-
fied and equipped professional.
Headlight high and low beams (discharge bulbs)
Front fog lights
Front turn signal lights
Side turn signal lights
Stop/tail lights
Tail lights
High mounted stoplight
License plate lights
Daytime running lights
Front position lights (vehicles with discharge headlights)
STEP2
STEP3
Page 481 of 609
460
4-3. Do-it-yourself maintenance
IS250/220d/200d_EE
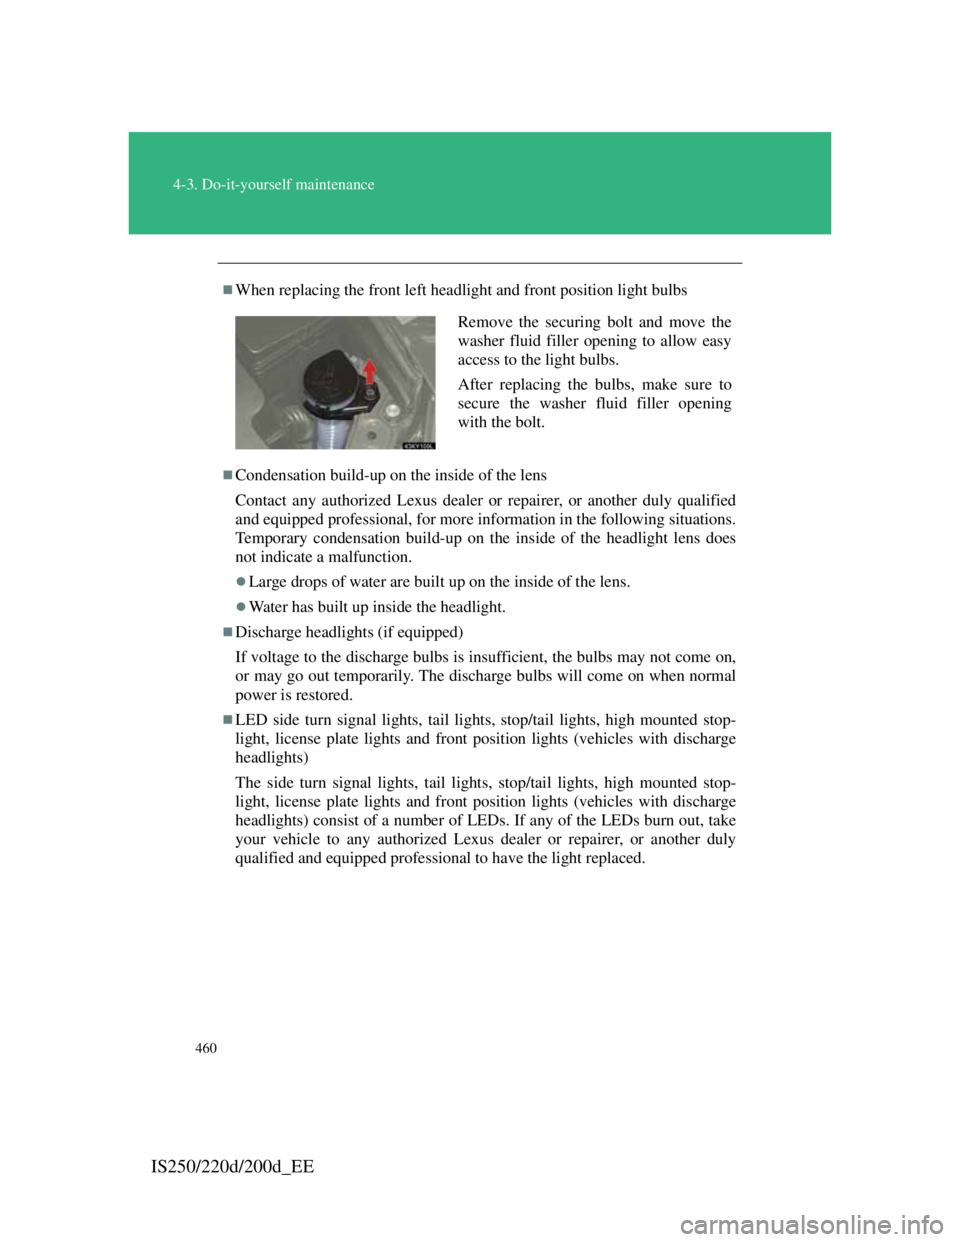
When replacing the front left headlight and front position light bulbs
Condensation build-up on the inside of the lens
Contact any authorized Lexus dealer or repairer, or another duly qualified
and equipped professional, for more information in the following situations.
Temporary condensation build-up on the inside of the headlight lens does
not indicate a malfunction.
Large drops of water are built up on the inside of the lens.
Water has built up inside the headlight.
Discharge headlights (if equipped)
If voltage to the discharge bulbs is insufficient, the bulbs may not come on,
or may go out temporarily. The discharge bulbs will come on when normal
power is restored.
LED side turn signal lights, tail lights, stop/tail lights, high mounted stop-
light, license plate lights and front position lights (vehicles with discharge
headlights)
The side turn signal lights, tail lights, stop/tail lights, high mounted stop-
light, license plate lights and front position lights (vehicles with discharge
headlights) consist of a number of LEDs. If any of the LEDs burn out, take
your vehicle to any authorized Lexus dealer or repairer, or another duly
qualified and equipped professional to have the light replaced.
Remove the securing bolt and move the
washer fluid filler opening to allow easy
access to the light bulbs.
After replacing the bulbs, make sure to
secure the washer fluid filler opening
with the bolt.
Page 482 of 609
461
4-3. Do-it-yourself maintenance
4
Maintenance and care
IS250/220d/200d_EE
CAUTION
Replacing light bulbs
Turn off the headlights. Do not attempt to replace the bulb immediately
after turning off the headlights.
The bulbs become very hot and may cause burns.
Do not touch the glass portion of the light bulb with bare hands. Hold the
bulb by the plastic or metal portion.
If the bulb is scratched or dropped it may blow out or crack.
Fully install light bulbs and any parts used to secure them. Failing to do so
may result in heat damage, fire, or water entering the headlight unit. This
may damage the headlights or cause condensation to build up on the lens.
Discharge headlights (if equipped)
Contact any authorized Lexus dealer or repairer, or another duly qualified
and equipped professional, before replacing discharge headlights (includ-
ing light bulbs).
Do not touch the high-intensity discharge headlight’s high voltage socket
when the headlights are turned on.
An extremely high voltage of 20000 V will be discharged and could result
in serious injury or death by electric shock.
Do not attempt to take apart or repair the low beam discharge headlight
bulbs, connectors, power supply circuits, or related components.
Doing so could result in electric shock and serious injury or death.
To prevent damage or fire
Make sure bulbs are fully seated and locked.
Page 487 of 609

5
461
5-1. Essential information
When trouble arises
IS250/220d/200d_EE
Installing towing eyelets
Remove the eyelet cover using
a flathead screwdriver.
To protect the bodywork, place
a rag between the screwdriver
and the vehicle body, as shown
in the illustration.
Insert the towing eyelet into the
hole and tighten partially by
hand.
Tighten down the towing eyelet
securely using a wheel nut
wrench.
STEP1
STEP2
STEP3
Location of the emergency towing eyelet
P. 4 8 5
Page 502 of 609

476
5-2. Steps to take in an emergency
IS250/220d/200d_EE
(If equipped)
Indicates a malfunction in the pre-crash safety
system.
(If equipped)
Indicates a malfunction in the automatic headlight
leveling system
(If equipped)
Indicates a Lexus parking assist-sensor malfunc-
tion.
The malfunctioning assist-sensor is shown flash-
ing on the display.
(Flashing)
(If equipped)
Indicates a malfunction in the dynamic radar
cruise control system.
Press the “ON-OFF” button once to deactivate
the system, and then press the button again to
reactivate the system.
Warning messageDetails
Page 506 of 609

480
5-2. Steps to take in an emergency
IS250/220d/200d_EE
(If equipped)
Indicates that Lexus
parking assist-sensor is
dirty or covered with
ice.
Clean the sensor.
(Flashing)
(If equipped)
Indicates that the
dynamic radar cruise
control sensor is dirty or
covered with ice.
Clean the sensor.
(Flashing and then
continuously on)
(Flashing)
(If equipped)
Indicates that the
dynamic radar cruise
control system is unable
to judge vehicle-to-
vehicle distance.
• Switch the driving
mode to either the nor-
mal or power mode.
• If the windshield wip-
ers are on, turn them
off or set them to
either the intermittent
or the slow mode.
(Flashing)
(If equipped)
Indicates that your vehi-
cle is nearing the vehi-
cle ahead (in dynamic
radar cruise mode).
Slow the vehicle by
applying the brakes.
Warning messageDetailsCorrection procedure