display Lexus IS220d 2012 Navigation manual
[x] Cancel search | Manufacturer: LEXUS, Model Year: 2012, Model line: IS220d, Model: Lexus IS220d 2012Pages: 407, PDF Size: 23.8 MB
Page 251 of 407
244
1. AUDIO/VIDEO SYSTEM OPERATION
ISF_IS_ISC_Navi_EE
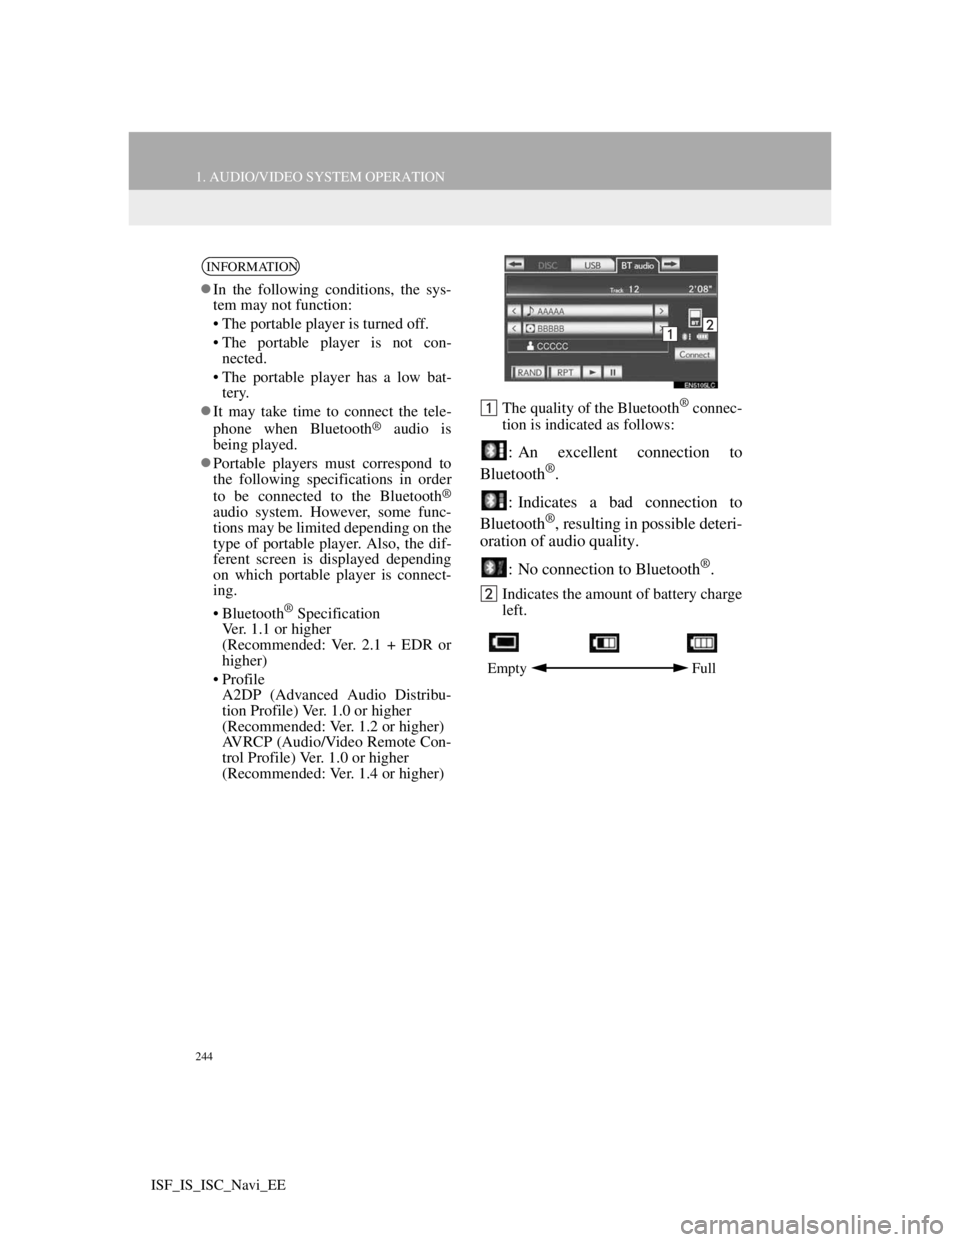
The quality of the Bluetooth® connec-
tion is indicated as follows:
: An excellent connection to
Bluetooth®.
: Indicates a bad connection to
Bluetooth
®, resulting in possible deteri-
oration of audio quality.
: No connection to Bluetooth
®.
Indicates the amount of battery charge
left.
INFORMATION
In the following conditions, the sys-
tem may not function:
• The portable player is turned off.
• The portable player is not con-
nected.
• The portable player has a low bat-
tery.
It may take time to connect the tele-
phone when Bluetooth
® audio is
being played.
Portable players must correspond to
the following specifications in order
to be connected to the Bluetooth
®
audio system. However, some func-
tions may be limited depending on the
type of portable player. Also, the dif-
ferent screen is displayed depending
on which portable player is connect-
ing.
• Bluetooth
® Specification
Ver. 1.1 or higher
(Recommended: Ver. 2.1 + EDR or
higher)
• Profile
A2DP (Advanced Audio Distribu-
tion Profile) Ver. 1.0 or higher
(Recommended: Ver. 1.2 or higher)
AVRCP (Audio/Video Remote Con-
trol Profile) Ver. 1.0 or higher
(Recommended: Ver. 1.4 or higher)
Empty Full
Page 252 of 407
245
1. AUDIO/VIDEO SYSTEM OPERATION
5
AUDIO/VIDEO SYSTEM
ISF_IS_ISC_Navi_EE
The portable player will be automati-
cally connected under the following
conditions:
• The “ENGINE START STOP” switch
is in either ACCESSORY or IGNI-
TION ON mode.
• When “Bluetooth* power” is
switched from off to on.
• When the portable player is discon-
nected for some reason.
*:Bluetooth is a registered trademark of
Bluetooth SIG, Inc.
INFORMATION
Remaining charge is not displayed
while the Bluetooth® device is con-
necting.
The amount of charge left does not
always correspond correctly with
your portable player.
This system does not have a charging
function.
An antenna for Bluetooth
® connec-
tion is built into the instrument panel.
The condition of the Bluetooth
® con-
nection may not be good and the sys-
tem may not function when using a
Bluetooth
® portable player in the fol-
lowing conditions:
• The portable player is obstructed by
certain objects (behind a seat or in
the glove box or console box).
• The portable player touches or is
covered with metal materials.
Leave the Bluetooth
® portable player
in a place where the condition of
Bluetooth
® connection is good.
Portable player information is regis-
tered when the portable player is con-
nected to the Bluetooth
® audio
system. When selling or disposing of
the vehicle, remove the Bluetooth
®
audio information from the system.
(See “DELETING A Bluetooth®
DEVICE” on page 190.)
CONNECTING A Bluetooth®
AUDIO PLAYER
To use the Bluetooth® audio system,
it is necessary to register a portable
player with the system. Once the por-
table player has been registered, it is
possible to listen to the music.
Once the portable player has been
registered, it is possible to listen to
music through the navigation sys-
tem. (See “REGISTERING A
Bluetooth
® DEVICE” on page 189.)
INFORMATION
For operating the portable player, see
the instruction manual that comes
with it.
WHEN “Bluetooth* power” IS
ON
Page 253 of 407
246
1. AUDIO/VIDEO SYSTEM OPERATION
ISF_IS_ISC_Navi_EE
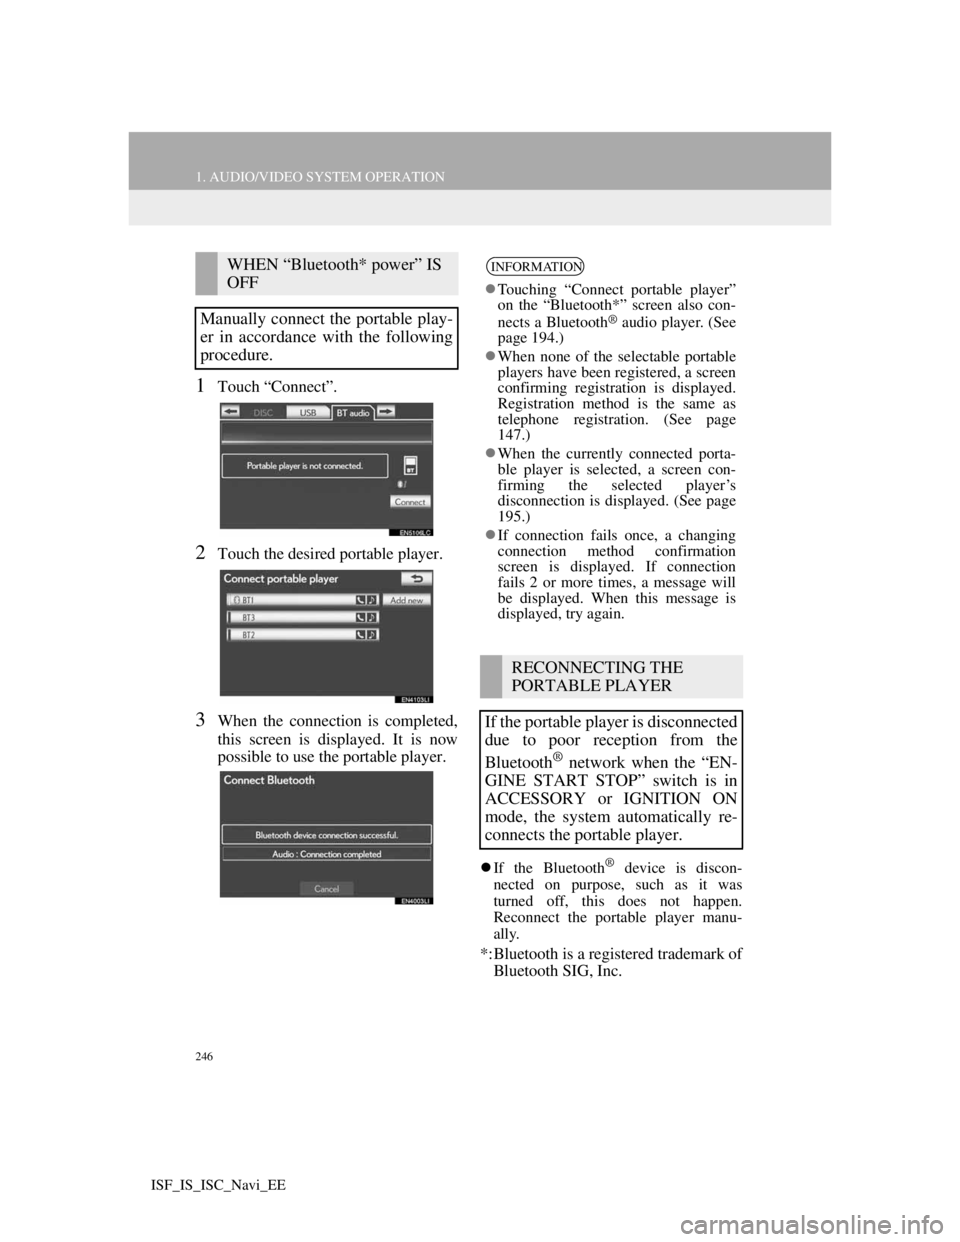
1Touch “Connect”.
2Touch the desired portable player.
3When the connection is completed,
this screen is displayed. It is now
possible to use the portable player.
If the Bluetooth® device is discon-
nected on purpose, such as it was
turned off, this does not happen.
Reconnect the portable player manu-
ally.
*:Bluetooth is a registered trademark of
Bluetooth SIG, Inc.
WHEN “Bluetooth* power” IS
OFF
Manually connect the portable play-
er in accordance with the following
procedure.INFORMATION
Touching “Connect portable player”
on the “Bluetooth*” screen also con-
nects a Bluetooth
® audio player. (See
page 194.)
When none of the selectable portable
players have been registered, a screen
confirming registration is displayed.
Registration method is the same as
telephone registration. (See page
147.)
When the currently connected porta-
ble player is selected, a screen con-
firming the selected player’s
disconnection is displayed. (See page
195.)
If connection fails once, a changing
connection method confirmation
screen is displayed. If connection
fails 2 or more times, a message will
be displayed. When this message is
displayed, try again.
RECONNECTING THE
PORTABLE PLAYER
If the portable player is disconnected
due to poor reception from the
Bluetooth
® network when the “EN-
GINE START STOP” switch is in
ACCESSORY or IGNITION ON
mode, the system automatically re-
connects the portable player.
Page 254 of 407
247
1. AUDIO/VIDEO SYSTEM OPERATION
5
AUDIO/VIDEO SYSTEM
ISF_IS_ISC_Navi_EE
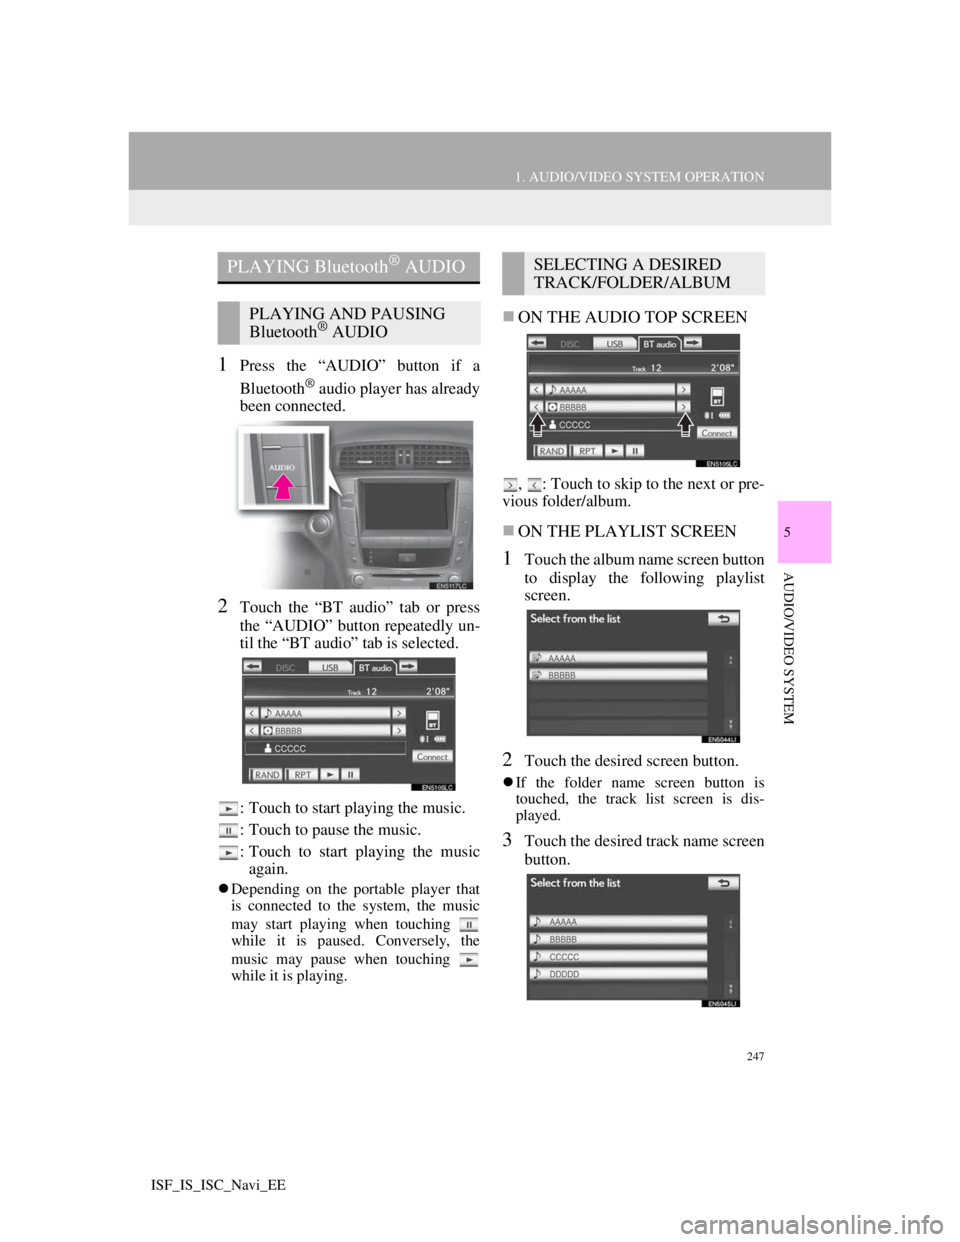
1Press the “AUDIO” button if a
Bluetooth
® audio player has already
been connected.
2Touch the “BT audio” tab or press
the “AUDIO” button repeatedly un-
til the “BT audio” tab is selected.
: Touch to start playing the music.
: Touch to pause the music.
: Touch to start playing the music
again.
Depending on the portable player that
is connected to the system, the music
may start playing when touching
while it is paused. Conversely, the
music may pause when touching
while it is playing.
ON THE AUDIO TOP SCREEN
, : Touch to skip to the next or pre-
vious folder/album.
ON THE PLAYLIST SCREEN
1Touch the album name screen button
to display the following playlist
screen.
2Touch the desired screen button.
If the folder name screen button is
touched, the track list screen is dis-
played.
3Touch the desired track name screen
button.
PLAYING Bluetooth® AUDIO
PLAYING AND PAUSING
Bluetooth® AUDIO
SELECTING A DESIRED
TRACK/FOLDER/ALBUM
Page 255 of 407
248
1. AUDIO/VIDEO SYSTEM OPERATION
ISF_IS_ISC_Navi_EE
, : Touch to move the list up or
down by 5 track/folder groups. If either
of these screen buttons is touched when
the top/bottom page of the list is dis-
played, the last/first page is displayed.
Channel/Track button: Press the “ ” or
“ ” button of Channel/Track to scroll
through the track list one by one.
Tune/Scroll knob: Turn the knob clock-
wise or counterclockwise to quickly
scroll up or down the track/folder list.
To select the desired track/folder, press
the knob.
, : If appears to the right of an
item name, the complete name is too
long for the screen. Touch to scroll to
the end of the name. Touch to move
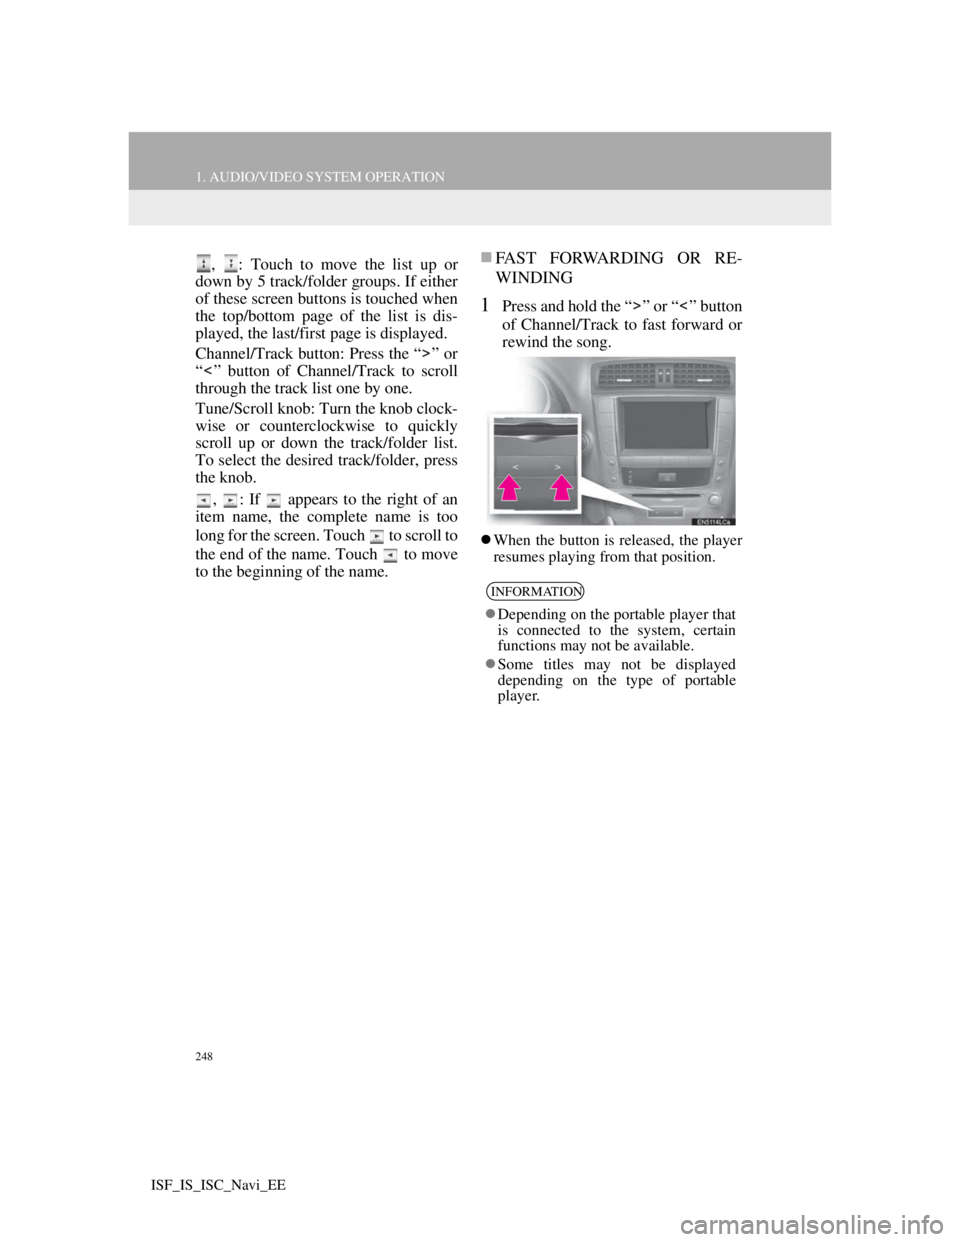
to the beginning of the name.FAST FORWARDING OR RE-
WINDING
1Press and hold the “ ” or “ ” button
of Channel/Track to fast forward or
rewind the song.
When the button is released, the player
resumes playing from that position.
INFORMATION
Depending on the portable player that
is connected to the system, certain
functions may not be available.
Some titles may not be displayed
depending on the type of portable
player.
Page 256 of 407
249
1. AUDIO/VIDEO SYSTEM OPERATION
5
AUDIO/VIDEO SYSTEM
ISF_IS_ISC_Navi_EE
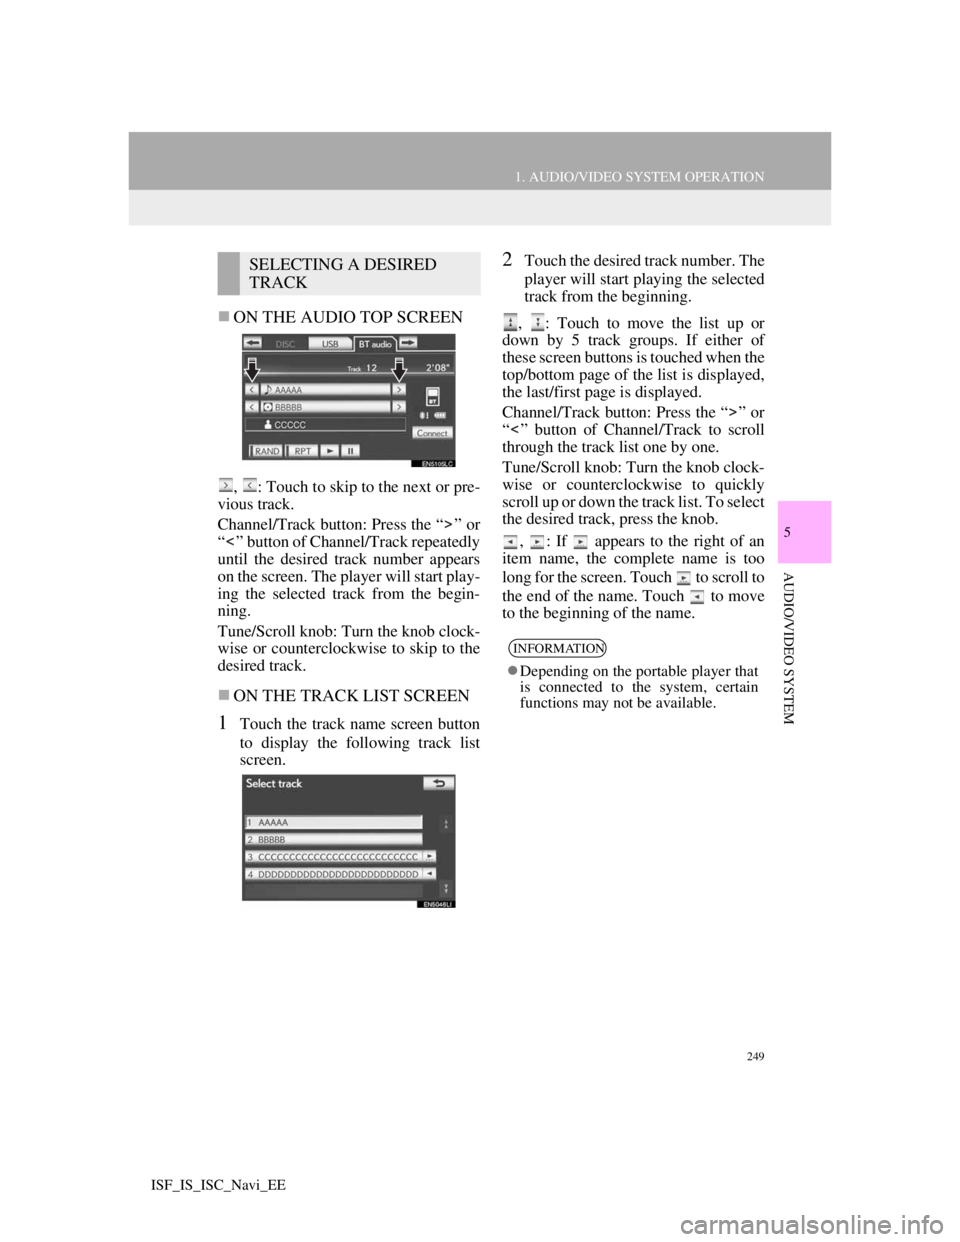
ON THE AUDIO TOP SCREEN
, : Touch to skip to the next or pre-
vious track.
Channel/Track button: Press the “ ” or
“ ” button of Channel/Track repeatedly
until the desired track number appears
on the screen. The player will start play-
ing the selected track from the begin-
ning.
Tune/Scroll knob: Turn the knob clock-
wise or counterclockwise to skip to the
desired track.
ON THE TRACK LIST SCREEN
1Touch the track name screen button
to display the following track list
screen.
2Touch the desired track number. The
player will start playing the selected
track from the beginning.
, : Touch to move the list up or
down by 5 track groups. If either of
these screen buttons is touched when the
top/bottom page of the list is displayed,
the last/first page is displayed.
Channel/Track button: Press the “ ” or
“ ” button of Channel/Track to scroll
through the track list one by one.
Tune/Scroll knob: Turn the knob clock-
wise or counterclockwise to quickly
scroll up or down the track list. To select
the desired track, press the knob.
, : If appears to the right of an
item name, the complete name is too
long for the screen. Touch to scroll to
the end of the name. Touch to move
to the beginning of the name.SELECTING A DESIRED
TRACK
INFORMATION
Depending on the portable player that
is connected to the system, certain
functions may not be available.
Page 266 of 407

259
1. AUDIO/VIDEO SYSTEM OPERATION
5
AUDIO/VIDEO SYSTEM
ISF_IS_ISC_Navi_EE
MP3 player: MP3 files are compatible
with the ID3 Tag Ver. 1.0, Ver. 1.1, Ver.
2.2 and Ver. 2.3 formats. The unit can-
not display disc title, track title and art-
ist name in other formats.
USB memory: MP3 files are compati-
ble with the ID3 Tag Ver. 1.0, Ver. 1.1,
Ver. 2.2, Ver. 2.3 and Ver. 2.4 formats.
The unit cannot display track title and
artist name in other formats.
WMA files can contain a WMA tag
that is used in the same way as an ID3
tag. WMA tags carry information such
as track title and artist name.
The emphasis function is available only
when playing MP3/WMA files
recorded at 32, 44.1 and 48 kHz.
MP3 files for MP3 player:
MPEG 1 LAYER 3 — 32, 44.1, 48 kHz
MPEG 2 LSF LAYER 3 — 16, 22.05,
24 kHz
MP3 files for USB memory:
MPEG 1 AUDIO LAYER 2, 3 — 32,
44.1, 48 kHz
MPEG 2 AUDIO LAYER 2, 3 — 16,
22.05, 24 kHz
WMA files for WMA player:
Ver. 7, 8, 9 (9.1/9.2) CBR — 32, 44.1,
48 kHz
WMA files for USB memory:
Ver. 7, 8, 9 (9.1/9.2) CBR — 32, 44.1,
48 kHz
The sound quality of MP3/WMA files
generally improves with higher bit
rates. In order to achieve a reasonable
level of sound quality, discs recorded
with a bit rate of at least 128 kbps are
recommended.MP3 files for MP3 player:
MPEG1 LAYER3 — 32 to 320 kbps
MPEG2 LSF LAYER3 — 8 to 160
kbps
MP3 files for USB memory:
MPEG 1 AUDIO LAYER 3 — 32 to
320 kbps
MPEG 2 AUDIO LAYER 3 — 8 to 160
kbps
WMA files for WMA player:
Ver. 7, 8 CBR — 48 to 192 kbps
Ver. 9 (9.1/9.2) CBR — 48 to 320 kbps
(VBR*)
WMA files for USB memory:
Ver. 9 (9.1/9.2) CBR — 48 to 320 kbps
(VBR*)
*: Variable Bit Rate
The MP3/WMA player does not play
back MP3/WMA files from discs
recorded using packet write data trans-
fer (UDF format). Discs should be
recorded using “pre-mastering” soft-
ware rather than packet-write software.
M3u playlists are not compatible with
the audio player.
MP3i (MP3 interactive) and MP3PRO
formats are not compatible with the
audio player.
The player is compatible with VBR
(Variable Bit Rate).
When playing back files recorded as
VBR (Variable Bit Rate) files, the play
time will not be correctly displayed if
the fast forward or reverse operations
are used.
It is not possible to check folders that
do not include MP3/WMA files.
MP3/WMA files in folders up to 8 lev-
els deep can be played. However, the
start of playback may be delayed when
using discs containing numerous levels
of folders. For this reason, we recom-
mend creating discs with no more than
2 levels of folders.
SAMPLING FREQUENCY
PLAYABLE BIT RATES
Page 269 of 407

262
ISF_IS_ISC_Navi_EE
2. SETUP
1. AUDIO SETTINGS
1Press the “SETUP” button.
2Touch “Audio”.
3Touch “Sound settings”.
1Touch the “DSP” tab to display this
screen.
2Touch the desired items to be set.
3Touch “OK”.
AUTOMATIC SOUND LEVELIS-
ER (ASL)
1Touch “Automatic sound leveliser”.
2Touch “On” or “Off”.
SURROUND FUNCTION
1Touch “Surround”.
2Touch “On” or “Off”.
SOUND SETTINGS
Sound balance etc. can be adjusted.
DISPLAYING SOUND
SETTINGS
DSP CONTROL
The system adjusts to the optimum
volume and tone quality according to
vehicle speed to compensate for in-
creased vehicle noise.
This function can create a feeling of
presence.
Page 270 of 407

263
2. SETUP
5
AUDIO/VIDEO SYSTEM
ISF_IS_ISC_Navi_EE
TONE
BALANCE
1Touch the “Sound” tab to display
this screen.
2Touch the desired screen button.
3Touch “OK”.
TONE AND BALANCE
How good an audio program sounds
is largely determined by the mix of
the treble, mid and bass levels. In
fact, different kinds of music and vo-
cal programs usually sound better
with different mixes of treble, mid
and bass.
A good balance of the left and right
stereo channels and of the front and
rear sound levels is also important.
Keep in mind that when listening to
a stereo recording or broadcast,
changing the right/left balance will
increase the volume of 1 group of
sounds while decreasing the volume
of another.
Screen buttonFunction
“Treble”
“+” or “-”Touch to adjust high-
pitched tones.
“Mid” “+” or
“-”Touch to adjust mid-
pitched tones.
“Bass” “+” or
“-”Touch to adjust low-
pitched tones.
“Front” or
“Rear”
Touch to adjust sound
balance between the
front and rear speak-
ers.
“L” or “R”
Touch to adjust the
sound balance be-
tween the left and
right speakers.
INFORMATION
The tone of each mode (such as AM,
FM and DVD player) can be adjusted.
Page 272 of 407

265
2. SETUP
5
AUDIO/VIDEO SYSTEM
ISF_IS_ISC_Navi_EE
1Press the “SETUP” button.
2Touch “Audio”.
3Touch “iPod settings”.
4Touch “Display cover art”.
5Touch “On” or “Off”.
6After iPod setting has been changed,
touch “OK”.
iPod SETTINGS
When the track currently being
played has cover art data, it can be
displayed.