USB Lexus IS220d 2012 Navigation manual
[x] Cancel search | Manufacturer: LEXUS, Model Year: 2012, Model line: IS220d, Model: Lexus IS220d 2012Pages: 407, PDF Size: 23.8 MB
Page 205 of 407
198
ISF_IS_ISC_Navi_EE1. QUICK REFERENCE.................... 200
2. SOME BASICS .............................. 202
SPEECH COMMAND SYSTEM .......... 202
TURNING THE SYSTEM
ON AND OFF...................................... 203
MUTING AND PAUSING
THE SYSTEM ..................................... 203
SWITCHING BETWEEN
FUNCTIONS ....................................... 203
SELECTING SCREEN SIZE................. 204
DVD PLAYER ....................................... 205
AUX PORT ............................................ 205
USB PORT ............................................. 206
3. RADIO OPERATION .................... 207
LISTENING TO THE RADIO .............. 207
PRESETTING A STATION .................. 207
SELECTING A STATION .................... 208
RDS (RADIO DATA SYSTEM) ........... 208
1AUDIO/VIDEO SYSTEM
OPERATION
Page 206 of 407
5
199
1
3
4
6
7
8
9
10
5
2
ISF_IS_ISC_Navi_EE4. DVD PLAYER OPERATION ........ 210
INSERTING A DISC ............................. 210
EJECTING A DISC ............................... 210
PLAYING A DISC ................................ 211
PLAYING AN AUDIO DISC............... 211
PLAYING AN MP3/WMA DISC ......... 213
OPERATING A DVD DISC ................. 216
PLAYING A DVD DISC....................... 217
DVD OPTIONS ..................................... 219
IF THE PLAYER MALFUNCTIONS... 228
DVD PLAYER AND DVD VIDEO
DISC INFORMATION ....................... 228
5. USB MEMORY OPERATION ...... 231
CONNECTING A USB MEMORY ...... 231
PLAYING A USB MEMORY............... 232
6. iPod OPERATION.......................... 237
CONNECTING iPod ............................. 237
PLAYING iPod MUSIC ........................ 238
PLAYING iPod VIDEO ........................ 241
7. Bluetooth® AUDIO
OPERATION................................ 243
CONNECTING A Bluetooth®
AUDIO PLAYER ................................ 245
PLAYING Bluetooth
® AUDIO ............. 247
8. AUDIO/VIDEO REMOTE
CONTROLS
(STEERING SWITCHES) ........... 252
9. AUDIO/VIDEO SYSTEM
OPERATING HINTS .................. 254
RADIO RECEPTION ............................. 254
iPod ......................................................... 255
USB MEMORY...................................... 256
CARING FOR YOUR DVD
PLAYER AND DISC .......................... 256
MP3/WMA FILES.................................. 258
CD-R AND CD-RW DISCS................... 260
TERMS ................................................... 260
1. AUDIO SETTINGS ....................... 262
SOUND SETTINGS ............................... 262
RADIO SETTINGS ................................ 264
iPod SETTINGS ..................................... 265
2SETUP
AUDIO/VIDEO SYSTEM
For vehicles sold outside Europe, some of the functions cannot be operated while
Page 210 of 407
203
1. AUDIO/VIDEO SYSTEM OPERATION
5
AUDIO/VIDEO SYSTEM
ISF_IS_ISC_Navi_EE
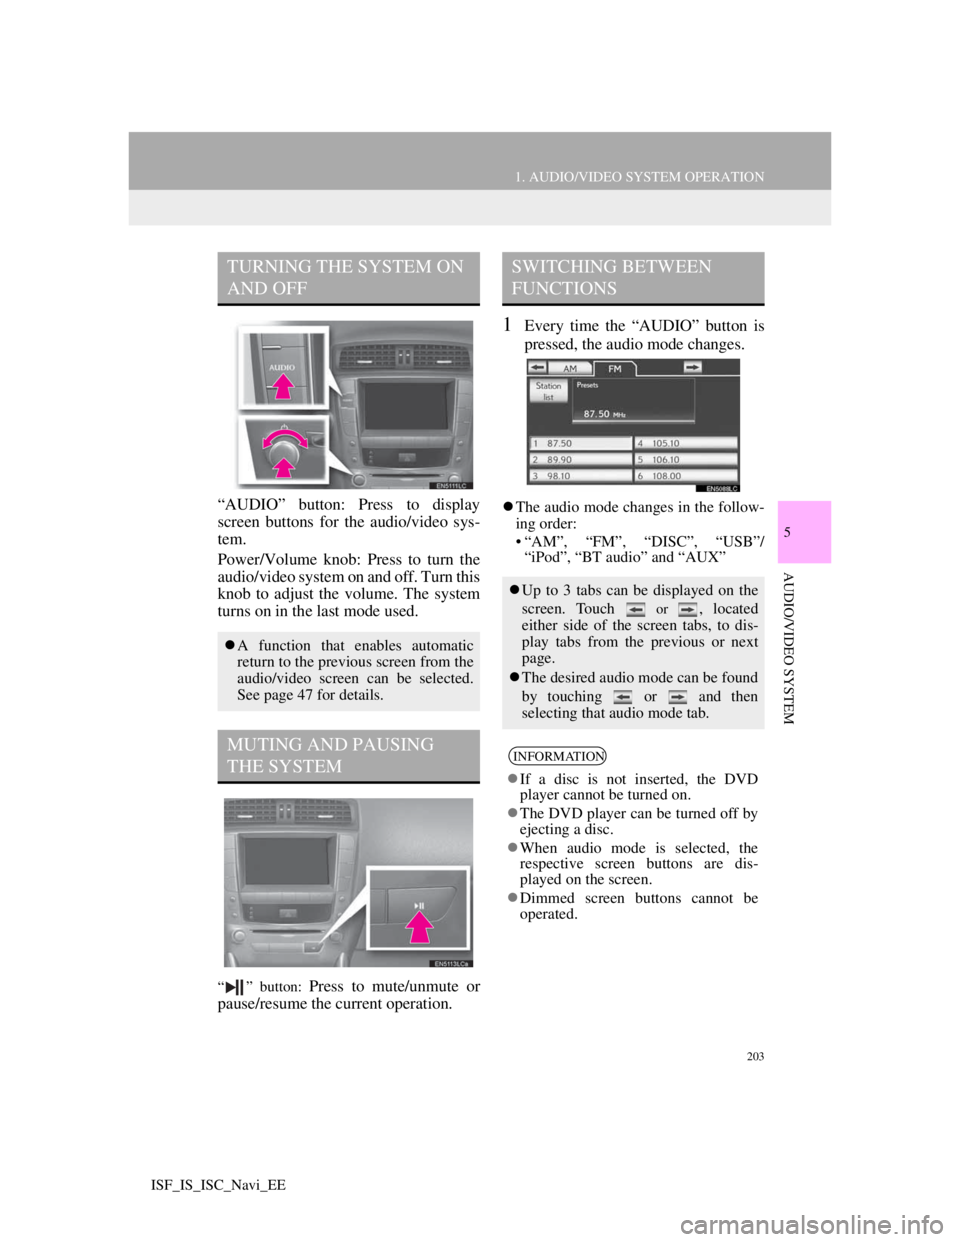
“AUDIO” button: Press to display
screen buttons for the audio/video sys-
tem.
Power/Volume knob: Press to turn the
audio/video system on and off. Turn this
knob to adjust the volume. The system
turns on in the last mode used.
“ ” button: Press to mute/unmute or
pause/resume the current operation.
1Every time the “AUDIO” button is
pressed, the audio mode changes.
The audio mode changes in the follow-
ing order:
• “AM”, “FM”, “DISC”, “USB”/
“iPod”, “BT audio” and “AUX”
TURNING THE SYSTEM ON
AND OFF
A function that enables automatic
return to the previous screen from the
audio/video screen can be selected.
See page 47 for details.
MUTING AND PAUSING
THE SYSTEM
SWITCHING BETWEEN
FUNCTIONS
Up to 3 tabs can be displayed on the
screen. Touch
or , located
either side of the screen tabs, to dis-
play tabs from the previous or next
page.
The desired audio mode can be found
by touching or and then
selecting that audio mode tab.
INFORMATION
If a disc is not inserted, the DVD
player cannot be turned on.
The DVD player can be turned off by
ejecting a disc.
When audio mode is selected, the
respective screen buttons are dis-
played on the screen.
Dimmed screen buttons cannot be
operated.
Page 213 of 407
206
1. AUDIO/VIDEO SYSTEM OPERATION
ISF_IS_ISC_Navi_EE
1Press the “AUDIO” button to
display the audio control screen and
touch the “USB” or “iPod” tab or
press the “AUDIO” button
repeatedly to change to USB
memory or iPod mode.
INFORMATION
When the portable audio player is not
connected to the AUX port, the tab
will be dimmed.
USB PORT
A USB memory/iPod can be con-
nected to the USB port. For details,
see “CONNECTING A USB MEM-
ORY” on page 231 and “CON-
NECTING iPod” on page 237.
INFORMATION
When a USB memory/iPod is not
connected with the USB port, the tab
will be dimmed.
Page 238 of 407
231
1. AUDIO/VIDEO SYSTEM OPERATION
5
AUDIO/VIDEO SYSTEM
ISF_IS_ISC_Navi_EE
5. USB MEMORY OPERATION
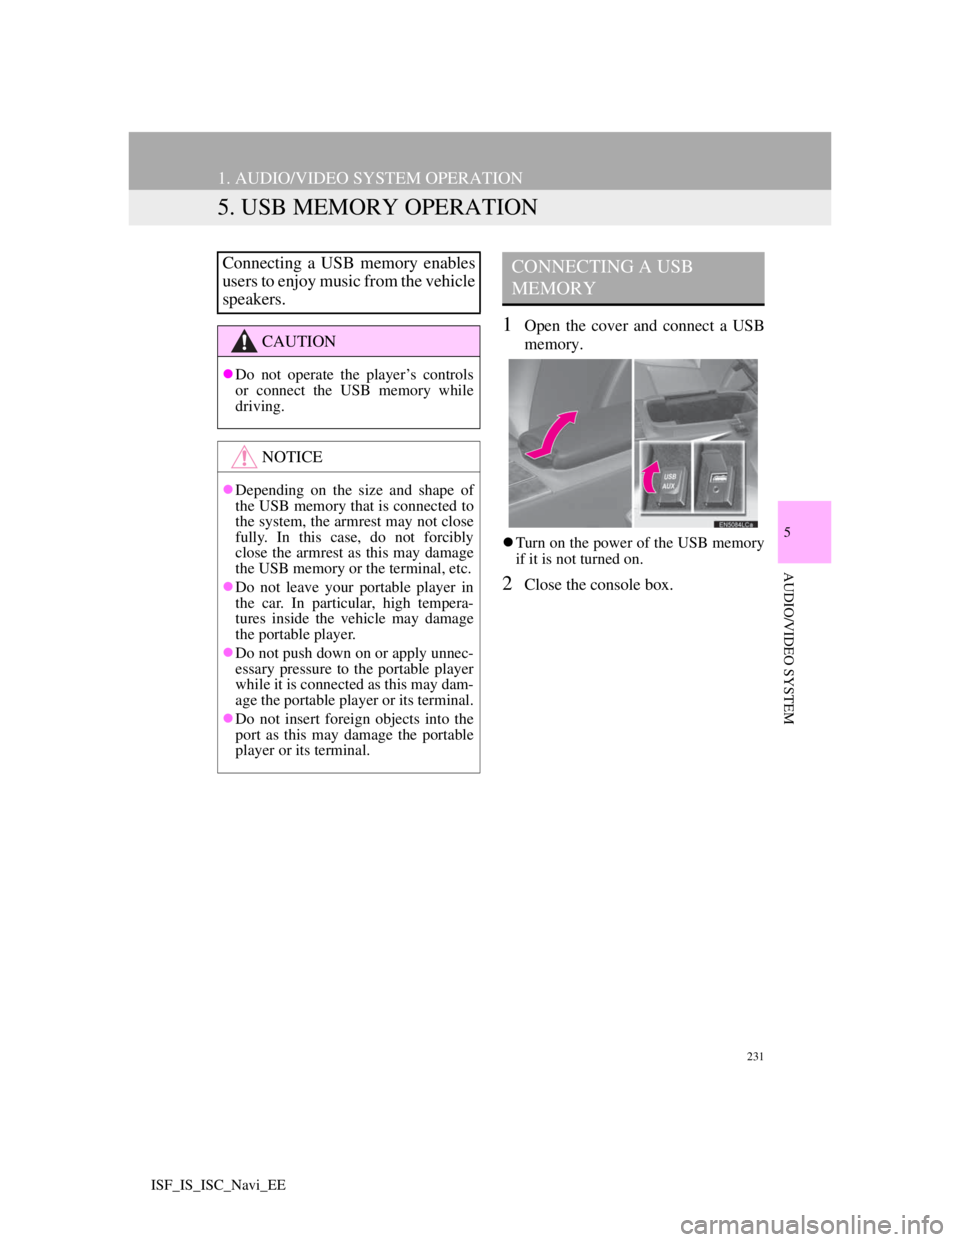
1Open the cover and connect a USB
memory.
Turn on the power of the USB memory
if it is not turned on.
2Close the console box.
Connecting a USB memory enables
users to enjoy music from the vehicle
speakers.
CAUTION
Do not operate the player’s controls
or connect the USB memory while
driving.
NOTICE
Depending on the size and shape of
the USB memory that is connected to
the system, the armrest may not close
fully. In this case, do not forcibly
close the armrest as this may damage
the USB memory or the terminal, etc.
Do not leave your portable player in
the car. In particular, high tempera-
tures inside the vehicle may damage
the portable player.
Do not push down on or apply unnec-
essary pressure to the portable player
while it is connected as this may dam-
age the portable player or its terminal.
Do not insert foreign objects into the
port as this may damage the portable
player or its terminal.
CONNECTING A USB
MEMORY
Page 239 of 407
232
1. AUDIO/VIDEO SYSTEM OPERATION
ISF_IS_ISC_Navi_EE
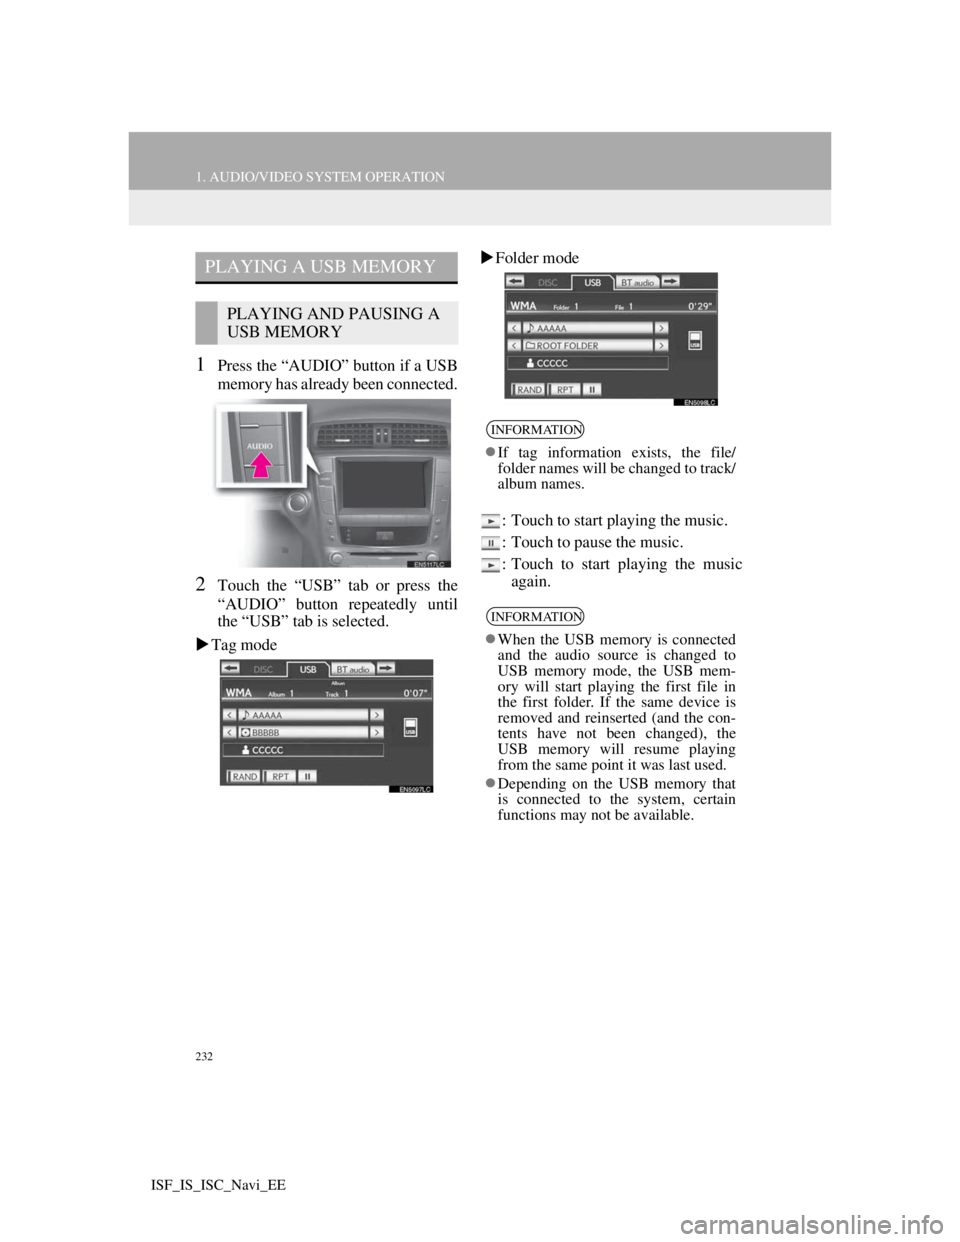
1Press the “AUDIO” button if a USB
memory has already been connected.
2Touch the “USB” tab or press the
“AUDIO” button repeatedly until
the “USB” tab is selected.
Tag modeFolder mode
: Touch to start playing the music.
: Touch to pause the music.
: Touch to start playing the music
again.
PLAYING A USB MEMORY
PLAYING AND PAUSING A
USB MEMORY
INFORMATION
If tag information exists, the file/
folder names will be changed to track/
album names.
INFORMATION
When the USB memory is connected
and the audio source is changed to
USB memory mode, the USB mem-
ory will start playing the first file in
the first folder. If the same device is
removed and reinserted (and the con-
tents have not been changed), the
USB memory will resume playing
from the same point it was last used.
Depending on the USB memory that
is connected to the system, certain
functions may not be available.
Page 240 of 407
233
1. AUDIO/VIDEO SYSTEM OPERATION
5
AUDIO/VIDEO SYSTEM
ISF_IS_ISC_Navi_EE
ON THE USB TOP SCREEN
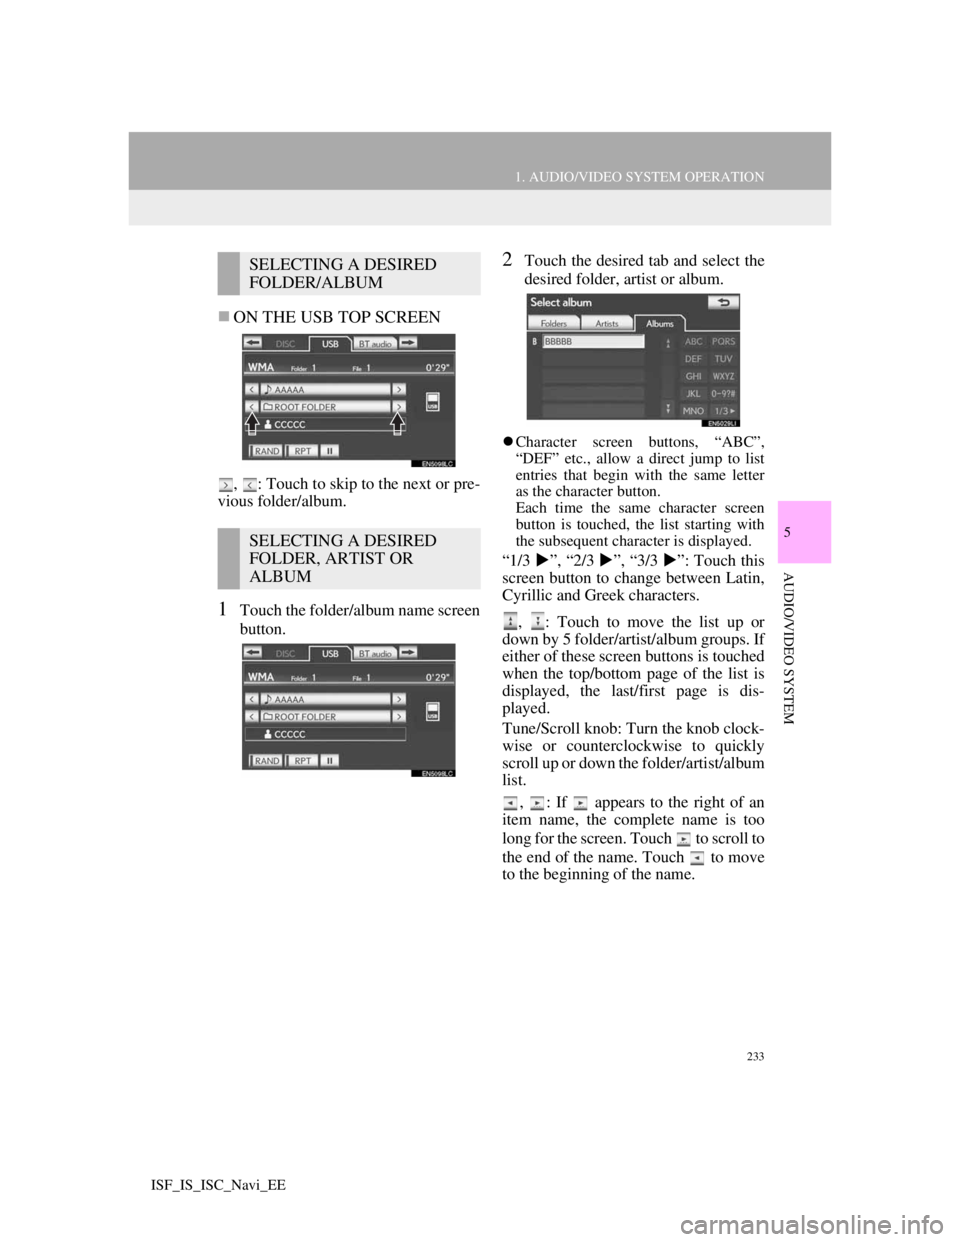
, : Touch to skip to the next or pre-
vious folder/album.
1Touch the folder/album name screen
button.
2Touch the desired tab and select the
desired folder, artist or album.
Character screen buttons, “ABC”,
“DEF” etc., allow a direct jump to list
entries that begin with the same letter
as the character button.
Each time the same character screen
button is touched, the list starting with
the subsequent character is displayed.
“1/3 ”, “2/3 ”, “3/3 ”: Touch this
screen button to change between Latin,
Cyrillic and Greek characters.
, : Touch to move the list up or
down by 5 folder/artist/album groups. If
either of these screen buttons is touched
when the top/bottom page of the list is
displayed, the last/first page is dis-
played.
Tune/Scroll knob: Turn the knob clock-
wise or counterclockwise to quickly
scroll up or down the folder/artist/album
list.
, : If appears to the right of an
item name, the complete name is too
long for the screen. Touch to scroll to
the end of the name. Touch to move
to the beginning of the name.
SELECTING A DESIRED
FOLDER/ALBUM
SELECTING A DESIRED
FOLDER, ARTIST OR
ALBUM
Page 241 of 407
234
1. AUDIO/VIDEO SYSTEM OPERATION
ISF_IS_ISC_Navi_EE
ON THE USB TOP SCREEN
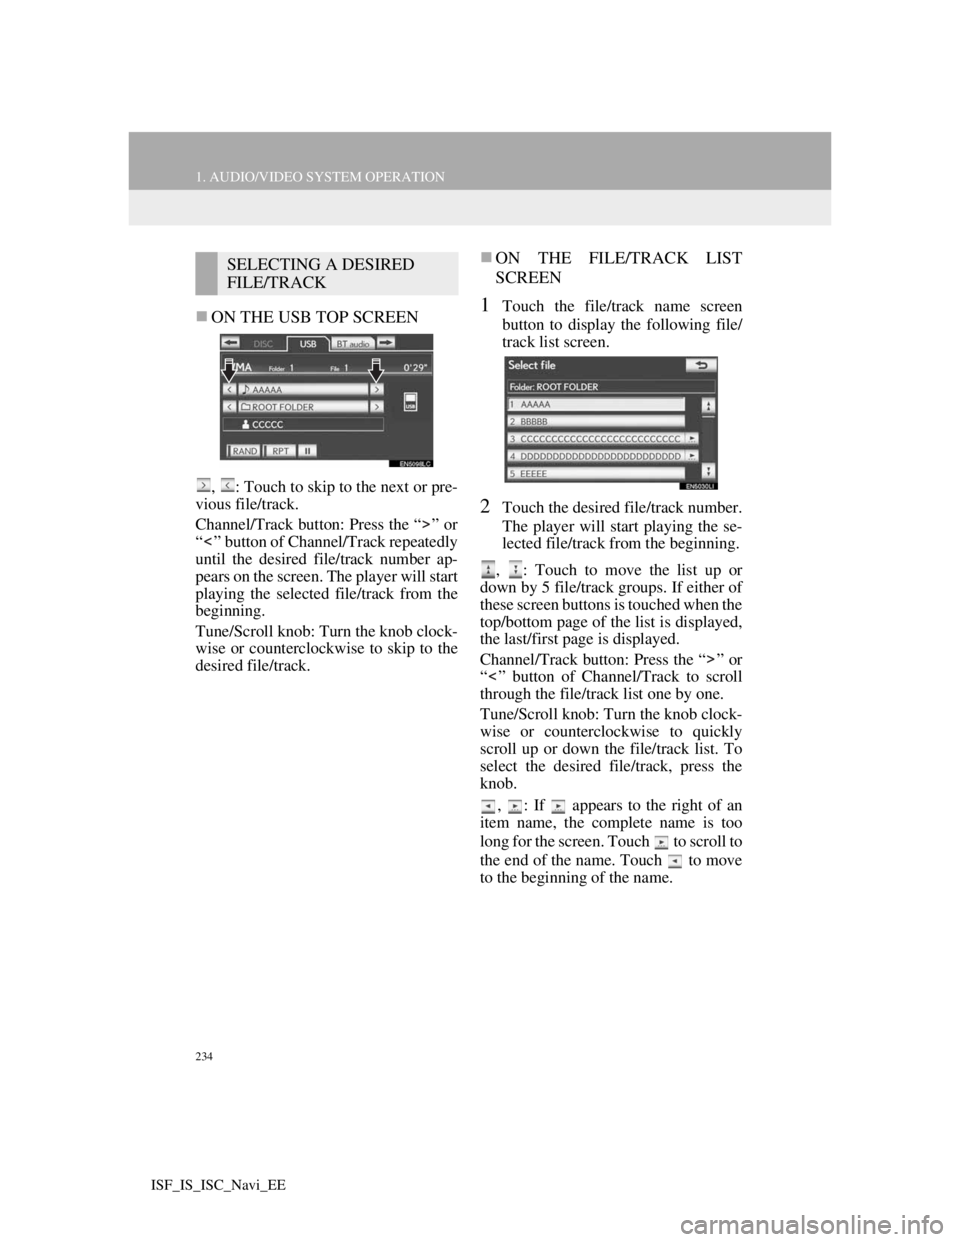
, : Touch to skip to the next or pre-
vious file/track.
Channel/Track button: Press the “ ” or
“ ” button of Channel/Track repeatedly
until the desired file/track number ap-
pears on the screen. The player will start
playing the selected file/track from the
beginning.
Tune/Scroll knob: Turn the knob clock-
wise or counterclockwise to skip to the
desired file/track.
ON THE FILE/TRACK LIST
SCREEN
1Touch the file/track name screen
button to display the following file/
track list screen.
2Touch the desired file/track number.
The player will start playing the se-
lected file/track from the beginning.
, : Touch to move the list up or
down by 5 file/track groups. If either of
these screen buttons is touched when the
top/bottom page of the list is displayed,
the last/first page is displayed.
Channel/Track button: Press the “ ” or
“ ” button of Channel/Track to scroll
through the file/track list one by one.
Tune/Scroll knob: Turn the knob clock-
wise or counterclockwise to quickly
scroll up or down the file/track list. To
select the desired file/track, press the
knob.
, : If appears to the right of an
item name, the complete name is too
long for the screen. Touch to scroll to
the end of the name. Touch to move
to the beginning of the name.
SELECTING A DESIRED
FILE/TRACK
Page 260 of 407
253
1. AUDIO/VIDEO SYSTEM OPERATION
5
AUDIO/VIDEO SYSTEM
ISF_IS_ISC_Navi_EE
Bluetooth® audio player
Use the “ ” or “ ” switch to skip up or
down to a different track or album in
either direction.
To select a desired track: Quickly press
and release the “ ” or “ ” switch until
the desired track is selected. To return to
the beginning of the current track, press
the “ ” switch once quickly.
To select a desired album: Press and
hold the “ ” or “ ” switch until a beep
is heard to change to the next or the pre-
vious album. Repeat it until the desired
album is selected.
USB memory/iPod
Use the “ ” or “ ” switch to skip up or
down to a different file or track in
either direction.
To select a desired file or track: Press the
“ ” or “ ” switch until the desired file
or track is selected. To return to the be-
ginning of the current file or track, press
the “ ” switch once quickly.
To select a desired folder or album
(USB memory only): Press and hold the
“ ” or “ ” switch until a beep is heard
to change to the next or the previous
folder or album. Repeat it until the de-
sired folder or album is selected.
“MODE” switch
Press the “MODE” switch to select an
audio mode. Each press changes the
mode sequentially if the desired mode
is ready to use.
To turn the audio/video system on,
press the “MODE” switch.
Press and hold the “MODE” switch to
mute/unmute or pause/resume the cur-
rent operation.
Page 263 of 407
256
1. AUDIO/VIDEO SYSTEM OPERATION
ISF_IS_ISC_Navi_EE
The following iPod®, iPod nano®, iPod
classic®, iPod touch® and iPhone® de-
vices can be used with this system.
Made for
• iPod touch (4th generation)
• iPod touch (3rd generation)
• iPod touch (2nd generation)
• iPod touch (1st generation)
• iPod classic
• iPod with video
• iPod nano (6th generation)
• iPod nano (5th generation)
• iPod nano (4th generation)
• iPod nano (3rd generation)
• iPod nano (2nd generation)
• iPod nano (1st generation)
• iPhone 4
• iPhone 3GS
• iPhone 3G
• iPhone
Depending on differences between
models or software versions etc., some
models might be incompatible with this
system.
USB memory that can be used for MP3
and WMA playback:
• USB communication formats: USB
2.0 HS (480 Mbps) and FS (12 Mbps)
• File formats: FAT 16/32
• Correspondence class: Mass storage
class
This DVD player is intended for use
with 4.7 in. (12 cm) discs only.
Extremely high temperatures can keep
the DVD player from working. On hot
days, use the air conditioning system to
cool the inside of the vehicle before
using the player.
Bumpy roads or other vibrations may
make the DVD player skip.
If moisture gets into the DVD player,
the discs may not be able to be played.
Remove the discs from the player and
wait until it dries.
COMPATIBLE MODELSUSB MEMORY
CARING FOR YOUR DVD
PLAYER AND DISC
CAUTION
DVD players use an invisible laser
beam which could cause hazardous
radiation exposure if directed outside
the unit. Be sure to operate the player
correctly.