navigation system Lexus IS220d 2012 Navigation manual
[x] Cancel search | Manufacturer: LEXUS, Model Year: 2012, Model line: IS220d, Model: Lexus IS220d 2012Pages: 407, PDF Size: 23.8 MB
Page 320 of 407
313
1. CONNECTED SERVICES
9
CONNECTED SERVICES
ISF_IS_ISC_Navi_EE
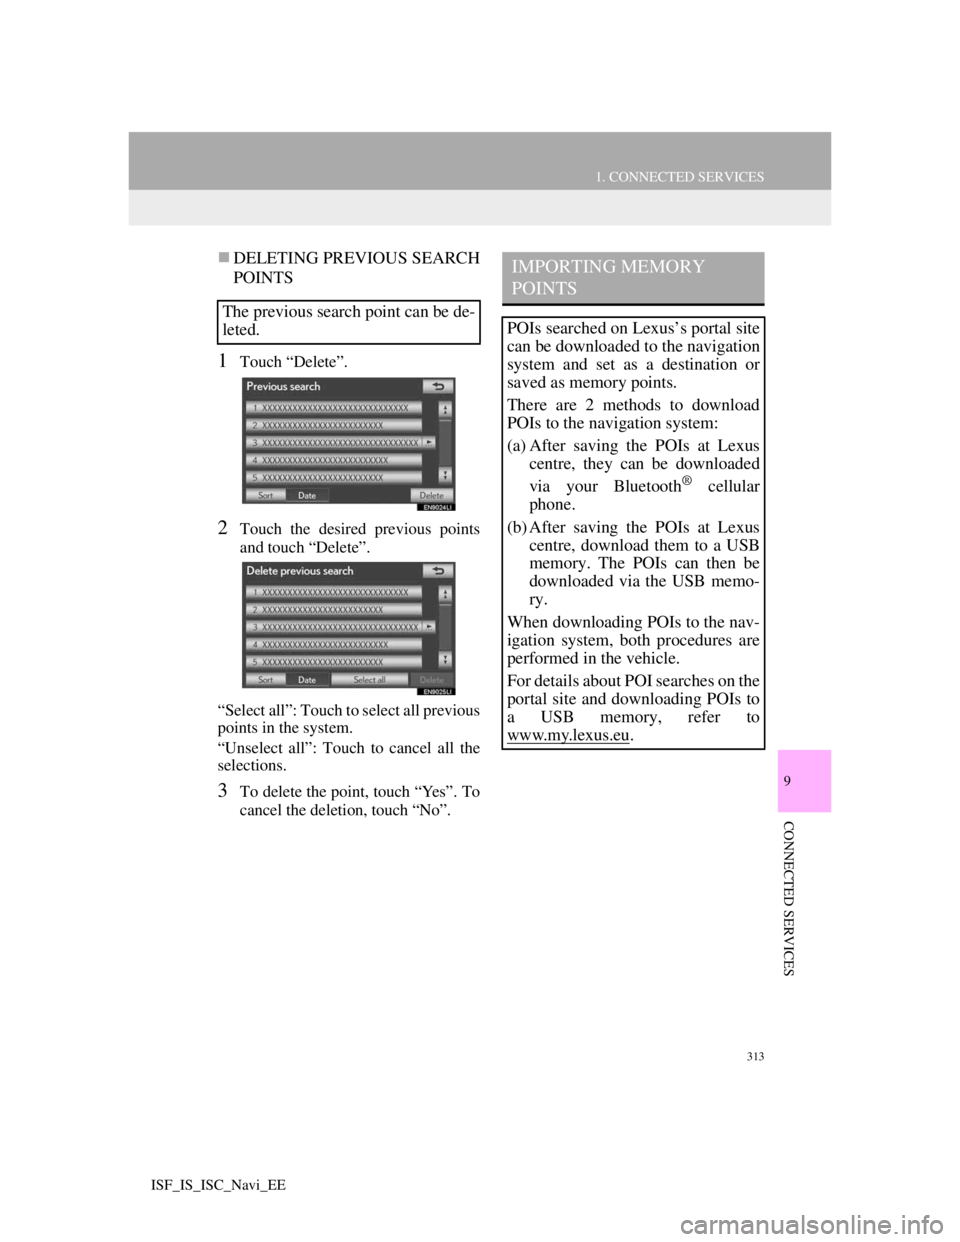
DELETING PREVIOUS SEARCH
POINTS
1Touch “Delete”.
2Touch the desired previous points
and touch “Delete”.
“Select all”: Touch to select all previous
points in the system.
“Unselect all”: Touch to cancel all the
selections.
3To delete the point, touch “Yes”. To
cancel the deletion, touch “No”.
The previous search point can be de-
leted.
IMPORTING MEMORY
POINTS
POIs searched on Lexus’s portal site
can be downloaded to the navigation
system and set as a destination or
saved as memory points.
There are 2 methods to download
POIs to the navigation system:
(a) After saving the POIs at Lexus
centre, they can be downloaded
via your Bluetooth
® cellular
phone.
(b) After saving the POIs at Lexus
centre, download them to a USB
memory. The POIs can then be
downloaded via the USB memo-
ry.
When downloading POIs to the nav-
igation system, both procedures are
performed in the vehicle.
For details about POI searches on the
portal site and downloading POIs to
a USB memory, refer to
www.my.lex
us.eu.
Page 321 of 407
314
1. CONNECTED SERVICES
ISF_IS_ISC_Navi_EE
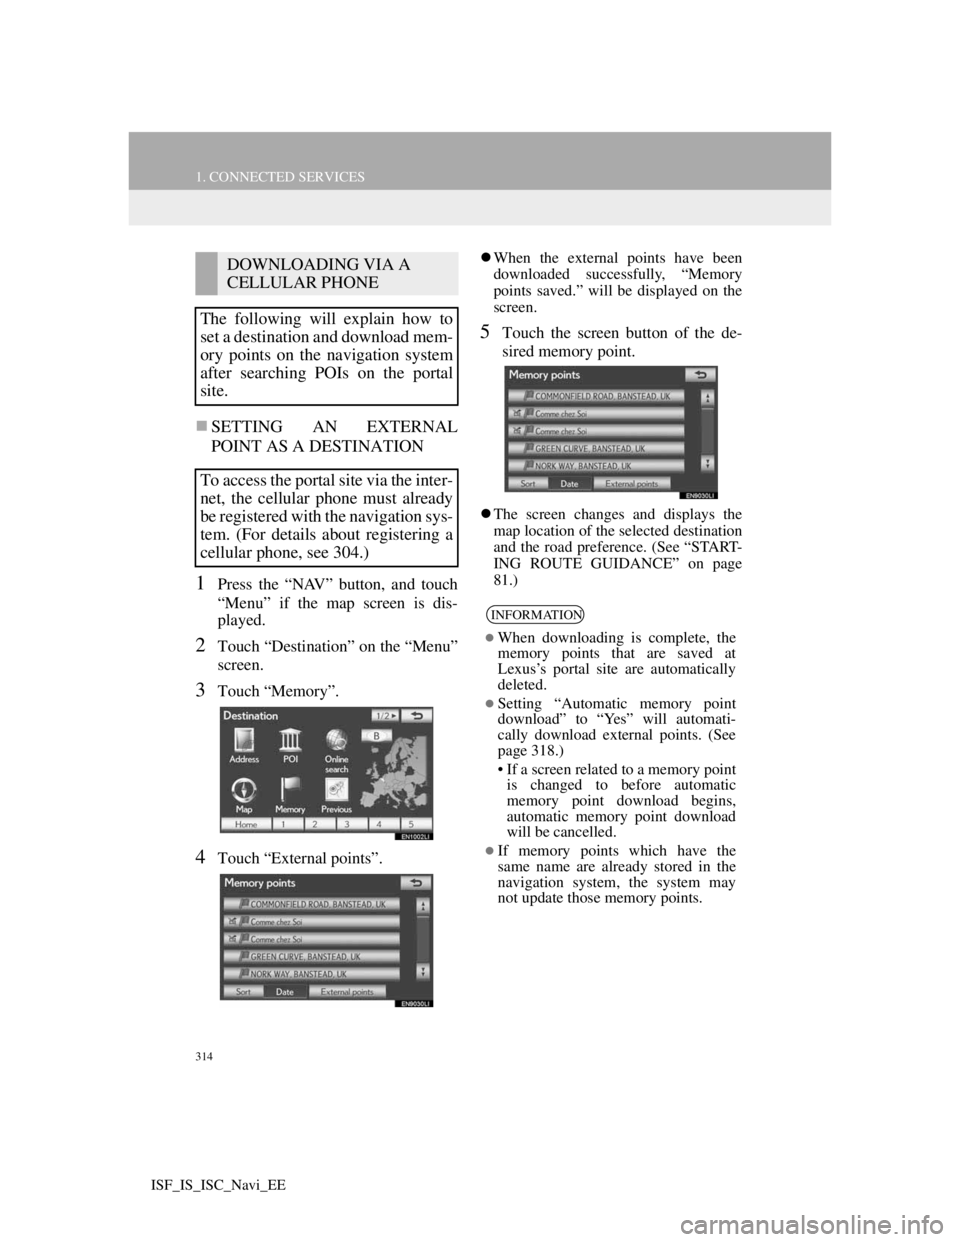
SETTING AN EXTERNAL
POINT AS A DESTINATION
1Press the “NAV” button, and touch
“Menu” if the map screen is dis-
played.
2Touch “Destination” on the “Menu”
screen.
3Touch “Memory”.
4Touch “External points”.
When the external points have been
downloaded successfully, “Memory
points saved.” will be displayed on the
screen.
5Touch the screen button of the de-
sired memory point.
The screen changes and displays the
map location of the selected destination
and the road preference. (See “START-
ING ROUTE GUIDANCE” on page
81.)
DOWNLOADING VIA A
CELLULAR PHONE
The following will explain how to
set a destination and download mem-
ory points on the navigation system
after searching POIs on the portal
site.
To access the portal site via the inter-
net, the cellular phone must already
be registered with the navigation sys-
tem. (For details about registering a
cellular phone, see 304.)
INFORMATION
When downloading is complete, the
memory points that are saved at
Lexus’s portal site are automatically
deleted.
Setting “Automatic memory point
download” to “Yes” will automati-
cally download external points. (See
page 318.)
• If a screen related to a memory point
is changed to before automatic
memory point download begins,
automatic memory point download
will be cancelled.
If memory points which have the
same name are already stored in the
navigation system, the system may
not update those memory points.
Page 322 of 407
315
1. CONNECTED SERVICES
9
CONNECTED SERVICES
ISF_IS_ISC_Navi_EE
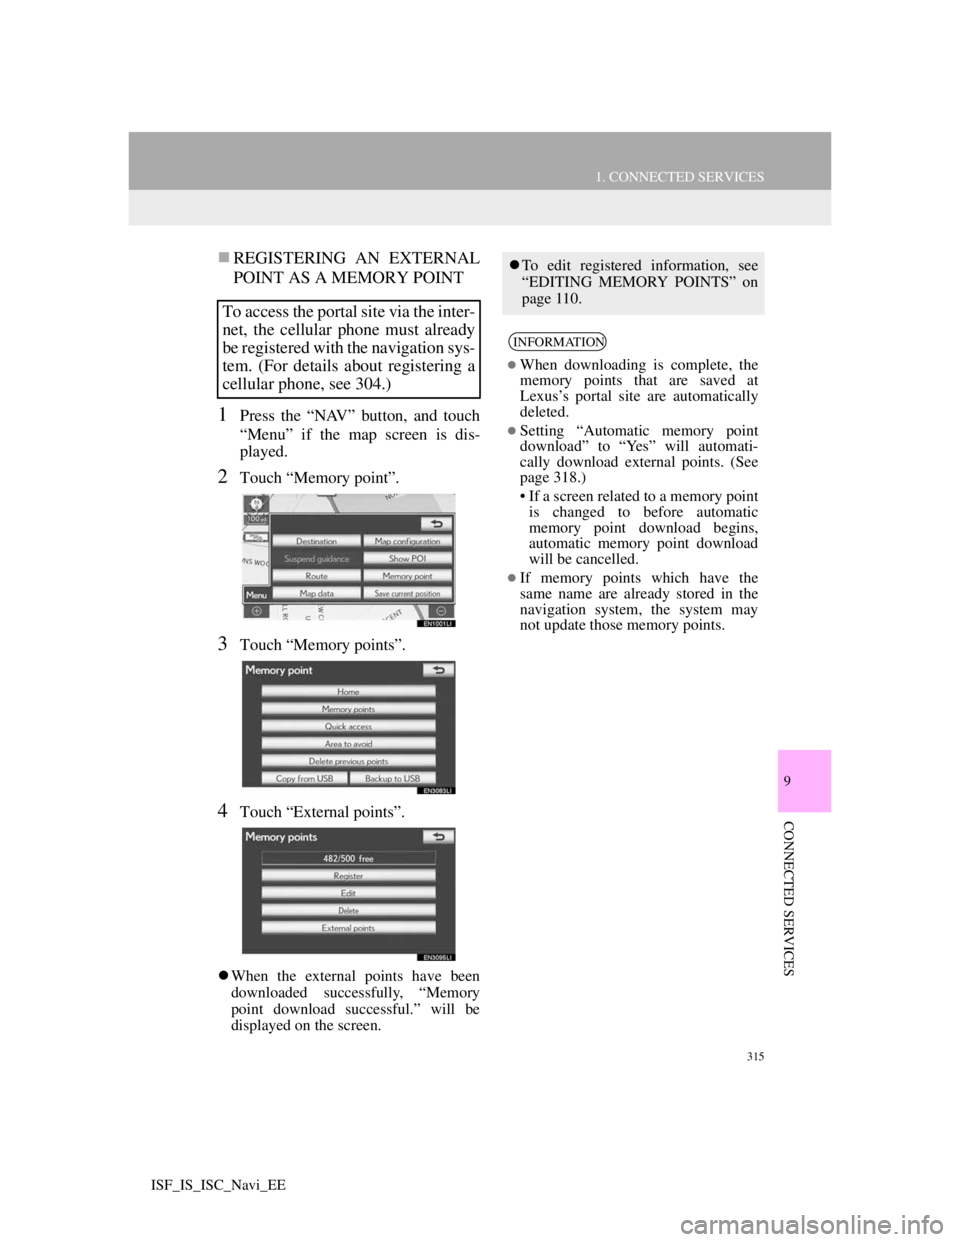
REGISTERING AN EXTERNAL
POINT AS A MEMORY POINT
1Press the “NAV” button, and touch
“Menu” if the map screen is dis-
played.
2Touch “Memory point”.
3Touch “Memory points”.
4Touch “External points”.
When the external points have been
downloaded successfully, “Memory
point download successful.” will be
displayed on the screen.
To access the portal site via the inter-
net, the cellular phone must already
be registered with the navigation sys-
tem. (For details about registering a
cellular phone, see 304.)
To edit registered information, see
“EDITING MEMORY POINTS” on
page 110.
INFORMATION
When downloading is complete, the
memory points that are saved at
Lexus’s portal site are automatically
deleted.
Setting “Automatic memory point
download” to “Yes” will automati-
cally download external points. (See
page 318.)
• If a screen related to a memory point
is changed to before automatic
memory point download begins,
automatic memory point download
will be cancelled.
If memory points which have the
same name are already stored in the
navigation system, the system may
not update those memory points.
Page 324 of 407
317
1. CONNECTED SERVICES
9
CONNECTED SERVICES
ISF_IS_ISC_Navi_EE
INFORMATION
Memory points that are located out-
side of the map’s data range cannot be
registered.
A maximum of 500 memory points
can be registered.
When there are 21 or more memory
points stored on a USB memory, only
20 memory points will be displayed at
a time.
Memory points acquired from the
portal site can only be registered with
the registered navigation system at
the time of acquirement.
In some cases, memory points may
not be able to be imported. If this
occurs, “Device ID error” will be dis-
played.
If memory points which have the
same name are already stored in the
navigation system, the system may
not update those memory points.
Page 325 of 407
318
ISF_IS_ISC_Navi_EE
2. SETUP
1. ONLINE SEARCH SETTINGS
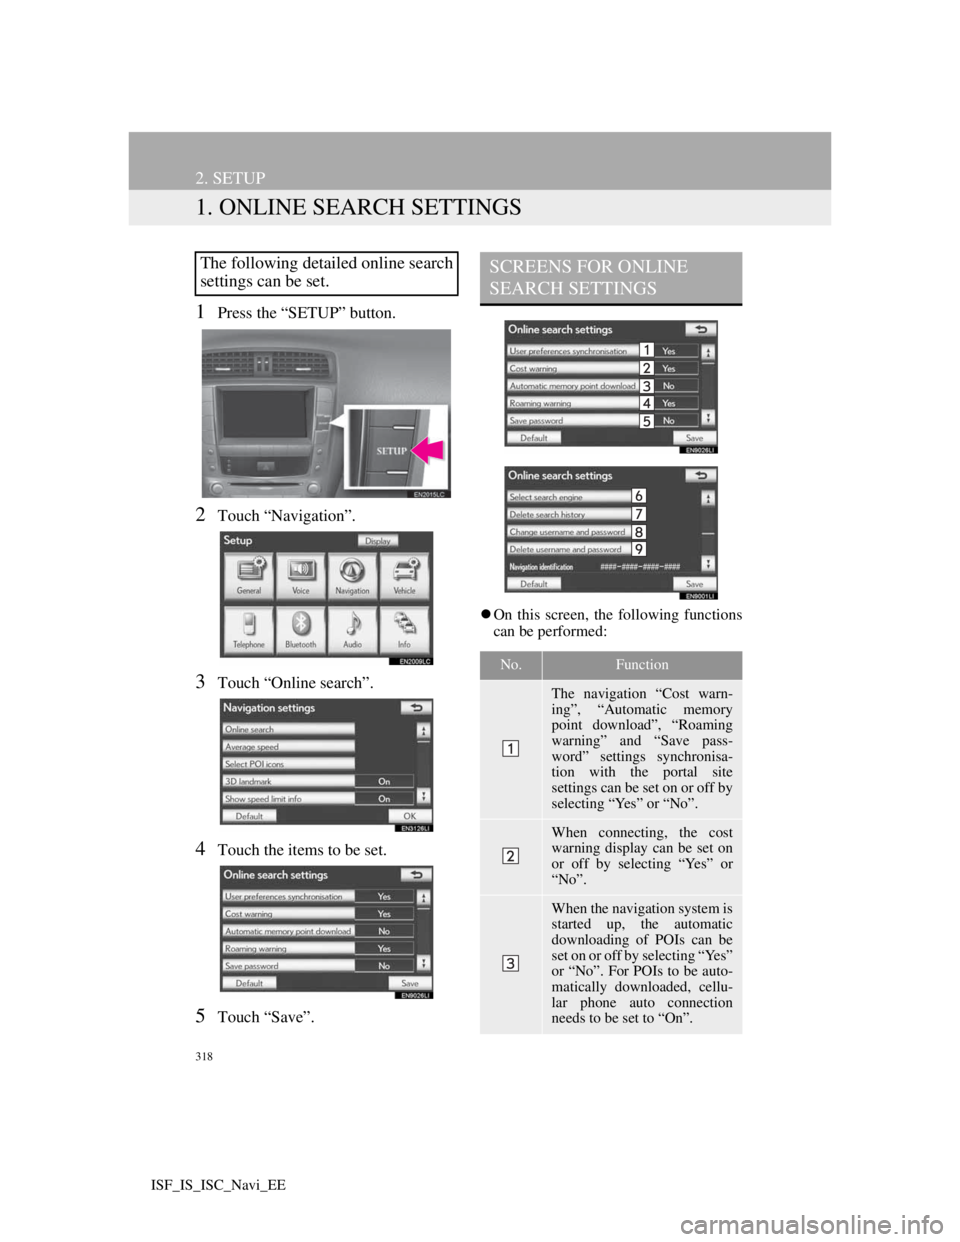
1Press the “SETUP” button.
2Touch “Navigation”.
3Touch “Online search”.
4Touch the items to be set.
5Touch “Save”.
On this screen, the following functions
can be performed:
The following detailed online search
settings can be set.SCREENS FOR ONLINE
SEARCH SETTINGS
No.Function
The navigation “Cost warn-
ing”, “Automatic memory
point download”, “Roaming
warning” and “Save pass-
word” settings synchronisa-
tion with the portal site
settings can be set on or off by
selecting “Yes” or “No”.
When connecting, the cost
warning display can be set on
or off by selecting “Yes” or
“No”.
When the navigation system is
started up, the automatic
downloading of POIs can be
set on or off by selecting “Yes”
or “No”. For POIs to be auto-
matically downloaded, cellu-
lar phone auto connection
needs to be set to “On”.
Page 326 of 407
319
2. SETUP
9
CONNECTED SERVICES
ISF_IS_ISC_Navi_EE
To reset all setup items, touch
“Default”.
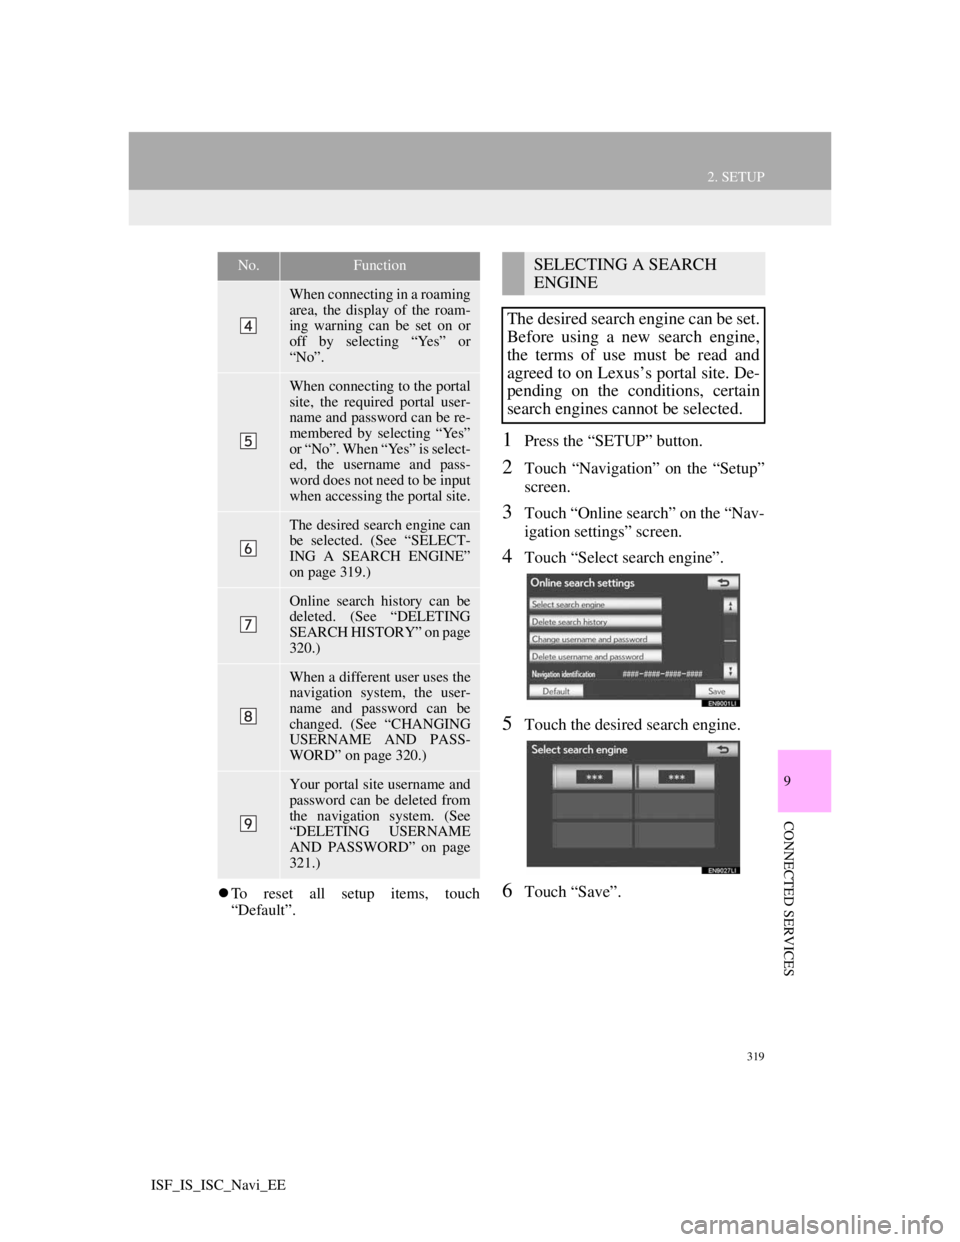
1Press the “SETUP” button.
2Touch “Navigation” on the “Setup”
screen.
3Touch “Online search” on the “Nav-
igation settings” screen.
4Touch “Select search engine”.
5Touch the desired search engine.
6Touch “Save”.
When connecting in a roaming
area, the display of the roam-
ing warning can be set on or
off by selecting “Yes” or
“No”.
When connecting to the portal
site, the required portal user-
name and password can be re-
membered by selecting “Yes”
or “No”. When “Yes” is select-
ed, the username and pass-
word does not need to be input
when accessing the portal site.
The desired search engine can
be selected. (See “SELECT-
ING A SEARCH ENGINE”
on page 319.)
Online search history can be
deleted. (See “DELETING
SEARCH HISTORY” on page
320.)
When a different user uses the
navigation system, the user-
name and password can be
changed. (See “CHANGING
USERNAME AND PASS-
WORD” on page 320.)
Your portal site username and
password can be deleted from
the navigation system. (See
“DELETING USERNAME
AND PASSWORD” on page
321.)
No.FunctionSELECTING A SEARCH
ENGINE
The desired search engine can be set.
Before using a new search engine,
the terms of use must be read and
agreed to on Lexus’s portal site. De-
pending on the conditions, certain
search engines cannot be selected.
Page 327 of 407
320
2. SETUP
ISF_IS_ISC_Navi_EE
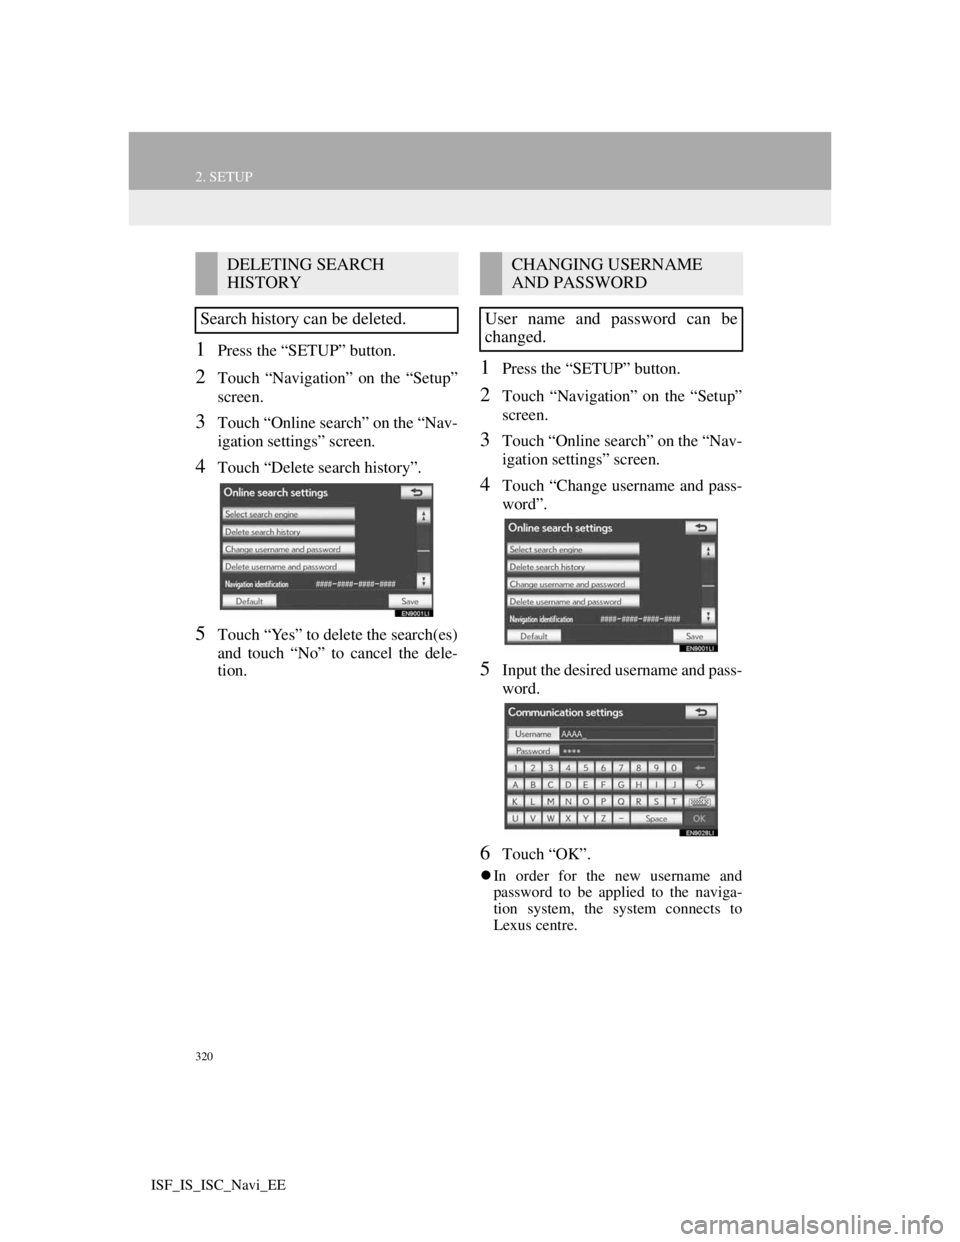
1Press the “SETUP” button.
2Touch “Navigation” on the “Setup”
screen.
3Touch “Online search” on the “Nav-
igation settings” screen.
4Touch “Delete search history”.
5Touch “Yes” to delete the search(es)
and touch “No” to cancel the dele-
tion.
1Press the “SETUP” button.
2Touch “Navigation” on the “Setup”
screen.
3Touch “Online search” on the “Nav-
igation settings” screen.
4Touch “Change username and pass-
word”.
5Input the desired username and pass-
word.
6Touch “OK”.
In order for the new username and
password to be applied to the naviga-
tion system, the system connects to
Lexus centre.
DELETING SEARCH
HISTORY
Search history can be deleted.CHANGING USERNAME
AND PASSWORD
User name and password can be
changed.
Page 350 of 407
343
1. LEXUS PARKING ASSIST MONITOR
10
PERIPHERAL MONITORING SYSTEM
ISF_IS_ISC_Navi_EE
5. LEXUS PARKING AS-
SIST MONITOR PRECAU-
TIONS
The image adjustment procedure for
the parking assist monitor screen is the
same as the procedure for adjusting the
navigation screen. (See page 35.)
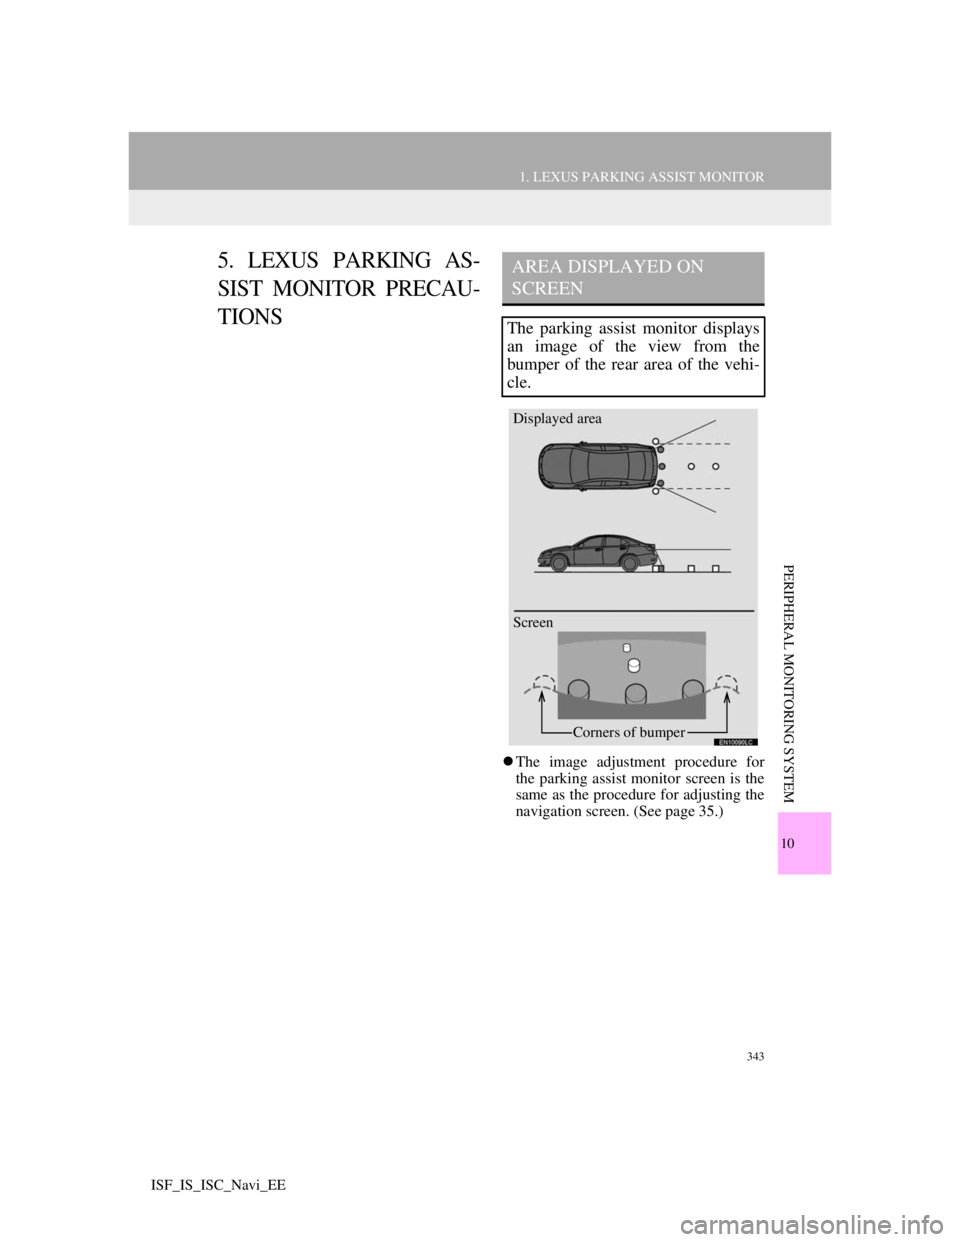
AREA DISPLAYED ON
SCREEN
The parking assist monitor displays
an image of the view from the
bumper of the rear area of the vehi-
cle.
Screen Displayed area
Corners of bumper
Page 361 of 407
350
2. LEXUS PARKING ASSIST-SENSOR
ISF_IS_ISC_Navi_EE
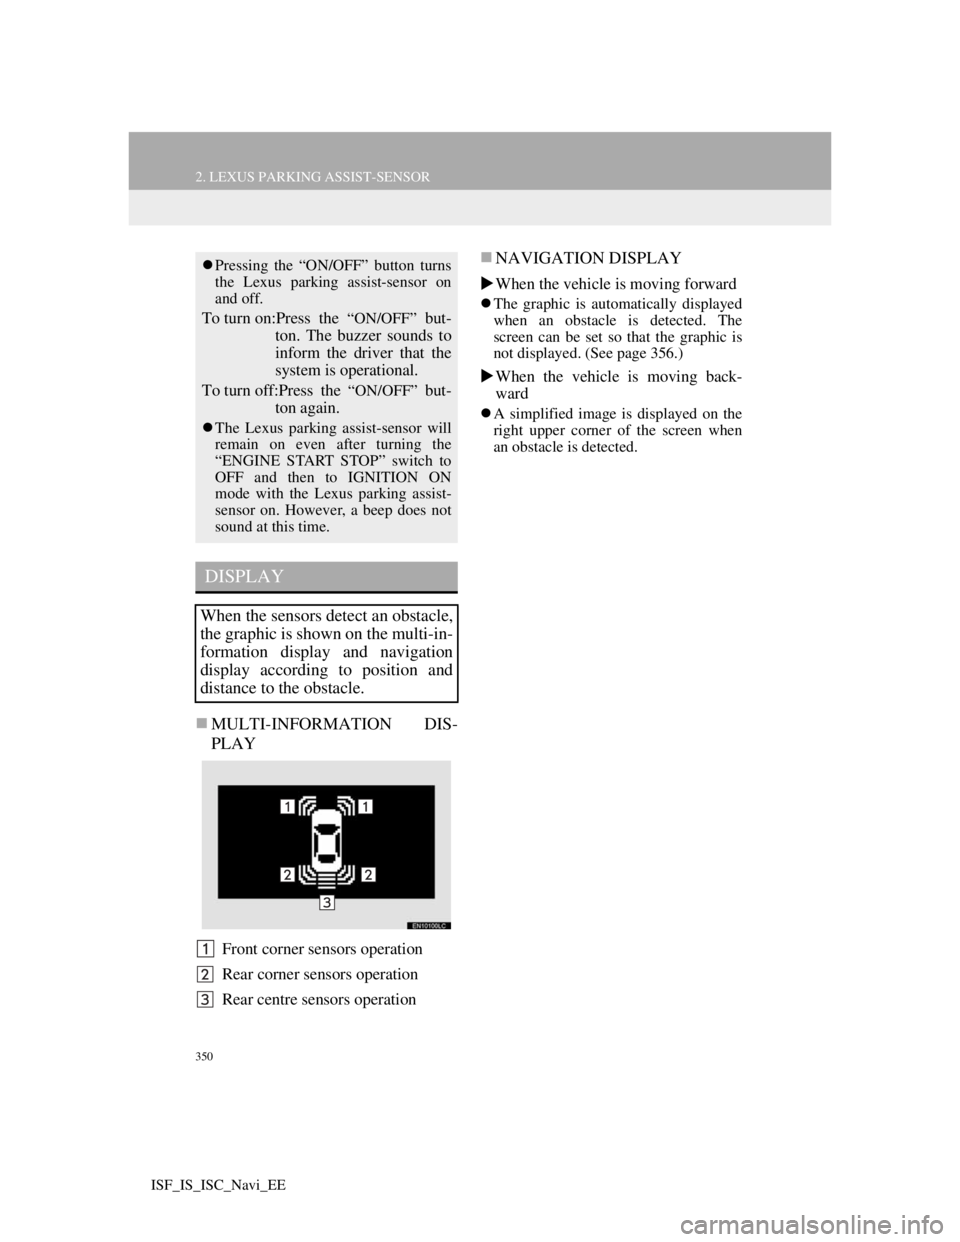
MULTI-INFORMATION DIS-
PLAY
Front corner sensors operation
Rear corner sensors operation
Rear centre sensors operation
NAVIGATION DISPLAY
When the vehicle is moving forward
The graphic is automatically displayed
when an obstacle is detected. The
screen can be set so that the graphic is
not displayed. (See page 356.)
When the vehicle is moving back-
ward
A simplified image is displayed on the
right upper corner of the screen when
an obstacle is detected.
Pressing the “ON/OFF” button turns
the Lexus parking assist-sensor on
and off.
To turn on:Press the “ON/OFF” but-
ton. The buzzer sounds to
inform the driver that the
system is operational.
To turn off:Press the
“ON/OFF” but-
ton again.
The Lexus parking assist-sensor will
remain on even after turning the
“ENGINE START STOP” switch to
OFF and then to IGNITION ON
mode with the Lexus parking assist-
sensor on. However, a beep does not
sound at this time.
DISPLAY
When the sensors detect an obstacle,
the graphic is shown on the multi-in-
formation display and navigation
display according to position and
distance to the obstacle.
Page 374 of 407

363
ISF_IS_ISC_Navi_EE
I
Importing memory points ..................... 313
Initial screen ............................................ 28
Inputting letters and numbers.................. 30
iPod ....................................................... 237
Connecting iPod ................................ 237
Playing iPod music ............................ 238
Playing iPod video............................. 241
K
Keyboard layout ...................................... 30
L
Language ................................................. 49
Lexus parking assist monitor ................ 324
Lexus parking assist-sensor .................. 349
Limitations of the navigation system .... 134
List screen operation ............................... 30
M
Map ......................................................... 37
Map database information and updates 367
Map database version and covered area 137
Map icons ............................................... 47
Map information ................................... 137
Map orientation and 3D map mode ........ 46
Map scale ................................................ 45
Map screen.............................................. 20
Memory point settings .......................... 103
“Menu” screen ........................................ 22
MP3 ...................................... 213, 258, 261
N
NAV button ............................................ 10
Navigation settings ............................... 124
Navigation system .................................. 60
North-up screen ...................................... 46