navigation Lexus IS250 2012 Navigation Manual
[x] Cancel search | Manufacturer: LEXUS, Model Year: 2012, Model line: IS250, Model: Lexus IS250 2012Pages: 393, PDF Size: 38.23 MB
Page 105 of 393
NAVIGATION SYSTEM: ROUTE GUIDANCE
104
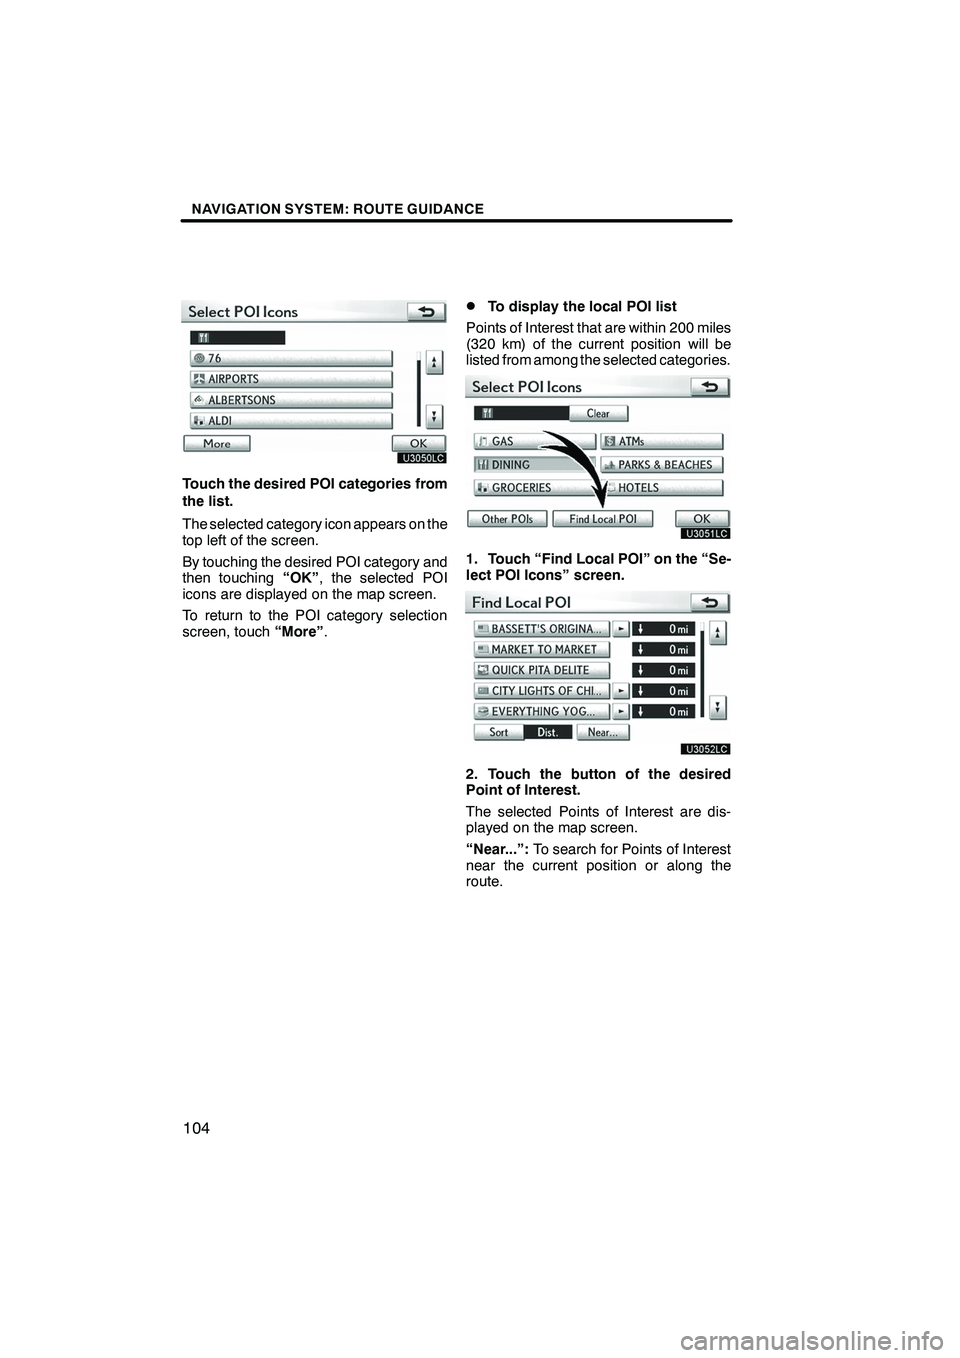
Touch the desired POI categories from
the list.
The selected category icon appears on the
top left of the screen.
By touching the desired POI category and
then touching“OK”, the selected POI
icons are displayed on the map screen.
To return to the POI category selection
screen, touch “More”.
DTo display the local POI list
Points of Interest that are within 200 miles
(320 km) of the current position will be
listed from among the selected categories.
1. Touch “Find Local POI” on the “Se-
lect POI Icons” screen.
2. Touch the button of the desired
Point of Interest.
The selected Points of Interest are dis-
played on the map screen.
“Near...”: To search for Points of Interest
near the current position or along the
route.
ISF/IS NAVI (U)
Finish
Page 106 of 393
NAVIGATION SYSTEM: ROUTE GUIDANCE
105
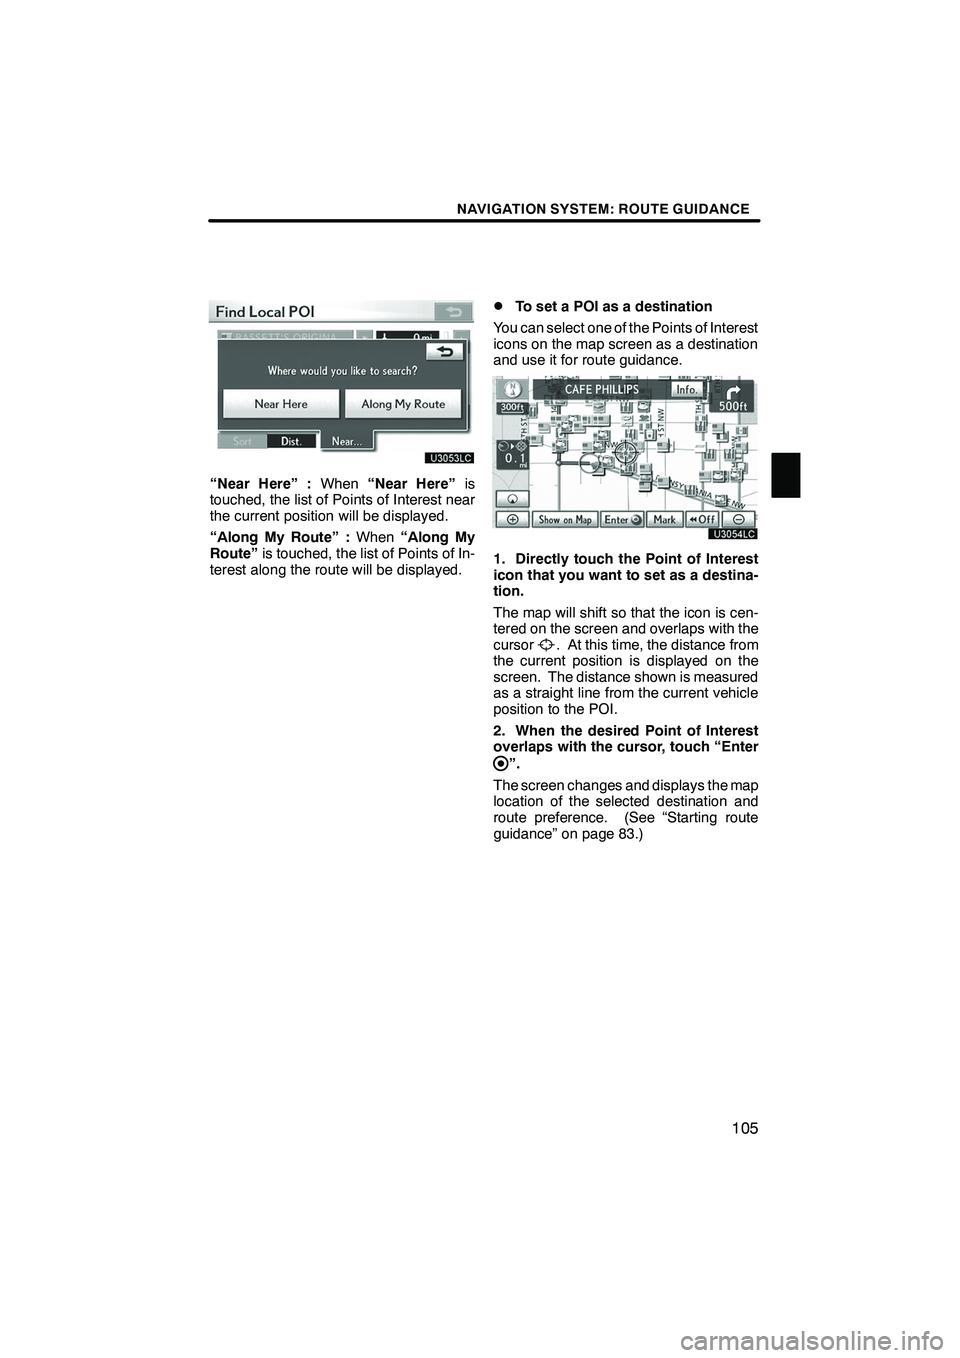
“Near Here” :When“Near Here” is
touched, the list of Points of Interest near
the current position will be displayed.
“Along My Route” : When“Along My
Route” is touched, the list of Points of In-
terest along the route will be displayed.
DTo set a POI as a destination
You can select one of the Points of Interest
icons on the map screen as a destination
and use it for route guidance.
1. Directly touch the Point of Interest
icon that you want to set as a destina-
tion.
The map will shift so that the icon is cen-
tered on the screen and overlaps with the
cursor
. At this time, the distance from
the current position is displayed on the
screen. The distance shown is measured
as a straight line from the current vehicle
position to the POI.
2. When the desired Point of Interest
overlaps with the cursor, touch “Enter
”.
The screen changes and displays the map
location of the selected destination and
route preference. (See “Starting route
guidance” on page 83.)
ISF/IS NAVI (U)
Finish
3
Page 107 of 393
NAVIGATION SYSTEM: ROUTE GUIDANCE
106
D
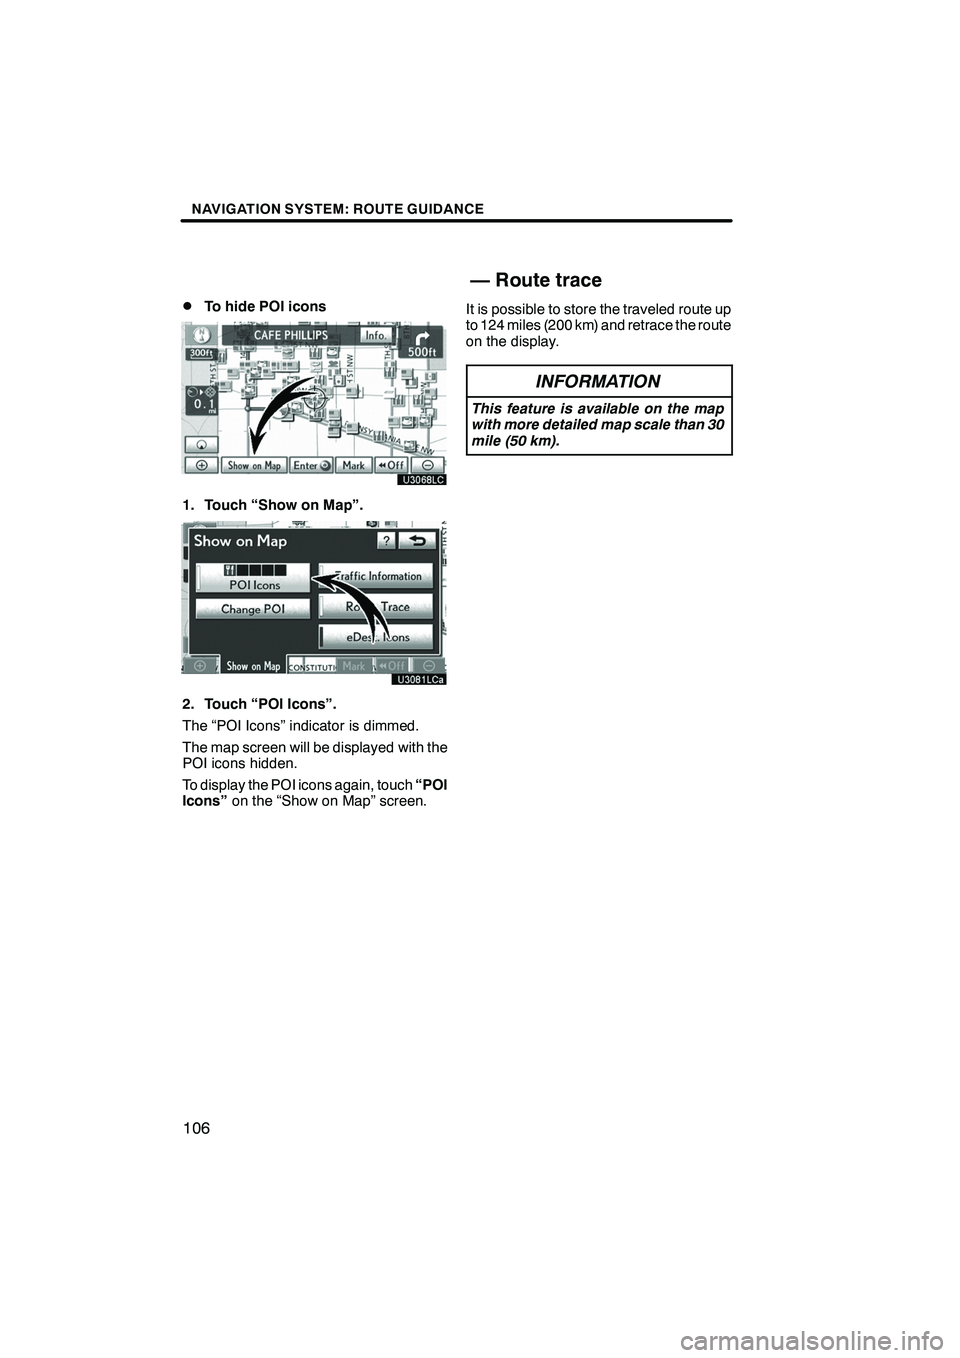
To hide POI icons
1. Touch “Show on Map”.
2. Touch “POI Icons”.
The “POI Icons” indicator is dimmed.
The map screen will be displayed with the
POI icons hidden.
To display the POI icons again, touch
“POI
Icons” on the “Show on Map” screen. It is possible to store the traveled route up
to 124 miles (200 km) and retrace the route
on the display.
INFORMATION
This feature is available on the map
with more detailed map scale than 30
mile (50 km).
ISF/IS NAVI (U)
Finish
— Route trace
Page 108 of 393
NAVIGATION SYSTEM: ROUTE GUIDANCE
107
D
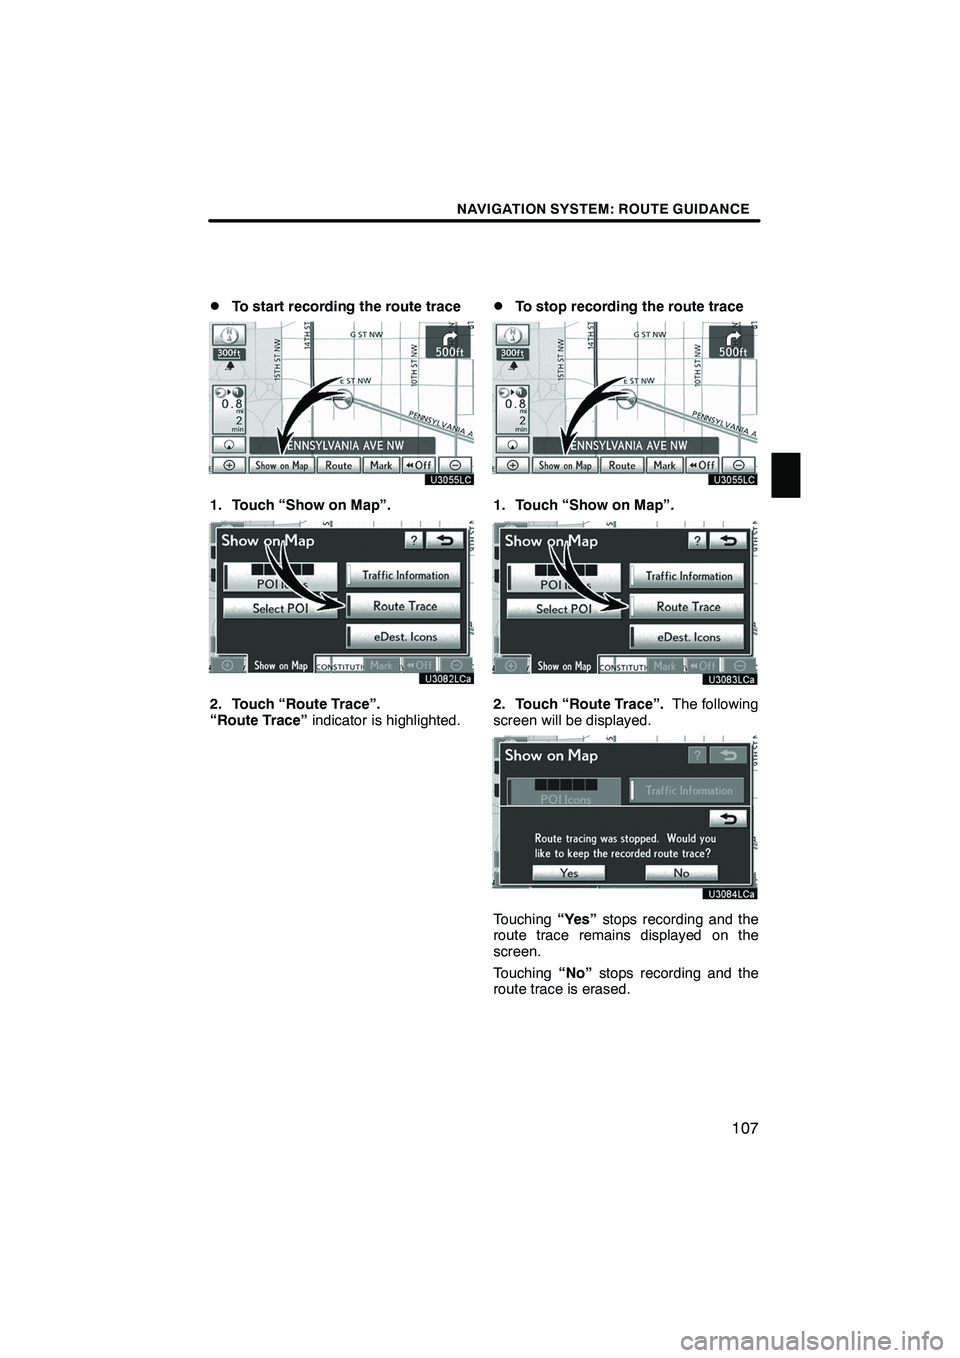
To start recording the route trace
1. Touch “Show on Map”.
2. Touch “Route Trace”.
“Route Trace”
indicator is highlighted.
DTo stop recording the route trace
1. Touch “Show on Map”.
2. Touch “Route Trace”. The following
screen will be displayed.
Touching “Yes”stops recording and the
route trace remains displayed on the
screen.
Touching “No”stops recording and the
route trace is erased.
ISF/IS NAVI (U)
Finish
3
Page 109 of 393

NAVIGATION SYSTEM: ROUTE GUIDANCE
108
ISF/IS NAVI (U)
Finish
Page 110 of 393
SECTION4
NAVIGATION SYSTEM: MEMORY POINTS
109
NAVIGATION SYSTEM: MEMORY POINTS
DNavigation settings 11 0
...................................
Setting up the “Home” 111 ................................
Setting up the “Preset Destinations” 113 ....................
Setting up the “Address Book” 116 .........................
Setting up the “Areas to Avoid” 122 ........................
Deleting previous destinations 127 .........................
ISF/IS NAVI (U)
Finish
4
Page 111 of 393
NAVIGATION SYSTEM: MEMORY POINTS
11 0
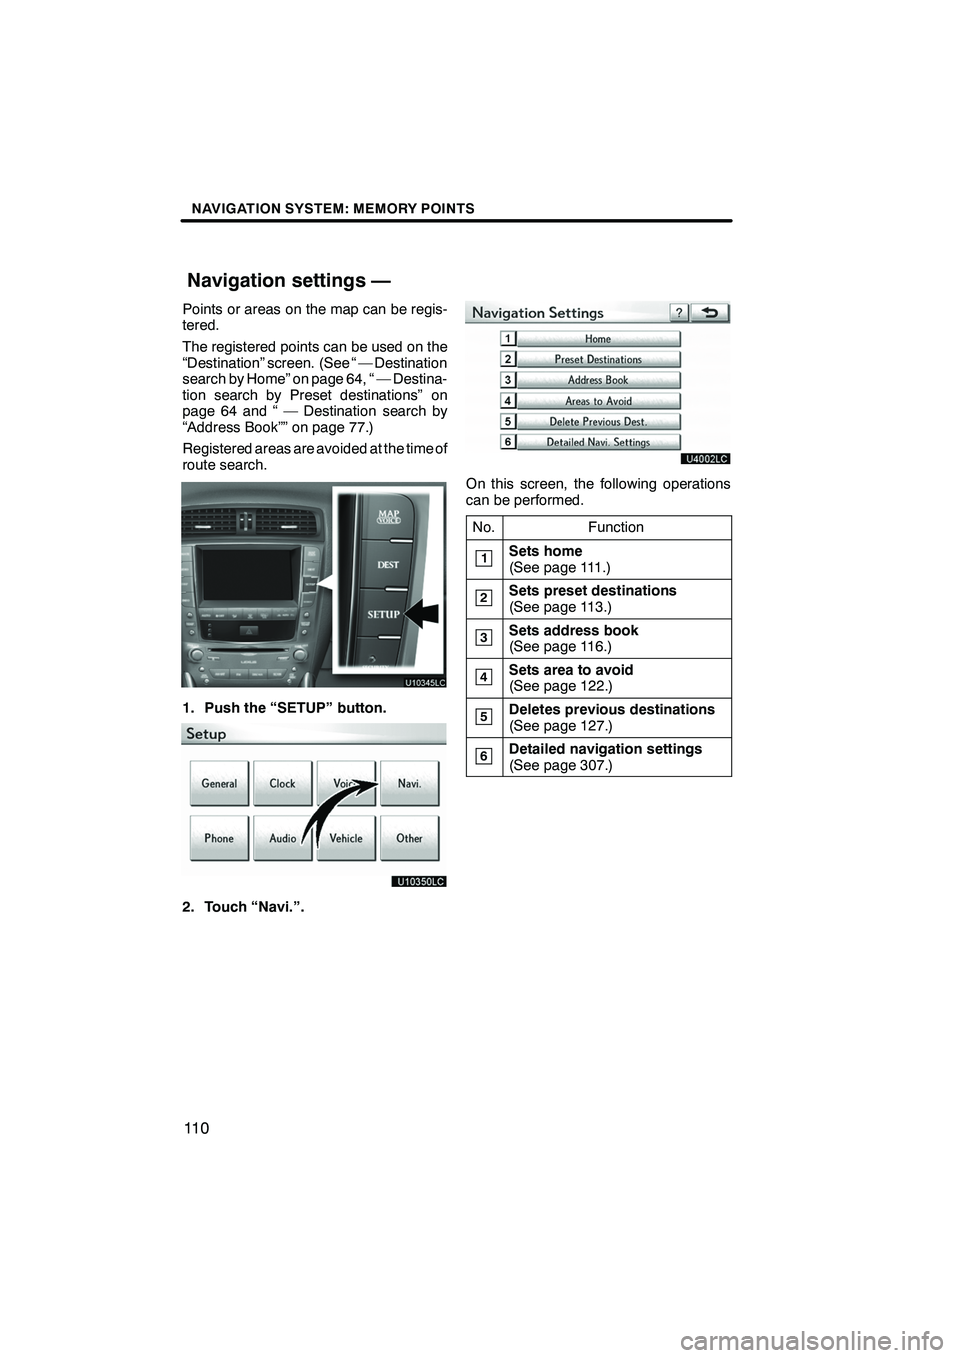
Points or areas on the map can be regis-
tered.
The registered points can be used on the
“Destination” screen. (See “ — Destination
search by Home” on page 64, “ — Destina-
tion search by Preset destinations” on
page 64 and “ — Destination search by
“Address Book”” on page 77.)
Registered areas are avoided at the time of
route search.
1. Push the “SETUP” button.
2. Touch “Navi.”.
On this screen, the following operations
can be performed.No.
Function
1Sets home
(See page 111.)
2Sets preset destinations
(See page 113.)
3Sets address book
(See page 116.)
4Sets area to avoid
(See page 122.)
5Deletes previous destinations
(See page 127.)
6Detailed navigation settings
(See page 307.)
ISF/IS NAVI (U)
Finish
Navigation settings —
Page 112 of 393
NAVIGATION SYSTEM: MEMORY POINTS
111
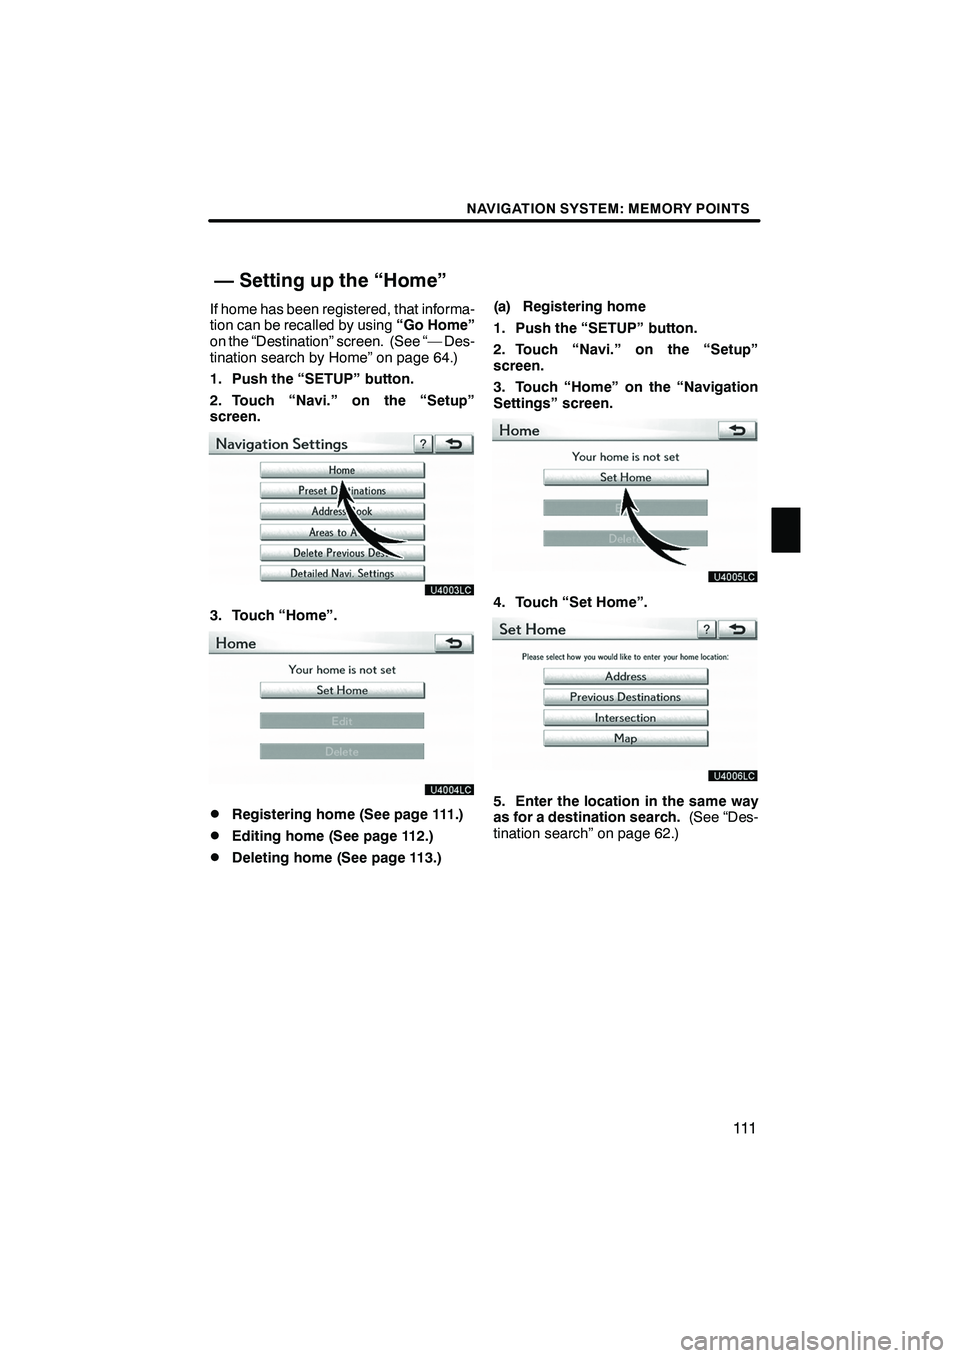
If home has been registered, that informa-
tion can be recalled by using“Go Home”
on the “Destination” screen. (See “— Des-
tination search by Home” on page 64.)
1. Push the “SETUP” button.
2. Touch “Navi.” on the “Setup”
screen.
3. Touch “Home”.
DRegistering home (See page 111.)
DEditing home (See page 112.)
DDeleting home (See page 113.) (a) Registering home
1. Push the “SETUP” button.
2. Touch “Navi.” on the “Setup”
screen.
3. Touch “Home” on the “Navigation
Settings” screen.
4. Touch “Set Home”.
5. Enter the location in the same way
as for a destination search.
(See “Des-
tination search” on page 62.)
ISF/IS NAVI (U)
Finish
— Setting up the “Home”
4
Page 113 of 393
NAVIGATION SYSTEM: MEMORY POINTS
11 2
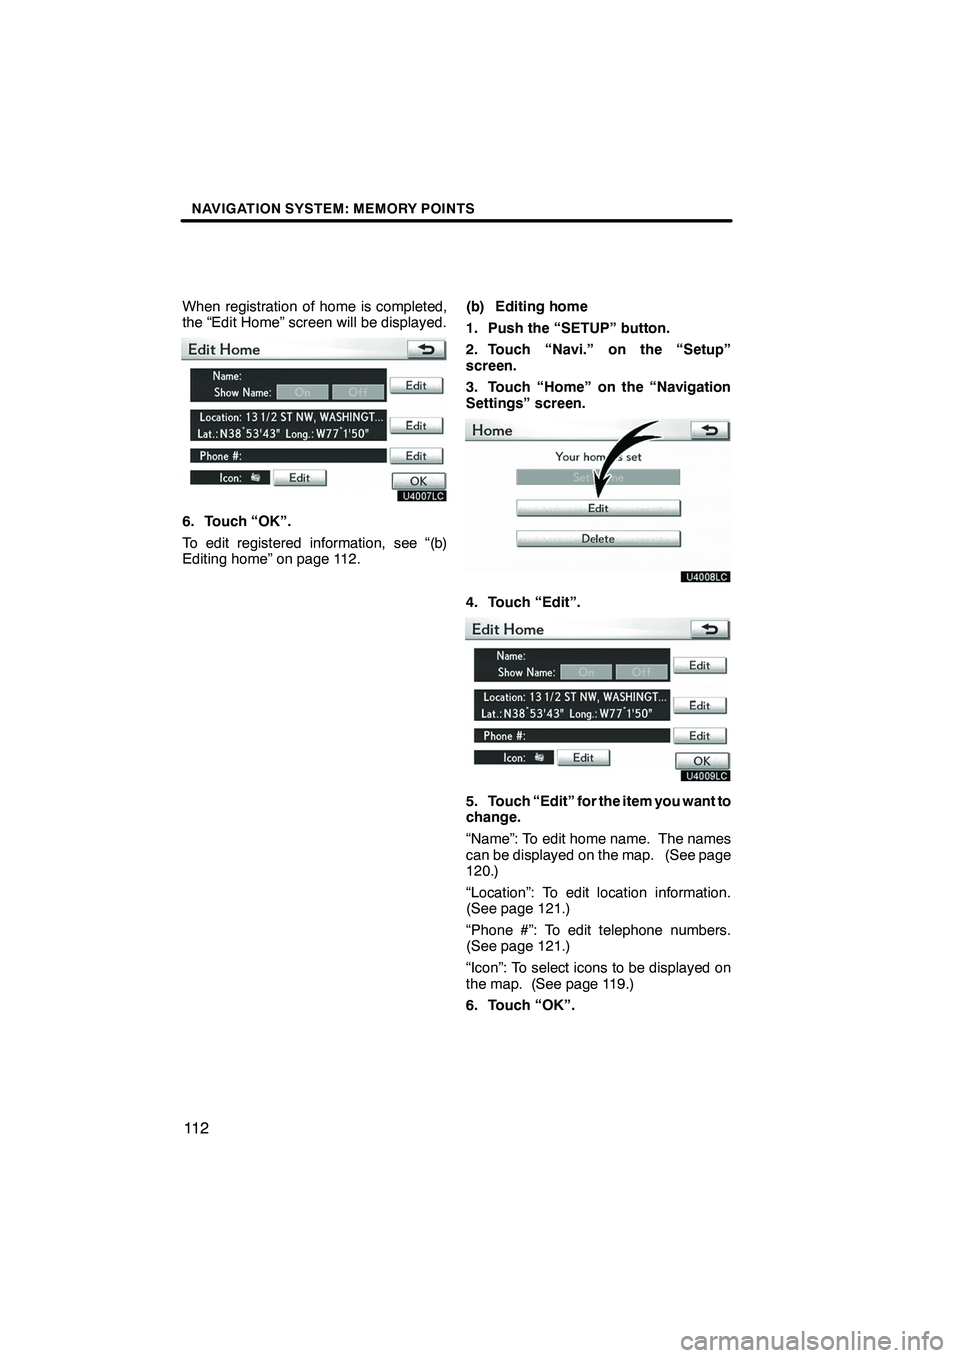
When registration of home is completed,
the “Edit Home” screen will be displayed.
6. Touch “OK”.
To edit registered information, see “(b)
Editing home” on page 112.(b) Editing home
1. Push the “SETUP” button.
2. Touch “Navi.” on the “Setup”
screen.
3. Touch “Home” on the “Navigation
Settings” screen.
4. Touch “Edit”.
5. Touch “Edit” for the item you want to
change.
“Name”: To edit home name. The names
can be displayed on the map. (See page
120.)
“Location”: To edit location information.
(See page 121.)
“Phone #”: To edit telephone numbers.
(See page 121.)
“Icon”: To select icons to be displayed on
the map. (See page 119.)
6. Touch “OK”.
ISF/IS NAVI (U)
Finish
Page 114 of 393
NAVIGATION SYSTEM: MEMORY POINTS
11 3
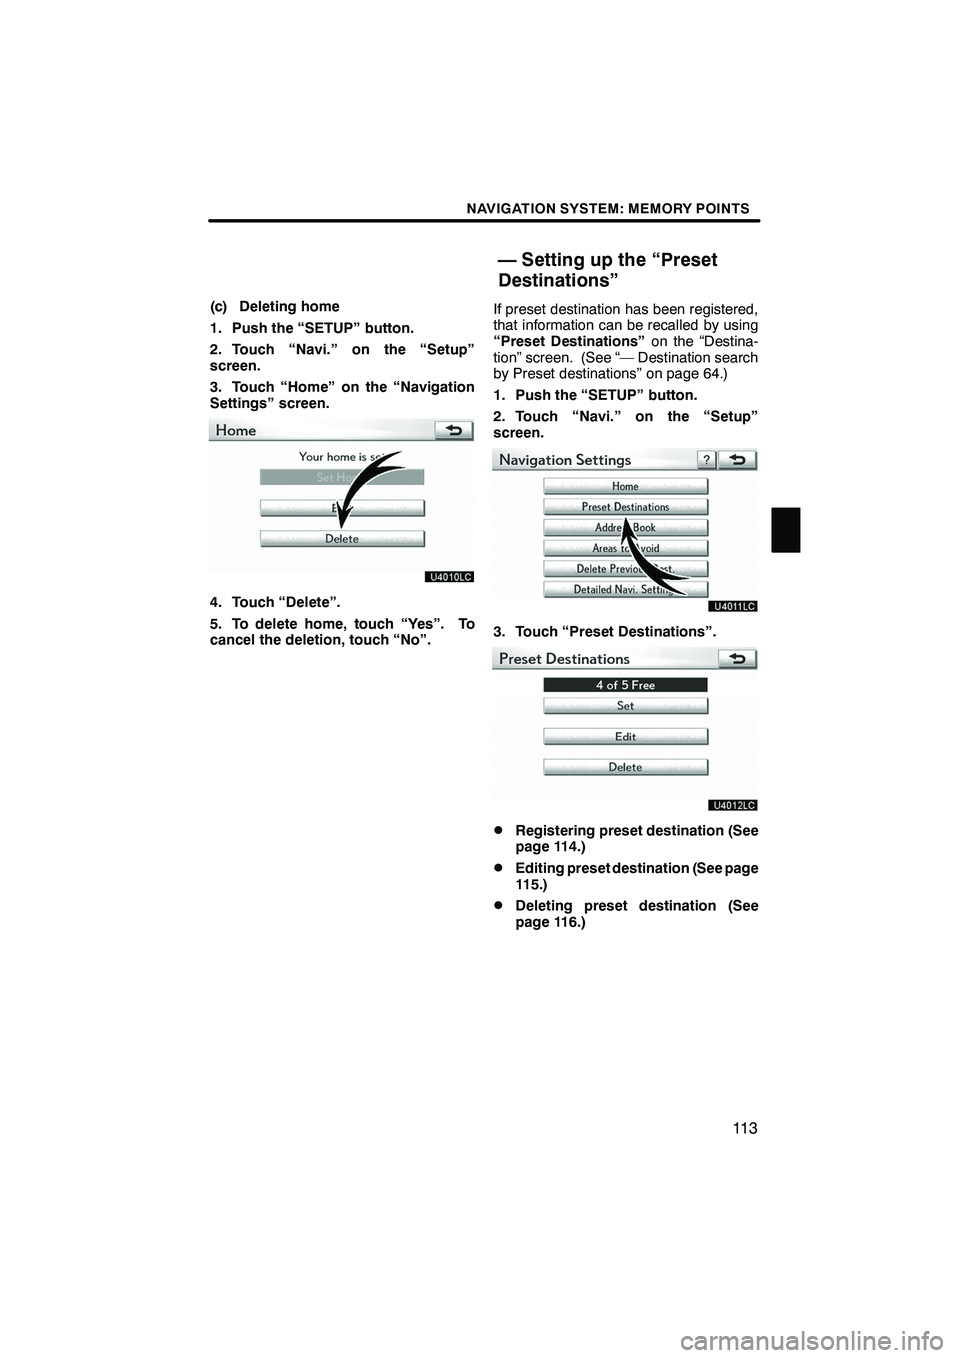
(c) Deleting home
1. Push the “SETUP” button.
2. Touch “Navi.” on the “Setup”
screen.
3. Touch “Home” on the “Navigation
Settings” screen.
4. Touch “Delete”.
5. To delete home, touch “Yes”. To
cancel the deletion, touch “No”.If preset destination has been registered,
that information can be recalled by using
“Preset Destinations”
on the “Destina-
tion” screen. (See “— Destination search
by Preset destinations” on page 64.)
1. Push the “SETUP” button.
2. Touch “Navi.” on the “Setup”
screen.
3. Touch “Preset Destinations”.
DRegistering preset destination (See
page 114.)
DEditing preset destination (See page
115.)
DDeleting preset destination (See
page 116.)
ISF/IS NAVI (U)
Finish
— Setting up the “Preset
Destinations”
4