Lexus IS300h 2013 Navigation manual
IS300h 2013
Lexus
Lexus
https://www.carmanualsonline.info/img/36/30038/w960_30038-0.png
Lexus IS300h 2013 Navigation manual
Trending: change language, fuel consumption, brake, ABS, Sd card, air conditioning, turn signal
Page 241 of 415
241
3. MEDIA OPERATION
IS300h/250_Navi_EE
4
AUDIO/VIDEO SYSTEM
7. VTR
CONTROL SCREEN To operate the Video functions such as iPod video or VTR, a 4-pole AUX cable
is necessary. However, depending on the cable specifications, the video func-
tion may not work properly. For more information, contact any authorized Lex-
us dealer or repairer, or another duly qualified and equipped professional.
OVERVIEW
The VTR operation screen can be reached by the following methods:
Connecting a device to the AUX port (P.195)
Using the instrument panel
Press the “MEDIA” button to display the audio control screen.
Using the Remote Touch
Press the “MENU” button on the Remote Touch, then select “Audio” to display
the audio control screen.
Page 242 of 415
242
3. MEDIA OPERATION
IS300h/250_Navi_EE
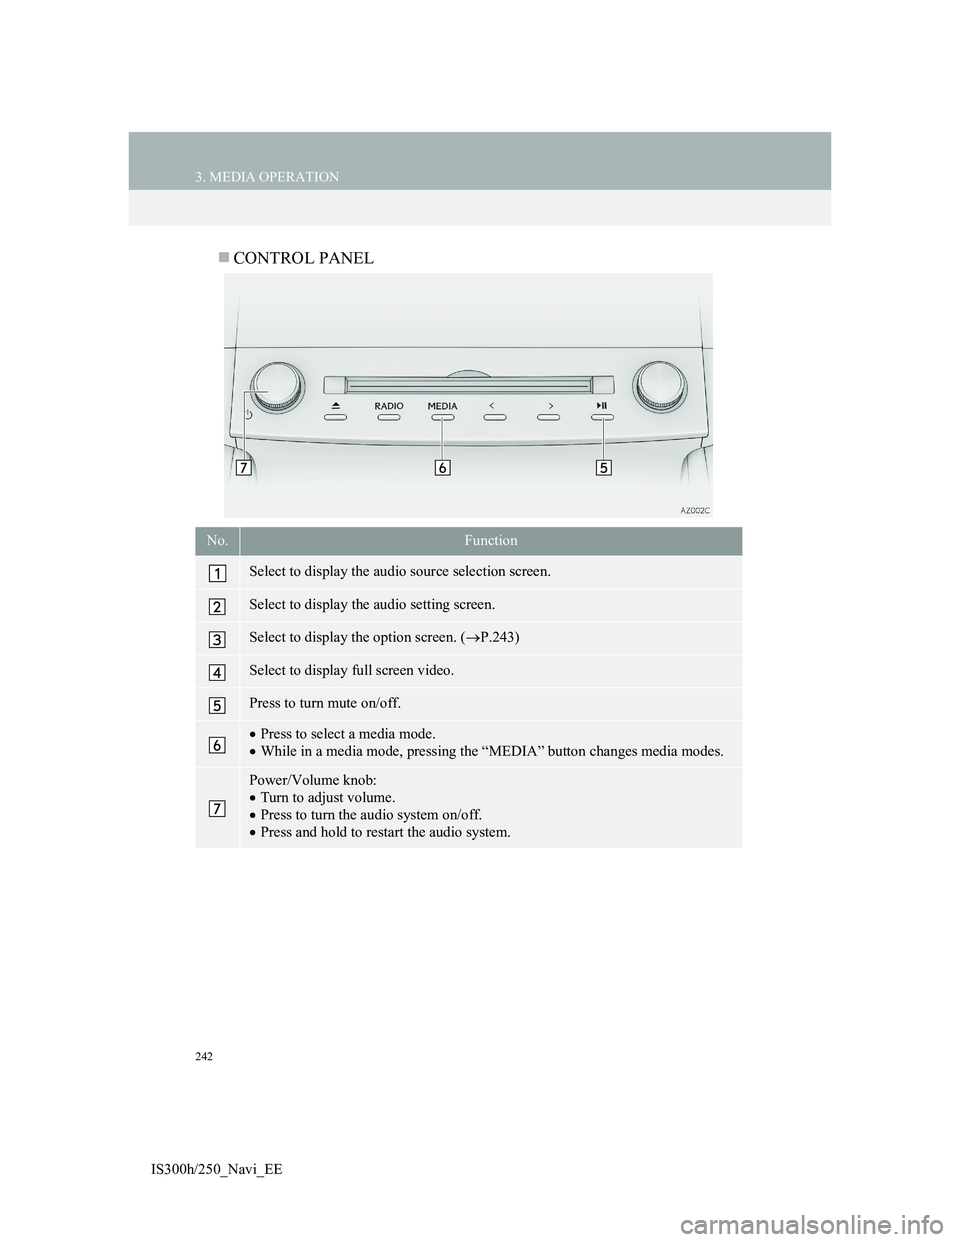
CONTROL PANEL
No.Function
Select to display the audio source selection screen.
Select to display the audio setting screen.
Select to display the option screen. (P.243)
Select to display full screen video.
Press to turn mute on/off.
Press to select a media mode.
While in a media mode, pressing the “MEDIA” button changes media modes.
Power/Volume knob:
Turn to adjust volume.
Press to turn the audio system on/off.
Press and hold to restart the audio system.
Page 243 of 415
243
3. MEDIA OPERATION
4
AUDIO/VIDEO SYSTEM
IS300h/250_Navi_EE
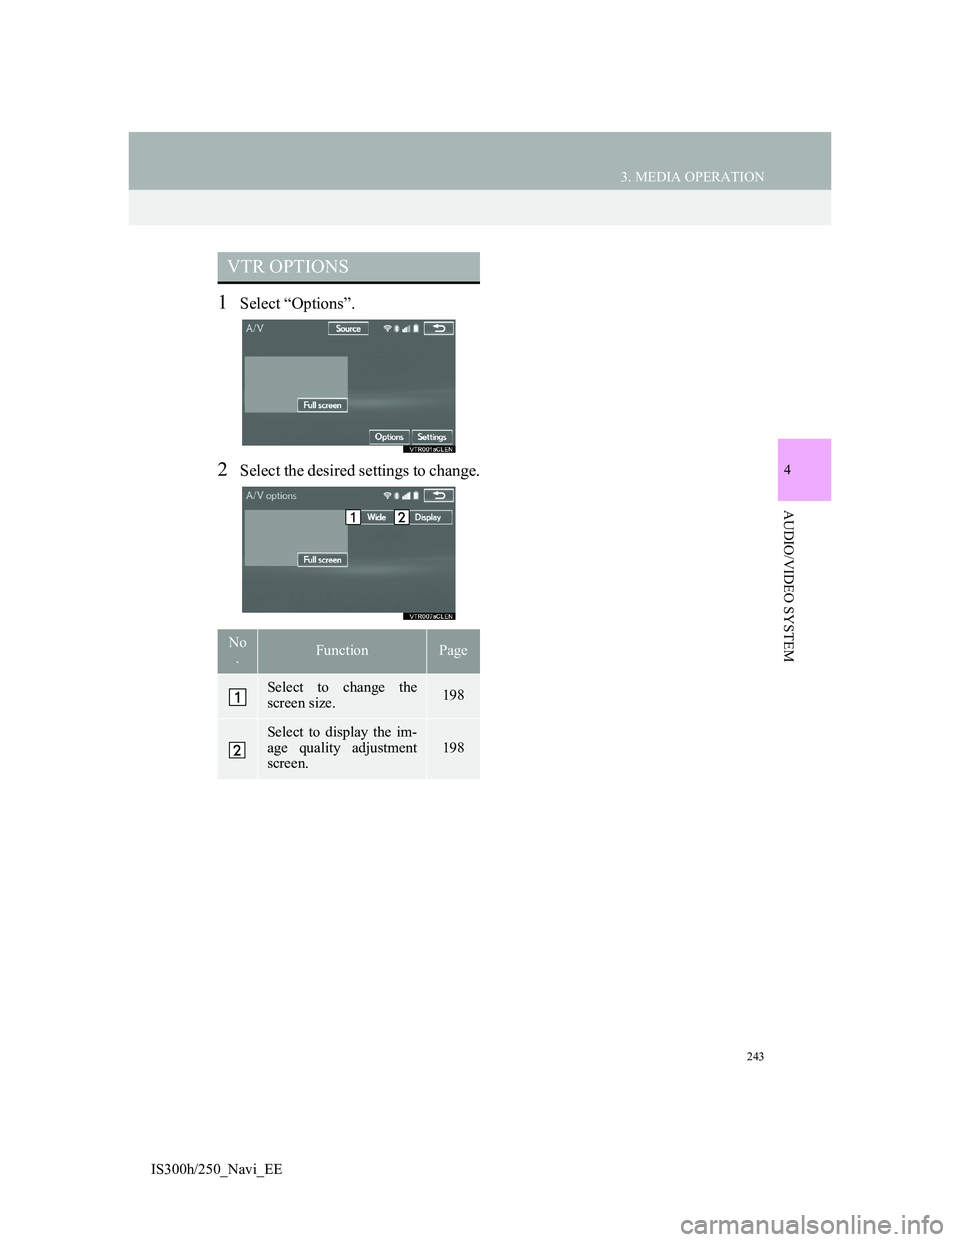
1Select “Options”.
2Select the desired settings to change.
VTR OPTIONS
No
.FunctionPage
Select to change the
screen size.198
Select to display the im-
age quality adjustment
screen.
198
Page 244 of 415
244
IS300h/250_Navi_EE
4. AUDIO/VISUAL REMOTE CONTROLS
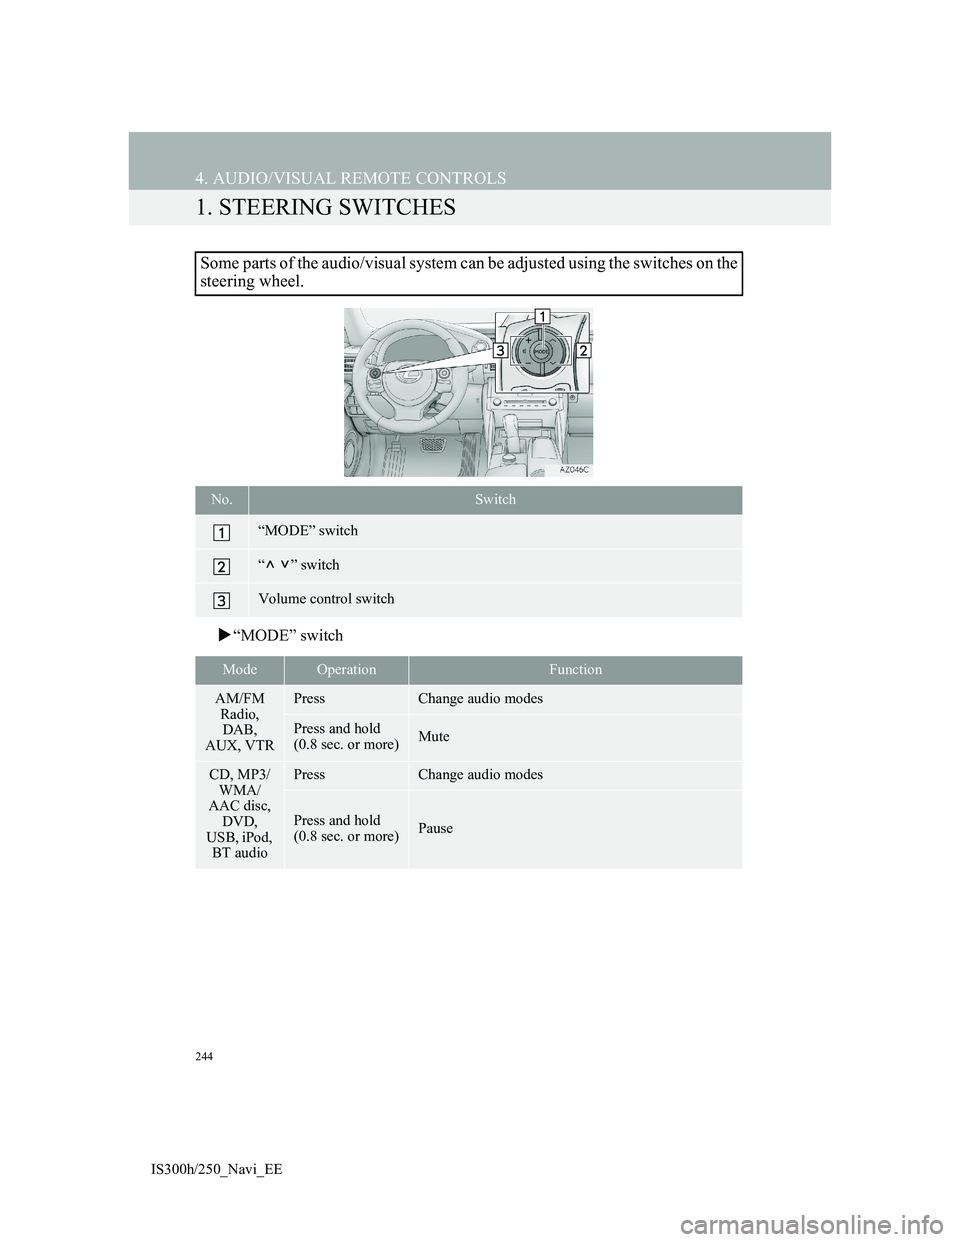
1. STEERING SWITCHES
“MODE” switch
Some parts of the audio/visual system can be adjusted using the switches on the
steering wheel.
No.Switch
“MODE” switch
“” switch
Volume control switch
ModeOperationFunction
AM/FM
Radio,
DAB,
AUX, VTRPressChange audio modes
Press and hold
(0.8 sec. or more)Mute
CD, MP3/
WMA/
AAC disc,
DVD,
USB, iPod,
BT audioPressChange audio modes
Press and hold
(0.8 sec. or more)Pause
Page 245 of 415
245
4. AUDIO/VISUAL REMOTE CONTROLS
4
AUDIO/VIDEO SYSTEM
IS300h/250_Navi_EE
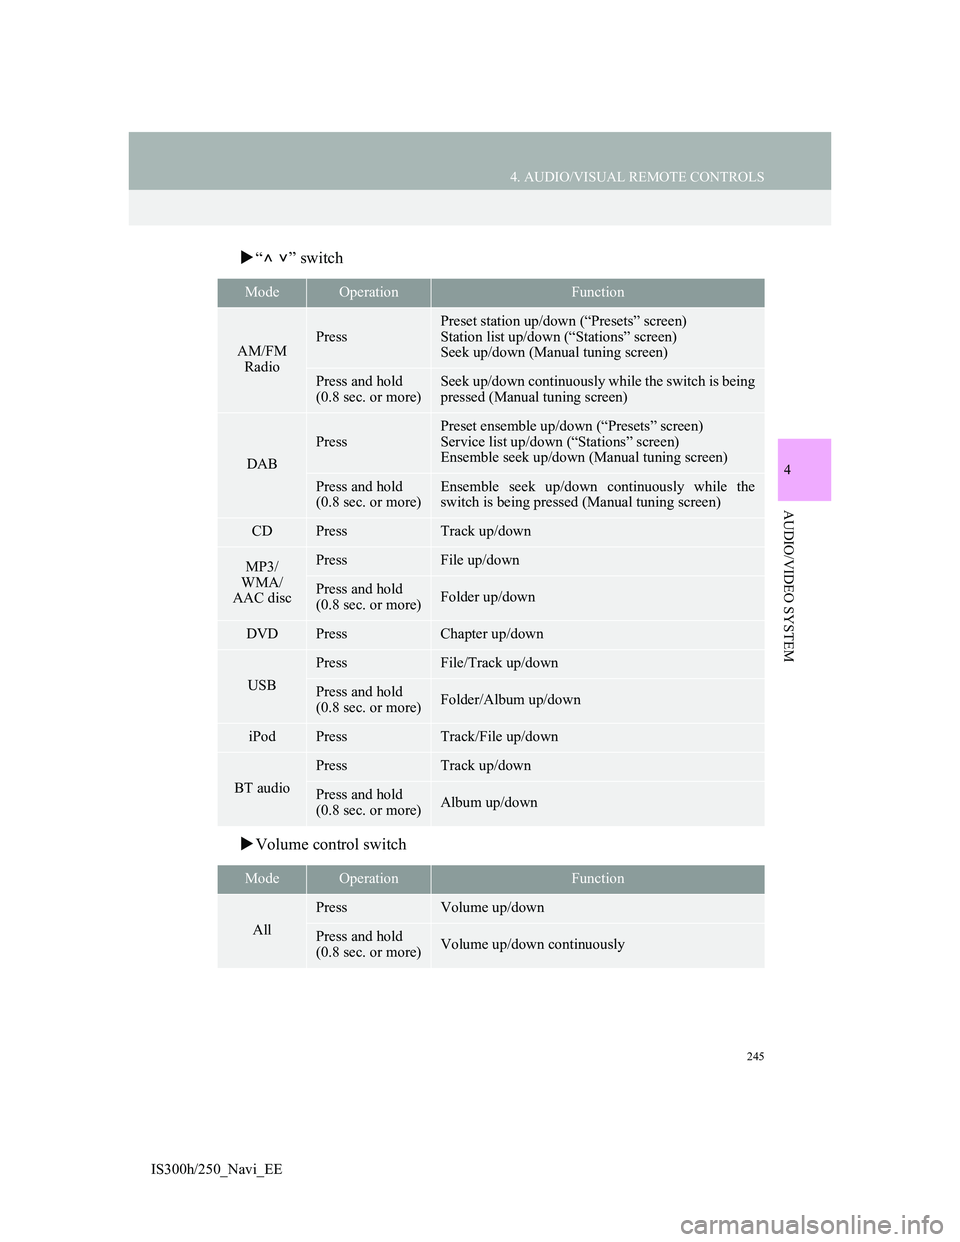
“” switch
Volume control switch
ModeOperationFunction
AM/FM
RadioPress
Preset station up/down (“Presets” screen)
Station list up/down (“Stations” screen)
Seek up/down (Manual tuning screen)
Press and hold
(0.8 sec. or more)Seek up/down continuously while the switch is being
pressed (Manual tuning screen)
DAB
Press
Preset ensemble up/down (“Presets” screen)
Service list up/down (“Stations” screen)
Ensemble seek up/down (Manual tuning screen)
Press and hold
(0.8 sec. or more)Ensemble seek up/down continuously while the
switch is being pressed (Manual tuning screen)
CDPressTrack up/down
MP3/
WMA/
AAC discPressFile up/down
Press and hold
(0.8 sec. or more)Folder up/down
DVDPressChapter up/down
USB
PressFile/Track up/down
Press and hold
(0.8 sec. or more)Folder/Album up/down
iPodPressTrack/File up/down
BT audio
PressTrack up/down
Press and hold
(0.8 sec. or more)Album up/down
ModeOperationFunction
All
PressVolume up/down
Press and hold
(0.8 sec. or more)Volume up/down continuously
Page 246 of 415
246
IS300h/250_Navi_EE
5. SETUP
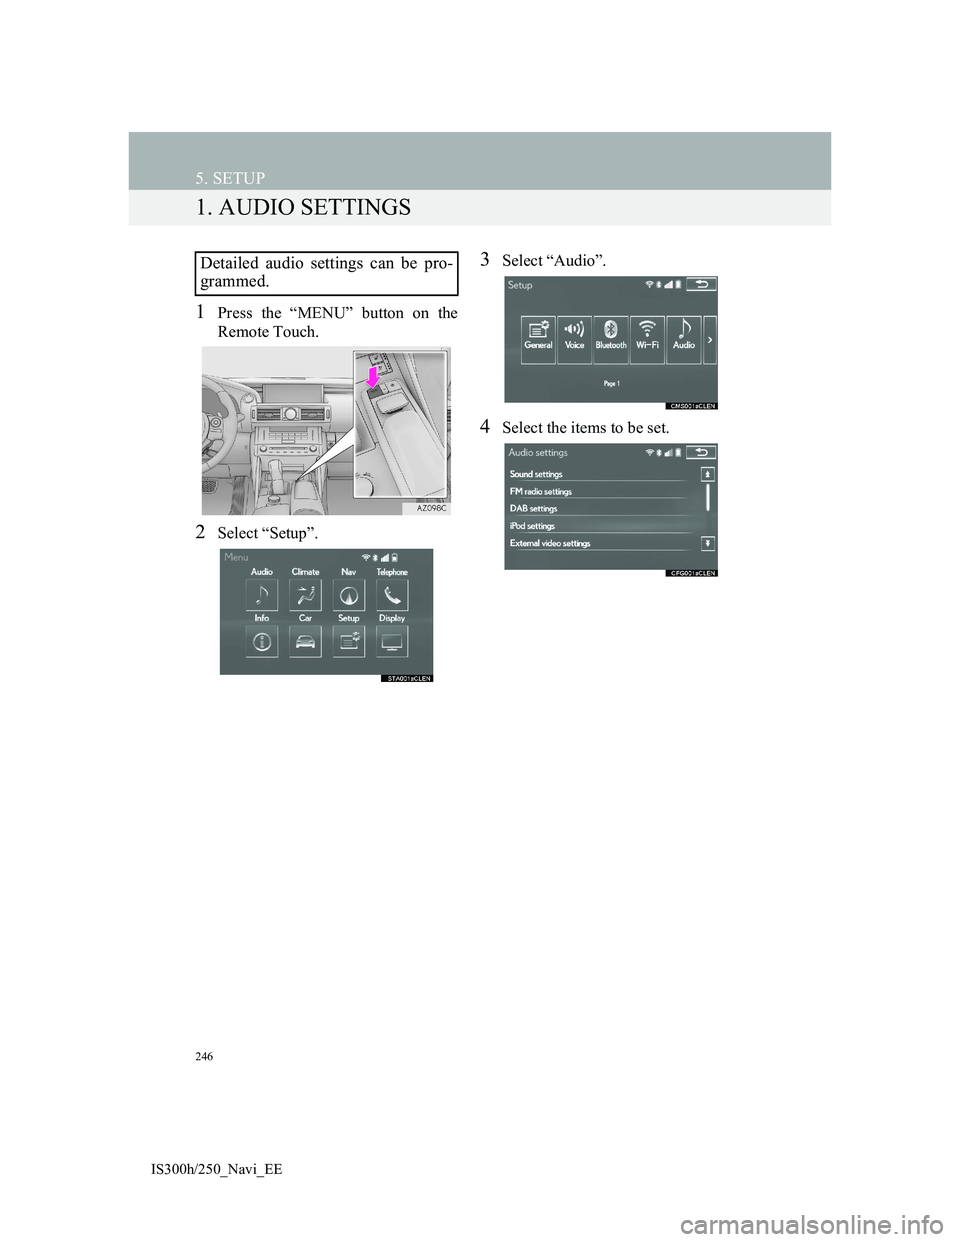
1. AUDIO SETTINGS
1Press the “MENU” button on the
Remote Touch.
2Select “Setup”.
3Select “Audio”.
4Select the items to be set.
Detailed audio settings can be pro-
grammed.
Page 247 of 415
247
5. SETUP
4
AUDIO/VIDEO SYSTEM
IS300h/250_Navi_EE
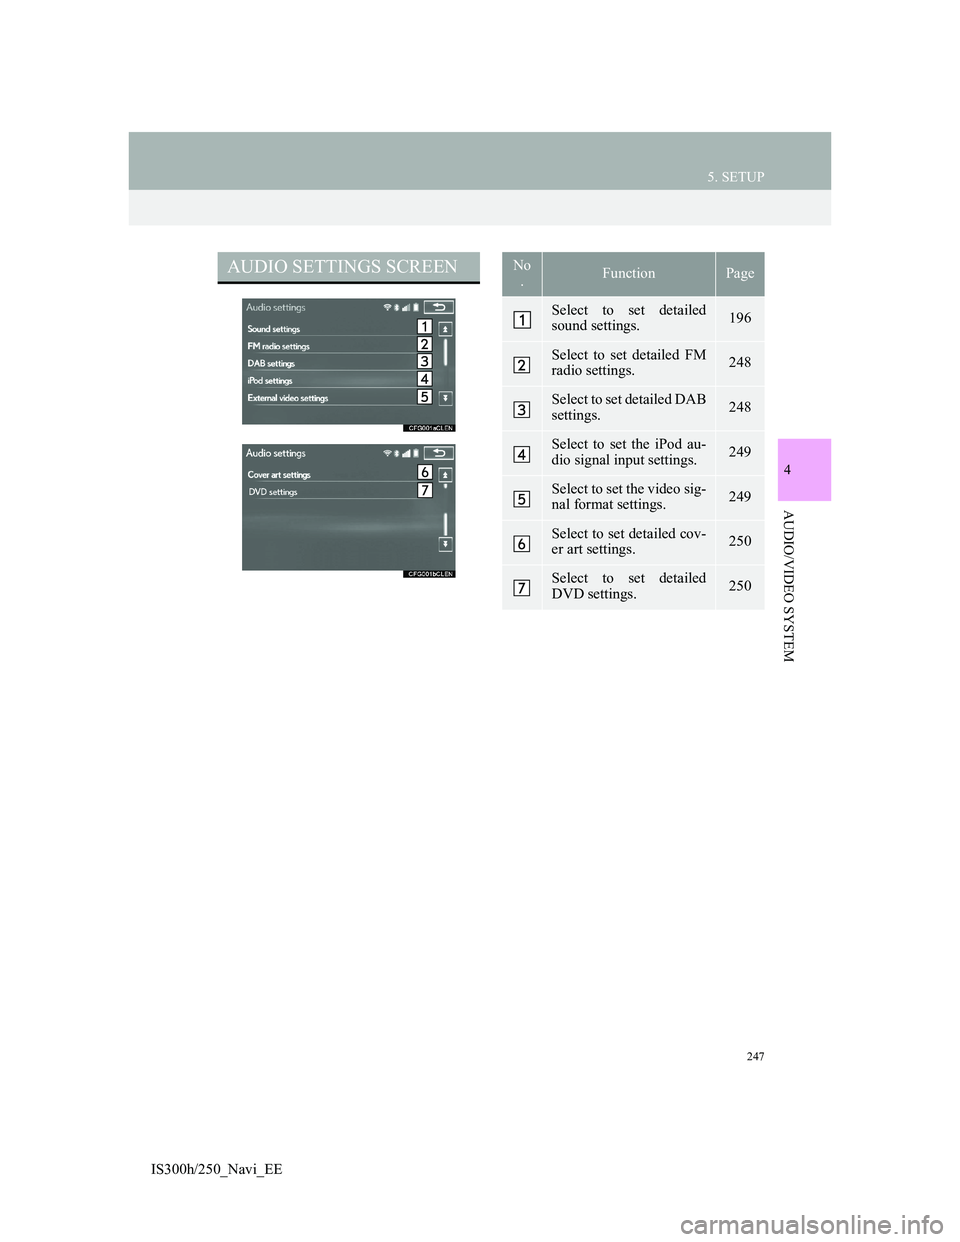
AUDIO SETTINGS SCREENNo
.FunctionPage
Select to set detailed
sound settings.196
Select to set detailed FM
radio settings.248
Select to set detailed DAB
settings. 248
Select to set the iPod au-
dio signal input settings.249
Select to set the video sig-
nal format settings.249
Select to set detailed cov-
er art settings.250
Select to set detailed
DVD settings.250
Page 248 of 415
248
5. SETUP
IS300h/250_Navi_EE
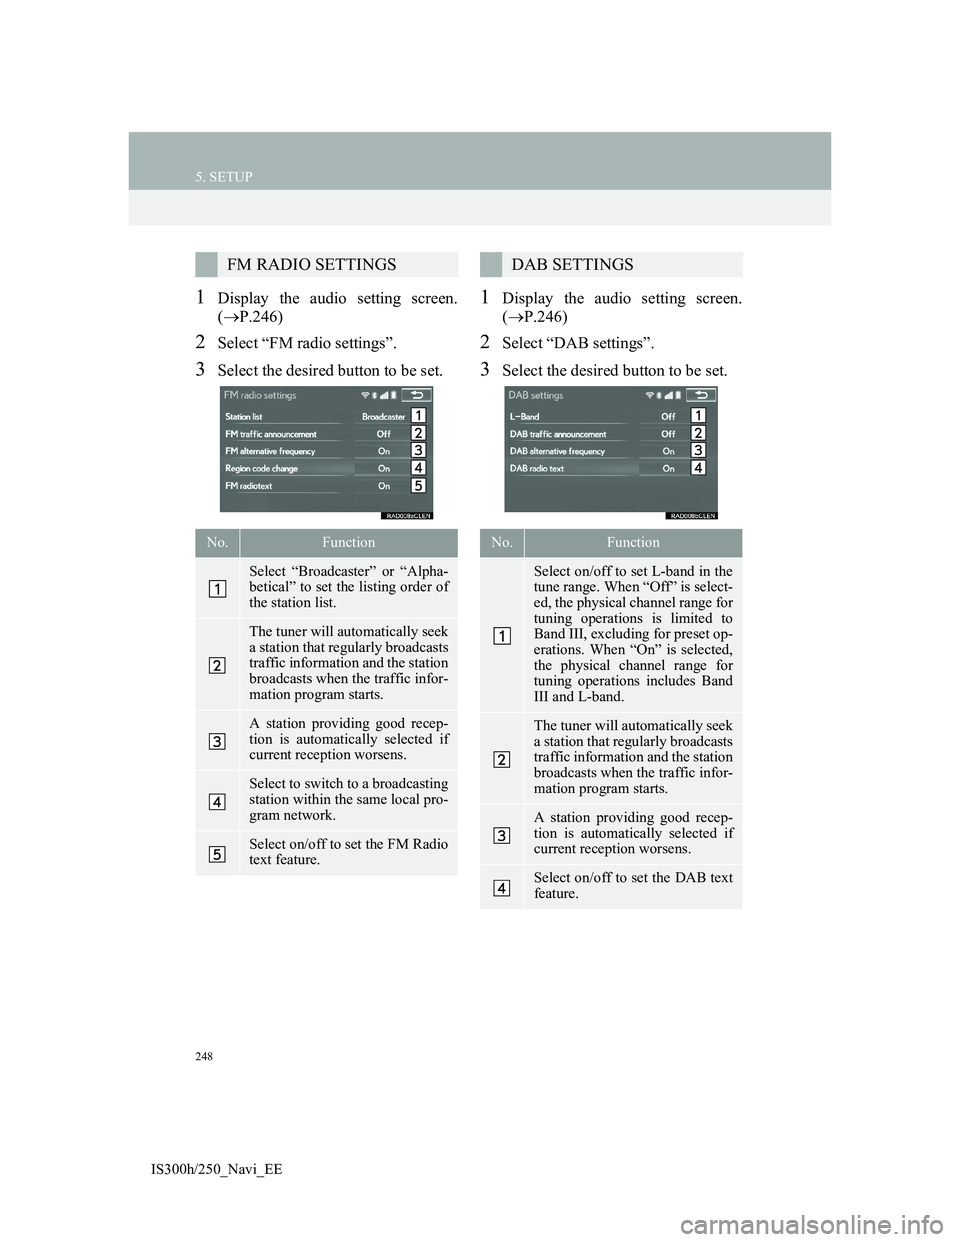
1Display the audio setting screen.
(P.246)
2Select “FM radio settings”.
3Select the desired button to be set.
1Display the audio setting screen.
(P.246)
2Select “DAB settings”.
3Select the desired button to be set.
FM RADIO SETTINGS
No.Function
Select “Broadcaster” or “Alpha-
betical” to set the listing order of
the station list.
The tuner will automatically seek
a station that regularly broadcasts
traffic information and the station
broadcasts when the traffic infor-
mation program starts.
A station providing good recep-
tion is automatically selected if
current reception worsens.
Select to switch to a broadcasting
station within the same local pro-
gram network.
Select on/off to set the FM Radio
text feature.
DAB SETTINGS
No.Function
Select on/off to set L-band in the
tune range. When “Off” is select-
ed, the physical channel range for
tuning operations is limited to
Band III, excluding for preset op-
erations. When “On” is selected,
the physical channel range for
tuning operations includes Band
III and L-band.
The tuner will automatically seek
a station that regularly broadcasts
traffic information and the station
broadcasts when the traffic infor-
mation program starts.
A station providing good recep-
tion is automatically selected if
current reception worsens.
Select on/off to set the DAB text
feature.
Page 249 of 415
249
5. SETUP
4
AUDIO/VIDEO SYSTEM
IS300h/250_Navi_EE
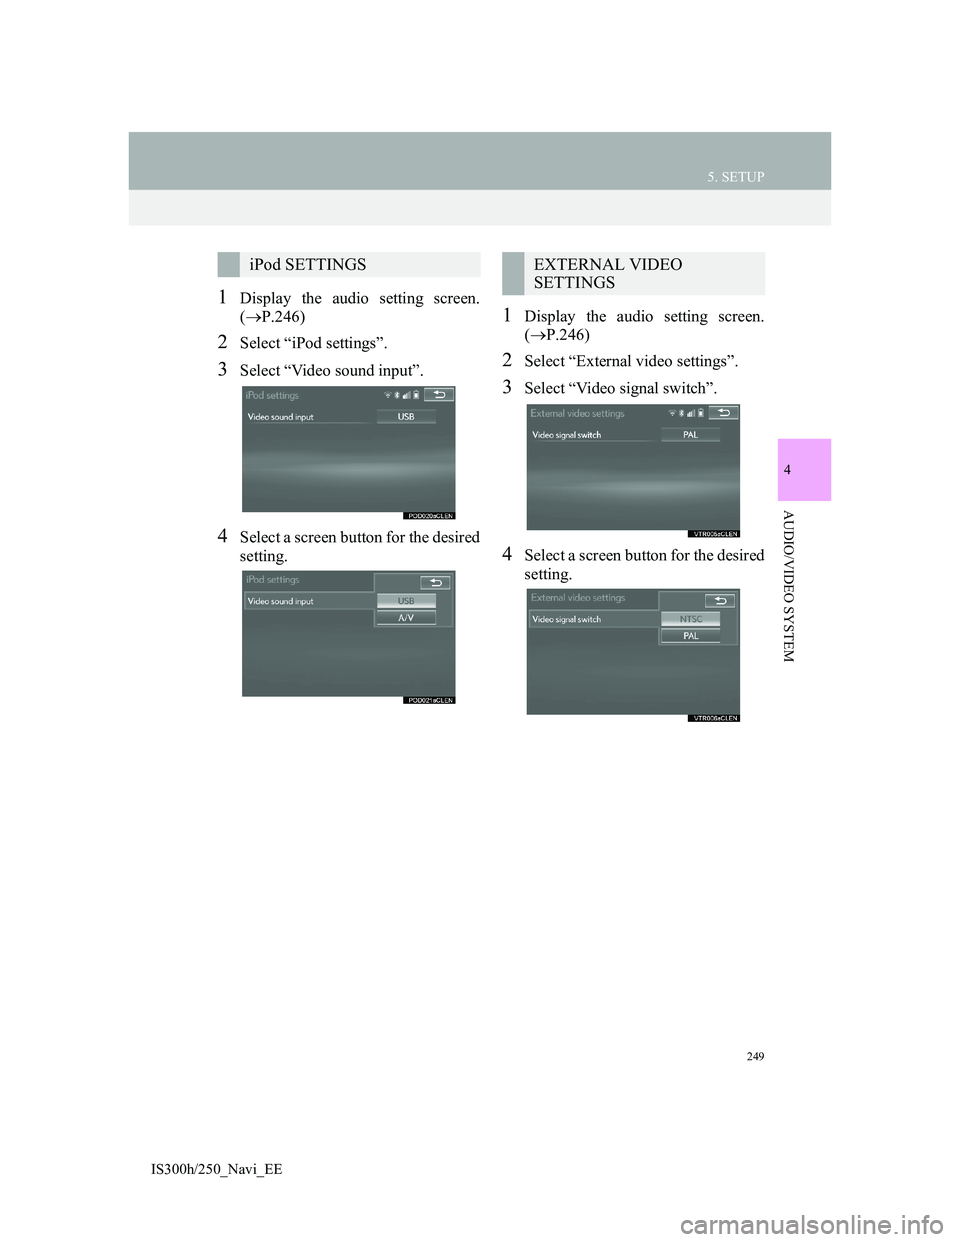
1Display the audio setting screen.
(P.246)
2Select “iPod settings”.
3Select “Video sound input”.
4Select a screen button for the desired
setting.
1Display the audio setting screen.
(P.246)
2Select “External video settings”.
3Select “Video signal switch”.
4Select a screen button for the desired
setting.
iPod SETTINGSEXTERNAL VIDEO
SETTINGS
Page 250 of 415
250
5. SETUP
IS300h/250_Navi_EE
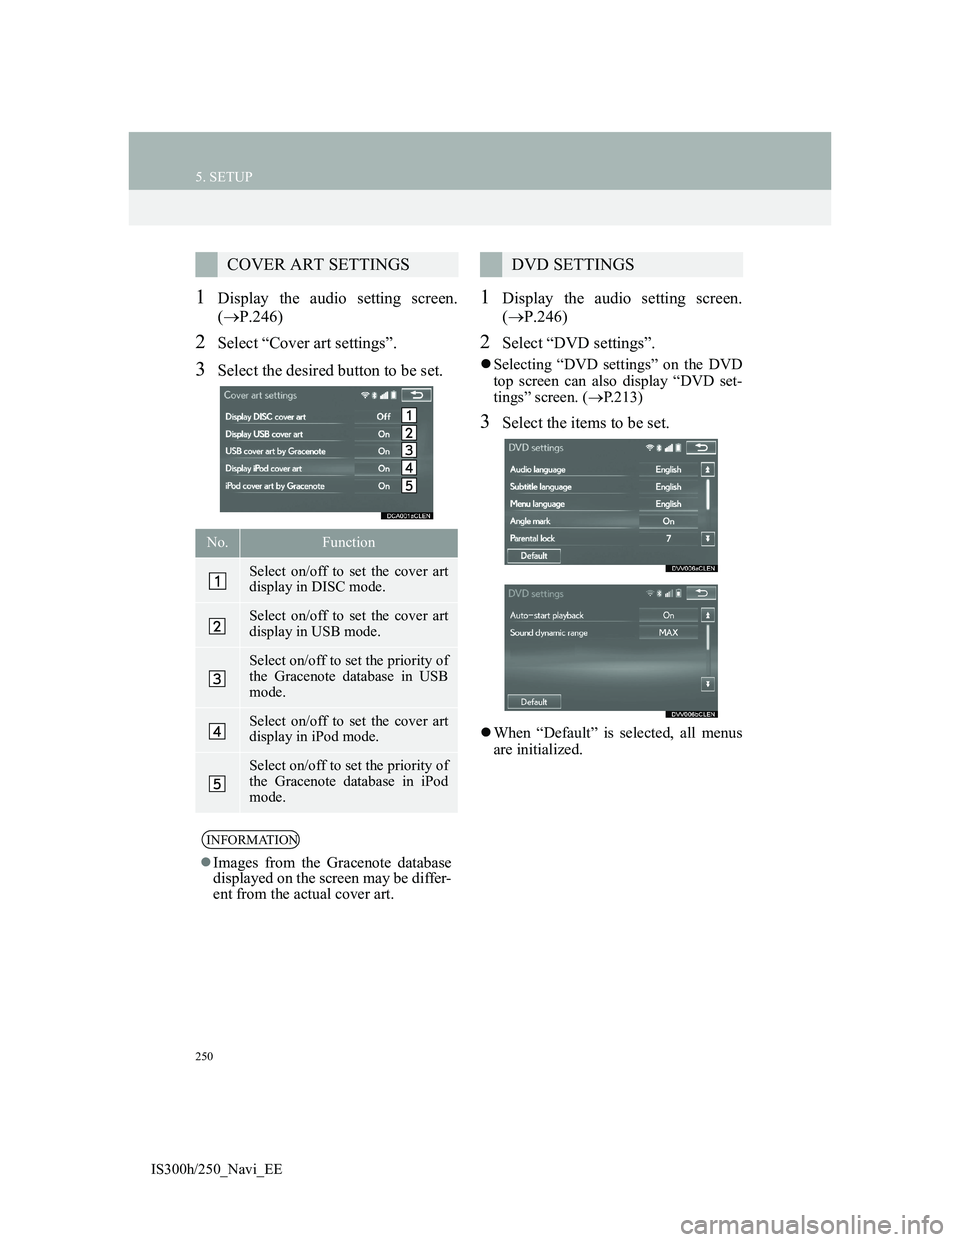
1Display the audio setting screen.
(P.246)
2Select “Cover art settings”.
3Select the desired button to be set.
1Display the audio setting screen.
(P.246)
2Select “DVD settings”.
Selecting “DVD settings” on the DVD
top screen can also display “DVD set-
tings” screen. (P.213)
3Select the items to be set.
When “Default” is selected, all menus
are initialized.
COVER ART SETTINGS
No.Function
Select on/off to set the cover art
display in DISC mode.
Select on/off to set the cover art
display in USB mode.
Select on/off to set the priority of
the Gracenote database in USB
mode.
Select on/off to set the cover art
display in iPod mode.
Select on/off to set the priority of
the Gracenote database in iPod
mode.
INFORMATION
Images from the Gracenote database
displayed on the screen may be differ-
ent from the actual cover art.
DVD SETTINGS
Trending: maintenance, service indicator, wheel, CD player, headlights, manual radio set, navigation update

