LEXUS LS430 2003 Factory Service Manual
LS430 2003
LEXUS
LEXUS
https://www.carmanualsonline.info/img/36/57050/w960_57050-0.png
LEXUS LS430 2003 Factory Service Manual
Page 125 of 4500
OK: Go to next step
2.INSPECT BATTERY
a. Check the battery voltage.
Standard:
Voltage: 10 to 14 V
NG: INSPECT CHARGING SYSTEM (SEE ON
-VEHICLE INSPECTION )
OK: Go to next step
3.INSPECT SKID CONTROL ECU TERMINAL VOLTAGE (IG1 TERMINAL)
a. Connect the hand-held tester to the DLC3.
b. Start the engine.
c. Select the DATA LIST mode on the hand-held tester.
Fig. 91: DATA LIST Mode Description
Courtesy of TOYOTA MOTOR SALES, U.S.A., INC.
d. Read the voltage condition output from the ECU displayed on the hand-held tester.
Standard:
"Normal" is displayed.
NG: Go to step 4
OK: REPLACE ABS & TRACTION ACTUATOR ASSY (SEE REPLACEMENT
)
4.INSPECT SKID CONTROL ECU CONNECTOR (GND TERMINAL CONTINUITY)
a. Disconnect the skid control ECU connector.
b. Measure the resistance according to the value (s) in the table below.
Standard:
Page 126 of 4500
TESTER CONNECTION SPECIFIED CONDITION
NG: REPAIR OR REPLACE HARNESS OR CONNECTOR (GND TERMINAL - BODY
GROUND)
Fig. 92: Identifying Skid Control ECU Connector Terminals
Courtesy of TOYOTA MOTOR SALES, U.S.A., INC.
OK: CHECK AND REPAIR HARNESS AND CONNECTOR (IG1 TERMINAL - BATTERY)
CIRCUIT DESCRIPTION
Master c
ylinder pressure sensor is connected to the skid control ECU in the actuator.
Tester ConnectionSpecified Condition
S42-32 (GND) - Body groundBelow 1ohms
Page 128 of 4500

c. Select the DATA LIST mode on the hand-held tester.
MEASUREMENT ITEM / RANGE (DISPLAY) DESCRIPTION
d. Check that the brake fluid pressure value of the master cylinder pressure sensor observed in the
hand held tester changes when the brake pedal is depressed.
OK: Go to next step
When the pedal is depressed, displayed voltage on the hand-held tester increases.
NG: Go to step 2
OK: REPLACE ABS & TRACTION ACTUATOR ASSY (SEE REPLACEMENT
)
2.INSPECT SKID CONTROL ECU TERMINAL VOLTAGE (STP TERMINAL)
a. Disconnect the skid control ECU connector.
b. Measure the voltage according to the value (s) in the table below.
Standard:
TESTER CONNECTION SPECIFIED CONDITION
NG: CHECK AND REPLACE STOP LIGHT SWITCH CIRCUIT
OK: REPLACE ABS & TRACTION ACTUATOR ASSY (SEE REPLACEMENT
)
ItemMeasurement Item / Range (Display)Normal Condition
MAS CYL PRS
1Master cylinder pressure sensor 1 reading /
min.: 0 V, max.: 5 VWhen brake pedal is released:
0.3 to 0.9V
Tester ConnectionSwitch ConditionSpecified Condition
S42-27 (STP) - Body groundBrake pedal depressed8 to 14V
S42-27 (STP) - Body groundBrake pedal releasedBelow 1 V
Page 129 of 4500
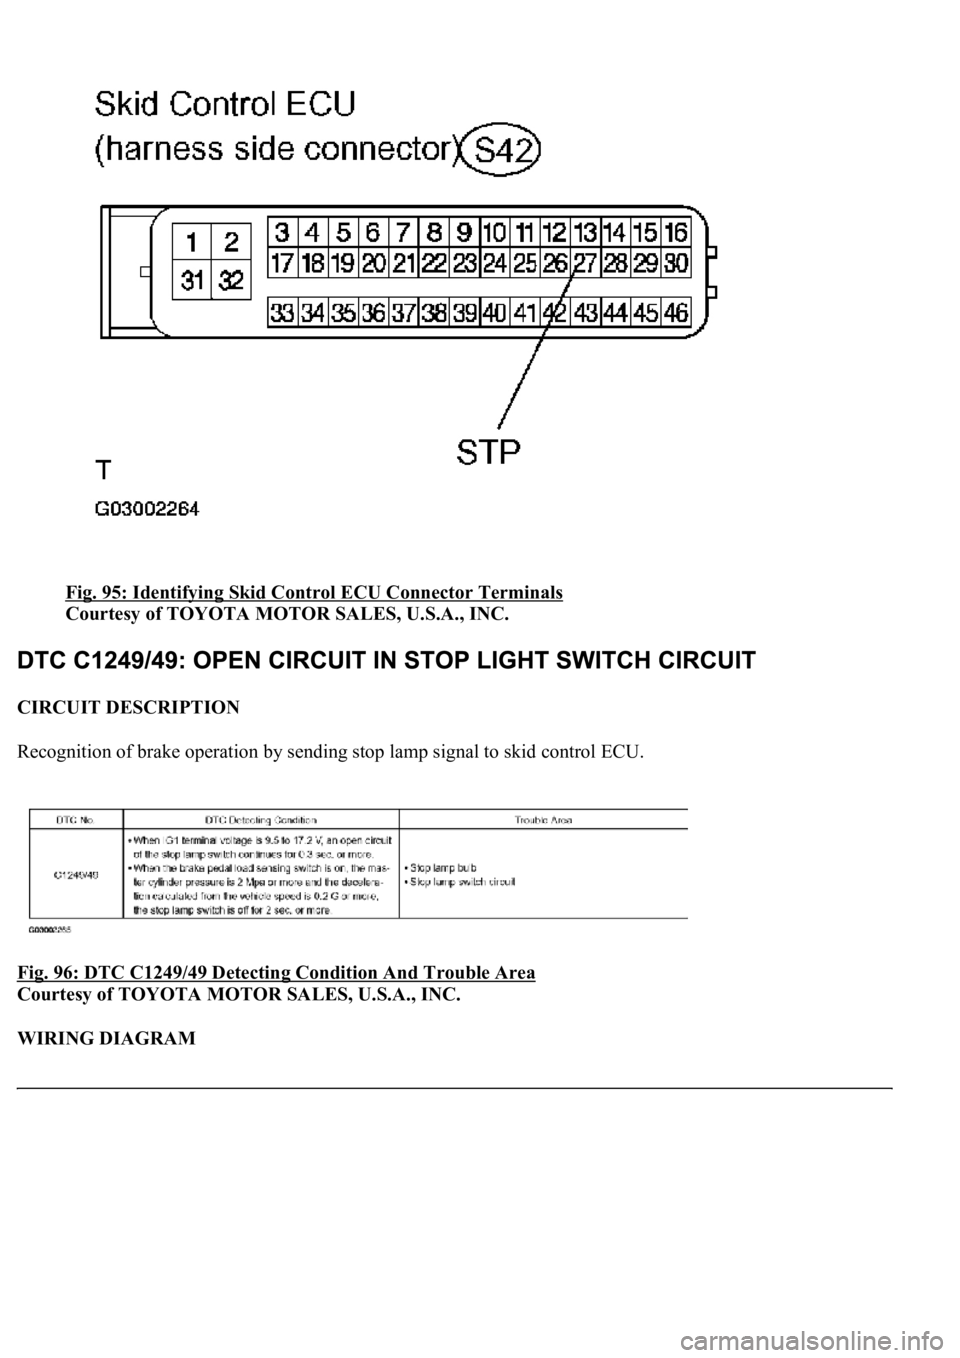
Fig. 95: Identifying Skid Control ECU Connector Terminals
Courtesy of TOYOTA MOTOR SALES, U.S.A., INC.
CIRCUIT DESCRIPTION
Recognition of brake operation by sending stop lamp signal to skid control ECU.
Fig. 96: DTC C1249/49 Detecting Condition And Trouble Area
Courtesy of TOYOTA MOTOR SALES, U.S.A., INC.
WIRING DIAGRAM
Page 131 of 4500
Fig. 98: Pedal Condition Reference Table
Courtesy of TOYOTA MOTOR SALES, U.S.A., INC.
NG: Go to step 6
HINT:
Check the stop lamp bulb as it may have burnt out.
OK:
2.INSPECT MULTIPLEX COMMUNICATION SYSTEM (SEE HOW TO PROCEED WITH
TROUBLESHOOTING )
a. Is DTC output Multiplex communication system?
Result:
DTC OUTPUT DESCRIPTION
B: REPAIR MULTIPLEX COMMUNICATION SYSTEM
A: Go to next step
3.CHECK HARNESS AND CONNECTOR (STP1 TERMINAL VOLTAGE OF DRIVER SIDE J/B
ECU)
a. Disconnect the driver side J/B ECU connector.
b. Measure the voltage according to the value (s) in the table below.
Standard:
TESTER CONNECTION SPECIFIED CONDITION
DTC is not outputA
TDC is outputB
Tester ConnectionSwitch ConditionSpecified Condition
D3-13 (STP1) - Body ground Brakepedal depressed8 to 14 V
D3-13 (STP1) - Body groundBrake pedal releasedBelow 1 V
Page 132 of 4500
Fig. 99: Identifying Driver Side J/B ECU connector Terminals
Courtesy of TOYOTA MOTOR SALES, U.S.A., INC.
NG: REPAIR OR REPLACE HARNESS OR CONNECTOR
OK: Go to next step
4.CHECK HARNESS AND CONNECTOR (STPA OF DRIVER SIDE J/B ECU - STP OF SKID
CONTROL ECU)
a. Disconnect driver side J/B ECU connector and skid control ECU connector.
Page 134 of 4500
Fig. 100: Identifying Driver Side J/B ECU Connector And Skid Control ECU Connector Terminals
Courtesy of TOYOTA MOTOR SALES, U.S.A., INC.
NG: REPAIR OR REPLACE HARNESS OR CONNECTO
R
Page 136 of 4500
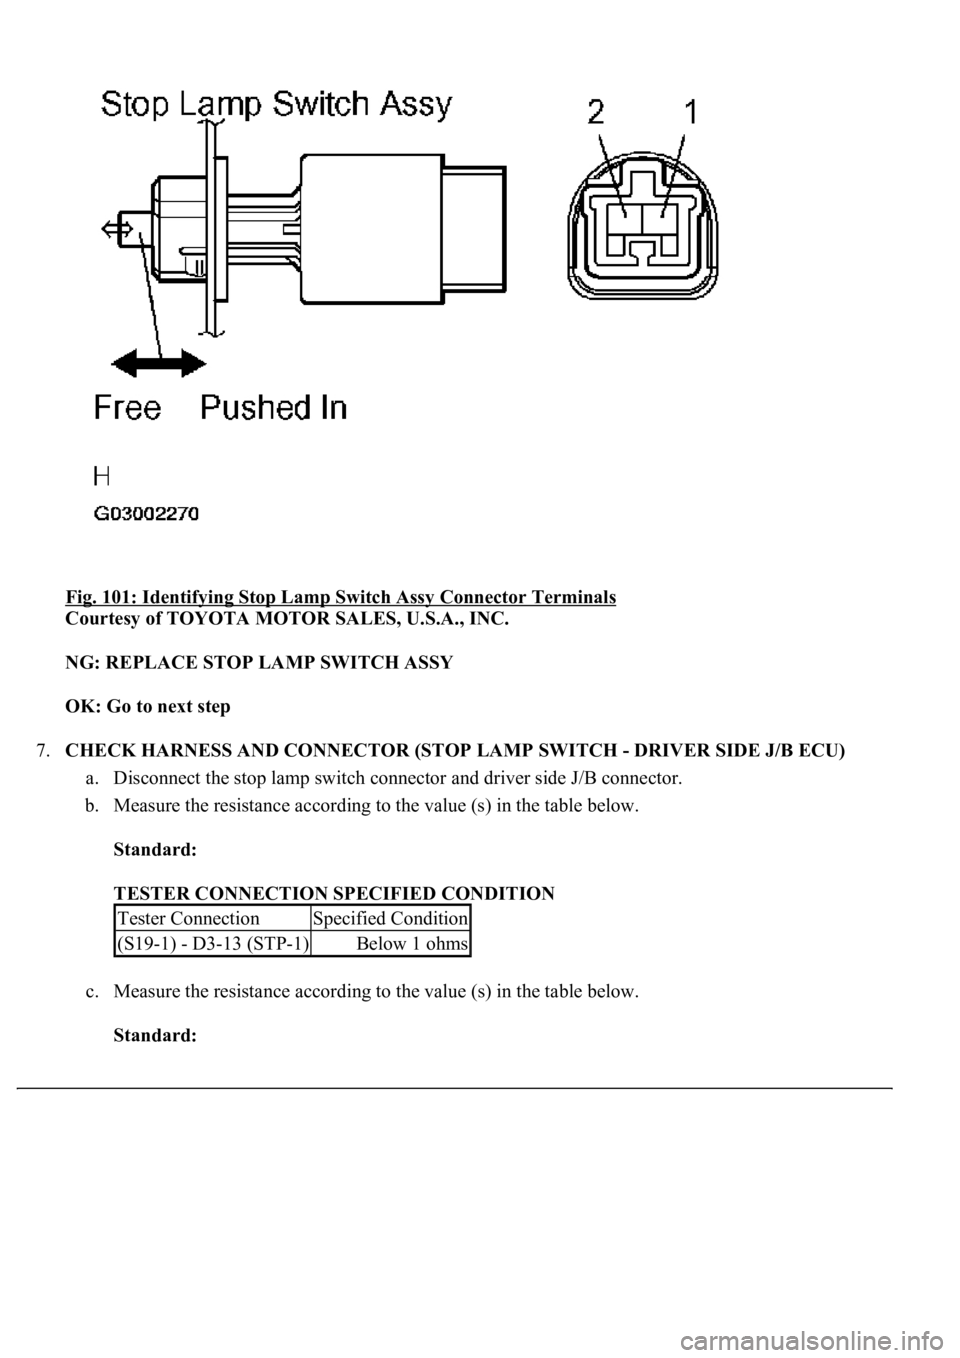
Fig. 101: Identifying Stop Lamp Switch Assy Connector Terminals
Courtesy of TOYOTA MOTOR SALES, U.S.A., INC.
NG: REPLACE STOP LAMP SWITCH ASSY
OK: Go to next step
7.CHECK HARNESS AND CONNECTOR (STOP LAMP SWITCH - DRIVER SIDE J/B ECU)
a. Disconnect the stop lamp switch connector and driver side J/B connector.
b. Measure the resistance according to the value (s) in the table below.
Standard:
TESTER CONNECTION SPECIFIED CONDITION
c. Measure the resistance according to the value (s) in the table below.
Standard:
Tester ConnectionSpecified Condition
(S19-1) - D3-13 (STP-1)Below 1 ohms
Page 138 of 4500
Fig. 102: Identifying Stop Lamp Switch Connector And Driver Side J/B Connector Terminals
Courtesy of TOYOTA MOTOR SALES, U.S.A., INC.
NG: REPAIR OR REPLACE HARNESS OR CONNECTOR
OK: Go to next step
8.CHECK HARNESS AND CONNECTOR (STPA OF DRIVER SIDE J/B ECU - STP OF SKID
CONTROL ECU)
a. Disconnect the driver side J/B connector and skid control ECU connector.
b. Measure the resistance according to the value (s) in the table below.
Standard:
TESTER CONNECTION SPECIFIED CONDITION
Standard:
TESTER CONNECTION SPECIFIED CONDITION
Tester ConnectionSpecified Condition
D5-3 (STPA) - S42-27 (STP)Below 1 ohms
Tester ConnectionSpecified Condition
S42-27 (STP) - Body ground1 Mohms or higher
Page 139 of 4500
Fig. 103: Identifying Driver Side J/B Connector And Skid Control ECU Connector Terminals
Courtesy of TOYOTA MOTOR SALES, U.S.A., INC.
NG: REPAIR OR REPLACE HARNESS OR CONNECTOR