relay LEXUS LS430 2003 Factory Manual PDF
[x] Cancel search | Manufacturer: LEXUS, Model Year: 2003, Model line: LS430, Model: LEXUS LS430 2003Pages: 4500, PDF Size: 87.45 MB
Page 2026 of 4500
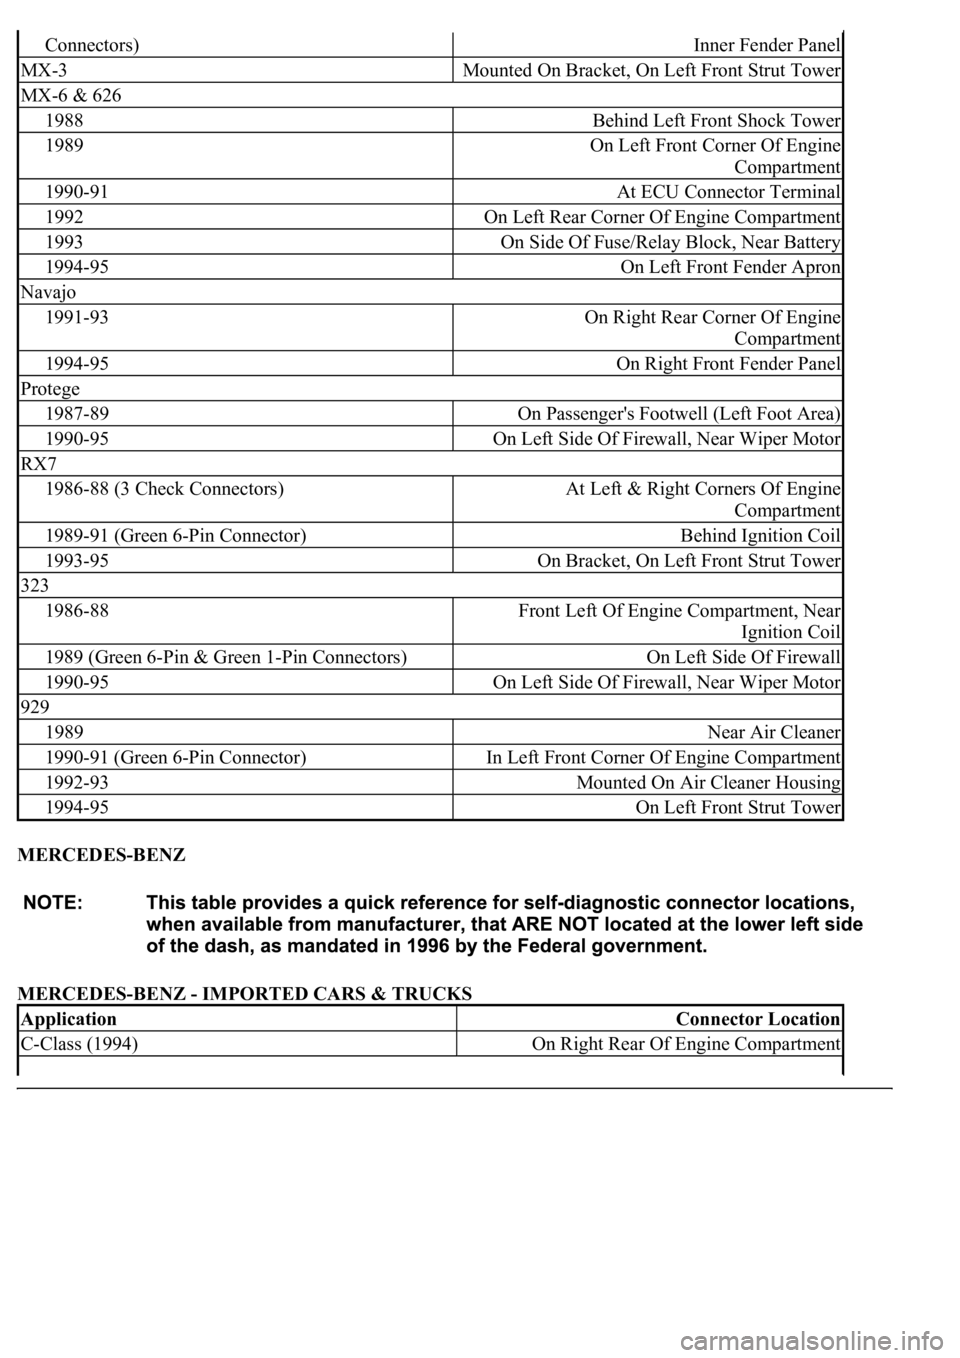
MERCEDES-BENZ
MERCEDES-BENZ - IMPORTED CARS & TRUCKS
Connectors)Inner Fender Panel
MX-3Mounted On Bracket, On Left Front Strut Tower
MX-6 & 626
1988Behind Left Front Shock Tower
1989On Left Front Corner Of Engine
Compartment
1990-91At ECU Connector Terminal
1992On Left Rear Corner Of Engine Compartment
1993On Side Of Fuse/Relay Block, Near Battery
1994-95On Left Front Fender Apron
Navajo
1991-93On Right Rear Corner Of Engine
Compartment
1994-95On Right Front Fender Panel
Protege
1987-89On Passenger's Footwell (Left Foot Area)
1990-95On Left Side Of Firewall, Near Wiper Motor
RX7
1986-88 (3 Check Connectors)At Left & Right Corners Of Engine
Compartment
1989-91 (Green 6-Pin Connector)Behind Ignition Coil
1993-95On Bracket, On Left Front Strut Tower
323
1986-88Front Left Of Engine Compartment, Near
Ignition Coil
1989 (Green 6-Pin & Green 1-Pin Connectors)On Left Side Of Firewall
1990-95On Left Side Of Firewall, Near Wiper Motor
929
1989Near Air Cleaner
1990-91 (Green 6-Pin Connector)In Left Front Corner Of Engine Compartment
1992-93Mounted On Air Cleaner Housing
1994-95On Left Front Strut Tower
ApplicationConnector Location
C-Class (1994)On Right Rear Of Engine Compartment
Page 2028 of 4500
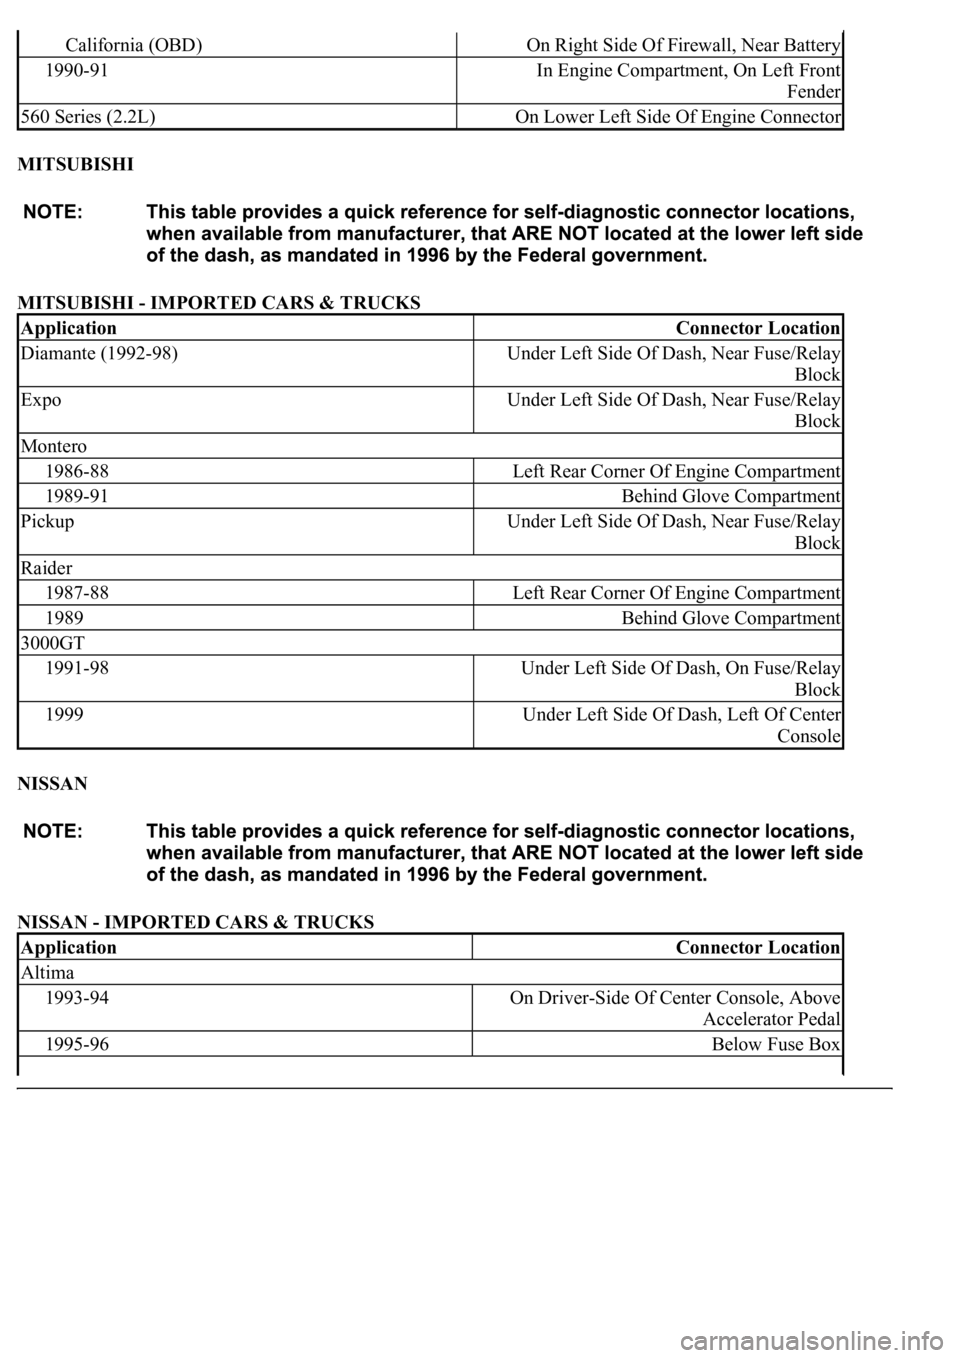
MITSUBISHI
MITSUBISHI - IMPORTED CARS & TRUCKS
NISSAN
NISSAN - IMPORTED CARS & TRUCKS
California (OBD)On Right Side Of Firewall, Near Battery
1990-91In Engine Compartment, On Left Front
Fender
560 Series (2.2L)On Lower Left Side Of Engine Connector
ApplicationConnector Location
Diamante (1992-98)Under Left Side Of Dash, Near Fuse/Relay
Block
ExpoUnder Left Side Of Dash, Near Fuse/Relay
Block
Montero
1986-88Left Rear Corner Of Engine Compartment
1989-91Behind Glove Compartment
PickupUnder Left Side Of Dash, Near Fuse/Relay
Block
Raider
1987-88Left Rear Corner Of Engine Compartment
1989Behind Glove Compartment
3000GT
1991-98Under Left Side Of Dash, On Fuse/Relay
Block
1999Under Left Side Of Dash, Left Of Center
Console
ApplicationConnector Location
Altima
1993-94On Driver-Side Of Center Console, Above
Accelerator Pedal
1995-96Below Fuse Box
Page 2030 of 4500
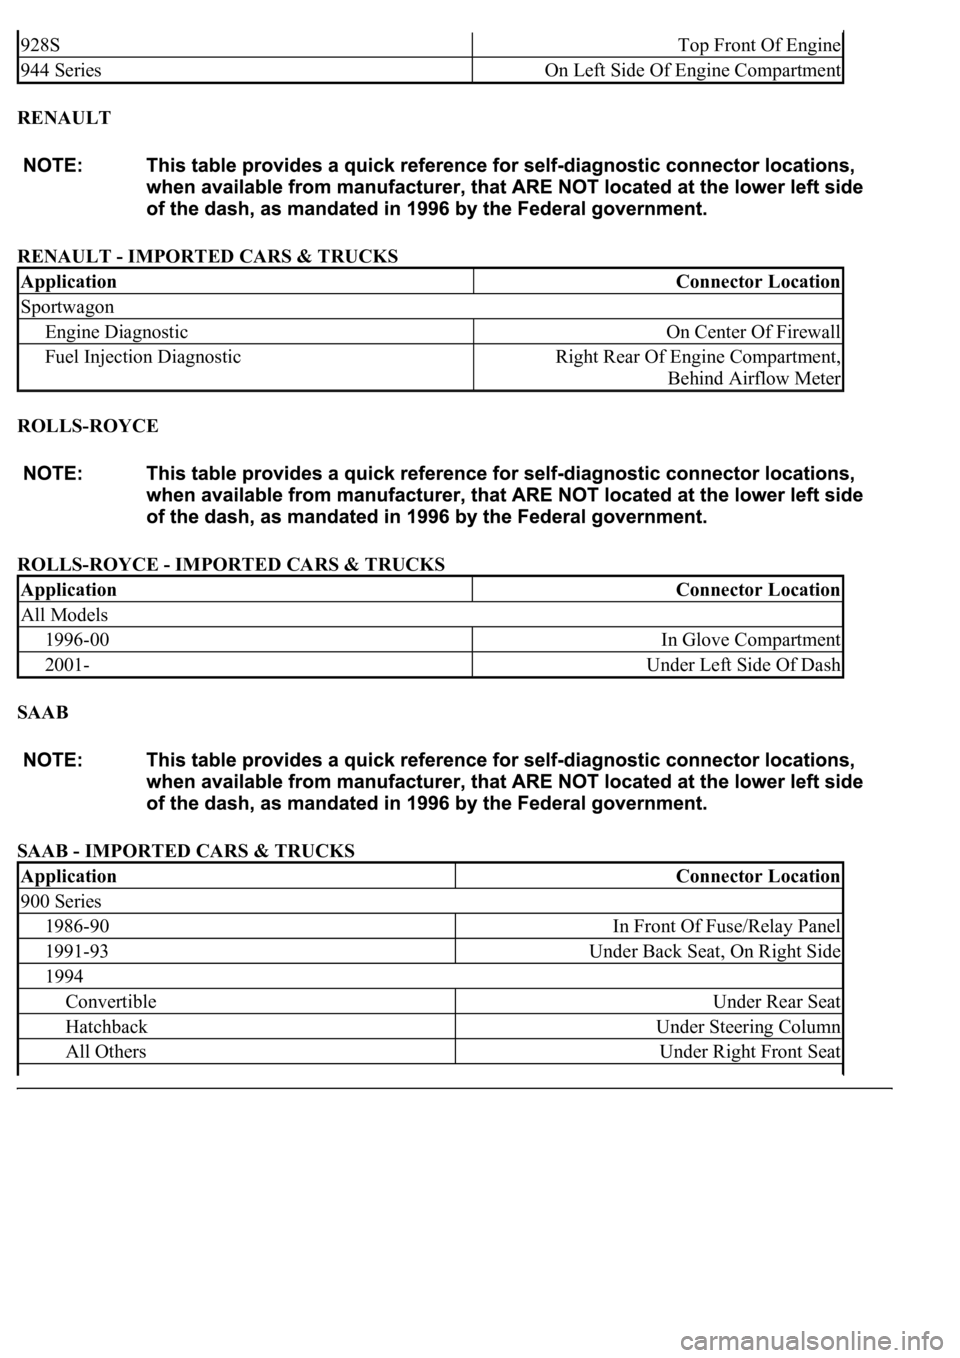
RENAULT
RENAULT - IMPORTED CARS & TRUCKS
ROLLS-ROYCE
ROLLS-ROYCE - IMPORTED CARS & TRUCKS
SAAB
SAAB - IMPORTED CARS & TRUCKS
928STop Front Of Engine
944 SeriesOn Left Side Of Engine Compartment
ApplicationConnector Location
Sportwagon
Engine DiagnosticOn Center Of Firewall
Fuel Injection DiagnosticRight Rear Of Engine Compartment,
Behind Airflow Meter
ApplicationConnector Location
All Models
1996-00In Glove Compartment
2001-Under Left Side Of Dash
ApplicationConnector Location
900 Series
1986-90In Front Of Fuse/Relay Panel
1991-93Under Back Seat, On Right Side
1994
ConvertibleUnder Rear Seat
HatchbackUnder Steering Column
All OthersUnder Right Front Seat
Page 2033 of 4500
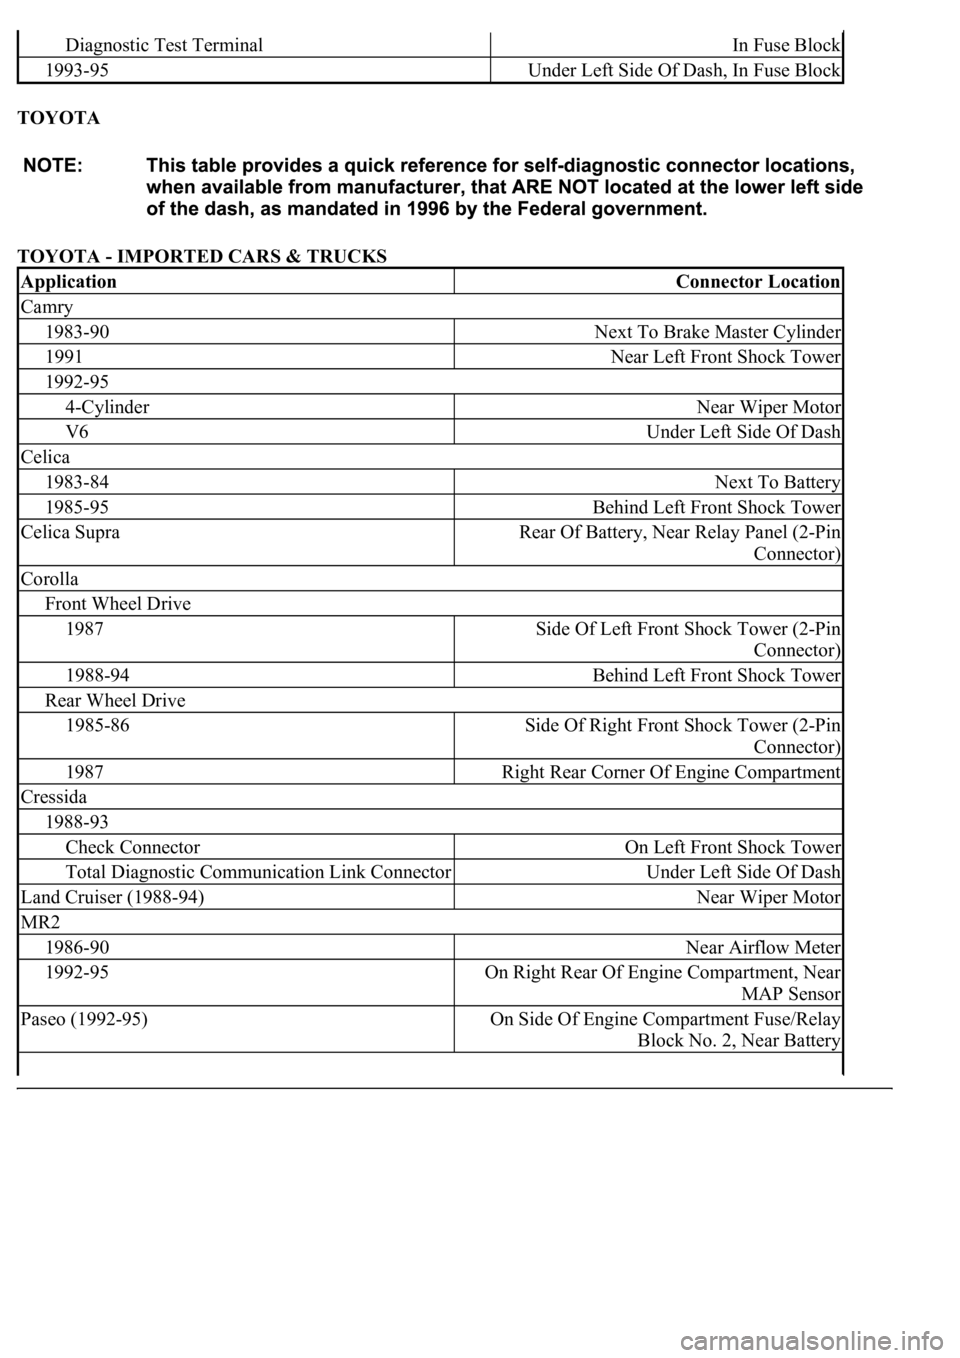
TOYOTA
TOYOTA - IMPORTED CARS & TRUCKS
Diagnostic Test TerminalIn Fuse Block
1993-95Under Left Side Of Dash, In Fuse Block
ApplicationConnector Location
Camry
1983-90Next To Brake Master Cylinder
1991Near Left Front Shock Tower
1992-95
4-CylinderNear Wiper Motor
V6Under Left Side Of Dash
Celica
1983-84Next To Battery
1985-95Behind Left Front Shock Tower
Celica SupraRear Of Battery, Near Relay Panel (2-Pin
Connector)
Corolla
Front Wheel Drive
1987Side Of Left Front Shock Tower (2-Pin
Connector)
1988-94Behind Left Front Shock Tower
Rear Wheel Drive
1985-86Side Of Right Front Shock Tower (2-Pin
Connector)
1987Right Rear Corner Of Engine Compartment
Cressida
1988-93
Check ConnectorOn Left Front Shock Tower
Total Diagnostic Communication Link ConnectorUnder Left Side Of Dash
Land Cruiser (1988-94)Near Wiper Motor
MR2
1986-90Near Airflow Meter
1992-95On Right Rear Of Engine Compartment, Near
MAP Sensor
Paseo (1992-95)On Side Of Engine Compartment Fuse/Relay
Block No. 2, Near Battery
Page 2034 of 4500
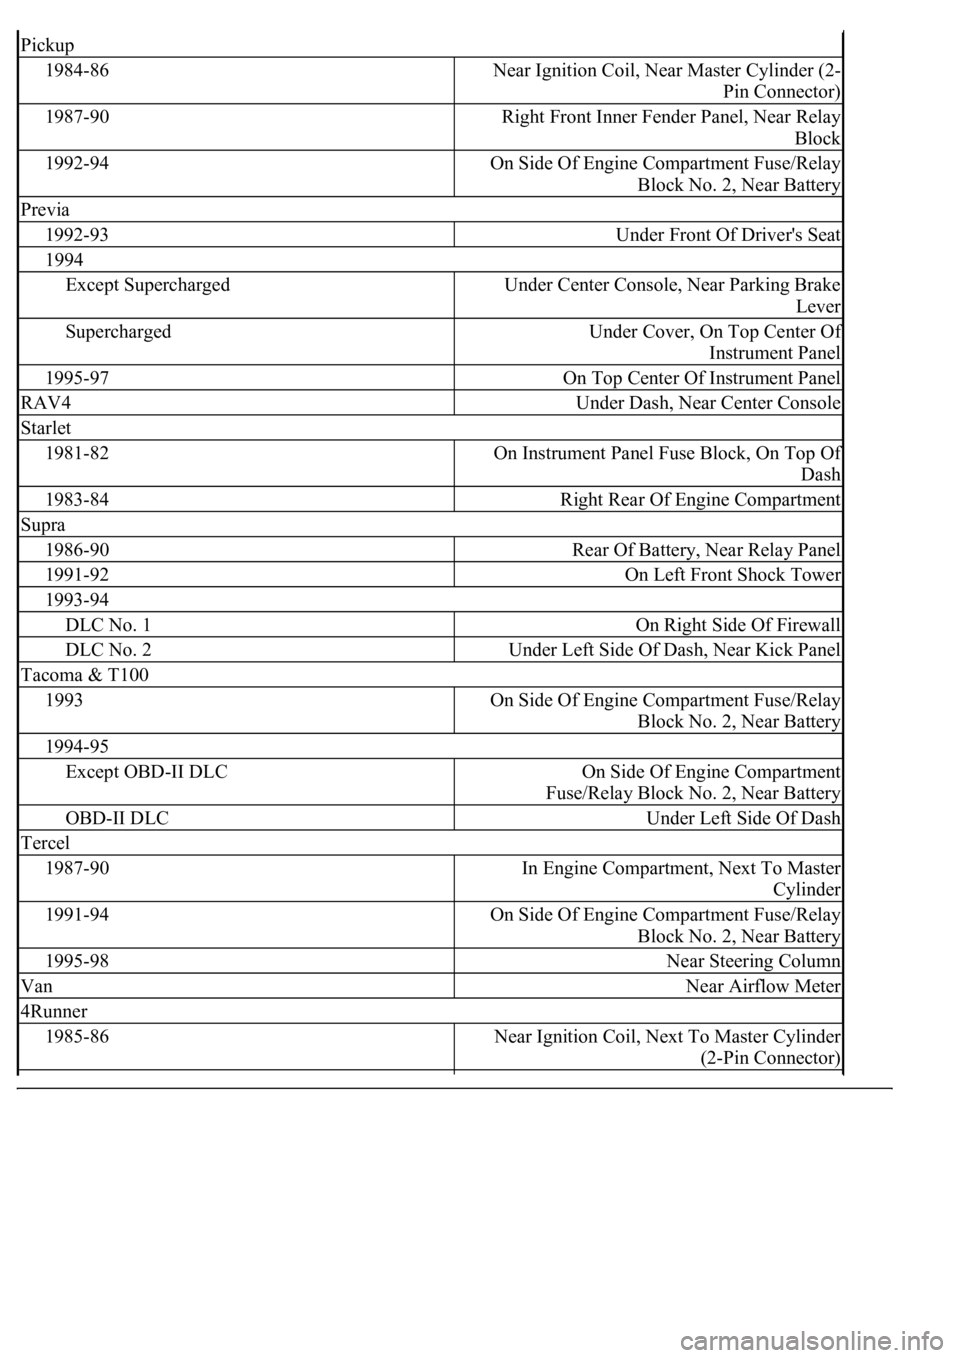
Pickup
1984-86Near Ignition Coil, Near Master Cylinder (2-
Pin Connector)
1987-90Right Front Inner Fender Panel, Near Relay
Block
1992-94On Side Of Engine Compartment Fuse/Relay
Block No. 2, Near Battery
Previa
1992-93Under Front Of Driver's Seat
1994
Except SuperchargedUnder Center Console, Near Parking Brake
Lever
SuperchargedUnder Cover, On Top Center Of
Instrument Panel
1995-97On Top Center Of Instrument Panel
RAV4Under Dash, Near Center Console
Starlet
1981-82On Instrument Panel Fuse Block, On Top Of
Dash
1983-84Right Rear Of Engine Compartment
Supra
1986-90Rear Of Battery, Near Relay Panel
1991-92On Left Front Shock Tower
1993-94
DLC No. 1On Right Side Of Firewall
DLC No. 2Under Left Side Of Dash, Near Kick Panel
Tacoma & T100
1993On Side Of Engine Compartment Fuse/Relay
Block No. 2, Near Battery
1994-95
Except OBD-II DLCOn Side Of Engine Compartment
Fuse/Relay Block No. 2, Near Battery
OBD-II DLCUnder Left Side Of Dash
Tercel
1987-90In Engine Compartment, Next To Master
Cylinder
1991-94On Side Of Engine Compartment Fuse/Relay
Block No. 2, Near Battery
1995-98Near Steering Column
VanNear Airflow Meter
4Runner
1985-86Near Ignition Coil, Next To Master Cylinder
(2-Pin Connector)
Page 2035 of 4500
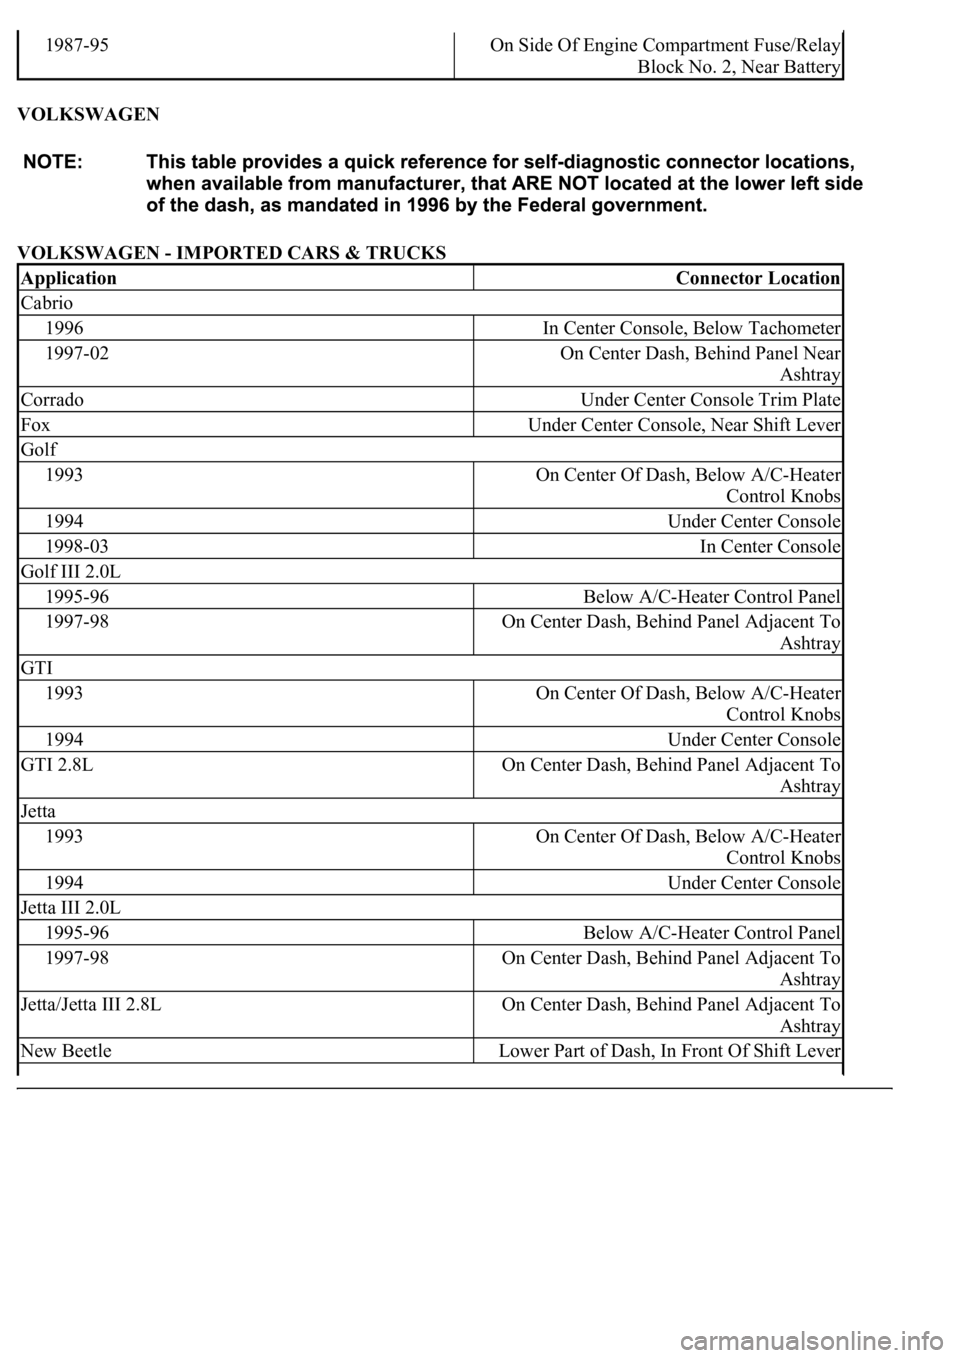
VOLKSWAGEN
VOLKSWAGEN - IMPORTED CARS & TRUCKS
1987-95On Side Of Engine Compartment Fuse/Relay
Block No. 2, Near Battery
ApplicationConnector Location
Cabrio
1996In Center Console, Below Tachometer
1997-02On Center Dash, Behind Panel Near
Ashtray
CorradoUnder Center Console Trim Plate
FoxUnder Center Console, Near Shift Lever
Golf
1993On Center Of Dash, Below A/C-Heater
Control Knobs
1994Under Center Console
1998-03In Center Console
Golf III 2.0L
1995-96Below A/C-Heater Control Panel
1997-98On Center Dash, Behind Panel Adjacent To
Ashtray
GTI
1993On Center Of Dash, Below A/C-Heater
Control Knobs
1994Under Center Console
GTI 2.8LOn Center Dash, Behind Panel Adjacent To
Ashtray
Jetta
1993On Center Of Dash, Below A/C-Heater
Control Knobs
1994Under Center Console
Jetta III 2.0L
1995-96Below A/C-Heater Control Panel
1997-98On Center Dash, Behind Panel Adjacent To
Ashtray
Jetta/Jetta III 2.8LOn Center Dash, Behind Panel Adjacent To
Ashtray
New BeetleLower Part of Dash, In Front Of Shift Lever
Page 2213 of 4500
NG: REPLACE FUSE
OK: Go to Next Step.
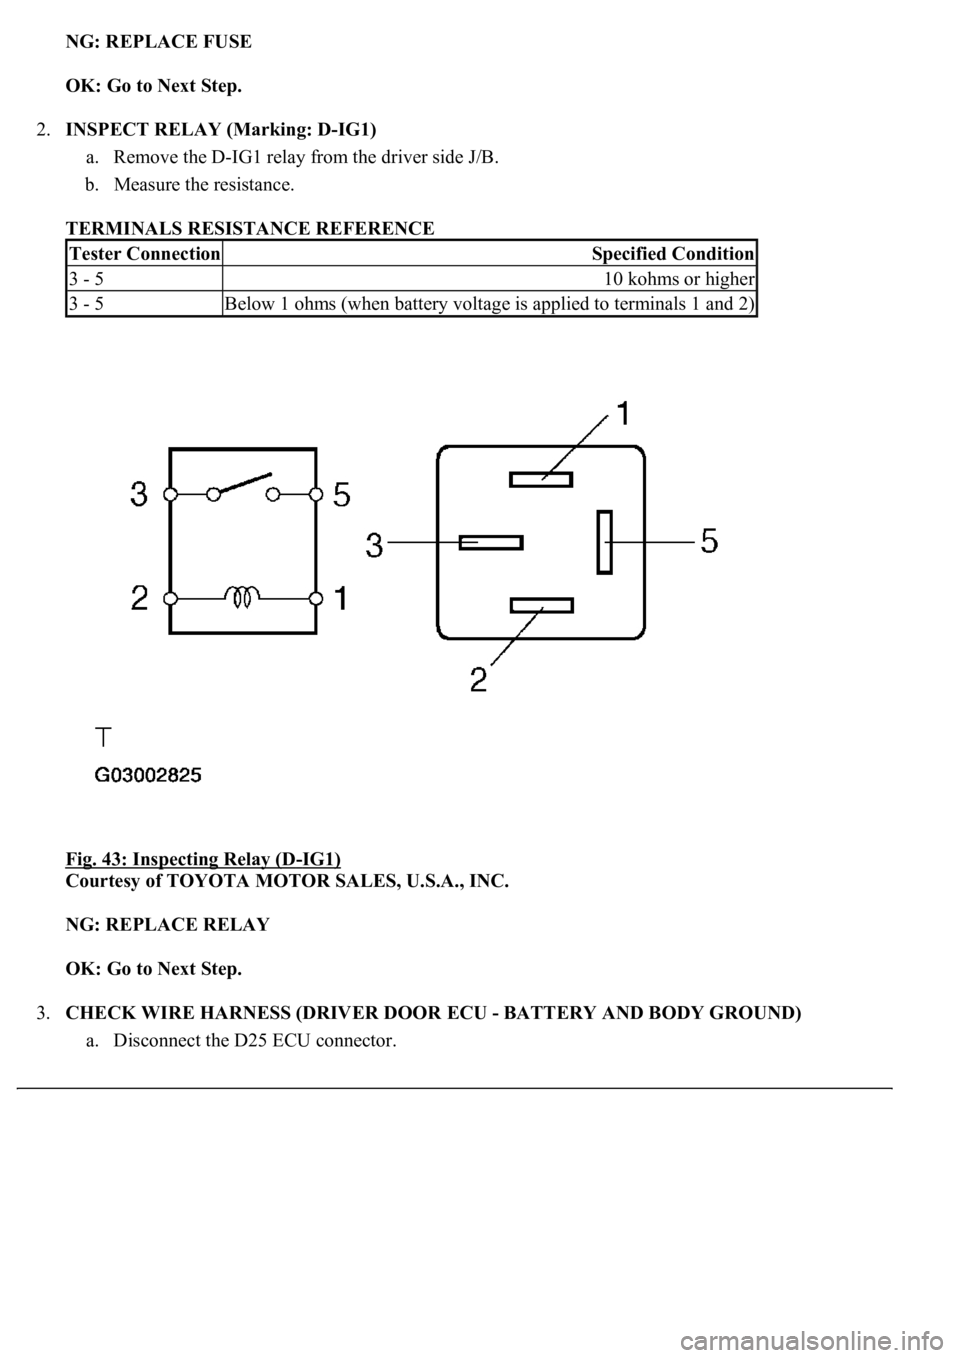
2.INSPECT RELAY (Marking: D-IG1)
a. Remove the D-IG1 relay from the driver side J/B.
b. Measure the resistance.
TERMINALS RESISTANCE REFERENCE
Fig. 43: Inspecting Relay (D
-IG1)
Courtesy of TOYOTA MOTOR SALES, U.S.A., INC.
NG: REPLACE RELAY
OK: Go to Next Step.
3.CHECK WIRE HARNESS (DRIVER DOOR ECU - BATTERY AND BODY GROUND)
a. Disconnect the D25 ECU connector.
Tester ConnectionSpecified Condition
3 - 510 kohms or higher
3 - 5Below 1 ohms (when battery voltage is applied to terminals 1 and 2)
Page 2216 of 4500
1.INSPECT FUSE (MPX-IG, AM1, P DOOR, MPX-B1, D/C CUT)
a. Remove the MPX-IG and AM1 fuses from the driver side J/B.
b. Remove the P DOOR and MPX-B1 fuses from the passenger side J/B.
c. Remove the D/C CUT fuse from the FL block assy.
d. Measure the resistance.
Standard: Below 1 ohms
NG: REPLACE FUSE
OK: Go to Next Step.
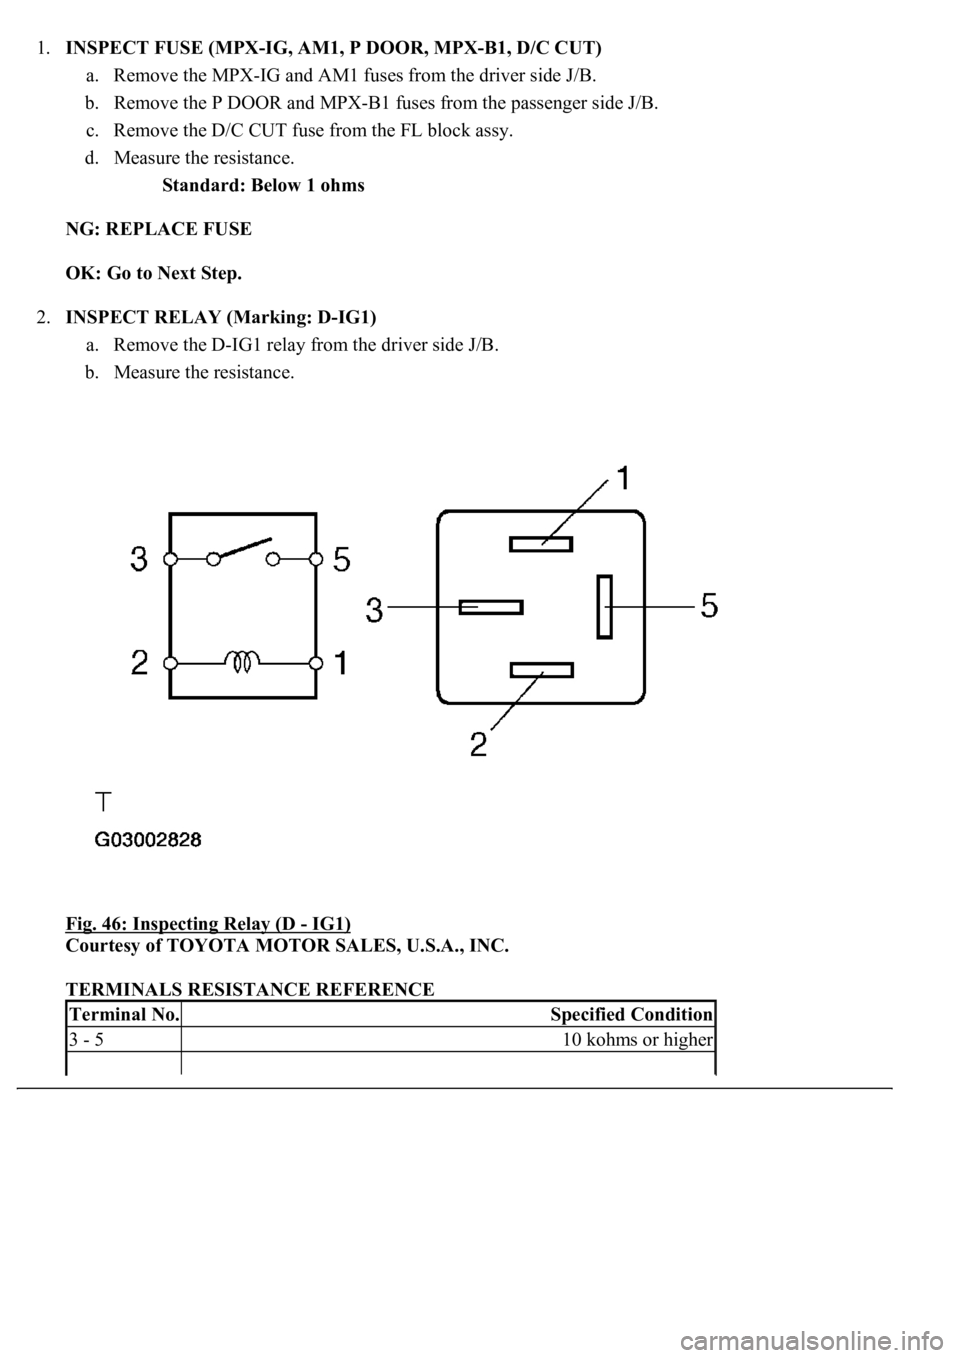
2.INSPECT RELAY (Marking: D-IG1)
a. Remove the D-IG1 relay from the driver side J/B.
b. Measure the resistance.
Fig. 46: Inspecting Relay (D
- IG1)
Courtesy of TOYOTA MOTOR SALES, U.S.A., INC.
TERMINALS RESISTANCE REFERENCE
Terminal No.Specified Condition
3 - 510 kohms or higher
Page 2217 of 4500
NG: REPLACE RELAY
OK: Go to Next Step.
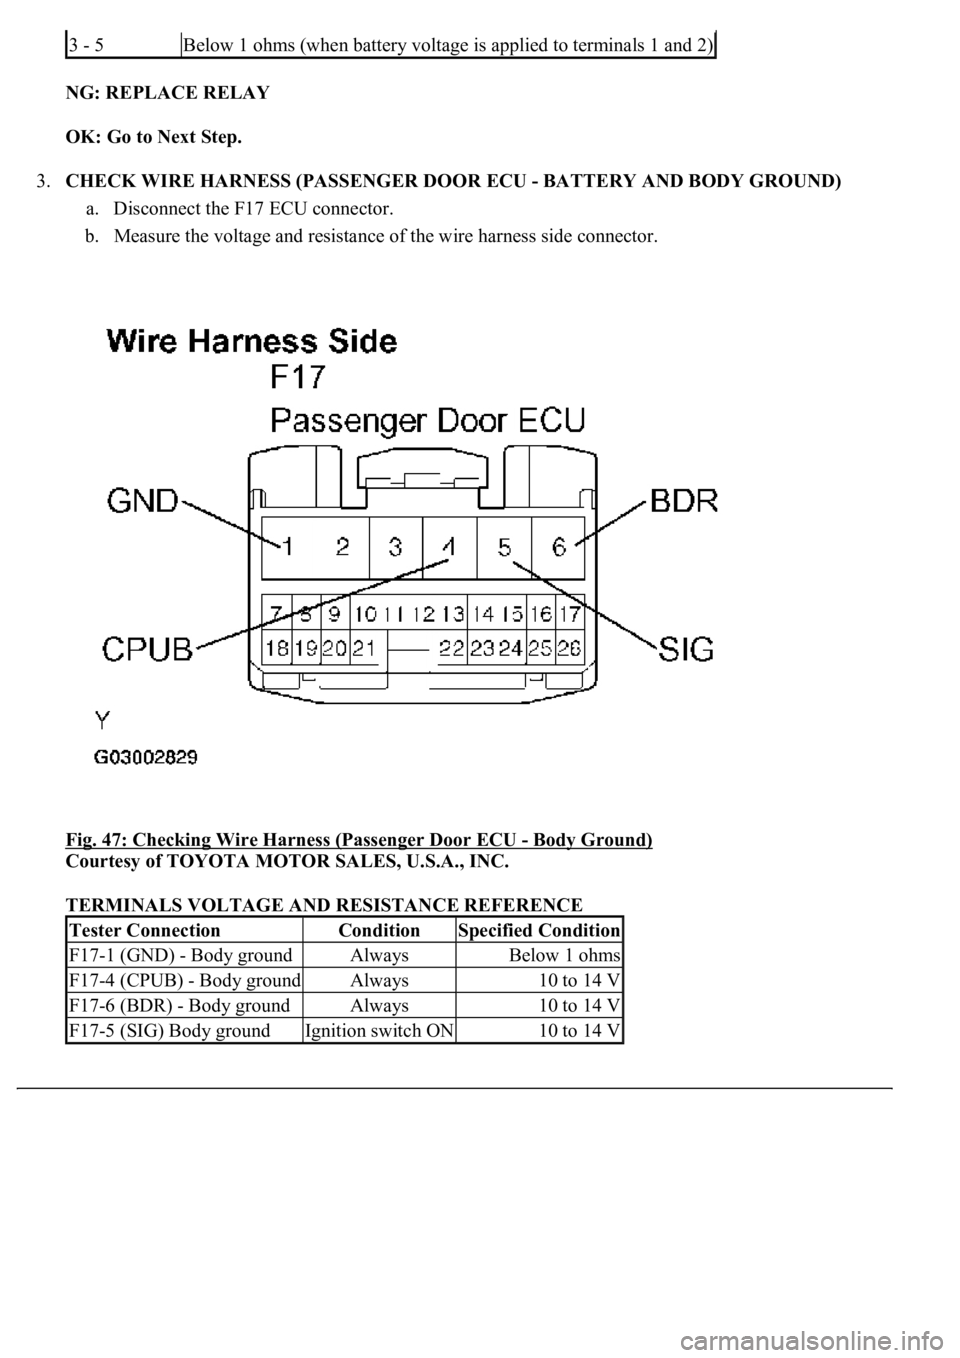
3.CHECK WIRE HARNESS (PASSENGER DOOR ECU - BATTERY AND BODY GROUND)
a. Disconnect the F17 ECU connector.
b. Measure the voltage and resistance of the wire harness side connector.
<0029004c004a001100030017001a001d00030026004b00480046004e004c0051004a0003003a004c005500480003002b0044005500510048005600560003000b003300440056005600480051004a0048005500030027005200520055000300280026003800
03[
- Body Ground)
Courtesy of TOYOTA MOTOR SALES, U.S.A., INC.
TERMINALS VOLTAGE AND RESISTANCE REFERENCE
3 - 5Below 1 ohms (when battery voltage is applied to terminals 1 and 2)
Tester ConnectionConditionSpecified Condition
F17-1 (GND) - Body groundAlwaysBelow 1 ohms
F17-4 (CPUB) - Body groundAlways10 to 14 V
F17-6 (BDR) - Body groundAlways10 to 14 V
F17-5 (SIG) Body groundIgnition switch ON10 to 14 V
Page 2220 of 4500
b. Remove the RR DOOR LH and MPX-B1 fuses from the passenger side J/B.
c. Remove the D/C CUT fuse from the FL block assy.
d. Measure the resistance.
Standard: Below 1 ohms
NG: REPLACE FUSE
OK: Go to Next Step.
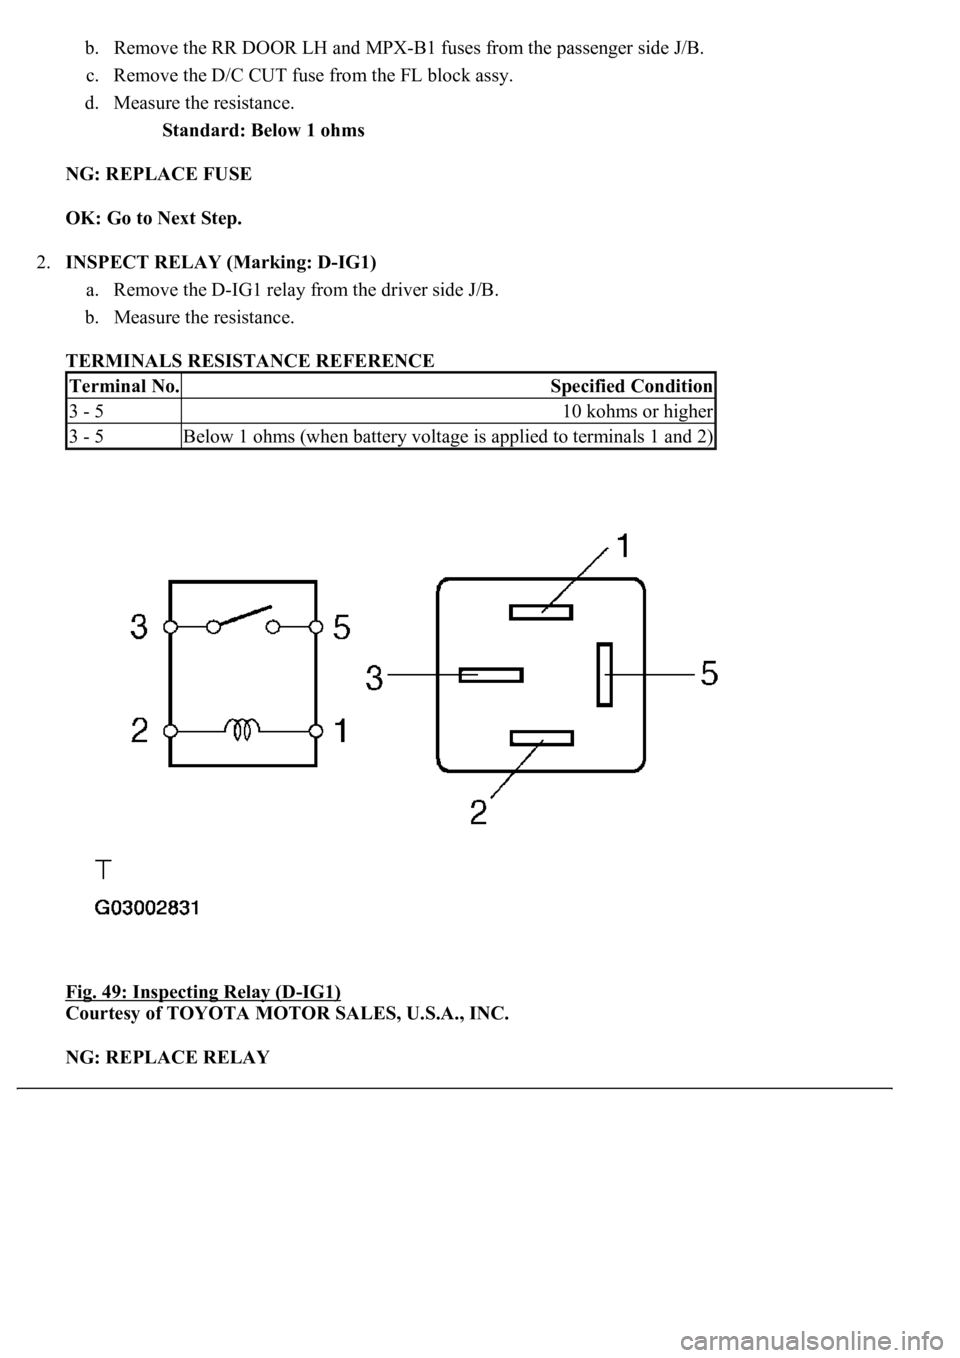
2.INSPECT RELAY (Marking: D-IG1)
a. Remove the D-IG1 relay from the driver side J/B.
b. Measure the resistance.
TERMINALS RESISTANCE REFERENCE
Fig. 49: Inspecting Relay (D
-IG1)
Courtesy of TOYOTA MOTOR SALES, U.S.A., INC.
NG: REPLACE RELAY
Terminal No.Specified Condition
3 - 510 kohms or higher
3 - 5Below 1 ohms (when battery voltage is applied to terminals 1 and 2)