automatic transmission fluid LEXUS LS430 2003 Factory Repair Manual
[x] Cancel search | Manufacturer: LEXUS, Model Year: 2003, Model line: LS430, Model: LEXUS LS430 2003Pages: 4500, PDF Size: 87.45 MB
Page 818 of 4500
PRECAUTION
1. The automatic transmission is composed of highly precision-finished parts which need careful inspection
before reassembly because even a small nick could cause fluid leakage or affect performance. The
instructions here are organized so that you work on only one component group at a time. This will help
avoid confusion from similar-looking parts of different sub-assemblies being on your workbench at the
same time. The component groups should be inspected and repaired from the converter housing side.
Inspect, repair and reassemble as much as possible before proceeding to the next component group. If a
defect is found in a certain component group during reassembly, inspect and repair this group
immediately. If a component group cannot be assembled because parts are being ordered, be sure to keep
all parts of the group in a separate container while proceeding with disassembly, inspection, repair and
reassembly of other component groups. Recommended ATF: ATF WS
2. All disassembled parts should be washed clean and any fluid passages and holes should be blown through
with compressed air.
3. Dry all parts with compressed air. Never use shop rags.
4. When using compressed air, be careful not to not aim at yourself to prevent accidentally spraying ATF or
kerosene on your face.
5. Only recommended automatic transaxle fluid or kerosene should be used for cleaning.
6. After cleaning, the parts should be arranged in the correct order for efficient inspection, repairs, and
reassembly.
7. When disassembling a valve body, be sure to match each valve together with the corresponding spring.
8. New discs for the brakes and clutches that are to be used for replacement must be soaked in ATF for at
least 15 minutes before reassembly.
9. All oil seal rings, clutch discs, clutch plates, rotating parts, and sliding surfaces should be coated with
ATF prior to reassembly.
10. All gaskets and rubber O-rings should be replaced.
11. Do not apply adhesive cements to gaskets or similar parts.
12. Make sure that the ends of a snap ring are not aligned with one of the cutouts and are installed in the
groove correctly.
13. When replacing a worn bushing, the sub-assembly containing the bushing must also be replaced.
14. Check thrust bearings and races for wear or damage. Replace them as necessary.
15. Use petroleum jelly to keep parts in place.
16. When working with FIPG material, perform the following: Using a razor blade and a gasket scraper,
remove all the old packing (FIPG) material from the gasket surface.
Thoroughly clean all components to remove any loose material.
Page 845 of 4500
3.REMOVE ENGINE UNDER COVER NO.2
4.REMOVE INSTRUMENT PANEL UNDER COVER SUB-ASSY NO.2 (SEE REPLACEMENT
)
5.REMOVE INSTRUMENT PANEL GARNISH SUB-ASSY LH (SEE REPLACEMENT
)
6.REMOVE INSTRUMENT PANEL FINISH PANEL (SEE REPLACEMENT
)
7.REMOVE INSTRUMENT PANEL UNDER COVER SUB-ASSY NO.1 (SEE REPLACEMENT
)
8.REMOVE SWITCH BRACE HOLE COVER (SEE REPLACEMENT
)
9.REMOVE INSTRUMENT PANEL SAFETY PAD SUB-ASSY NO.1 (SEE REPLACEMENT
)
10.REMOVE INSTRUMENT PANEL CUP HOLDER ASSY (SEE REPLACEMENT
)
11.REMOVE CONSOLE UPPER REAR PANEL SUB-ASSY (SEE REPLACEMENT
)
12.REMOVE CONSOLE BOX CARPET (SEE REPLACEMENT
)
13.REMOVE REAR CONSOLE ARMREST ASSY (SEE REPLACEMENT
)
14.REMOVE INSTRUMENT PANEL FINISH PANEL LOWER CENTER (SEE REPLACEMENT
)
15.REMOVE INSTRUMENT CLUSTER FINISH PANEL SUB-ASSY CENTER (SEE
REPLACEMENT
)
16.REMOVE CONSOLE PANEL SUB-ASSY UPPER (SEE REPLACEMENT
)
17.REMOVE CONSOLE BOX (SEE REPLACEMENT
)
18.SEPARATE OXYGEN SENSOR (SEE REPLACEMENT
)
a. Separate the 2 heated oxygen sensors.
19.REMOVE FRONT FLOOR BRACE CENTER (SEE REPLACEMENT
)
20.REMOVE EXHAUST PIPE ASSY (SEE REPLACEMENT
)
21.REMOVE FRONT FLOOR HEAT INSULATOR NO.1 (SEE OVERHAUL
)
22.REMOVE PROPELLER W/CENTER BEARING SHAFT ASSY (SEE OVERHAUL
)
SST 09922-10010
23.DRAIN AUTOMATIC TRANSMISSION FLUID
a. Remove the drain plug, gasket and drain the ATF.
b.Install a new gasket and the drain plug.
Torque: 20 N.m (205 kgf.cm, 15 ft.lbf)
24.REMOVE EXHAUST PIPE NO.1 SUPPORT BRACKET SUB-ASSY
a. Remove the 2 bolts and exhaust pipe No.1 support bracket sub-ass
y.
Page 873 of 4500
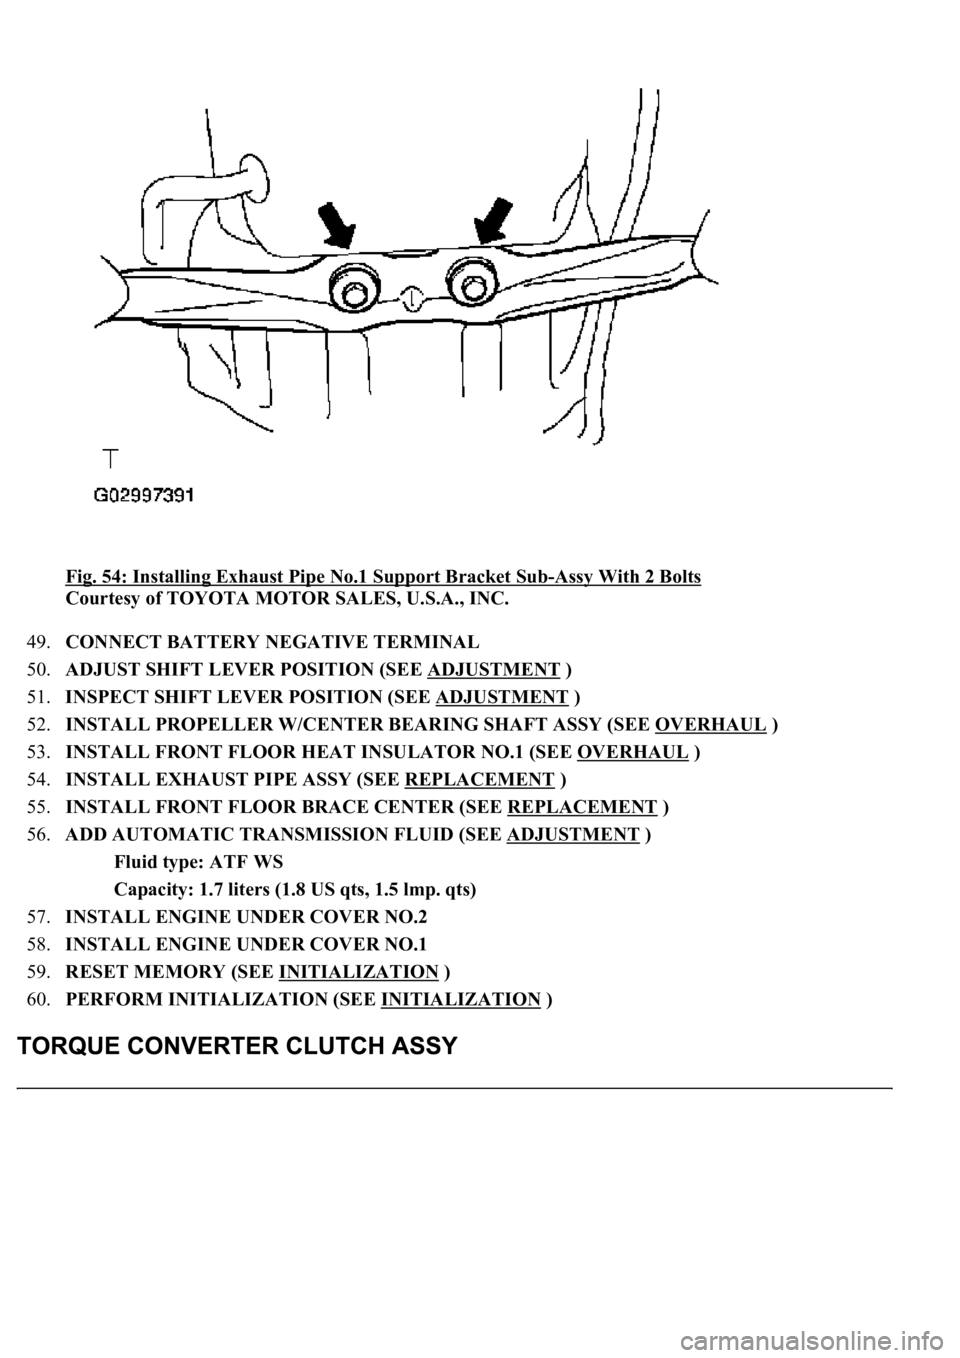
Fig. 54: Installing Exhaust Pipe No.1 Support Bracket Sub-Assy With 2 Bolts
Courtesy of TOYOTA MOTOR SALES, U.S.A., INC.
49.CONNECT BATTERY NEGATIVE TERMINAL
50.ADJUST SHIFT LEVER POSITION (SEE ADJUSTMENT
)
51.INSPECT SHIFT LEVER POSITION (SEE ADJUSTMENT
)
52.INSTALL PROPELLER W/CENTER BEARING SHAFT ASSY (SEE OVERHAUL
)
53.INSTALL FRONT FLOOR HEAT INSULATOR NO.1 (SEE OVERHAUL
)
54.INSTALL EXHAUST PIPE ASSY (SEE REPLACEMENT
)
55.INSTALL FRONT FLOOR BRACE CENTER (SEE REPLACEMENT
)
56.ADD AUTOMATIC TRANSMISSION FLUID (SEE ADJUSTMENT
)
Fluid type: ATF WS
Capacity: 1.7 liters (1.8 US qts, 1.5 lmp. qts)
57.INSTALL ENGINE UNDER COVER NO.2
58.INSTALL ENGINE UNDER COVER NO.1
59.RESET MEMORY (SEE INITIALIZATION
)
60.PERFORM INITIALIZATION (SEE INITIALIZATION
)
Page 880 of 4500
Courtesy of TOYOTA MOTOR SALES, U.S.A., INC.
REPLACEMENT
<00380056004c0051004a00030044000300550044005d0052005500030045004f00440047004800030044005100470003004a00440056004e0048005700030056004600550044005300480055000f000300550048005000520059004800030044004f004f00
030057004b004800030052004f004700030029002c0033002a[ material from the gasket surfaces.
Thoroughly clean all components to remove any loose material.
Clean both sealing surfaces with a non-residue solvent.
Apply FIPG in a continuous line width approximately 1 mm (0.04 in.) along the sealing surface.
Parts must be assembled within 10 minutes of application. Otherwise, the FIPG material must be
removed and reapplied.
1.DISCONNECT BATTERY NEGATIVE TERMINAL
2.DRAIN AUTOMATIC TRANSMISSION FLUID
a. Remove the drain plug, gasket and drain the ATF.
b. Install a new gasket and the drain plug.
Torque: 20 N.m (205 kgf.cm, 15 ft.lbf)
3.REMOVE AUTOMATIC TRANSMISSION OIL PAN SUB-ASSY
a. Remove the 20 bolts, oil pan and
gasket.
Page 893 of 4500
Fig. 72: Installing Oil Pan With 20 Bolts To Transmission Case
Courtesy of TOYOTA MOTOR SALES, U.S.A., INC.
11.CONNECT BATTERY NEGATIVE TERMINAL
12.ADD AUTOMATIC TRANSMISSION FLUID (SEE ADJUSTMENT
)
Fluid type: ATF WS
Capacity: 4.3 liters (4.5 US qts, 3.8 Imp.qts)
13.RESET MEMORY (SEE INITIALIZATION
)
14.PERFORM INITIALIZATION (SEE INITIALIZATION
)
REPLACEMENT
<00380056004c0051004a00030044000300550044005d0052005500030045004f00440047004800030044005100470003004a00440056004e0048005700030056004600550044005300480055000f000300550048005000520059004800030044004f004f00
030057004b004800030052004f004700030029002c0033002a[ material from the gasket surfaces.
Thoroughly clean all components to remove any loose material.
Page 894 of 4500
Clean both sealing surfaces with a non-residue solvent.
Apply FIPG in a continuous line width approximately 1 mm (0.04 in.) along the sealing surface.
Parts must be assembled within 10 minutes of application. Otherwise, the FIPG material must be
removed and reapplied.
1.DISCONNECT BATTERY NEGATIVE TERMINAL
2.DRAIN AUTOMATIC TRANSMISSION FLUID
a. Remove the drain plug, gasket and drain the ATF.
b. Install a new gasket and the drain plug.
Torque: 20 N.m (205 kgf.cm, 15 ft.lbf)
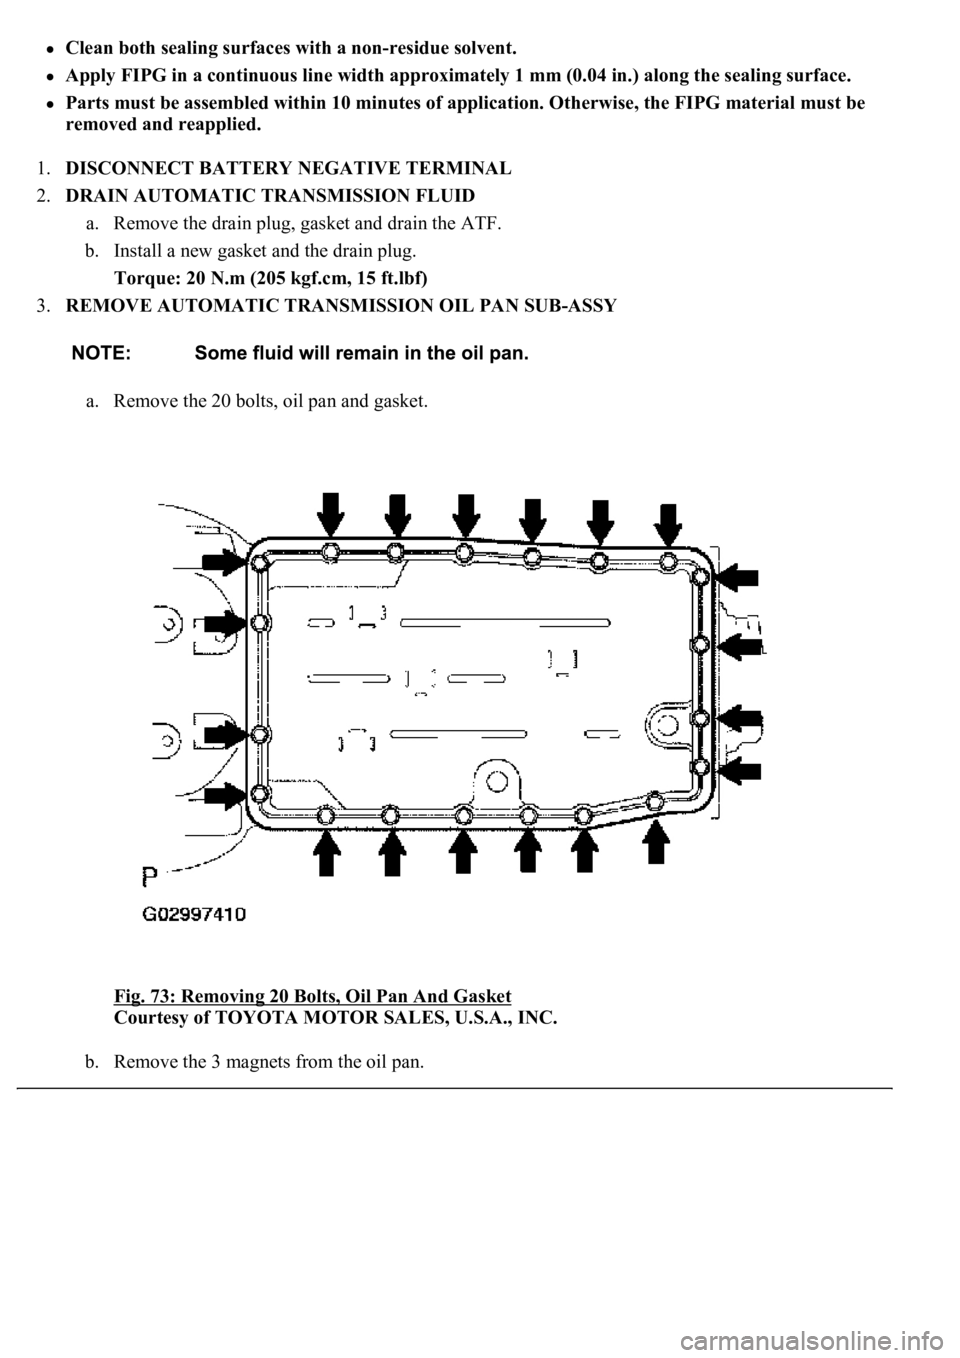
3.REMOVE AUTOMATIC TRANSMISSION OIL PAN SUB-ASSY
a. Remove the 20 bolts, oil pan and gasket.
Fig. 73: Removing 20 Bolts, Oil Pan And Gasket
Courtesy of TOYOTA MOTOR SALES, U.S.A., INC.
b. Remove the 3 magnets from the oil pan.
Page 912 of 4500
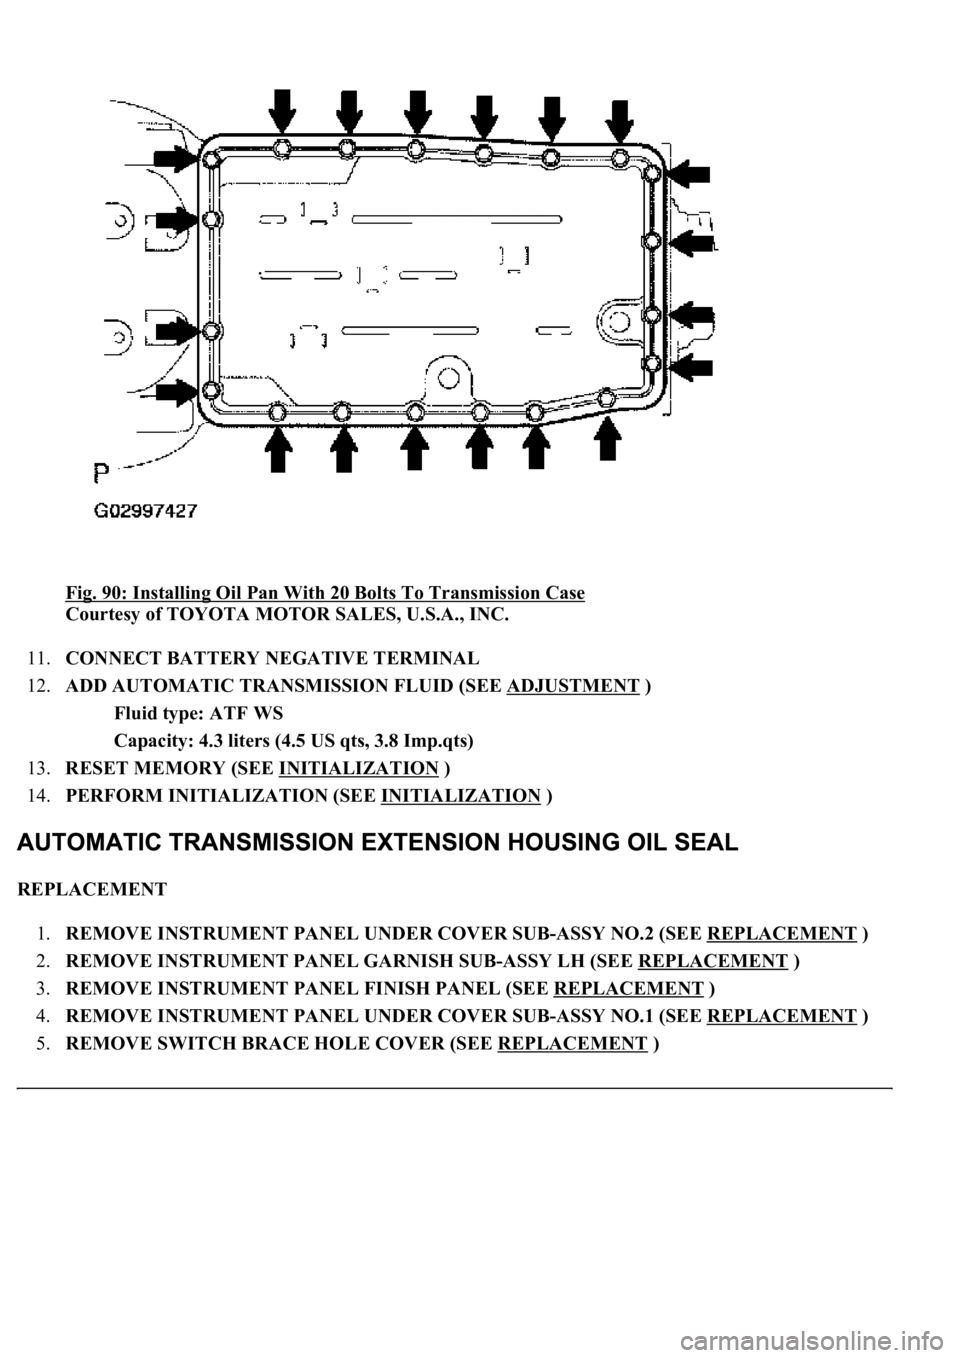
Fig. 90: Installing Oil Pan With 20 Bolts To Transmission Case
Courtesy of TOYOTA MOTOR SALES, U.S.A., INC.
11.CONNECT BATTERY NEGATIVE TERMINAL
12.ADD AUTOMATIC TRANSMISSION FLUID (SEE ADJUSTMENT
)
Fluid type: ATF WS
Capacity: 4.3 liters (4.5 US qts, 3.8 Imp.qts)
13.RESET MEMORY (SEE INITIALIZATION
)
14.PERFORM INITIALIZATION (SEE INITIALIZATION
)
REPLACEMENT
1.REMOVE INSTRUMENT PANEL UNDER COVER SUB-ASSY NO.2 (SEE REPLACEMENT
)
2.REMOVE INSTRUMENT PANEL GARNISH SUB-ASSY LH (SEE REPLACEMENT
)
3.REMOVE INSTRUMENT PANEL FINISH PANEL (SEE REPLACEMENT
)
4.REMOVE INSTRUMENT PANEL UNDER COVER SUB-ASSY NO.1 (SEE REPLACEMENT
)
5.REMOVE SWITCH BRACE HOLE COVER (SEE REPLACEMENT
)
Page 913 of 4500
6.REMOVE INSTRUMENT PANEL SAFETY PAD SUB-ASSY NO.1 (SEE REPLACEMENT )
7.REMOVE INSTRUMENT PANEL CUP HOLDER ASSY (SEE REPLACEMENT
)
8.REMOVE CONSOLE UPPER REAR PANEL SUB-ASSY (SEE REPLACEMENT
)
9.REMOVE CONSOLE BOX CARPET (SEE REPLACEMENT
)
10.REMOVE REAR CONSOLE ARMREST ASSY (SEE REPLACEMENT
)
11.REMOVE INSTRUMENT PANEL FINISH PANEL LOWER CENTER (SEE REPLACEMENT
)
12.REMOVE INSTRUMENT CLUSTER FINISH PANEL SUB-ASSY CENTER (SEE
REPLACEMENT
)
13.REMOVE CONSOLE PANEL SUB-ASSY UPPER (SEE REPLACEMENT
)
14.REMOVE CONSOLE BOX (SEE REPLACEMENT
)
15.SEPARATE OXYGEN SENSOR (SEE REPLACEMENT
)
16.REMOVE EXHAUST PIPE ASSY (SEE REPLACEMENT
)
17.REMOVE PROPELLER W/CENTER BEARING SHAFT ASSY (SEE OVERHAUL
)
18.DRAIN AUTOMATIC TRANSMISSION FLUID
a. Remove the drain plug, gasket and drain the ATF.
b. Install a new gasket and the drain plug.
Torque: 20 N.m (205 kgf.cm, 15 ft.lbf)
19.REMOVE AUTOMATIC TRANSMISSION FLANGE YOKE ASSY
a. Using SST and a hammer, loosen the staked part of the nut.
SST 09930-00010
HINT:
Move the shift lever to the P position.
Page 921 of 4500
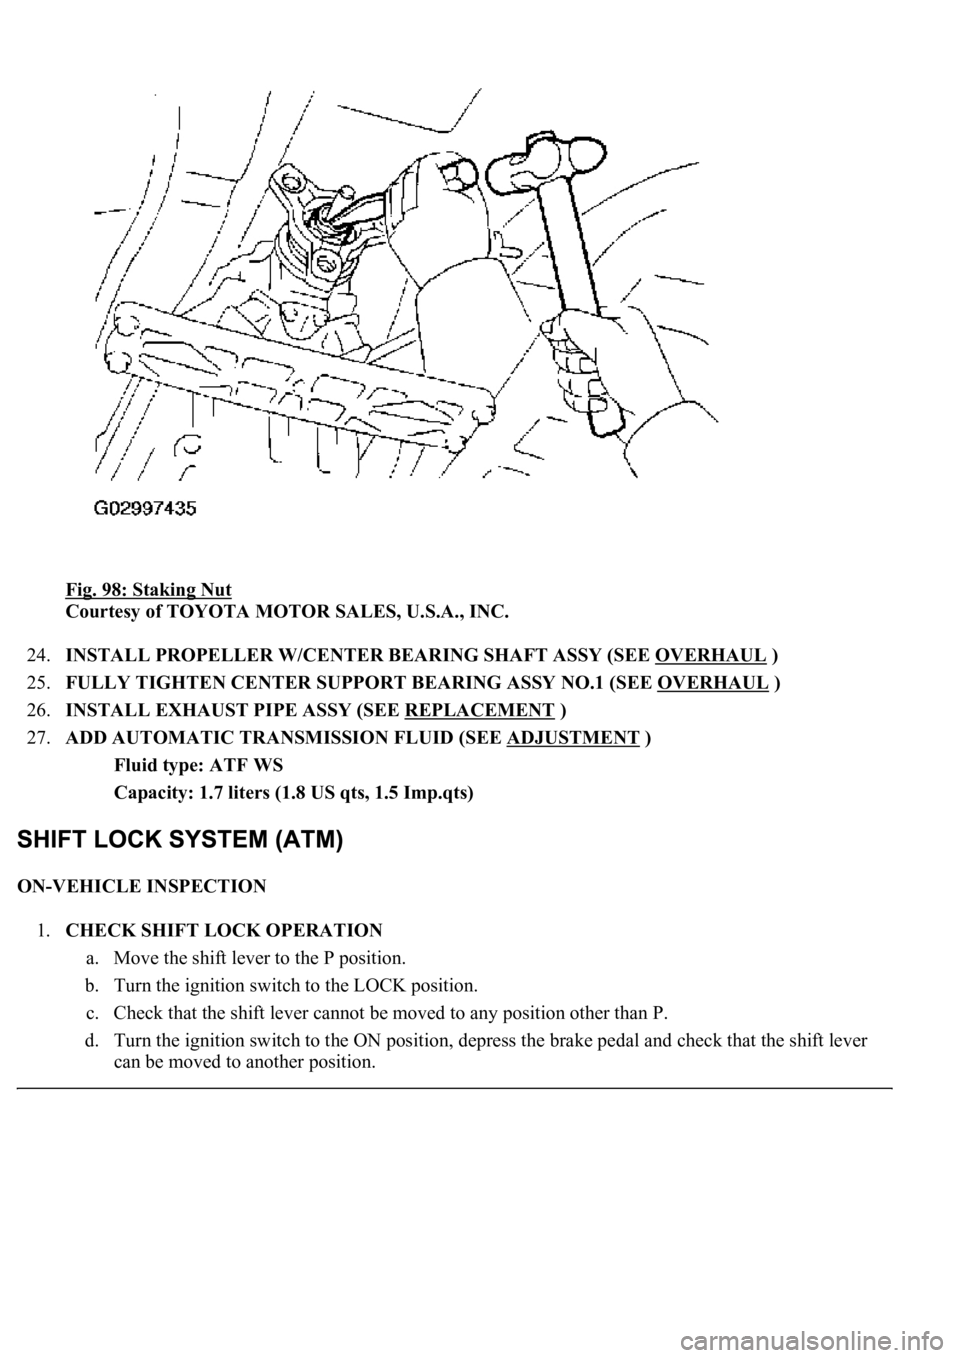
Fig. 98: Staking Nut
Courtesy of TOYOTA MOTOR SALES, U.S.A., INC.
24.INSTALL PROPELLER W/CENTER BEARING SHAFT ASSY (SEE OVERHAUL
)
25.FULLY TIGHTEN CENTER SUPPORT BEARING ASSY NO.1 (SEE OVERHAUL
)
26.INSTALL EXHAUST PIPE ASSY (SEE REPLACEMENT
)
27.ADD AUTOMATIC TRANSMISSION FLUID (SEE ADJUSTMENT
)
Fluid type: ATF WS
Capacity: 1.7 liters (1.8 US qts, 1.5 Imp.qts)
ON-VEHICLE INSPECTION
1.CHECK SHIFT LOCK OPERATION
a. Move the shift lever to the P position.
b. Turn the ignition switch to the LOCK position.
c. Check that the shift lever cannot be moved to any position other than P.
d. Turn the ignition switch to the ON position, depress the brake pedal and check that the shift lever
can be moved to another position.
Page 2414 of 4500
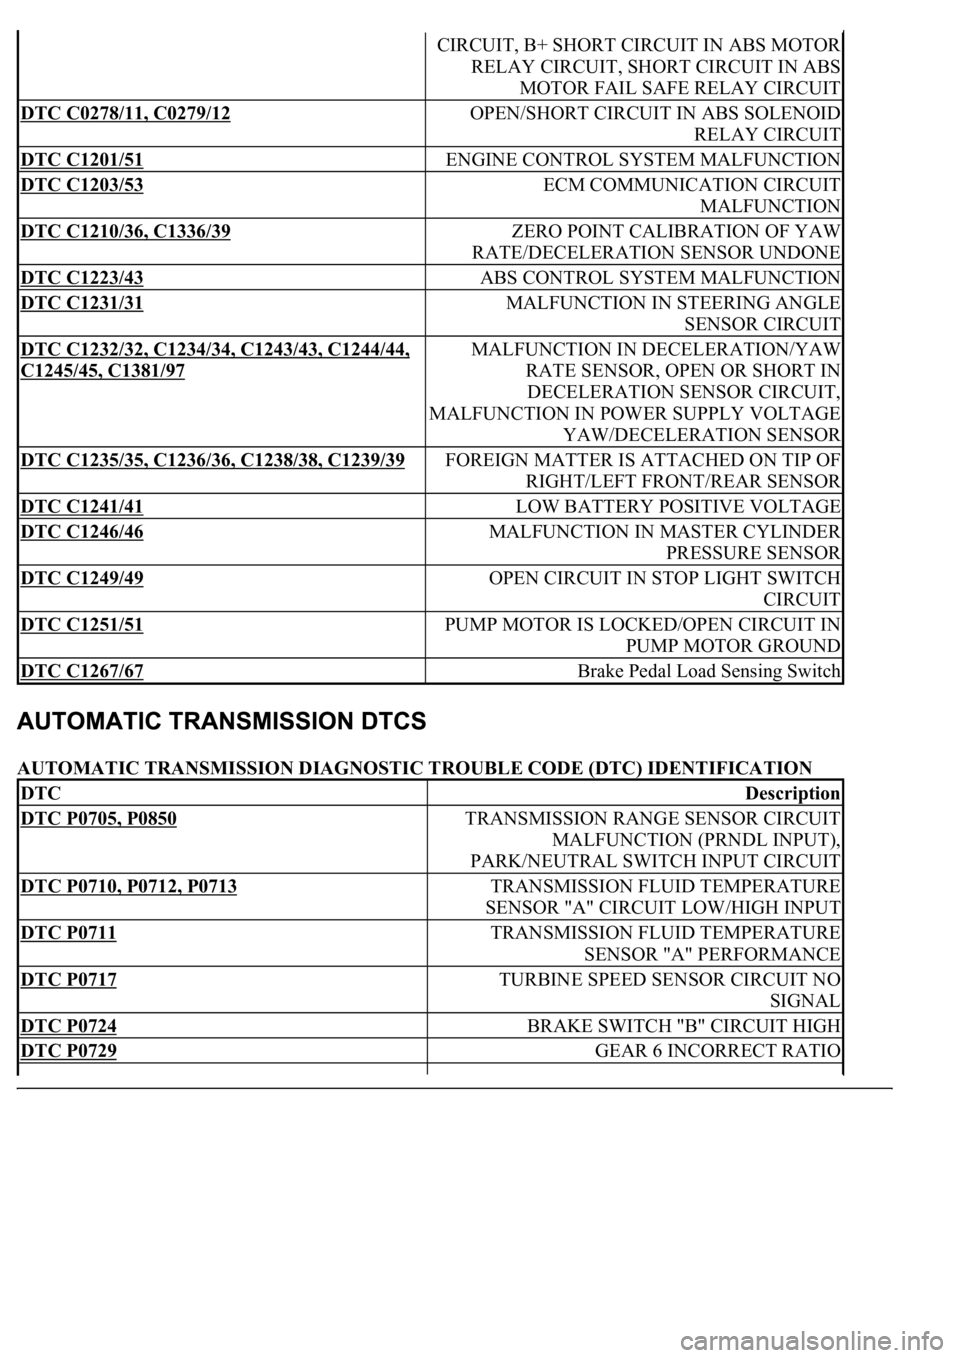
AUTOMATIC TRANSMISSION DIAGNOSTIC TROUBLE CODE (DTC) IDENTIFICATION
CIRCUIT, B+ SHORT CIRCUIT IN ABS MOTOR
RELAY CIRCUIT, SHORT CIRCUIT IN ABS
MOTOR FAIL SAFE RELAY CIRCUIT
DTC C0278/11, C0279/12 OPEN/SHORT CIRCUIT IN ABS SOLENOID
RELAY CIRCUIT
DTC C1201/51 ENGINE CONTROL SYSTEM MALFUNCTION
DTC C1203/53 ECM COMMUNICATION CIRCUIT
MALFUNCTION
DTC C1210/36, C1336/39 ZERO POINT CALIBRATION OF YAW
RATE/DECELERATION SENSOR UNDONE
DTC C1223/43 ABS CONTROL SYSTEM MALFUNCTION
DTC C1231/31 MALFUNCTION IN STEERING ANGLE
SENSOR CIRCUIT
DTC C1232/32, C1234/34, C1243/43, C1244/44,
C1245/45, C1381/97
MALFUNCTION IN DECELERATION/YAW
RATE SENSOR, OPEN OR SHORT IN
DECELERATION SENSOR CIRCUIT,
MALFUNCTION IN POWER SUPPLY VOLTAGE
YAW/DECELERATION SENSOR
DTC C1235/35, C1236/36, C1238/38, C1239/39 FOREIGN MATTER IS ATTACHED ON TIP OF
RIGHT/LEFT FRONT/REAR SENSOR
DTC C1241/41 LOW BATTERY POSITIVE VOLTAGE
DTC C1246/46 MALFUNCTION IN MASTER CYLINDER
PRESSURE SENSOR
DTC C1249/49 OPEN CIRCUIT IN STOP LIGHT SWITCH
CIRCUIT
DTC C1251/51 PUMP MOTOR IS LOCKED/OPEN CIRCUIT IN
PUMP MOTOR GROUND
DTC C1267/67 Brake Pedal Load Sensing Switch
DTCDescription
DTC P0705, P0850 TRANSMISSION RANGE SENSOR CIRCUIT
MALFUNCTION (PRNDL INPUT),
PARK/NEUTRAL SWITCH INPUT CIRCUIT
DTC P0710, P0712, P0713 TRANSMISSION FLUID TEMPERATURE
SENSOR "A" CIRCUIT LOW/HIGH INPUT
DTC P0711 TRANSMISSION FLUID TEMPERATURE
SENSOR "A" PERFORMANCE
DTC P0717 TURBINE SPEED SENSOR CIRCUIT NO
SIGNAL
DTC P0724 BRAKE SWITCH "B" CIRCUIT HIGH
DTC P0729 GEAR 6 INCORRECT RATIO