belt LEXUS LS500 2020 Owner's Guide
[x] Cancel search | Manufacturer: LEXUS, Model Year: 2020, Model line: LS500, Model: LEXUS LS500 2020Pages: 516, PDF Size: 10.38 MB
Page 53 of 516

531-2. Child safety
1
For safety and security
■Child restraint LATCH anchors
LATCH anchors are provided for the
outboard rear seat. (Buttons displaying
the location of the anchors are
attached to the seats.)
■When installing in the rear out-
board seats
Install the child restraint system in
accordance to the operation manual
enclosed with the child restraint sys-
tem.
WARNING
●Do not allow children to play with the
seat belt. If the seat belt becomes
twisted around a child’s neck, it may
lead to choking or other serious inju-
ries that could result in death.
If this occurs and the buckle cannot be
unfastened, scissors should be used to
cut the belt.
●Ensure that the belt and plate are
securely locked and the seat belt is not
twisted.
●Shake the child restraint system left
and right, and forward and backward
to ensure that it has been securely
installed.
●When a booster seat is installed,
always ensure that th e shoulder belt is
positioned across the center of the
child’s shoulder. The belt should be
kept away from the child’s neck, but
not so that it could fall off the child’s
shoulder.
●Follow all installation instructions pro-
vided by the child restraint system
manufacturer.
●When securing some types of child
restraint systems in rear seats, it may
not be possible to properly use the
seat belts in positions next to the child
restraint without inte rfering with it or
affecting seat belt effectiveness. Be
sure your seat belt fits snugly across
your shoulder and low on your hips. If it
does not, or if it interferes with the
child restraint, move to a different posi-
tion. Failure to do so may result in
death or serious injury.
●When installing a child restraint system
in the rear center seat, adjust both seat
cushions to the same position and
align both seatbacks at the same
angle. Otherwise, the child restraint
system cannot be securely restrained
and this may cause death or serious
injuries in the event of sudden braking,
sudden swerving or an accident.
●If the seat is adjusted, reconfirm the
security of the child restraint system.
■When installing a booster seat
To prevent the belt from going into ALR
lock mode, do not fully extend the shoul-
der belt. ALR mode causes the belt to
tighten only. This could cause injury or
discomfort to the child. (
P.26)
■Do not use a seat belt extender
If a seat belt extender is used when
installing a child restra int system, the seat
belt will not securely hold the child
restraint system, which could cause
death or serious injury to the child or
other passengers in the event of sudden
braking, sudden swerving or an accident.
Child restraint system fixed with
a child restraint LATCH anchor
Page 55 of 516
551-2. Child safety
1
For safety and security
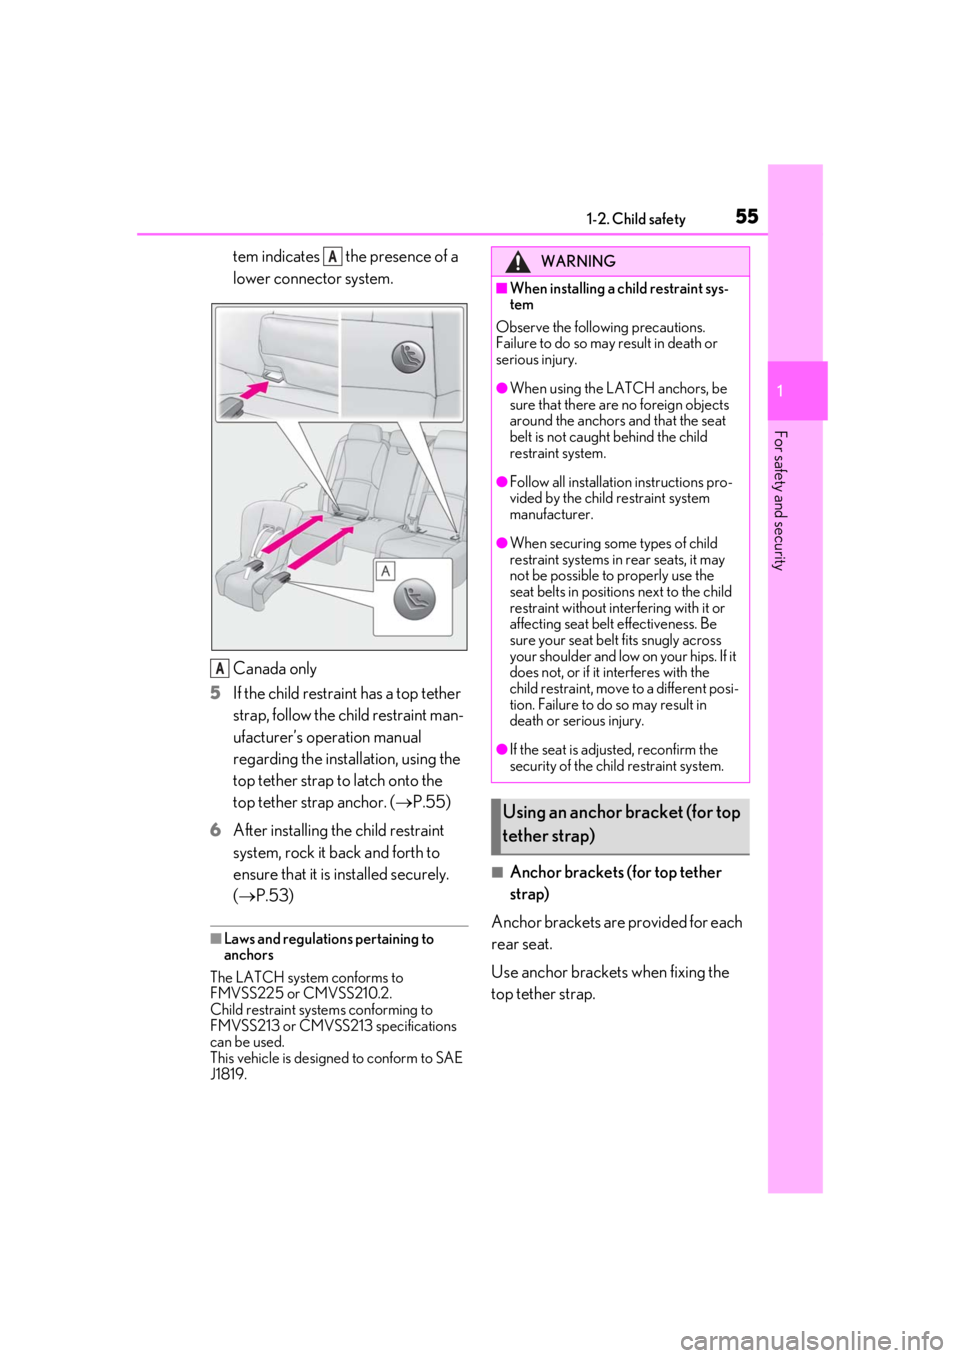
tem indicates the presence of a
lower connector system.
Canada only
5
If the child restraint has a top tether
strap, follow the child restraint man-
ufacturer’s operation manual
regarding the installation, using the
top tether strap to latch onto the
top tether strap anchor. ( P.55)
6
After installing the child restraint
system, rock it back and forth to
ensure that it is installed securely.
( P.53)
■Laws and regulations pertaining to
anchors
The LATCH system conforms to
FMVSS225 or CMVSS210.2.
Child restraint systems conforming to
FMVSS213 or CMVSS213 specifications
can be used.
This vehicle is designed to conform to SAE
J1819.
■Anchor brackets (for top tether
strap)
Anchor brackets are provided for each
rear seat.
Use anchor brackets when fixing the
top tether strap.
A
A
WARNING
■When installing a child restraint sys-
tem
Observe the following precautions.
Failure to do so may result in death or
serious injury.
●When using the LATCH anchors, be
sure that there are no foreign objects
around the anchors and that the seat
belt is not caught behind the child
restraint system.
●Follow all installation instructions pro-
vided by the child restraint system
manufacturer.
●When securing some types of child
restraint systems in rear seats, it may
not be possible to properly use the
seat belts in position s next to the child
restraint without interfering with it or
affecting seat belt effectiveness. Be
sure your seat belt fits snugly across
your shoulder and low on your hips. If it
does not, or if it interferes with the
child restraint, move to a different posi-
tion. Failure to do so may result in
death or serious injury.
●If the seat is adjusted, reconfirm the
security of the child restraint system.
Using an anchor bracket (for top
tether strap)
Page 57 of 516
571-2. Child safety
1
For safety and security
WARNING
●Firmly attach the top tether strap and
make sure that the belt is not twisted.
●Do not attach the top tether strap to
anything other than the anchor
bracket.
●Follow all installation instructions pro-
vided by the child restraint system
manufacturer.
●Be sure to have the top tether strap
pass over the top of the head restraint.
If the belt passes below the head
restraint, it is possible that the child
restraint system may not be securely
fixed.
●If the seat is adjusted, reconfirm the
security of the child restraint system.
NOTICE
■Anchor brackets (for top tether
strap)
When not in use, make certain to close
the lid. If it remains open, the lid may be
damaged.
Page 69 of 516

692-1. Instrument cluster
2
Vehicle status information and indicators
Warning lights inform the driver of mal-
functions in the indicated vehicle’s sys-
tems.
Warning lights
(U.S.A.)
Brake system warning light*1
( P.419)
(red)
(Canada)
Brake system warning light*1
( P.419)
(yellow)
Brake system warning light*1
( P.419)
High coolant temperature
warning light
*2 ( P.419)
Charging system warning
light
*2 ( P.420)
Low engine oil pressure warn-
ing light
*2 ( P.420)
(U.S.A.)
Malfunction indicator lamp*1
( P.420)
(Canada)
Malfunction indicator lamp*1
( P.420)
SRS warning light
*1 ( P.420)
Pop Up Hood warning light
*1
( P.421)
(U.S.A.)
ABS warning light*1 ( P.421)
(Canada)
ABS warning light*1 ( P.421)
Brake Override System warn-
ing light/Drive-Start Control
warning light
*2 ( P.421)
(red)
Electric power steering system
warning light
*1 ( P.422)
(yellow)
Electric power steering system
warning light
*1 ( P.422)
Low fuel level warning light
( P.422)
Driver’s and front passenger’s
seat belt reminder light
( P.422)
Rear passengers’ seat belt
reminder lights
*3 ( P.422)
Tire pressure warning light
*1
( P.423)
(orange)
LTA indicator ( P.423)
(flashes)
Intuitive parking assist OFF indi-
cator
*1 (if equipped) ( P.423)
(flashes)
RCTA OFF indicator*1 (if
equipped) ( P.424)
(flashes)
RCD OFF indicator (if
equipped) ( P.424)
(flashes)
PKSB OFF indicator*1 (if
equipped) ( P.424)
(flashes or
illuminates)PCS warning light*1 ( P.425)
Slip indicator
*1 ( P.425)
(flashes)
(U.S.A.)
Parking brake indicator
( P.425)
Page 119 of 516
1193-3. Adjusting the seats
3
Before driving
3-3.Adjusting the seats
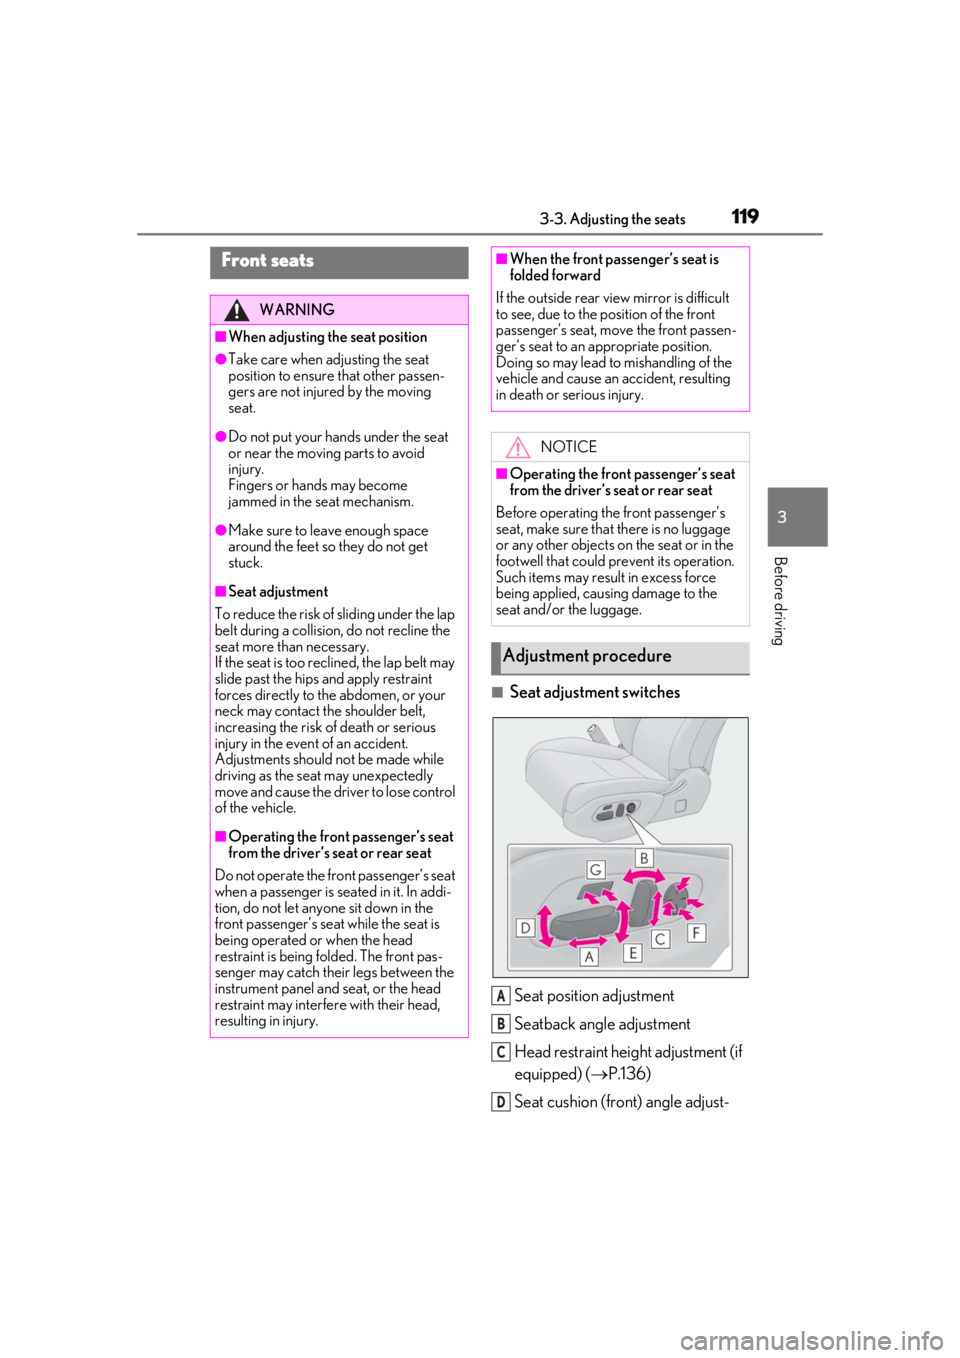
■Seat adjustment switchesSeat position adjustment
Seatback angle adjustment
Head restraint height adjustment (if
equipped) ( P.136)
Seat cushion (front) angle adjust-
Front seats
WARNING
■When adjusting the seat position
●Take care when ad justing the seat
position to ensure that other passen-
gers are not injured by the moving
seat.
●Do not put your hands under the seat
or near the moving parts to avoid
injury.
Fingers or hands may become
jammed in the se at mechanism.
●Make sure to leave enough space
around the feet so they do not get
stuck.
■Seat adjustment
To reduce the risk of sliding under the lap
belt during a collision, do not recline the
seat more than necessary.
If the seat is too reclined, the lap belt may
slide past the hips and apply restraint
forces directly to the abdomen, or your
neck may contact the shoulder belt,
increasing the risk of death or serious
injury in the event of an accident.
Adjustments should not be made while
driving as the seat may unexpectedly
move and cause the driver to lose control
of the vehicle.
■Operating the front passenger’s seat
from the driver’s seat or rear seat
Do not operate the front passenger’s seat
when a passenger is seated in it. In addi-
tion, do not let anyone sit down in the
front passenger’s seat while the seat is
being operated or when the head
restraint is being folded. The front pas-
senger may catch their legs between the
instrument panel and seat, or the head
restraint may interfer e with their head,
resulting in injury.
■When the front passenger’s seat is
folded forward
If the outside rear view mirror is difficult
to see, due to the position of the front
passenger’s seat, move the front passen-
ger’s seat to an appropriate position.
Doing so may lead to mishandling of the
vehicle and cause an accident, resulting
in death or serious injury.
NOTICE
■Operating the front passenger’s seat
from the driver’s seat or rear seat
Before operating the front passenger’s
seat, make sure that there is no luggage
or any other objects on the seat or in the
footwell that could prevent its operation.
Such items may result in excess force
being applied, causing damage to the
seat and/or the luggage.
Adjustment procedure
A
B
C
D
Page 122 of 516
1223-3. Adjusting the seats
■Operating the foldable head restraint
using the driver’s seat adjustment
switches in front passenger mode (if
equipped)
●When the front passenger’s seatback
angle is adjusted using the driver’s seat
adjustment switches in front passenger
mode, the front passenger’s head
restraint will operate automatically as fol-
lows:
• When the front passenger’s seatback is moved forward to the upright position,
the head restraint will lower and fold for-
ward when the seatback angle adjust-
ment switch is released.
• When the front passenger’s seatback is
moved backward to the upright position,
the head restraint will move to the upright
position when the se atback angle adjust-
ment switch is released.
●If any of the following conditions are met,
the front passenger’s head restraint will
not fold forward even though the front
passenger’s seatback angle is being
adjusted using the driver’s seat adjust-
ment switches in front passenger mode:
• The engine switch is in ACCESSORY
mode or off.
• The weight of an occupant or heavy object, etc. is detected on the front pas-
senger’s seat.
Once weight is detect ed on the seat, the
seat will be judged as occupied until the
front passenger’s door is opened then
closed or the engine switch is turned off.
• Vehicles without a rear seat entertain- ment system:The front passenger’s seat is
in the rear most position.
• The front passenger’s seat belt is fas-
tened.
• The front passenger’s door is open. (The
front seat will not move forward.)
• The front passenger’s seat is not in the
lowest position.
• The front passenger’s seat seat cushion
(front) is not in the lowest position.
• The front passenger’s seat seat cushion is extended (if equipped).
●If either of the following conditions is met,
the front passenger’s head restraint will
not return to the upright position even though the front passenger’s seatback
angle is being adjusted using the driver’s
seat adjustment switch
es in front passen-
ger mode:
• The engine switch is in ACCESSORY mode or off.
• The front passenger’s seat position is moved to a position forward of the neu-
tral position.
■Operating the foldable head restraint
using the front passenger’s seat adjust-
ment switches (if equipped)
When the front passenger’s head restraint is
folded forward and the front passenger’s
door is open, if the front passenger’s seat
adjustment switches are used to move the
seat backward or recline the seatback, the
head restraint will move to the upright posi-
tion automatically when the switch is
released.
To stop the operation of the front passen-
ger’s head restraint part-way, perform any
of the following operations:
●Operate any front passenger’s seat
adjustment switch.
The head restraint will stop when the seat
position adjustment switch or seatback
angle adjustment switch is operated to
move the seat backward or recline the
seatback, and will resume operating when
the switch is released.
●Press the “SET” button.
●Press the “1”, “2” or “3” button.
●Press the seat switch.
■Operation of the front passenger’s seat
using the Center Display will be can-
celed when (vehicles with a foldable
head restraint)
In the following situations, the front passen-
ger’s seat cannot be operated using the
Center Display:
●The engine switch is in ACCESSORY
mode or off.
●The weight of an occupant or heavy
object, etc. is detected on the front pas-
senger’s seat.
Once weight is detected on the seat, the
Page 123 of 516
1233-3. Adjusting the seats
3
Before driving
seat will be judged as occupied until the
front passenger’s door is opened then
closed or the engine switch is turned off.
●The front passenger’s seat belt is fas-
tened.
●The front passenger’s door is open. (The
front seat will not move forward.)
■When the front passenger’s seat is
folded forward
By reclining the front passenger’s seat seat-
back, the forward view of the rear passen-
ger can be improved.
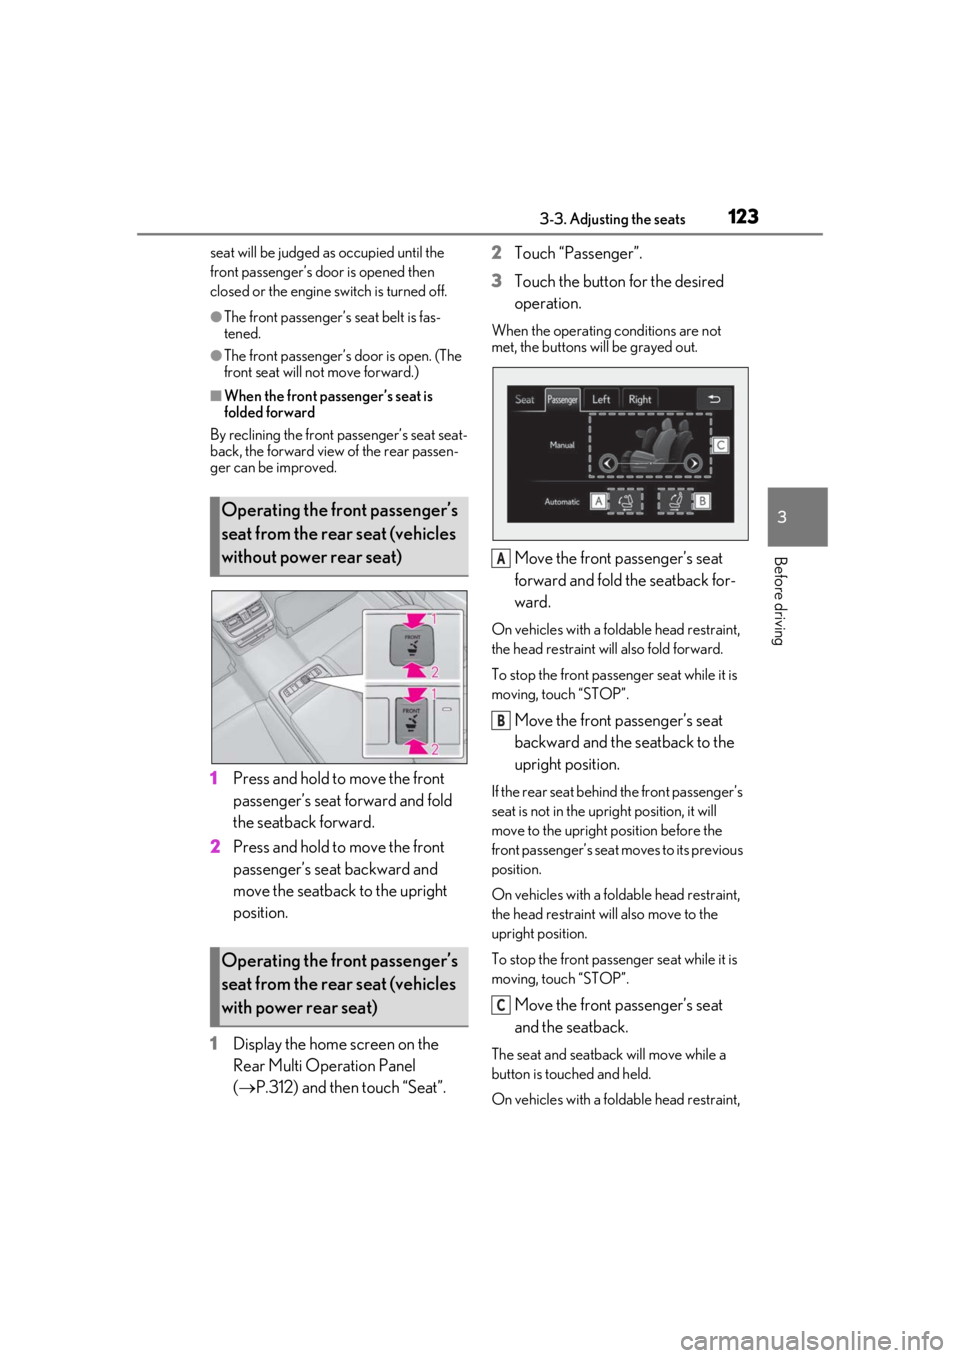
1 Press and hold to move the front
passenger’s seat forward and fold
the seatback forward.
2 Press and hold to move the front
passenger’s seat backward and
move the seatback to the upright
position.
1 Display the home screen on the
Rear Multi Operation Panel
(P.312) and then touch “Seat”. 2
Touch “Passenger”.
3 Touch the button for the desired
operation.
When the operating conditions are not
met, the buttons will be grayed out.
Move the front passenger’s seat
forward and fold the seatback for-
ward.
On vehicles with a foldable head restraint,
the head restraint will also fold forward.
To stop the front passen ger seat while it is
moving, touch “STOP”.
Move the front passenger’s seat
backward and the seatback to the
upright position.
If the rear seat behind the front passenger’s
seat is not in the up right position, it will
move to the upright position before the
front passenger’s seat moves to its previous
position.
On vehicles with a foldable head restraint,
the head restraint will also move to the
upright position.
To stop the front passen ger seat while it is
moving, touch “STOP”.
Move the front passenger’s seat
and the seatback.
The seat and seatback will move while a
button is touched and held.
On vehicles with a foldable head restraint,
Operating the front passenger’s
seat from the rear seat (vehicles
without power rear seat)
Operating the front passenger’s
seat from the rear seat (vehicles
with power rear seat)
A
B
C
Page 124 of 516
1243-3. Adjusting the seats
the head restraint will also move.
■Operating the front passenger’s seat
from the rear seat
●In the following situations, the front pas-
senger’s seat cannot be operated using
the Rear Multi Operation Panel:
• The engine switch is in ACCESSORY mode or off.
• The rear seat belt is not fastened and
weight is not detected on the rear seat.
Once weight is detect ed on the seat, the
seat will be judged as occupied until a rear
door is opened then closed or the engine
switch is turned off and the doors are
locked.
• The weight of an occupant or heavy object, etc. is detected on the front pas-
senger’s seat.
Once weight is detect ed on the seat, the
seat will be judged as occupied until the
front passenger’s door is opened then
closed or the engine switch is turned off.
• The front passenger’s seat belt is fas-
tened.
• The front passenger’s door is open. (The
front seat will not move forward.)
●If the rear armrest is stowed while the
seat position is being adjusted, the opera-
tion will stop.
■Canceling an operation
To cancel an operation, press and hold the
button of the Rear Multi Opera-
tion Panel or press it 3 times in quick suc-
cession.
■When the front passenger’s seat is
folded forward
P.123
Pneumatic chambers built into the
front seat apply pre ssure to the occu-
pant’s body at different modes and intensities.
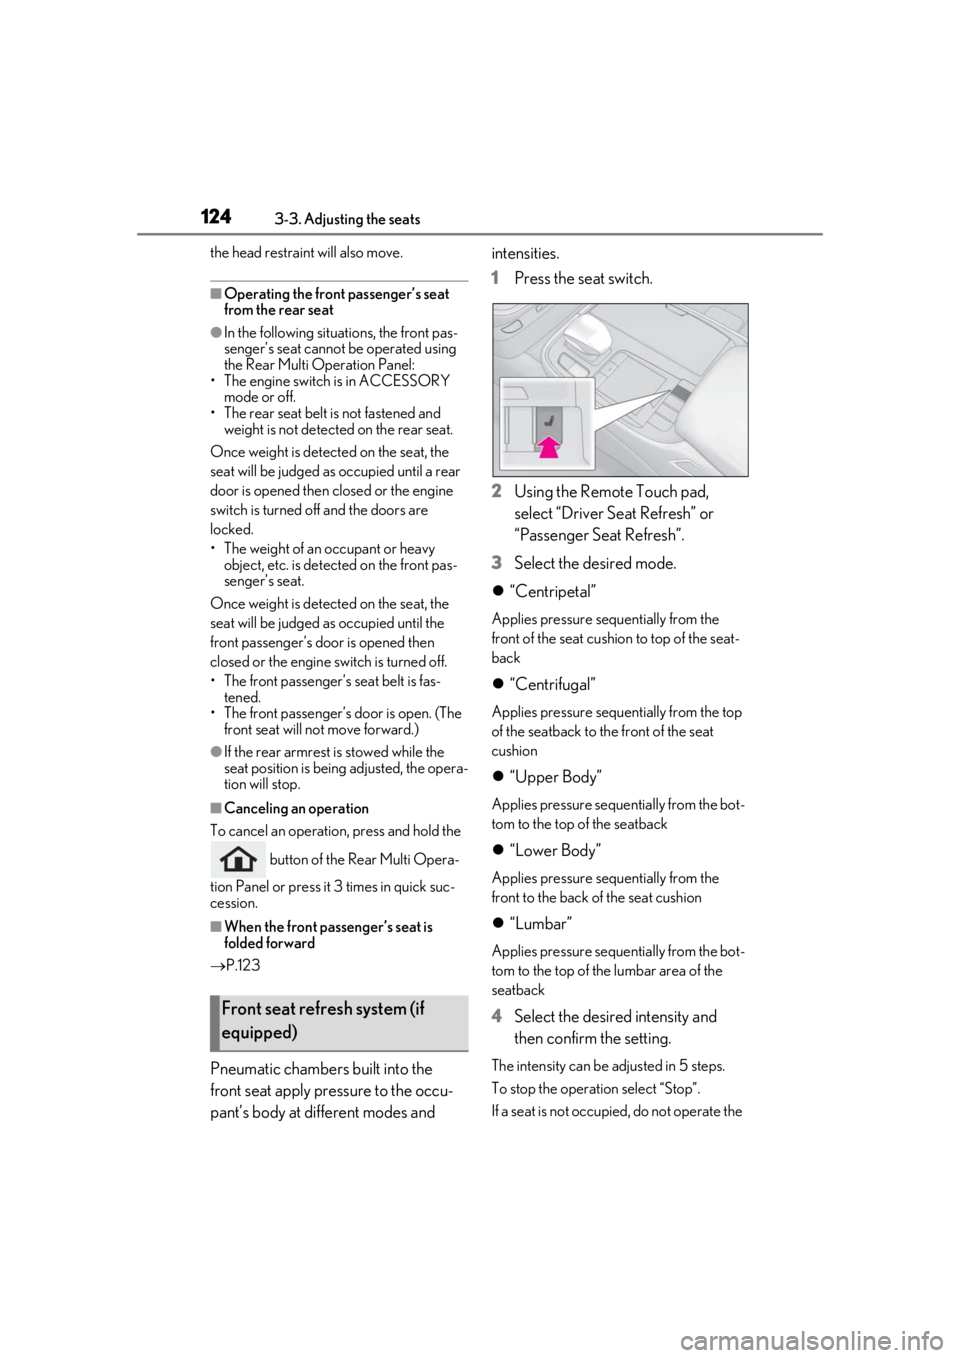
1
Press the seat switch.
2 Using the Remote Touch pad,
select “Driver Se at Refresh” or
“Passenger Seat Refresh”.
3 Select the desired mode.
“Centripetal”
Applies pressure sequentially from the
front of the seat cushion to top of the seat-
back
“Centrifugal”
Applies pressure sequentially from the top
of the seatback to the front of the seat
cushion
“Upper Body”
Applies pressure sequentially from the bot-
tom to the top of the seatback
“Lower Body”
Applies pressure sequentially from the
front to the back of the seat cushion
“Lumbar”
Applies pressure sequentially from the bot-
tom to the top of the lumbar area of the
seatback
4 Select the desired intensity and
then confirm the setting.
The intensity can be adjusted in 5 steps.
To stop the operation select “Stop”.
If a seat is not occupied, do not operate the
Front seat refresh system (if
equipped)
Page 125 of 516
1253-3. Adjusting the seats
3
Before driving
front seat refresh system for that seat.
■Refresh system
●Operating conditions
• The engine switch is in IGNITION ON mode.
• The temperature in the cabin is not extremely high.
• For the front passenger’s seat: The weight
of an occupant is detected on the front
passenger’s seat or the front passenger’s
seat belt is fastened.
Once weight is detect ed on the seat, the
seat will be judged as occupied until the
front passenger’s door is opened then
closed or the engine switch is turned off.
●Automatic stop function
• The operation will be canceled automati- cally after approximately 15 minutes.
• If the power easy ac cess system begins
operating, the front seat refresh system
will stop.
*: If equipped
WARNING
■Important points while driving
Do not adjust the driver’s seat refresh
system while driving.
Using it may affect your ability to control
the vehicle, possibly leading to an acci-
dent resulting in death or serious injury.
■Using the refresh system
●Those who are pregnant, have recently
given birth, or suffer from ailments
requiring rest (heart disease etc.)
should consult a doctor before use.
●Do not allow children to use the
refresh function.
●Do not use immediately after consum-
ing a meal or alcohol, or for an
extended period of time.
●If you feel sick while using the refresh
function, immediately discontinue use.
Power rear seat*
WARNING
■When adjusting the seat position
●Take care when adjusting the seat
position to ensure that other passen-
gers are not injured by the moving
seat.
●When adjusting the rear seat with an
ottoman, make sure there is sufficient
space so that a foot does not get
caught between the ottoman and front
passenger seat. (If equipped)
●Vehicles with a rear seat entertainment
system: When the rear seat is moving
to the Entertainment Mode position,
do not allow hands near the rear dis-
play. Otherwise, a hand or finger may
be caught, possibly causing injury.
■Seat adjustment
To reduce the risk of sliding under the lap
belt during a collision, do not recline the
seat more than necessary.
If the seat is too rec lined, the lap belt may
slide past the hips and apply restraint
forces directly to the abdomen, or your
neck may contact the shoulder belt,
increasing the risk of death or serious
injury in the event of an accident.
Adjustments should not be made while
driving as the seat may unexpectedly
move and cause the driver to lose control
of the vehicle.
■Using the ottoman (if equipped)
●Do not sit on the ottoman.
If someone sits on the ottoman, the seat
belt cannot be fitted properly, and they
may be thrown from th e seat, resulting in
death or serious injury in the event of an
accident or sudden braking.
Page 127 of 516
1273-3. Adjusting the seats
3
Before driving
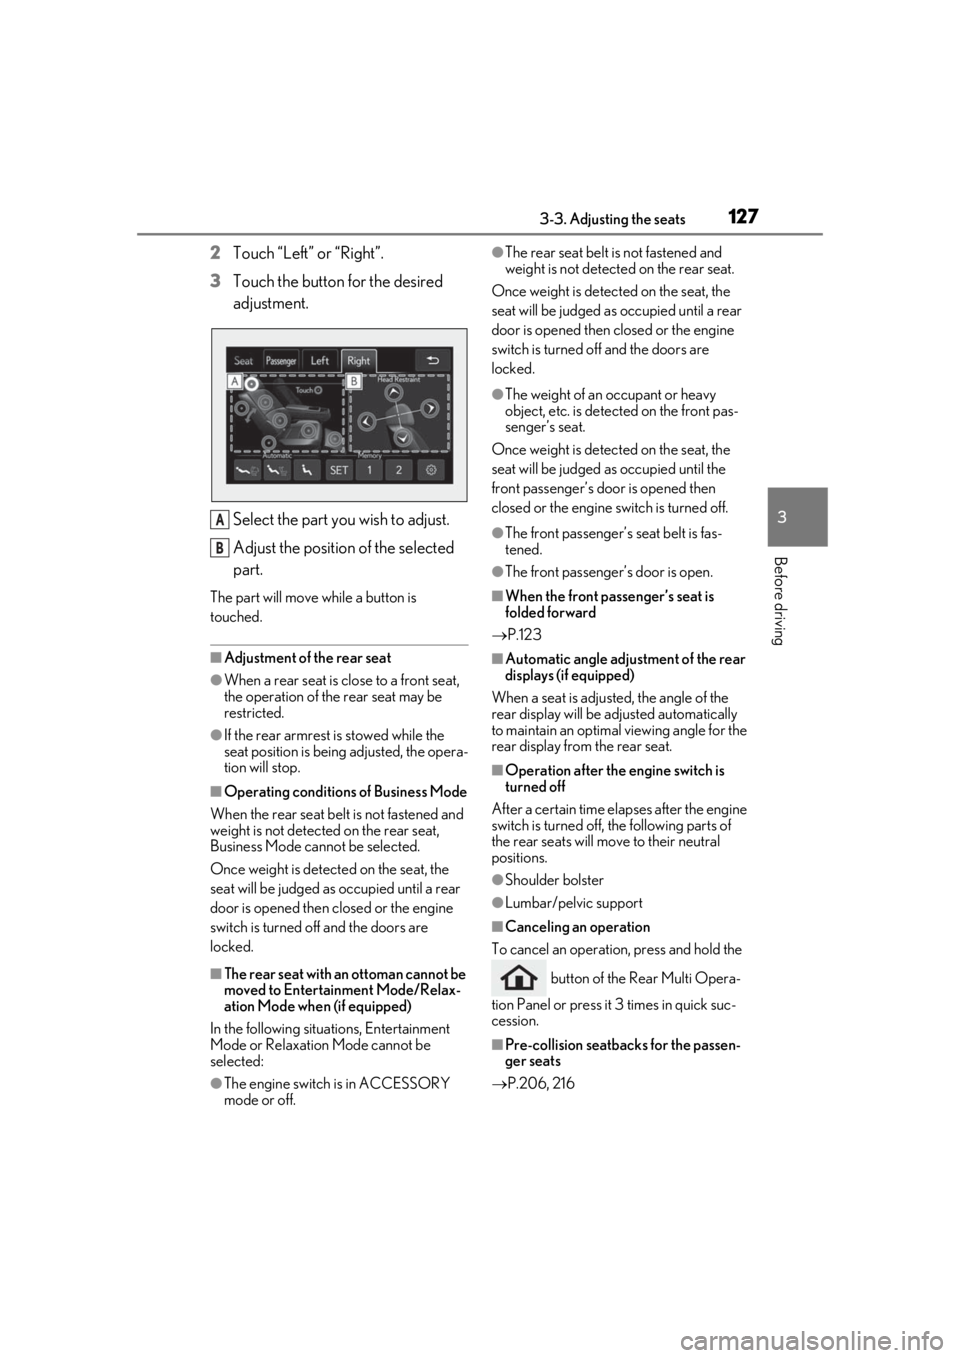
2Touch “Left” or “Right”.
3 Touch the button for the desired
adjustment.
Select the part you wish to adjust.
Adjust the position of the selected
part.
The part will move while a button is
touched.
■Adjustment of the rear seat
●When a rear seat is close to a front seat,
the operation of the rear seat may be
restricted.
●If the rear armrest is stowed while the
seat position is being adjusted, the opera-
tion will stop.
■Operating conditions of Business Mode
When the rear seat belt is not fastened and
weight is not detected on the rear seat,
Business Mode cannot be selected.
Once weight is detect ed on the seat, the
seat will be judged as occupied until a rear
door is opened then closed or the engine
switch is turned off and the doors are
locked.
■The rear seat with an ottoman cannot be
moved to Entertainment Mode/Relax-
ation Mode when (if equipped)
In the following situations, Entertainment
Mode or Relaxation Mode cannot be
selected:
●The engine switch is in ACCESSORY
mode or off.
●The rear seat belt is not fastened and
weight is not detected on the rear seat.
Once weight is detected on the seat, the
seat will be judged as occupied until a rear
door is opened then closed or the engine
switch is turned off and the doors are
locked.
●The weight of an occupant or heavy
object, etc. is detected on the front pas-
senger’s seat.
Once weight is detected on the seat, the
seat will be judged as occupied until the
front passenger’s door is opened then
closed or the engine switch is turned off.
●The front passenger’s seat belt is fas-
tened.
●The front passenger’s door is open.
■When the front passenger’s seat is
folded forward
P.123
■Automatic angle adjustment of the rear
displays (if equipped)
When a seat is adjusted, the angle of the
rear display will be adjusted automatically
to maintain an optimal viewing angle for the
rear display from the rear seat.
■Operation after the engine switch is
turned off
After a certain time elapses after the engine
switch is turned off, the following parts of
the rear seats will move to their neutral
positions.
●Shoulder bolster
●Lumbar/pelvic support
■Canceling an operation
To cancel an operatio n, press and hold the
button of the Rear Multi Opera-
tion Panel or press it 3 times in quick suc-
cession.
■Pre-collision seatback s for the passen-
ger seats
P.206, 216
A
B