belt LEXUS LS500 2020 Service Manual
[x] Cancel search | Manufacturer: LEXUS, Model Year: 2020, Model line: LS500, Model: LEXUS LS500 2020Pages: 516, PDF Size: 10.38 MB
Page 128 of 516
1283-3. Adjusting the seats
■Customization
Some functions can be customized.
( P.470)
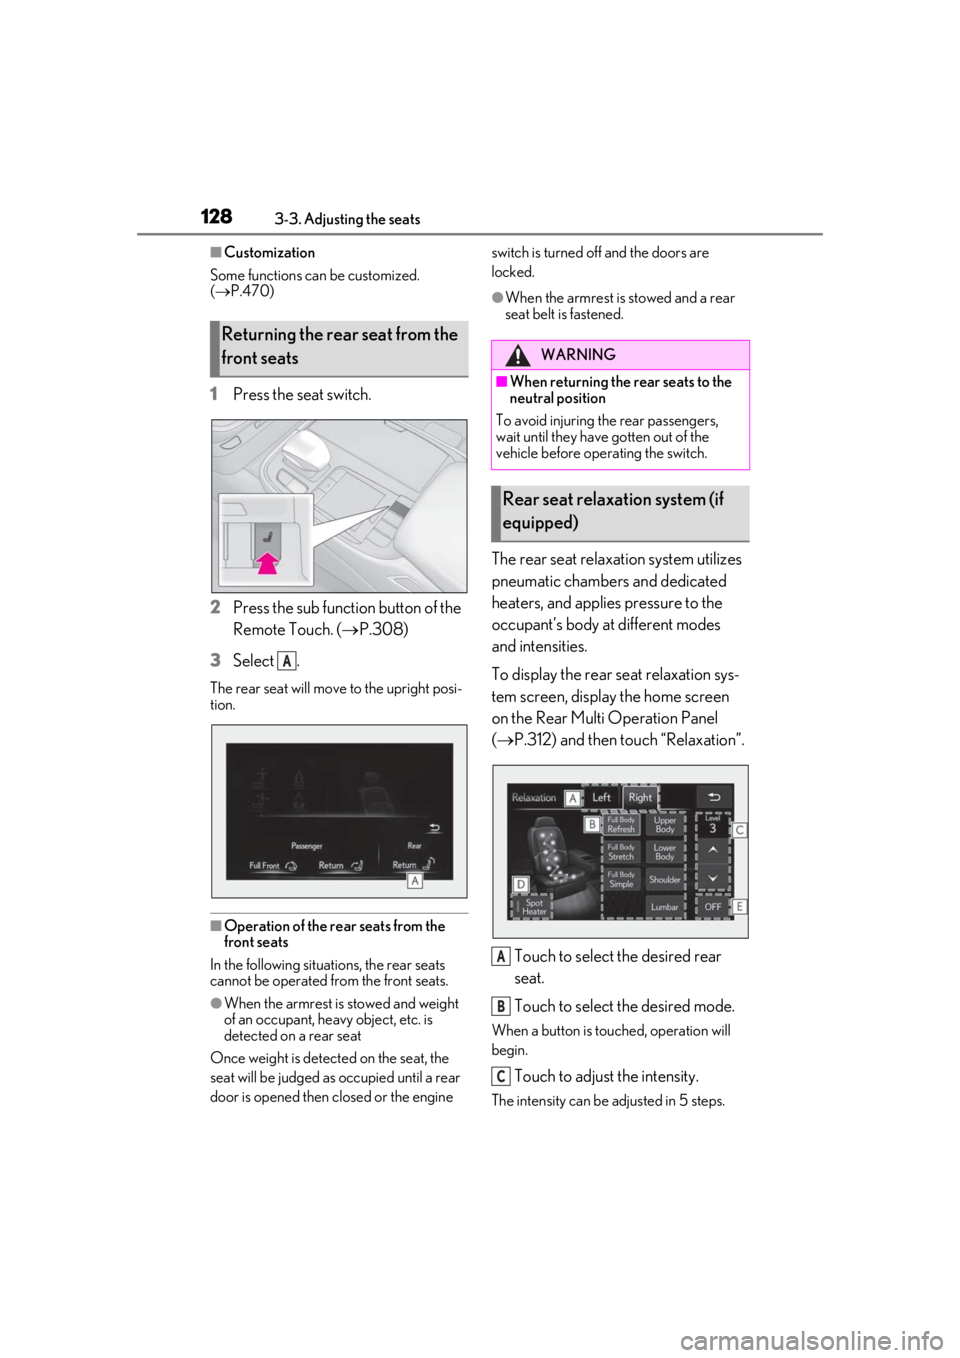
1Press the seat switch.
2
Press the sub function button of the
Remote Touch. ( P.308)
3
Select .
The rear seat will move to the upright posi-
tion.
■Operation of the rear seats from the
front seats
In the following situations, the rear seats
cannot be operated from the front seats.
●When the armrest is stowed and weight
of an occupant, heavy object, etc. is
detected on a rear seat
Once weight is detect ed on the seat, the
seat will be judged as occupied until a rear
door is opened then closed or the engine switch is turned off and the doors are
locked.
●When the armrest is stowed and a rear
seat belt is fastened.
The rear seat relaxation system utilizes
pneumatic chambers and dedicated
heaters, and applies pressure to the
occupant’s body at different modes
and intensities.
To display the rear seat relaxation sys-
tem screen, display the home screen
on the Rear Multi Operation Panel
(
P.312) and then touch “Relaxation”.
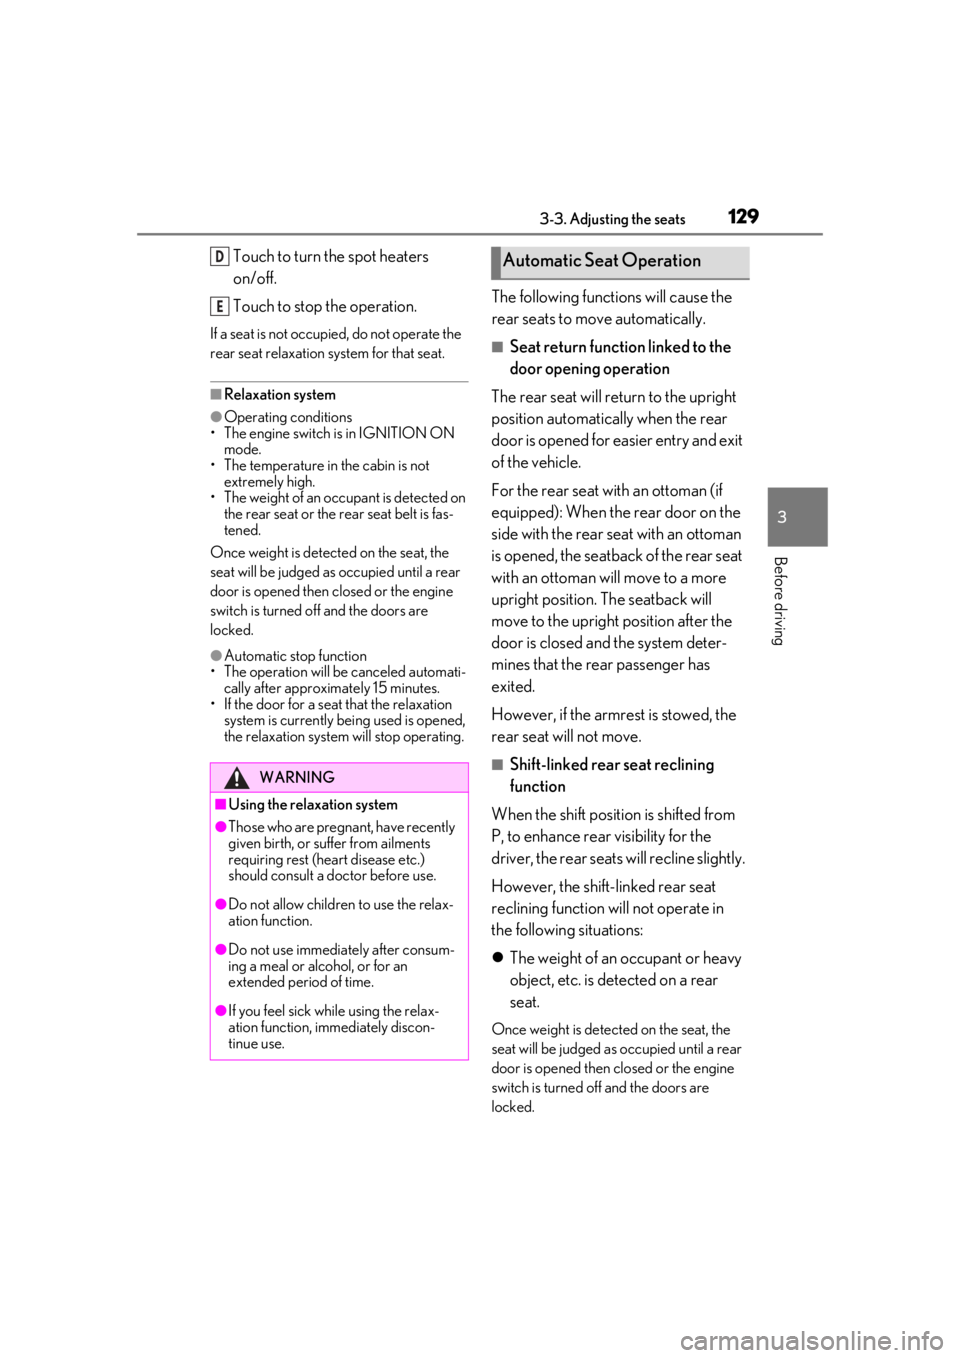
Touch to select the desired rear
seat.
Touch to select the desired mode.
When a button is touched, operation will
begin.
Touch to adjust the intensity.
The intensity can be adjusted in 5 steps.
Returning the rear seat from the
front seats
A
WARNING
■When returning the rear seats to the
neutral position
To avoid injuring the rear passengers,
wait until they have gotten out of the
vehicle before operating the switch.
Rear seat relaxation system (if
equipped)
A
B
C
Page 129 of 516
1293-3. Adjusting the seats
3
Before driving
Touch to turn the spot heaters
on/off.
Touch to stop the operation.
If a seat is not occupied, do not operate the
rear seat relaxation system for that seat.
■Relaxation system
●Operating conditions
• The engine switch is in IGNITION ON mode.
• The temperature in the cabin is not extremely high.
• The weight of an occupant is detected on
the rear seat or the rear seat belt is fas-
tened.
Once weight is detect ed on the seat, the
seat will be judged as occupied until a rear
door is opened then closed or the engine
switch is turned off and the doors are
locked.
●Automatic stop function
• The operation will be canceled automati-
cally after approximately 15 minutes.
• If the door for a seat that the relaxation
system is currently being used is opened,
the relaxation system will stop operating.
The following functions will cause the
rear seats to move automatically.
■Seat return function linked to the
door opening operation
The rear seat will return to the upright
position automatically when the rear
door is opened for ea sier entry and exit
of the vehicle.
For the rear seat with an ottoman (if
equipped): When the rear door on the
side with the rear seat with an ottoman
is opened, the seatback of the rear seat
with an ottoman will move to a more
upright position. The seatback will
move to the upright position after the
door is closed and the system deter-
mines that the rear passenger has
exited.
However, if the armrest is stowed, the
rear seat will not move.
■Shift-linked rear seat reclining
function
When the shift position is shifted from
P, to enhance rear visibility for the
driver, the rear seats will recline slightly.
However, the shift-linked rear seat
reclining function will not operate in
the following situations:
The weight of an occupant or heavy
object, etc. is detected on a rear
seat.
Once weight is detected on the seat, the
seat will be judged as occupied until a rear
door is opened then closed or the engine
switch is turned off and the doors are
locked.
WARNING
■Using the relaxation system
●Those who are pregnant, have recently
given birth, or suffer from ailments
requiring rest (heart disease etc.)
should consult a doctor before use.
●Do not allow children to use the relax-
ation function.
●Do not use immediately after consum-
ing a meal or alcohol, or for an
extended period of time.
●If you feel sick while using the relax-
ation function, immediately discon-
tinue use.
D
E
Automatic Seat Operation
Page 130 of 516
1303-3. Adjusting the seats
A rear seat belt is fastened.
A rear door is open.
The armrest is stowed.
When a front seat is close to a rear
seat, the rear seats may not operate or
the range of movement may be
restricted.
■Changing automatic seat opera-
tion settings
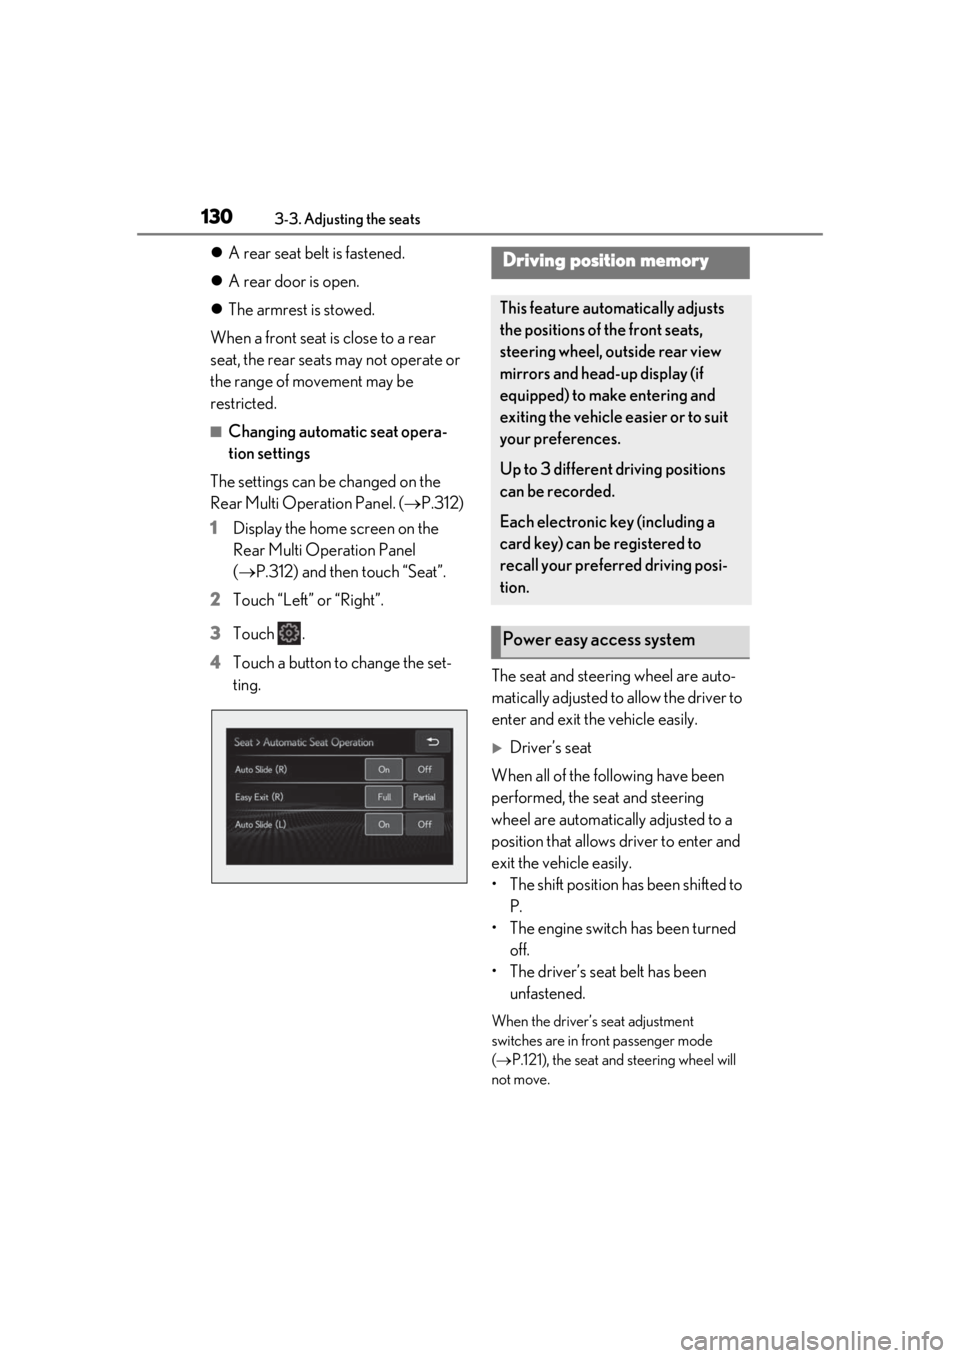
The settings can be changed on the
Rear Multi Operation Panel. ( P.312)
1 Display the home screen on the
Rear Multi Operation Panel
(P.312) and then touch “Seat”.
2 Touch “Left” or “Right”.
3 Touch .
4 Touch a button to change the set-
ting. The seat and steering wheel are auto-
matically adjusted to allow the driver to
enter and exit the vehicle easily.
Driver’s seat
When all of the following have been
performed, the seat and steering
wheel are automatically adjusted to a
position that allows driver to enter and
exit the vehicle easily.
• The shift position has been shifted to P.
• The engine switch has been turned off.
• The driver’s seat belt has been unfastened.
When the driver’s seat adjustment
switches are in front passenger mode
( P.121), the seat and steering wheel will
not move.
Driving position memory
This feature automatically adjusts
the positions of the front seats,
steering wheel, outside rear view
mirrors and head-up display (if
equipped) to make entering and
exiting the vehicle easier or to suit
your preferences.
Up to 3 different driving positions
can be recorded.
Each electronic key (including a
card key) can be registered to
recall your preferred driving posi-
tion.
Power easy access system
Page 131 of 516

1313-3. Adjusting the seats
3
Before driving
On vehicles with adjustable seat cush-
ion side bolsters, when the driver’s
door is opened with the engine switch
off, the seat cushion side bolsters will
lower if they are in the default position.
When any of the following has been
performed, the seat and steering
wheel automatically return to their
original positions.
• The engine switch has been turned to ACCESSORY mode or IGNI-
TION ON mode.
• The driver’s seat belt has been fas- tened.
Front passenger’s seat
If all of the following have been per-
formed while the vehicle is stopped,
the lumbar support, pelvic support,
shoulder bolster (if equipped), seat-
back side bolster (if equipped), and hip
support (if equipped) will be moved to
their default position. On vehicles with
adjustable seat cushion side bolsters,
the seat cushion side bolsters will
lower.
• The passenger’s seat belt has been unfastened.
• The front passenger’s door is opened.
■Operation of the power easy access sys-
tem
●When exiting the vehicle, the power easy
access system may not operate if the seat
is already in the rearmost or uppermost
position or close to the rear seat.
●If the seat position is adjusted during
power easy access syst em operation, the
automatic operation will stop. (The seat
will change to manual operation.)
●If the seat position is adjusted during or
after the power easy access system oper-
ation when the driver is exiting the vehi-
cle, the power easy access system will not
operate when entering the vehicle.
■Seat cushion side bolster adjustment (if
equipped)
If the seat cushion side bolsters have been
lowered, when the front door is closed, the
seat cushion side bolsters will move to their
default position.
If the seat is adjusted while the seat cushion
side bolsters are moving to the default posi-
tion, their movement will be temporarily
suspended. (The seat cushion side bolsters
will move to the default position after a cer-
tain amount of time.)
■Customization
Some functions can be customized.
( P.470)
1 Turn the engine switch to IGNI-
TION ON mode.
2 Check that the shift position is in P.
3 Adjust the driver’s seat, steering
wheel, outside rear view mirrors
and head-up display (if equipped)
to the desired positions.
4 While pressing the “SET” button, or
within 3 seconds after the “SET”
Recording a driving position into
memory
Page 134 of 516
1343-3. Adjusting the seats
cle easier.
If the driving position is in a position that
has already been recorded, the seat and
outside rear view mirrors will not move.
2Turn the engine switch to ACCES-
SORY mode or IGNITION ON
mode, or fasten a seat belt.
The seat, steering wheel and head-up dis-
play (if equipped) will move to the
recorded position.
■Recalling the driving position using the
memory recall function
●Different driving positions can be regis-
tered for each electronic key. Therefore,
the driving position that is recalled may
be different depending on the key being
carried.
●If a door other than the driver’s door is
unlocked with the smart access system
with push-button start, the driving posi-
tion cannot be recalled. In this case, press
the driving position button which has
been set.
■Customization
Some functions can be customized.
( P.470)
*: If equipped
1Turn the engine switch to IGNI-
TION ON mode.
2
Display the home screen on the
Rear Multi Operation Panel
( P.312) and then touch “Seat”.
3
Touch “Left” or “Right”.
4
Adjust the rear seat to the desired
position and then touch “SET”.
5
Touch “1” or “2”.
If the preset is being used, the previously
recorded seat position will be overwritten.
■In order to correctly use the position
memory function
If a seat position is already in the furthest
possible position and the seat is operated in
the same direction, the recorded position
may be slightly differen t when it is recalled.
1Turn the engine switch to IGNI-
TION ON mode.
Rear seat position memory*
The rear seat position can be mem-
orized and recalled with the touch
of a button.
Recording a position into mem-
ory
WARNING
■Seat adjustment caution
Take care during seat adjustment so that
the rear passengers do not strike the
front seats.
Recalling the memorized posi-
tion
Page 135 of 516
1353-3. Adjusting the seats
3
Before driving
2Display the home screen on the
Rear Multi Operation Panel
(P.312) and then touch “Seat”.
3
Touch “Left” or “Right”.
4
Touch “1” or “2”.
When the operating conditions are not
met, the buttons will be grayed out.
To stop the operation touch “STOP”.
If the seat is adjust ed while a memorized
position is being recalled, the automatic
operation will stop. (The seat will change to
manual operation.)
■Operating condition
The weight of an occupant is detected on
the rear seat or the rear seat belt is fas-
tened.
Once weight is detect ed on the seat, the
seat will be judged as occupied until the
rear door is opened then closed or the
engine switch is turned off.
■Recalling a rear seat position
If a memorized rear seat position is recalled,
the seat may stop part-way to ensure suffi-
cient space for the rear passenger.
■Recalling the ottoman position (if
equipped)
When a seat position is recalled, the otto-
man will not raise or extend. The ottoman
position can only be recalled if the memo-
rized position is lower and shorter than the
current position.
Head restraints
Head restraints are provided for all
seats.
Vehicles with power rear seat: The
head restraint for the rear center
seat is integrated into the seatback
and cannot be adjusted.
WARNING
■Head restraint precautions
Observe the following precautions
regarding the head re straints. Failure to
do so may result in death or serious
injury.
●Use the head restraints designed for
each respective seat.
●Adjust the head restraints to the cor-
rect position at all times.
●Manual type: After adjusting the head
restraints, push down on them and
make sure they are locked in position.
●Do not drive with the head restraints
removed.
Page 139 of 516
1393-4. Adjusting the steering wheel and mirrors
3
Before driving
3-4.Adjusting the steering wheel and mirrors
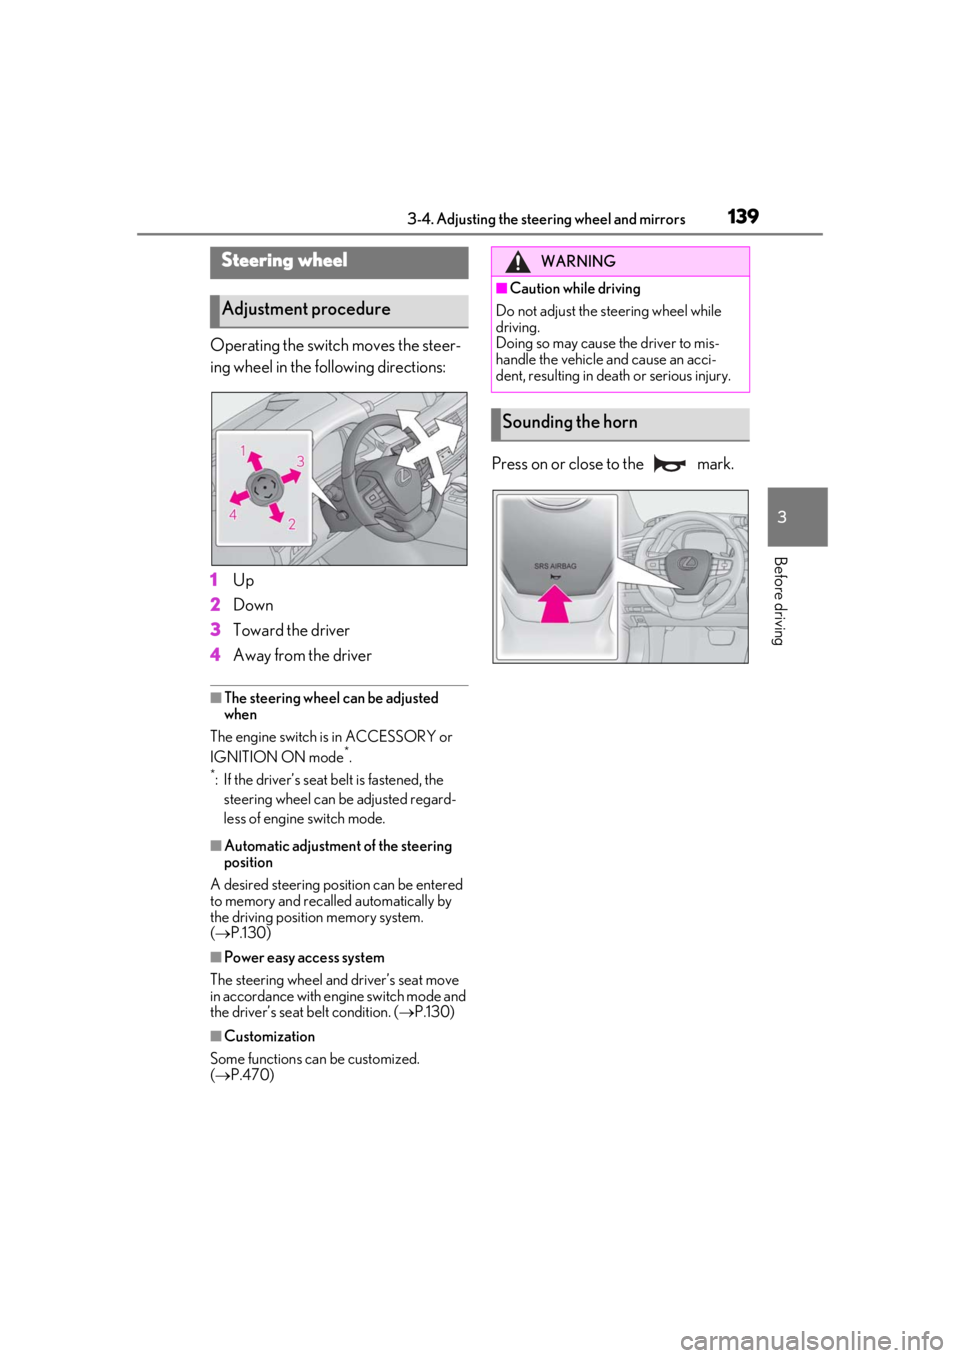
Operating the switch moves the steer-
ing wheel in the following directions:
1
Up
2
Down
3
Toward the driver
4
Away from the driver
■The steering wheel can be adjusted
when
The engine switch is in ACCESSORY or
IGNITION ON mode
*.
*: If the driver’s seat belt is fastened, the steering wheel can be adjusted regard-
less of engine switch mode.
■Automatic adjustment of the steering
position
A desired steering position can be entered
to memory and recalled automatically by
the driving position memory system.
( P.130)
■Power easy access system
The steering wheel and driver’s seat move
in accordance with engine switch mode and
the driver’s seat belt condition. ( P.130)
■Customization
Some functions can be customized.
( P.470)
Press on or close to the mark.
Steering wheel
Adjustment procedure
WARNING
■Caution while driving
Do not adjust the steering wheel while
driving.
Doing so may cause the driver to mis-
handle the vehicle and cause an acci-
dent, resulting in death or serious injury.
Sounding the horn
Page 177 of 516
1774-2. Driving procedures
4
Driving
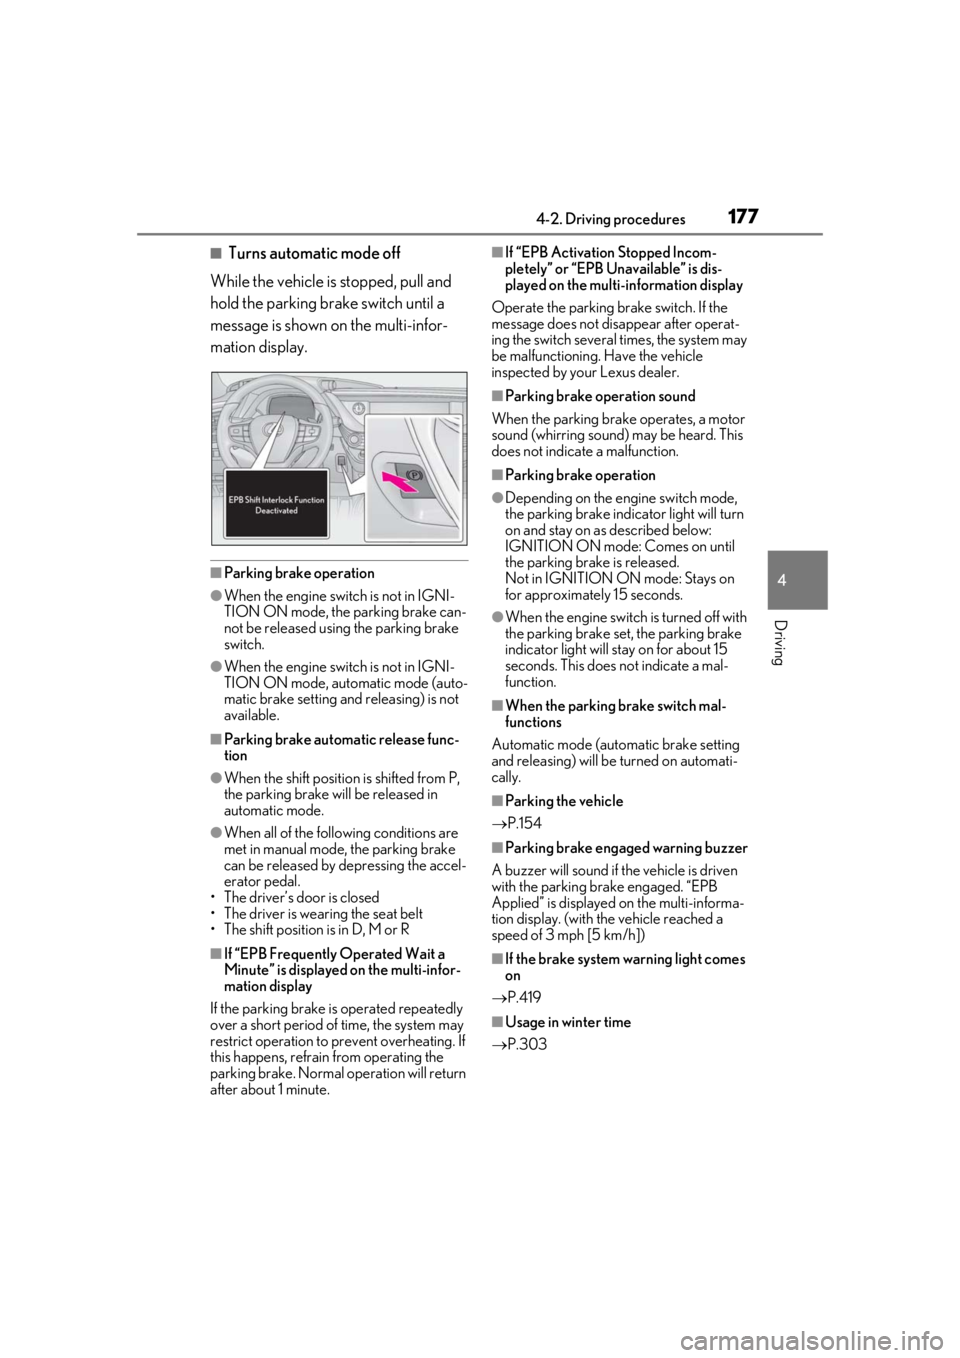
■Turns automatic mode off
While the vehicle is stopped, pull and
hold the parking brake switch until a
message is shown on the multi-infor-
mation display.
■Parking brake operation
●When the engine swit ch is not in IGNI-
TION ON mode, the parking brake can-
not be released using the parking brake
switch.
●When the engine swit ch is not in IGNI-
TION ON mode, automatic mode (auto-
matic brake setting and releasing) is not
available.
■Parking brake automatic release func-
tion
●When the shift position is shifted from P,
the parking brake will be released in
automatic mode.
●When all of the foll owing conditions are
met in manual mode, the parking brake
can be released by depressing the accel-
erator pedal.
• The driver’s door is closed
• The driver is wearing the seat belt
• The shift position is in D, M or R
■If “EPB Frequently Operated Wait a
Minute” is displayed on the multi-infor-
mation display
If the parking brake is operated repeatedly
over a short period of time, the system may
restrict operation to prevent overheating. If
this happens, refrain from operating the
parking brake. Normal operation will return
after about 1 minute.
■If “EPB Activation Stopped Incom-
pletely” or “EPB Unavailable” is dis-
played on the multi-information display
Operate the parking brake switch. If the
message does not disappear after operat-
ing the switch several times, the system may
be malfunctioning. Have the vehicle
inspected by your Lexus dealer.
■Parking brake operation sound
When the parking brake operates, a motor
sound (whirring sound) may be heard. This
does not indicate a malfunction.
■Parking brake operation
●Depending on the engine switch mode,
the parking brake indicator light will turn
on and stay on as described below:
IGNITION ON mode: Comes on until
the parking brake is released.
Not in IGNITION ON mode: Stays on
for approximately 15 seconds.
●When the engine switch is turned off with
the parking brake set, the parking brake
indicator light will stay on for about 15
seconds. This does not indicate a mal-
function.
■When the parking brake switch mal-
functions
Automatic mode (automatic brake setting
and releasing) will be turned on automati-
cally.
■Parking the vehicle
P.154
■Parking brake engaged warning buzzer
A buzzer will sound if the vehicle is driven
with the parking brake engaged. “EPB
Applied” is displayed on the multi-informa-
tion display. (with the vehicle reached a
speed of 3 mph [5 km/h])
■If the brake system warning light comes
on
P.419
■Usage in winter time
P.303
Page 178 of 516
1784-2. Driving procedures
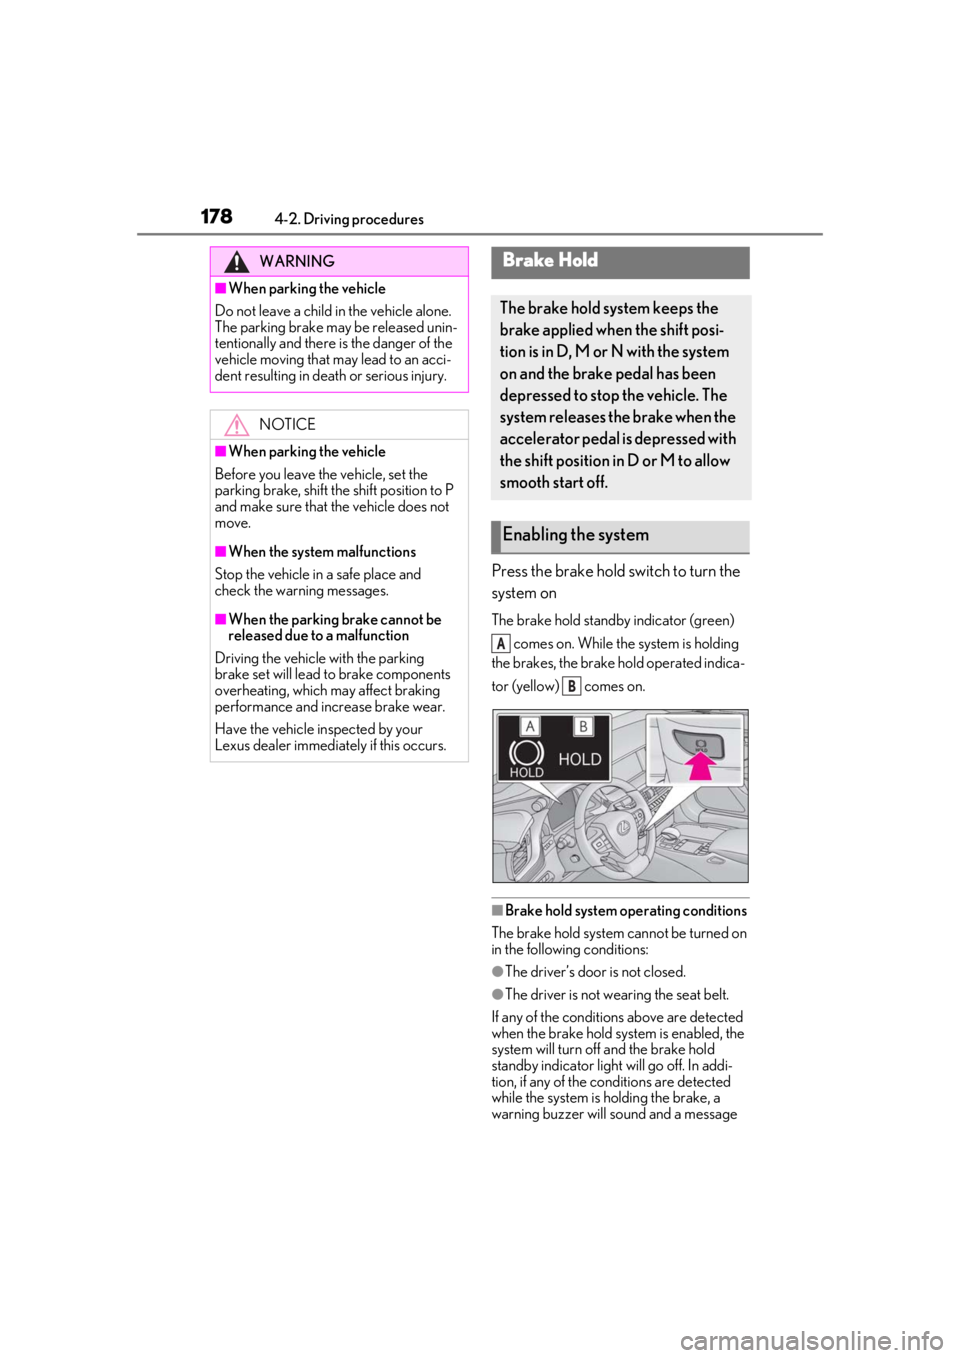
Press the brake hold switch to turn the
system on
The brake hold standby indicator (green) comes on. While the system is holding
the brakes, the brake hold operated indica-
tor (yellow) comes on.
■Brake hold system operating conditions
The brake hold system cannot be turned on
in the following conditions:
●The driver’s door is not closed.
●The driver is not wearing the seat belt.
If any of the conditions above are detected
when the brake hold system is enabled, the
system will turn off and the brake hold
standby indicator light will go off. In addi-
tion, if any of the co nditions are detected
while the system is holding the brake, a
warning buzzer will sound and a message
WARNING
■When parking the vehicle
Do not leave a child in the vehicle alone.
The parking brake may be released unin-
tentionally and there is the danger of the
vehicle moving that may lead to an acci-
dent resulting in death or serious injury.
NOTICE
■When parking the vehicle
Before you leave the vehicle, set the
parking brake, shift the shift position to P
and make sure that the vehicle does not
move.
■When the system malfunctions
Stop the vehicle in a safe place and
check the warning messages.
■When the parking brake cannot be
released due to a malfunction
Driving the vehicle with the parking
brake set will lead to brake components
overheating, which may affect braking
performance and increase brake wear.
Have the vehicle inspected by your
Lexus dealer immediately if this occurs.
Brake Hold
The brake hold system keeps the
brake applied when the shift posi-
tion is in D, M or N with the system
on and the brake pedal has been
depressed to stop the vehicle. The
system releases the brake when the
accelerator pedal is depressed with
the shift position in D or M to allow
smooth start off.
Enabling the system
A
B
Page 179 of 516
1794-2. Driving procedures
4
Driving
will be shown on the multi-information dis-
play. The parking brake will then be set
automatically.
■Brake hold function
●If the brake pedal is left released for a
period of about 3 minutes after the sys-
tem has started holding the brake, the
parking brake will be set automatically. In
this case, a warning buzzer sounds and a
message is shown on the multi-informa-
tion display.
●To turn the system off while the system is
holding the brake, firmly depress the
brake pedal and press the button again.
●The brake hold function may not hold the
vehicle when the vehicle is on a steep
incline. In this situation, it may be neces-
sary for the driver to apply the brakes. A
warning buzzer will sound and the
multi-information display will inform the
driver of this situation. If a warning mes-
sage is shown on the multi-information
display, read the message and follow the
instructions.
■When the parking brake is set automati-
cally while the system is holding the
brakes
Perform any of the following operations to
release the parking brake.
●Depress the accelerator pedal. (The
parking brake will not be released auto-
matically if the seat belt is not fastened.)
●Operate the parking brake switch with
the brake pedal depressed.
Make sure that the pa rking brake indicator
light goes off. ( P.176)
■When an inspection at your Lexus
dealer is necessary
When the brake hold standby indicator
(green) does not illuminate even when the
brake hold switch is pressed with the brake
hold system operating conditions met, the
system may be malfun ctioning. Have the
vehicle inspected at your Lexus dealer.
■If “Brake Hold Fault Depress Brake to
Deactivate Visit Your Dealer” or “Brake
Hold Malfunction Visit Your Dealer” is
displayed on the multi-information dis-
play
The system may be malfunctioning. Have
the vehicle inspected by your Lexus dealer.
■Warning messages and buzzers
Warning messages and buzzers are used to
indicate a system malfunction or to inform
the driver of the need for caution. If a warn-
ing message is shown on the multi-informa-
tion display, read the message and follow
the instructions.
■If the brake hold operated indicator
flashes
P.426
WARNING
■When the vehicle is on a steep incline
When using the brake hold system on a
steep incline exercise caution. The brake
hold function may not hold the vehicle in
such a situation.
■When stopped on a slippery road
The system cannot stop the vehicle when
the gripping ability of the tires has been
exceeded. Do not use the system when
stopped on a slippery road.
NOTICE
■When parking the vehicle
The brake hold system is not designed
for use when parking the vehicle for a
long period of time. Turning the engine
switch off while the system is holding the
brake may release the brake, which
would cause the vehicle to move. When
operating the engine switch, depress the
brake pedal, shift the shift position to P
and set the parking brake.