tow LEXUS LX570 2016 Owners Manual
[x] Cancel search | Manufacturer: LEXUS, Model Year: 2016, Model line: LX570, Model: LEXUS LX570 2016Pages: 632, PDF Size: 10.34 MB
Page 3 of 632

3 1
8765432
LX570_OM_OM60N01U_(U) 94-1. Before driving
Driving the vehicle .......................174
Cargo and luggage.................... 182
Vehicle load limits ....................... 186
Trailer towing ................................. 187
Dinghy towing ............................. 204
4-2. Driving procedures
Engine (ign ition) switch ........... 205
Automatic transmission ........... 210
Turn signal lever ............................216
Parking brake ................................ 217
4-3. Operating the lights
and wipers
Headlight switch ........................ 220
Automatic High Beam..............224
Fog light switch ........................... 229
Windshield wipers and
washer ...........................................231
Rear window wiper and
washer ......................................... 235
Headlight cleaner switch........ 238
4-4. Refueling
Opening the fuel tank cap ..... 239 4-5. Using the driving support
systems
Lexus Safety System+ ...............242
PCS (Pre-Collision
System) ....................................... 250
LDA (Lane Departure
Alert)............................................ 263
Dynamic radar cruise
control with full-speed
range .............................................. 271
Cruise control ............................. 283
Driving mode select
switch ........................................... 286
Intuitive parking assist .............. 289
4-Wheel AHC (Active
Height Control
Suspension)................................ 297
Four-wheel drive system ......... 305
Crawl Control (with Turn
Assist function) ........................ 309
Multi-terrain Select.....................314
Multi-terrain Monitor................ 318
BSM (Blind Spot Monitor)..... 365
• BSM function......................... 369
• RCTA function .......................373
Driving assist systems ...............379
4-6. Driving tips
Winter driving tips ..................... 384
Off-road precautions............... 3874
Driving
Page 5 of 632

5 1
8765432
LX570_OM_OM60N01U_(U) 96-1. Maintenance and care
Cleaning and protecting
the vehicle exterior ................ 458
Cleaning and protecting
the vehicle inte rior.................... 461
6-2. Maintenance
Maintenance
requirements ............................ 464
General maintenance.............. 466
Emission inspection and
maintenance (I/M)
programs .................................... 469
6-3. Do-it-yourself maintenance
Do-it-yourself service
precautions.................................470
Hood ................................................ 472
Engine compartment ................473
Tires.................................................. 486
Tire inflation pressure ............... 495
Wheels ........................................... 499
Air conditioning filter ................ 501
Electronic key battery.............. 503
Checking and replacing
fuses..............................................505
Light bulbs ....................................508 7-1. Essential information
Emergency flashers ....................514
If your vehicle has to be
stopped in an emergency......515
7-2. Steps to take in an emergency
If your vehicle needs
to be towed..................................516
If you think something is
wrong........................................... 522
Fuel pump shut off system ...... 523
If a warning light turns
on or a warning buzzer
sounds ..........................................524
If a warning message is
displayed .................................... 532
If you have a flat tire .................. 536
If the engine will not start .........547
If the shift lever cannot be
shifted from P ........................... 549
If the electronic key does
not operate properly ............. 550
If the vehicle battery is
discharged ................................. 553
If your vehicle overheats ......... 556
If the vehicle becomes
stuck ............................................. 5596
Maintenance and care 7
When trouble arises
Page 16 of 632
16 Pictorial index
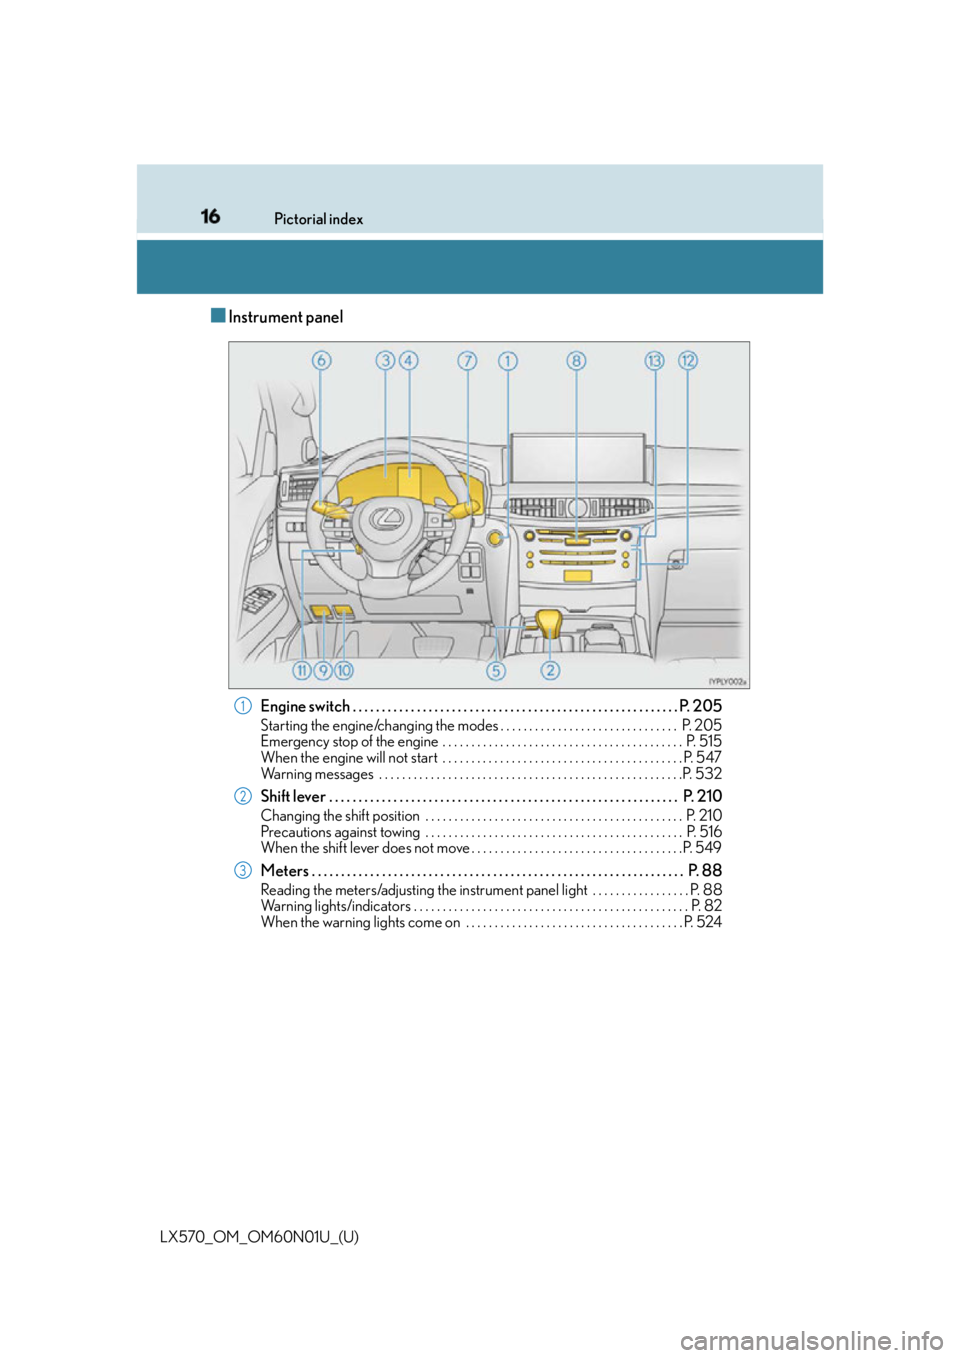
LX570_OM_OM60N01U_(U) ■ Instrument panel
Engine switch . . . . . . . . . . . . . . . . . . . . . . . . . . . . . . . . . . . . . . . . . . . . . . . . . . . . . . . . P. 205Starting the engine/changing the modes . . . . . . . . . . . . . . . . . . . . . . . . . . . . . . . P. 205
Emergency stop of the engine . . . . . . . . . . . . . . . . . . . . . . . . . . . . . . . . . . . . . . . . . . P. 515
When the engine will not start . . . . . . . . . . . . . . . . . . . . . . . . . . . . . . . . . . . . . . . . . . P. 547
Warning messages . . . . . . . . . . . . . . . . . . . . . . . . . . . . . . . . . . . . . . . . . . . . . . . . . . . . .P. 53 2
Shift lever . . . . . . . . . . . . . . . . . . . . . . . . . . . . . . . . . . . . . . . . . . . . . . . . . . . . . . . . . . . . P. 210Changing the shift position . . . . . . . . . . . . . . . . . . . . . . . . . . . . . . . . . . . . . . . . . . . . . P. 210
Precautions against towing . . . . . . . . . . . . . . . . . . . . . . . . . . . . . . . . . . . . . . . . . . . . . P. 516
When the shift lever does not move . . . . . . . . . . . . . . . . . . . . . . . . . . . . . . . . . . . . .P. 549
Meters . . . . . . . . . . . . . . . . . . . . . . . . . . . . . . . . . . . . . . . . . . . . . . . . . . . . . . . . . . . . . . . . P. 88Reading the meters/adjusting the instrument pa nel light . . . . . . . . . . . . . . . . . P. 88
Warning lights/indicators . . . . . . . . . . . . . . . . . . . . . . . . . . . . . . . . . . . . . . . . . . . . . . . . P. 82
When the warning lights come on . . . . . . . . . . . . . . . . . . . . . . . . . . . . . . . . . . . . . . P. 524 1
2
3
Page 32 of 632
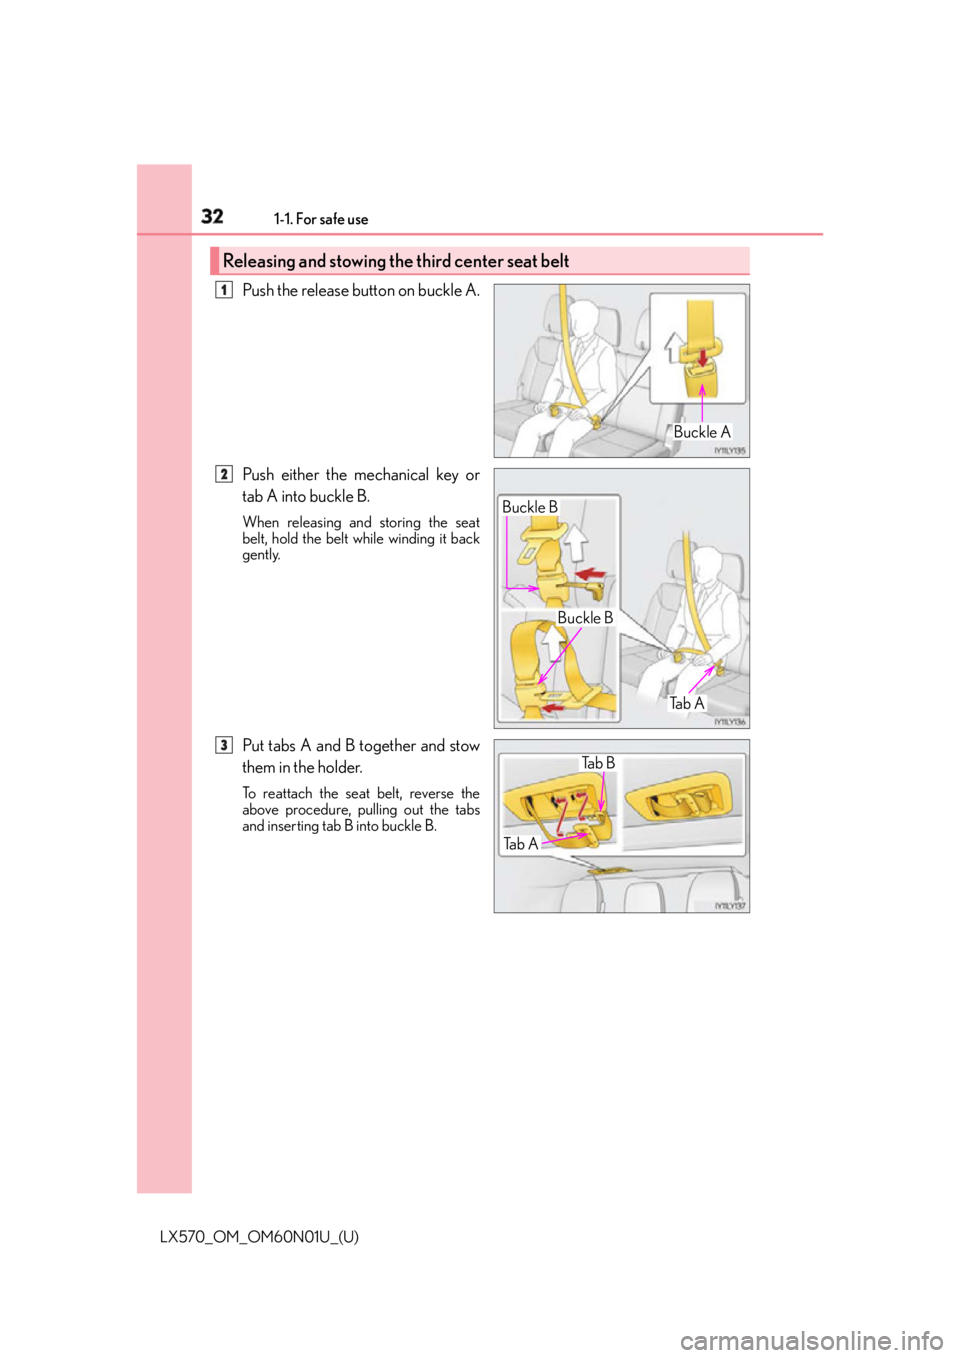
32 1-1. For safe use
LX570_OM_OM60N01U_(U) Push the release button on buckle A.
Push either the mechanical key or
tab A into buckle B. When releasing and storing the seat
belt, hold the belt while winding it back
gently.
Put tabs A and B together and stow
them in the holder. To reattach the seat belt, reverse the
above procedure, pulling out the tabs
and inserting tab B into buckle B.Releasing and stowing the third center seat belt
Buckle A1
Ta b ABuckle B
Buckle B2
Ta b A Ta b B3
Page 41 of 632

411-1. For safe use
LX570_OM_OM60N01U_(U) 1
For safety and security Your vehicle is equipped with ADVANCED AIRBAGS designed based on the
US motor vehicle safety standards (FMVSS208). The airbag sensor assembly
(ECU) controls airbag deployment based on information obtained from the sen-
sors etc. shown in the system compon ents diagram above. This information
includes crash severity and occupant information. As the airbags deploy, a
chemical reaction in the inflators quickly fills the airbags with non-toxic gas to
help restrain the moti on of the occupants.WA R N I N G ■
SRS airbag precautions
Observe the following precautions regarding the SRS airbags.
Failure to do so may cause death or serious injury. ●
The driver and all passengers in the vehicle must wear their seat belts properly.
The SRS airbags are supplemental device s to be used with the seat belts.●
The SRS driver airbag deploys with consider able force, and can cause death or seri-
ous injury especially if the driver is very close to the airbag. The National Highway
Traffic Safety Administration (NHTSA) advises:
Since the risk zone for the driver’s airbag is the first 2 - 3 in. (50 - 75 mm) of inflation,
placing yourself 10 in. (250 mm) from your driver airbag provides you with a clear
margin of safety. This distance is measured from the center of the steering wheel to
your breastbone. If you sit less than 10 in. (250 mm) away now, you can change your
driving position in several ways:
• Move your seat to the rear as far as you can while still reaching the pedals com-
fortably.
• Slightly recline the back of the seat. Al though vehicle designs vary, many drivers
can achieve the 10 in. (250 mm) distance, even with the driver seat all the way for-
ward, simply by reclining the back of th e seat somewhat. If reclining the back of
your seat makes it hard to see the road, raise yourself by using a firm, non-slippery
cushion, or raise the seat if your vehicle has that feature.
• If your steering wheel is ad justable, tilt it downward. Th is points the airbag toward
your chest instead of your head and neck.
The seat should be adjusted as recommen ded by NHTSA above, while still maintain-
ing control of the foot pedals, steering whee l, and your view of the instrument panel
controls.
Page 43 of 632
431-1. For safe use
LX570_OM_OM60N01U_(U) 1
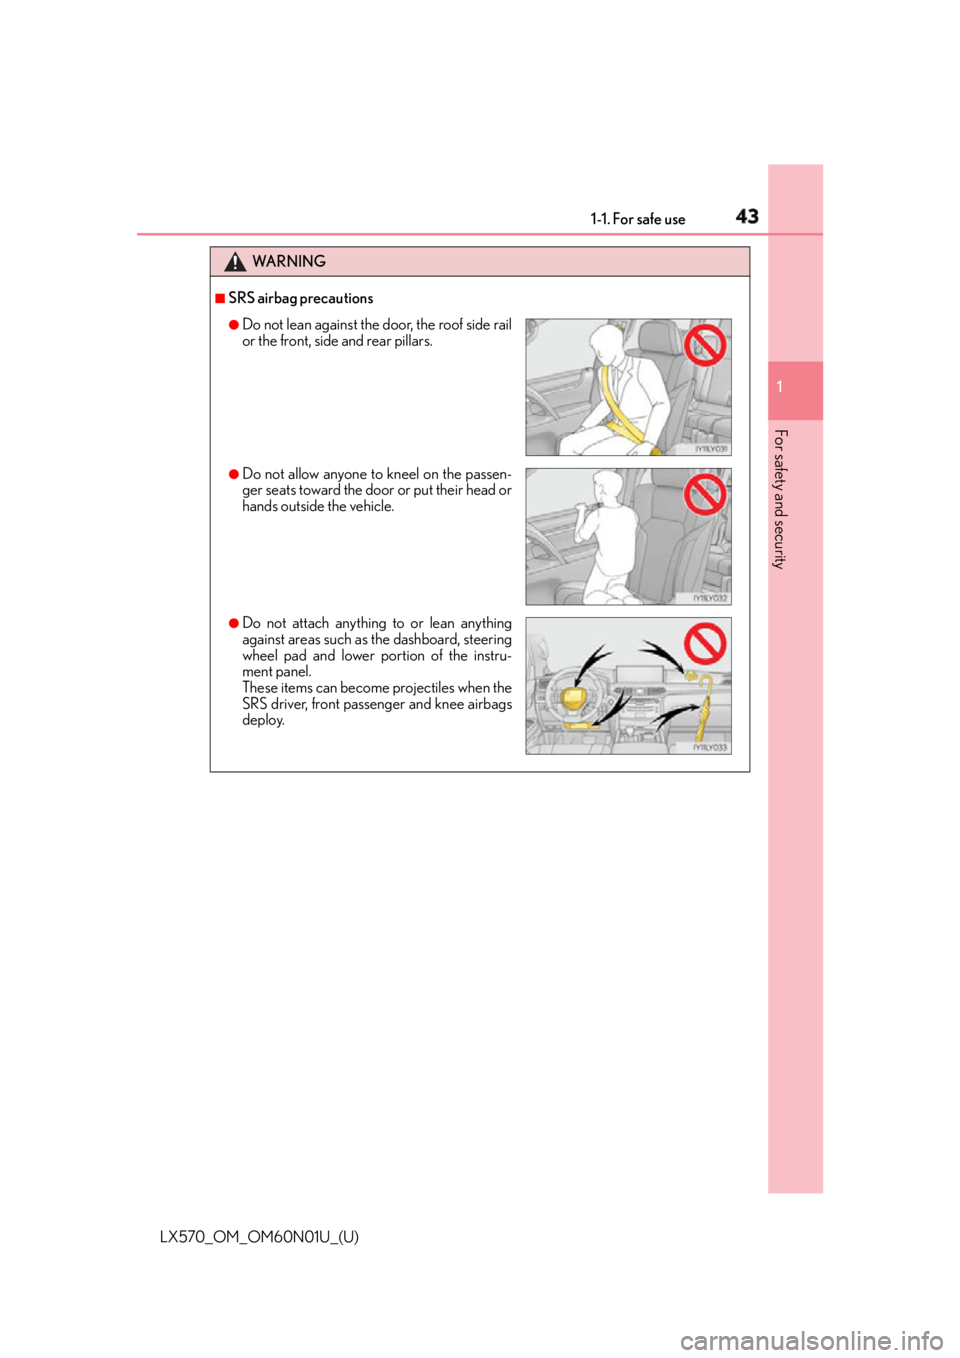
For safety and security WA R N I N G ■
SRS airbag precautions ●
Do not lean against the door, the roof side rail
or the front, side and rear pillars. ●
Do not allow anyone to kneel on the passen-
ger seats toward the door or put their head or
hands outside the vehicle. ●
Do not attach anything to or lean anything
against areas such as the dashboard, steering
wheel pad and lower portion of the instru-
ment panel.
These items can become projectiles when the
SRS driver, front passenger and knee airbags
deploy.
Page 134 of 632
134
LX570_OM_OM60N01U_(U) 3-2. Opening, closing and locking the doors■
Battery-saving function
The battery-saving function will be activated in order to prevent the electronic key bat-
tery and the battery from being discharged wh ile the vehicle is not in operation for a long
time. ●
In the following situations, the smart access system with push-button start may take
some time to unlock the doors.
• The electronic key has been left in an area of approximately 6 ft. (2 m) of the outside
of the vehicle for 10 minutes or longer.
• The smart access system with push-butto n start has not been used for 5 days or
longer. ●
If the smart access system with push-butto n start has not been used for 14 days or
longer, the doors cannot be unlocked at any doors except the driver’s door. In this case,
take hold of the driver’s door handle, or us e the wireless remote control or the mechan-
ical key, to unlock the doors. ■
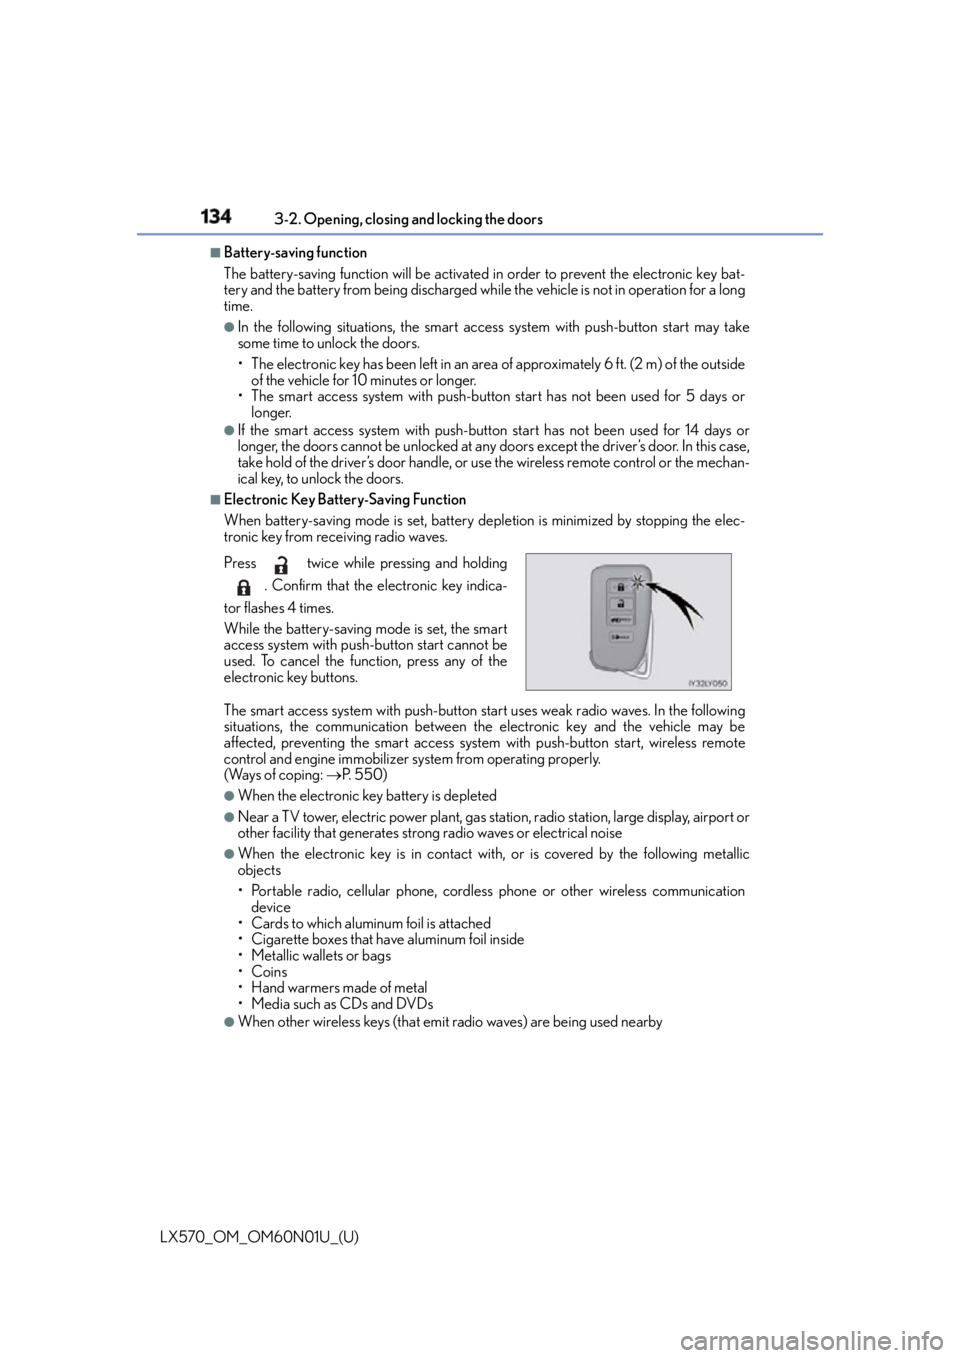
Electronic Key Battery-Saving Function
When battery-saving mode is set, battery depletion is minimized by stopping the elec-
tronic key from receiving radio waves.
The smart access system with push-button start uses weak radio waves. In the following
situations, the communication between th e electronic key and the vehicle may be
affected, preventing the smart access system with push-button start, wireless remote
control and engine immobilizer system from operating properly.
(Ways of coping: P. 5 5 0 )●
When the electronic key battery is depleted ●
Near a TV tower, electric powe r plant, gas station, radio stat ion, large display, airport or
other facility that generates strong radio waves or electrical noise ●
When the electronic key is in contact wi th, or is covered by the following metallic
objects
• Portable radio, cellular phone, cordless phone or other wireless communication
device
• Cards to which aluminum foil is attached
• Cigarette boxes that have aluminum foil inside
• Metallic wallets or bags
•Coins
•Hand warmers made of metal
• Media such as CDs and DVDs ●
When other wireless keys (that emit radio waves) are being used nearbyPress twice while pressing and holding
. Confirm that the electronic key indica-
tor flashes 4 times.
While the battery-saving mode is set, the smart
access system with push-button start cannot be
used. To cancel the function, press any of the
electronic key buttons.
Page 143 of 632

LX570_OM_OM60N01U_(U) 1433-3. Adjusting the seats
3
Operation of each component For easy access to the third seat, perform in “Tumbling the second seats”
( P. 144). ■
Before tumbling the second seats
Stow the seat belt buckles and
lower the head restraints to the
lowest position.
Pass the outer seat belts through
the seat belt hangers and secure
the seat belt plates. This prevents the shoulder belt from
being damaged.
Make sure that the seat belts are
removed from the hangers before
using them.
Vehicles with rear seat entertain-
ment system: Install the display
cover for the rear seat entertain-
ment system. Tumbling the second seats and third seat entry 1
1
2
3
Page 144 of 632

144
LX570_OM_OM60N01U_(U) 3-3. Adjusting the seats■
Tumbling the second seats
Fold down the seatback while
pulling the seatback angle adjust-
ment lever, and swing the whole
seat up and forward.
Hook the holding strap to the
assist grip and secure the seat by
pulling its free end. When returning the second seat to
its original position, stow the holding
strap.
Remove the seat hook covers
from the back of the seat cushion,
and install them on the seat
hooks. When returning the second seat to
its original position, remove the seat
hook covers from the floor and install
them in the back of the seat cushion.1
2
3
Page 145 of 632
LX570_OM_OM60N01U_(U) 1453-3. Adjusting the seats
3
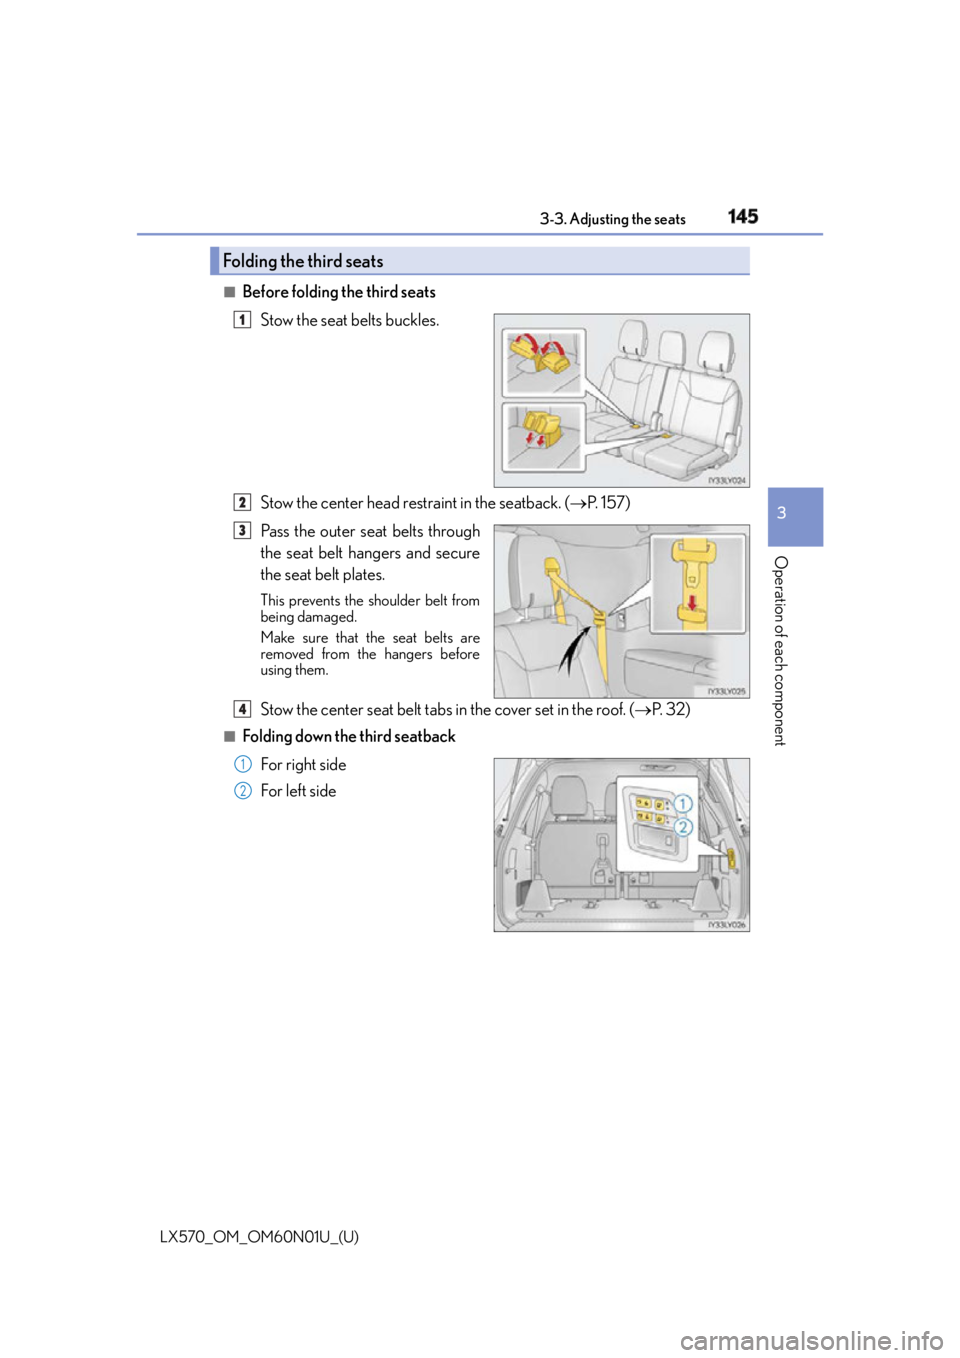
Operation of each component ■
Before folding the third seats
Stow the seat belts buckles.
Stow the center head restraint in the seatback. ( P. 1 5 7 )
Pass the outer seat belts through
the seat belt hangers and secure
the seat belt plates. This prevents the shoulder belt from
being damaged.
Make sure that the seat belts are
removed from the hangers before
using them.
Stow the center seat belt tabs in the cover set in the roof. ( P. 3 2 )■
Folding down the third seatback
For right side
For lef t sideFolding the third seats 1
2
3
4
1
2