LEXUS SC400 1991 Service Repair Manual
Manufacturer: LEXUS, Model Year: 1991,
Model line: SC400,
Model: LEXUS SC400 1991
Pages: 4087, PDF Size: 75.75 MB
LEXUS SC400 1991 Service Repair Manual
SC400 1991
LEXUS
LEXUS
https://www.carmanualsonline.info/img/36/57051/w960_57051-0.png
LEXUS SC400 1991 Service Repair Manual
Trending: service interval, high beam, wheel, recommended oil, boot, checking oil, fuel
Page 1731 of 4087
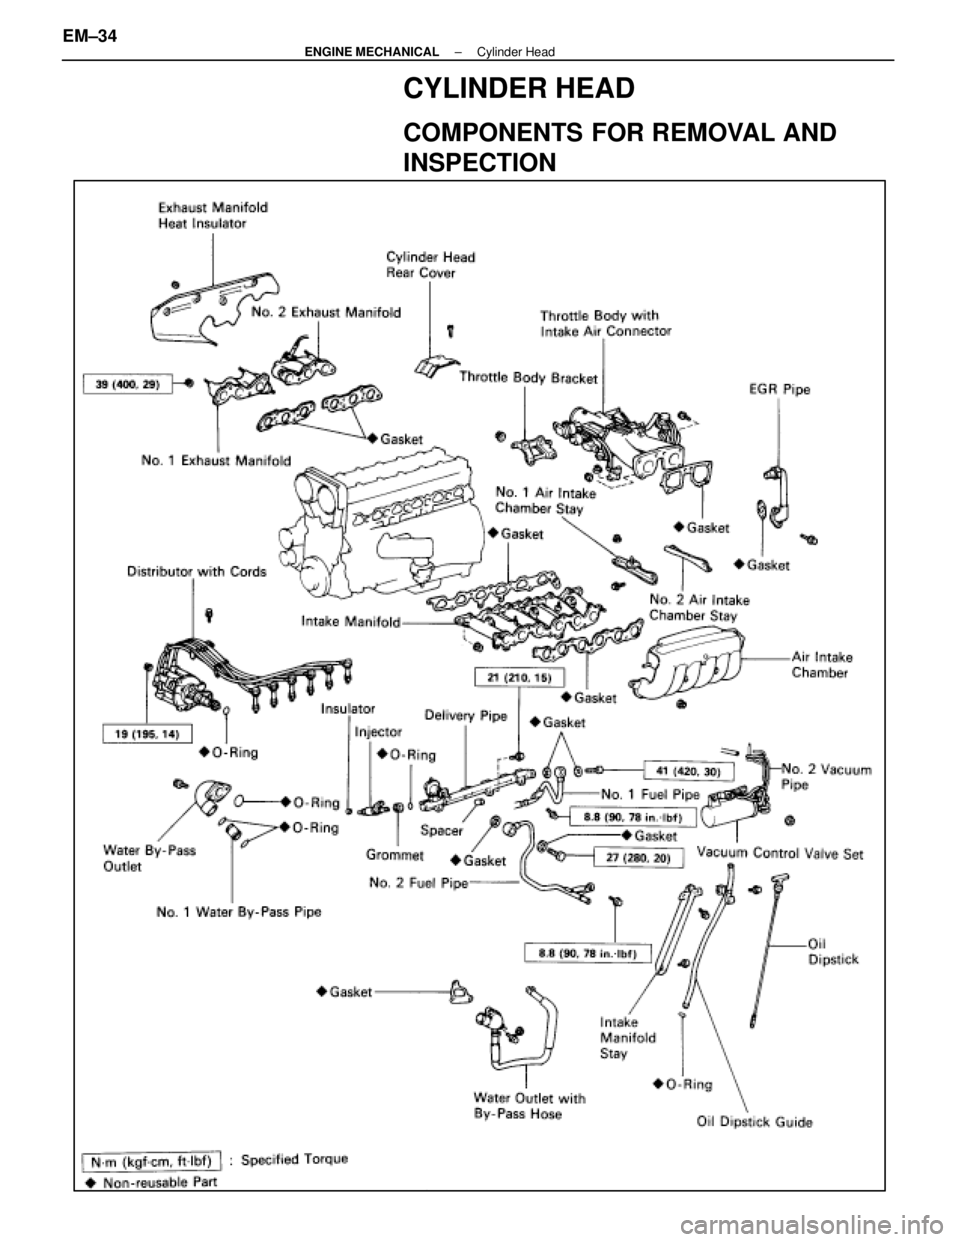
CYLINDER HEAD
COMPONENTS FOR REMOVAL AND
INSPECTION
EM±34±
ENGINE MECHANICAL Cylinder Head
WhereEverybodyKnowsYourName
Page 1732 of 4087
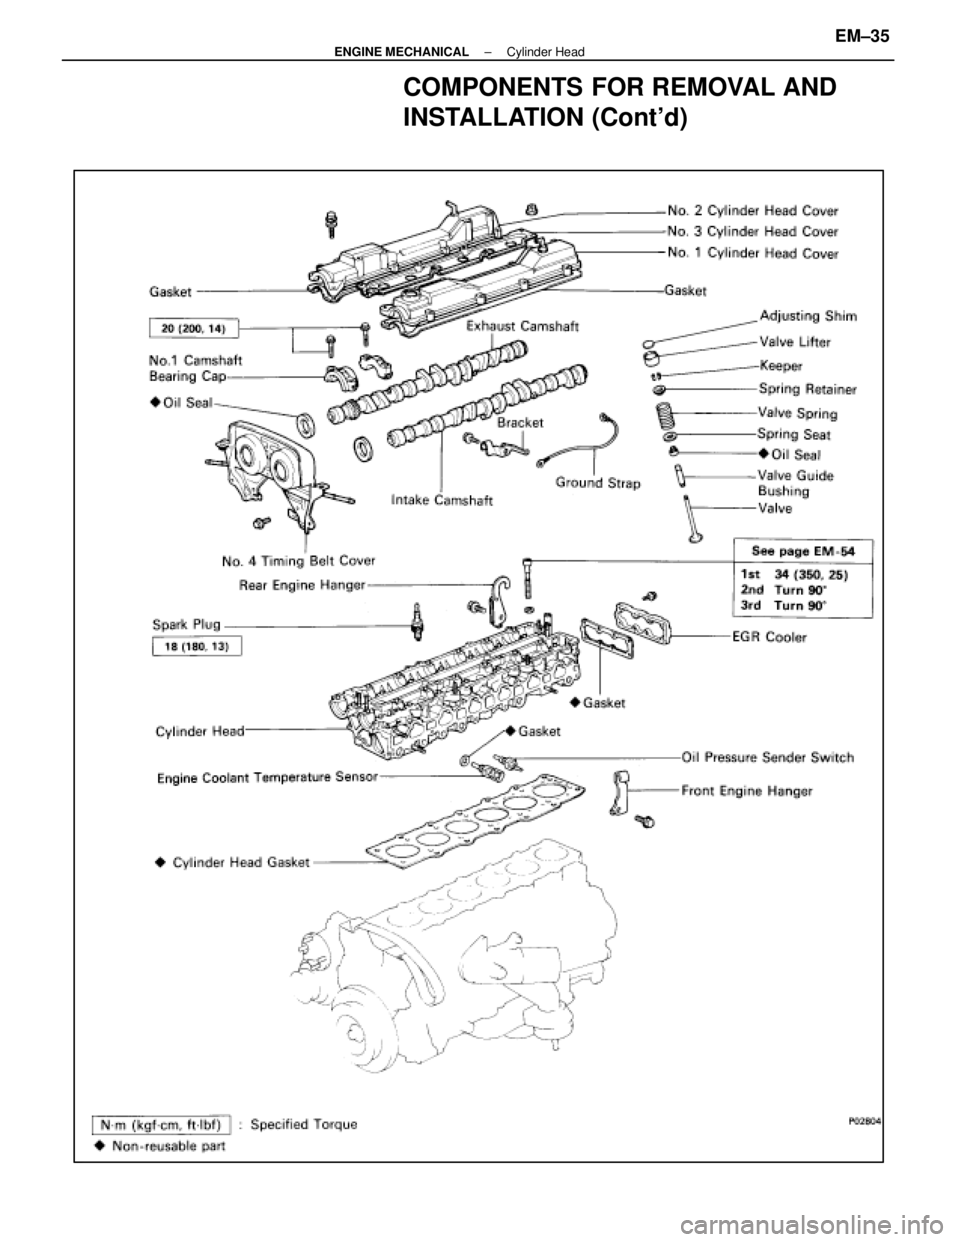
COMPONENTS FOR REMOVAL AND
INSTALLATION (Cont'd)
±
ENGINE MECHANICAL Cylinder HeadEM±35
WhereEverybodyKnowsYourName
Page 1733 of 4087
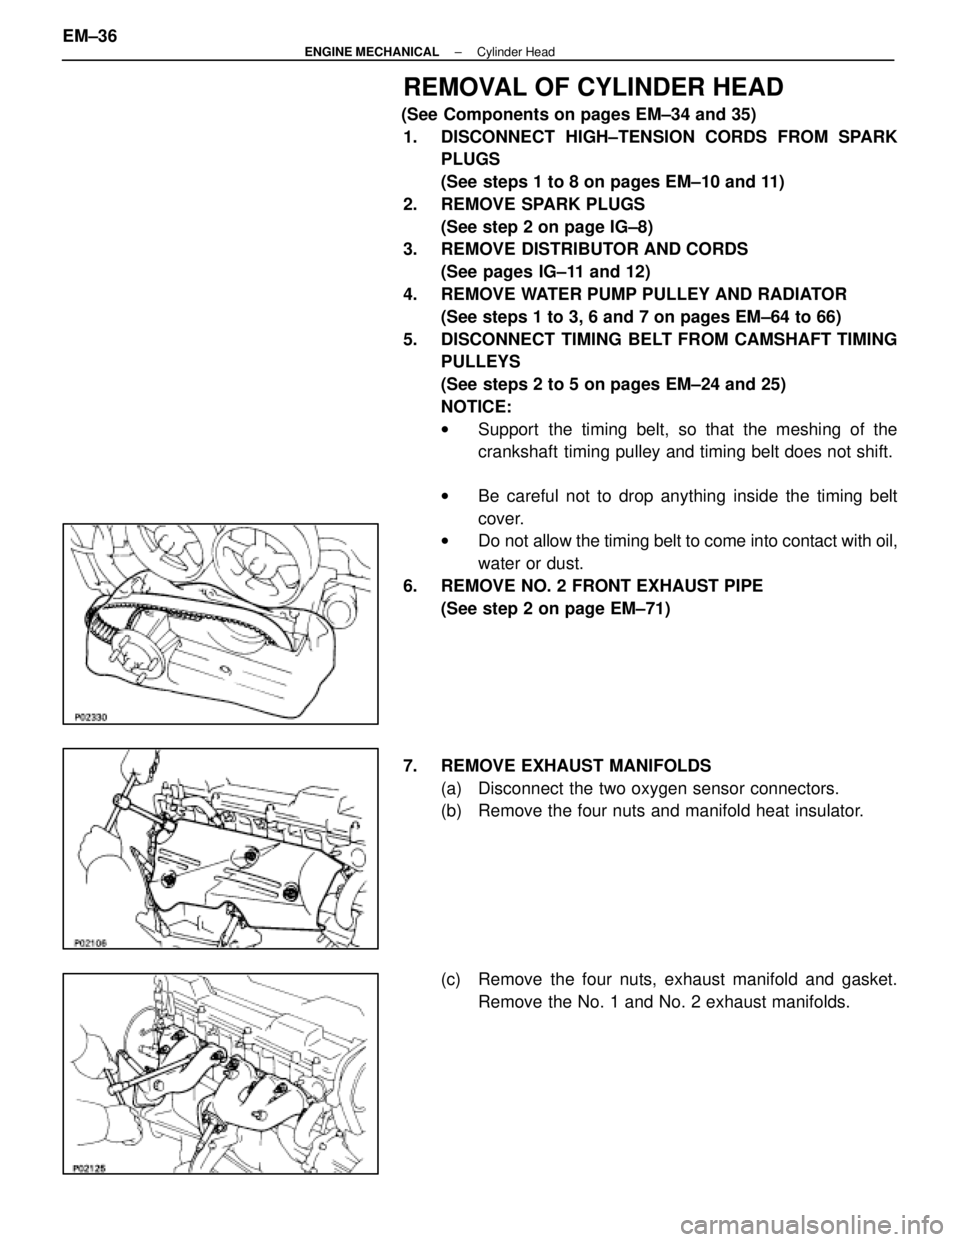
REMOVAL OF CYLINDER HEAD
(See Components on pages EM±34 and 35)1. DISCONNECT HIGH±TENSION CORDS FROM SPARK PLUGS
(See steps 1 to 8 on pages EM±10 and 11)
2. REMOVE SPARK PLUGS (See step 2 on page IG±8)
3. REMOVE DISTRIBUTOR AND CORDS
(See pages IG±11 and 12)
4. REMOVE WATER PUMP PULLEY AND RADIATOR (See steps 1 to 3, 6 and 7 on pages EM±64 to 66)
5. DISCONNECT TIMING BELT FROM CAMSHAFT TIMING PULLEYS
(See steps 2 to 5 on pages EM±24 and 25)
NOTICE:
wSupport the timing belt, so that the meshing of the
crankshaft timing pulley and timing belt does not shift.
w Be careful not to drop anything inside the timing belt
cover.
w Do not allow the timing belt to come into contact with oil,
water or dust.
6. REMOVE NO. 2 FRONT EXHAUST PIPE (See step 2 on page EM±71)
7. REMOVE EXHAUST MANIFOLDS (a) Disconnect the two oxygen sensor connectors.
(b) Remove the four nuts and manifold heat insulator.
(c) Remove the four nuts, exhaust manifold and gasket.Remove the No. 1 and No. 2 exhaust manifolds.
EM±36
±
ENGINE MECHANICAL Cylinder Head
WhereEverybodyKnowsYourName
Page 1734 of 4087
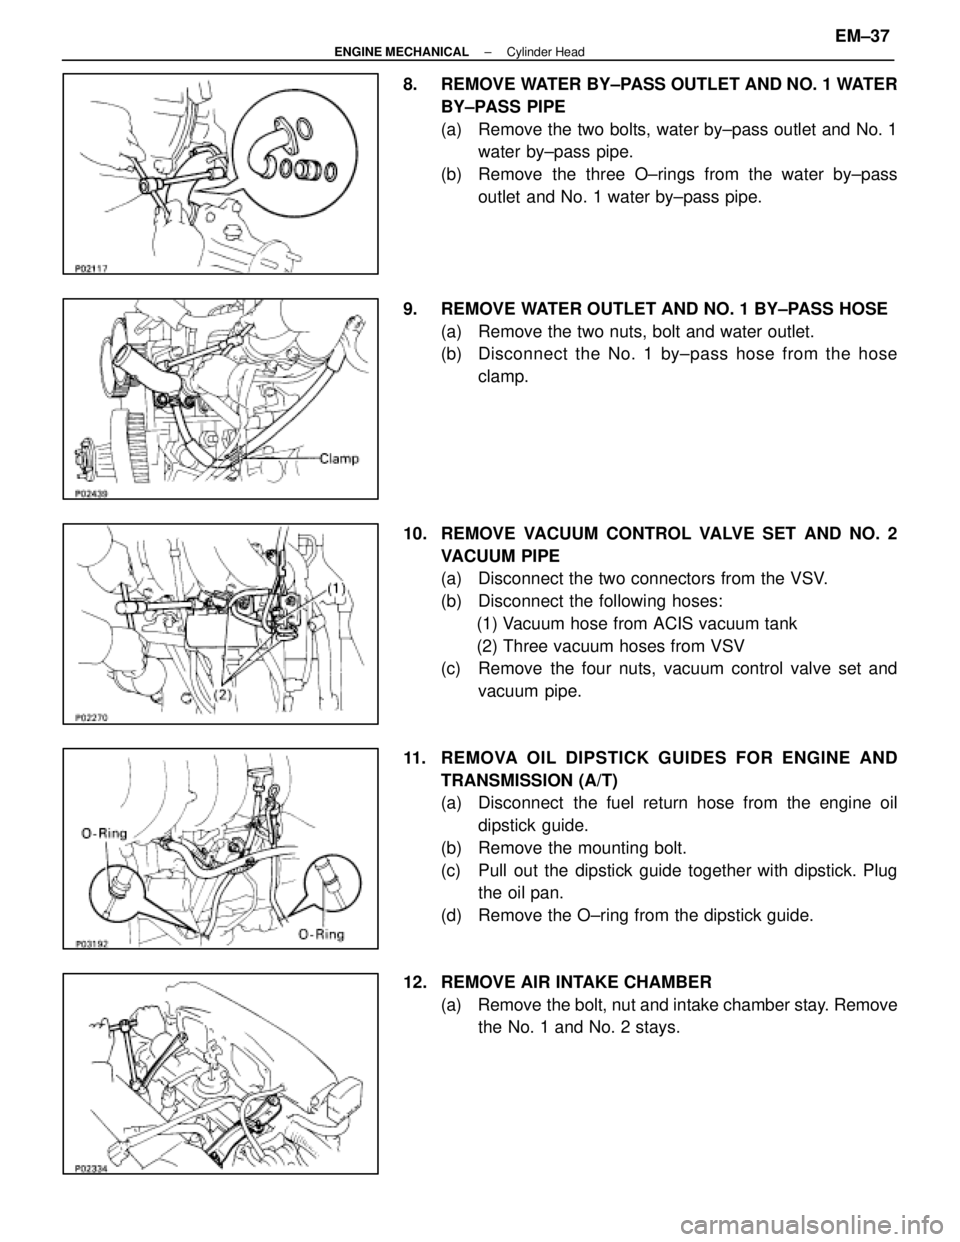
8. REMOVE WATER BY±PASS OUTLET AND NO. 1 WATERBY±PASS PIPE
(a) Remove the two bolts, water by±pass outlet and No. 1water by±pass pipe.
(b) Remove the three O±rings from the water by±pass outlet and No. 1 water by±pass pipe.
9. REMOVE WATER OUTLET AND NO. 1 BY±PASS HOSE (a) Remove the two nuts, bolt and water outlet.
(b) Disc onnect the No. 1 by±pass hose from the hose
clamp.
10. REMOVE VACUUM CONTROL VALVE SET AND NO. 2 VACUUM PIPE
(a) Disconnect the two connectors from the VSV.
(b) Disconnect the following hoses:(1) Vacuum hose from ACIS vacuum tank
(2) Three vacuum hoses from VSV
(c) Remove the four nuts, vacuum control valve set and
vacuum pipe.
11. REMOVA OIL DIPSTICK GUIDES FOR ENGINE AND TRANSMISSION (A/T)
(a) Disconnect the fuel return hose from the engine oildipstick guide.
(b) Remove the mounting bolt.
(c) Pull out the dipstick guide together with dipstick. Plug the oil pan.
(d) Remove the O±ring from the dipstick guide.
12. REMOVE AIR INTAKE CHAMBER (a) Remove the bolt, nut and intake chamber stay. Removethe No. 1 and No. 2 stays.
±
ENGINE MECHANICAL Cylinder HeadEM±37
WhereEverybodyKnowsYourName
Page 1735 of 4087
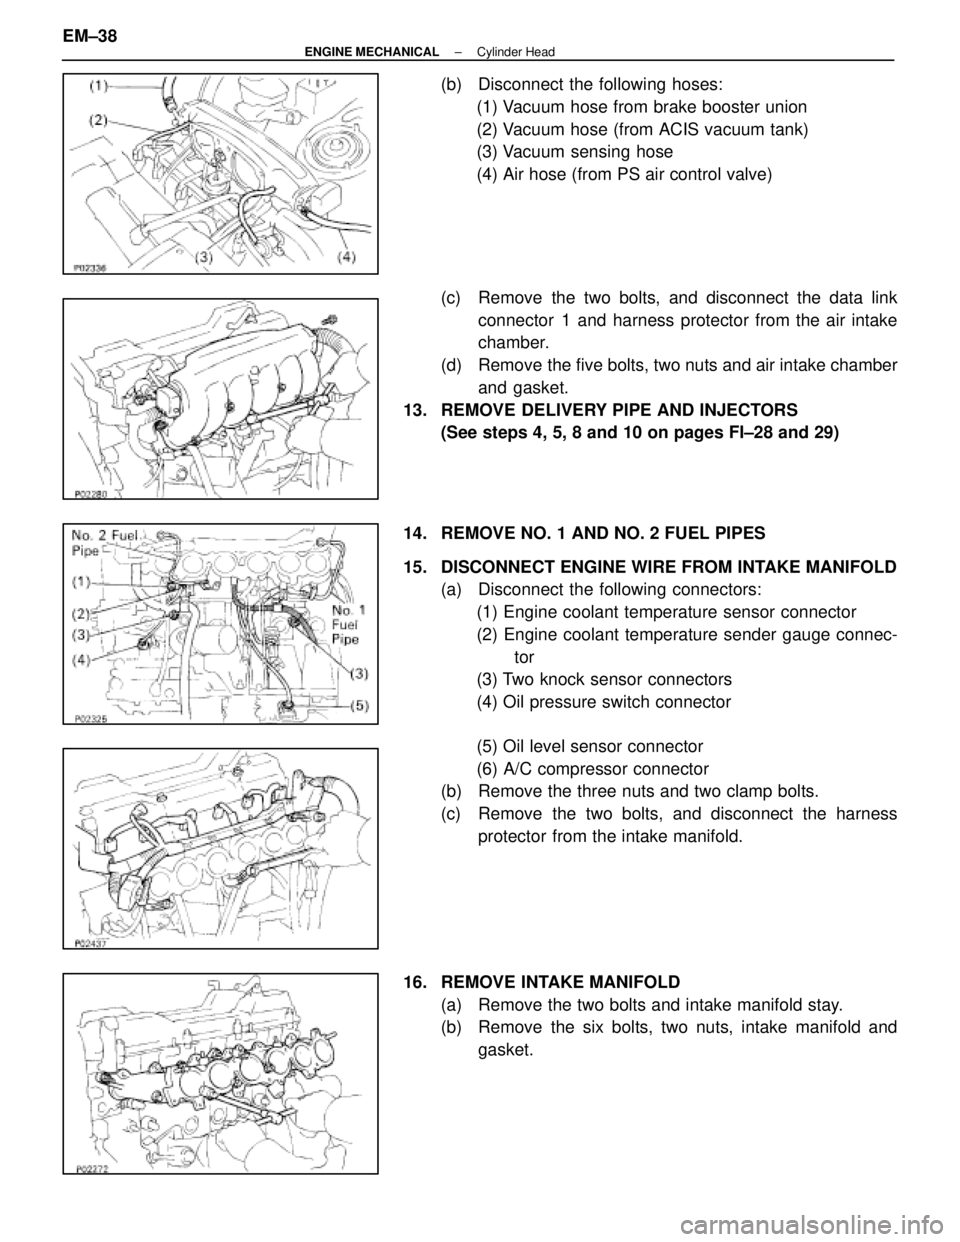
(b) Disconnect the following hoses:(1) Vacuum hose from brake booster union
(2) Vacuum hose (from ACIS vacuum tank)
(3) Vacuum sensing hose
(4) Air hose (from PS air control valve)
(c) Remove the two bolts, and disconnect the data link connector 1 and harness protector from the air intake
chamber.
(d) Remove the five bolts, two nuts and air intake chamber and gasket.
13. REMOVE DELIVERY PIPE AND INJECTORS (See steps 4, 5, 8 and 10 on pages FI±28 and 29)
14. REMOVE NO. 1 AND NO. 2 FUEL PIPES
15. DISCONNECT ENGINE WIRE FROM INTAKE MANIFOLD (a) Disconnect the following connectors:
(1) Engine coolant temperature sensor connector
(2) Engine coolant temperature sender gauge connec- tor
(3) Two knock sensor connectors
(4) Oil pressure switch connector
(5) Oil level sensor connector
(6) A/C compressor connector
(b) Remove the three nuts and two clamp bolts.
(c) Remove the two bolts, and disconnect the harness
protector from the intake manifold.
16. REMOVE INTAKE MANIFOLD (a) Remove the two bolts and intake manifold stay.
(b) Remove the six bolts, two nuts, intake manifold andgasket.
EM±38
±
ENGINE MECHANICAL Cylinder Head
WhereEverybodyKnowsYourName
Page 1736 of 4087
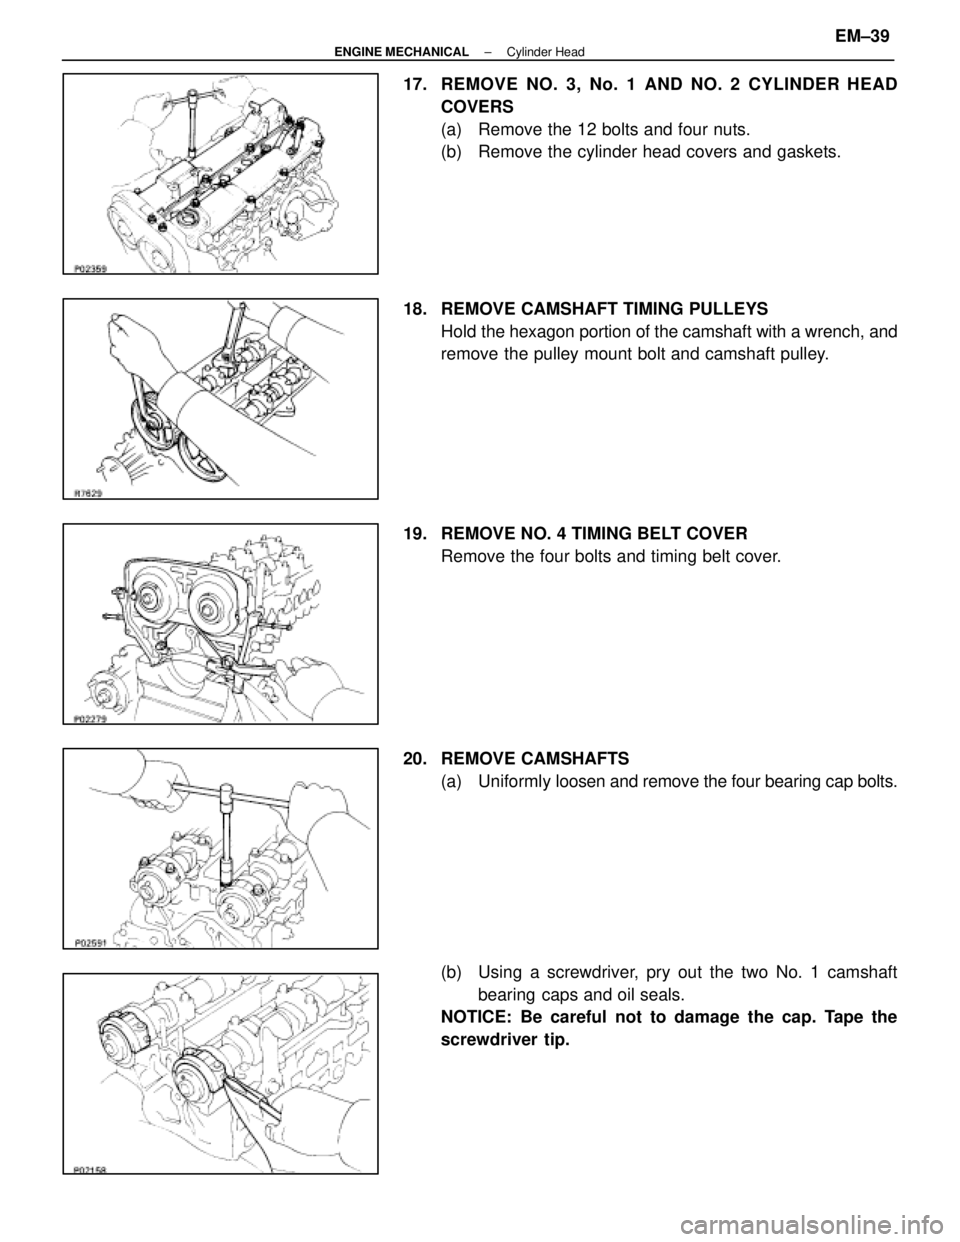
17. REMOVE NO. 3, No. 1 AND NO. 2 CYLINDER HEADCOVERS
(a) Remove the 12 bolts and four nuts.
(b) Remove the cylinder head covers and gaskets.
18. REMOVE CAMSHAFT TIMING PULLEYS Hold the hexagon portion of the camshaft with a wrench, and
remove the pulley mount bolt and camshaft pulley.
19. REMOVE NO. 4 TIMING BELT COVER Remove the four bolts and timing belt cover.
20. REMOVE CAMSHAFTS (a) Uniformly loosen and remove the four bearing cap bolts.
(b) Using a screwdriver, pry out the two No. 1 camshaft bearing caps and oil seals.
NOTICE: Be careful not to damage the cap. Tape the
screwdriver tip.
±
ENGINE MECHANICAL Cylinder HeadEM±39
WhereEverybodyKnowsYourName
Page 1737 of 4087
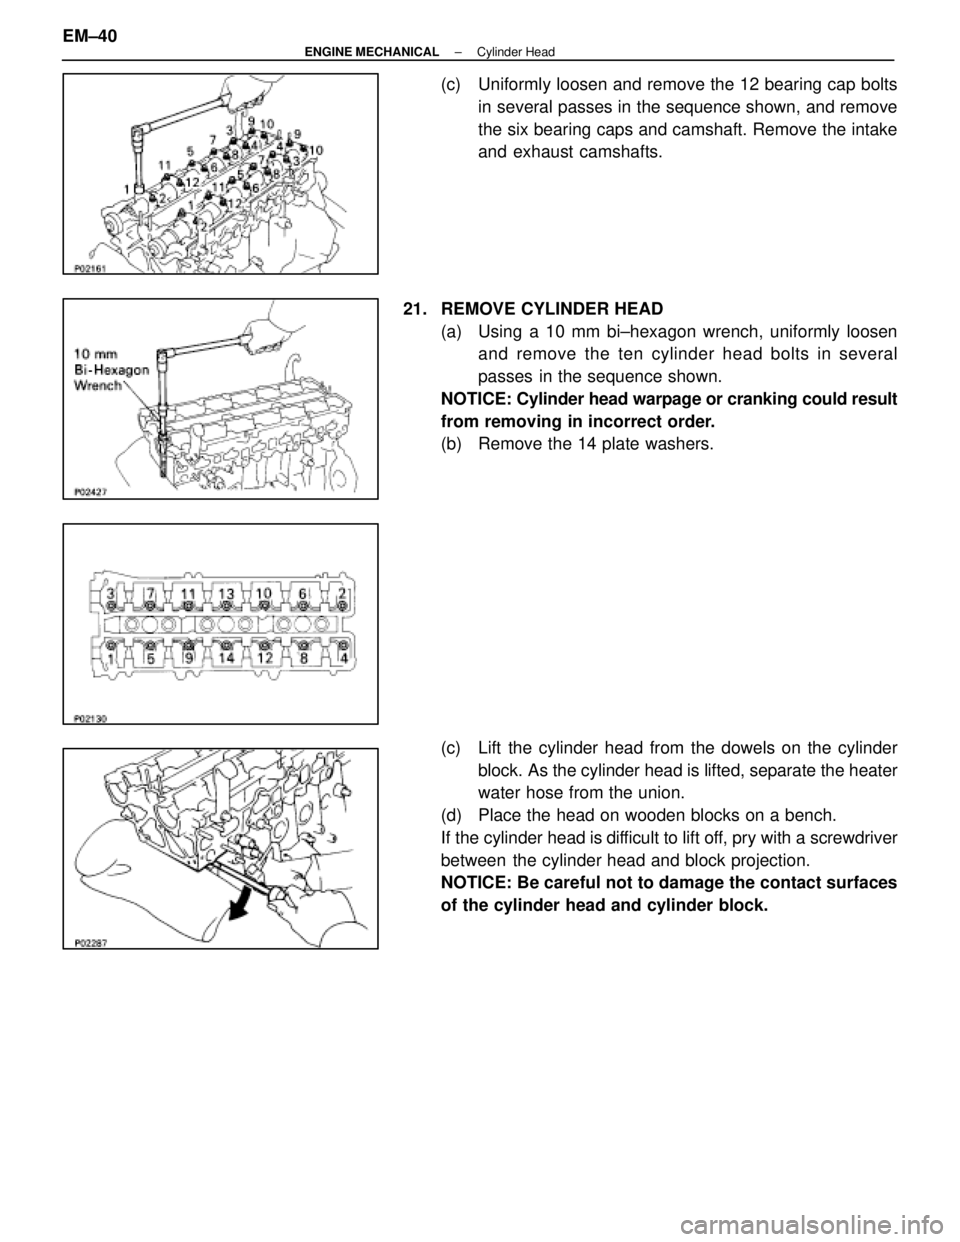
(c) Uniformly loosen and remove the 12 bearing cap boltsin several passes in the sequence shown, and remove
the six bearing caps and camshaft. Remove the intake
and exhaust camshafts.
21. REMOVE CYLINDER HEAD (a) Using a 10 mm bi±hexagon wrench, uniformly loosenand remove the ten cylinder head bolts in several
passes in the sequence shown.
NOTICE: Cylinder head warpage or cranking could result
from removing in incorrect order.
(b) Remove the 14 plate washers.
(c) Lift the cylinder head from the dowels on the cylinder block. As the cylinder head is lifted, separate the heater
water hose from the union.
(d) Place the head on wooden blocks on a bench.
If the cylinder head is difficult to lift off, pry with a screwdriver
between the cylinder head and block projection.
NOTICE: Be careful not to damage the contact surfaces
of the cylinder head and cylinder block.
EM±40
±
ENGINE MECHANICAL Cylinder Head
WhereEverybodyKnowsYourName
Page 1738 of 4087
DISASSEMBLY OF CYLINDER HEAD
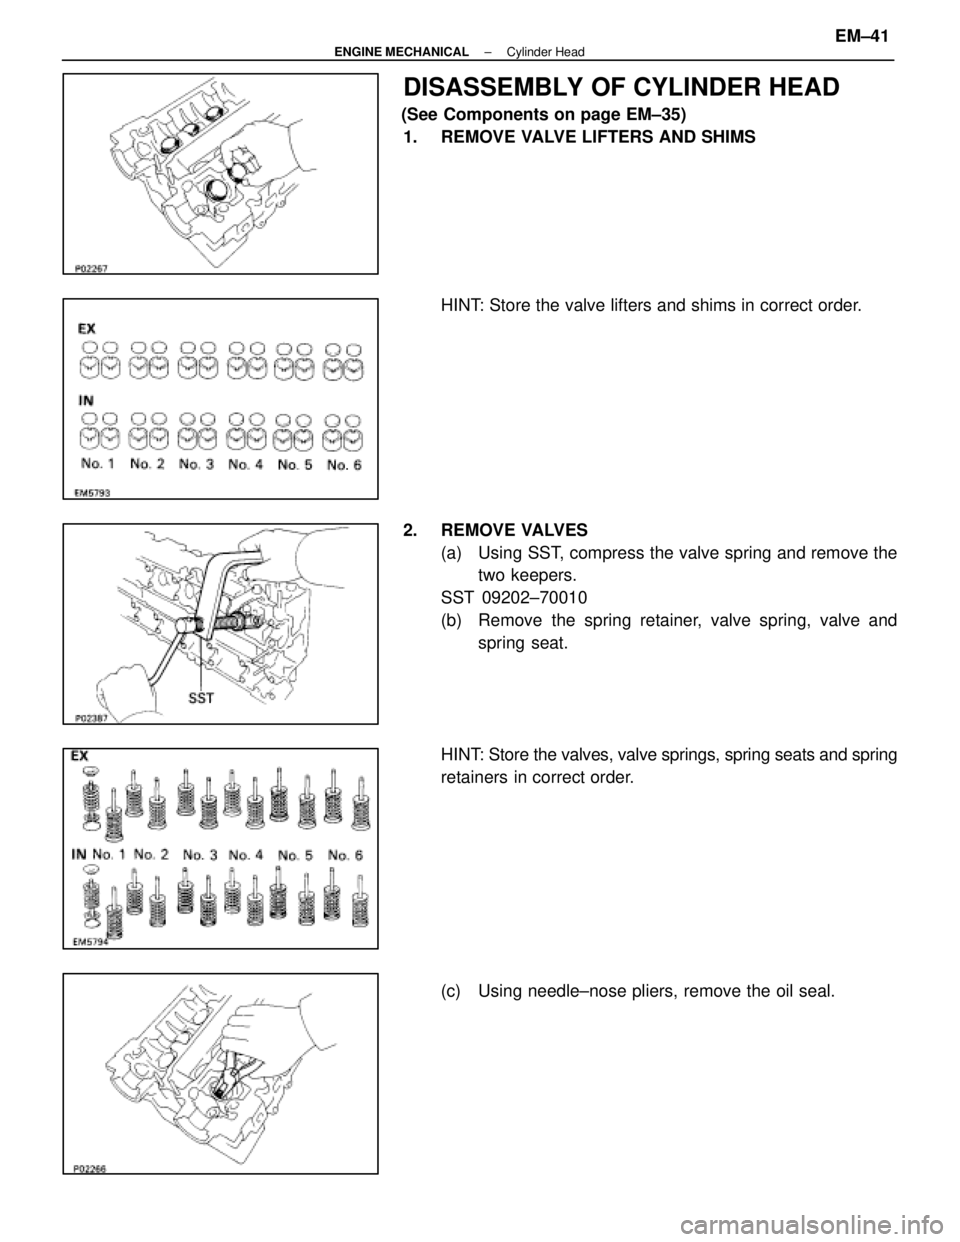
(See Components on page EM±35)1. REMOVE VALVE LIFTERS AND SHIMS
HINT: Store the valve lifters and shims in correct order.
2. REMOVE VALVES (a) Using SST, compress the valve spring and remove thetwo keepers.
SST 09202±70010
(b) Remove the spring retainer, valve spring, valve and spring seat.
HINT: Store the valves, valve springs, spring seats and spring
retainers in correct order.
(c) Using needle±nose pliers, remove the oil seal.
±
ENGINE MECHANICAL Cylinder HeadEM±41
WhereEverybodyKnowsYourName
Page 1739 of 4087
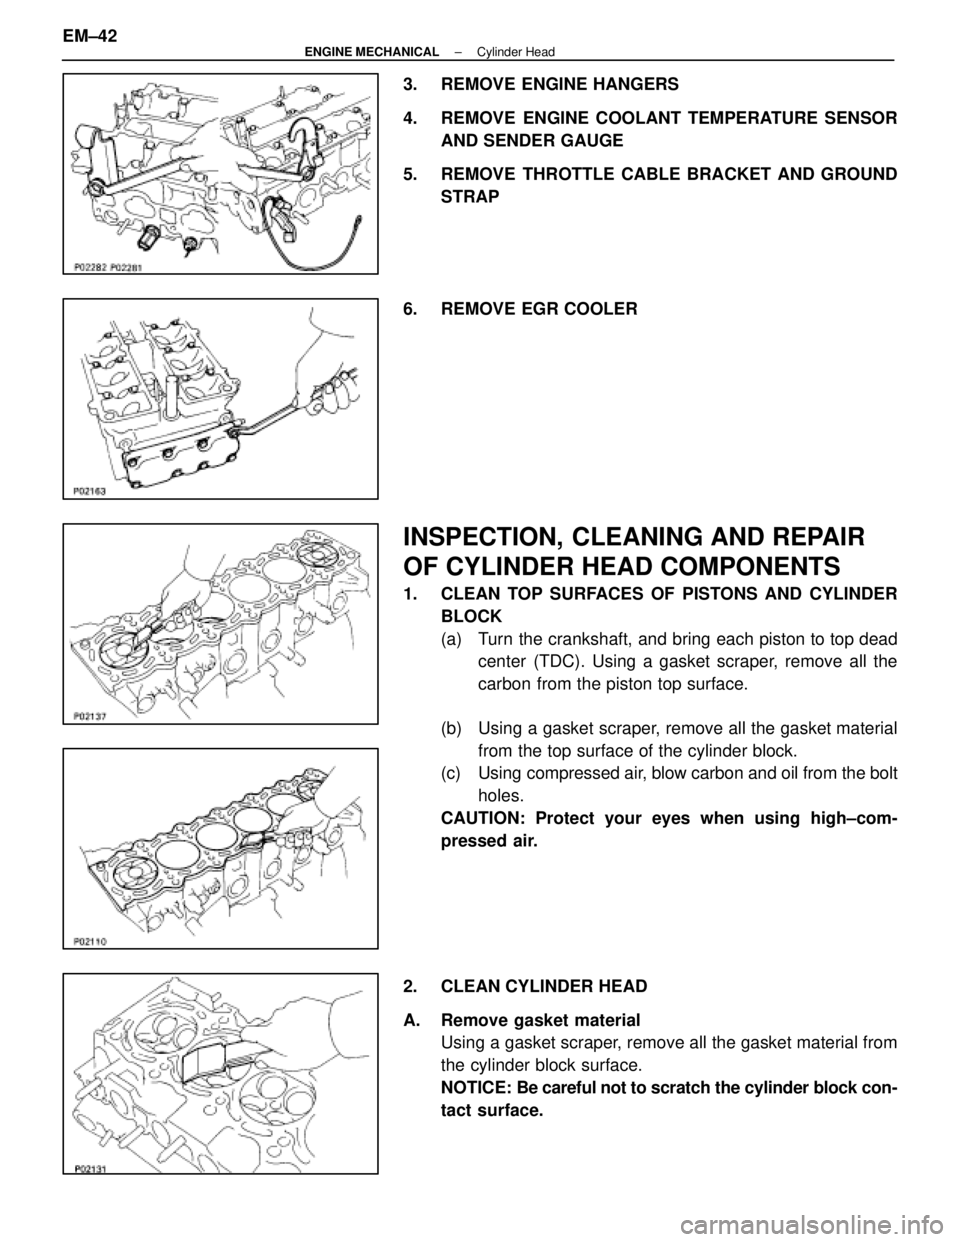
3. REMOVE ENGINE HANGERS
4. REMOVE ENGINE COOLANT TEMPERATURE SENSORAND SENDER GAUGE
5. REMOVE THROTTLE CABLE BRACKET AND GROUND STRAP
6. REMOVE EGR COOLER
INSPECTION, CLEANING AND REPAIR
OF CYLINDER HEAD COMPONENTS
1. CLEAN TOP SURFACES OF PISTONS AND CYLINDER BLOCK
(a) Turn the crankshaft, and bring each piston to top deadcenter (TDC). Using a gasket scraper, remove all the
carbon from the piston top surface.
(b) Using a gasket scraper, remove all the gasket material from the top surface of the cylinder block.
(c) Using compressed air, blow carbon and oil from the bolt
holes.
CAUTION: Protect your eyes when using high±com-
pressed air.
2. CLEAN CYLINDER HEAD
A. Remove gasket material Using a gasket scraper, remove all the gasket material from
the cylinder block surface.
NOTICE: Be careful not to scratch the cylinder block con-
tact surface.
EM±42
±
ENGINE MECHANICAL Cylinder Head
WhereEverybodyKnowsYourName
Page 1740 of 4087
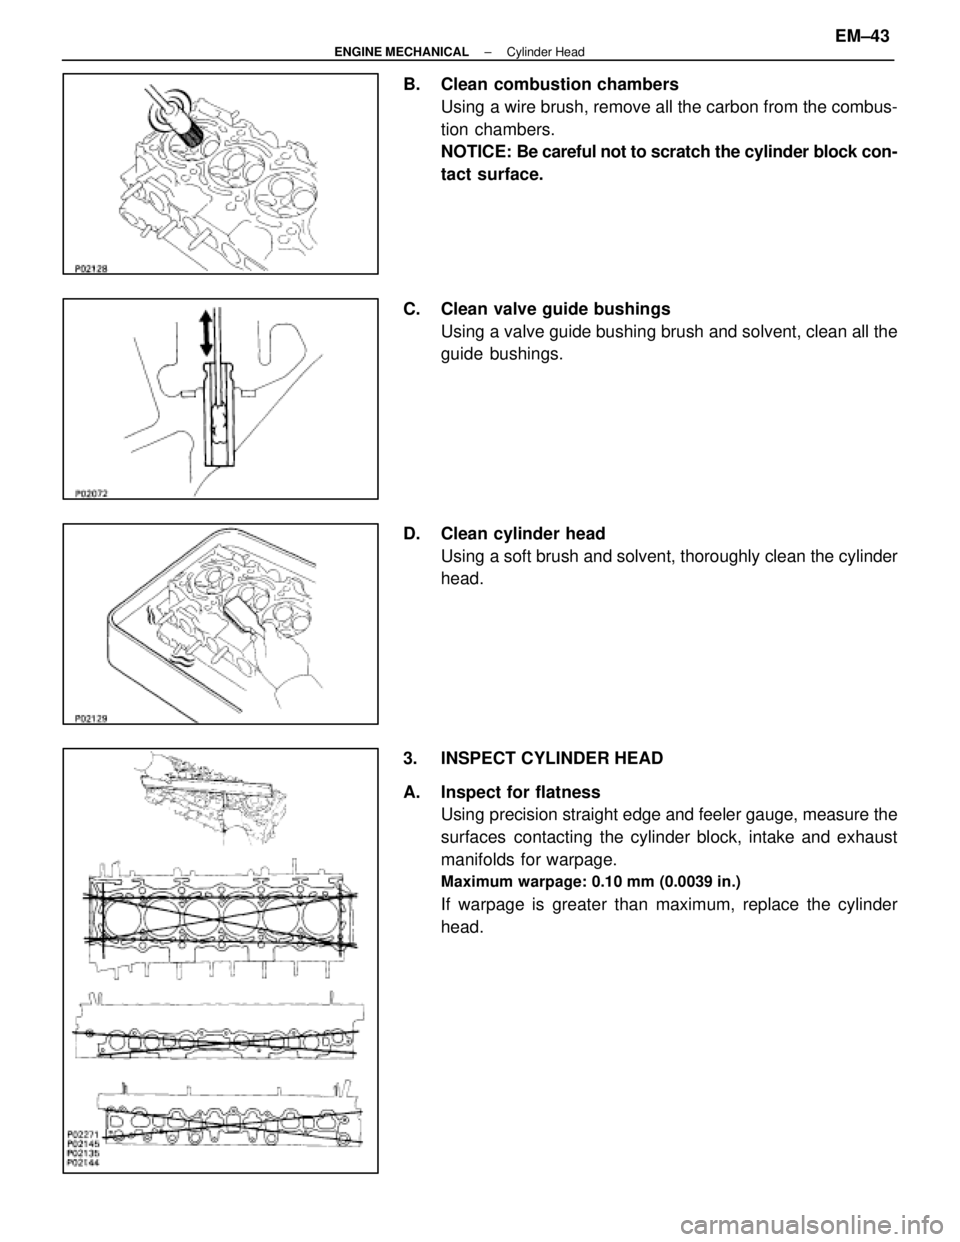
B. Clean combustion chambersUsing a wire brush, remove all the carbon from the combus-
tion chambers.
NOTICE: Be careful not to scratch the cylinder block con-
tact surface.
C. Clean valve guide bushings Using a valve guide bushing brush and solvent, clean all the
guide bushings.
D. Clean cylinder head Using a soft brush and solvent, thoroughly clean the cylinder
head.
3. INSPECT CYLINDER HEAD
A. Inspect for flatness Using precision straight edge and feeler gauge, measure the
surfaces contacting the cylinder block, intake and exhaust
manifolds for warpage.
Maximum warpage: 0.10 mm (0.0039 in.)
If warpage is greater than maximum, replace the cylinder
head.
±
ENGINE MECHANICAL Cylinder HeadEM±43
WhereEverybodyKnowsYourName
Trending: spark plugs replace, brakes, phone, radiator cap, width, center console, diagram
