LEXUS SC400 1991 Service Repair Manual
Manufacturer: LEXUS, Model Year: 1991, Model line: SC400, Model: LEXUS SC400 1991Pages: 4087, PDF Size: 75.75 MB
Page 541 of 4087
Parts Inspection
(Power Window Master Switch)
REMOVAL AND INSTALLATION OF
POWER WINDOW MASTER SWITCH
(See page BO±33)
INSPECTION OF POWER WINDOW
MASTER SWITCH
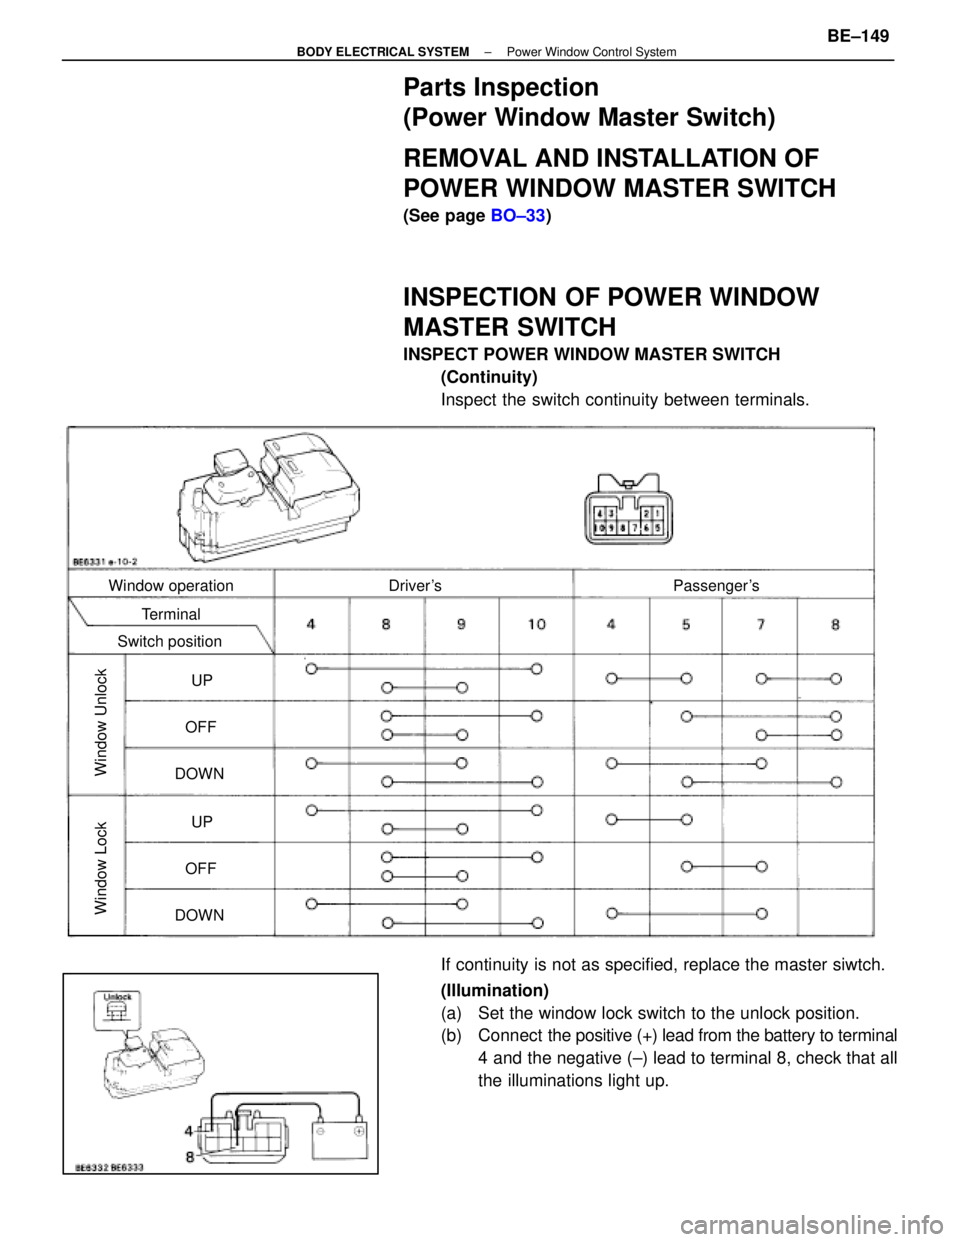
INSPECT POWER WINDOW MASTER SWITCH
(Continuity)
Inspect the switch continuity between terminals.
Window operation Driver's Passenger's
Terminal
Switch position
UP
OFF
DOWN
UP
OFF
DOWN
Window Unlock
Window Lock
If continuity is not as specified, replace the master siwtch.
(Illumination)
(a) Set the window lock switch to the unlock position.
(b) Connect the positive (+) lead from the battery to terminal
4 and the negative (±) lead to terminal 8, check that all
the illuminations light up.
±
BODY ELECTRICAL SYSTEM Power Window Control SystemBE±149
WhereEverybodyKnowsYourName
Page 542 of 4087
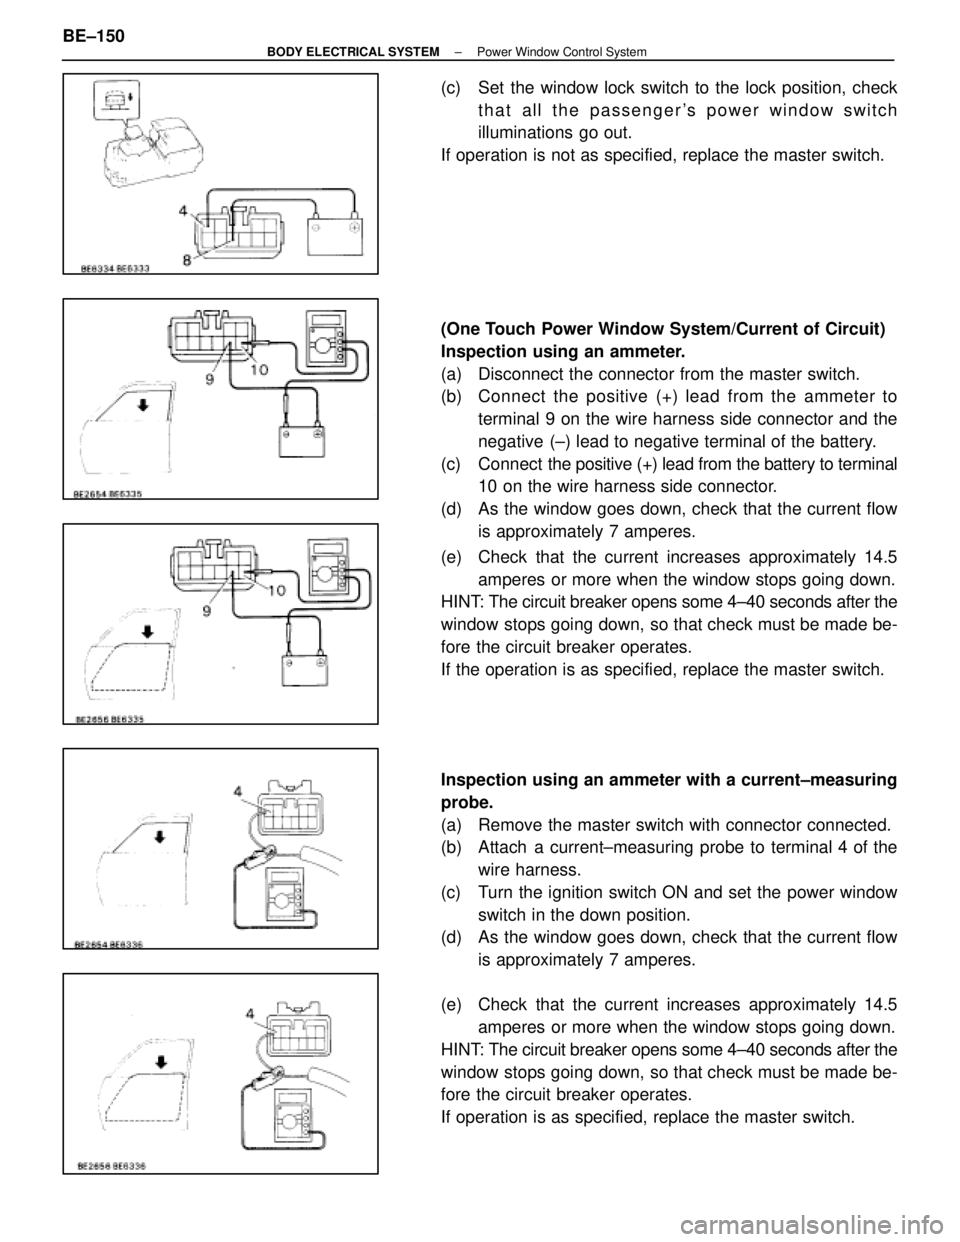
(c) Set the window lock switch to the lock position, checkthat all the passenger's power window switch
illuminations go out.
If operation is not as specified, replace the master switch.
(One Touch Power Window System/Current of Circuit)
Inspection using an ammeter.
(a) Disconnect the connector from the master switch.
(b) C onnect the positive (+) lead from the ammeter to
terminal 9 on the wire harness side connector and the
negative (±) lead to negative terminal of the battery.
(c) Connect the positive (+) lead from the battery to terminal
10 on the wire harness side connector.
(d) As the window goes down, check that the current flow is approximately 7 amperes.
(e) Check that the current increases approximately 14.5 amperes or more when the window stops going down.
HINT: The circuit breaker opens some 4±40 seconds after the
window stops going down, so that check must be made be-
fore the circuit breaker operates.
If the operation is as specified, replace the master switch.
Inspection using an ammeter with a current±measuring
probe.
(a) Remove the master switch with connector connected.
(b) Attach a current±measuring probe to terminal 4 of the
wire harness.
(c) Turn the ignition switch ON and set the power window switch in the down position.
(d) As the window goes down, check that the current flow
is approximately 7 amperes.
(e) Check that the current increases approximately 14.5 amperes or more when the window stops going down.
HINT: The circuit breaker opens some 4±40 seconds after the
window stops going down, so that check must be made be-
fore the circuit breaker operates.
If operation is as specified, replace the master switch.
BE±150
±
BODY ELECTRICAL SYSTEM Power Window Control System
WhereEverybodyKnowsYourName
Page 543 of 4087
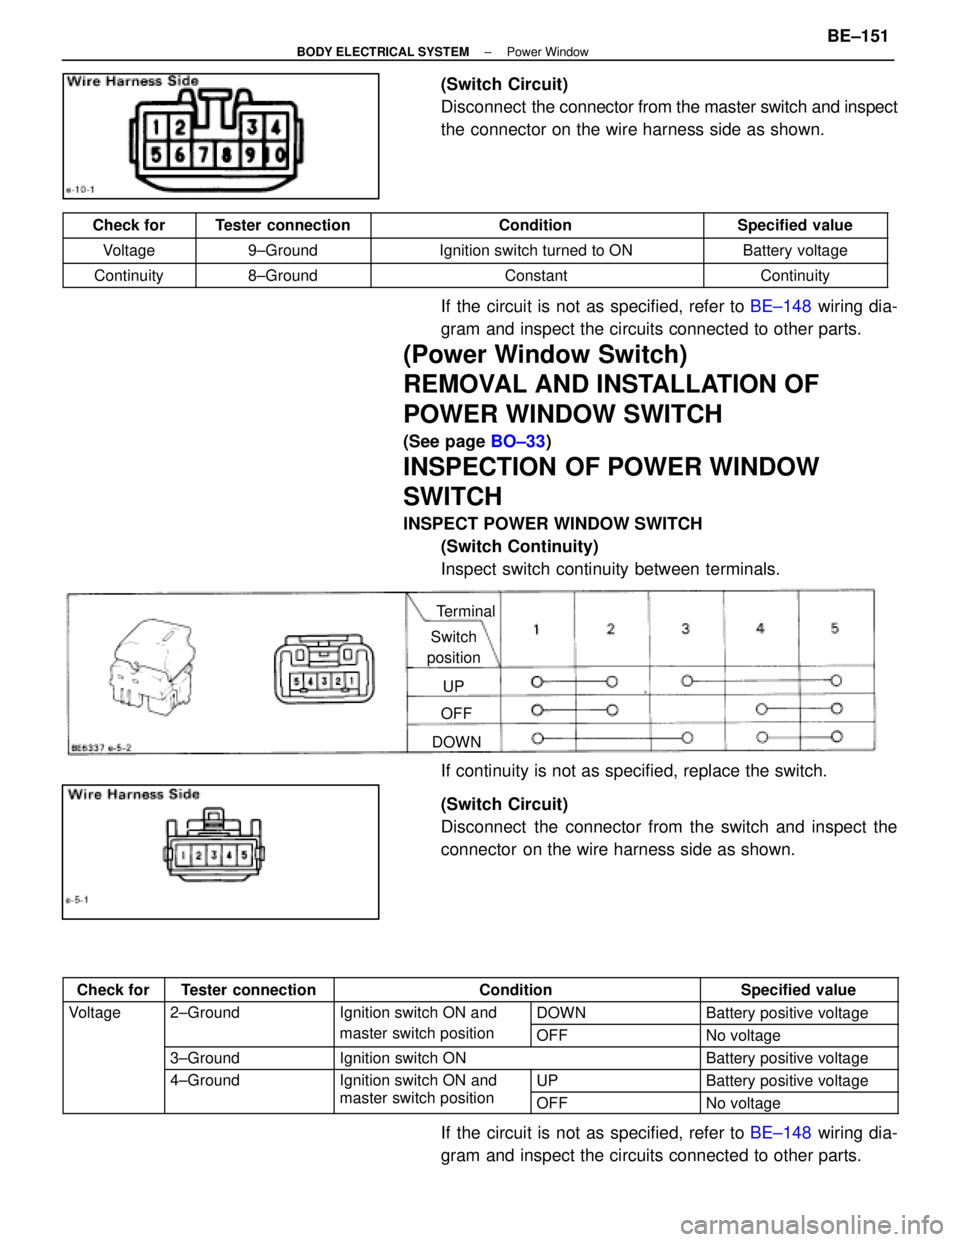
(Switch Circuit)
Disconnect the connector from the master switch and inspect
the connector on the wire harness side as shown.
Check forTester connectionConditionSpecified value
Voltage9±GroundIgnition switch turned to ONBattery voltage
Continuity8±GroundConstantContinuity
If the circuit is not as specified, refer to BE±148 wiring dia-
gram and inspect the circuits connected to other parts.
(Power Window Switch)
REMOVAL AND INSTALLATION OF
POWER WINDOW SWITCH
(See page BO±33)
INSPECTION OF POWER WINDOW
SWITCH
INSPECT POWER WINDOW SWITCH
(Switch Continuity)
Inspect switch continuity between terminals.
Terminal
Switch
position
UP
OFF
DOWN
If continuity is not as specified, replace the switch.
(Switch Circuit)
Disconnect the connector from the switch and inspect the
connector on the wire harness side as shown.
Check forTester connectionConditionSpecified value
Voltage2±GroundIgnition switch ON andDOWNBattery positive voltagegg
master switch positionOFFNo voltage
3±GroundIgnition switch ONBattery positive voltage
4±GroundIgnition switch ON and UPBattery positive voltageg
master switch positionOFFNo voltage
If the circuit is not as specified, refer to BE±148 wiring dia-
gram and inspect the circuits connected to other parts.
±
BODY ELECTRICAL SYSTEM Power WindowBE±151
WhereEverybodyKnowsYourName
Page 544 of 4087
(Power Window Main Relay)
REMOVAL AND INSTALLATION OF
POWER WINDOW MAIN RELAY
(See page BE±16)
INSPECTION OF POWER WINDOW MAIN
RELAY
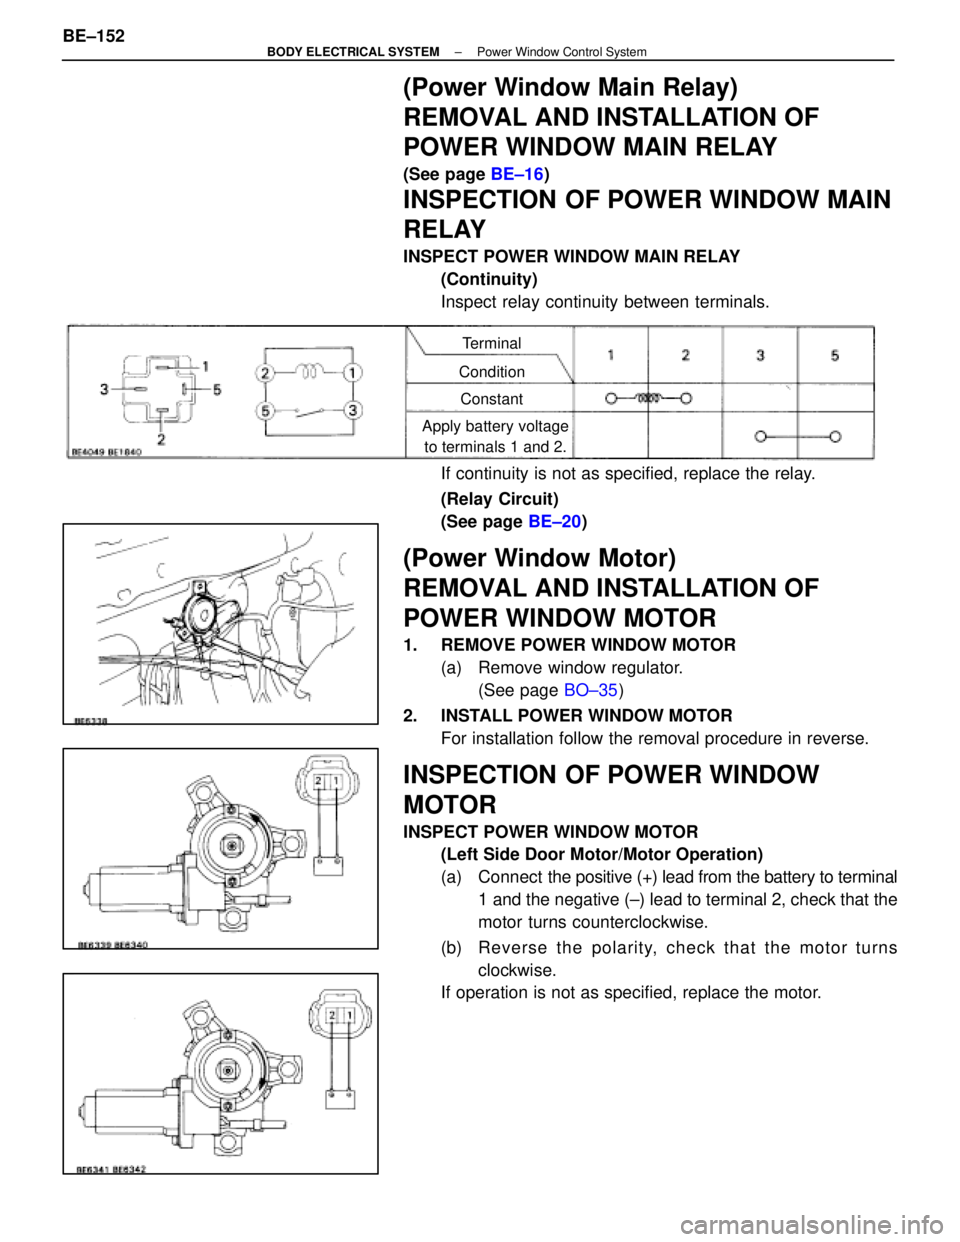
INSPECT POWER WINDOW MAIN RELAY
(Continuity)
Inspect relay continuity between terminals.
Terminal
Condition Constant
Apply battery voltage to terminals 1 and 2.
If continuity is not as specified, replace the relay.
(Relay Circuit)
(See page BE±20)
(Power Window Motor)
REMOVAL AND INSTALLATION OF
POWER WINDOW MOTOR
1. REMOVE POWER WINDOW MOTOR
(a) Remove window regulator.(See page BO±35)
2. INSTALL POWER WINDOW MOTOR For installation follow the removal procedure in reverse.
INSPECTION OF POWER WINDOW
MOTOR
INSPECT POWER WINDOW MOTOR(Left Side Door Motor/Motor Operation)
(a) Connect the positive (+) lead from the battery to terminal
1 and the negative (±) lead to terminal 2, check that the
motor turns counterclockwise.
(b) Re ve rse th e po la rity, ch e ck th a t th e mo to r tu rn s clockwise.
If operation is not as specified, replace the motor.
BE±152
±
BODY ELECTRICAL SYSTEM Power Window Control System
WhereEverybodyKnowsYourName
Page 545 of 4087
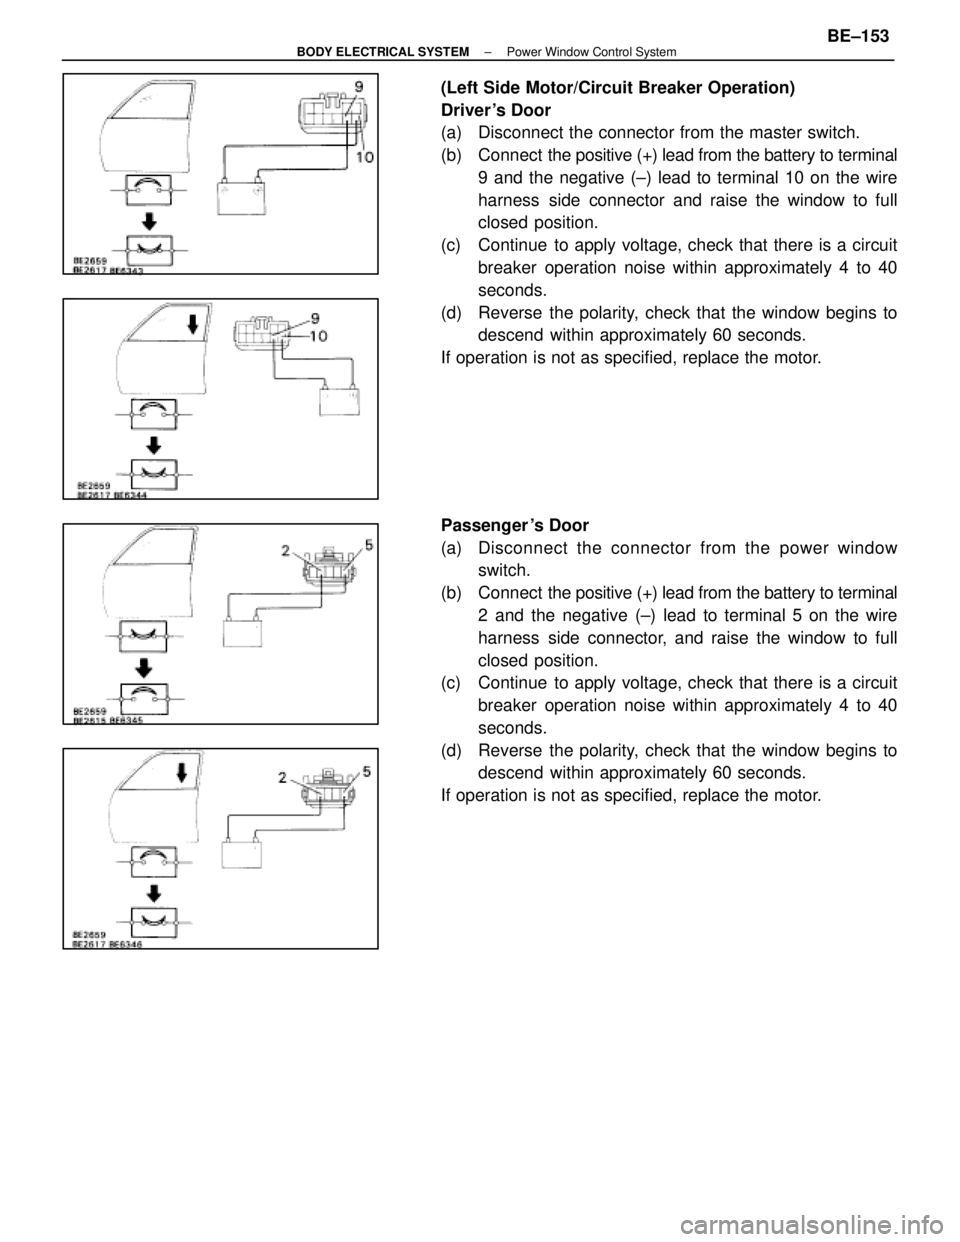
(Left Side Motor/Circuit Breaker Operation)
Driver 's Door
(a) Disconnect the connector from the master switch.
(b) Connect the positive (+) lead from the battery to terminal
9 and the negative (±) lead to terminal 10 on the wire
harness side connector and raise the window to full
closed position.
(c) Continue to apply voltage, check that there is a circuit breaker operation noise within approximately 4 to 40
seconds.
(d) Reverse the polarity, check that the window begins to descend within approximately 60 seconds.
If operation is not as specified, replace the motor.
Passenger 's Door
(a) Disc onnect the connector from the power window
switch.
(b) Connect the positive (+) lead from the battery to terminal
2 and the negative (±) lead to terminal 5 on the wire
harness side connector, and raise the window to full
closed position.
(c) Continue to apply voltage, check that there is a circuit
breaker operation noise within approximately 4 to 40
seconds.
(d) Reverse the polarity, check that the window begins to descend within approximately 60 seconds.
If operation is not as specified, replace the motor.
±
BODY ELECTRICAL SYSTEM Power Window Control SystemBE±153
WhereEverybodyKnowsYourName
Page 546 of 4087
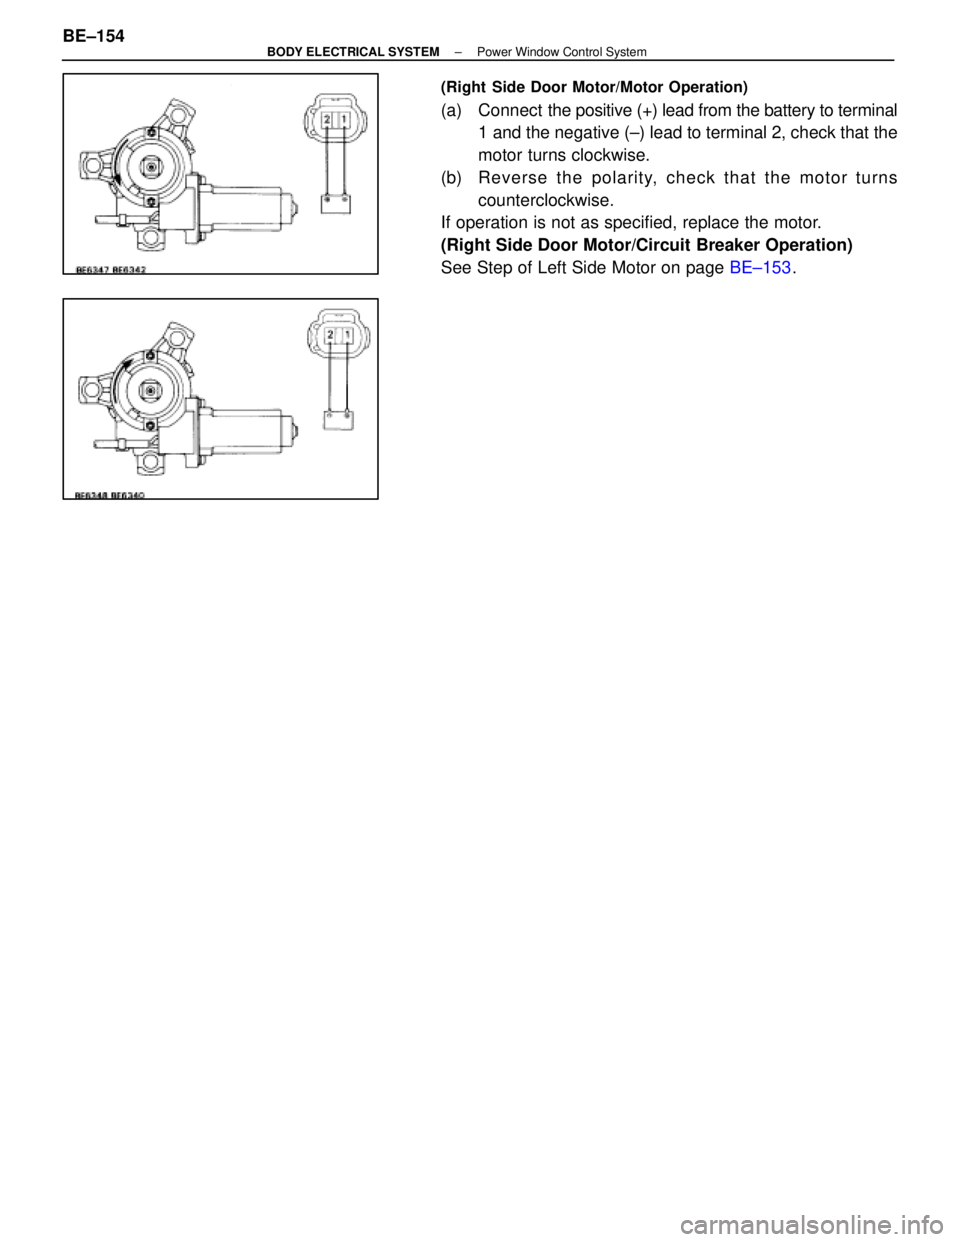
(Right Side Door Motor/Motor Operation)
(a) Connect the positive (+) lead from the battery to terminal
1 and the negative (±) lead to terminal 2, check that the
motor turns clockwise.
(b) Re ve rse th e po la rity, ch e ck th a t th e mo to r tu rn s counterclockwise.
If operation is not as specified, replace the motor.
(Right Side Door Motor/Circuit Breaker Operation)
See Step of Left Side Motor on page BE±153.
BE±154
±
BODY ELECTRICAL SYSTEM Power Window Control System
WhereEverybodyKnowsYourName
Page 547 of 4087
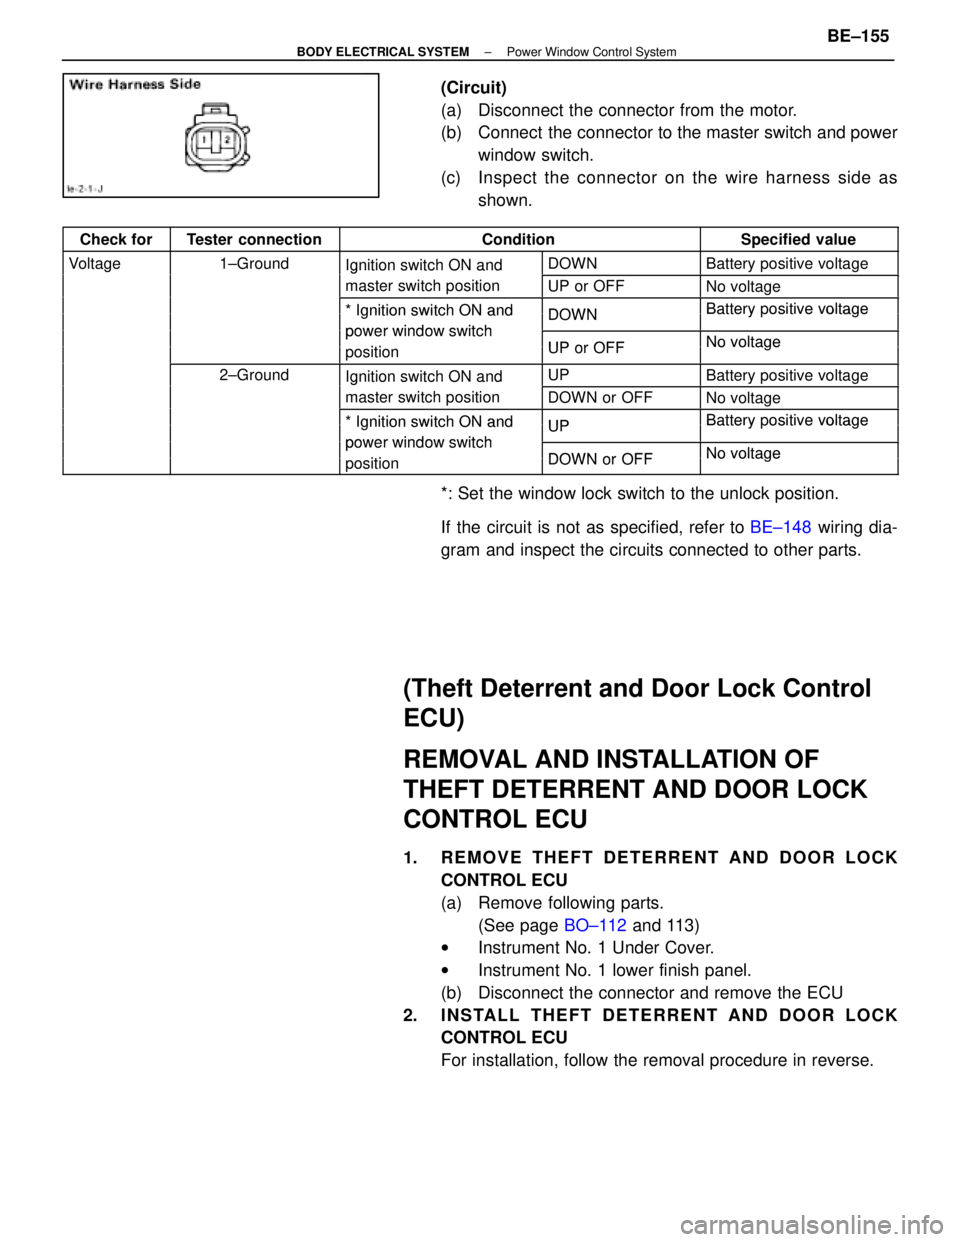
(Circuit)
(a) Disconnect the connector from the motor.
(b) Connect the connector to the master switch and powerwindow switch.
(c) Inspect the c onnector on the wire harness side as
shown.
Check forTester connectionConditionSpecified value
Voltage1±GroundIgnition switch ON andDOWNBattery positive voltagegIgnition switch ON and
master switch positionUP or OFFNo voltage
*Ignition switch ON andDOWNBatterypositive voltage* Ignition switch ON and
power window switch
DOWNBattery ositive voltage
power window switch
iti
UP or OFFNo voltagepositionUP or OFFNo voltage
2±GroundIgnition switch ON andUPBattery positive voltageIgnition switch ON and
master switch positionDOWN or OFFNo voltage
*Ignition switch ON andUPBatterypositive voltage* Ignition switch ON and
power window switch
UPBattery ositive voltage
power window switch
iti
DOWN or OFFNo voltagepositionDOWN or OFFNo voltage
*: Set the window lock switch to the unlock position.
If the circuit is not as specified, refer to BE±148 wiring dia-
gram and inspect the circuits connected to other parts.
(Theft Deterrent and Door Lock Control
ECU)
REMOVAL AND INSTALLATION OF
THEFT DETERRENT AND DOOR LOCK
CONTROL ECU
1. REMOVE THEFT DETERRENT AND DOOR LOCK CONTROL ECU
(a) Remove following parts.(See page BO±112 and 113)
w Instrument No. 1 Under Cover.
w Instrument No. 1 lower finish panel.
(b) Disconnect the connector and remove the ECU
2. INSTALL THEFT DETERRENT AND DOOR LOCK CONTROL ECU
For installation, follow the removal procedure in reverse.
±
BODY ELECTRICAL SYSTEM Power Window Control SystemBE±155
WhereEverybodyKnowsYourName
Page 548 of 4087
INSPECTION OF THEFT DETERRENT
AND DOOR LOCK CONTROL ECU
INSPECT THEFT DETERRENT AND DOOR LOCK CONTROL
ECU(Circuit)
(a) Inspect ECU Power Source Circuit.(See page BE±376)
(b) Inspect Actuator Power Source Circuit.
(See page BE±378)
(c) Inspect Ignition Switch Circuit. (See page BE±25)
(d) Inspect Door Open Detection Switch Circuit.
(See page BE±392)
If circuit is as specified, inspect ECU operation.
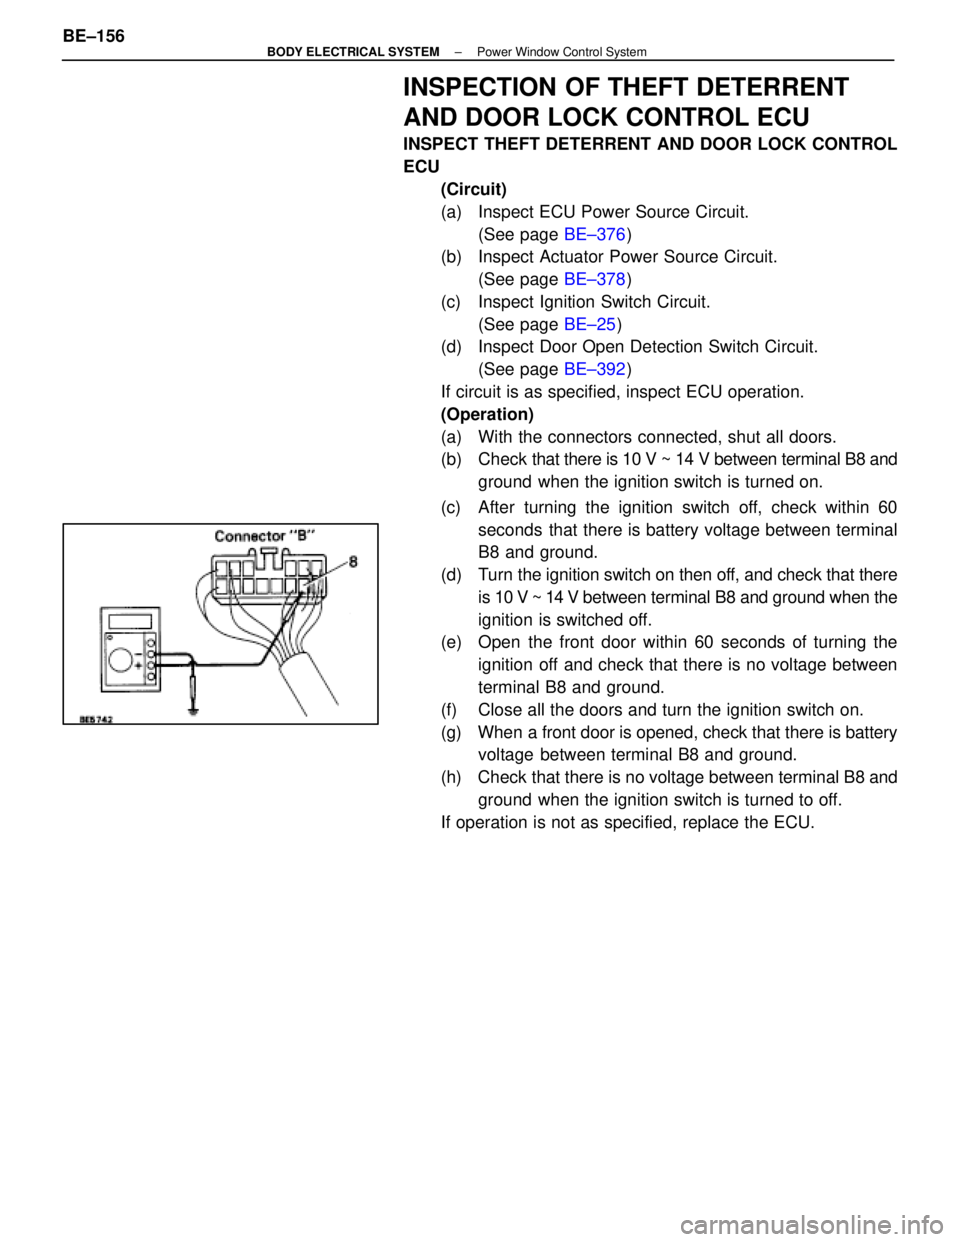
(Operation)
(a) With the connectors connected, shut all doors.
(b) Check that there is 10 V ~ 14 V between terminal B8 and
ground when the ignition switch is turned on.
(c) After turning the ignition switch off, check within 60 seconds that there is battery voltage between terminal
B8 and ground.
(d) Turn the ignition switch on then off, and check that there
is 10 V ~ 14 V between terminal B8 and ground when the
ignition is switched off.
(e) Open the front door within 60 seconds of turning the
ignition off and check that there is no voltage between
terminal B8 and ground.
(f) Close all the doors and turn the ignition switch on.
(g) When a front door is opened, check that there is battery voltage between terminal B8 and ground.
(h) Check that there is no voltage between terminal B8 and ground when the ignition switch is turned to off.
If operation is not as specified, replace the ECU.
BE±156
±
BODY ELECTRICAL SYSTEM Power Window Control System
WhereEverybodyKnowsYourName
Page 549 of 4087

Troubleshooting
You will find the cause of trouble more easily by properly using the table \
shown below. In this table, the
numbers indicate the order of priority of the causes of trouble. Check each part in \
the order shown. If neces-
sary, replace the part.
See page
BE±4 ,21BE±4,21BE±4,20BE±4,20BE±156BE±152BE±149BE±151BE±152BE±26BE±392BE±4,20 ±±
Part
name
Trouble
AM1 FuseDOME FuseDOOR FusePOWER FuseTheft Deterrent and Door Lock Control ECUPower Window Main RelayPower Window Master SwitchPower Window SwitchPower Window MotorIgnition SwitchDoor Open Detection SwitchECU±IG FuseWire Harness
*1 Power window does not operate.1234
*2 Power window does not operate.35467218
ªOne Touch Power Window Systemº does
not operate.1
Only one window glass does not move.1234
ªWindow Lock Systemº does not operate1
ªWindow Lock Illuminationº does not light
up.1
Key±off power window does not operate124536
*1: Dook Lock does not operate.
*2: Dook Lock is normal.
±
BODY ELECTRICAL SYSTEM Power Window Control SystemBE±157
WhereEverybodyKnowsYourName
Page 550 of 4087
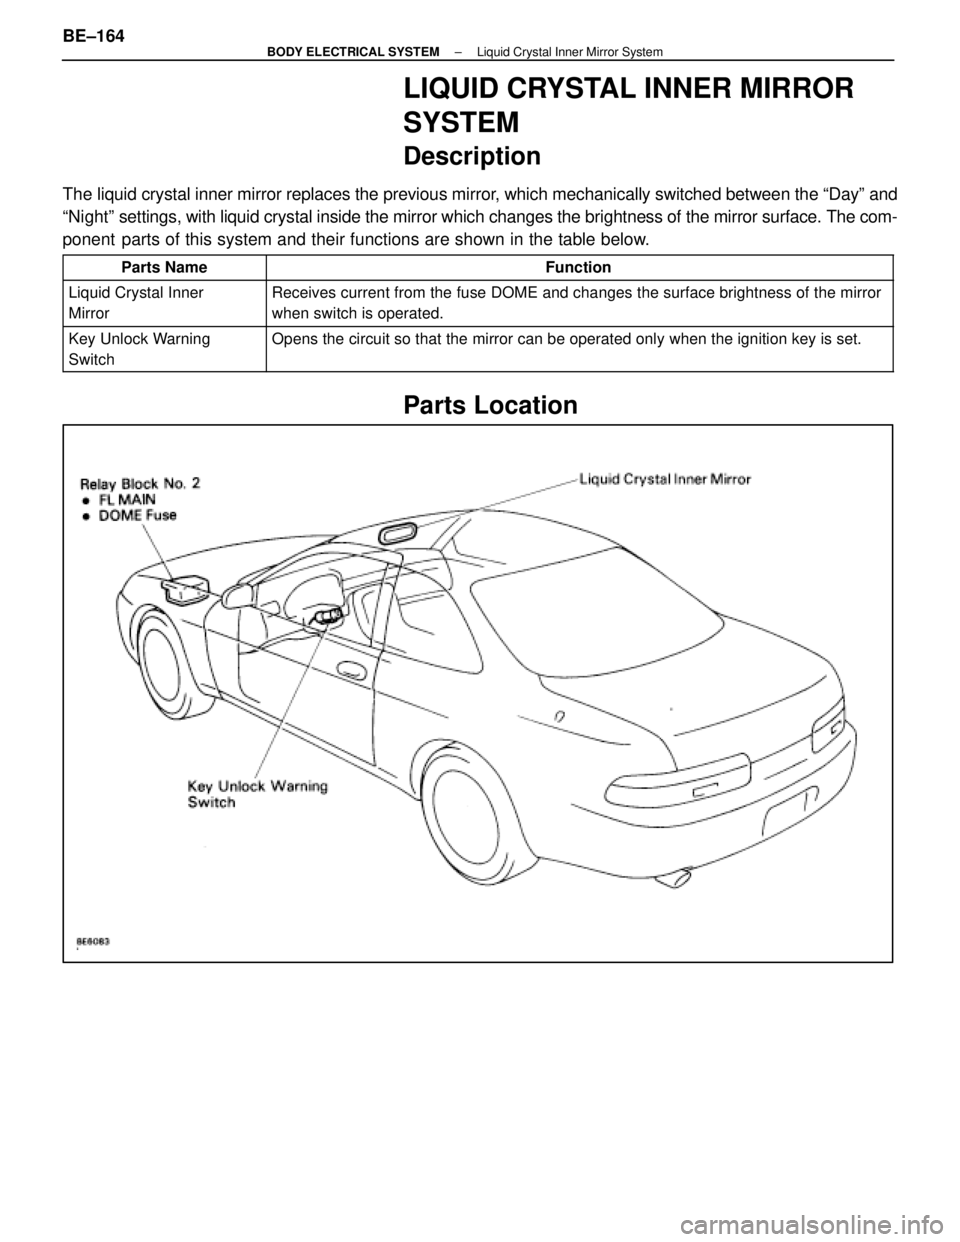
LIQUID CRYSTAL INNER MIRROR
SYSTEM
Description
The liquid crystal inner mirror replaces the previous mirror, which mechanically switched between the ªDayº and
ªNightº settings, with liquid crystal inside the mirror which changes the bright\
ness of the mirror surface. The com-
ponent parts of this system and their functions are shown in the table below.
Parts NameFunction
Liquid Crystal Inner
MirrorReceives current from the fuse DOME and changes the surface brightness o\
f the mirror
when switch is operated.
Key Unlock Warning
SwitchOpens the circuit so that the mirror can be operated only when the ignit\
ion key is set.
Parts Location
BE±164±
BODY ELECTRICAL SYSTEM Liquid Crystal Inner Mirror System
WhereEverybodyKnowsYourName