LEXUS SC400 1991 Service Repair Manual
Manufacturer: LEXUS, Model Year: 1991,
Model line: SC400,
Model: LEXUS SC400 1991
Pages: 4087, PDF Size: 75.75 MB
LEXUS SC400 1991 Service Repair Manual
SC400 1991
LEXUS
LEXUS
https://www.carmanualsonline.info/img/36/57051/w960_57051-0.png
LEXUS SC400 1991 Service Repair Manual
Trending: fuses, fuel, bulb, warning lights, tire type, fuse box location, engine oil capacity
Page 791 of 4087
NGOK
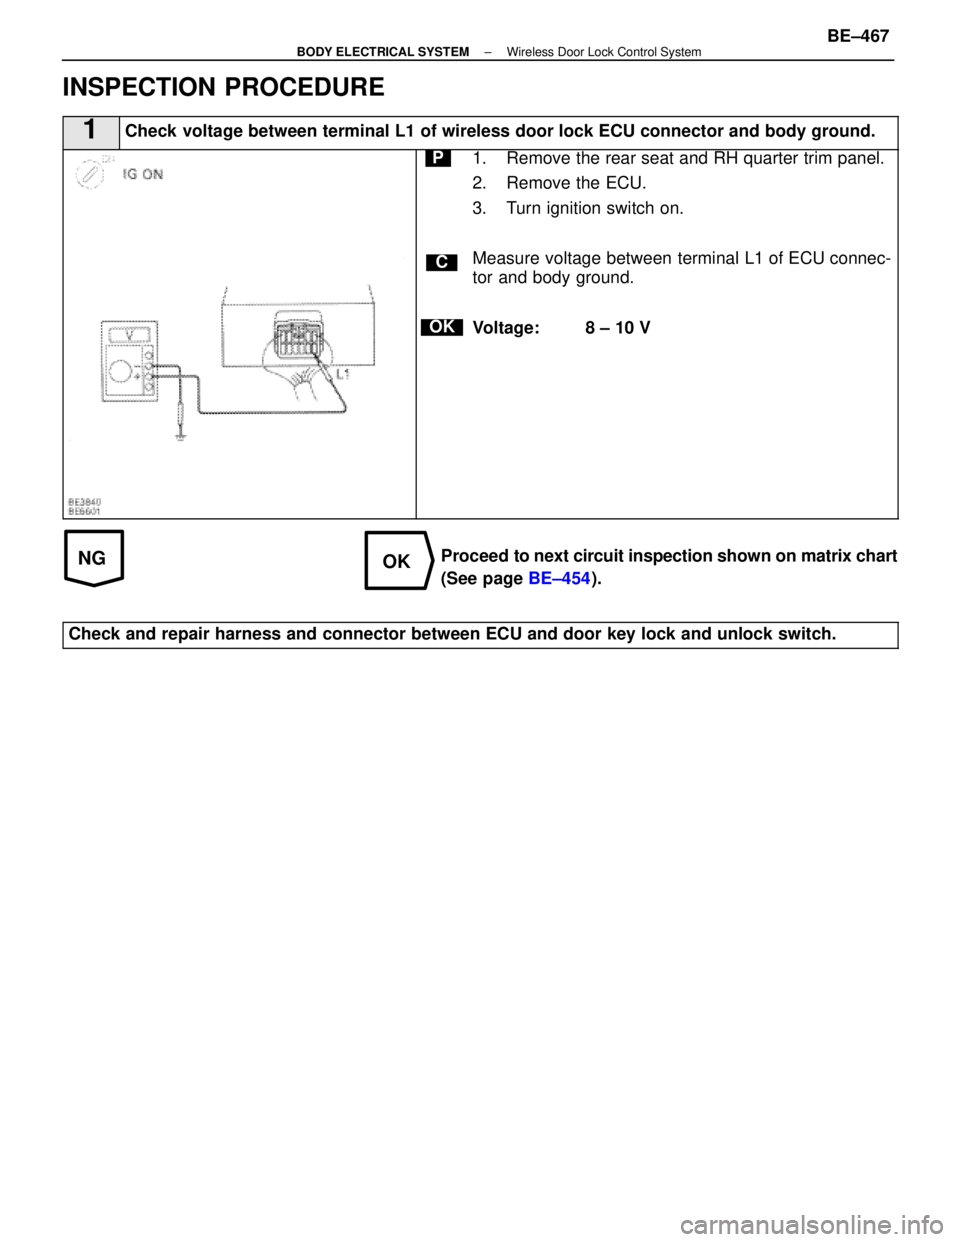
INSPECTION PROCEDURE
1Check voltage between terminal L1 of wireless door lock ECU connector and bod\
y ground.
C
OK
P1. Remove the rear seat and RH quarter trim panel.
2. Remove the ECU.
3. Turn ignition switch on.
Measure voltage between terminal L1 of ECU connec-
tor and body ground.
Voltage: 8 ± 10 V
Proceed to next circuit inspection shown on matrix chart
(See page BE±454).
Check and repair harness and connector between ECU and door key lock and\
unlock switch.
±
BODY ELECTRICAL SYSTEM Wireless Door Lock Control SystemBE±467
WhereEverybodyKnowsYourName
Page 792 of 4087
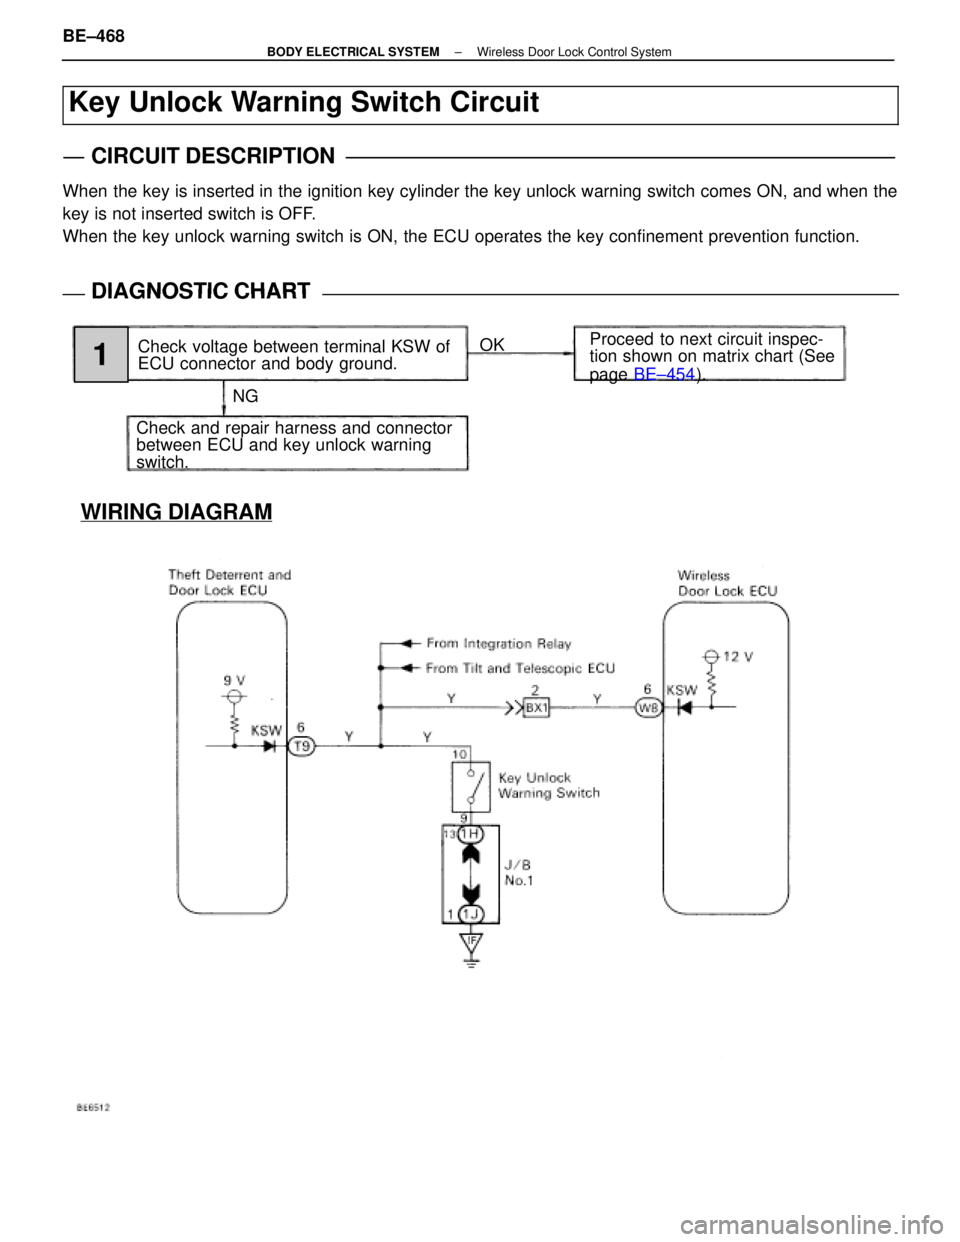
WIRING DIAGRAM
Key Unlock Warning Switch Circuit
CIRCUIT DESCRIPTION
When the key is inserted in the ignition key cylinder the key unlock warning\
switch comes ON, and when the
key is not inserted switch is OFF.
When the key unlock warning switch is ON, the ECU operates the key confi\
nement prevention function.
DIAGNOSTIC CHARTDIAGNOSTIC CHART
NGOK
Proceed to next circuit inspec-
tion shown on matrix chart (See
page
BE±454 ).
Check voltage between terminal KSW of
ECU connector and body ground.
Check and repair harness and connector
between ECU and key unlock warning
switch.
1
BE±468±
BODY ELECTRICAL SYSTEM Wireless Door Lock Control System
WhereEverybodyKnowsYourName
Page 793 of 4087
NGOK
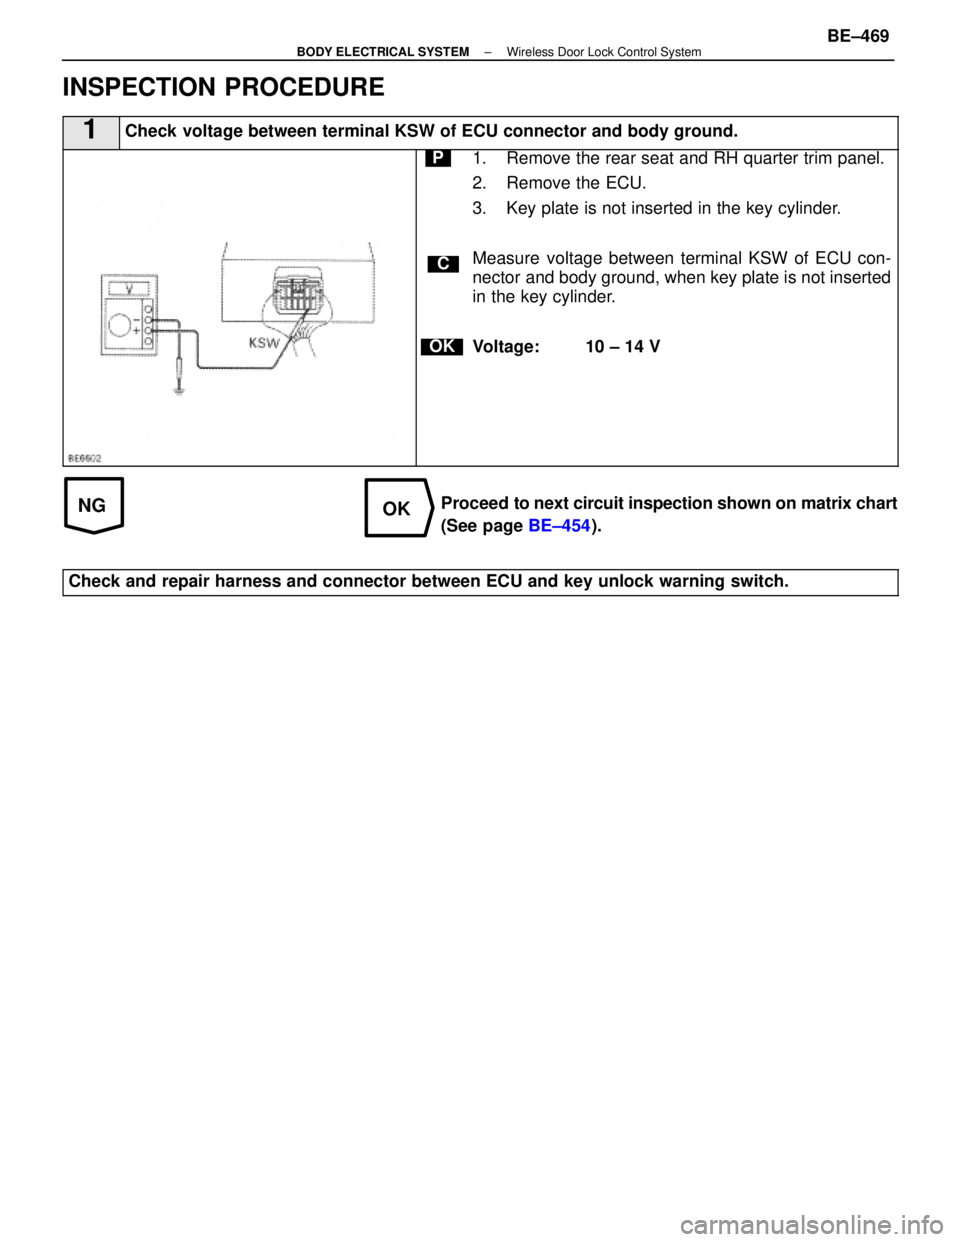
INSPECTION PROCEDURE
1Check voltage between terminal KSW of ECU connector and body ground.
C
OK
P1. Remove the rear seat and RH quarter trim panel.
2. Remove the ECU.
3. Key plate is not inserted in the key cylinder.
Measure voltage between terminal KSW of ECU con-
nector and body ground, when key plate is not inserted
in the key cylinder.
Voltage: 10 ± 14 V
Proceed to next circuit inspection shown on matrix chart
(See page BE±454).
Check and repair harness and connector between ECU and key unlock warnin\
g switch.
±
BODY ELECTRICAL SYSTEM Wireless Door Lock Control SystemBE±469
WhereEverybodyKnowsYourName
Page 794 of 4087
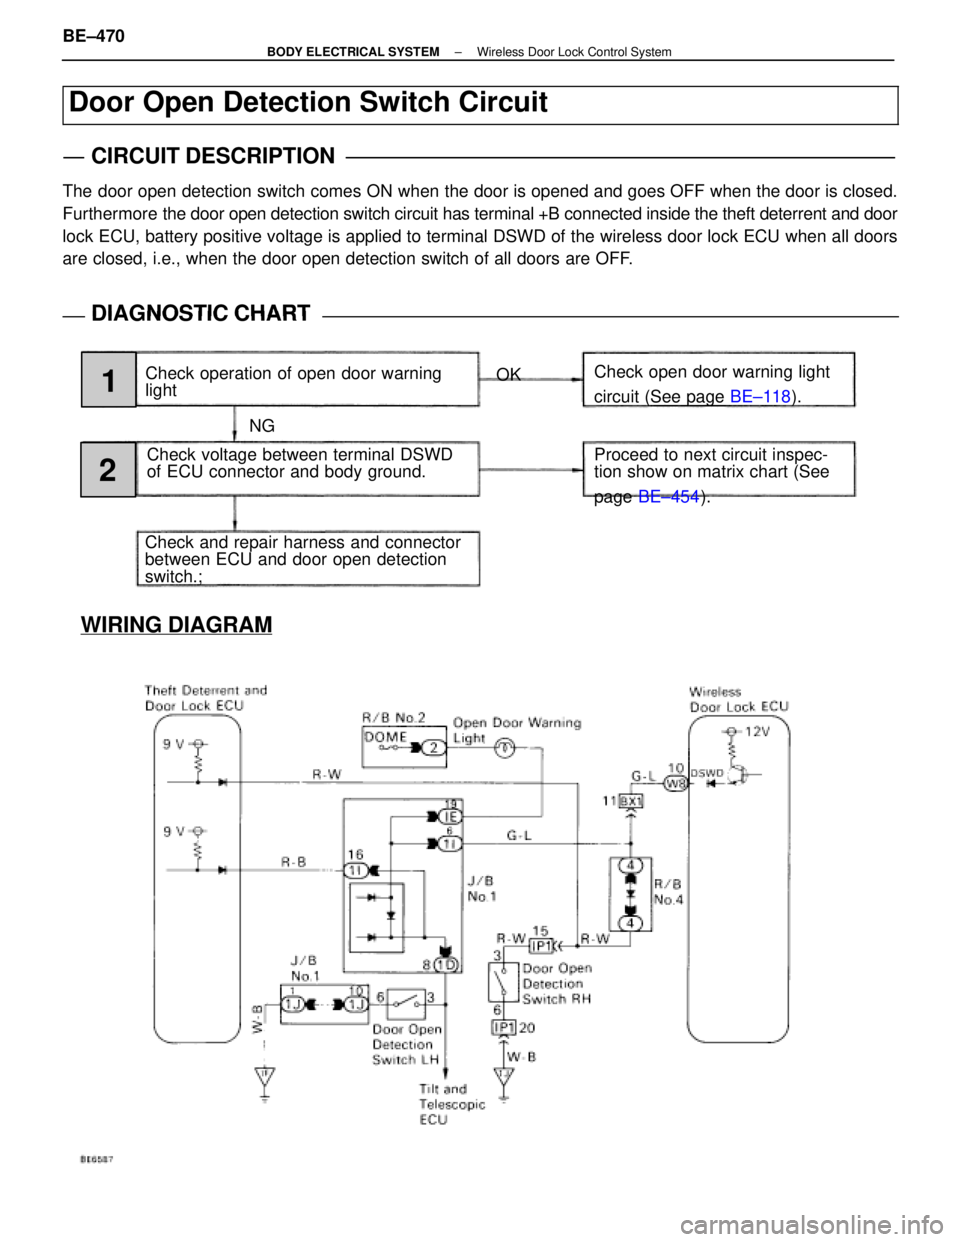
WIRING DIAGRAM
Door Open Detection Switch Circuit
CIRCUIT DESCRIPTION
The door open detection switch comes ON when the door is opened and goes OFF when the door is closed.
Furthermore the door open detection switch circuit has terminal +B connected inside \
the theft deterrent and door
lock ECU, battery positive voltage is applied to terminal DSWD of the wirele\
ss door lock ECU when all doors
are closed, i.e., when the door open detection switch of all doors are O\
FF.
DIAGNOSTIC CHARTDIAGNOSTIC CHART
NG OK
Check open door warning light
circuit (See page
BE±118).
Check operation of open door warning
light
Check voltage between terminal DSWD
of ECU connector and body ground. Proceed to next circuit inspec-
tion show on matrix chart (See
page
BE±454 ).
Check and repair harness and connector
between ECU and door open detection
switch.;
1
2
BE±470±
BODY ELECTRICAL SYSTEM Wireless Door Lock Control System
WhereEverybodyKnowsYourName
Page 795 of 4087
OKNG
NGOK
INSPECTION PROCEDURE
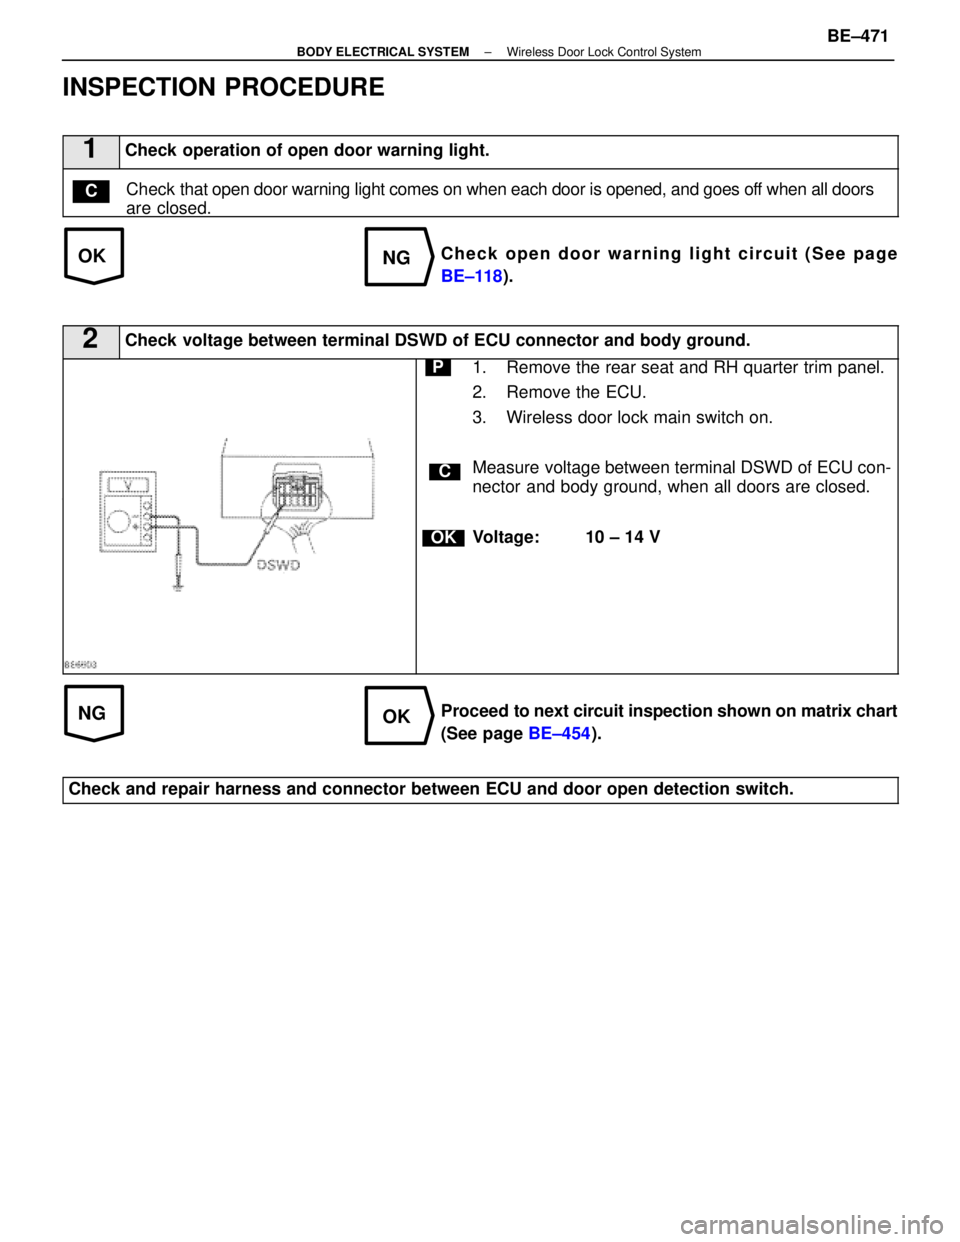
1Check operation of open door warning light.
Check that open door warning light comes on when each door is opened, and goes\
off when all doors
are closed.C
Check open door warning light circuit (See page
BE±118 ).
2Check voltage between terminal DSWD of ECU connector and body ground.
C
OK
P1. Remove the rear seat and RH quarter trim panel.
2. Remove the ECU.
3. Wireless door lock main switch on.
Measure voltage between terminal DSWD of ECU con-
nector and body ground, when all doors are closed.
Voltage: 10 ± 14 V
Proceed to next circuit inspection shown on matrix chart
(See page BE±454).
Check and repair harness and connector between ECU and door open detecti\
on switch.
±
BODY ELECTRICAL SYSTEM Wireless Door Lock Control SystemBE±471
WhereEverybodyKnowsYourName
Page 796 of 4087
±MEMO± BE±472
±
BODY ELECTRICAL SYSTEM Wireless Door Lock Control System
WhereEverybodyKnowsYourName
Page 797 of 4087
BODY ELECTRICAL SYSTEM
±
BODY ELECTRICAL SYSTEMBE±1
WhereEverybodyKnowsYourName
Page 798 of 4087
GENERAL INFORMATION
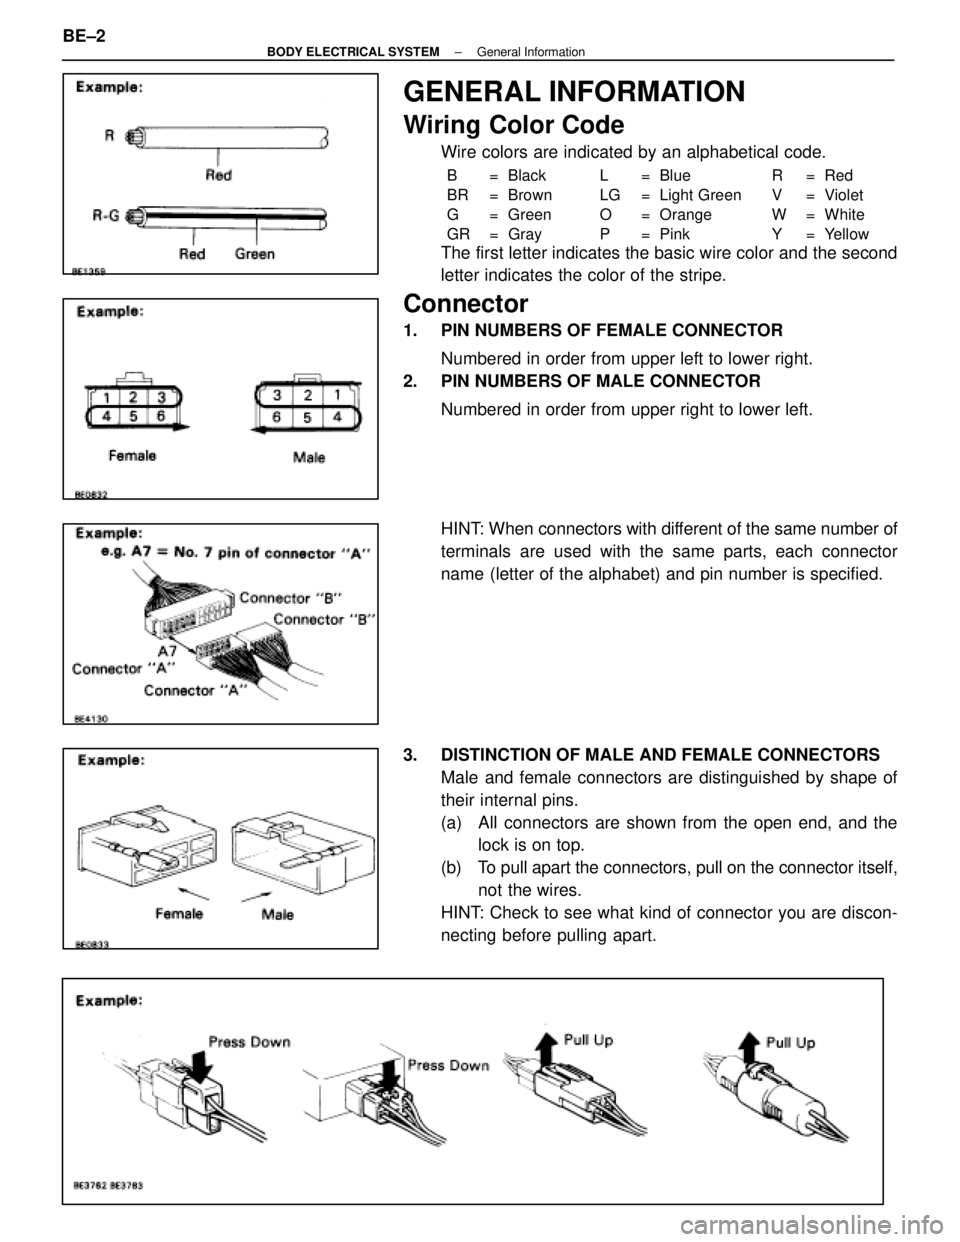
Wiring Color Code
Wire colors are indicated by an alphabetical code.
B = Black L = Blue R = Red
BR = Brown LG = Light Green V = Violet
G = Green O = Orange W = White
GR = Gray P = Pink Y = Yellow
The first letter indicates the basic wire color and the second
letter indicates the color of the stripe.
Connector
1. PIN NUMBERS OF FEMALE CONNECTORNumbered in order from upper left to lower right.
2. PIN NUMBERS OF MALE CONNECTOR
Numbered in order from upper right to lower left.
HINT: When connectors with different of the same number of
terminals are used with the same parts, each connector
name (letter of the alphabet) and pin number is specified.
3. DISTINCTION OF MALE AND FEMALE CONNECTORS Male and female connectors are distinguished by shape of
their internal pins.
(a) All connectors are shown from the open end, and thelock is on top.
(b) To pull apart the connectors, pull on the connector itself, not the wires.
HINT: Check to see what kind of connector you are discon-
necting before pulling apart.
BE±2
±
BODY ELECTRICAL SYSTEM General Information
WhereEverybodyKnowsYourName
Page 799 of 4087
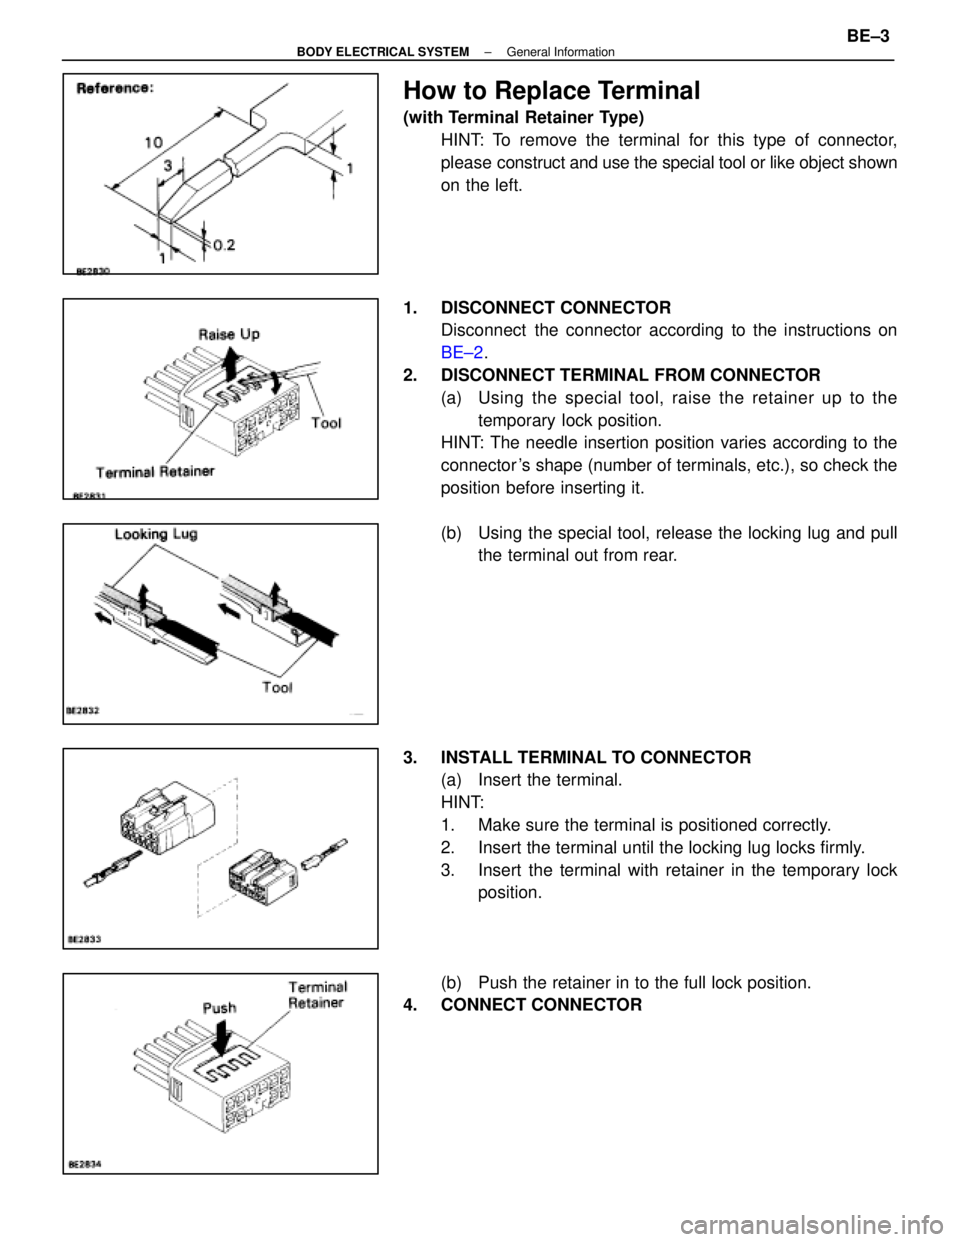
How to Replace Terminal
(with Terminal Retainer Type)HINT: To remove the terminal for this type of connector,
please construct and use the special tool or like object shown
on the left.
1. DISCONNECT CONNECTOR Disconnect the connector according to the instructions on
BE±2 .
2. DISCONNECT TERMINAL FROM CONNECTOR (a) Using the special tool, raise the retainer up to thetemporary lock position.
HINT: The needle insertion position varies according to the
connector 's shape (number of terminals, etc.), so check the
position before inserting it.
(b) Using the special tool, release the locking lug and pull the terminal out from rear.
3. INSTALL TERMINAL TO CONNECTOR (a) Insert the terminal.
HINT:
1. Make sure the terminal is positioned correctly.
2. Insert the terminal until the locking lug locks firmly.
3. Insert the terminal with retainer in the temporary lockposition.
(b) Push the retainer in to the full lock position.
4. CONNECT CONNECTOR
±
BODY ELECTRICAL SYSTEM General InformationBE±3
WhereEverybodyKnowsYourName
Page 800 of 4087
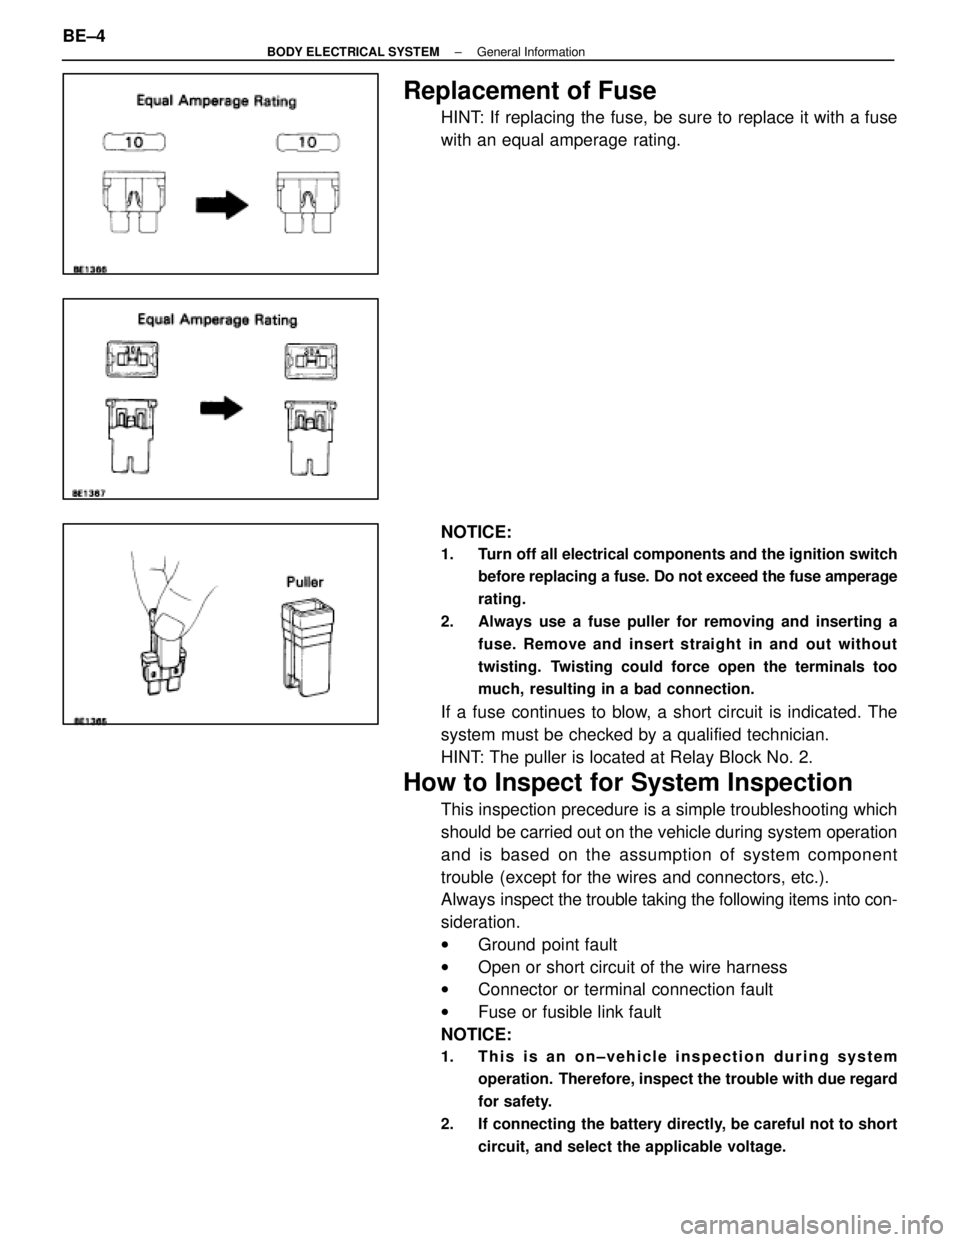
Replacement of Fuse
HINT: If replacing the fuse, be sure to replace it with a fuse
with an equal amperage rating.
NOTICE:
1. Turn off all electrical components and the ignition switchbefore replacing a fuse. Do not exceed the fuse amperage
rating.
2. Always use a fuse puller for removing and inserting a fuse. Remove and insert straight in and out without
twisting. Twisting could force open the terminals too
much, resulting in a bad connection.
If a fuse continues to blow, a short circuit is indicated. The
system must be checked by a qualified technician.
HINT: The puller is located at Relay Block No. 2.
How to Inspect for System Inspection
This inspection precedure is a simple troubleshooting which
should be carried out on the vehicle during system operation
and is based on the assumption of system component
trouble (except for the wires and connectors, etc.).
Always inspect the trouble taking the following items into con-
sideration.
wGround point fault
w Open or short circuit of the wire harness
w Connector or terminal connection fault
w Fuse or fusible link fault
NOTICE:
1. This is an on±vehicle inspection during system
operation. Therefore, inspect the trouble with due regard
for safety.
2. If connecting the battery directly, be careful not to short circuit, and select the applicable voltage.
BE±4±
BODY ELECTRICAL SYSTEM General Information
WhereEverybodyKnowsYourName
Trending: fuel, diagram, seats, service indicator, interior lights, air bleeding, transmission oil
