headlamp LINCOLN AVIATOR 2023 User Guide
[x] Cancel search | Manufacturer: LINCOLN, Model Year: 2023, Model line: AVIATOR, Model: LINCOLN AVIATOR 2023Pages: 681, PDF Size: 9.33 MB
Page 117 of 681
You can switch the front fog lamps on if any
of the following occur:
• You set the lighting control to the parking
lamps position.
• You set the lighting control to the
headlamps position.
• You set the lighting control to the
autolamps position and the headlamps
are on.
The front fog lamp button is on the lighting
control.
Press the button to switch the front
fog lamps on or off.
Note:The brightness of the daytime running
lamps may decrease when the front fog
lamps are switched on.
Front Fog Lamp Indicator
It illuminates when you switch the
front fog lamps on.
ADAPTIVE HEADLAMPS (IF EQUIPPED)
About Adaptive Headlamps
The headlamps are designed to adapt when
you are steering around a curve, or if the
camera detects lane markings indicating a
curve or traffic signs indicating an
intersection.
The system is designed to operate if all of
the following occur:
• You switch the system on through your
vehicle settings.
• You set the lighting control to the
autolamps position.
• The ambient light level is low enough that
low beams are required.
114
Lighting
Page 118 of 681
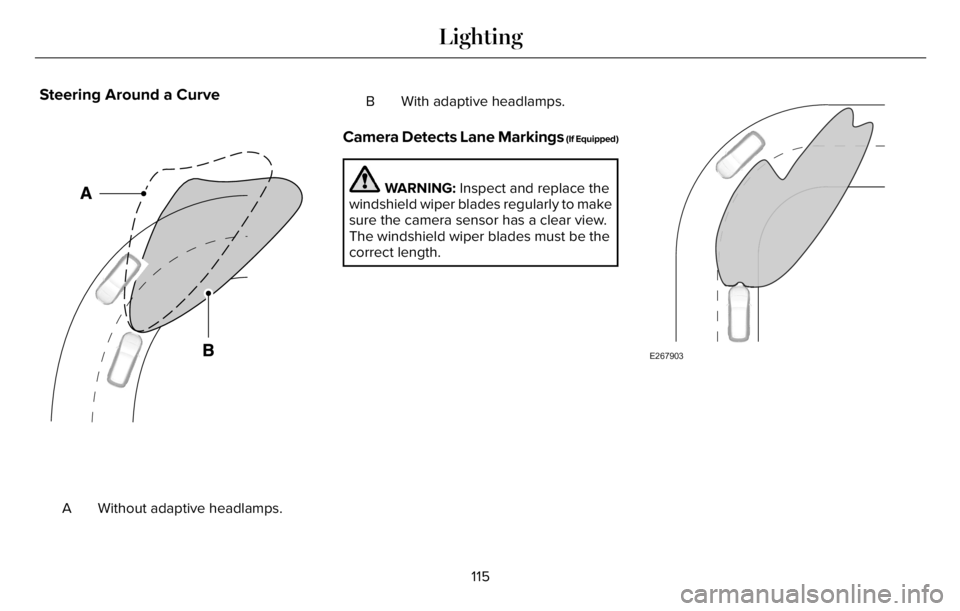
Steering Around a Curve
E161714E161714
Without adaptive headlamps. AB With adaptive headlamps.
Camera Detects Lane Markings (If Equipped)
WARNING: Inspect and replace the
windshield wiper blades regularly to make
sure the camera sensor has a clear view.
The windshield wiper blades must be the
correct length.
E267903
115
Lighting
Page 119 of 681
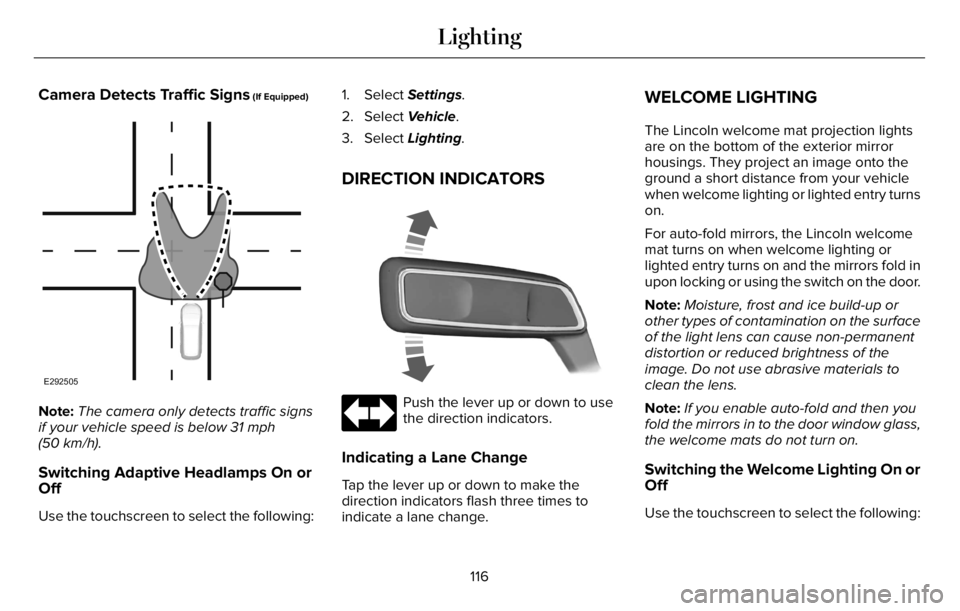
Camera Detects Traffic Signs (If Equipped)
E292505
Note:The camera only detects traffic signs
if your vehicle speed is below 31 mph
(50 km/h).
Switching Adaptive Headlamps On or
Off
Use the touchscreen to select the following:1. Select Settings.
2. Select Vehicle.
3. Select Lighting.
DIRECTION INDICATORS
EE2731800
Push the lever up or down to use
the direction indicators.
Indicating a Lane Change
Tap the lever up or down to make the
direction indicators flash three times to
indicate a lane change.
WELCOME LIGHTING
The Lincoln welcome mat projection lights
are on the bottom of the exterior mirror
housings. They project an image onto the
ground a short distance from your vehicle
when welcome lighting or lighted entry turns
on.
For auto-fold mirrors, the Lincoln welcome
mat turns on when welcome lighting or
lighted entry turns on and the mirrors fold in
upon locking or using the switch on the door.
Note:Moisture, frost and ice build-up or
other types of contamination on the surface
of the light lens can cause non-permanent
distortion or reduced brightness of the
image. Do not use abrasive materials to
clean the lens.
Note:If you enable auto-fold and then you
fold the mirrors in to the door window glass,
the welcome mats do not turn on.
Switching the Welcome Lighting On or
Off
Use the touchscreen to select the following:
116
Lighting
Page 122 of 681
WHAT IS AUTOMATIC HIGH BEAM
CONTROL
The system turns on high beams if it is dark
enough and no other traffic is present. If it
detects an approaching vehicle’s headlamps
or tail lamps, or street lighting ahead, the
system turns the high beams off. Low beams
remain on.
A camera sensor, centrally mounted behind
the windshield of your vehicle, continuously
monitors conditions to turn the high beams
on and off.
SWITCHING AUTOMATIC HIGH
BEAM CONTROL ON AND OFF
WARNING: Do not use the system in
poor visibility, for example fog, heavy rain,
spray or snow.
Use the touchscreen to select the following:
1. Select Settings.
2. Select Vehicle.3. Select Lighting.
Activating the Automatic High Beam
Control
E281240
Switch the lighting control to the
autolamps position. See
Autolamps (page 112).
Note:The lighting control defaults to
autolamps each time you switch your vehicle
on.
When active, the high beams turn on if all
the following conditions occur:
• The ambient light level is low enough.
• There is no traffic in front of your vehicle.
• The vehicle speed is greater than
approximately 25 mph (40 km/h).
When active, the high beams turn off if at
least one of the following conditions occur:
• The ambient light level is high enough
that you do not require high beams.
• The system detects an approaching
vehicle's headlamps or tail lamps.
• The system detects severe rain, snow or
fog.• A blocked vehicle camera.
• The vehicle speed falls below
approximately 19 mph (30 km/h).
Note:The deactivation speed is lower on
curves.
Note:Certain curvy road situations may
delay high beam reactivation.
Note:If you have a blocked sensor, the
system may not operate properly. Keep the
windshield free from obstruction or damage.
Note:The system may not operate properly
in cold or inclement conditions. You can
switch on the high beams by overriding the
system.
Note:If the system detects a blockage, for
example bird droppings, bug splatter, snow
or ice, the system goes into low beam mode
until you clear the blockage. If you have a
blocked camera, a message may appear in
the information display.
Note:Using much larger tires or equipping
vehicle accessories such as snowplows can
modify your vehicle's ride height and
degrade automatic high beam control
performance.
119
Automatic High Beam Control
Page 136 of 681
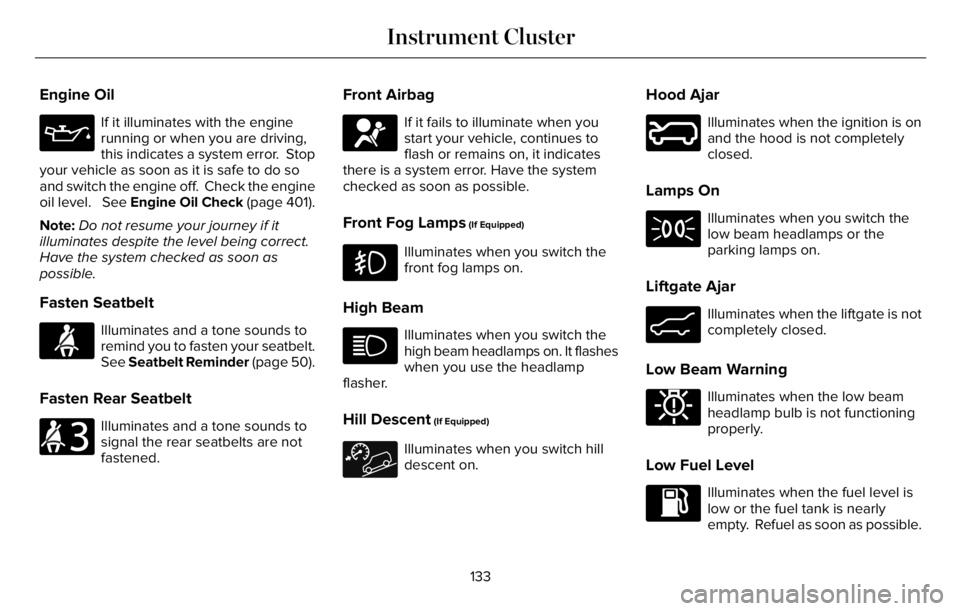
Engine Oil
If it illuminates with the engine
running or when you are driving,
this indicates a system error. Stop
your vehicle as soon as it is safe to do so
and switch the engine off. Check the engine
oil level. See Engine Oil Check (page 401).
Note:Do not resume your journey if it
illuminates despite the level being correct.
Have the system checked as soon as
possible.
Fasten Seatbelt
E71880
Illuminates and a tone sounds to
remind you to fasten your seatbelt.
See Seatbelt Reminder (page 50).
Fasten Rear Seatbelt
E206718
Illuminates and a tone sounds to
signal the rear seatbelts are not
fastened.
Front Airbag
E67017
If it fails to illuminate when you
start your vehicle, continues to
flash or remains on, it indicates
there is a system error. Have the system
checked as soon as possible.
Front Fog Lamps (If Equipped)
Illuminates when you switch the
front fog lamps on.
High Beam
Illuminates when you switch the
high beam headlamps on. It flashes
when you use the headlamp
flasher.
Hill Descent (If Equipped)
Illuminates when you switch hill
descent on.
Hood Ajar
E246598
Illuminates when the ignition is on
and the hood is not completely
closed.
Lamps On
Illuminates when you switch the
low beam headlamps or the
parking lamps on.
Liftgate Ajar
E162453
Illuminates when the liftgate is not
completely closed.
Low Beam Warning
E181350
Illuminates when the low beam
headlamp bulb is not functioning
properly.
Low Fuel Level
Illuminates when the fuel level is
low or the fuel tank is nearly
empty. Refuel as soon as possible.
133
Instrument Cluster
Page 138 of 681
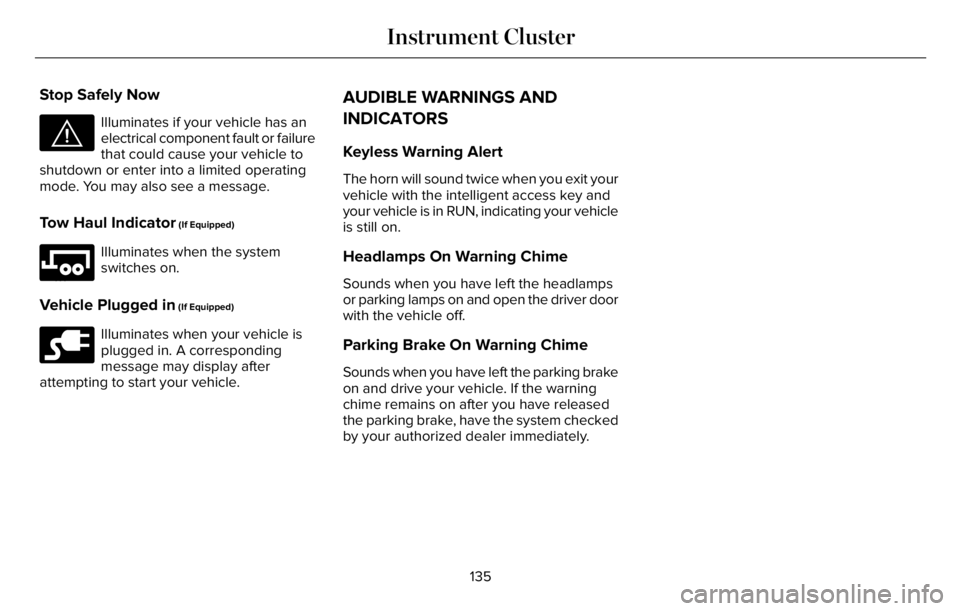
Stop Safely Now
E144693
Illuminates if your vehicle has an
electrical component fault or failure
that could cause your vehicle to
shutdown or enter into a limited operating
mode. You may also see a message.
Tow Haul Indicator (If Equipped)
E246592
Illuminates when the system
switches on.
Vehicle Plugged in (If Equipped)
E228962
Illuminates when your vehicle is
plugged in. A corresponding
message may display after
attempting to start your vehicle.
AUDIBLE WARNINGS AND
INDICATORS
Keyless Warning Alert
The horn will sound twice when you exit your
vehicle with the intelligent access key and
your vehicle is in RUN, indicating your vehicle
is still on.
Headlamps On Warning Chime
Sounds when you have left the headlamps
or parking lamps on and open the driver door
with the vehicle off.
Parking Brake On Warning Chime
Sounds when you have left the parking brake
on and drive your vehicle. If the warning
chime remains on after you have released
the parking brake, have the system checked
by your authorized dealer immediately.
135
Instrument Cluster
Page 146 of 681
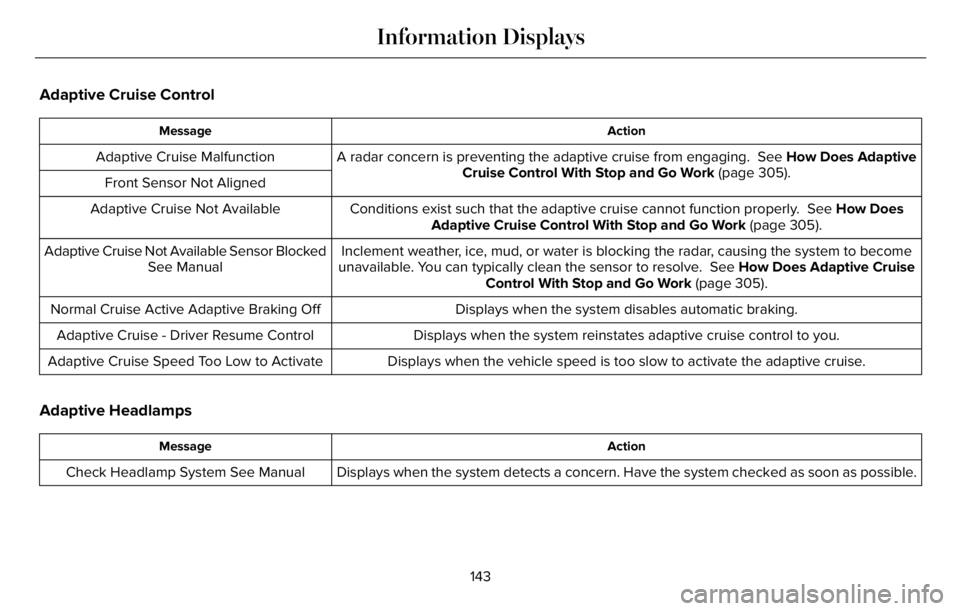
Adaptive Cruise Control
Action Message
A radar concern is preventing the adaptive cruise from engaging. See How Does Adaptive
Cruise Control With Stop and Go Work (page 305). Adaptive Cruise Malfunction
Front Sensor Not Aligned
Conditions exist such that the adaptive cruise cannot function properly. See How Does
Adaptive Cruise Control With Stop and Go Work (page 305). Adaptive Cruise Not Available
Inclement weather, ice, mud, or water is blocking the radar, causing the system to become
unavailable. You can typically clean the sensor to resolve. See How Does Adaptive Cruise
Control With Stop and Go Work (page 305). Adaptive Cruise Not Available Sensor Blocked
See Manual
Displays when the system disables automatic braking. Normal Cruise Active Adaptive Braking Off
Displays when the system reinstates adaptive cruise control to you. Adaptive Cruise - Driver Resume Control
Displays when the vehicle speed is too slow to activate the adaptive cruise. Adaptive Cruise Speed Too Low to Activate
Adaptive Headlamps
Action Message
Displays when the system detects a concern. Have the system checked as soon as possible. Check Headlamp System See Manual
143
Information Displays
Page 209 of 681
• Without applying the brake pedal, press
and release the button once when the
ignition is in the on mode, or when your
vehicle is running but is not moving.
On: All electrical circuits are operational and
the warning lamps and indicators illuminate.
• Without applying the brake pedal, press
and release the button once.
Start: Starts your vehicle. The engine may
not start when your vehicle starts.
• Press the brake pedal, and then press
the button for any length of time. An
indicator light on the button illuminates
when the ignition is on and when your
vehicle starts.
STARTING A GASOLINE ENGINE
When you start the engine, the idle speed
increases. This helps to warm up the
engine. If the engine idle speed does not
slow down, have your vehicle checked as
soon as possible.Note: You can crank the engine for a total
of 60 seconds without the engine starting
before the starting system temporarily
disables. The 60 seconds does not have to
be all at once. For example, if you crank the
engine three times for 20 seconds each time,
without the engine starting, you reached the
60-second time limit. A message appears
in the information display alerting you that
you exceeded the cranking time. You
cannot attempt to start the engine for at
least 15 minutes. After 15 minutes, you are
limited to a 15-second engine cranking time.
You need to wait 60 minutes before you can
crank the engine for 60 seconds again.
Before starting your vehicle, check the
following:
• Make sure all occupants have fastened
their seatbelts.
• Make sure the headlamps and electrical
accessories are off.
• Make sure the parking brake is on.
• Make sure the transmission is in park (P).
• Switch the ignition on.
Note:Do not touch the accelerator pedal.Note:You must have your intelligent access
key in your vehicle in order to shift the
transmission out of park (P).
1. Fully press the brake pedal.
2. Press the push button ignition switch.
The system does not function if:
• The passive key frequencies are jammed.
• The key battery has no charge.
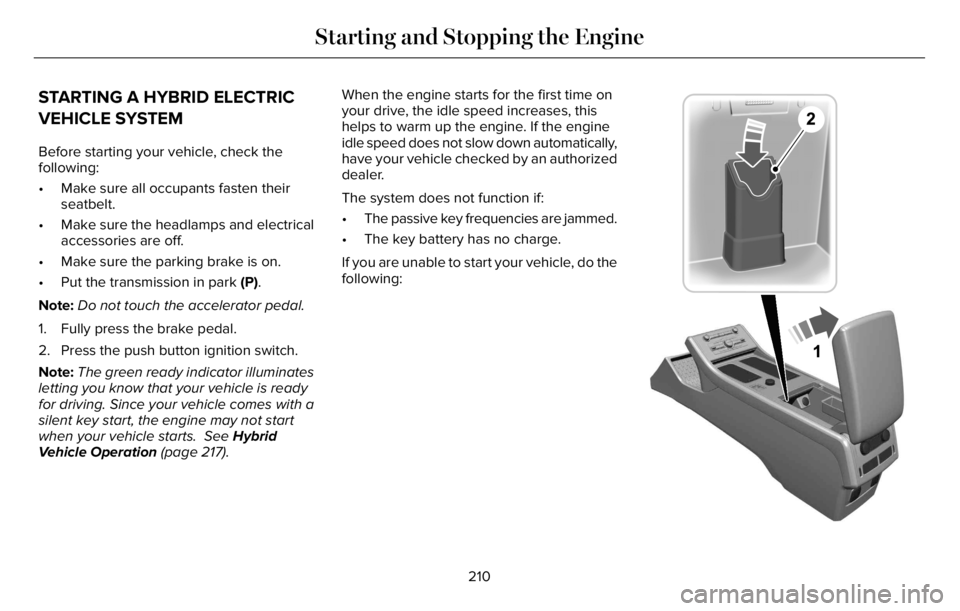
If you are unable to start your vehicle, do the
following:
206
Starting and Stopping the Engine
Page 213 of 681
STARTING A HYBRID ELECTRIC
VEHICLE SYSTEM
Before starting your vehicle, check the
following:
• Make sure all occupants fasten their
seatbelt.
• Make sure the headlamps and electrical
accessories are off.
• Make sure the parking brake is on.
• Put the transmission in park (P).
Note:Do not touch the accelerator pedal.
1. Fully press the brake pedal.
2. Press the push button ignition switch.
Note:The green ready indicator illuminates
letting you know that your vehicle is ready
for driving. Since your vehicle comes with a
silent key start, the engine may not start
when your vehicle starts. See Hybrid
Vehicle Operation (page 217).When the engine starts for the first time on
your drive, the idle speed increases, this
helps to warm up the engine. If the engine
idle speed does not slow down automatically,
have your vehicle checked by an authorized
dealer.
The system does not function if:
• The passive key frequencies are jammed.
• The key battery has no charge.
If you are unable to start your vehicle, do the
following:
E297378
210
Starting and Stopping the Engine
Page 233 of 681
E293006E293006
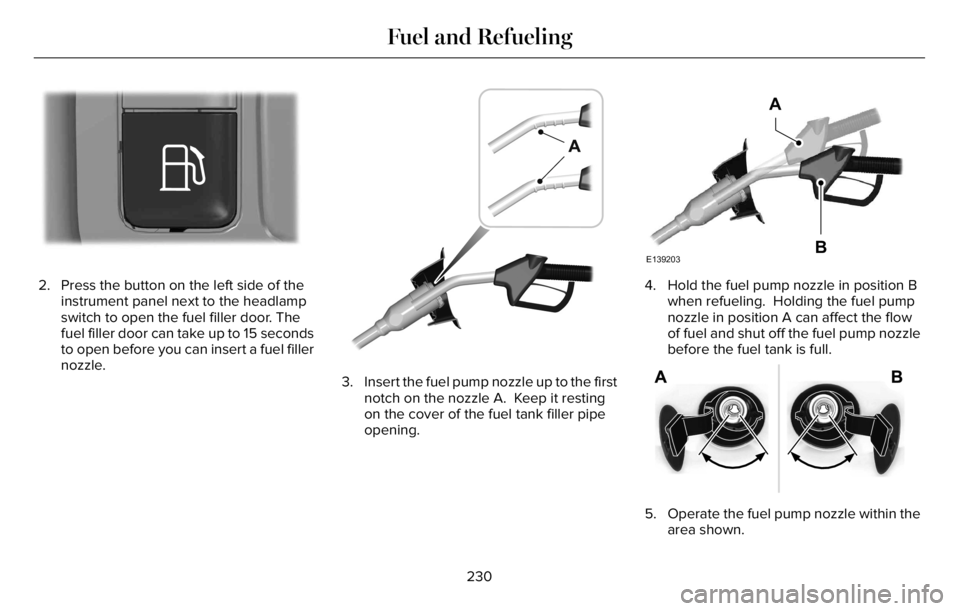
2. Press the button on the left side of the
instrument panel next to the headlamp
switch to open the fuel filler door. The
fuel filler door can take up to 15 seconds
to open before you can insert a fuel filler
nozzle.
39 0E139202E139202
3. Insert the fuel pump nozzle up to the first
notch on the nozzle A. Keep it resting
on the cover of the fuel tank filler pipe
opening.
E139203
A
B
4. Hold the fuel pump nozzle in position B
when refueling. Holding the fuel pump
nozzle in position A can affect the flow
of fuel and shut off the fuel pump nozzle
before the fuel tank is full.
E206912
5. Operate the fuel pump nozzle within the
area shown.
230
Fuel and Refueling