warning light LINCOLN AVIATOR 2023 Service Manual
[x] Cancel search | Manufacturer: LINCOLN, Model Year: 2023, Model line: AVIATOR, Model: LINCOLN AVIATOR 2023Pages: 681, PDF Size: 9.33 MB
Page 341 of 681
WARNING: In situations where the
vehicle camera has limited detection
capability, this may reduce system
performance. These situations include but
are not limited to direct or low sunlight,
vehicles at night without tail lights,
unconventional vehicle types, pedestrians
with complex backgrounds, running
pedestrians, partly obscured pedestrians,
or pedestrians that the system cannot
distinguish from a group. Failure to take
care may result in the loss of control of
your vehicle, serious personal injury or
death.
WARNING: The system cannot help
prevent all crashes. Do not rely on this
system to replace driver judgment and the
need to maintain a safe distance and
speed.
Using the Pre-Collision Assist System
The system is active at speeds above
approximately3 mph (5 km/h)and pedestrian
detection is active at speeds up to 50 mph
(80 km/h).
E156130
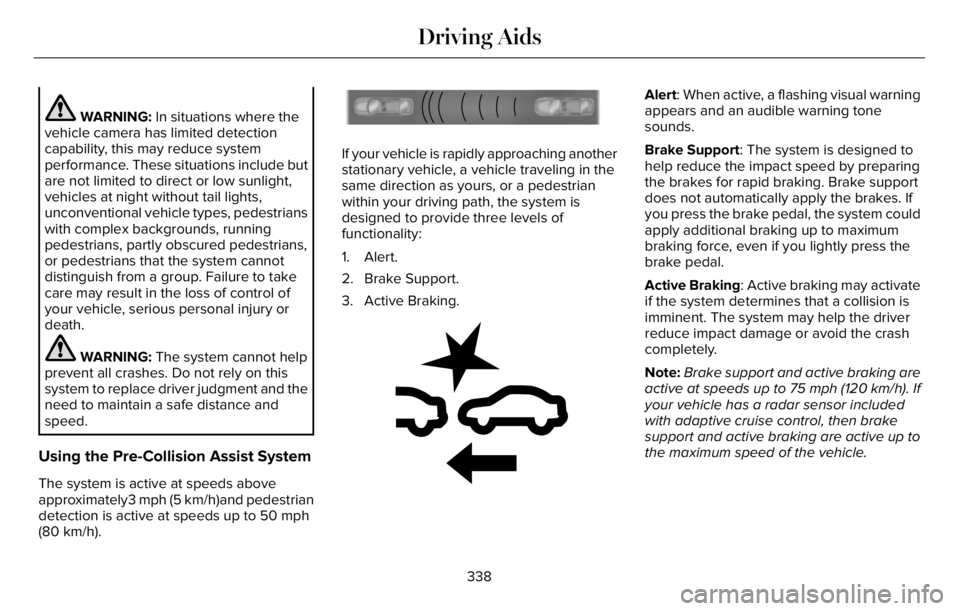
If your vehicle is rapidly approaching another
stationary vehicle, a vehicle traveling in the
same direction as yours, or a pedestrian
within your driving path, the system is
designed to provide three levels of
functionality:
1. Alert.
2. Brake Support.
3. Active Braking.
E255268E255268
Alert: When active, a flashing visual warning
appears and an audible warning tone
sounds.
Brake Support: The system is designed to
help reduce the impact speed by preparing
the brakes for rapid braking. Brake support
does not automatically apply the brakes. If
you press the brake pedal, the system could
apply additional braking up to maximum
braking force, even if you lightly press the
brake pedal.
Active Braking: Active braking may activate
if the system determines that a collision is
imminent. The system may help the driver
reduce impact damage or avoid the crash
completely.
Note:Brake support and active braking are
active at speeds up to 75 mph (120 km/h). If
your vehicle has a radar sensor included
with adaptive cruise control, then brake
support and active braking are active up to
the maximum speed of the vehicle.
338
Driving Aids
Page 357 of 681
TOWING A TRAILER
WARNING: Towing trailers
beyond the maximum recommended
gross trailer weight exceeds the limit
of your vehicle and could result in
engine damage, transmission damage,
structural damage, loss of vehicle
control, vehicle rollover and personal
injury.
WARNING: Do not exceed the
GVWR or the GAWR specified on the
certification label.
Note: See Recommended Towing
Weights (page 356).
Your vehicle may have electrical items,
such as fuses or relays, related to
towing. See Fuses (page 382).Your vehicle's load capacity designation
is by weight, not by volume, so you
cannot necessarily use all available
space when loading a vehicle or trailer.
Towing a trailer places an extra load on
your vehicle's engine, transmission, axle,
brakes, tires and suspension. Inspect
these components periodically during,
and after, any towing operation.
Load Placement
To help minimize how trailer movement
affects your vehicle when driving:
• Load the heaviest items closest to
the trailer floor.
• Load the heaviest items centered
between the left and right side trailer
tires.• Load the heaviest items above the
trailer axles or just slightly forward
toward the trailer tongue. Do not
allow the final trailer tongue weight
to go above or below 10-15% of the
loaded trailer weight.
• Select a ball mount with the correct
rise or drop and load capacity. When
both the loaded vehicle and trailer
are connected, the trailer frame
should be level, or slightly angled
down toward your vehicle, when
viewed from the side.
When driving with a trailer or payload, a
slight takeoff vibration or shudder may
be present due to the increased payload
weight. Additional information regarding
proper trailer loading and setting your
vehicle up for towing is located in
another chapter of this manual. See
Load Limit (page 348).
You can also find information in the RV
& Trailer Towing Guide available at your
authorized dealer, or online.
354
Towing
Page 361 of 681
Trailer Lamps
WARNING: Never connect any trailer
lamp wiring to the vehicle's tail lamp wiring;
this may damage the electrical system
resulting in fire. Contact your authorized
dealer as soon as possible for assistance
in proper trailer tow wiring installation.
Additional electrical equipment may be
required.
Most towed vehicles require trailer lamps.
Make sure all running lights, brake lights,
direction indicators and hazard flashers are
working.
Before Towing a Trailer
Practice turning, stopping and backing up to
get the feel of your vehicle-trailer
combination before starting on a trip. When
turning, make wider turns so the trailer
wheels clear curbs and other obstacles.
When Towing a Trailer
• Do not drive faster than 70 mph
(113 km/h) during the first 500 mi
(800 km).
• Do not make full-throttle starts.
• Check your hitch, electrical connections
and trailer wheel lug nuts thoroughly after
you have traveled 50 mi (80 km).
• When stopped in congested or heavy
traffic during hot weather, place the
gearshift in park (P) to aid engine and
transmission cooling and to help A/C
performance.
• Turn off the speed control with heavy
loads or in hilly terrain. The speed control
may turn off automatically when you are
towing on long, steep grades.
• Shift to a lower gear when driving down
a long or steep hill. Do not apply the
brakes continuously, as they may
overheat and become less effective.• If your transmission is equipped with a
Grade Assist or Tow/Haul feature, use
this feature when towing. This provides
engine braking and helps eliminate
excessive transmission shifting for
optimum fuel economy and transmission
cooling.
• Allow more distance for stopping with a
trailer attached. Anticipate stops and
brake gradually.
• Avoid parking on a grade. However, if
you must park on a grade:
1. Turn the steering wheel to point your
vehicle tires away from traffic flow.
2. Set your vehicle parking brake.
3. Place the automatic transmission in park
(P).
4. Place wheel chocks in front and back of
the trailer wheels. (Chocks not included
with vehicle.)
Launching or Retrieving a Boat or
Personal Watercraft (PWC)
Note:Disconnect the wiring to the trailer
before backing the trailer into the water.
358
Towing
Page 365 of 681
• Do not add unnecessary accessories to
the exterior of your vehicle, for example
running boards. If you use a roof rack,
remember to fold it down or remove it
when not in use.
• Do not shift into neutral when you are
braking or when your vehicle is slowing
down.
• Shut all windows when driving at high
speeds.
• Switch off all electric systems when not
in use, for example air conditioning. Make
sure that you unplug any accessories
from the auxiliary power points when not
in use.
DRIVING THROUGH SHALLOW
WATER
WARNING: Do not attempt to cross
a deep or flowing body of water. Failure to
follow this instruction could result in the
loss of control of your vehicle, personal
injury or death.Note:Driving through standing water can
cause vehicle damage.
Note:Engine damage can occur if water
enters the air filter.
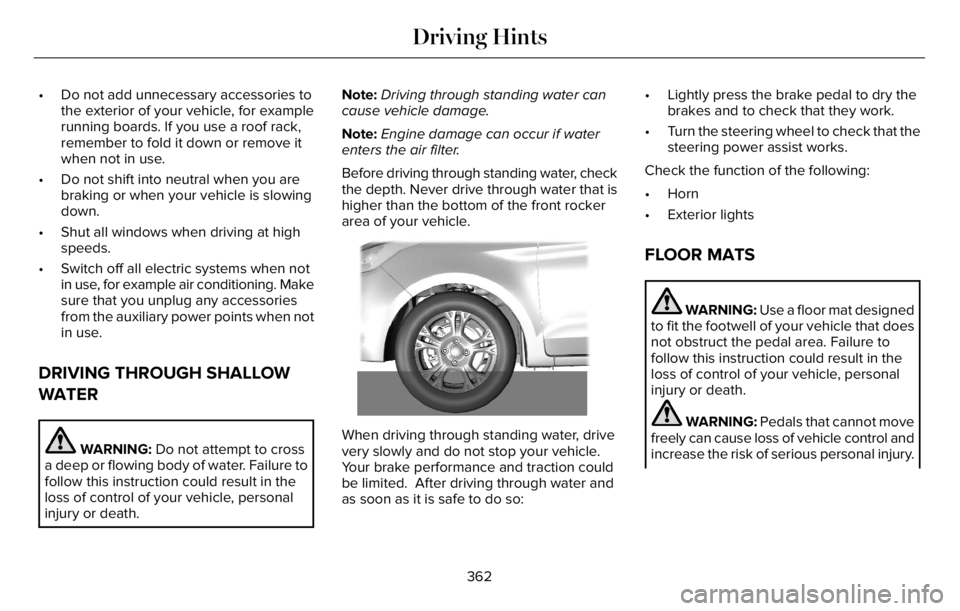
Before driving through standing water, check
the depth. Never drive through water that is
higher than the bottom of the front rocker
area of your vehicle.
66E266447
When driving through standing water, drive
very slowly and do not stop your vehicle.
Your brake performance and traction could
be limited. After driving through water and
as soon as it is safe to do so:• Lightly press the brake pedal to dry the
brakes and to check that they work.
• Turn the steering wheel to check that the
steering power assist works.
Check the function of the following:
• Horn
• Exterior lights
FLOOR MATS
WARNING: Use a floor mat designed
to fit the footwell of your vehicle that does
not obstruct the pedal area. Failure to
follow this instruction could result in the
loss of control of your vehicle, personal
injury or death.
WARNING: Pedals that cannot move
freely can cause loss of vehicle control and
increase the risk of serious personal injury.
362
Driving Hints
Page 369 of 681

The fuel pump shutoff stops the flow of fuel
to the engine in the event of a moderate to
severe crash. Not every impact causes a
shutoff.
Should your vehicle shut off after a crash,
you may restart your vehicle.
If your vehicle has a key system:
1. Switch off the ignition.
2. Switch to start position.
3. Switch off the ignition.
4. Switch on the ignition to re-enable the
fuel pump.
5. If the vehicle does not start, repeat steps
1 through 4.
If your vehicle has a push button start
system:
1. Press START/STOP to switch off your
vehicle.
2. Press the brake pedal and START/STOP
to switch on your vehicle.
3. Remove your foot from the brake pedal
and press START/STOP to switch off
your vehicle.4. You can attempt to start the vehicle by
pressing the brake pedal and
START/STOP, or press START/STOP
without pressing the brake pedal.
5. If the vehicle does not start, repeat steps
1 through 4.
JUMP STARTING THE VEHICLE
WARNING: Batteries normally
produce explosive gases which can cause
personal injury. Therefore, do not allow
flames, sparks or lighted substances to
come near the battery. When working near
the battery, always shield your face and
protect your eyes. Always provide correct
ventilation.
WARNING: Keep batteries out of
reach of children. Batteries contain sulfuric
acid. Avoid contact with skin, eyes or
clothing. Shield your eyes when working
near the battery to protect against possible
splashing of acid solution. In case of acid
contact with skin or eyes, flush immediately
with water for a minimum of 15 minutes and
get prompt medical attention. If acid is
swallowed, call a physician immediately.
WARNING: Use only adequately
sized cables with insulated clamps.
Preparing Your Vehicle
Do not attempt to push-start your automatic
transmission vehicle.
Note:Attempting to push-start a vehicle with
an automatic transmission may cause
transmission damage.
Note:Use only a 12-volt supply to start your
vehicle.
366
Roadside Emergencies
Page 407 of 681
ENGINE COOLANT CHECK
WARNING: Do not remove the
coolant reservoir cap when the engine is
on or the cooling system is hot. Wait 10
minutes for the cooling system to cool
down. Cover the coolant reservoir cap with
a thick cloth to prevent the possibility of
scalding and slowly remove the cap.
Failure to follow this instruction could result
in personal injury.
WARNING: Do not put coolant in the
windshield washer reservoir. If sprayed on
the windshield, coolant could make it
difficult to see through the windshield.
WARNING: To reduce the risk of
personal injury, make sure the engine is
cool before unscrewing the coolant
pressure relief cap. The cooling system is
under pressure. Steam and hot liquid can
come out forcefully when you loosen the
cap slightly.When the engine is cold, check the
concentration and level of the coolant at the
intervals listed in the scheduled maintenance
information. See Scheduled Maintenance
(page 579).
Note:Make sure that the coolant level is
between the MIN and the MAX marks on
the coolant reservoir.
Note: Coolant expands when it is hot. The
level may extend beyond the MAX mark.
Maintain coolant concentration within 48%
to 50%, which equates to a freeze point
between -29°F (-34°C) and -35°F (-37°C).
Coolant concentration should be checked
using a refractometer. We do not recommend
the use of hydrometers or coolant test strips
for measuring coolant concentration.Adding Coolant
WARNING: Do not add coolant
further than the MAX mark.
WARNING: Do not add coolant when
the vehicle is on or the cooling system is
hot. Failure to follow this instruction could
result in personal injury.
WARNING: Do not remove the
coolant reservoir cap when the engine is
on or the cooling system is hot. Wait 10
minutes for the cooling system to cool
down. Cover the coolant reservoir cap with
a thick cloth to prevent the possibility of
scalding and slowly remove the cap.
Failure to follow this instruction could result
in personal injury.
WARNING: Do not put coolant in the
windshield washer reservoir. If sprayed on
the windshield, coolant could make it
difficult to see through the windshield.
Note: Do not use stop leak pellets, cooling
system sealants, or non-specified additives
as they can cause damage to the engine
cooling or heating systems. Resulting
component damage may not be covered by
the vehicle Warranty.
404
Maintenance
Page 413 of 681
CHANGING THE 12V BATTERY -
GASOLINE
WARNING: Batteries normally
produce explosive gases which can cause
personal injury. Therefore, do not allow
flames, sparks or lighted substances to
come near the battery. When working near
the battery, always shield your face and
protect your eyes. Always provide correct
ventilation.
WARNING: When lifting a
plastic-cased battery, excessive pressure
on the end walls could cause acid to flow
through the vent caps, resulting in personal
injury and damage to the vehicle or battery.
Lift the battery with a battery carrier or with
your hands on opposite corners.
WARNING: Keep batteries out of
reach of children. Batteries contain sulfuric
acid. Avoid contact with skin, eyes or
clothing. Shield your eyes when working
near the battery to protect against possible
splashing of acid solution. In case of acid
contact with skin or eyes, flush immediately
with water for a minimum of 15 minutes and
get prompt medical attention. If acid is
swallowed, call a physician immediately.
WARNING: Battery posts, terminals
and related accessories contain lead and
lead compounds, chemicals known to the
State of California to cause cancer and
reproductive harm. Wash your hands after
handling.
WARNING: This vehicle may have
more than one battery. Removing the
battery cables from only one battery does
not disconnect your vehicle electrical
system. Make sure you disconnect the
battery cables from all batteries when
disconnecting power. Failure to do so may
cause serious personal injury or property
damage.
WARNING: For vehicles with
Auto-Start-Stop the battery requirement is
different. You must replace the battery with
one of exactly the same specification.
The battery is in the engine compartment.
See Under Hood Overview (page 400).
Your vehicle has a maintenance-free battery.
It does not require additional water during
service.
If the vehicle battery has a cover and vent
hose, make sure you correctly install it after
cleaning or replacing the battery.
410
Maintenance
Page 416 of 681
CHANGING THE 12V BATTERY -
PLUG-IN HYBRID ELECTRIC
VEHICLE (PHEV)
WARNING: Batteries normally
produce explosive gases which can cause
personal injury. Therefore, do not allow
flames, sparks or lighted substances to
come near the battery. When working near
the battery, always shield your face and
protect your eyes. Always provide correct
ventilation.
WARNING: When lifting a
plastic-cased battery, excessive pressure
on the end walls could cause acid to flow
through the vent caps, resulting in personal
injury and damage to the vehicle or battery.
Lift the battery with a battery carrier or with
your hands on opposite corners.
WARNING: Keep batteries out of
reach of children. Batteries contain sulfuric
acid. Avoid contact with skin, eyes or
clothing. Shield your eyes when working
near the battery to protect against possible
splashing of acid solution. In case of acid
contact with skin or eyes, flush immediately
with water for a minimum of 15 minutes and
get prompt medical attention. If acid is
swallowed, call a physician immediately.
WARNING: Battery posts, terminals
and related accessories contain lead and
lead compounds, chemicals known to the
State of California to cause cancer and
reproductive harm. Wash your hands after
handling.
WARNING: This vehicle may have
more than one battery. Removing the
battery cables from only one battery does
not disconnect your vehicle electrical
system. Make sure you disconnect the
battery cables from all batteries when
disconnecting power. Failure to do so may
cause serious personal injury or property
damage.
WARNING: For vehicles with
Auto-Start-Stop the battery requirement is
different. You must replace the battery with
one of exactly the same specification.
The primary battery is in the engine
compartment. See Under Hood Overview
(page 400).
The secondary battery is located behind the
trim panel in the luggage compartment.
413
Maintenance
Page 420 of 681
E142465
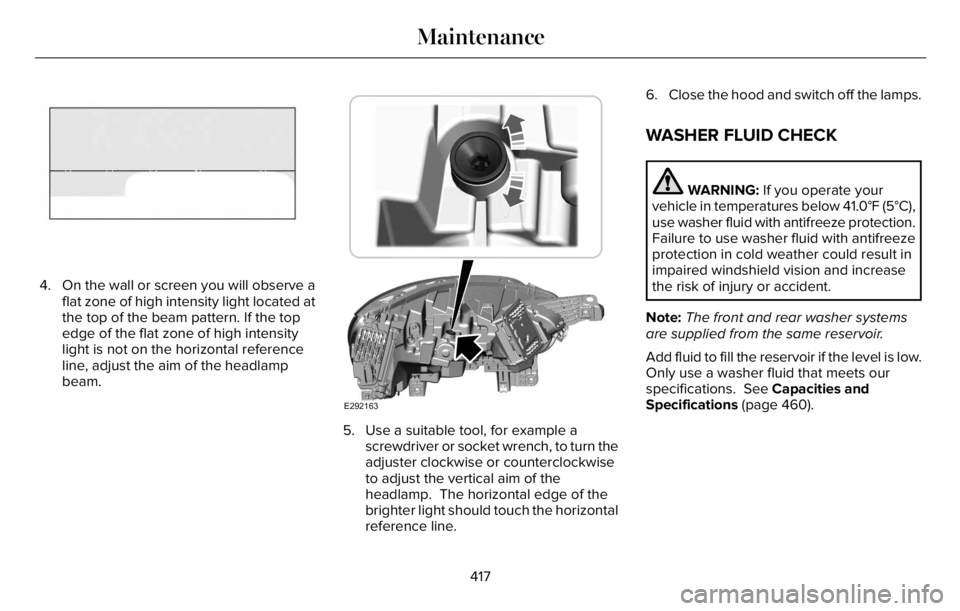
4. On the wall or screen you will observe a
flat zone of high intensity light located at
the top of the beam pattern. If the top
edge of the flat zone of high intensity
light is not on the horizontal reference
line, adjust the aim of the headlamp
beam.
E292163
5. Use a suitable tool, for example a
screwdriver or socket wrench, to turn the
adjuster clockwise or counterclockwise
to adjust the vertical aim of the
headlamp. The horizontal edge of the
brighter light should touch the horizontal
reference line.6. Close the hood and switch off the lamps.
WASHER FLUID CHECK
WARNING: If you operate your
vehicle in temperatures below 41.0°F (5°C),
use washer fluid with antifreeze protection.
Failure to use washer fluid with antifreeze
protection in cold weather could result in
impaired windshield vision and increase
the risk of injury or accident.
Note:The front and rear washer systems
are supplied from the same reservoir.
Add fluid to fill the reservoir if the level is low.
Only use a washer fluid that meets our
specifications. See Capacities and
Specifications (page 460).
417
Maintenance
Page 428 of 681
Note: Do not use razor blades or other
sharp objects to clean or remove decals from
the inside of the heated rear window. The
vehicle warranty does not cover damage
caused to the heated rear window grid lines.
CLEANING THE INTERIOR
WARNING: Do not use cleaning
solvents, bleach or dye on the vehicle's
seatbelts, as these actions may weaken
the belt webbing.
WARNING: On vehicles equipped
with seat-mounted airbags, do not use
chemical solvents or strong detergents.
Such products could contaminate the side
airbag system and affect performance of
the side airbag in a crash.For fabric, carpets, cloth seats and seats
equipped with side airbags:
• Remove dust and loose dirt with a
vacuum cleaner.
• Remove light stains and soil with
Motorcraft Professional Strength Carpet
& Upholstery Cleaner.
• If grease or tar is present on the material,
spot-clean the area first with Motorcraft
Spot and Stain Remover. In Canada, use
Motorcraft Multi-Purpose Cleaner.
• If a ring forms on the fabric after spot
cleaning, clean the entire area
immediately (but do not oversaturate) or
the ring will set.
• Do not use household cleaning products
or glass cleaners, which can stain and
discolor the fabric and affect the flame
retardant abilities of the seat materials.
Mirrors
Do not clean the housing or glass of any
mirror with harsh abrasives, fuel or other
petroleum or ammonia-based cleaning
products.
CLEANING THE INSTRUMENT
PANEL AND INSTRUMENT
CLUSTER LENS
WARNING: Do not use chemical
solvents or strong detergents when
cleaning the steering wheel or instrument
panel to avoid contamination of the airbag
system.
Note:Follow the same procedure as
cleaning leather seats for cleaning leather
instrument panels and leather interior trim
surfaces. See Cleaning Leather Seats (page
426).
Clean the instrument panel and cluster lens
with a clean, damp and soft cloth, then use
a clean, dry and soft cloth to dry these areas.
425
Vehicle Care