light LINCOLN AVIATOR 2023 Workshop Manual
[x] Cancel search | Manufacturer: LINCOLN, Model Year: 2023, Model line: AVIATOR, Model: LINCOLN AVIATOR 2023Pages: 681, PDF Size: 9.33 MB
Page 245 of 681

E301E301E301E301E301E301E303010E301E301E301011111111111111111111111111111
Charging
E306676To charge the high-voltage battery:
1. Put the vehicle in park (P).
2. Press the center right edge of the charge
port door and then release to open the
door.
3. Plug the charging coupler into the charge
port receptacle on your vehicle. Make
sure the button clicks confirming that you
have completely engaged the coupler.Note:Put your vehicle in park (P) to charge,
and for the charge status indicator to
illuminate.
Note:Pump and fan noise could be present
when charging the high voltage battery. The
pump and fan noise is normal as it circulates
liquid and keeps your high voltage battery
cool while charging.
E295257E295257E295222952959295295292952952952959552959529599595295295295952955222222257257252572525725772572577257252257
4. Verify that the cord acknowledgment
feature activates. This indicates the
beginning of a normal charge cycle. The
charge status indicator lights up each
zone alternately from bottom to top and
from bottom to top again.5. If using a charging station, follow the
instructions on the charge station to
begin the charging process.
The charge status indicator displays how far
along the charge is:
• When the bottom zone is pulsing, the
charge is between 0-20 percent.
• When the bottom zone illuminates and
the next is pulsing, the charge is between
20-40 percent.
• When two zones illuminate and the next
is pulsing, the charge is between 40-60
percent.
• When three zones illuminate and the next
is pulsing, the charge is between 60-80
percent.
• When four zones illuminate and the top
zone is pulsing, the charge is between
80-100 percent.
• When all zones illuminate, the charge is
100 percent.
242
High Voltage Battery - Plug-In Hybrid Electric Vehicle (PHEV)
Page 246 of 681
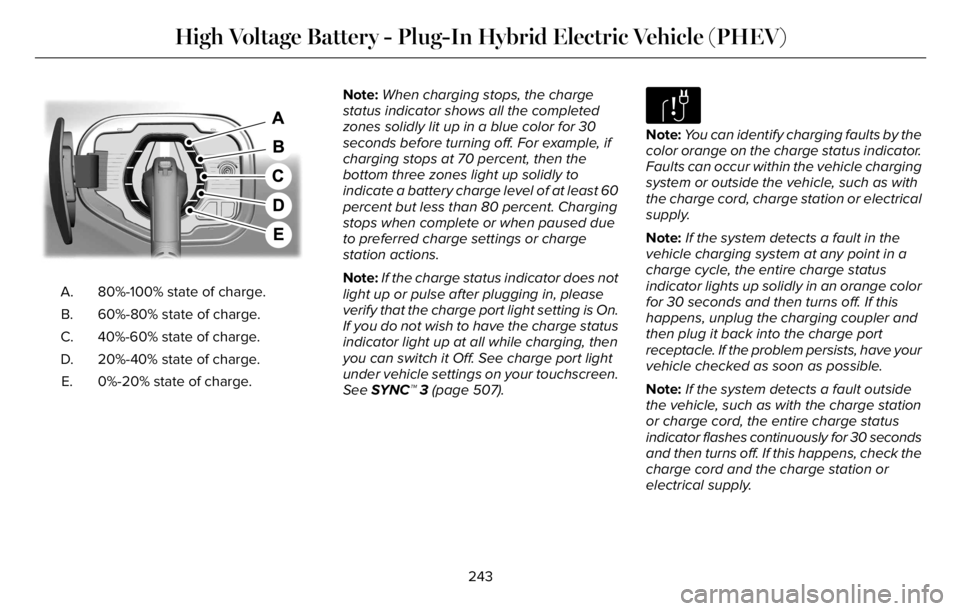
E301E301E301E301E301E301E3E301E301330101971971971971971971979197
80%-100% state of charge. A.
60%-80% state of charge. B.
40%-60% state of charge. C.
20%-40% state of charge. D.
0%-20% state of charge. E.Note:When charging stops, the charge
status indicator shows all the completed
zones solidly lit up in a blue color for 30
seconds before turning off. For example, if
charging stops at 70 percent, then the
bottom three zones light up solidly to
indicate a battery charge level of at least 60
percent but less than 80 percent. Charging
stops when complete or when paused due
to preferred charge settings or charge
station actions.
Note:If the charge status indicator does not
light up or pulse after plugging in, please
verify that the charge port light setting is On.
If you do not wish to have the charge status
indicator light up at all while charging, then
you can switch it Off. See charge port light
under vehicle settings on your touchscreen.
See SYNC™ 3 (page 507).
E306677
Note:You can identify charging faults by the
color orange on the charge status indicator.
Faults can occur within the vehicle charging
system or outside the vehicle, such as with
the charge cord, charge station or electrical
supply.
Note:If the system detects a fault in the
vehicle charging system at any point in a
charge cycle, the entire charge status
indicator lights up solidly in an orange color
for 30 seconds and then turns off. If this
happens, unplug the charging coupler and
then plug it back into the charge port
receptacle. If the problem persists, have your
vehicle checked as soon as possible.
Note:If the system detects a fault outside
the vehicle, such as with the charge station
or charge cord, the entire charge status
indicator flashes continuously for 30 seconds
and then turns off. If this happens, check the
charge cord and the charge station or
electrical supply.
243
High Voltage Battery - Plug-In Hybrid Electric Vehicle (PHEV)
Page 247 of 681
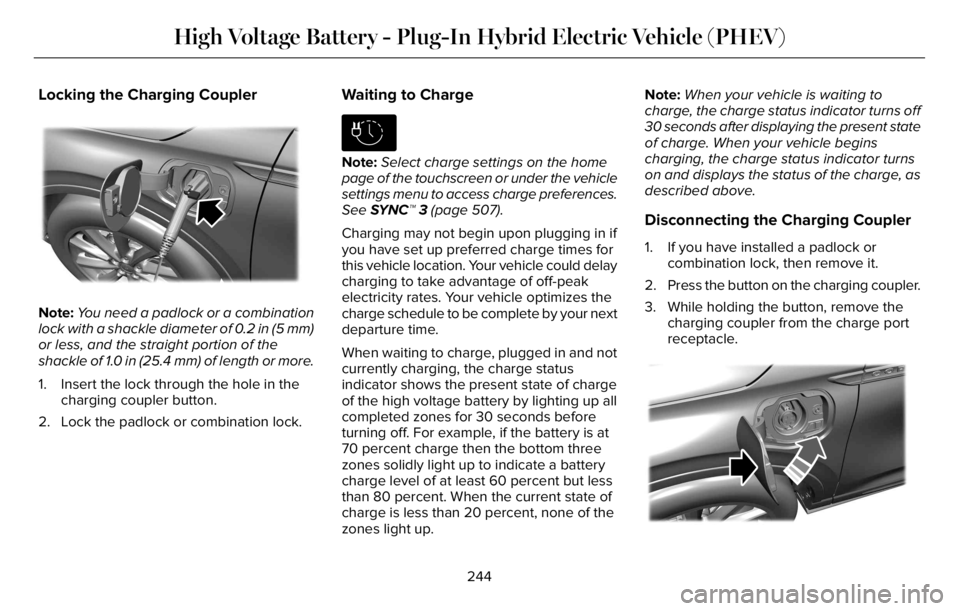
Locking the Charging Coupler
E295451E295451E295451
Note:You need a padlock or a combination
lock with a shackle diameter of 0.2 in (5 mm)
or less, and the straight portion of the
shackle of 1.0 in (25.4 mm) of length or more.
1. Insert the lock through the hole in the
charging coupler button.
2. Lock the padlock or combination lock.
Waiting to Charge
E306678
Note:Select charge settings on the home
page of the touchscreen or under the vehicle
settings menu to access charge preferences.
See SYNC™ 3 (page 507).
Charging may not begin upon plugging in if
you have set up preferred charge times for
this vehicle location. Your vehicle could delay
charging to take advantage of off-peak
electricity rates. Your vehicle optimizes the
charge schedule to be complete by your next
departure time.
When waiting to charge, plugged in and not
currently charging, the charge status
indicator shows the present state of charge
of the high voltage battery by lighting up all
completed zones for 30 seconds before
turning off. For example, if the battery is at
70 percent charge then the bottom three
zones solidly light up to indicate a battery
charge level of at least 60 percent but less
than 80 percent. When the current state of
charge is less than 20 percent, none of the
zones light up.Note:When your vehicle is waiting to
charge, the charge status indicator turns off
30 seconds after displaying the present state
of charge. When your vehicle begins
charging, the charge status indicator turns
on and displays the status of the charge, as
described above.
Disconnecting the Charging Coupler
1. If you have installed a padlock or
combination lock, then remove it.
2. Press the button on the charging coupler.
3. While holding the button, remove the
charging coupler from the charge port
receptacle.
E295444E295444E295444
244
High Voltage Battery - Plug-In Hybrid Electric Vehicle (PHEV)
Page 252 of 681
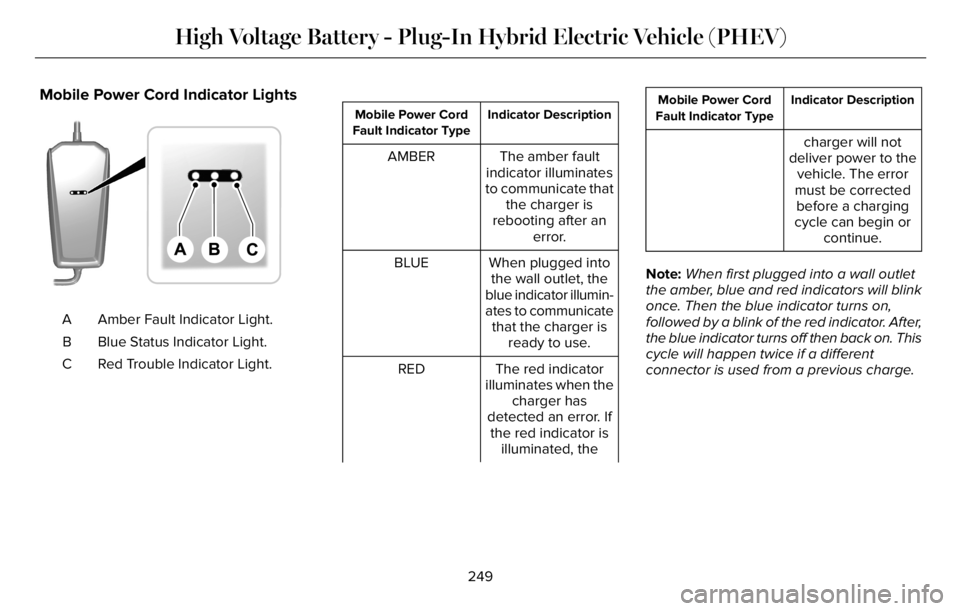
Mobile Power Cord Indicator Lights
E336515E336515
Amber Fault Indicator Light. A
Blue Status Indicator Light. B
Red Trouble Indicator Light. C
Indicator Description Mobile Power Cord
Fault Indicator Type
The amber fault
indicator illuminates
to communicate that
the charger is
rebooting after an
error. AMBER
When plugged into
the wall outlet, the
blue indicator illumin-
ates to communicate
that the charger is
ready to use. BLUE
The red indicator
illuminates when the
charger has
detected an error. If
the red indicator is
illuminated, the RED
Indicator Description Mobile Power Cord
Fault Indicator Type
charger will not
deliver power to the
vehicle. The error
must be corrected
before a charging
cycle can begin or
continue.
Note:When first plugged into a wall outlet
the amber, blue and red indicators will blink
once. Then the blue indicator turns on,
followed by a blink of the red indicator. After,
the blue indicator turns off then back on. This
cycle will happen twice if a different
connector is used from a previous charge.
249
High Voltage Battery - Plug-In Hybrid Electric Vehicle (PHEV)
Page 257 of 681
Note:When plugging into an unfamiliar wall
outlet, let the vehicle charge for several
minutes before leaving it unattended. The
red indicator will illuminate if not charging.
The unit will turn off if breaker or
infrastructure ground fault circuit interrupter
(GFCI) is tripped. You can view vehicle
charging status remotely via the Lincoln Way
App.
Mobile Power Cord Auto-Restart
Auto-restart helps to make sure that your
vehicle will be charged and ready for use
when needed. A charge could be interrupted
if errors are detected. Charging resumes
once the error is no longer detected. The
red indicator illuminates during an error
condition.
The exception to the immediate auto-restart
is when the interruption is due to a charger
ground fault circuit interrupter (GFCI) event.
The charger attempts to restart 15 minutes
after a ground fault circuit interrupter (GFCI)
event. After the fourth attempt to restart, the
charger shuts down and the red indicator
stays on.If the fault persists, do not continue to try to
charge your vehicle. Contact your authorized
dealer.
CARE INSTRUCTIONS
Do not use cleaners or solvents as this could
damage your mobile power cord. Do not
place stress on the charger cables. If unit
overheats, remove the mobile power cord
from direct sunlight.
SAFETY FEATURES
The charger includes the following safety
features to protect against the risk of electric
shock:
• Service Ground Check: The charger
constantly checks for the presence of a
service ground connection. If the service
ground ever fails, the charger red
indicator turns ON and shuts down power
to the vehicle.
• Thermal Event Sensor: Charger module
senses out-of-ordinary thermal events
and decreases the charging current or
shuts the unit down if required.• Ground fault circuit interrupter (GFCI)
Protection: The charger has a ground
fault circuit interrupter (GFCI) reaction
system to protect against electric shock.
If the charger module detects an output
ground fault, it shuts down power to the
output cable and illuminates the red
indicator.
• Insulation: The charger module,
connector, cable assembly, and charge
coupler are completely insulated. There
are no exposed live parts, to protect
against electric shock.
• Unintentional Disconnection: The charge
coupler is designed to minimize
unintentional disconnection. A pilot signal
wire in the cable and charge coupler
eliminates the possibility of electric shock
when not connected to a vehicle or if an
unintended disconnect occurs during a
charge. Disconnection during charging
is safe.
254
High Voltage Battery - Plug-In Hybrid Electric Vehicle (PHEV)
Page 258 of 681
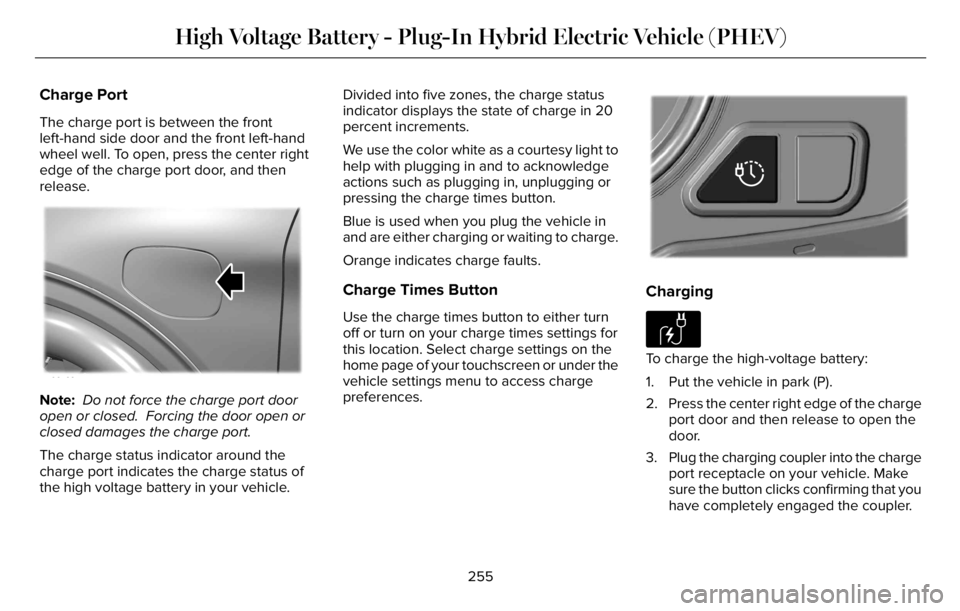
Charge Port
The charge port is between the front
left-hand side door and the front left-hand
wheel well. To open, press the center right
edge of the charge port door, and then
release.
E295258
Note: Do not force the charge port door
open or closed. Forcing the door open or
closed damages the charge port.
The charge status indicator around the
charge port indicates the charge status of
the high voltage battery in your vehicle.Divided into five zones, the charge status
indicator displays the state of charge in 20
percent increments.
We use the color white as a courtesy light to
help with plugging in and to acknowledge
actions such as plugging in, unplugging or
pressing the charge times button.
Blue is used when you plug the vehicle in
and are either charging or waiting to charge.
Orange indicates charge faults.
Charge Times Button
Use the charge times button to either turn
off or turn on your charge times settings for
this location. Select charge settings on the
home page of your touchscreen or under the
vehicle settings menu to access charge
preferences.
E301E301E301E301E301E301E30301300E301E3013011111111111111111111111111111
Charging
E306676To charge the high-voltage battery:
1. Put the vehicle in park (P).
2. Press the center right edge of the charge
port door and then release to open the
door.
3. Plug the charging coupler into the charge
port receptacle on your vehicle. Make
sure the button clicks confirming that you
have completely engaged the coupler.
255
High Voltage Battery - Plug-In Hybrid Electric Vehicle (PHEV)
Page 259 of 681

Note:Put your vehicle in park (P) to charge,
and for the charge status indicator to
illuminate.
Note:Pump and fan noise could be present
when charging the high voltage battery. The
pump and fan noise is normal as it circulates
liquid and keeps your high voltage battery
cool while charging.
E295257E295257E2952295222992952929529529522995295952952959959529529595295295522257225722252572572577252575772525772257
4. Verify that the cord acknowledgment
feature activates. This indicates the
beginning of a normal charge cycle. The
charge status indicator lights up each
zone alternately from bottom to top and
from bottom to top again.5. If using a charging station, follow the
instructions on the charge station to
begin the charging process.
Charge Port Indicators
The charge status indicator displays how far
along the charge is:
• When the bottom zone is pulsing, the
charge is between 0-20 percent.
• When the bottom zone illuminates and
the next is pulsing, the charge is between
20-40 percent.
• When two zones illuminate and the next
is pulsing, the charge is between 40-60
percent.
• When three zones illuminate and the next
is pulsing, the charge is between 60-80
percent.
• When four zones illuminate and the top
zone is pulsing, the charge is between
80-100 percent.
• When all zones illuminate, the charge is
100 percent.
E301E301E301E301E301E301E301301330101971971971971971971979197
80%-100% state of charge. A.
60%-80% state of charge. B.
40%-60% state of charge. C.
20%-40% state of charge. D.
0%-20% state of charge. E.
256
High Voltage Battery - Plug-In Hybrid Electric Vehicle (PHEV)
Page 260 of 681

Note:When charging stops, the charge
status indicator shows all the completed
zones solidly lit up in a blue color for 30
seconds before turning off. For example, if
charging stops at 70 percent, then the
bottom three zones light up solidly to
indicate a battery charge level of at least 60
percent but less than 80 percent. Charging
stops when complete or when paused due
to preferred charge settings or charge
station actions.
Note:If the charge status indicator does not
light up or pulse after plugging in, please
verify that the charge port light setting is On.
If you do not wish to have the charge status
indicator light up at all while charging, then
you can switch it Off. See charge port light
under vehicle settings on your touchscreen.
E306677
Note:You can identify charging faults by the
color orange on the charge status indicator.
Faults can occur within the vehicle charging
system or outside the vehicle, such as with
the charge cord, charge station or electrical
supply.Note:If the system detects a fault in the
vehicle charging system at any point in a
charge cycle, the entire charge status
indicator lights up solidly in an orange color
for 30 seconds and then turns off. If this
happens, unplug the charging coupler and
then plug it back into the charge port
receptacle. If the problem persists, have your
vehicle checked as soon as possible.
Note:If the system detects a fault outside
the vehicle, such as with the charge station
or charge cord, the entire charge status
indicator flashes continuously for 30 seconds
and then turns off. If this happens, check the
charge cord and the charge station or
electrical supply.
Waiting to Charge
E306678
Note:Select charge settings on the home
page of the touchscreen or under the vehicle
settings menu to access charge preferences.Charging may not begin upon plugging in if
you have set up preferred charge times for
this vehicle location. Your vehicle could delay
charging to take advantage of off-peak
electricity rates. Your vehicle optimizes the
charge schedule to be complete by your next
departure time.
When waiting to charge, plugged in and not
currently charging, the charge status
indicator shows the present state of charge
of the high voltage battery by lighting up all
completed zones for 30 seconds before
turning off. For example, if the battery is at
70 percent charge then the bottom three
zones solidly light up to indicate a battery
charge level of at least 60 percent but less
than 80 percent. When the current state of
charge is less than 20 percent, none of the
zones light up.
Note:When your vehicle is waiting to
charge, the charge status indicator turns off
30 seconds after displaying the present state
of charge. When your vehicle begins
charging, the charge status indicator turns
on and displays the status of the charge, as
described above.
257
High Voltage Battery - Plug-In Hybrid Electric Vehicle (PHEV)
Page 266 of 681
Note:A screwdriver tool longer than 4.7 in
(120 mm) could hit the underside of the
armrest console before you achieve full
travel of the detent.
6. With your foot still fully applied on the
brake pedal, disengage the parking
brake. See Electric Parking Brake (page
272).
7. Your vehicle remains in neutral (N) for
emergency towing purposes.
8. Switch off the ignition.
9. Once it is safe to do so, and there is no
risk of your vehicle rolling, disconnect
the negative, black, battery cable from
the battery.
Returning Your Vehicle to Normal Mode
1. Once it is safe to do so, reconnect the
negative, black, battery cable to the
battery.
2. Apply the parking brake. See Electric
Parking Brake (page 272).
Note: If the vehicle battery is dead, you
could require an external power source to
apply the parking brake.3. Fully apply the brake pedal and hold, do
not release.
4. Insert the screwdriver fully into the
Manual Park Release lever slot. Push the
tool downwards. The system detent
releases and the Manual Park Release
lever moves forward, allowing the vehicle
to go back into the park (P) position.
Remove the screwdriver.
5. Install the access cover.
6. With your foot fully applied on the brake
pedal, start your vehicle. Confirm that
your vehicle is in the park (P) position and
that the instrument cluster indicates park
(P).
7. If the instrument cluster does not display
the park (P) position or there is a
message stating Park Not Available,
Transmission Not In Park or Shift System
Fault, apply the parking brake before
exiting your vehicle. Contact an
authorized dealer.If Your Vehicle Gets Stuck in Mud or
Snow
If your vehicle gets stuck in the mud or snow,
you can rock it out by shifting between
forward and reverse gears, stopping
between shifts in a steady pattern. Press
lightly on the accelerator in each gear.
Note:Do not rock the vehicle if the engine
is not at normal operating temperature or
damage to the transmission could occur.
Note:Do not rock the vehicle for more than
a minute or damage to the transmission and
tires could occur, or the engine could
overheat.
263
Transmission
Page 270 of 681
If Your Vehicle Gets Stuck
WARNING: Apply the parking brake,
shift into park (P), switch the ignition off
and remove the key before you leave your
vehicle. Failure to follow this instruction
could result in personal injury or death.
WARNING: If the parking brake is
fully released, but the brake warning lamp
remains illuminated, the brakes may not
be working properly. Have your vehicle
checked as soon as possible.
WARNING: Do not spin the wheels
at over 34 mph (55 km/h). The tires may
fail and injure a passenger or bystander.
If your vehicle gets stuck in mud or snow it
could be rocked out by shifting between
forward and reverse gears, stopping
between shifts, in a steady pattern. Press
lightly on the accelerator in each gear.
It could be beneficial to disengage Traction
Control while attempting to rock the vehicle.Note:Do not rock the vehicle if the engine
is not at normal operating temperature or
damage to the transmission could occur.
Note:Do not rock the vehicle for more than
a few minutes or damage to the transmission
and tires could occur or the engine could
overheat.
Emergency Maneuvers
• In an unavoidable emergency situation
where a sudden sharp turn must be
made, remember to avoid "over-driving"
your vehicle (i.e., turn the steering wheel
only as rapidly and as far as required to
avoid the emergency). Excessive steering
can result in less vehicle control, not
more. Additionally, smooth variations of
the accelerator and/or brake pedal
pressure should be utilized if changes in
vehicle speed are called for. Avoid abruptsteering, acceleration or braking which
could result in an increased risk of loss
of vehicle control, vehicle rollover and/or
personal injury. Use all available road
surface to return the vehicle to a safe
direction of travel.
• In the event of an emergency stop, avoid
skidding the tires and do not attempt any
sharp steering wheel movements.
• If the vehicle goes from one type of
surface to another (i.e., from concrete to
gravel) there is a change in the way the
vehicle responds to a maneuver
(steering, acceleration or braking). Again,
avoid these abrupt inputs.
Sand
When driving over sand, try to keep all four
wheels on the most solid area of the trail.
Avoid reducing the tire pressures but shift
to a lower gear and drive steadily through
the terrain. Apply the accelerator slowly and
avoid spinning the wheels.
267
All-Wheel Drive (If Equipped)