check engine light LINCOLN AVIATOR 2023 Owners Manual
[x] Cancel search | Manufacturer: LINCOLN, Model Year: 2023, Model line: AVIATOR, Model: LINCOLN AVIATOR 2023Pages: 681, PDF Size: 9.33 MB
Page 134 of 681
WARNING LAMPS AND
INDICATORS
The following warning lamps and indicators
alert you to a vehicle condition that may
become serious. Some lamps illuminate
when you start your vehicle to make sure
they work. If any lamps remain on after
starting your vehicle, refer to the respective
system warning lamp for further information.
Depending on your vehicle options and
instrument cluster type, not all warning lamps
and indicators shown are available.
Note:Some warning indicators appear in
the instrument cluster and function the same
as a warning lamp, but do not display when
you start your vehicle.
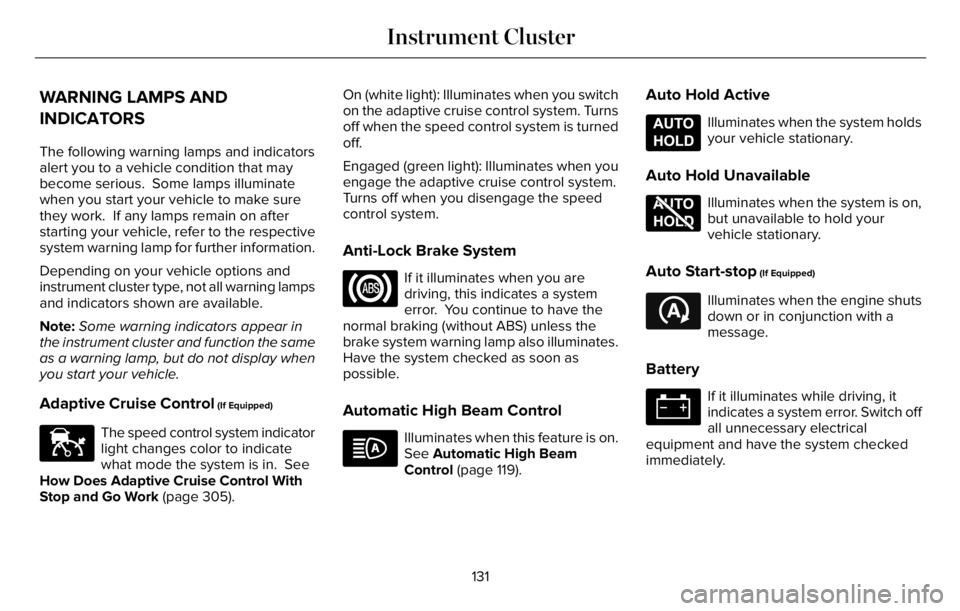
Adaptive Cruise Control (If Equipped)
E144524
The speed control system indicator
light changes color to indicate
what mode the system is in. See
How Does Adaptive Cruise Control With
Stop and Go Work (page 305).On (white light): Illuminates when you switch
on the adaptive cruise control system. Turns
off when the speed control system is turned
off.
Engaged (green light): Illuminates when you
engage the adaptive cruise control system.
Turns off when you disengage the speed
control system.
Anti-Lock Brake System
If it illuminates when you are
driving, this indicates a system
error. You continue to have the
normal braking (without ABS) unless the
brake system warning lamp also illuminates.
Have the system checked as soon as
possible.
Automatic High Beam Control
Illuminates when this feature is on.
See Automatic High Beam
Control (page 119).
Auto Hold Active
E197933
Illuminates when the system holds
your vehicle stationary.
Auto Hold Unavailable
E197934
Illuminates when the system is on,
but unavailable to hold your
vehicle stationary.
Auto Start-stop (If Equipped)
E121377
Illuminates when the engine shuts
down or in conjunction with a
message.
Battery
If it illuminates while driving, it
indicates a system error. Switch off
all unnecessary electrical
equipment and have the system checked
immediately.
131
Instrument Cluster
Page 154 of 681
Action Message
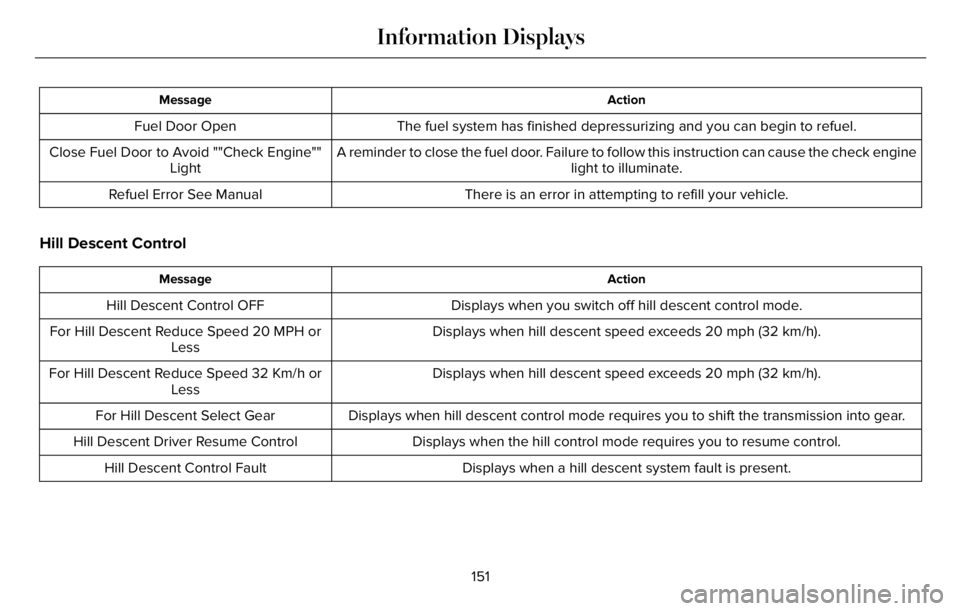
The fuel system has finished depressurizing and you can begin to refuel. Fuel Door Open
A reminder to close the fuel door. Failure to follow this instruction can cause the check engine
light to illuminate. Close Fuel Door to Avoid ""Check Engine""
Light
There is an error in attempting to refill your vehicle. Refuel Error See Manual
Hill Descent Control
Action Message
Displays when you switch off hill descent control mode. Hill Descent Control OFF
Displays when hill descent speed exceeds 20 mph (32 km/h). For Hill Descent Reduce Speed 20 MPH or
Less
Displays when hill descent speed exceeds 20 mph (32 km/h). For Hill Descent Reduce Speed 32 Km/h or
Less
Displays when hill descent control mode requires you to shift the transmission into gear. For Hill Descent Select Gear
Displays when the hill control mode requires you to resume control. Hill Descent Driver Resume Control
Displays when a hill descent system fault is present. Hill Descent Control Fault
151
Information Displays
Page 209 of 681
• Without applying the brake pedal, press
and release the button once when the
ignition is in the on mode, or when your
vehicle is running but is not moving.
On: All electrical circuits are operational and
the warning lamps and indicators illuminate.
• Without applying the brake pedal, press
and release the button once.
Start: Starts your vehicle. The engine may
not start when your vehicle starts.
• Press the brake pedal, and then press
the button for any length of time. An
indicator light on the button illuminates
when the ignition is on and when your
vehicle starts.
STARTING A GASOLINE ENGINE
When you start the engine, the idle speed
increases. This helps to warm up the
engine. If the engine idle speed does not
slow down, have your vehicle checked as
soon as possible.Note: You can crank the engine for a total
of 60 seconds without the engine starting
before the starting system temporarily
disables. The 60 seconds does not have to
be all at once. For example, if you crank the
engine three times for 20 seconds each time,
without the engine starting, you reached the
60-second time limit. A message appears
in the information display alerting you that
you exceeded the cranking time. You
cannot attempt to start the engine for at
least 15 minutes. After 15 minutes, you are
limited to a 15-second engine cranking time.
You need to wait 60 minutes before you can
crank the engine for 60 seconds again.
Before starting your vehicle, check the
following:
• Make sure all occupants have fastened
their seatbelts.
• Make sure the headlamps and electrical
accessories are off.
• Make sure the parking brake is on.
• Make sure the transmission is in park (P).
• Switch the ignition on.
Note:Do not touch the accelerator pedal.Note:You must have your intelligent access
key in your vehicle in order to shift the
transmission out of park (P).
1. Fully press the brake pedal.
2. Press the push button ignition switch.
The system does not function if:
• The passive key frequencies are jammed.
• The key battery has no charge.
If you are unable to start your vehicle, do the
following:
206
Starting and Stopping the Engine
Page 231 of 681
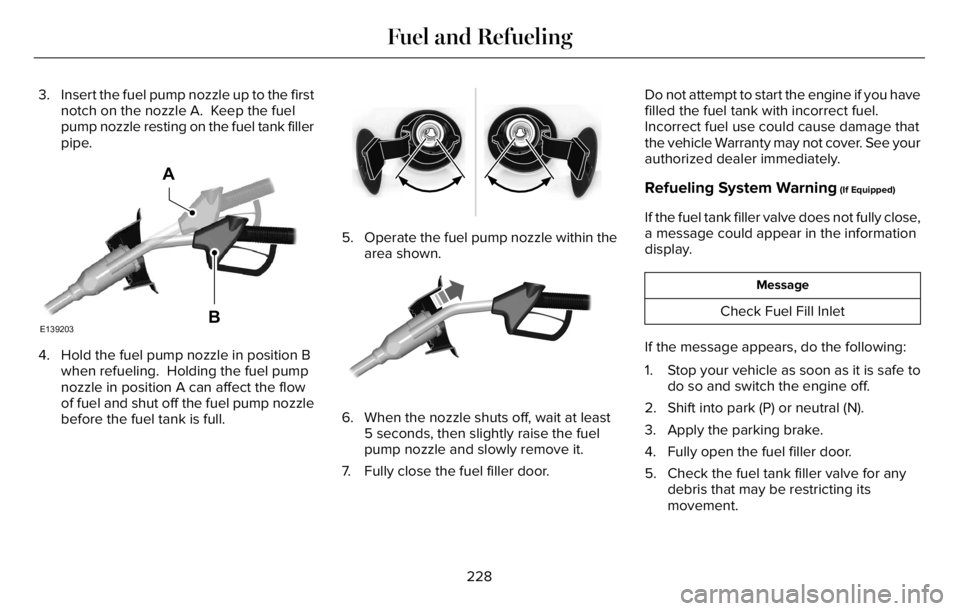
3. Insert the fuel pump nozzle up to the first
notch on the nozzle A. Keep the fuel
pump nozzle resting on the fuel tank filler
pipe.
E139203
A
B
4. Hold the fuel pump nozzle in position B
when refueling. Holding the fuel pump
nozzle in position A can affect the flow
of fuel and shut off the fuel pump nozzle
before the fuel tank is full.
5. Operate the fuel pump nozzle within the
area shown.
E190819081
6. When the nozzle shuts off, wait at least
5 seconds, then slightly raise the fuel
pump nozzle and slowly remove it.
7. Fully close the fuel filler door.Do not attempt to start the engine if you have
filled the fuel tank with incorrect fuel.
Incorrect fuel use could cause damage that
the vehicle Warranty may not cover. See your
authorized dealer immediately.
Refueling System Warning (If Equipped)
If the fuel tank filler valve does not fully close,
a message could appear in the information
display.
Message
Check Fuel Fill Inlet
If the message appears, do the following:
1. Stop your vehicle as soon as it is safe to
do so and switch the engine off.
2. Shift into park (P) or neutral (N).
3. Apply the parking brake.
4. Fully open the fuel filler door.
5. Check the fuel tank filler valve for any
debris that may be restricting its
movement.
228
Fuel and Refueling
Page 235 of 681
Action Message
Your vehicle has a sealed fuel
system that may be under
pressure. This information
message appears while the
fuel system is depressurizing
with the fuel filler door closed.
Wait for the fuel system to
depressurize and for the fuel
filler door to unlatch. Please wait
for fuel
door to
open
This information message
appears when the fuel system
depressurizes and the fuel
filler door opens. Fully open
the fuel filler door to refuel
and fully close the fuel filler
door when refueling is
complete. Fuel Door
Open
Your vehicle has a sealed fuel
system that requires the fuel
filler door to be fully closed
after refueling. This warning
message appears when the
fuel filler door is ajar. Please Fuel door
ajar Close
fully to
avoid
""Check
Engine""
Action Message
light fully close the fuel filler door
to avoid a "Check Engine"
Light.
If you see this message and
a "Check Engine" lamp illumin-
ates, please fully close the
fuel filler door. The "Check
Engine" Light should clear
within five seconds. If the
"Check Engine" light persists,
please see your dealer.
A warning message appears
in the information display
when the fuel system fails to
depressurize or the fuel filler
door fails to open. You may
have to use the fuel filler door
manual override lever. Refuel Error
See Manual
If the Refuel Error information message
appears, do the following:
1. Check the fuel filler door for anything that
may be obstructing its movement, for
example ice or snow.2. Remove any obstruction from the fuel
filler door.
3. Press the button on the left side of the
instrument panel to open the fuel filler
door.
4. If the fuel filler door fails to open and the
Refuel Error message remains in the
information display, use the fuel filler
door manual override lever.
Fuel Filler Door Manual Override Lever
WARNING: The fuel system may be
under pressure. If you hear a hissing sound
near the fuel filler inlet, do not refuel until
the sound stops. Otherwise, fuel may spray
out, which could cause serious personal
injury.
Note:The transmission must be in park (P)
or neutral (N).
When using the manual override lever do
the following:
1. Switch the ignition on.
232
Fuel and Refueling
Page 237 of 681
EMISSION LAW
WARNING: Do not remove or alter
the original equipment floor covering or
insulation between it and the metal floor
of the vehicle. The floor covering and
insulation protect occupants of the vehicle
from the engine and exhaust system heat
and noise. On vehicles with no original
equipment floor covering insulation, do not
carry passengers in a manner that permits
prolonged skin contact with the metal floor.
Failure to follow these instructions may
result in fire or personal injury.
U.S. federal laws and certain state laws
prohibit removing or rendering inoperative
emission control system components. Similar
federal or provincial laws may apply in
Canada. We do not approve of any vehicle
modification without first determining
applicable laws.
Tampering with emissions control
systems including related sensors
or the Diesel Exhaust Fluid system
can result in reduced engine power and the
illumination of the service engine soon light.
Tampering With a Noise Control
System
Federal laws prohibit the following acts:
• Removal or rendering inoperative by any
person other than for purposes of
maintenance.
• Repair or replacement of any device or
element of the design incorporated into
a new vehicle for the purpose of noise
control prior to its sale or delivery to the
ultimate purchaser or while it is in use.
• The use of the vehicle after any person
removes or renders inoperative any
device or element of the design.The U.S. Environmental Protection Agency
may presume to constitute tampering as
follows:
• Removal of hood blanket, fender apron
absorbers, fender apron barriers,
underbody noise shields or acoustically
absorptive material.
• Tampering or rendering inoperative the
engine speed governor, to allow engine
speed to exceed manufacturer
specifications.
If the engine does not start, runs rough,
experiences a decrease in engine
performance, experiences excess fuel
consumption or produces excessive exhaust
smoke, check for the following:
• A plugged or disconnected air inlet
system hose.
• A plugged engine air filter element.
• Water in the fuel filter and water
separator.
• A clogged fuel filter.
• Contaminated fuel.
• Air in the fuel system, due to loose
connections.
234
Engine Emission Control
Page 270 of 681
If Your Vehicle Gets Stuck
WARNING: Apply the parking brake,
shift into park (P), switch the ignition off
and remove the key before you leave your
vehicle. Failure to follow this instruction
could result in personal injury or death.
WARNING: If the parking brake is
fully released, but the brake warning lamp
remains illuminated, the brakes may not
be working properly. Have your vehicle
checked as soon as possible.
WARNING: Do not spin the wheels
at over 34 mph (55 km/h). The tires may
fail and injure a passenger or bystander.
If your vehicle gets stuck in mud or snow it
could be rocked out by shifting between
forward and reverse gears, stopping
between shifts, in a steady pattern. Press
lightly on the accelerator in each gear.
It could be beneficial to disengage Traction
Control while attempting to rock the vehicle.Note:Do not rock the vehicle if the engine
is not at normal operating temperature or
damage to the transmission could occur.
Note:Do not rock the vehicle for more than
a few minutes or damage to the transmission
and tires could occur or the engine could
overheat.
Emergency Maneuvers
• In an unavoidable emergency situation
where a sudden sharp turn must be
made, remember to avoid "over-driving"
your vehicle (i.e., turn the steering wheel
only as rapidly and as far as required to
avoid the emergency). Excessive steering
can result in less vehicle control, not
more. Additionally, smooth variations of
the accelerator and/or brake pedal
pressure should be utilized if changes in
vehicle speed are called for. Avoid abruptsteering, acceleration or braking which
could result in an increased risk of loss
of vehicle control, vehicle rollover and/or
personal injury. Use all available road
surface to return the vehicle to a safe
direction of travel.
• In the event of an emergency stop, avoid
skidding the tires and do not attempt any
sharp steering wheel movements.
• If the vehicle goes from one type of
surface to another (i.e., from concrete to
gravel) there is a change in the way the
vehicle responds to a maneuver
(steering, acceleration or braking). Again,
avoid these abrupt inputs.
Sand
When driving over sand, try to keep all four
wheels on the most solid area of the trail.
Avoid reducing the tire pressures but shift
to a lower gear and drive steadily through
the terrain. Apply the accelerator slowly and
avoid spinning the wheels.
267
All-Wheel Drive (If Equipped)
Page 274 of 681

GENERAL INFORMATION
Note: Occasional brake noise is normal. If
a metal-to-metal, continuous grinding or
continuous squeal sound is present, the
brake linings may be worn. Have your
vehicle checked. If your vehicle has
continuous vibration or shudder in the
steering wheel when braking, have your
vehicle checked.
Note: Brake dust may accumulate on the
wheels, even under normal driving
conditions. Some dust is inevitable as the
brakes wear and does not contribute to
brake noise. Wet brakes result in reduced
braking efficiency. Gently press the brake
pedal a few times when driving from a car
wash or standing water to dry the brakes.
See Cleaning the Wheels (page 427).
Brake Over Accelerator
In the event the accelerator pedal becomes
stuck or entrapped, apply steady and firm
pressure to the brake pedal to slow the
vehicle and reduce engine power. If you
experience this condition, apply the brakes
and bring your vehicle to a safe stop. Move
the transmission to park (P), switch the
engine off and apply the parking brake.
Inspect the accelerator pedal for any
interference. If none are found and the
condition persists, have your vehicle
checked. If your vehicle has to be towed,
we recommend that you contact a
professional towing service.
Emergency Brake Assist
Emergency brake assist detects when you
brake heavily by measuring the rate at which
you press the brake pedal. It provides
maximum braking efficiency as long as you
press the pedal. Emergency brake assist
can reduce stopping distances in critical
situations.Note:Depending on applicable laws and
regulations in the country for which your
vehicle was originally built, your brake lamps
may flash during heavy braking. Following
this, your hazard lights may also flash when
your vehicle comes to a stop.
Anti-lock Brake System
This system helps you maintain steering
control during emergency stops by keeping
the brakes from locking.
This lamp illuminates momentarily
when you switch the ignition on to
confirm the lamp is functional.
If the warning lamp does not illuminate
during start up, remains on or flashes, the
system may be disabled. Have the system
checked. If the anti-lock brake system is
disabled, normal braking is still operational.
See Warning Lamps and Indicators (page
131).
Note:Indicators vary depending on region.
271
Brakes
Page 310 of 681
Hilly Condition Usage
You should select a lower gear when the
system is active in situations such as
prolonged downhill driving on steep grades,
for example in mountainous areas. The
system needs additional engine braking in
these situations to reduce the load on the
vehicle’s regular brake system to prevent it
from overheating.
Note:An audible alarm sounds and the
system shuts down if it applies brakes for an
extended period of time. This allows the
brakes to cool. The system functions
normally again after the brakes cool.
ADAPTIVE CRUISE CONTROL
LIMITATIONS - VEHICLES WITH:
ADAPTIVE CRUISE CONTROL
WITH LANE CENTERING
Adaptive cruise control limitations apply to
lane centering unless stated otherwise or
contradicted by a lane centering limitation.
See Adaptive Cruise Control Limitations
(page 307).The system may not correctly operate in any
of the following conditions:
• The lane is too narrow or wide.
• The system does not detect at least one
lane marking or when lanes merge or
split.
• Limited steering torque input is applied.
• Areas under construction or new
infrastructure.
• When modifications to the steering
system have been made.
• When using a spare tire.
Note:The driving assistance torque is limited
and may not be sufficient for all driving
situations such as driving through tight
curves or driving through curves at high
speeds.
Note:In exceptional conditions, the system
may deviate from the center line.
ADAPTIVE CRUISE CONTROL
LIMITATIONS - VEHICLES WITH:
ADAPTIVE CRUISE CONTROL
WITH STOP AND GO
Sensor Limitations
WARNING: On rare occasions,
detection issues can occur due to the road
infrastructures, for example bridges,
tunnels and safety barriers. In these cases,
the system may brake late or
unexpectedly. At all times, you are
responsible for controlling your vehicle,
supervising the system and intervening, if
required.
WARNING: If the system
malfunctions, have your vehicle checked
as soon as possible.
WARNING: Large contrasts in outside
lighting can limit sensor performance.
307
Adaptive Cruise Control (If Equipped)
Page 361 of 681
Trailer Lamps
WARNING: Never connect any trailer
lamp wiring to the vehicle's tail lamp wiring;
this may damage the electrical system
resulting in fire. Contact your authorized
dealer as soon as possible for assistance
in proper trailer tow wiring installation.
Additional electrical equipment may be
required.
Most towed vehicles require trailer lamps.
Make sure all running lights, brake lights,
direction indicators and hazard flashers are
working.
Before Towing a Trailer
Practice turning, stopping and backing up to
get the feel of your vehicle-trailer
combination before starting on a trip. When
turning, make wider turns so the trailer
wheels clear curbs and other obstacles.
When Towing a Trailer
• Do not drive faster than 70 mph
(113 km/h) during the first 500 mi
(800 km).
• Do not make full-throttle starts.
• Check your hitch, electrical connections
and trailer wheel lug nuts thoroughly after
you have traveled 50 mi (80 km).
• When stopped in congested or heavy
traffic during hot weather, place the
gearshift in park (P) to aid engine and
transmission cooling and to help A/C
performance.
• Turn off the speed control with heavy
loads or in hilly terrain. The speed control
may turn off automatically when you are
towing on long, steep grades.
• Shift to a lower gear when driving down
a long or steep hill. Do not apply the
brakes continuously, as they may
overheat and become less effective.• If your transmission is equipped with a
Grade Assist or Tow/Haul feature, use
this feature when towing. This provides
engine braking and helps eliminate
excessive transmission shifting for
optimum fuel economy and transmission
cooling.
• Allow more distance for stopping with a
trailer attached. Anticipate stops and
brake gradually.
• Avoid parking on a grade. However, if
you must park on a grade:
1. Turn the steering wheel to point your
vehicle tires away from traffic flow.
2. Set your vehicle parking brake.
3. Place the automatic transmission in park
(P).
4. Place wheel chocks in front and back of
the trailer wheels. (Chocks not included
with vehicle.)
Launching or Retrieving a Boat or
Personal Watercraft (PWC)
Note:Disconnect the wiring to the trailer
before backing the trailer into the water.
358
Towing