lock LINCOLN MKT 2018 Service Manual
[x] Cancel search | Manufacturer: LINCOLN, Model Year: 2018, Model line: MKT, Model: LINCOLN MKT 2018Pages: 564, PDF Size: 4.66 MB
Page 125 of 564
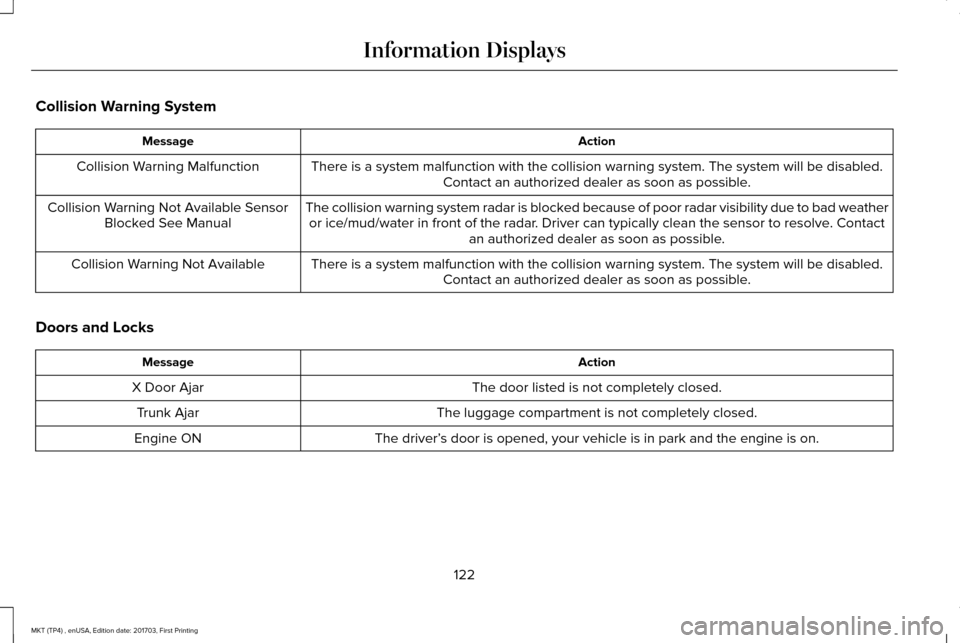
Collision Warning System
Action
Message
There is a system malfunction with the collision warning system. The sys\
tem will be disabled.Contact an authorized dealer as soon as possible.
Collision Warning Malfunction
The collision warning system radar is blocked because of poor radar visibility due to bad weatheror ice/mud/water in front of the radar. Driver can typically clean the sensor to resolve. Contact an authorized dealer as soon as possible.
Collision Warning Not Available Sensor
Blocked See Manual
There is a system malfunction with the collision warning system. The sys\
tem will be disabled.Contact an authorized dealer as soon as possible.
Collision Warning Not Available
Doors and Locks Action
Message
The door listed is not completely closed.
X Door Ajar
The luggage compartment is not completely closed.
Trunk Ajar
The driver’s door is opened, your vehicle is in park and the engine is on.
Engine ON
122
MKT (TP4) , enUSA, Edition date: 201703, First Printing Information Displays
Page 130 of 564
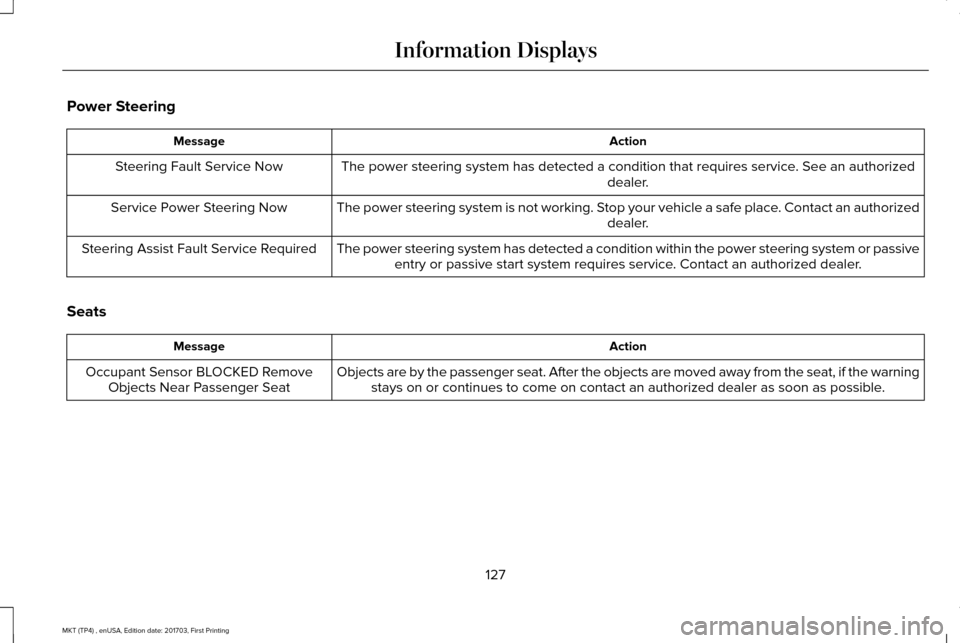
Power Steering
Action
Message
The power steering system has detected a condition that requires service\
. See an authorized dealer.
Steering Fault Service Now
The power steering system is not working. Stop your vehicle a safe place. Contact an authorized dealer.
Service Power Steering Now
The power steering system has detected a condition within the power stee\
ring system or passiveentry or passive start system requires service. Contact an authorized dealer.
Steering Assist Fault Service Required
Seats Action
Message
Objects are by the passenger seat. After the objects are moved away from\
the seat, if the warningstays on or continues to come on contact an authorized dealer as soon as\
possible.
Occupant Sensor BLOCKED Remove
Objects Near Passenger Seat
127
MKT (TP4) , enUSA, Edition date: 201703, First Printing Information Displays
Page 136 of 564
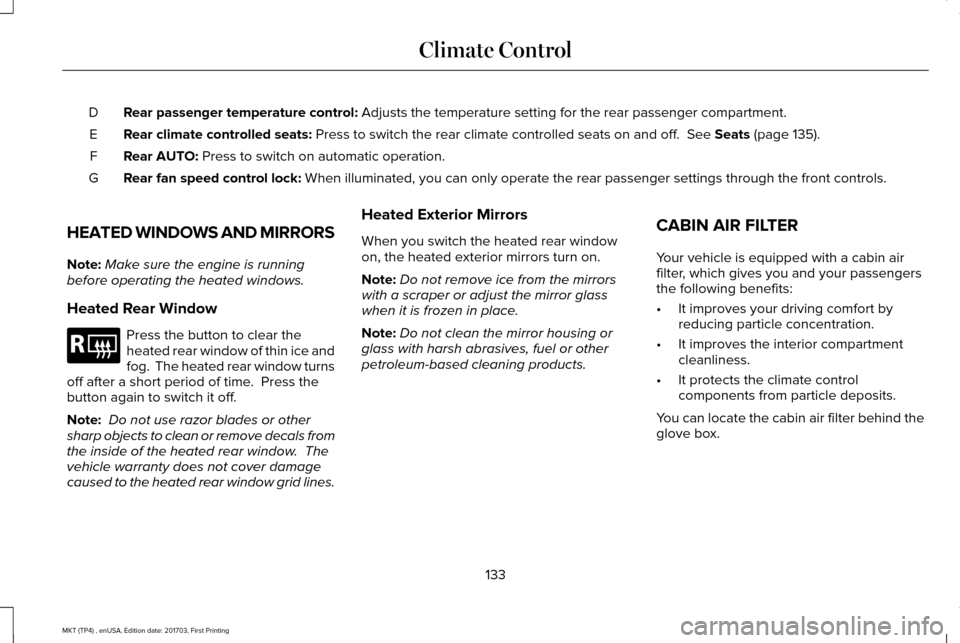
Rear passenger temperature control: Adjusts the temperature setting for the rear passenger compartment.
D
Rear climate controlled seats:
Press to switch the rear climate controlled seats on and off. See Seats (page 135).
E
Rear AUTO:
Press to switch on automatic operation.
F
Rear fan speed control lock:
When illuminated, you can only operate the rear passenger settings thro\
ugh the front controls.
G
HEATED WINDOWS AND MIRRORS
Note: Make sure the engine is running
before operating the heated windows.
Heated Rear Window Press the button to clear the
heated rear window of thin ice and
fog. The heated rear window turns
off after a short period of time. Press the
button again to switch it off.
Note: Do not use razor blades or other
sharp objects to clean or remove decals from
the inside of the heated rear window. The
vehicle warranty does not cover damage
caused to the heated rear window grid lines. Heated Exterior Mirrors
When you switch the heated rear window
on, the heated exterior mirrors turn on.
Note:
Do not remove ice from the mirrors
with a scraper or adjust the mirror glass
when it is frozen in place.
Note: Do not clean the mirror housing or
glass with harsh abrasives, fuel or other
petroleum-based cleaning products. CABIN AIR FILTER
Your vehicle is equipped with a cabin air
filter, which gives you and your passengers
the following benefits:
•
It improves your driving comfort by
reducing particle concentration.
• It improves the interior compartment
cleanliness.
• It protects the climate control
components from particle deposits.
You can locate the cabin air filter behind the
glove box.
133
MKT (TP4) , enUSA, Edition date: 201703, First Printing Climate ControlE184884
Page 139 of 564
WARNINGS
The head restraint is a safety device.
Whenever possible it should be
installed and properly adjusted when the
seat is occupied. An improperly adjusted
head restraint may provide reduced
protection to an occupant during certain rear
impacts Install the head restraint properly to
help minimize the risk of neck injury in
the event of a crash. Note:
Adjust the seatback to an upright
driving position before adjusting the head
restraint. Adjust the head restraint so that
the top of it is level with the top of your head
and as far forward as possible. Make sure
that you remain comfortable. If you are
extremely tall, adjust the head restraint to
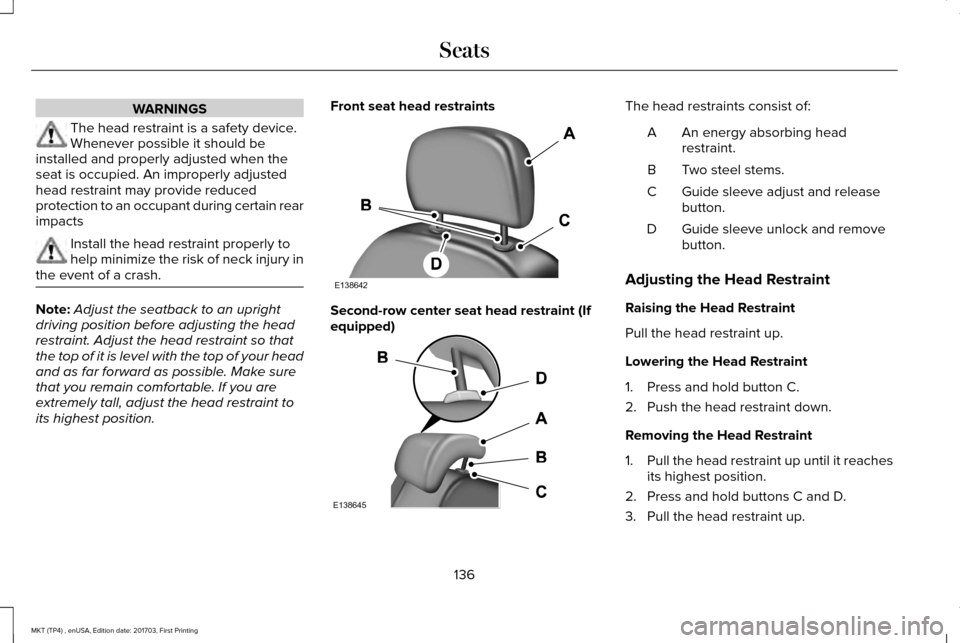
its highest position. Front seat head restraints
Second-row center seat head restraint (If
equipped) The head restraints consist of:
An energy absorbing head
restraint.
A
Two steel stems.
B
Guide sleeve adjust and release
button.
C
Guide sleeve unlock and remove
button.
D
Adjusting the Head Restraint
Raising the Head Restraint
Pull the head restraint up.
Lowering the Head Restraint
1. Press and hold button C.
2. Push the head restraint down.
Removing the Head Restraint
1. Pull the head restraint up until it reaches
its highest position.
2. Press and hold buttons C and D.
3. Pull the head restraint up.
136
MKT (TP4) , enUSA, Edition date: 201703, First Printing SeatsE138642 E138645
Page 140 of 564
Installing the Head Restraint
Align the steel stems into the guide sleeves
and push the head restraint down until it
locks.
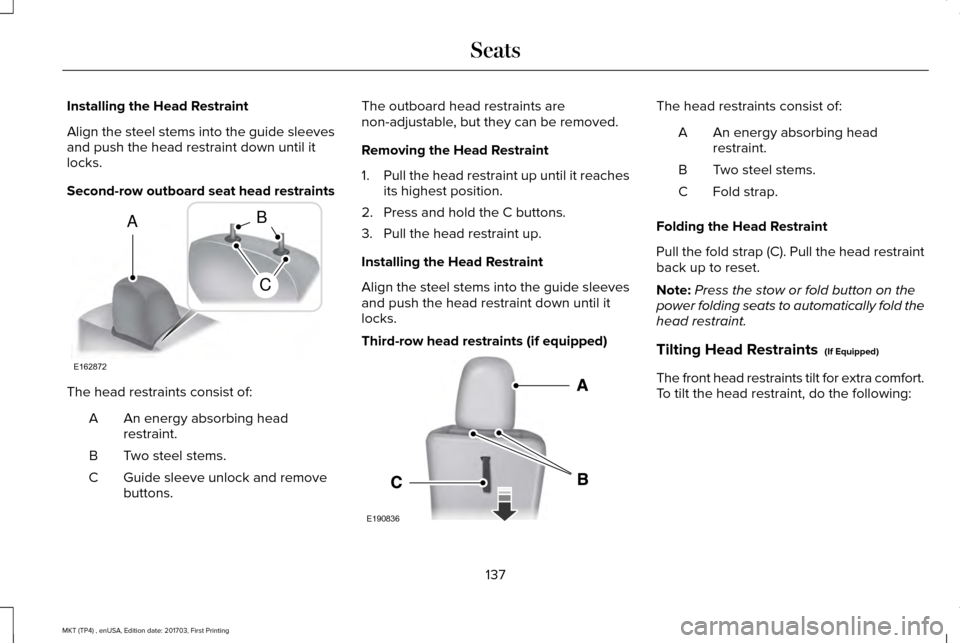
Second-row outboard seat head restraints
The head restraints consist of:
An energy absorbing head
restraint.
A
Two steel stems.
B
Guide sleeve unlock and remove
buttons.
C The outboard head restraints are
non-adjustable, but they can be removed.
Removing the Head Restraint
1.
Pull the head restraint up until it reaches
its highest position.
2. Press and hold the C buttons.
3. Pull the head restraint up.
Installing the Head Restraint
Align the steel stems into the guide sleeves
and push the head restraint down until it
locks.
Third-row head restraints (if equipped) The head restraints consist of:
An energy absorbing head
restraint.
A
Two steel stems.
B
Fold strap.
C
Folding the Head Restraint
Pull the fold strap (C). Pull the head restraint
back up to reset.
Note: Press the stow or fold button on the
power folding seats to automatically fold the
head restraint.
Tilting Head Restraints (If Equipped)
The front head restraints tilt for extra comfort.
To tilt the head restraint, do the following:
137
MKT (TP4) , enUSA, Edition date: 201703, First Printing SeatsE162872
A
C
B E190836
Page 144 of 564
Saving a PreSet Position
1. Switch the ignition on.
2. Adjust the memory features to your
desired position.
3. Press and hold the desired preset button
until you hear a single tone.
You can save up to three preset memory
positions. You can save a memory preset at
any time.
Recalling a PreSet Position
Press and release the preset button
associated with your desired driving position.
The memory features move to the position
stored for that preset.
You can recall a programmed memory
position:
• Only in park (P) or neutral (N) if the
ignition is on.
• In any gearshift position if the ignition is
not on. You can also recall a programmed memory
position by:
•
Pressing your remote control transmitter
unlock button (if the remote control is
programmed to a memory position).
• Unlocking your vehicle with an intelligent
access key (if it is programmed to a
memory position).
Note: Using a linked keyfob to recall your
memory position when the ignition is off
moves the seat to the Easy Entry position.
Note: Adjusting any active memory feature
or pressing a memory switch during a
memory recall cancels the operation.
Linking a PreSet Position to your
Remote Control or Intelligent Access
Key Fob
Your vehicle can save the preset memory
positions for up to two remote controls.
1. With the ignition on, move the memory features to the desired positions. 2.
Press and hold the desired preset button
for about five seconds. A tone sounds
after about two seconds. Continue
holding until you hear a second tone.
3. Within three seconds, press the lock button on the remote control you are
linking.
To unlink a remote control, follow the same
procedure – except in step 3, press the
unlock button on the remote control.
Note: If more than one linked remote control
or intelligent access key is in range, the
memory function moves to the settings of
the first key to initiate a memory recall.
Easy Entry and Exit Feature
This feature adjusts the position of the seat
and steering column to allow easier exit and
entry to the vehicle.
The driver seat automatically moves 2 in
(5 cm) rearward when the transmission is in
park (P) and you remove the key from the
ignition or you switch the ignition off.
141
MKT (TP4) , enUSA, Edition date: 201703, First Printing Seats
Page 147 of 564
Note:
When you switch the ignition off, the
power fold feature works until the battery
saver turns it off after 10 minutes. You can
reactivate the power seats by pressing the
unlock button on the remote entry key fob
or by using the unlock procedure on the
keyless entry keypad. See Doors and Locks
(page 72). Keep the key in the accessory or
run position to prevent the feature from
timing out.
Rear Seat Armrest (Livery) WARNING
Use only soft cups in the cup holders.
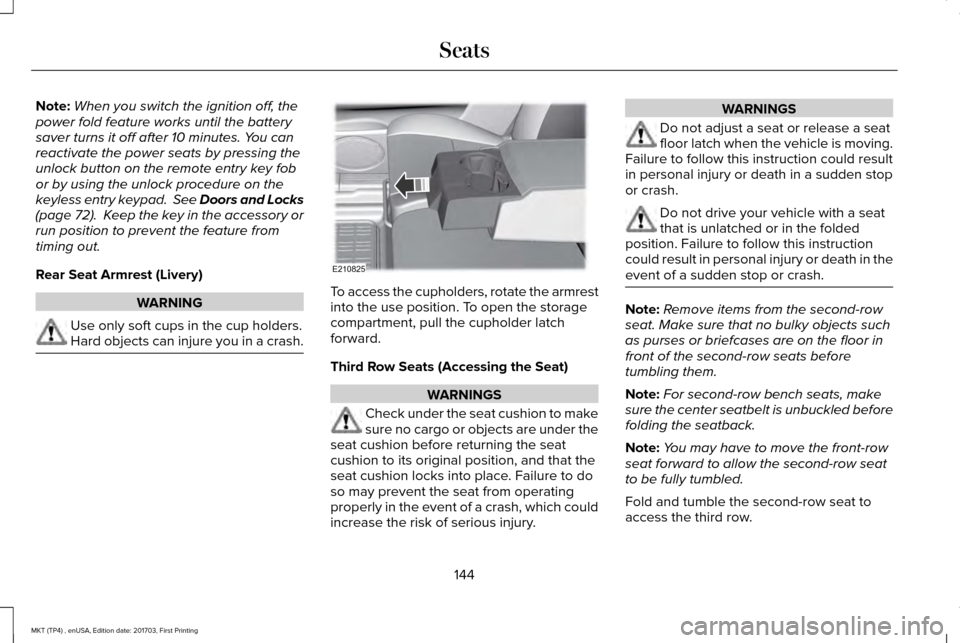
Hard objects can injure you in a crash. To access the cupholders, rotate the armrest
into the use position. To open the storage
compartment, pull the cupholder latch
forward.
Third Row Seats (Accessing the Seat)
WARNINGS
Check under the seat cushion to make
sure no cargo or objects are under the
seat cushion before returning the seat
cushion to its original position, and that the
seat cushion locks into place. Failure to do
so may prevent the seat from operating
properly in the event of a crash, which could
increase the risk of serious injury. WARNINGS
Do not adjust a seat or release a seat
floor latch when the vehicle is moving.
Failure to follow this instruction could result
in personal injury or death in a sudden stop
or crash. Do not drive your vehicle with a seat
that is unlatched or in the folded
position. Failure to follow this instruction
could result in personal injury or death in the
event of a sudden stop or crash. Note:
Remove items from the second-row
seat. Make sure that no bulky objects such
as purses or briefcases are on the floor in
front of the second-row seats before
tumbling them.
Note: For second-row bench seats, make
sure the center seatbelt is unbuckled before
folding the seatback.
Note: You may have to move the front-row
seat forward to allow the second-row seat
to be fully tumbled.
Fold and tumble the second-row seat to
access the third row.
144
MKT (TP4) , enUSA, Edition date: 201703, First Printing SeatsE210825
Page 148 of 564
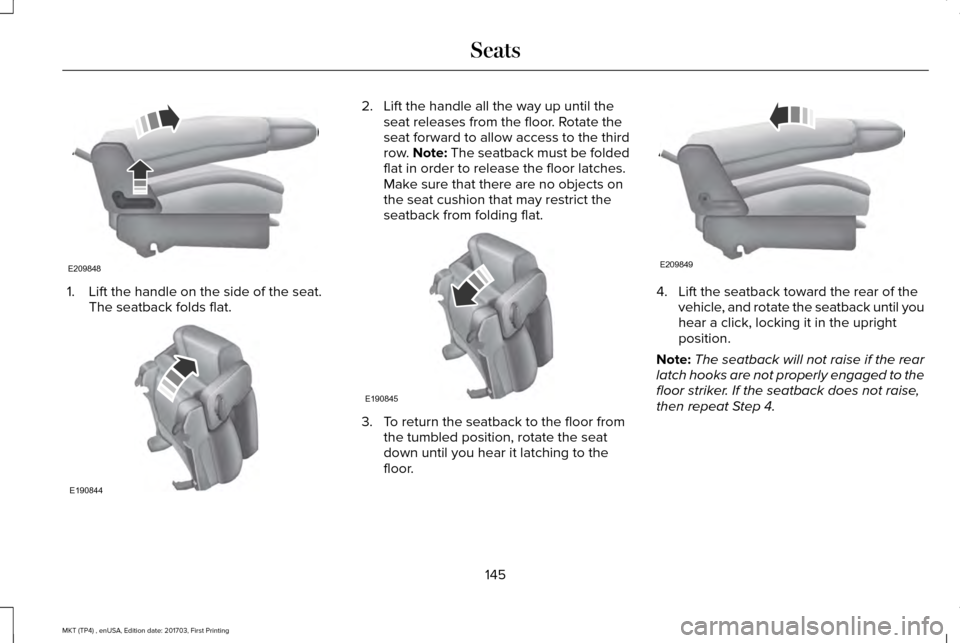
1. Lift the handle on the side of the seat.
The seatback folds flat. 2. Lift the handle all the way up until the
seat releases from the floor. Rotate the
seat forward to allow access to the third
row. Note: The seatback must be folded
flat in order to release the floor latches.
Make sure that there are no objects on
the seat cushion that may restrict the
seatback from folding flat. 3. To return the seatback to the floor from
the tumbled position, rotate the seat
down until you hear it latching to the
floor. 4. Lift the seatback toward the rear of the
vehicle, and rotate the seatback until you
hear a click, locking it in the upright
position.
Note: The seatback will not raise if the rear
latch hooks are not properly engaged to the
floor striker. If the seatback does not raise,
then repeat Step 4.
145
MKT (TP4) , enUSA, Edition date: 201703, First Printing SeatsE209848 E190844 E190845 E209849
Page 149 of 564
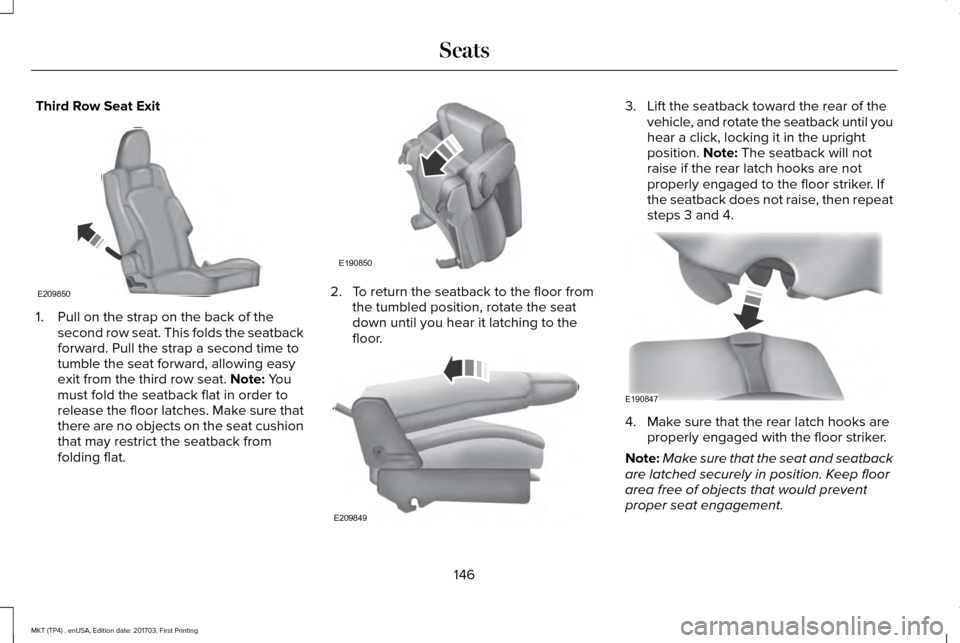
Third Row Seat Exit
1. Pull on the strap on the back of the
second row seat. This folds the seatback
forward. Pull the strap a second time to
tumble the seat forward, allowing easy
exit from the third row seat. Note: You
must fold the seatback flat in order to
release the floor latches. Make sure that
there are no objects on the seat cushion
that may restrict the seatback from
folding flat. 2. To return the seatback to the floor from
the tumbled position, rotate the seat
down until you hear it latching to the
floor. 3. Lift the seatback toward the rear of the
vehicle, and rotate the seatback until you
hear a click, locking it in the upright
position.
Note: The seatback will not
raise if the rear latch hooks are not
properly engaged to the floor striker. If
the seatback does not raise, then repeat
steps 3 and 4. 4. Make sure that the rear latch hooks are
properly engaged with the floor striker.
Note: Make sure that the seat and seatback
are latched securely in position. Keep floor
area free of objects that would prevent
proper seat engagement.
146
MKT (TP4) , enUSA, Edition date: 201703, First Printing SeatsE209850 E190850 E209849 E190847
Page 151 of 564
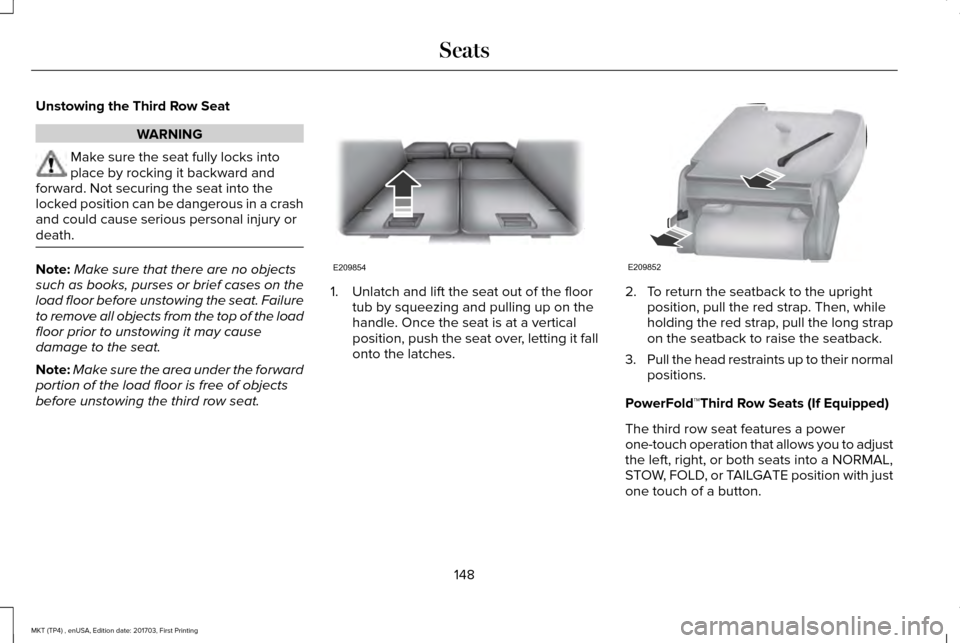
Unstowing the Third Row Seat
WARNING
Make sure the seat fully locks into
place by rocking it backward and
forward. Not securing the seat into the
locked position can be dangerous in a crash
and could cause serious personal injury or
death. Note:
Make sure that there are no objects
such as books, purses or brief cases on the
load floor before unstowing the seat. Failure
to remove all objects from the top of the load
floor prior to unstowing it may cause
damage to the seat.
Note: Make sure the area under the forward
portion of the load floor is free of objects
before unstowing the third row seat. 1. Unlatch and lift the seat out of the floor
tub by squeezing and pulling up on the
handle. Once the seat is at a vertical
position, push the seat over, letting it fall
onto the latches. 2. To return the seatback to the upright
position, pull the red strap. Then, while
holding the red strap, pull the long strap
on the seatback to raise the seatback.
3. Pull the head restraints up to their normal
positions.
PowerFold™Third Row Seats (If Equipped)
The third row seat features a power
one-touch operation that allows you to adjust
the left, right, or both seats into a NORMAL,
STOW, FOLD, or TAILGATE position with just
one touch of a button.
148
MKT (TP4) , enUSA, Edition date: 201703, First Printing SeatsE209854 E209852