warning LINCOLN MKT 2019 Owners Manual
[x] Cancel search | Manufacturer: LINCOLN, Model Year: 2019, Model line: MKT, Model: LINCOLN MKT 2019Pages: 575, PDF Size: 4.66 MB
Page 241 of 575

WARNING: Turning off trailer swaycontrol increases the risk of loss of vehiclecontro")
RV & Trailer Towing Guide Online
http://www.fleet.ford.com/towing-guides/Website
TRAILER SWAY CONTROL (If Equipped)
WARNING: Turning off trailer swaycontrol increases the risk of loss of vehiclecontrol, serious injury or death. Ford doesnot recommend disabling this featureexcept in situations where speed reductionmay be detrimental (such as hill climbing),the driver has significant trailer towingexperience, and can control trailer swayand maintain safe operation.
Note:This feature does not prevent trailersway, but reduces it when it begins.
Note:This feature cannot stop all trailersfrom swaying.
Note:In some cases, if your vehicle speedis too high, the system may turn on multipletimes, gradually reducing your vehicle speed.
The system applies the brakes to theindividual wheels and reduces engine torqueto aid vehicle stability. If the trailer beginsto sway, the stability control warning lampflashes and a message appears in theinformation display. See InformationMessages (page 112). Slow your vehicledown, pull safely to the side of the road andcheck for correct load distribution. See LoadCarrying (page 231).
You can switch this feature off in theinformation display. When you switch theignition on, the system automatically turnson.
RECOMMENDED TOWING
WEIGHTS
Note:Trailer tow is not permitted on allapplications of Livery and Limousine.
Note:Do not exceed the trailer weightfor your vehicle configuration listed inthe chart below.
Note:Make sure to take intoconsideration trailer frontal area. Do notexceed 20 ft² (1.86 m²) if your vehiclecan tow a class I trailer or 40 ft² (3.72m²) if your vehicle can tow a class IIItrailer.
Note:For high altitude operation,reduce the gross combined weight by2% per 1,000 ft (300 m) starting at the1,000 ft (300 m) elevation point.
238
MKT (TP4) , enUSA, Edition date: 201803, Second-Printing
Towing
Page 244 of 575

Distribute the trailer load so 10-15% of thetotal trailer weight is on the tongue.
Weight-Distributing Hitch
WARNING: Do not adjust the springbars so that your vehicle's rear bumper ishigher than before attaching the trailer.Doing so will defeat the function of theweight-distributing hitch, which may causeunpredictable handling, and could resultin serious personal injury.
When hooking-up a trailer using aweight-distributing hitch, always use thefollowing procedure:
1. Park your vehicle, without the trailer, ona level surface.
2. Measure the height of the top of yourvehicle’s front wheel opening on thefender. This is H1.
3.Attach the trailer to your vehicle withoutthe weight-distributing bars connected.
4. Measure the height of the top of yourvehicle’s front wheel opening on thefender a second time. This is H2.
5. Install and adjust the tension in theweight distributing bars so that the heightof the front fender is approximatelyhalfway between H1 and H2.
6.Check that the trailer is level. If not level,adjust the ball height accordingly andrepeat Steps 3–6.
Safety Chains
Note:Never attach safety chains to thebumper.
Always connect the safety chains to the hookretainers of your vehicle hitch.
To connect the safety chains, cross themunder the trailer tongue and allow enoughslack for turning tight corners. Do not allowthe chains to drag on the ground.
Trailer Brakes
WARNING: Do not connect a trailer'shydraulic brake system directly to yourvehicle's brake system. Your vehicle maynot have enough braking power and yourchances of having a collision greatlyincrease.
Electric brakes and manual, automatic orsurge-type trailer brakes are safe if you installthem properly and adjust them to themanufacturer's specifications. The trailerbrakes must meet local and federalregulations.
The rating for the tow vehicle's brakingsystem operation is at the gross vehicleweight rating, not the gross combinedweight rating.
Separate functioning brake systems arerequired for safe control of towed vehiclesand trailers weighing more than 1500 lb(680 kg) when loaded.
241
MKT (TP4) , enUSA, Edition date: 201803, Second-Printing
Towing
Page 245 of 575
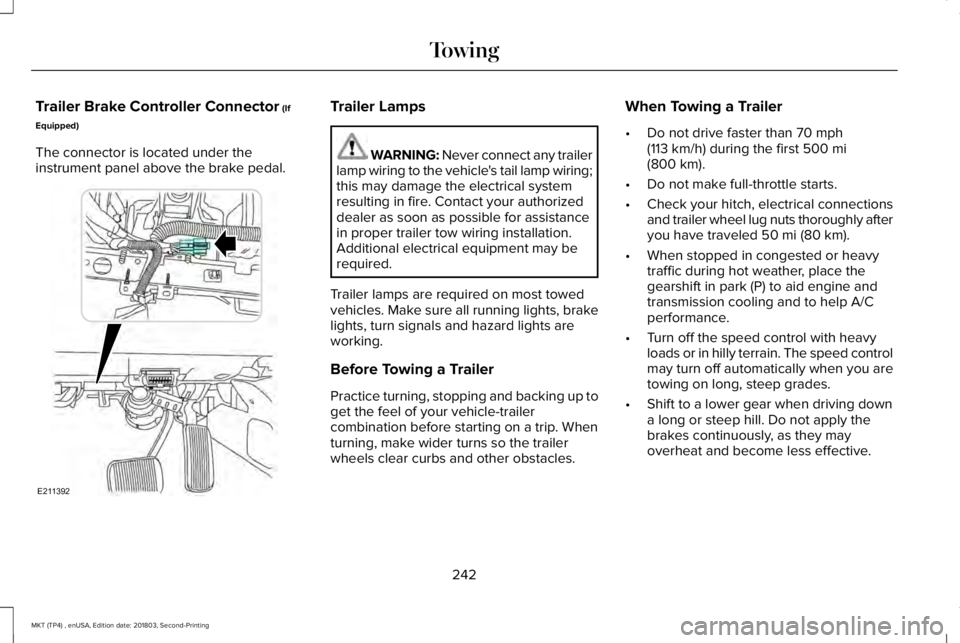
Trailer Brake Controller Connector (If
Equipped)
The connector is located under theinstrument panel above the brake pedal.
Trailer Lamps
WARNING: Never connect any trailerlamp wiring to the vehicle's tail lamp wiring;this may damage the electrical systemresulting in fire. Contact your authorizeddealer as soon as possible for assistancein proper trailer tow wiring installation.Additional electrical equipment may berequired.
Trailer lamps are required on most towedvehicles. Make sure all running lights, brakelights, turn signals and hazard lights areworking.
Before Towing a Trailer
Practice turning, stopping and backing up toget the feel of your vehicle-trailercombination before starting on a trip. Whenturning, make wider turns so the trailerwheels clear curbs and other obstacles.
When Towing a Trailer
•Do not drive faster than 70 mph(113 km/h) during the first 500 mi(800 km).
•Do not make full-throttle starts.
•Check your hitch, electrical connectionsand trailer wheel lug nuts thoroughly afteryou have traveled 50 mi (80 km).
•When stopped in congested or heavytraffic during hot weather, place thegearshift in park (P) to aid engine andtransmission cooling and to help A/Cperformance.
•Turn off the speed control with heavyloads or in hilly terrain. The speed controlmay turn off automatically when you aretowing on long, steep grades.
•Shift to a lower gear when driving downa long or steep hill. Do not apply thebrakes continuously, as they mayoverheat and become less effective.
242
MKT (TP4) , enUSA, Edition date: 201803, Second-Printing
TowingE211392
Page 246 of 575

•If your transmission is equipped with aGrade Assist or Tow/Haul feature, usethis feature when towing. This providesengine braking and helps eliminateexcessive transmission shifting foroptimum fuel economy and transmissioncooling.
•Allow more distance for stopping with atrailer attached. Anticipate stops andbrake gradually.
•Avoid parking on a grade. However, ifyou must park on a grade:
1. Turn the steering wheel to point yourvehicle tires away from traffic flow.
2. Set your vehicle parking brake.
3.Place the automatic transmission in park(P).
4. Place wheel chocks in front and back ofthe trailer wheels. Chocks are notincluded with your vehicle.
Launching or Retrieving a Boat orPersonal Watercraft (PWC)
Note:Disconnect the wiring to the trailerbefore backing the trailer into the water.
Note:Reconnect the wiring to the trailerafter removing the trailer from the water.
When backing down a ramp during boatlaunching or retrieval:
•Do not allow the static water level to riseabove the bottom edge of the rearbumper.
•Do not allow waves to break higher than6 in (15 cm) above the bottom edge ofthe rear bumper.
Exceeding these limits may allow water toenter vehicle components:
•Causing internal damage to thecomponents.
•Affecting driveability, emissions, andreliability.
Any time the rear axle submerges in water,replace the rear axle lubricant. Water maycontaminate the rear axle lubricant, which isnot a normal maintenance inspection itemunless there is a possibility of a leak or otheraxle repair is required.
TOWING THE VEHICLE ON FOUR
WHEELS
Emergency Towing
If your vehicle becomes inoperable (withoutaccess to wheel dollies or vehicle transporttrailer), it can be flat-towed (all wheels on theground, regardless of the powertrain andtransmission configuration) under thefollowing conditions:
•Your vehicle is facing forward for towingin a forward direction.
•Shift into neutral (N). If you cannot shiftthe transmission into neutral (N), you mayneed to override it. See Transmission(page 175).
•Maximum speed is 35 mph (56 km/h).
•Maximum distance is 50 mi (80 km).
WARNING: If your vehicle has asteering wheel lock make sure the ignitionis in the accessory or on position whenbeing towed.
243
MKT (TP4) , enUSA, Edition date: 201803, Second-Printing
Towing
Page 248 of 575
. During thistime, your vehicle may exhibit some unusualdriving characteristics.
Avoid driving too fast during the first 1,00")
BREAKING-IN
You need to break in new tires forapproximately 300 mi (480 km). During thistime, your vehicle may exhibit some unusualdriving characteristics.
Avoid driving too fast during the first 1,000 mi(1,600 km). Vary your speed frequently andchange up through the gears early. Do notlabor the engine.
Do not tow during the first 1,000 mi(1,600 km).
ECONOMICAL DRIVING
Fuel economy is affected by several thingssuch as how you drive, the conditions youdrive under and how you maintain yourvehicle.
There are some things to keep in mind thatmay improve your fuel economy:
•Accelerate and slow down in a smooth,moderate fashion.
•Drive at steady speeds.
•Anticipate stops; slowing down mayeliminate the need to stop.
•Combine errands and minimizestop-and-go driving (When runningerrands, go to the furthest destinationfirst and then work your way back home).
•Close the windows for high-speeddriving.
•Drive at reasonable speeds.
•Keep the tires properly inflated and useonly the recommended size.
•Use the recommended engine oil.
•Perform all regularly scheduledmaintenance.
There are also some things you may want toavoid doing because they reduce your fueleconomy:
•Avoid sudden or hard accelerations.
•Avoid revving the engine before turningoff the car.
•Avoid long idle periods.
•Do not warm up your vehicle on coldmornings.
•Reduce the use of air conditioning andheat.
•Avoid using speed control in hilly terrain.
•Do not rest your foot on the brake pedalwhile driving.
•Avoid carrying unnecessary weight.
•Avoid adding particular accessories toyour vehicle (e.g. bug deflectors,rollbars/light bars, running boards, skiracks).
•Avoid driving with the wheels out ofalignment.
DRIVING THROUGH WATER
WARNING: Do not drive throughflowing or deep water as you may losecontrol of your vehicle.
Note:Driving through standing water cancause vehicle damage.
Note:Engine damage can occur if waterenters the air filter.
245
MKT (TP4) , enUSA, Edition date: 201803, Second-Printing
Driving Hints
Page 249 of 575

Before driving through standing water, checkthe depth. Never drive through water that ishigher than the bottom of the front rockerarea of your vehicle.
When driving through standing water, drivevery slowly and do not stop your vehicle. Your brake performance and traction maybe limited. After driving through water andas soon as it is safe to do so:
•Lightly press the brake pedal to dry thebrakes and to check that they work.
•Check that the horn works.
•Check that the exterior lights work.
•Turn the steering wheel to check that thesteering power assist works.
FLOOR MATS
WARNING: Use a floor mat designedto fit the footwell of your vehicle that doesnot obstruct the pedal area. Failure tofollow this instruction could result in theloss of control of your vehicle, personalinjury or death.
WARNING: Pedals that cannot movefreely can cause loss of vehicle control andincrease the risk of serious personal injury.
WARNING: Secure the floor mat toboth retention devices so that it cannot slipout of position and interfere with thepedals. Failure to follow this instructioncould result in the loss of control of yourvehicle, personal injury or death.
WARNING: Do not place additionalfloor mats or any other covering on top ofthe original floor mats. This could result inthe floor mat interfering with the operationof the pedals. Failure to follow thisinstruction could result in the loss ofcontrol of your vehicle, personal injury ordeath.
WARNING: Always make sure thatobjects cannot fall into the driver foot wellwhile your vehicle is moving. Objects thatare loose can become trapped under thepedals causing a loss of vehicle control.
246
MKT (TP4) , enUSA, Edition date: 201803, Second-Printing
Driving HintsE259345 E142666
Page 252 of 575
. To obtain reimbursementin")
If you need to arrange roadside assistancefor yourself, Lincoln Motor Companyreimburses a reasonable amount for towingto the nearest Lincoln dealership within100 mi (160 km). To obtain reimbursementinformation, United States clients, call1-800-521-4140. Clients need to submit theiroriginal receipts.
Vehicles Sold in Canada: GettingRoadside Assistance
To fully assist you should you have a vehicleconcern, Lincoln Motor Company of Canada,Limited offers a complimentary roadsideassistance program. This program is eligiblewithin Canada or the continental UnitedStates.
The service is available 24 hours a day,seven days a week.
This program is separate from the NewVehicle Limited Warranty, but the coverageis concurrent with the powertrain coverageperiod of your vehicle. Canadian roadsidecoverage and benefits may differ from theU.S. coverage.
If you require more information, please callus in Canada at 1-800-387-9333, or visit ourwebsite at www.lincolncanada.com.
HAZARD FLASHERS
Note:The hazard flashers operate when theignition is in any position, or if the key is notin the ignition. If used when the vehicle is notrunning, the battery loses charge. As a result,there may be insufficient power to restartyour vehicle.
The flasher control is on theinstrument panel. Use your hazardflashers when your vehicle iscreating a safety hazard for other motorists.
•Press the flasher control and all front andrear direction indicators flash.
•Press the button again to switch them off.
FUEL SHUTOFF
WARNING: If your vehicle has beeninvolved in a crash, have the fuel systemchecked. Failure to follow this instructioncould result in fire, personal injury or death.
Note: When you try to restart your vehicleafter a fuel shutoff, the vehicle makes surethat various systems are safe to restart. Once the vehicle determines the systemsare safe, then the vehicle allows you torestart.
Note: In the event that your vehicle doesnot restart after your third attempt, contacta qualified technician.
The fuel pump shutoff stops the flow of fuelto the engine in the event of a moderate tosevere crash. Not every impact causes ashutoff.
Should your vehicle shut off after a crash,you may restart your vehicle.
249
MKT (TP4) , enUSA, Edition date: 201803, Second-Printing
Roadside Emergencies
Page 253 of 575

1. Press START/STOP to switch off yourvehicle.
2.Press the brake pedal and START/STOPto switch on your vehicle.
3. Remove your foot from the brake pedaland press START/STOP to switch offyour vehicle.
4. You can attempt to start the vehicle bypressing the brake pedal andSTART/STOP, or press START/STOPwithout pressing the brake pedal.
JUMP STARTING THE VEHICLE
WARNING: Batteries normallyproduce explosive gases which can causepersonal injury. Therefore, do not allowflames, sparks or lighted substances tocome near the battery. When working nearthe battery, always shield your face andprotect your eyes. Always provide correctventilation.
WARNING: Keep batteries out ofreach of children. Batteries contain sulfuricacid. Avoid contact with skin, eyes orclothing. Shield your eyes when workingnear the battery to protect against possiblesplashing of acid solution. In case of acidcontact with skin or eyes, flush immediatelywith water for a minimum of 15 minutes andget prompt medical attention. If acid isswallowed, call a physician immediately.
WARNING: Use only adequatelysized cables with insulated clamps.
Preparing Your Vehicle
Do not attempt to push-start your automatictransmission vehicle.
Note:Attempting to push-start a vehicle withan automatic transmission may causetransmission damage.
Note:Use only a 12-volt supply to start yourvehicle.
Note:Do not disconnect the battery of thedisabled vehicle as this could damage thevehicle electrical system.
Park the booster vehicle close to the hoodof the disabled vehicle, making sure the twovehicles do not touch.
Connecting the Jumper Cables
WARNING: Do not attach the cablesto fuel lines, engine rocker covers, theintake manifold or electrical componentsas grounding points. Stay clear of movingparts. To avoid reverse polarityconnections, make sure that you correctlyidentify the positive (+) and negative (-)terminals on both the disabled and boostervehicles before connecting the cables.
WARNING: Do not attach the end ofthe positive cable to the studs or L-shapedeyelet located above the positive (+)terminal of your vehicle’s battery. Highcurrent may flow through and causedamage to the fuses.
250
MKT (TP4) , enUSA, Edition date: 201803, Second-Printing
Roadside Emergencies
Page 254 of 575
terminal of the battery to be jumped. Aspark may cause an explosion of the gasesthat surround the battery.
Note:In the illustratio")
WARNING: Do not connect the endof the second cable to the negative (-)terminal of the battery to be jumped. Aspark may cause an explosion of the gasesthat surround the battery.
Note:In the illustration, the bottom vehiclerepresents the booster vehicle.
1. Connect the positive (+) jumper cable tothe positive (+) terminal of the dischargedbattery.
2.Connect the other end of the positive (+)cable to the positive (+) terminal of thebooster vehicle battery.
3. Connect the negative (-) cable to thenegative (-) terminal of the boostervehicle battery.
4.Make the final connection of the negative(-) cable to an exposed metal part of thestalled vehicle's engine, away from thebattery and the fuel injection system, orconnect the negative (-) cable to a groundconnection point if available.
Jump Starting
1. Start the engine of the booster vehicleand rev the engine moderately, or pressthe accelerator gently to keep yourengine speed between 2000 and 3000RPM, as shown in your tachometer.
2. Start the engine of the disabled vehicle.
3. Once the disabled vehicle has beenstarted, run both vehicle engines for anadditional three minutes beforedisconnecting the jumper cables.
251
MKT (TP4) , enUSA, Edition date: 201803, Second-Printing
Roadside Emergencies4
2
1
3
E142664
Page 265 of 575

FUSE SPECIFICATION CHART
Power Distribution Box
WARNING: Always disconnect thebattery before servicing high current fuses.
WARNING: To reduce risk ofelectrical shock, always replace the coverto the power distribution box beforereconnecting the battery or refilling fluidreservoirs.
The power distribution box is in the enginecompartment. It has high-current fuses thatprotect the vehicle's main electrical systemsfrom overloads.
If you disconnect and reconnect the battery,you will need to reset some features. SeeChanging the 12V Battery (page 295).
262
MKT (TP4) , enUSA, Edition date: 201803, Second-Printing
FusesE173618
97
98
77 96
95
94
93 92 91 90 89
88
66
44 78
56
39 26 18 1617
3 12
456789
192021222324
2728293031 40414243 55
575859606162636465 798081828384858687
67
45
32
10111213
333435
464748495051
6869707172
74
73
76
75
53
37 36
54
38
25
15
1452