LINCOLN MKX 2018 Owners Manual
Manufacturer: LINCOLN, Model Year: 2018, Model line: MKX, Model: LINCOLN MKX 2018Pages: 603, PDF Size: 4.94 MB
Page 371 of 603
USING SNOW CHAINS
WARNING
Snow tires must be the same size, loadindex, and speed rating as thoseoriginally provided by Ford. Use of any tireor wheel not recommended by Ford canaffect the safety and performance of yourvehicle, which could result in an increasedrisk of loss of vehicle control, vehicle rollover,personal injury, and death. Additionally, theuse of non-recommended tires and wheelscould cause steering, suspension, axle,transfer case, or power transfer unit failure.It is also strongly advised to follow the Fordrecommended tire inflation pressure foundon the Safety Compliance Certification Label(affixed to either the door hinge pillar,door-latch post, or the door edge that meetsthe door-latch post, next to the driver’sseating position), or Tire Label which islocated on the B-Pillar or the edge of thedriver door. Failure to follow the tire pressurerecommendations can cause uneventreadwear patterns and adversely affect theway your vehicle handles.
The tires on your vehicle may haveall-weather treads to provide traction in rainand snow. However, in some climates youmay need to use snow chains.
Your vehicle may not be compatible withsnow chain or cable usage with thefactory-fitted wheels and tires. Only certainchains or snow cables have been approvedby Ford as safe for use on your vehicle withthe following wheel and tire combination(s):18x8.0 wheels with 235/60R18 tires. Youshould only install chains or cables sized at10 mm or less in dimension as measured onthe sidewall of your tire. Not all S-class snowchains meet these restrictions. Chains of thissize restriction will include a tensioningdevice. The chains should be mounted inpairs on the front tires only. If you need touse chains, it is recommended that steelwheels (of the same size and specification)be used, as chains may chip aluminumwheels.
Follow these guidelines when using tractiondevices:
•If possible, avoid fully loading yourvehicle
•Purchase chains or cables from amanufacturer that clearly labels body totire dimension restrictions.
•When driving with snow chains or cables,do not exceed 30 mph (48 km/h) or themaximum speed recommended by thechain manufacturer; whichever is less.
•Drive cautiously. If you hear the chainsor cables rub or bang against the vehicle,stop and retighten them. If this does notwork, remove the chains or cables andprevent vehicle damage.
•Remove the chains or cables when theyare no longer needed. Do not use thechains or cables on dry roads.
•If a temporary spare tire is mounted onyour vehicle, do not use snow chains onthe axle with the temporary spare tire.
If you have any questions regarding snowtires or snow chains, please contact yourauthorized dealer.
368
MKX (CD9) Canada/United States of America, enUSA, Edition date: 201707, First Printing
Wheels and Tires
Page 372 of 603
TIRE PRESSURE MONITORING
SYSTEM
WARNING
The tire pressure monitoring system isnot a substitute for manually checkingtire pressures. You should periodically checktire pressures using a pressure gauge.Failure to correctly maintain tire pressurescould increase the risk of tire failure, loss ofcontrol, vehicle rollover and personal injury.
Note: You should only use tire sealants inroadside emergencies as they may causedamage to the tire pressure monitoringsystem sensor.
Note: If the tire pressure monitoring systemsensor becomes damaged, it may notfunction.
Each tire, including the spare (ifprovided), should be checkedmonthly when cold and inflated tothe inflation pressure recommended by thevehicle manufacturer on the vehicle placardor tire inflation pressure label. (If your vehiclehas tires of a different size than the sizeindicated on the vehicle placard or tireinflation pressure label, you shoulddetermine the proper tire inflation pressurefor those tires).
As an added safety feature, your vehicle hasbeen equipped with a Tire PressureMonitoring System (TPMS) that illuminates alow tire pressure telltale when one or moreof your tires is significantly under-inflated.Accordingly, when the low tire pressuretelltale illuminates, you should stop andcheck your tires as soon as possible, andinflate them to the proper pressure. Drivingon a significantly under-inflated tire causesthe tire to overheat and can lead to tirefailure. Under-inflation also reduces fuelefficiency and tire tread life, and may affectthe vehicle’s handling and stopping ability.
Please note that the TPMS is not a substitutefor proper tire maintenance, and it is thedriver’s responsibility to maintain correct tirepressure, even if under-inflation has notreached the level to trigger illumination ofthe TPMS low tire pressure telltale.
Your vehicle has also been equipped with aTPMS malfunction indicator to indicate whenthe system is not operating properly. TheTPMS malfunction indicator is combined withthe low tire pressure telltale. When thesystem detects a malfunction, the telltale willflash for approximately one minute and thenremain continuously illuminated. Thissequence will continue upon subsequentvehicle start-ups as long as the malfunctionexists.
When the malfunction indicator is illuminated,the system may not be able to detect orsignal low tire pressure as intended. TPMSmalfunctions may occur for a variety ofreasons, including the installation ofreplacement or alternate tires or wheels onthe vehicle that prevent the TPMS from
369
MKX (CD9) Canada/United States of America, enUSA, Edition date: 201707, First Printing
Wheels and Tires
Page 373 of 603
functioning properly. Always check the TPMSmalfunction telltale after replacing one ormore tires or wheels on your vehicle toensure that the replacement or alternate tiresand wheels allow the TPMS to continue tofunction properly.
This device complies with Part 15 of the FCCRules and with License exempt RSSStandards of Industry Canada. Operation issubject to the following two conditions:
1. This device may not cause harmfulinterference, and
2.This device must accept any interferencereceived, including interference that maycause undesired operation.
Note:Changes or modifications notexpressively approved by the partyresponsible for compliance could void theuser's authority to operate the equipment.The term "IC:" before the radio certificationnumber only signifies that Industry Canadatechnical specifications were met.
Changing Tires With a Tire PressureMonitoring System
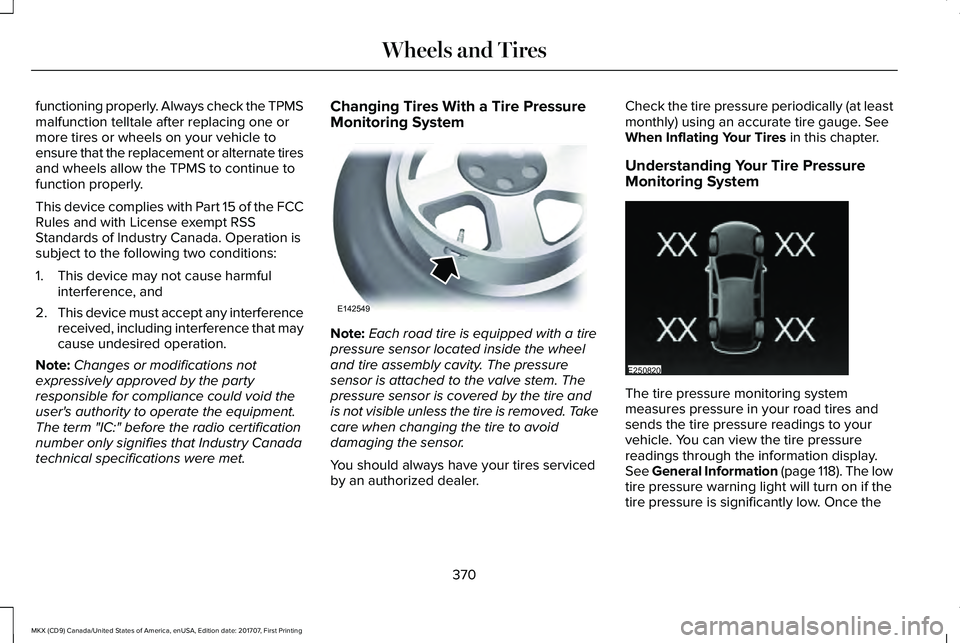
Note:Each road tire is equipped with a tirepressure sensor located inside the wheeland tire assembly cavity. The pressuresensor is attached to the valve stem. Thepressure sensor is covered by the tire andis not visible unless the tire is removed. Takecare when changing the tire to avoiddamaging the sensor.
You should always have your tires servicedby an authorized dealer.
Check the tire pressure periodically (at leastmonthly) using an accurate tire gauge. SeeWhen Inflating Your Tires in this chapter.
Understanding Your Tire PressureMonitoring System
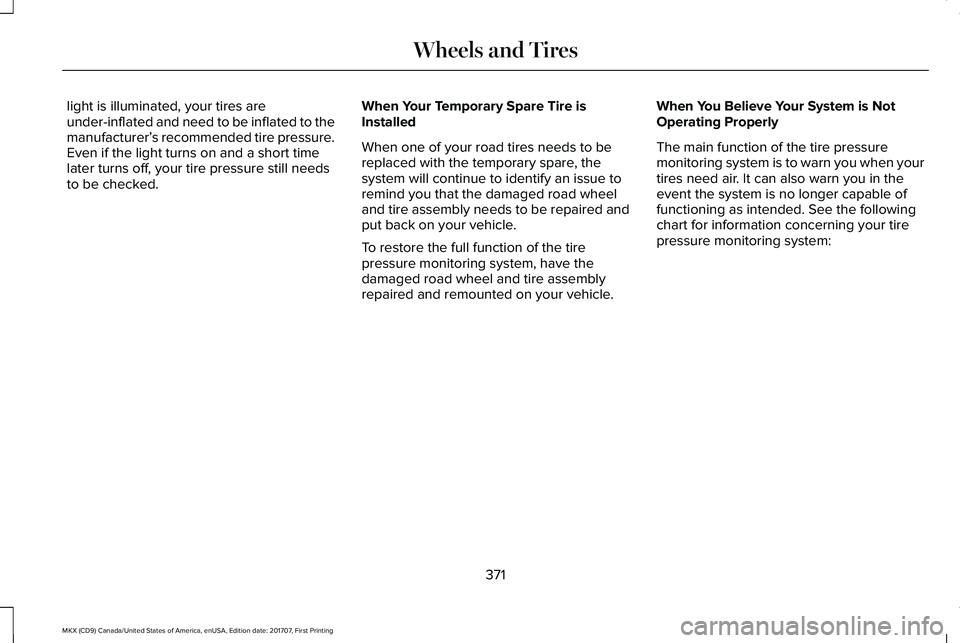
The tire pressure monitoring systemmeasures pressure in your road tires andsends the tire pressure readings to yourvehicle. You can view the tire pressurereadings through the information display.See General Information (page 118). The lowtire pressure warning light will turn on if thetire pressure is significantly low. Once the
370
MKX (CD9) Canada/United States of America, enUSA, Edition date: 201707, First Printing
Wheels and TiresE142549 E250820
Page 374 of 603
light is illuminated, your tires areunder-inflated and need to be inflated to themanufacturer’s recommended tire pressure.Even if the light turns on and a short timelater turns off, your tire pressure still needsto be checked.
When Your Temporary Spare Tire isInstalled
When one of your road tires needs to bereplaced with the temporary spare, thesystem will continue to identify an issue toremind you that the damaged road wheeland tire assembly needs to be repaired andput back on your vehicle.
To restore the full function of the tirepressure monitoring system, have thedamaged road wheel and tire assemblyrepaired and remounted on your vehicle.
When You Believe Your System is NotOperating Properly
The main function of the tire pressuremonitoring system is to warn you when yourtires need air. It can also warn you in theevent the system is no longer capable offunctioning as intended. See the followingchart for information concerning your tirepressure monitoring system:
371
MKX (CD9) Canada/United States of America, enUSA, Edition date: 201707, First Printing
Wheels and Tires
Page 375 of 603
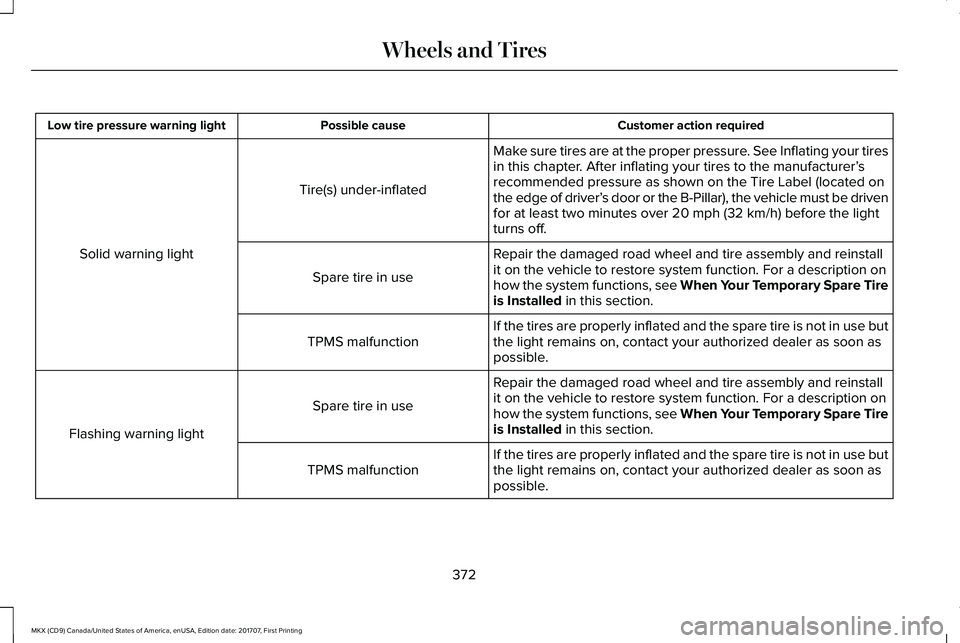
Customer action requiredPossible causeLow tire pressure warning light
Make sure tires are at the proper pressure. See Inflating your tiresin this chapter. After inflating your tires to the manufacturer’srecommended pressure as shown on the Tire Label (located onthe edge of driver’s door or the B-Pillar), the vehicle must be drivenfor at least two minutes over 20 mph (32 km/h) before the lightturns off.
Tire(s) under-inflated
Solid warning lightRepair the damaged road wheel and tire assembly and reinstallit on the vehicle to restore system function. For a description onhow the system functions, see When Your Temporary Spare Tireis Installed in this section.
Spare tire in use
If the tires are properly inflated and the spare tire is not in use butthe light remains on, contact your authorized dealer as soon aspossible.TPMS malfunction
Repair the damaged road wheel and tire assembly and reinstallit on the vehicle to restore system function. For a description onhow the system functions, see When Your Temporary Spare Tireis Installed in this section.
Spare tire in use
Flashing warning light
If the tires are properly inflated and the spare tire is not in use butthe light remains on, contact your authorized dealer as soon aspossible.TPMS malfunction
372
MKX (CD9) Canada/United States of America, enUSA, Edition date: 201707, First Printing
Wheels and Tires
Page 376 of 603
When Inflating Your Tires
WARNING
Do not use the tire pressure displayedin the information display as a tirepressure gauge. Failure to follow thisinstruction could result in personal injury ordeath.
When putting air into your tires (such as at agas station or in your garage), the tirepressure monitoring system may not respondimmediately to the air added to your tires.
It may take up to two minutes of driving over20 mph (32 km/h) for the light to turn off afteryou have filled your tires to therecommended inflation pressure.
How Temperature Affects Your TirePressure
The tire pressure monitoring system monitorstire pressure in each pneumatic tire. Whiledriving in a normal manner, a typicalpassenger tire inflation pressure mayincrease about 2–4 psi (14–28 kPa) from acold start situation. If the vehicle is stationary
overnight with the outside temperaturesignificantly lower than the daytimetemperature, the tire pressure may decreaseabout 3 psi (21 kPa) for a drop of 30°F (17°C)in ambient temperature. This lower pressurevalue may be detected by the tire pressuremonitoring system as being significantlylower than the recommended inflationpressure and activate the system warninglight for low tire pressure. If the low tirepressure warning light is on, visually checkeach tire to verify that no tire is flat. If one ormore tires are flat, repair as necessary.Check the air pressure in the road tires. Ifany tire is under-inflated, carefully drive thevehicle to the nearest location where air canbe added to the tires. Inflate all the tires tothe recommended inflation pressure.
CHANGING A ROAD WHEEL (If
Equipped)
WARNINGS
Do not use tire sealants as they maydamage the tire pressure monitoringsystem.
WARNINGS
If the tire pressure monitor sensorbecomes damaged it may not function.
Note:The use of tire sealant may damageyour tire pressure monitoring system andshould only be used in roadsideemergencies. If you must use a sealant, usethe Lincoln Tire Mobility Kit sealant. The tirepressure monitoring system sensor andvalve stem on the wheel must be replacedby an authorized dealer after use of thesealant.
Note:The tire pressure monitoring systemindicator light will illuminate when the sparetire is in use. To restore the full function ofthe monitoring system, all road wheelsequipped with tire pressure monitoringsensors must be mounted on the vehicle.
If you get a flat tire while driving, do not applythe brake heavily. Instead, graduallydecrease your speed. Hold the steeringwheel firmly and slowly move to a safe placeon the side of the road.
373
MKX (CD9) Canada/United States of America, enUSA, Edition date: 201707, First Printing
Wheels and Tires
Page 377 of 603
Have a flat serviced by an authorized dealerin order to prevent damage to the tirepressure monitoring system sensors. SeeTire Pressure Monitoring System (page 369).Replace the spare tire with a road tire assoon as possible. During repairing orreplacing of the flat tire, have an authorizeddealer inspect the tire pressure monitoringsystem sensor for damage.
Dissimilar Spare Wheel and TireAssembly Information
WARNING
Failure to follow these guidelines couldresult in an increased risk of loss ofvehicle control, injury or death.
If you have a dissimilar spare wheel and tire,then it is intended for temporary use only.This means that if you need to use it, youshould replace it as soon as possible with aroad wheel and tire assembly that is thesame size and type as the road tires andwheels that were originally provided by Ford.If the dissimilar spare tire or wheel isdamaged, it should be replaced rather thanrepaired.
A dissimilar spare wheel and tire assemblyis defined as a spare wheel and tire assemblythat is different in brand, size or appearancefrom the road tires and wheels and can beone of three types:
1. T-type mini-spare: This spare tire beginswith the letter T for tire size and may haveTemporary Use Only molded in the sidewall.
2. Full-size dissimilar spare with label onwheel: This spare tire has a label on thewheel that states: THIS WHEEL AND TIREASSEMBLY FOR TEMPORARY USE ONLY.
When driving with one of the dissimilar sparetires listed above, do not:
•Exceed 50 mph (80 km/h).
•Load the vehicle beyond maximumvehicle load rating listed on the SafetyCompliance Label.
•Tow a trailer.
•Use snow chains on the end of thevehicle with the dissimilar spare tire.
•Use more than one dissimilar spare tireat a time.
•Use commercial car washing equipment.
•Try to repair the dissimilar spare tire.
Use of one of the dissimilar spare tires listedabove at any one wheel location can lead toimpairment of the following:
•Handling, stability and brakingperformance.
•Comfort and noise.
•Ground clearance and parking at curbs.
•Winter weather driving capability.
•Wet weather driving capability.
•All-wheel driving capability (if applicable).
3. Full-size dissimilar spare without labelon wheel
374
MKX (CD9) Canada/United States of America, enUSA, Edition date: 201707, First Printing
Wheels and Tires
Page 378 of 603
When driving with the full-size dissimilarspare wheel and tire assembly, do not:
•Exceed 70 mph (113 km/h).
•Use more than one dissimilar sparewheel and tire assembly at a time.
•Use commercial car washing equipment.
•Use snow chains on the end of thevehicle with the dissimilar spare wheeland tire assembly.
The usage of a full-size dissimilar sparewheel and tire assembly can lead toimpairment of the following:
•Handling, stability and brakingperformance.
•Comfort and noise.
•Ground clearance and parking at curbs.
•Winter weather driving capability.
•Wet weather driving capability.
•All-wheel driving capability.
When driving with the full-size dissimilarspare wheel and tire assembly additionalcaution should be given to:
•Towing a trailer.
•Driving vehicles equipped with a camperbody.
•Driving vehicles with a load on the cargorack.
Drive cautiously when using a full-sizedissimilar spare wheel and tire assembly andseek service as soon as possible.
Tire Change Procedure
WARNINGS
When one of the front wheels is off theground, the transmission alone will notprevent the vehicle from moving or slippingoff the jack, even if the transmission is in park(P).
WARNINGS
To help prevent your vehicle frommoving when changing a wheel, shiftthe transmission into park (P), set the parkingbrake and use an appropriate block or wheelchock to secure the wheel diagonallyopposite to the wheel being changed. Forexample, when changing the front left wheel,place an appropriate block or wheel chockon the right rear wheel.
No person should place any portion oftheir body under a vehicle that issupported by a jack.
Do not attempt to change a tire on theside of the vehicle close to movingtraffic. Pull far enough off the road to avoidthe danger of being hit when operating thejack or changing the wheel.
Always use the jack provided asoriginal equipment with your vehicle.If using a jack other than the one provided,make sure the jack capacity is adequate forthe vehicle weight, including any vehiclecargo or modifications. If you are unsure ifthe jack capacity is adequate, contact theauthorized dealer.
375
MKX (CD9) Canada/United States of America, enUSA, Edition date: 201707, First Printing
Wheels and Tires
Page 379 of 603
Note:Passengers should not remain in yourvehicle when the vehicle is being jacked.
1. Park on a level surface, set the parkingbrake and activate the hazard flashers.
2. Place the transmission in park (P) andturn the engine off.
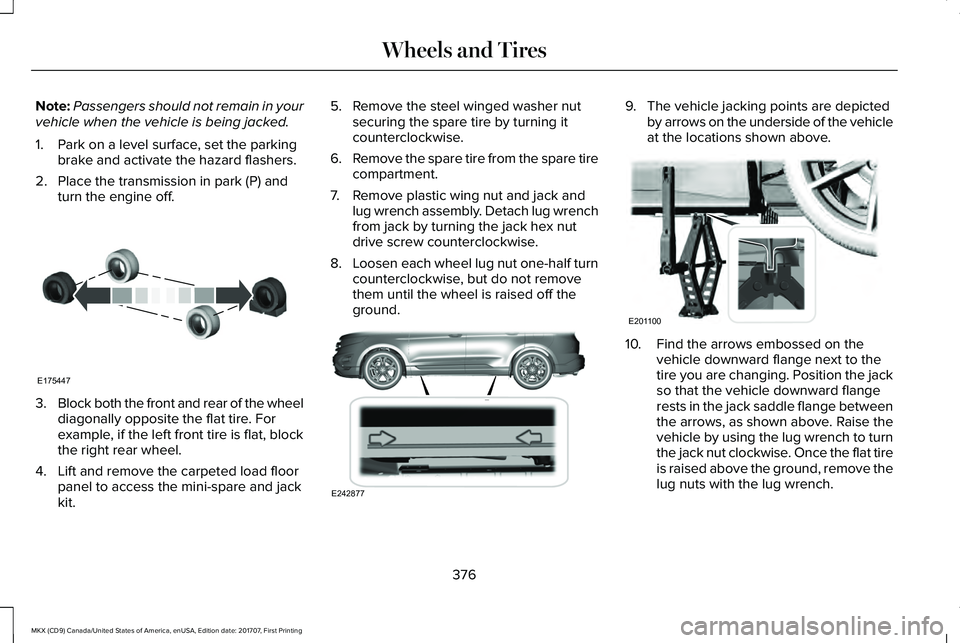
3.Block both the front and rear of the wheeldiagonally opposite the flat tire. Forexample, if the left front tire is flat, blockthe right rear wheel.
4. Lift and remove the carpeted load floorpanel to access the mini-spare and jackkit.
5. Remove the steel winged washer nutsecuring the spare tire by turning itcounterclockwise.
6.Remove the spare tire from the spare tirecompartment.
7. Remove plastic wing nut and jack andlug wrench assembly. Detach lug wrenchfrom jack by turning the jack hex nutdrive screw counterclockwise.
8.Loosen each wheel lug nut one-half turncounterclockwise, but do not removethem until the wheel is raised off theground.
9. The vehicle jacking points are depictedby arrows on the underside of the vehicleat the locations shown above.
10. Find the arrows embossed on thevehicle downward flange next to thetire you are changing. Position the jackso that the vehicle downward flangerests in the jack saddle flange betweenthe arrows, as shown above. Raise thevehicle by using the lug wrench to turnthe jack nut clockwise. Once the flat tireis raised above the ground, remove thelug nuts with the lug wrench.
376
MKX (CD9) Canada/United States of America, enUSA, Edition date: 201707, First Printing
Wheels and TiresE175447 E242877 E201100
Page 380 of 603
11.Replace the flat tire with the spare tire,making sure the valve stem is facingoutward. Reinstall the lug nuts until thewheel is snug against the hub. Do notfully tighten the lug nuts until the wheelhas been lowered.
12. Lower the wheel by turning the jackhandle counterclockwise.
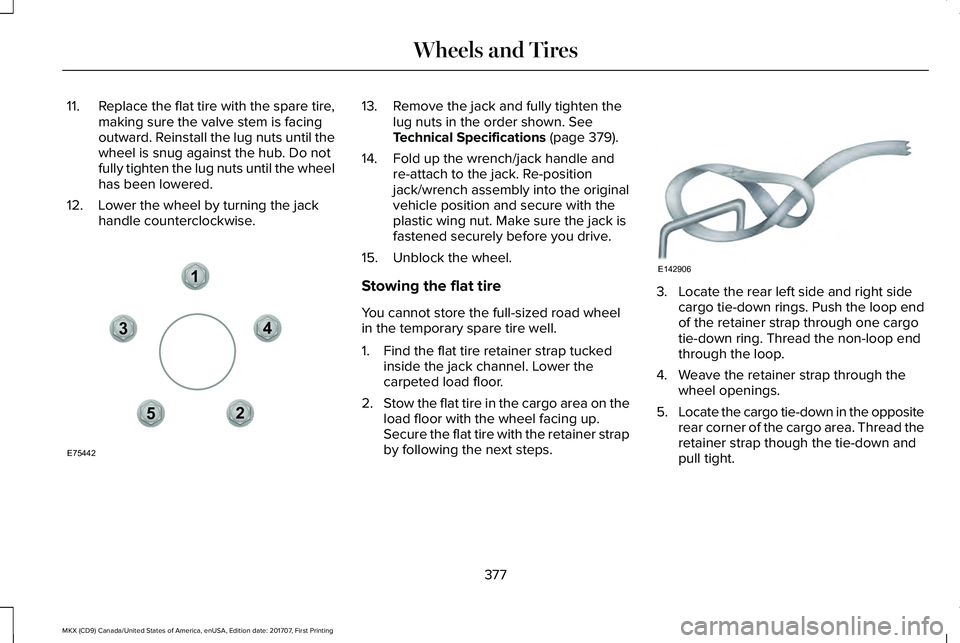
13. Remove the jack and fully tighten thelug nuts in the order shown. SeeTechnical Specifications (page 379).
14. Fold up the wrench/jack handle andre-attach to the jack. Re-positionjack/wrench assembly into the originalvehicle position and secure with theplastic wing nut. Make sure the jack isfastened securely before you drive.
15. Unblock the wheel.
Stowing the flat tire
You cannot store the full-sized road wheelin the temporary spare tire well.
1. Find the flat tire retainer strap tuckedinside the jack channel. Lower thecarpeted load floor.
2.Stow the flat tire in the cargo area on theload floor with the wheel facing up.Secure the flat tire with the retainer strapby following the next steps.
3. Locate the rear left side and right sidecargo tie-down rings. Push the loop endof the retainer strap through one cargotie-down ring. Thread the non-loop endthrough the loop.
4. Weave the retainer strap through thewheel openings.
5.Locate the cargo tie-down in the oppositerear corner of the cargo area. Thread theretainer strap though the tie-down andpull tight.
377
MKX (CD9) Canada/United States of America, enUSA, Edition date: 201707, First Printing
Wheels and Tires12
3
4
5
E75442 E142906