light LINCOLN MKZ 2013 Owners Manual
[x] Cancel search | Manufacturer: LINCOLN, Model Year: 2013, Model line: MKZ, Model: LINCOLN MKZ 2013Pages: 474, PDF Size: 3.79 MB
Page 5 of 474
Security
Passive Anti-Theft System................72
Anti-Theft Alarm
...................................73
Steering Wheel
Adjusting the Steering Wheel...........75
Audio Control
.........................................76
Voice Control
...........................................77
Cruise Control
.........................................77
Information Display Control..............77
Heated Steering Wheel......................78
Wipers and Washers
Windshield Wipers
...............................79
Autowipers..............................................79
Windshield Washers
...........................80
Lighting
Lighting Control
.....................................82
Autolamps...............................................82
Instrument Lighting Dimmer............83
Headlamp Exit Delay...........................83
Daytime Running Lamps...................83
Automatic High Beam Control
........84
Direction Indicators
..............................85
Interior Lamps
........................................85
Windows and Mirrors
Power Windows
....................................87
Global Opening and Closing............88
Exterior Mirrors......................................88
Interior Mirror
.........................................90
Sun Visors
...............................................90
Sun Shades
..............................................91 Moonroof..................................................91
Instrument Cluster
Gauges......................................................94
Warning Lamps and Indicators.......95
Audible Warnings and
Indicators.............................................99
Information Displays
General Information
..........................100
Information Messages
......................105
Audio System
General Information
...........................122
Audio unit - Vehicles With: Premium AM/FM/CD
........................................123
Media Hub
..............................................125
Climate Control
Automatic Climate Control.............126
Hints on Controlling the Interior Climate................................................127
Heated Windows and Mirrors.........128
Cabin Air Filter
......................................129
Remote Start
........................................129
Seats
Sitting in the Correct Position
..........131
Head Restraints
....................................131
Power Seats
..........................................133
Memory Function................................135
Rear Seats..............................................137
Heated Seats
.........................................137
Ventilated Seats
..................................139
Rear Seat Armrest
..............................140
2
Table of Contents
Page 11 of 474
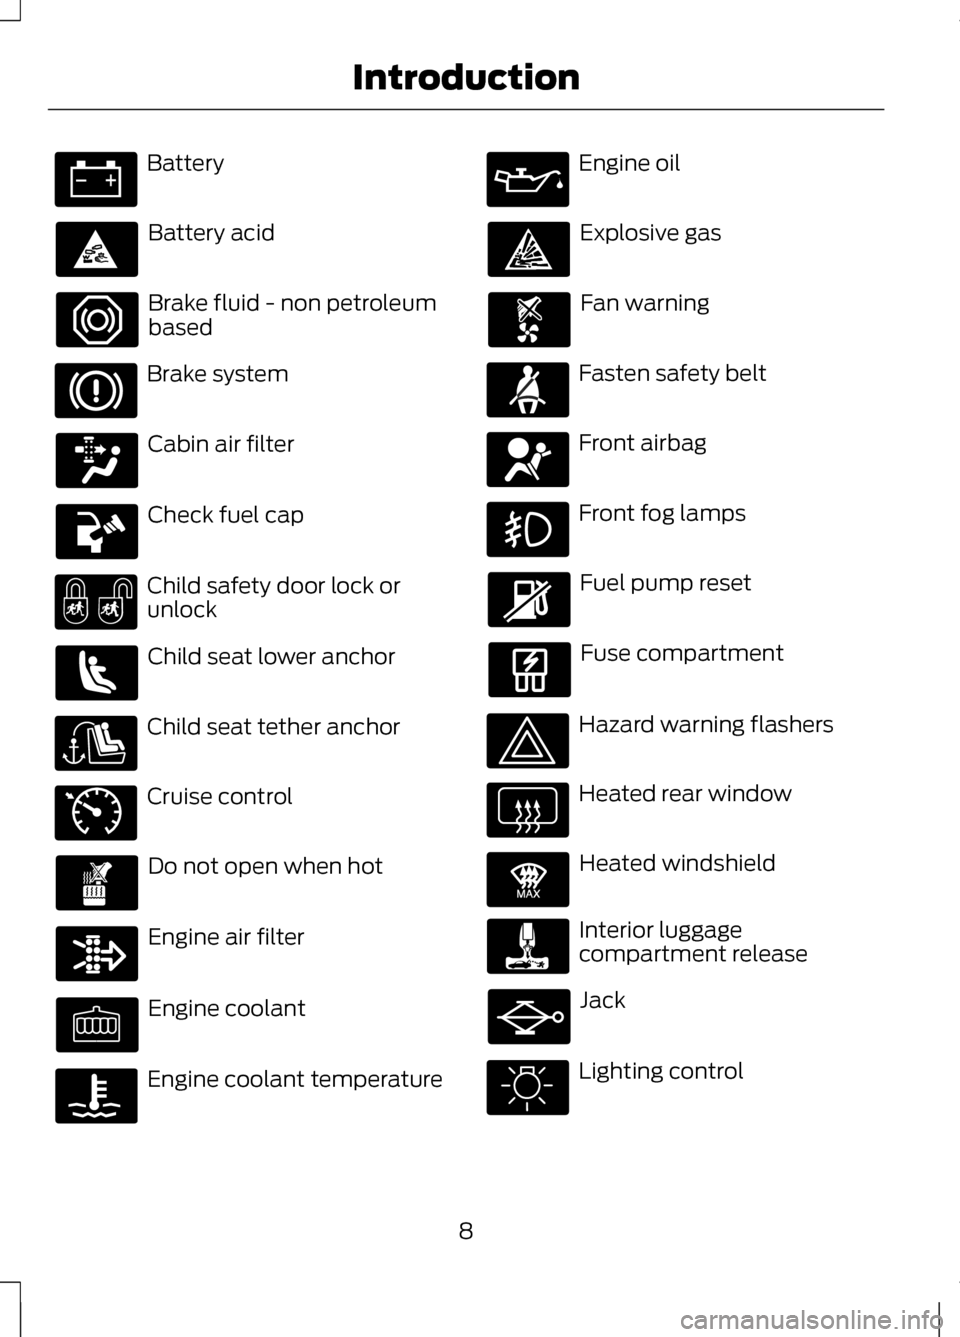
Battery
Battery acid
Brake fluid - non petroleum
based
Brake system
Cabin air filter
Check fuel cap
Child safety door lock or
unlock
Child seat lower anchor
Child seat tether anchor
Cruise control
Do not open when hot
Engine air filter
Engine coolant
Engine coolant temperature Engine oil
Explosive gas
Fan warning
Fasten safety belt
Front airbag
Front fog lamps
Fuel pump reset
Fuse compartment
Hazard warning flashers
Heated rear window
Heated windshield
Interior luggage
compartment release
Jack
Lighting control
8
Introduction E71340 E91392
Page 27 of 474
8.
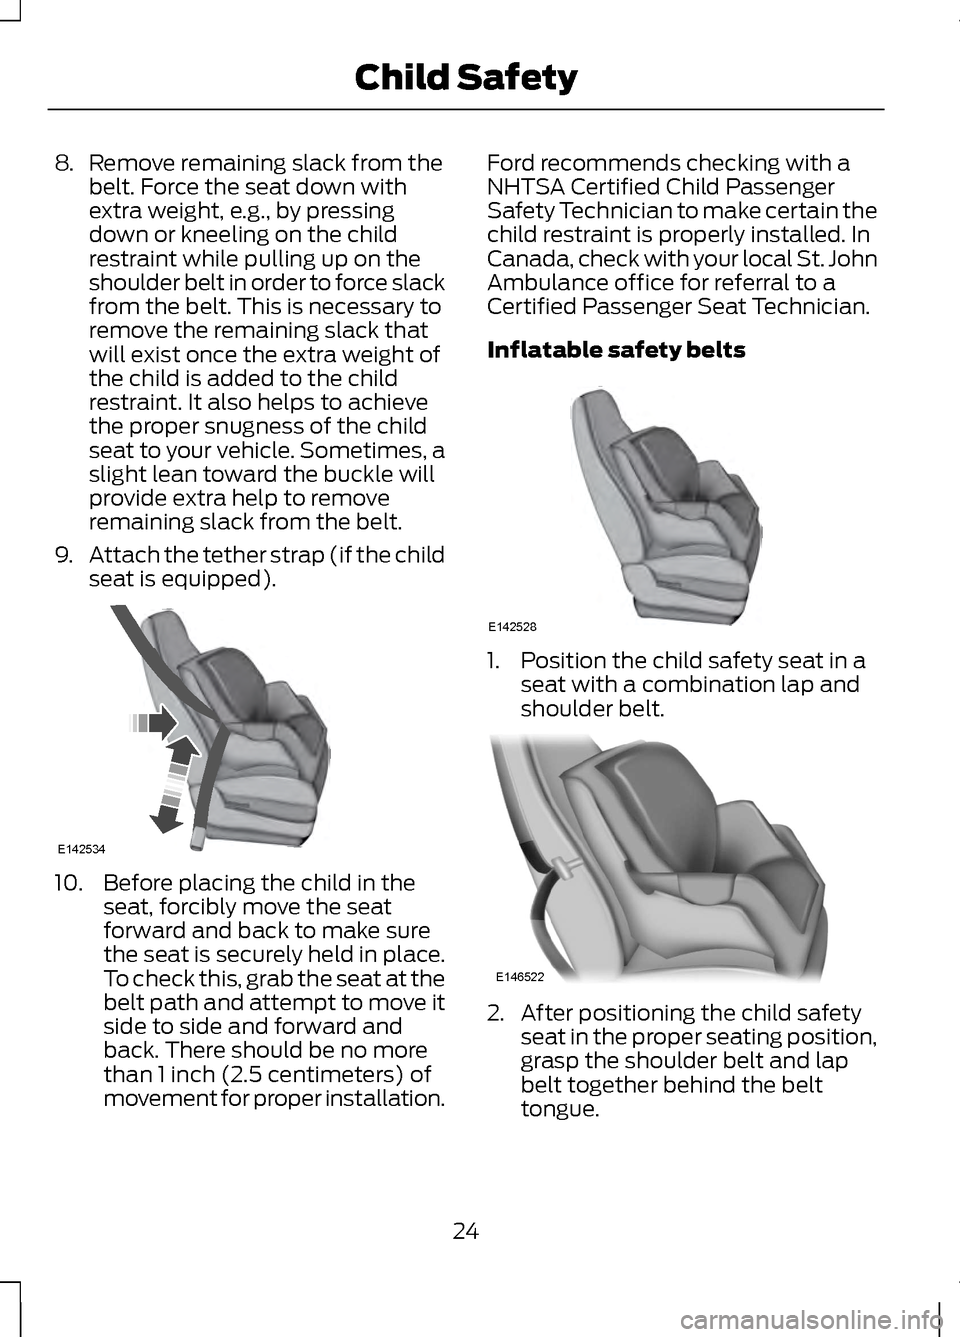
Remove remaining slack from the
belt. Force the seat down with
extra weight, e.g., by pressing
down or kneeling on the child
restraint while pulling up on the
shoulder belt in order to force slack
from the belt. This is necessary to
remove the remaining slack that
will exist once the extra weight of
the child is added to the child
restraint. It also helps to achieve
the proper snugness of the child
seat to your vehicle. Sometimes, a
slight lean toward the buckle will
provide extra help to remove
remaining slack from the belt.
9. Attach the tether strap (if the child
seat is equipped). 10. Before placing the child in the
seat, forcibly move the seat
forward and back to make sure
the seat is securely held in place.
To check this, grab the seat at the
belt path and attempt to move it
side to side and forward and
back. There should be no more
than 1 inch (2.5 centimeters) of
movement for proper installation. Ford recommends checking with a
NHTSA Certified Child Passenger
Safety Technician to make certain the
child restraint is properly installed. In
Canada, check with your local St. John
Ambulance office for referral to a
Certified Passenger Seat Technician.
Inflatable safety belts
1. Position the child safety seat in a
seat with a combination lap and
shoulder belt. 2. After positioning the child safety
seat in the proper seating position,
grasp the shoulder belt and lap
belt together behind the belt
tongue.
24
Child SafetyE142534 E142528 E146522
Page 29 of 474
8.
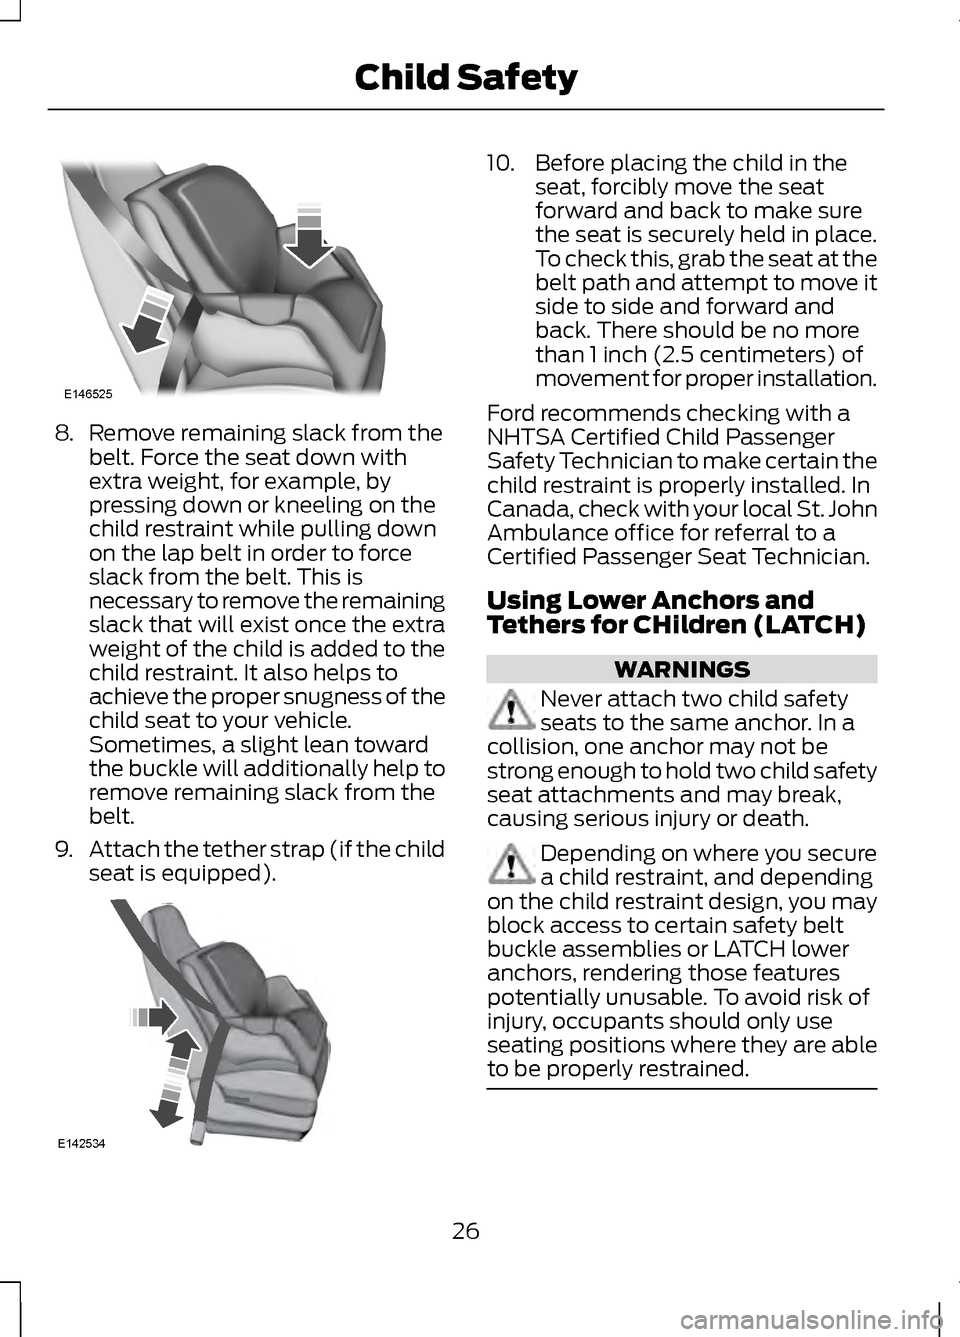
Remove remaining slack from the
belt. Force the seat down with
extra weight, for example, by
pressing down or kneeling on the
child restraint while pulling down
on the lap belt in order to force
slack from the belt. This is
necessary to remove the remaining
slack that will exist once the extra
weight of the child is added to the
child restraint. It also helps to
achieve the proper snugness of the
child seat to your vehicle.
Sometimes, a slight lean toward
the buckle will additionally help to
remove remaining slack from the
belt.
9. Attach the tether strap (if the child
seat is equipped). 10. Before placing the child in the
seat, forcibly move the seat
forward and back to make sure
the seat is securely held in place.
To check this, grab the seat at the
belt path and attempt to move it
side to side and forward and
back. There should be no more
than 1 inch (2.5 centimeters) of
movement for proper installation.
Ford recommends checking with a
NHTSA Certified Child Passenger
Safety Technician to make certain the
child restraint is properly installed. In
Canada, check with your local St. John
Ambulance office for referral to a
Certified Passenger Seat Technician.
Using Lower Anchors and
Tethers for CHildren (LATCH) WARNINGS
Never attach two child safety
seats to the same anchor. In a
collision, one anchor may not be
strong enough to hold two child safety
seat attachments and may break,
causing serious injury or death. Depending on where you secure
a child restraint, and depending
on the child restraint design, you may
block access to certain safety belt
buckle assemblies or LATCH lower
anchors, rendering those features
potentially unusable. To avoid risk of
injury, occupants should only use
seating positions where they are able
to be properly restrained. 26
Child SafetyE146525 E142534
Page 35 of 474
•
Height adjuster at the front
outboard seating positions.
• Safety belt pretensioner at the
front outboard seating positions.
• Belt tension sensor at the front
outboard passenger seating
position. •
Safety belt warning light and
chime. •
Crash sensors and monitoring
system with readiness indicator.
The safety belt pretensioners at the
front seating positions are designed
to tighten the safety belts when
activated. In frontal and near-frontal
collisions, the safety belt
pretensioners may be activated alone
or, if the collision is of sufficient
severity, together with the front
airbags. The pretensioners may also
activate when a side curtain airbag is
deployed.
FASTENING THE SAFETY
BELTS
Standard belts shown, inflatable
belts similar
The front outboard and rear safety
restraints in the vehicle are
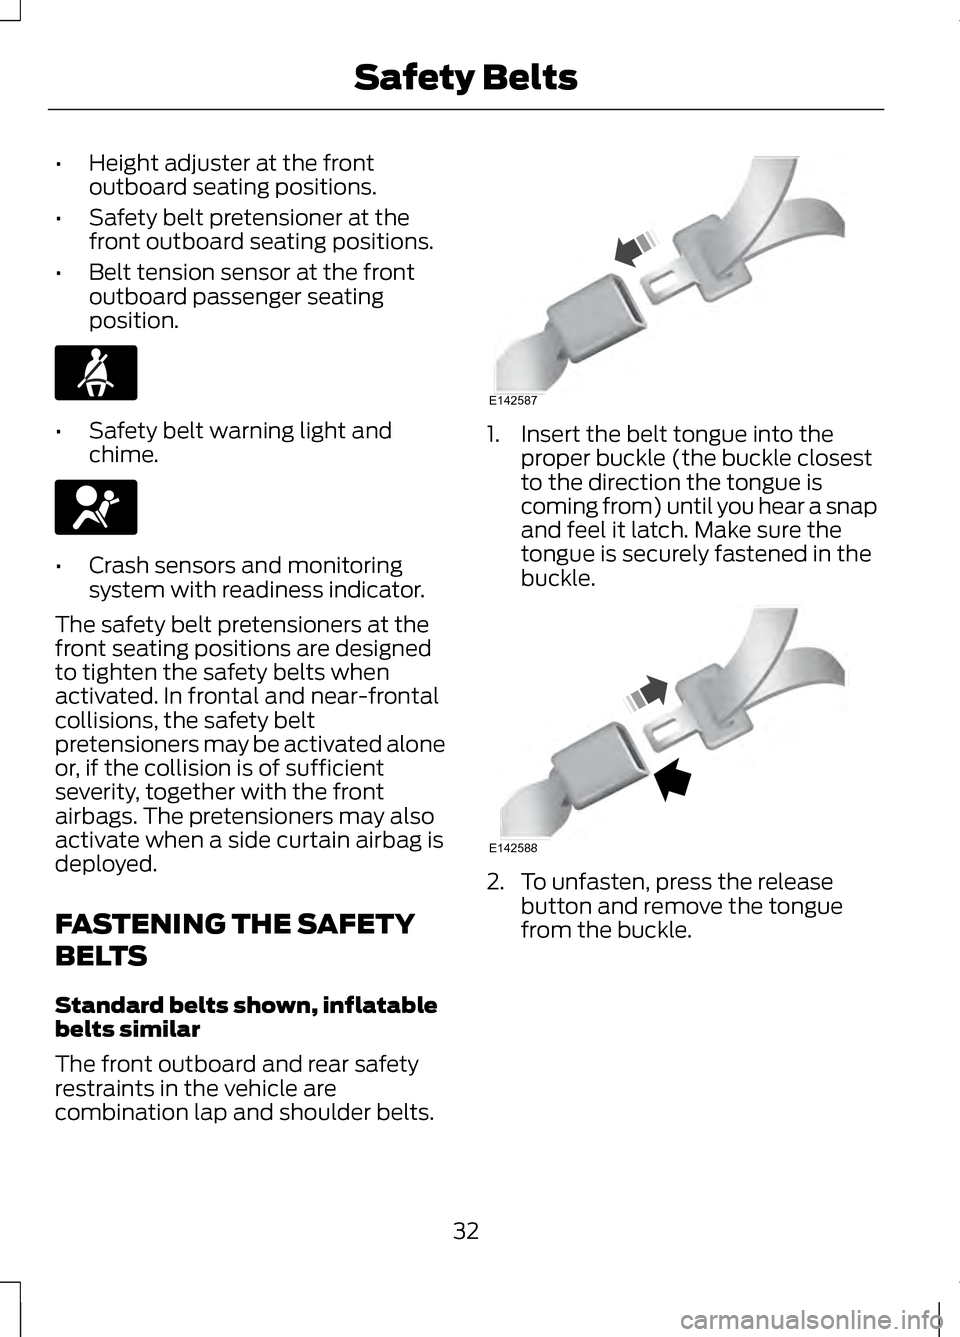
combination lap and shoulder belts. 1. Insert the belt tongue into the
proper buckle (the buckle closest
to the direction the tongue is
coming from) until you hear a snap
and feel it latch. Make sure the
tongue is securely fastened in the
buckle. 2. To unfasten, press the release
button and remove the tongue
from the buckle.
32
Safety Belts E142587 E142588
Page 37 of 474
Vehicle Sensitive Mode
This is the normal retractor mode,
which allows free shoulder belt length
adjustment to your movements and
locking in response to vehicle
movement. For example, if the driver
brakes suddenly or turns a corner
sharply, or the vehicle receives an
impact of approximately 5 mph (8
km/h) or more, the combination
safety belts will lock to help reduce
forward movement of the driver and
passengers.
In addition, the retractor is designed
to lock if the webbing is pulled out too
quickly. If this occurs, let the belt
retract slightly and pull webbing out
again in a slow and controlled
manner.
Automatic Locking Mode
In this mode, the shoulder belt is
automatically pre-locked. The belt
will still retract to remove any slack in
the shoulder belt. The automatic
locking mode is not available on the
driver safety belt.
When to Use the Automatic
Locking Mode
This mode should be used any time a
child safety seat, except a booster, is
installed in passenger front or rear
seating positions. Children 12 years old
and under should be properly
restrained in a rear seating position
whenever possible. See Child Safety
(page 15).
How to Use the Automatic Locking
Mode
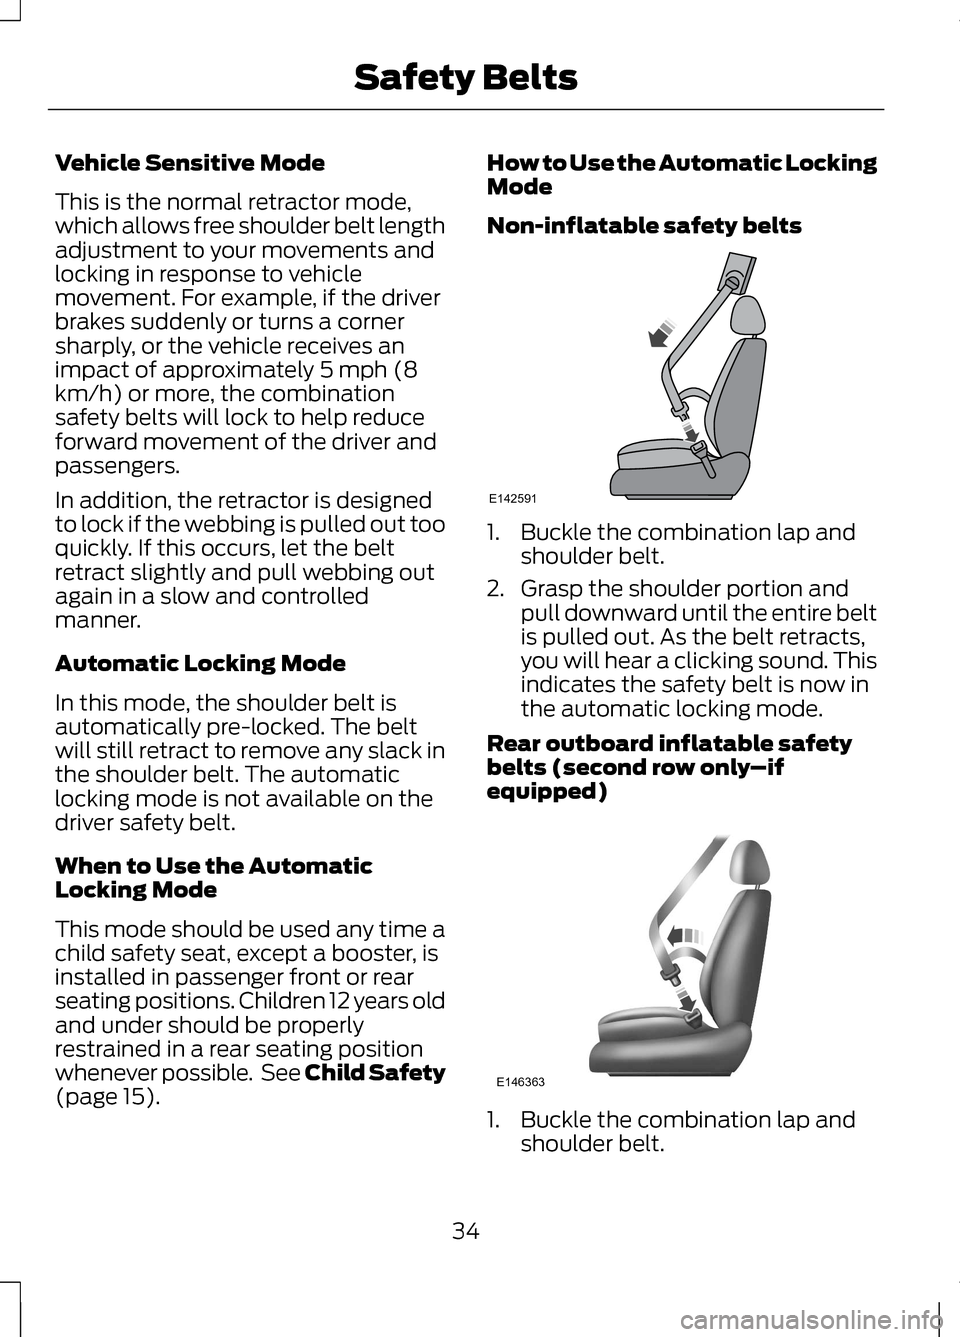
Non-inflatable safety belts
1. Buckle the combination lap and
shoulder belt.
2. Grasp the shoulder portion and pull downward until the entire belt
is pulled out. As the belt retracts,
you will hear a clicking sound. This
indicates the safety belt is now in
the automatic locking mode.
Rear outboard inflatable safety
belts (second row only –if
equipped) 1. Buckle the combination lap and
shoulder belt.
34
Safety BeltsE142591 E146363
Page 38 of 474
2. Grasp the lap portion of the belt
and pull upward until the entire
belt is pulled out.
3. Allow the belt to retract. As the belt retracts, you will hear a
clicking sound. This indicates the
safety belt is now in the automatic
locking mode.
How to Disengage the Automatic
Locking Mode
Disconnect the combination lap and
shoulder belt and allow it to retract
completely to disengage the
automatic locking mode and activate
the vehicle sensitive (emergency)
locking mode.
Rear Inflatable Safety Belt (If
Equipped) WARNING
Do not attempt to service, repair,
or modify the rear inflatable
safety belt. The rear inflatable safety belts are
fitted in the shoulder portion of the
safety belts of the second-row
outboard seating positions.
Note:
The rear inflatable safety belts
are compatible with most infant and
child safety car seats and belt
positioning booster seats when
properly installed. This is because they
are designed to fill with a cooled gas
at a lower pressure and at a slower rate
than traditional airbags. After inflation,
the shoulder portion of the safety belt
remains cool to the touch. The rear inflatable safety belt consists
of the following:
•
An inflatable bag located in the
shoulder safety belt webbing.
• Lap safety belt webbing with
automatic locking mode.
• The same warning light, electronic
control and diagnostic unit as used
for the front safety belts.
• Impact sensors located in various
parts of the vehicle.
How does the rear inflatable safety
belt system work?
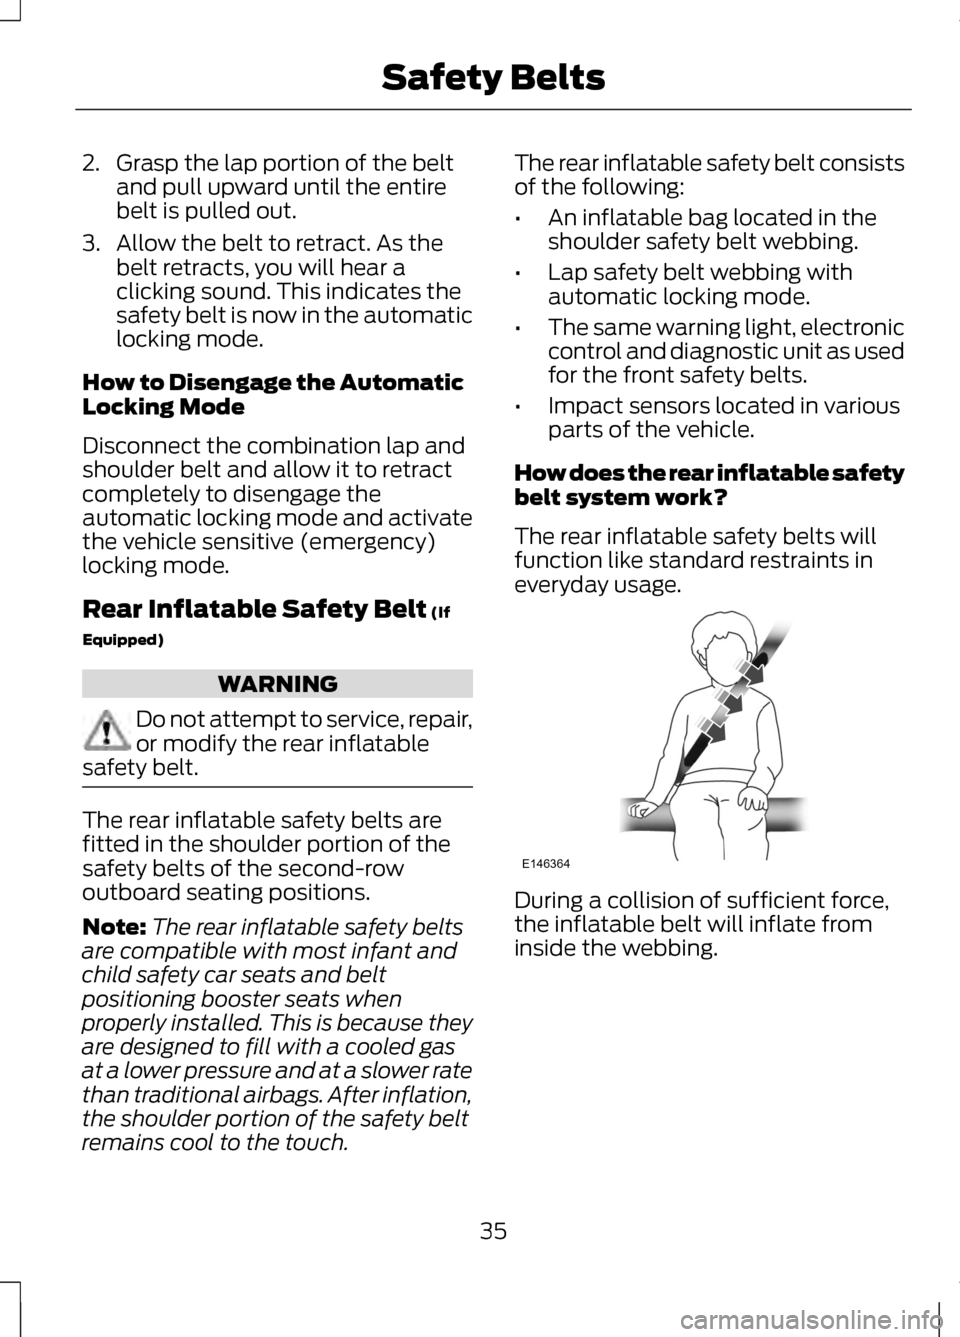
The rear inflatable safety belts will
function like standard restraints in
everyday usage. During a collision of sufficient force,
the inflatable belt will inflate from
inside the webbing.
35
Safety BeltsE146364
Page 40 of 474
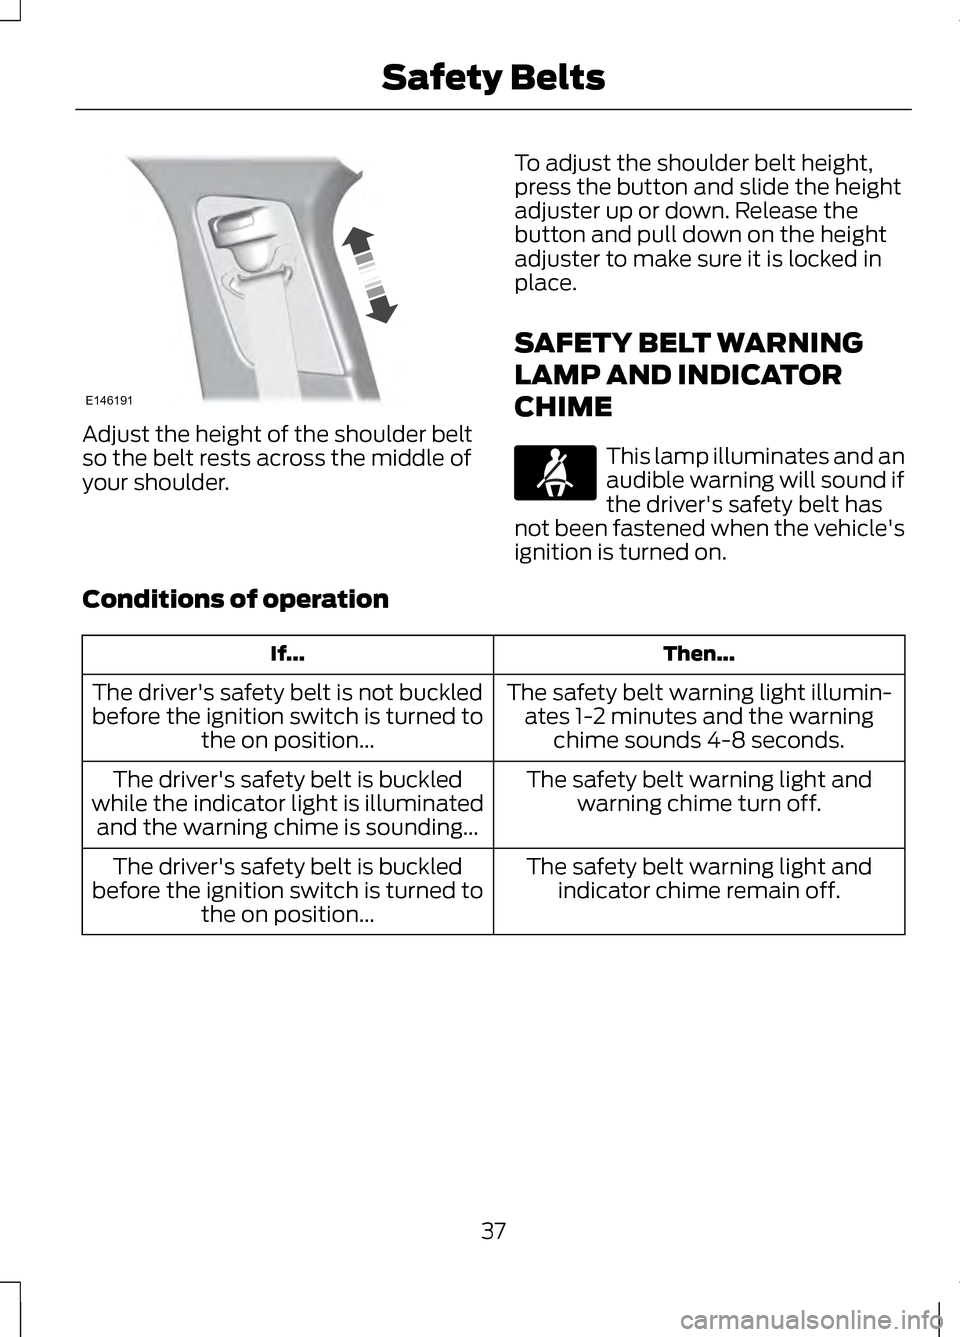
Adjust the height of the shoulder belt
so the belt rests across the middle of
your shoulder.
To adjust the shoulder belt height,
press the button and slide the height
adjuster up or down. Release the
button and pull down on the height
adjuster to make sure it is locked in
place.
SAFETY BELT WARNING
LAMP AND INDICATOR
CHIME This lamp illuminates and an
audible warning will sound if
the driver's safety belt has
not been fastened when the vehicle's
ignition is turned on.
Conditions of operation Then...
If...
The safety belt warning light illumin-ates 1-2 minutes and the warning chime sounds 4-8 seconds.
The driver's safety belt is not buckled
before the ignition switch is turned to the on position...
The safety belt warning light andwarning chime turn off.
The driver's safety belt is buckled
while the indicator light is illuminated and the warning chime is sounding...
The safety belt warning light andindicator chime remain off.
The driver's safety belt is buckled
before the ignition switch is turned to the on position...
37
Safety BeltsE146191
Page 41 of 474
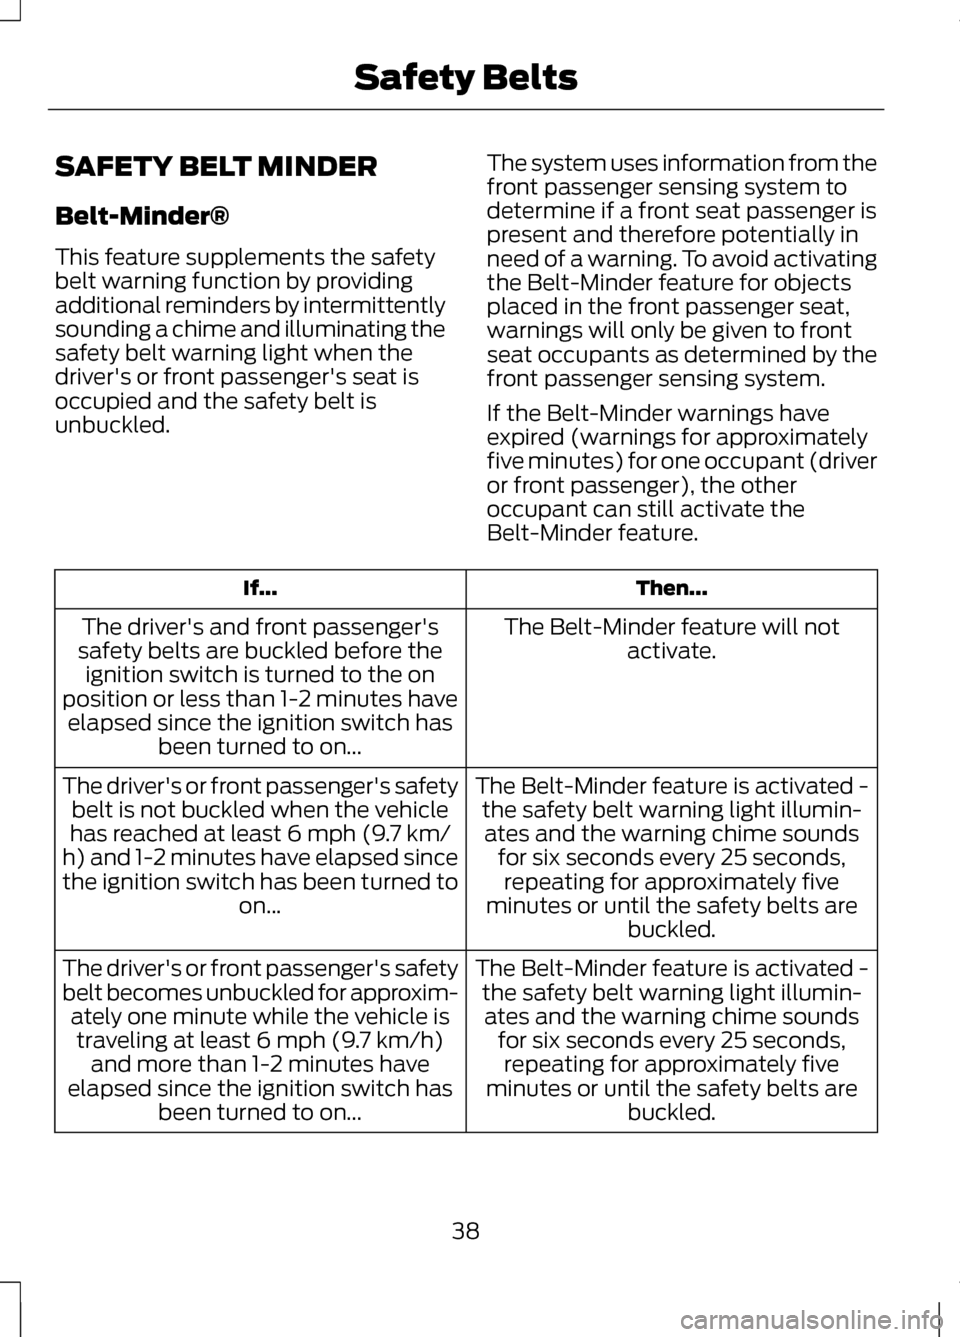
SAFETY BELT MINDER
Belt-Minder®
This feature supplements the safety
belt warning function by providing
additional reminders by intermittently
sounding a chime and illuminating the
safety belt warning light when the
driver's or front passenger's seat is
occupied and the safety belt is
unbuckled.
The system uses information from the
front passenger sensing system to
determine if a front seat passenger is
present and therefore potentially in
need of a warning. To avoid activating
the Belt-Minder feature for objects
placed in the front passenger seat,
warnings will only be given to front
seat occupants as determined by the
front passenger sensing system.
If the Belt-Minder warnings have
expired (warnings for approximately
five minutes) for one occupant (driver
or front passenger), the other
occupant can still activate the
Belt-Minder feature. Then...
If...
The Belt-Minder feature will notactivate.
The driver's and front passenger's
safety belts are buckled before the ignition switch is turned to the on
position or less than 1-2 minutes have elapsed since the ignition switch has been turned to on...
The Belt-Minder feature is activated -the safety belt warning light illumin-ates and the warning chime sounds for six seconds every 25 seconds,repeating for approximately five
minutes or until the safety belts are buckled.
The driver's or front passenger's safety
belt is not buckled when the vehicle
has reached at least 6 mph (9.7 km/
h) and 1-2 minutes have elapsed since
the ignition switch has been turned to on...
The Belt-Minder feature is activated -the safety belt warning light illumin-ates and the warning chime sounds for six seconds every 25 seconds,repeating for approximately five
minutes or until the safety belts are buckled.
The driver's or front passenger's safety
belt becomes unbuckled for approxim-
ately one minute while the vehicle istraveling at least 6 mph (9.7 km/h) and more than 1-2 minutes have
elapsed since the ignition switch has been turned to on...
38
Safety Belts
Page 42 of 474
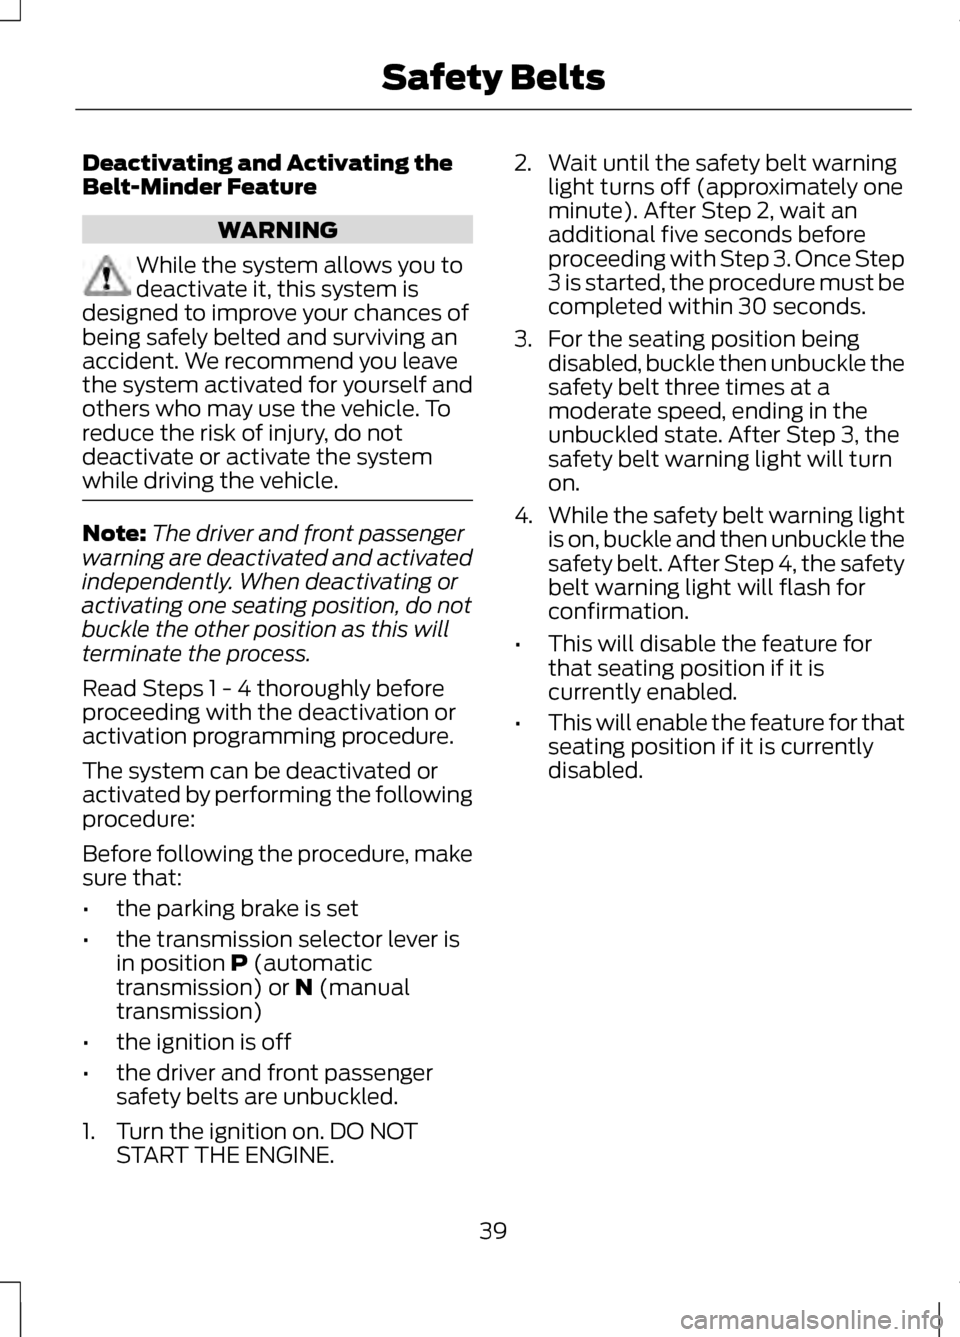
Deactivating and Activating the
Belt-Minder Feature
WARNING
While the system allows you to
deactivate it, this system is
designed to improve your chances of
being safely belted and surviving an
accident. We recommend you leave
the system activated for yourself and
others who may use the vehicle. To
reduce the risk of injury, do not
deactivate or activate the system
while driving the vehicle. Note:
The driver and front passenger
warning are deactivated and activated
independently. When deactivating or
activating one seating position, do not
buckle the other position as this will
terminate the process.
Read Steps 1 - 4 thoroughly before
proceeding with the deactivation or
activation programming procedure.
The system can be deactivated or
activated by performing the following
procedure:
Before following the procedure, make
sure that:
• the parking brake is set
• the transmission selector lever is
in position P (automatic
transmission) or N (manual
transmission)
• the ignition is off
• the driver and front passenger
safety belts are unbuckled.
1. Turn the ignition on. DO NOT START THE ENGINE. 2. Wait until the safety belt warning
light turns off (approximately one
minute). After Step 2, wait an
additional five seconds before
proceeding with Step 3. Once Step
3 is started, the procedure must be
completed within 30 seconds.
3. For the seating position being disabled, buckle then unbuckle the
safety belt three times at a
moderate speed, ending in the
unbuckled state. After Step 3, the
safety belt warning light will turn
on.
4. While the safety belt warning light
is on, buckle and then unbuckle the
safety belt. After Step 4, the safety
belt warning light will flash for
confirmation.
• This will disable the feature for
that seating position if it is
currently enabled.
• This will enable the feature for that
seating position if it is currently
disabled.
39
Safety Belts