tire LINCOLN MKZ 2013 Owners Manual
[x] Cancel search | Manufacturer: LINCOLN, Model Year: 2013, Model line: MKZ, Model: LINCOLN MKZ 2013Pages: 474, PDF Size: 3.79 MB
Page 8 of 474
Cleaning the Windows and Wiper
Blades................................................286
Cleaning the Interior
..........................287
Cleaning the Instrument Panel and Instrument Cluster Lens..............287
Cleaning Leather Seats...................288
Cleaning the Alloy Wheels.............289
Vehicle Storage
...................................289
Wheels and Tires
Temporary Mobility Kit.....................292
Tire Pressure Monitoring System...............................................298
Tire Care
................................................304
Using Snow Chains............................319
Changing a Road Wheel
...................319
Technical Specifications
.................324
Capacities and Specific- ations
Engine Specifications
.......................325
Motorcraft Parts.................................325
Vehicle Identification Number
.......327
Vehicle Certification Label..............328
Transmission Code Designation......................................328
Technical Specifications
.................329
Accessories
Accessories...........................................332
Ford Extended Service Plan (ESP)
Ford Extended Service Plan (ESP)..................................................334 MyLincoln Touch
™
General Information
..........................337
Settings...................................................351
Entertainment......................................361
Phone.....................................................385
Information...........................................392
Climate..................................................403
Navigation.............................................407
Appendices
End User License Agreement.........419
Scheduled Maintenance
Scheduled Maintenance
.................440
5
Table of Contents
Page 12 of 474
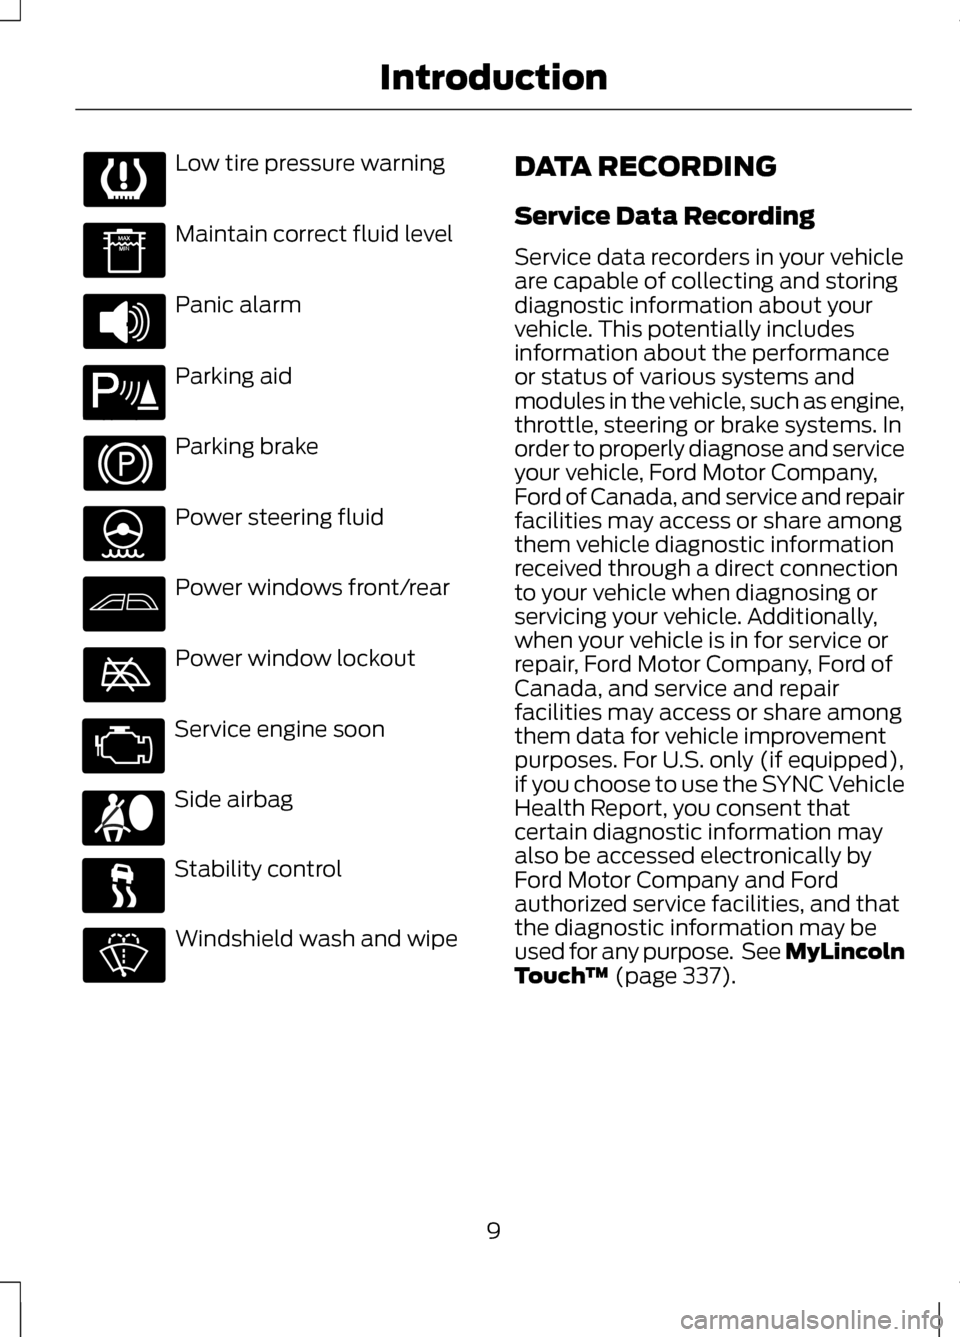
Low tire pressure warning
Maintain correct fluid level
Panic alarm
Parking aid
Parking brake
Power steering fluid
Power windows front/rear
Power window lockout
Service engine soon
Side airbag
Stability control
Windshield wash and wipe DATA RECORDING
Service Data Recording
Service data recorders in your vehicle
are capable of collecting and storing
diagnostic information about your
vehicle. This potentially includes
information about the performance
or status of various systems and
modules in the vehicle, such as engine,
throttle, steering or brake systems. In
order to properly diagnose and service
your vehicle, Ford Motor Company,
Ford of Canada, and service and repair
facilities may access or share among
them vehicle diagnostic information
received through a direct connection
to your vehicle when diagnosing or
servicing your vehicle. Additionally,
when your vehicle is in for service or
repair, Ford Motor Company, Ford of
Canada, and service and repair
facilities may access or share among
them data for vehicle improvement
purposes. For U.S. only (if equipped),
if you choose to use the SYNC Vehicle
Health Report, you consent that
certain diagnostic information may
also be accessed electronically by
Ford Motor Company and Ford
authorized service facilities, and that
the diagnostic information may be
used for any purpose. See MyLincoln
Touch
™ (page 337).
9
Introduction E139213
Page 37 of 474
Vehicle Sensitive Mode
This is the normal retractor mode,
which allows free shoulder belt length
adjustment to your movements and
locking in response to vehicle
movement. For example, if the driver
brakes suddenly or turns a corner
sharply, or the vehicle receives an
impact of approximately 5 mph (8
km/h) or more, the combination
safety belts will lock to help reduce
forward movement of the driver and
passengers.
In addition, the retractor is designed
to lock if the webbing is pulled out too
quickly. If this occurs, let the belt
retract slightly and pull webbing out
again in a slow and controlled
manner.
Automatic Locking Mode
In this mode, the shoulder belt is
automatically pre-locked. The belt
will still retract to remove any slack in
the shoulder belt. The automatic
locking mode is not available on the
driver safety belt.
When to Use the Automatic
Locking Mode
This mode should be used any time a
child safety seat, except a booster, is
installed in passenger front or rear
seating positions. Children 12 years old
and under should be properly
restrained in a rear seating position
whenever possible. See Child Safety
(page 15).
How to Use the Automatic Locking
Mode
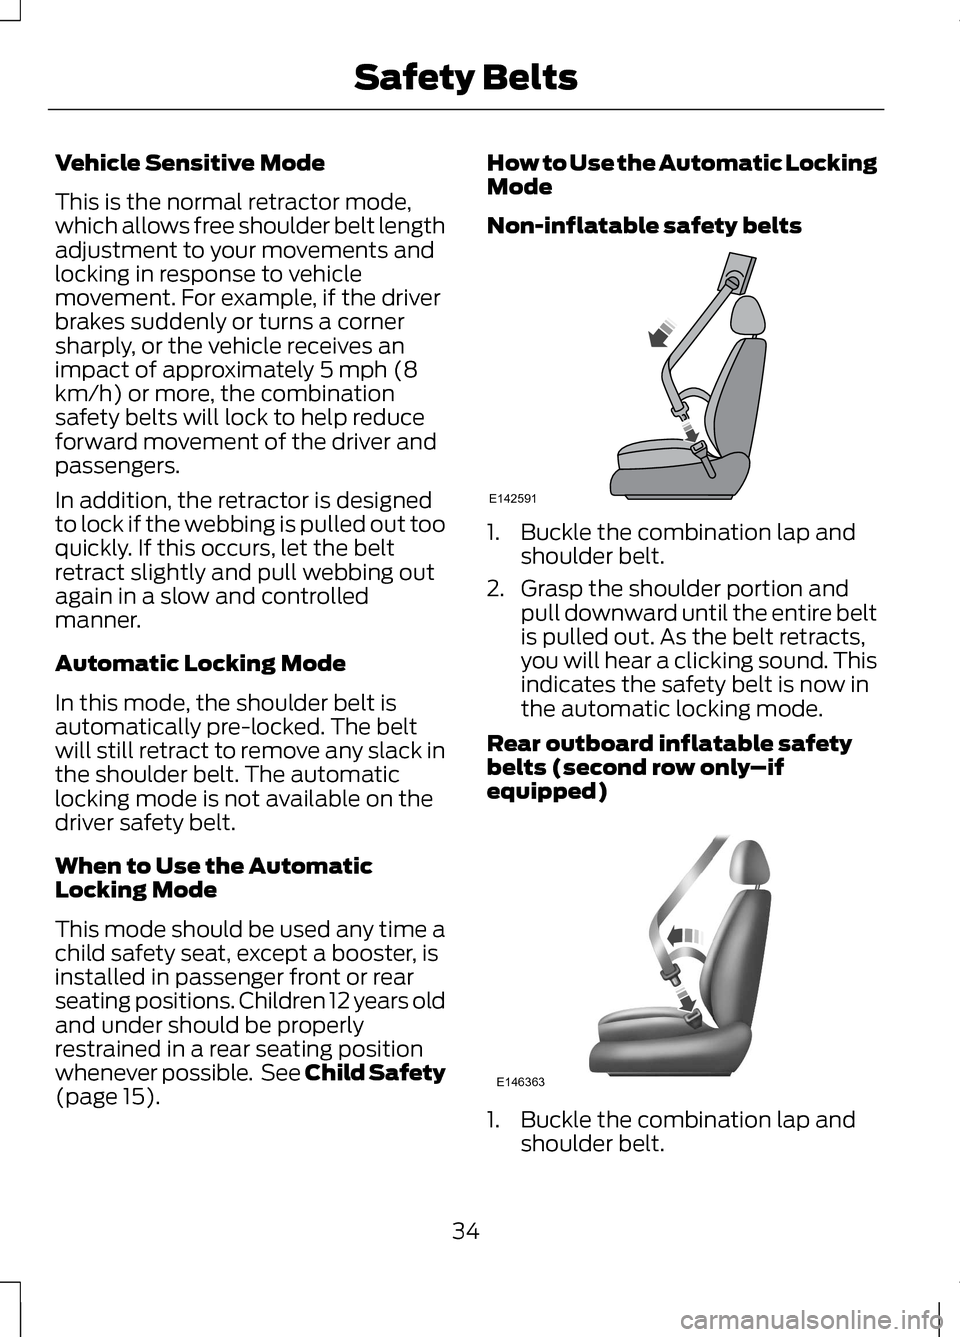
Non-inflatable safety belts
1. Buckle the combination lap and
shoulder belt.
2. Grasp the shoulder portion and pull downward until the entire belt
is pulled out. As the belt retracts,
you will hear a clicking sound. This
indicates the safety belt is now in
the automatic locking mode.
Rear outboard inflatable safety
belts (second row only –if
equipped) 1. Buckle the combination lap and
shoulder belt.
34
Safety BeltsE142591 E146363
Page 38 of 474
2. Grasp the lap portion of the belt
and pull upward until the entire
belt is pulled out.
3. Allow the belt to retract. As the belt retracts, you will hear a
clicking sound. This indicates the
safety belt is now in the automatic
locking mode.
How to Disengage the Automatic
Locking Mode
Disconnect the combination lap and
shoulder belt and allow it to retract
completely to disengage the
automatic locking mode and activate
the vehicle sensitive (emergency)
locking mode.
Rear Inflatable Safety Belt (If
Equipped) WARNING
Do not attempt to service, repair,
or modify the rear inflatable
safety belt. The rear inflatable safety belts are
fitted in the shoulder portion of the
safety belts of the second-row
outboard seating positions.
Note:
The rear inflatable safety belts
are compatible with most infant and
child safety car seats and belt
positioning booster seats when
properly installed. This is because they
are designed to fill with a cooled gas
at a lower pressure and at a slower rate
than traditional airbags. After inflation,
the shoulder portion of the safety belt
remains cool to the touch. The rear inflatable safety belt consists
of the following:
•
An inflatable bag located in the
shoulder safety belt webbing.
• Lap safety belt webbing with
automatic locking mode.
• The same warning light, electronic
control and diagnostic unit as used
for the front safety belts.
• Impact sensors located in various
parts of the vehicle.
How does the rear inflatable safety
belt system work?
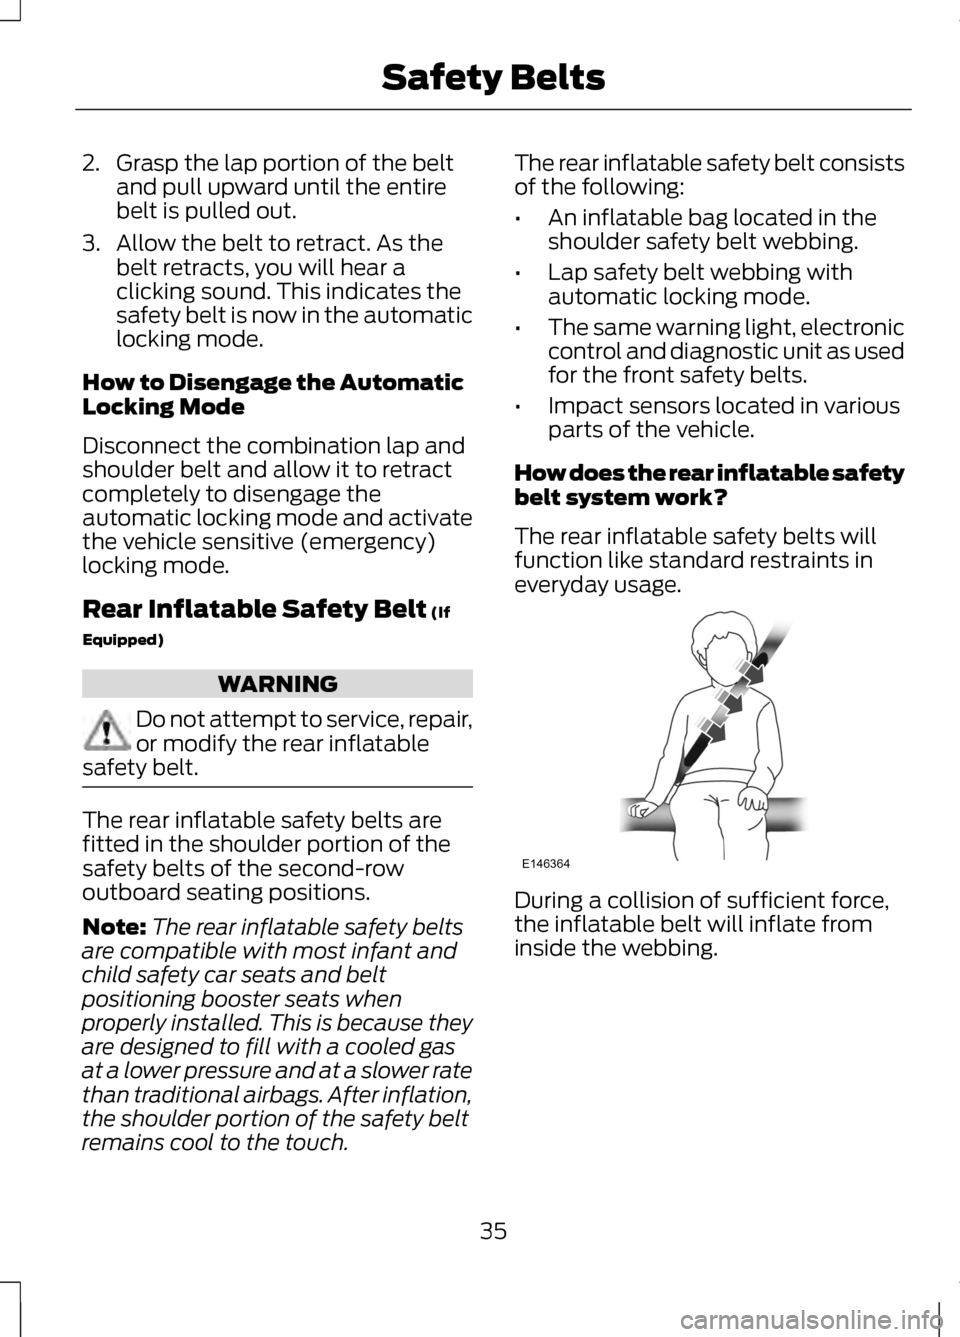
The rear inflatable safety belts will
function like standard restraints in
everyday usage. During a collision of sufficient force,
the inflatable belt will inflate from
inside the webbing.
35
Safety BeltsE146364
Page 76 of 474
You must have two previously
programmed intelligent access keys
inside the vehicle and the new
unprogrammed intelligent access keys
readily accessible. See your
authorized dealer to have the spare
key programmed if two previously
programmed keys are not available.
Make sure that the vehicle is off
before beginning this procedure. Make
sure that all doors are closed before
beginning and that they remain closed
throughout the procedure. Perform all
steps within 30 seconds of starting
the sequence. Stop and wait for at
least one minute before starting again
if any steps are performed out of
sequence.
Read and understand the entire
procedure before you begin.
1. Place a programmed intelligent
access key in the backup slot at
the bottom of the cupholder (after
removing the rubber covering).
2. Wait 5 seconds, then press the START/STOP button.
3. Remove the intelligent access key.
4. Within 10 seconds, place a second
programmed intelligent access key
in the backup slot and press the
START/STOP
button.
5. Wait 5 seconds, then press the START/STOP
button again.
6. Remove the intelligent access key.
7. Wait 5 seconds, then place the unprogrammed intelligent access
key in the backup slot and press
the
START/STOP button. The intelligent access key is now
programmed. Verify the remote
control functions operate and the
vehicle starts with the new intelligent
access key.
If it was not programmed successfully,
wait 10 seconds and repeat Steps 1
through 7. If you are still unsuccessful,
take your vehicle to your authorized
dealer.
ANTI-THEFT ALARM
(IF
EQUIPPED)
The system will warn you of an
unauthorized entry to your vehicle. It
will be triggered if any door, the
luggage compartment or the hood is
opened without using the key, remote
control or keyless entry keypad.
The direction indicators will flash and
the horn will sound if unauthorized
entry is attempted while the alarm is
armed.
Take all remote controls to an
authorized dealer if there is any
potential alarm problem with your
vehicle.
Arming the Alarm
The alarm is ready to arm when there
is not a key in the ignition.
Electronically lock the vehicle to arm
the alarm.
Disarming the Alarm
Disarm the alarm by any of the
following actions:
73
Security
Page 87 of 474
AUTOMATIC HIGH BEAM
CONTROL (IF EQUIPPED)
The system will automatically turn on
your high beams if it is dark enough
and no other traffic is present. When
it detects an approaching vehicle ’s
headlights, a preceding vehicle ’s tail
lamps or street lighting, the system
will turn off the high beams before
they distract other drivers. The low
beams remain on.
Note: If it appears that automatic
control of the high beams is not
functioning properly, check the
windshield in front of the camera for
blockage. A clear view of the road is
required for proper system operation.
Any windshield damage in the area of
the camera field-of-view should be
repaired.
Note: If a blockage is detected (e.g.
bird dropping, bug splatter, snow, or
ice) and no changes are observed, the
system will go into low beam mode
until the blockage is cleared. A
message may also appear in the
instrument cluster display noting the
front camera is blocked. Note:
Typical road dust, dirt and water
spots will not affect the automatic high
beam system ’s performance. However,
in cold or inclement weather
conditions, the automatic high beam
system's availability may be decreased.
If you want to change the beam state
independently of the system, you may
turn the high beams ON or OFF using
the multifunction switch lever.
Automatic control will resume when
conditions are correct.
Note: Modification of the vehicle ride
height (e.g. using much larger tires)
may degrade feature performance.
A camera sensor is centrally mounted
behind the windshield of the vehicle,
and monitors conditions continuously
to decide when to switch the high
beams off and on.
Once the system is active, the high
beams will switch on if:
• The ambient light level is low
enough that high beams are
needed.
• There is no traffic in front of the
vehicle.
• The vehicle speed is greater than
25 mph (40 km/h)
.
The high beams will switch off if:
• An approaching vehicle's
headlights or a preceding vehicle's
tail lamps are detected.
• Vehicle speed falls below
16 mph
(25 km/h).
• The ambient light level is high
enough that high beams are not
required.
84
Lighting
Page 101 of 474
Low Tire Pressure Warning
It will illuminate when your
tire pressure is low. If the
lamp remains on with the
engine running or when driving, check
your tire pressure as soon as possible.
It will also illuminate momentarily
when you switch the ignition on to
confirm the lamp is functional. If it
does not illuminate when you switch
the ignition on, or begins to flash at
any time, have the system checked by
your authorized dealer.
Low Washer Fluid It will illuminate when the
windshield washer fluid is
low.
Parking Lamps It will illuminate when you
switch the parking lamps on.
Powertrain Fault Illuminates when a
powertrain or an AWD fault
has been detected. Contact
your authorized dealer as soon as
possible. Service Engine Soon If the service engine soon
indicator light stays
illuminated after the engine
is started, it indicates that the On
Board Diagnostics system (OBD) has
detected a malfunction of the vehicle
emissions control system. Refer to On
board diagnostics (OBD) in the Fuel
and Refueling chapter for more
information about having your vehicle
serviced. See Emission Control
System (page 161).
If the light is blinking, engine misfire is
occurring which could damage your
catalytic converter. Drive in a
moderate fashion (avoid heavy
acceleration and deceleration) and
have your vehicle serviced
immediately.
Note: Under engine misfire conditions,
excessive exhaust temperatures could
damage the catalytic converter or other
vehicle components.
The service engine soon indicator light
illuminates when the ignition is first
turned on prior to engine start to
check the bulb and to indicate
whether the vehicle is ready for
Inspection/Maintenance (I/M) testing.
Normally, the service engine soon light
will stay on until the engine is cranked,
then turn itself off if no malfunctions
are present. However, if after 15
seconds the service engine soon light
blinks eight times, it means that the
vehicle is not ready for I/M testing.
See
Emission Control System
(page 161).
98
Instrument Cluster E132353
Page 111 of 474
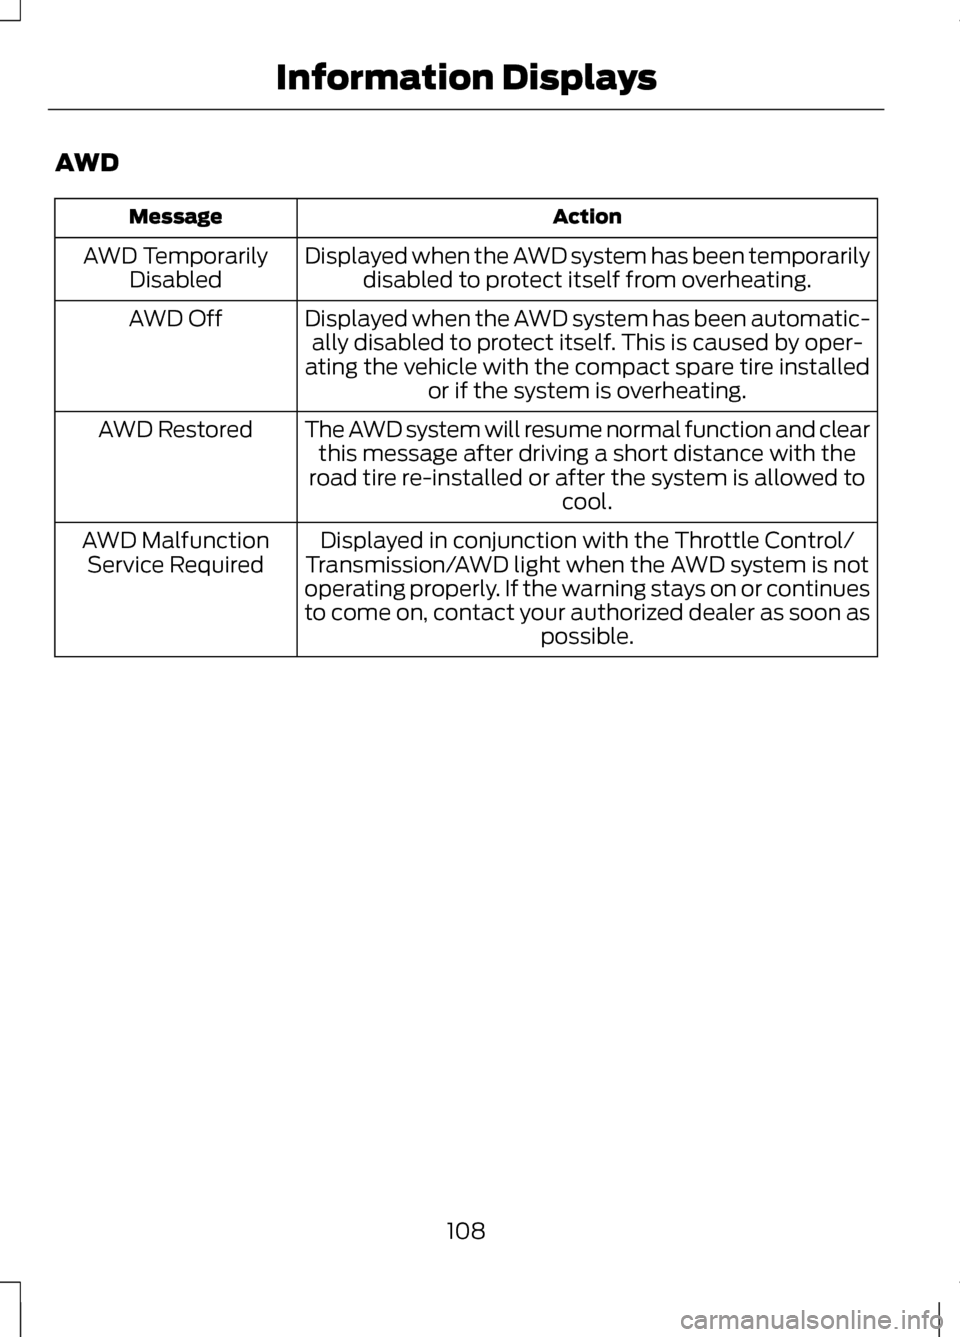
AWD
Action
Message
Displayed when the AWD system has been temporarilydisabled to protect itself from overheating.
AWD Temporarily
Disabled
Displayed when the AWD system has been automatic-ally disabled to protect itself. This is caused by oper-
ating the vehicle with the compact spare tire installed or if the system is overheating.
AWD Off
The AWD system will resume normal function and clearthis message after driving a short distance with the
road tire re-installed or after the system is allowed to cool.
AWD Restored
Displayed in conjunction with the Throttle Control/
Transmission/AWD light when the AWD system is not
operating properly. If the warning stays on or continues
to come on, contact your authorized dealer as soon as possible.
AWD Malfunction
Service Required
108
Information Displays
Page 121 of 474
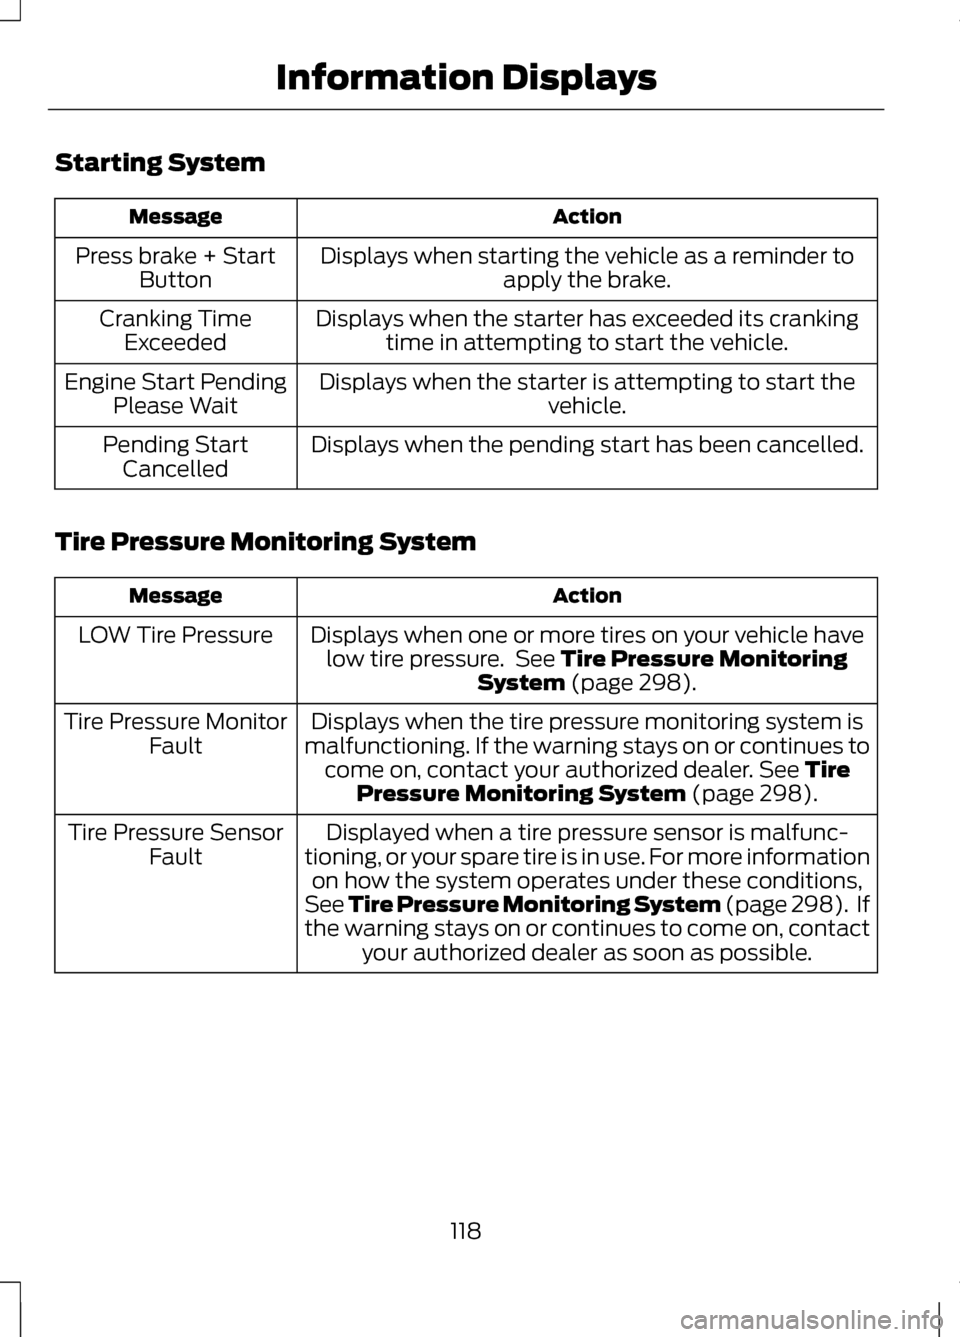
Starting System
Action
Message
Displays when starting the vehicle as a reminder toapply the brake.
Press brake + Start
Button
Displays when the starter has exceeded its crankingtime in attempting to start the vehicle.
Cranking Time
Exceeded
Displays when the starter is attempting to start the vehicle.
Engine Start Pending
Please Wait
Displays when the pending start has been cancelled.
Pending Start
Cancelled
Tire Pressure Monitoring System Action
Message
Displays when one or more tires on your vehicle havelow tire pressure. See Tire Pressure Monitoring
System (page 298).
LOW Tire Pressure
Displays when the tire pressure monitoring system is
malfunctioning. If the warning stays on or continues to come on, contact your authorized dealer.
See Tire
Pressure Monitoring System (page 298).
Tire Pressure Monitor
Fault
Displayed when a tire pressure sensor is malfunc-
tioning, or your spare tire is in use. For more information on how the system operates under these conditions,
See Tire Pressure Monitoring System (page 298). If
the warning stays on or continues to come on, contact your authorized dealer as soon as possible.
Tire Pressure Sensor
Fault
118
Information Displays
Page 160 of 474
If you have run out of fuel:
•
You may need to cycle the ignition
from off to on several times after
refueling to allow the fuel system
to pump the fuel from the tank to
the engine. On restarting, cranking
time will take a few seconds longer
than normal. With keyless ignition,
just start the engine. Crank time
will be longer than usual.
• Normally, adding 1 gallon (3.8
liters) of fuel is enough to restart
the engine. If the vehicle is out of
fuel and on a steep grade, more
than 1 gallon (3.8 liters) may be
required.
• The service engine soon indicator
may come on.
Refilling With a Portable Fuel
Container WARNINGS
Do not insert the nozzle of
portable fuel containers or
aftermarket funnels into the capless
fuel system. This could damage the
fuel system and its seal, and may
cause fuel to run onto the ground
instead of filling the tank, which could
result in serious personal injury. Do not try to pry open or push
open the capless fuel system
with foreign objects. This could
damage the fuel system and its seal
and cause injury to you or others. Note:
Do not use aftermarket funnels;
they will not work with the capless fuel
system and can damage it. The
included funnel has been specially
designed to work safely with your
vehicle.
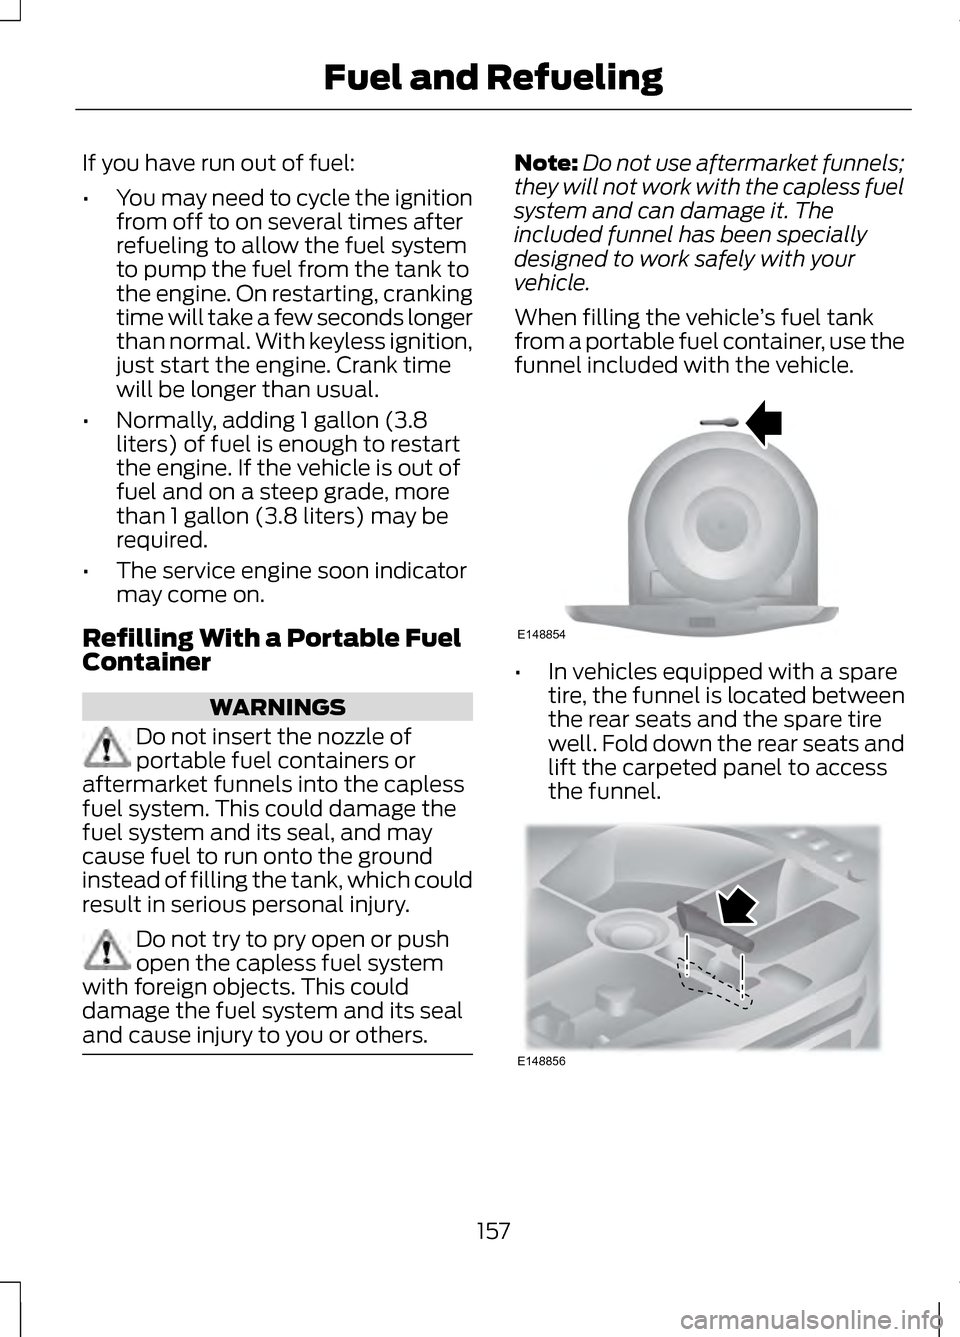
When filling the vehicle ’s fuel tank
from a portable fuel container, use the
funnel included with the vehicle. •
In vehicles equipped with a spare
tire, the funnel is located between
the rear seats and the spare tire
well. Fold down the rear seats and
lift the carpeted panel to access
the funnel. 157
Fuel and RefuelingE148854 E148856