light LINCOLN MKZ 2014 Manual PDF
[x] Cancel search | Manufacturer: LINCOLN, Model Year: 2014, Model line: MKZ, Model: LINCOLN MKZ 2014Pages: 468, PDF Size: 4.49 MB
Page 258 of 468
CHANGING A FUSE
Fuses
WARNING
Always replace a fuse with one
that has the specified amperage
rating. Using a fuse with a higher
amperage rating can cause severe
wire damage and could start a fire.
E142430
If electrical components in the vehicle
are not working, a fuse may have
blown. Blown fuses are identified by
a broken wire within the fuse. Check
the appropriate fuses before replacing
any electrical components.
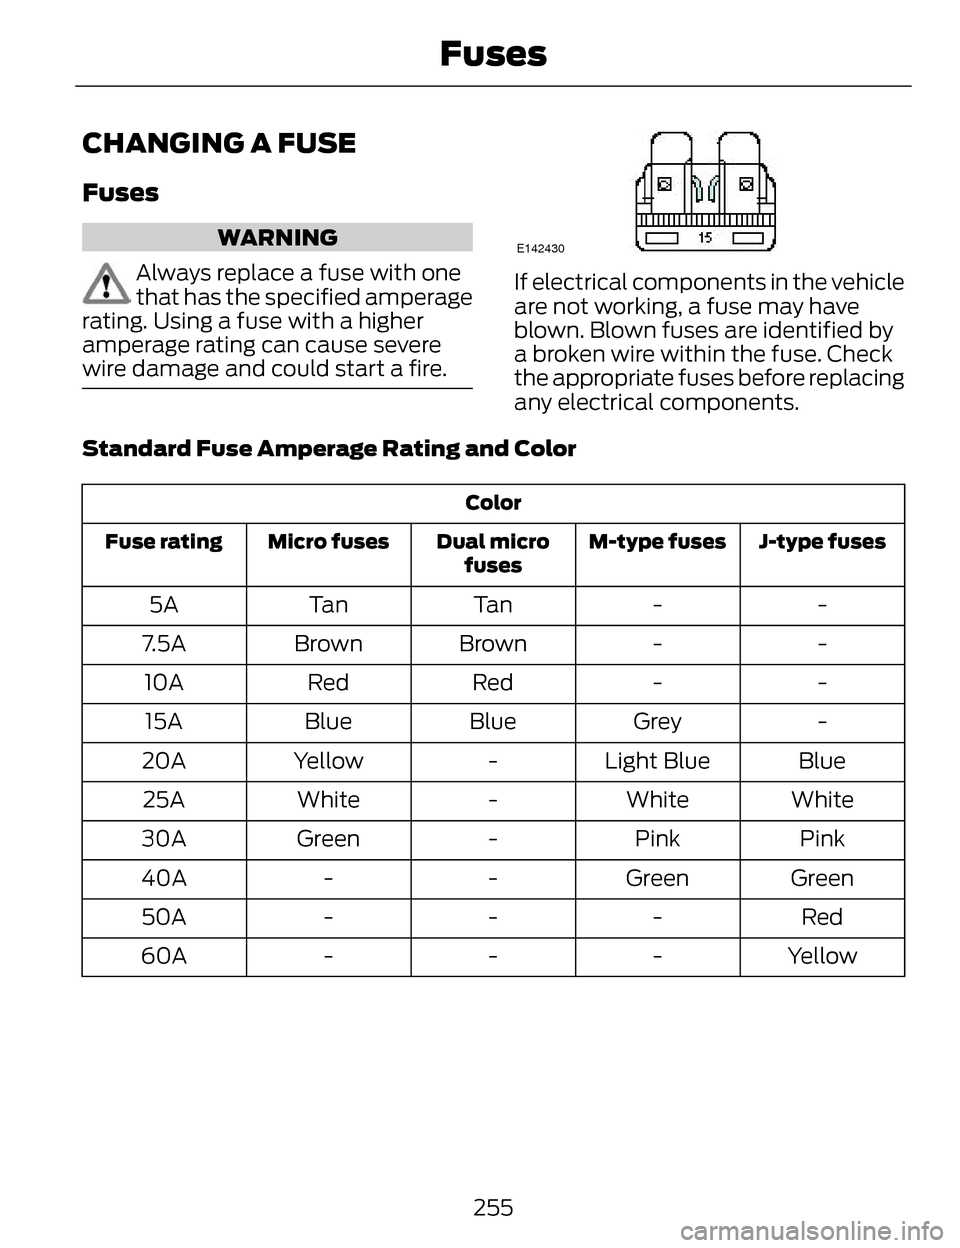
Standard Fuse Amperage Rating and Color
Color J-type fuses
M-type fuses
Dual micro
fuses
Micro fuses
Fuse rating
-
-
Ta n
Ta n
5A
-
-
Brown
Brown
7.5A
-
-
Red
Red
10A
-
Grey
Blue
Blue
15A
Blue
Light Blue
-
Yellow
20A
White
White
-
White
25A
Pink
Pink
-
Green
30A
Green
Green
-
-
40A
Red
-
-
-
50A
Yellow
-
-
-
60A
255
Fuses
Page 261 of 468
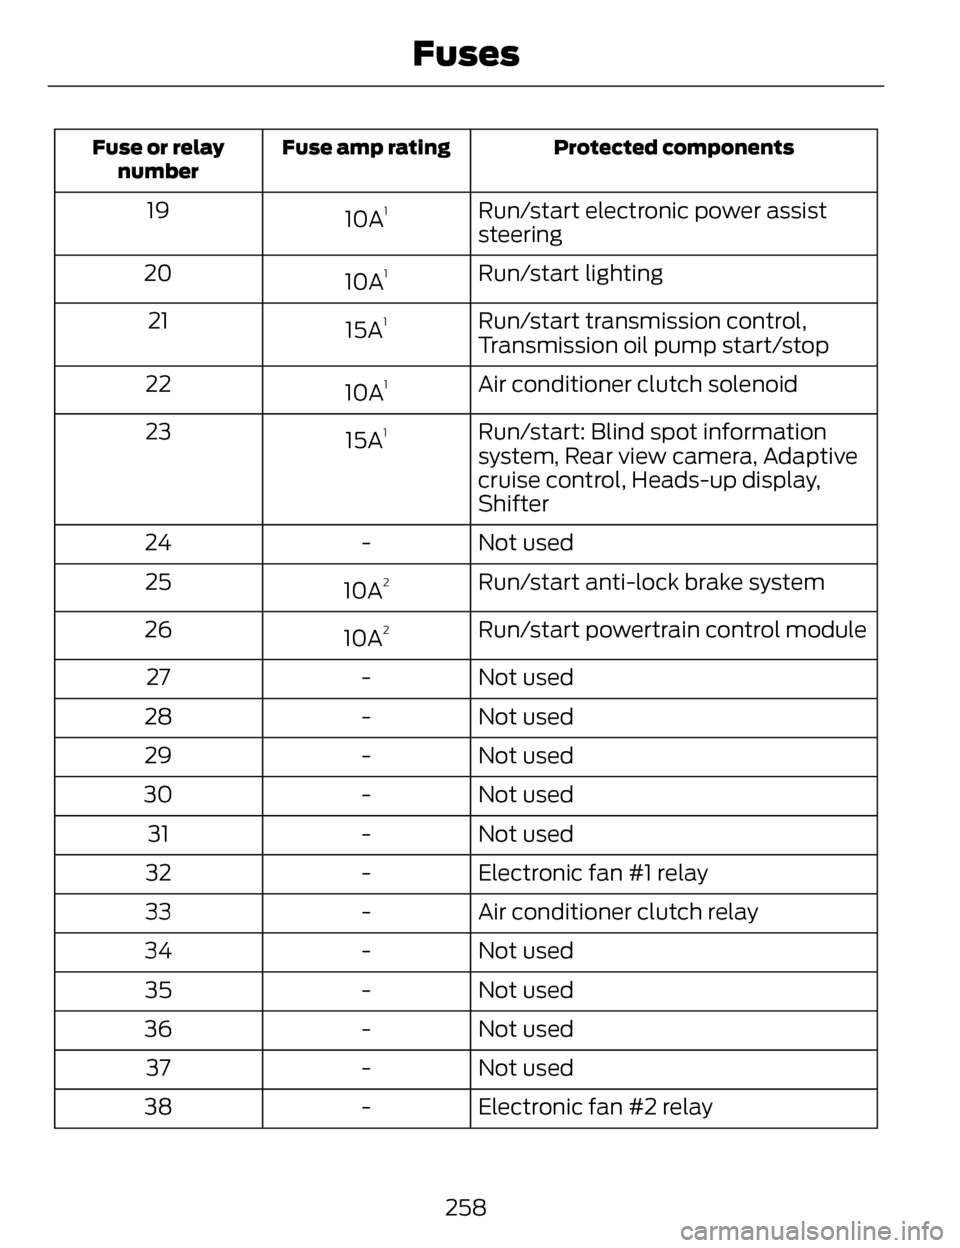
Protected components
Fuse amp rating
Fuse or relay
number
Run/start electronic power assist
steering
10A119
Run/start lighting
10A
120
Run/start transmission control,
Transmission oil pump start/stop
15A
121
Air conditioner clutch solenoid
10A
122
Run/start: Blind spot information
system, Rear view camera, Adaptive
cruise control, Heads-up display,
Shifter
15A
123
Not used
-
24
Run/start anti-lock brake system
10A
225
Run/start powertrain control module
10A
226
Not used
-
27
Not used
-
28
Not used
-
29
Not used
-
30
Not used
-
31
Electronic fan #1 relay
-
32
Air conditioner clutch relay
-
33
Not used
-
34
Not used
-
35
Not used
-
36
Not used
-
37
Electronic fan #2 relay
-
38
258
Fuses
Page 267 of 468
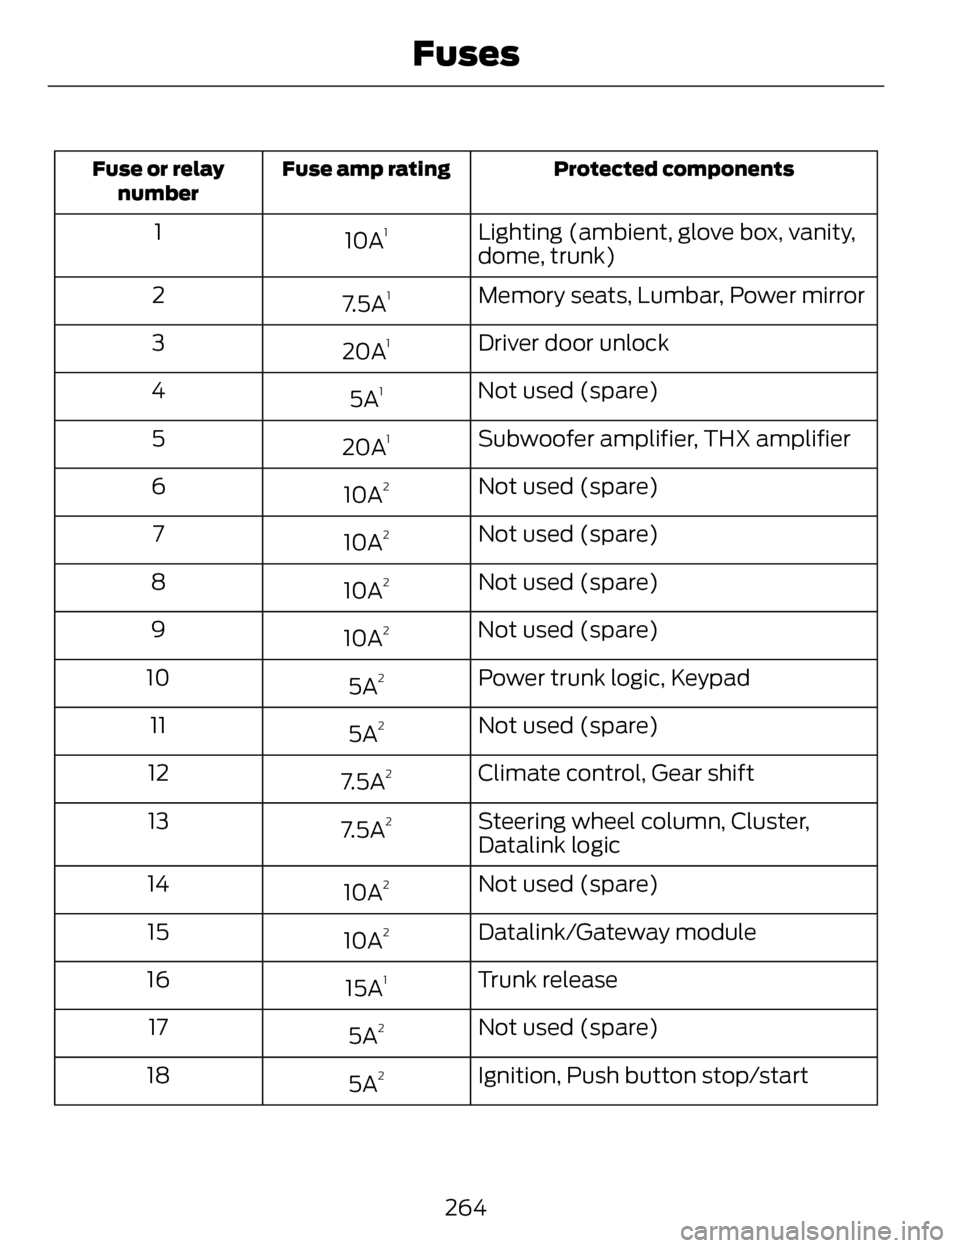
Protected components
Fuse amp rating
Fuse or relay
number
Lighting (ambient, glove box, vanity,
dome, trunk)
10A11
Memory seats, Lumbar, Power mirror
7.5A
12
Driver door unlock
20A
13
Not used (spare)
5A
14
Subwoofer amplifier, THX amplifier
20A
15
Not used (spare)
10A
26
Not used (spare)
10A
27
Not used (spare)
10A
28
Not used (spare)
10A
29
Power trunk logic, Keypad
5A
210
Not used (spare)
5A
211
Climate control, Gear shift
7.5A
212
Steering wheel column, Cluster,
Datalink logic
7.5A
213
Not used (spare)
10A
214
Datalink/Gateway module
10A
215
Trunk release
15A
116
Not used (spare)
5A
217
Ignition, Push button stop/start
5A
218
264
Fuses
Page 276 of 468
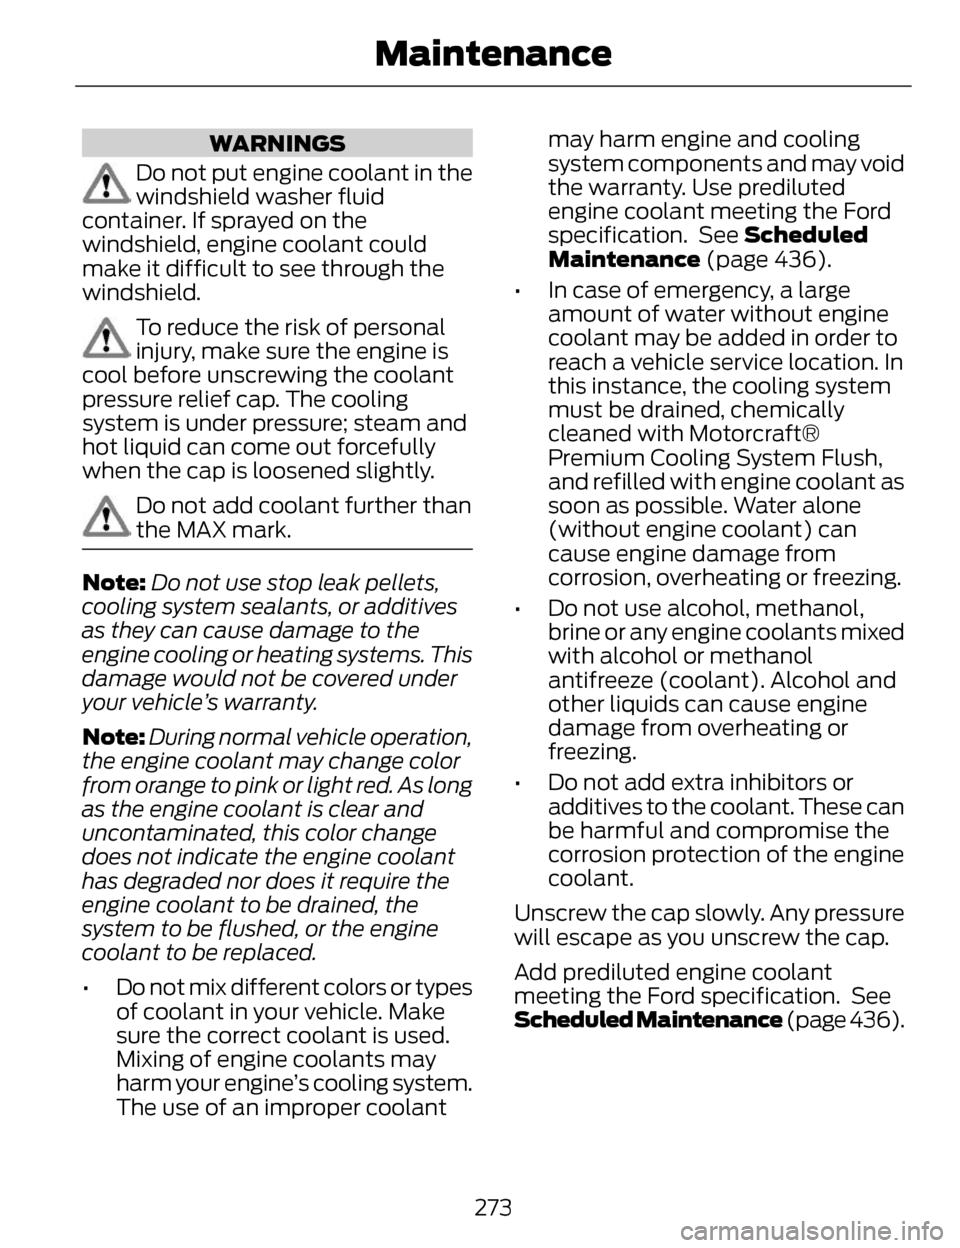
WARNINGS
Do not put engine coolant in the
windshield washer fluid
container. If sprayed on the
windshield, engine coolant could
make it difficult to see through the
windshield.
To reduce the risk of personal
injury, make sure the engine is
cool before unscrewing the coolant
pressure relief cap. The cooling
system is under pressure; steam and
hot liquid can come out forcefully
when the cap is loosened slightly.
Do not add coolant further than
the MAX mark.
Note: Do not use stop leak pellets,
cooling system sealants, or additives
as they can cause damage to the
engine cooling or heating systems. This
damage would not be covered under
your vehicle’s warranty.
Note: During normal vehicle operation,
the engine coolant may change color
from orange to pink or light red. As long
as the engine coolant is clear and
uncontaminated, this color change
does not indicate the engine coolant
has degraded nor does it require the
engine coolant to be drained, the
system to be flushed, or the engine
coolant to be replaced.
• Do not mix different colors or types of coolant in your vehicle. Make
sure the correct coolant is used.
Mixing of engine coolants may
harm your engine’s cooling system.
The use of an improper coolant may harm engine and cooling
system components and may void
the warranty. Use prediluted
engine coolant meeting the Ford
specification. See Scheduled
Maintenance (page 436).
• In case of emergency, a large amount of water without engine
coolant may be added in order to
reach a vehicle service location. In
this instance, the cooling system
must be drained, chemically
cleaned with Motorcraft®
Premium Cooling System Flush,
and refilled with engine coolant as
soon as possible. Water alone
(without engine coolant) can
cause engine damage from
corrosion, overheating or freezing.
• Do not use alcohol, methanol, brine or any engine coolants mixed
with alcohol or methanol
antifreeze (coolant). Alcohol and
other liquids can cause engine
damage from overheating or
freezing.
• Do not add extra inhibitors or additives to the coolant. These can
be harmful and compromise the
corrosion protection of the engine
coolant.
Unscrew the cap slowly. Any pressure
will escape as you unscrew the cap.
Add prediluted engine coolant
meeting the Ford specification. See
Scheduled Maintenance (page 436).
273
Maintenance
Page 284 of 468
CHANGING THE 12V
BATTERY
WARNINGS
Batteries normally produce
explosive gases which can cause
personal injury. Therefore, do not
allow flames, sparks or lighted
substances to come near the battery.
When working near the battery,
always shield your face and protect
your eyes. Always provide proper
ventilation.
When lifting a plastic-cased
battery, excessive pressure on
the end walls could cause acid to flow
through the vent caps, resulting in
personal injury and damage to the
vehicle or battery. Lift the battery with
a battery carrier or with your hands on
opposite corners.
Keep batteries out of reach of
children. Batteries contain
sulfuric acid. Avoid contact with skin,
eyes or clothing. Shield your eyes
when working near the battery to
protect against possible splashing of
acid solution. In case of acid contact
with skin or eyes, flush immediately
with water for a minimum of 15
minutes and get prompt medical
attention. If acid is swallowed, call a
physician immediately.
Your vehicle is equipped with a
Motorcraft® maintenance-free
battery which normally does not
require additional water during its life
of service. Note:
If your battery has a
cover/shield, make sure it is reinstalled
after the battery has been cleaned or
replaced.
Note: See an authorized dealer for low
voltage battery access, testing, or
replacement.
When a low voltage battery
replacement is necessary, see an
authorized dealer to replace the low
voltage battery with a Ford
recommended replacement low
voltage battery that matches the
electrical requirements of the vehicle
To ensure proper operation of the
battery management system (BMS),
do not allow a technician to connect
any electrical device ground
connection directly to the low voltage
battery negative post. A connection
at the low voltage battery negative
post can cause inaccurate
measurements of the battery
condition and potential incorrect
system operation.
Note: If a person adds electrical or
electronic accessories or components
to the vehicle, the accessories or
components may adversely affect the
low voltage battery performance and
durability and may also affect the
performance of other electrical
systems in the vehicle.
For longer, trouble-free operation,
keep the top of the battery clean and
dry. Also, make certain the battery
cables are always tightly fastened to
the battery terminals.
281
Maintenance
Page 288 of 468
ADJUSTING THE
HEADLAMPS
Vertical Aim Adjustment
The headlamps on your vehicle are
properly aimed at the assembly plant.
If your vehicle has been in an accident,
the alignment of your headlamps
should be checked by your authorized
dealer.
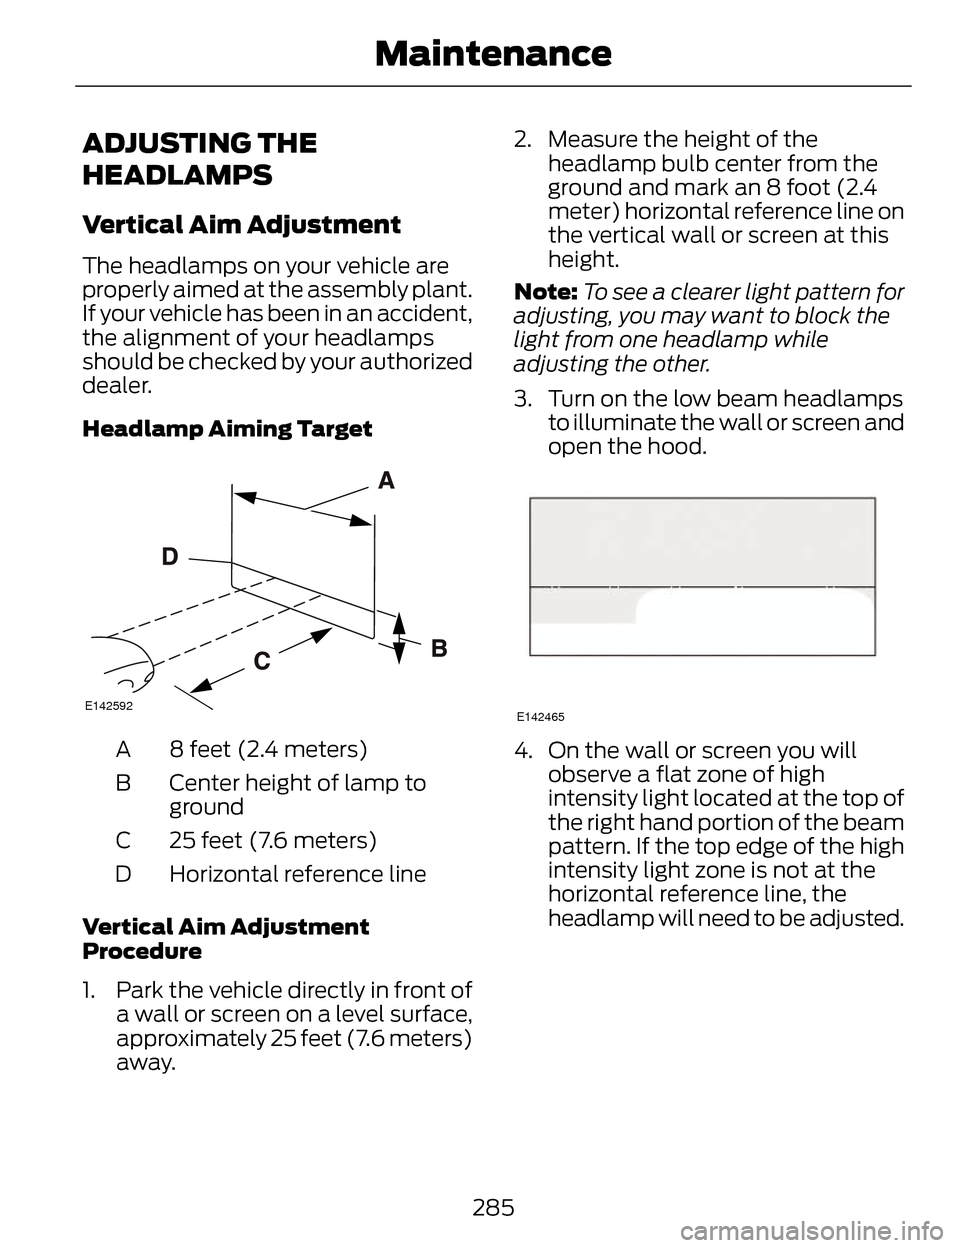
Headlamp Aiming Target
E142592
8 feet (2.4 meters)
A
Center height of lamp to
ground
B
25 feet (7.6 meters)
C
Horizontal reference line
D
Vertical Aim Adjustment
Procedure
1. Park the vehicle directly in front of a wall or screen on a level surface,
approximately 25 feet (7.6 meters)
away. 2. Measure the height of the
headlamp bulb center from the
ground and mark an 8 foot (2.4
meter) horizontal reference line on
the vertical wall or screen at this
height.
Note: To see a clearer light pattern for
adjusting, you may want to block the
light from one headlamp while
adjusting the other.
3. Turn on the low beam headlamps to illuminate the wall or screen and
open the hood.
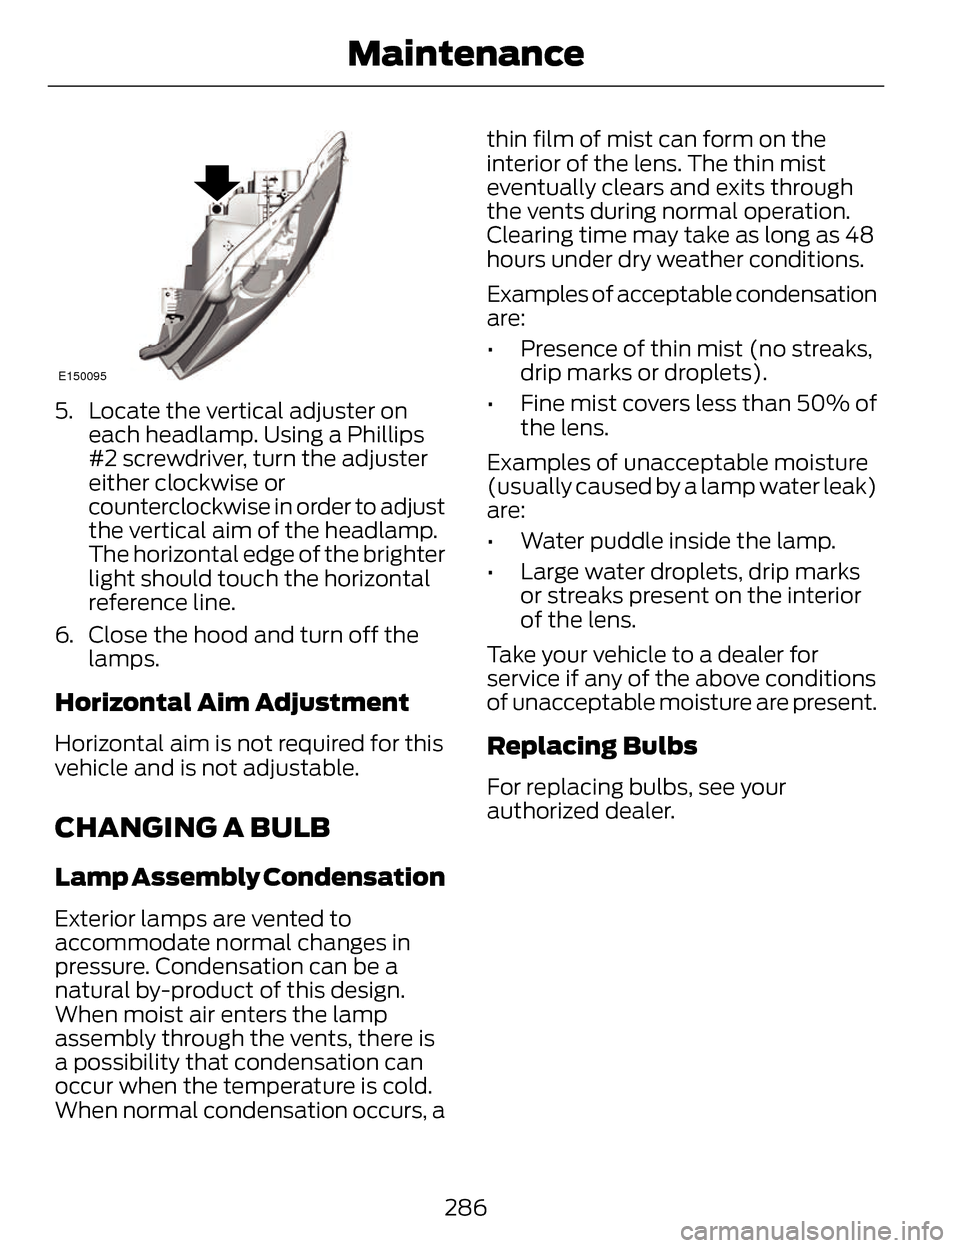
E142465
4. On the wall or screen you willobserve a flat zone of high
intensity light located at the top of
the right hand portion of the beam
pattern. If the top edge of the high
intensity light zone is not at the
horizontal reference line, the
headlamp will need to be adjusted.
285
Maintenance
Page 289 of 468
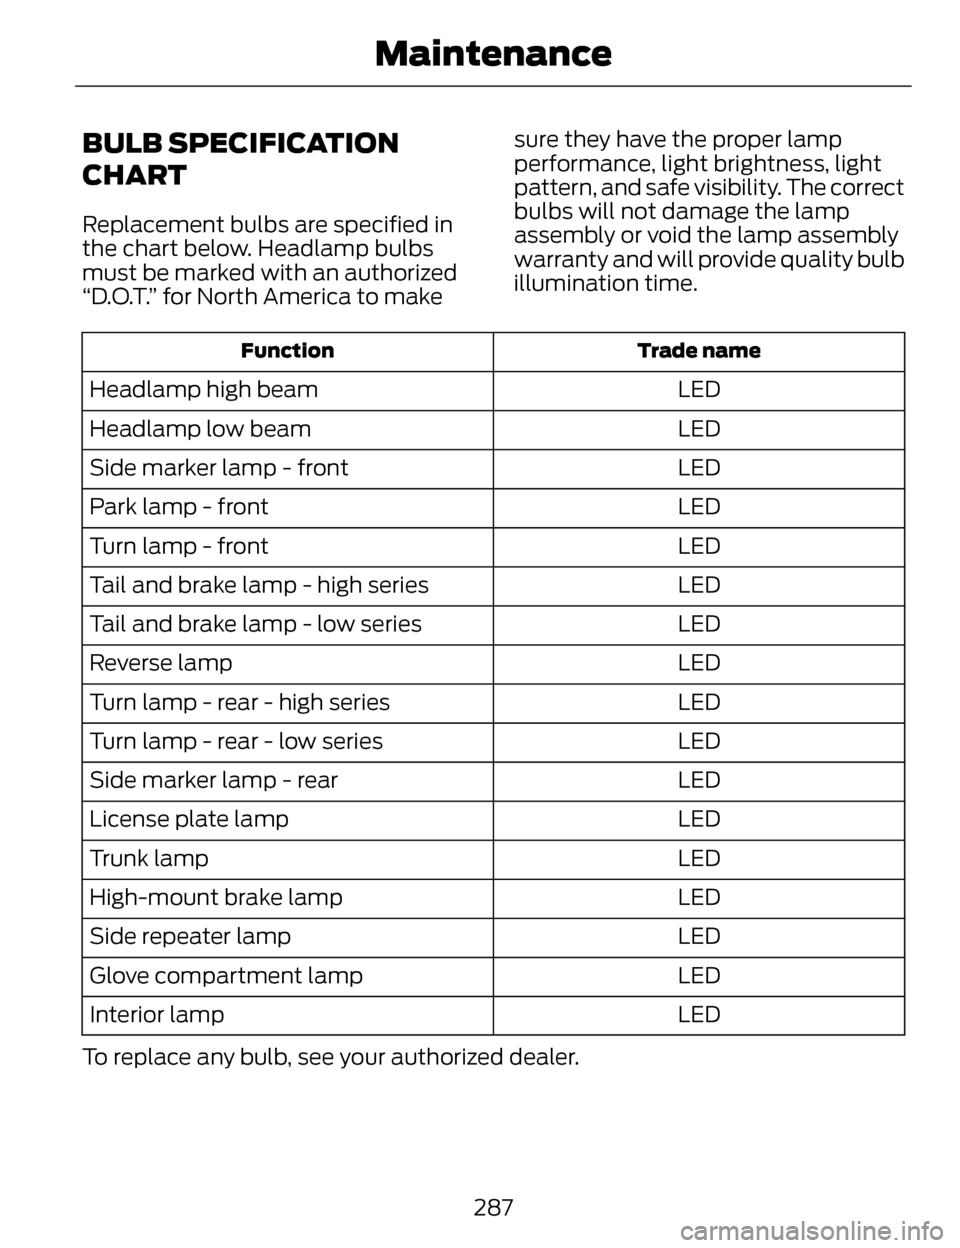
E150095
5. Locate the vertical adjuster oneach headlamp. Using a Phillips
#2 screwdriver, turn the adjuster
either clockwise or
counterclockwise in order to adjust
the vertical aim of the headlamp.
The horizontal edge of the brighter
light should touch the horizontal
reference line.
6. Close the hood and turn off the lamps.
Horizontal Aim Adjustment
Horizontal aim is not required for this
vehicle and is not adjustable.
CHANGING A BULB
Lamp Assembly Condensation
Exterior lamps are vented to
accommodate normal changes in
pressure. Condensation can be a
natural by-product of this design.
When moist air enters the lamp
assembly through the vents, there is
a possibility that condensation can
occur when the temperature is cold.
When normal condensation occurs, a thin film of mist can form on the
interior of the lens. The thin mist
eventually clears and exits through
the vents during normal operation.
Clearing time may take as long as 48
hours under dry weather conditions.
Examples of acceptable condensation
are:
• Presence of thin mist (no streaks,
drip marks or droplets).
• Fine mist covers less than 50% of the lens.
Examples of unacceptable moisture
(usually caused by a lamp water leak)
are:
• Water puddle inside the lamp.
• Large water droplets, drip marks or streaks present on the interior
of the lens.
Take your vehicle to a dealer for
service if any of the above conditions
of unacceptable moisture are present.
Replacing Bulbs
For replacing bulbs, see your
authorized dealer.
286
Maintenance
Page 290 of 468
BULB SPECIFICATION
CHART
Replacement bulbs are specified in
the chart below. Headlamp bulbs
must be marked with an authorized
“D.O.T.” for North America to makesure they have the proper lamp
performance, light brightness, light
pattern, and safe visibility. The correct
bulbs will not damage the lamp
assembly or void the lamp assembly
warranty and will provide quality bulb
illumination time.
Trade name
Function
LED
Headlamp high beam
LED
Headlamp low beam
LED
Side marker lamp - front
LED
Park lamp - front
LED
Turn lamp - front
LED
Tail and brake lamp - high series
LED
Tail and brake lamp - low series
LED
Reverse lamp
LED
Turn lamp - rear - high series
LED
Turn lamp - rear - low series
LED
Side marker lamp - rear
LED
License plate lamp
LED
Trunk lamp
LED
High-mount brake lamp
LED
Side repeater lamp
LED
Glove compartment lamp
LED
Interior lamp
To replace any bulb, see your authorized dealer.
287
Maintenance
Page 291 of 468
GENERAL INFORMATION
Your Ford or Lincoln authorized dealer
has many quality products available
to clean your vehicle and protect its
finishes.
CLEANING PRODUCTS
For best results, use the following
products or products of equivalent
quality:
Motorcraft Bug and Tar Remover
(ZC-42)
Motorcraft Custom Bright Metal
Cleaner (ZC-15)
Motorcraft Detail Wash (ZC-3-A)
Motorcraft Dusting Cloth (ZC-24)
Motorcraft Engine Shampoo and
Degreaser (U.S. only) (ZC-20)
Motorcraft Engine Shampoo (Canada
only) (CXC-66-A)
Motorcraft Multi-Purpose Cleaner
(Canada only) (CXC-101)
Motorcraft Premium Glass Cleaner
(Canada only) (CXC-100)
Motorcraft Premium Quality
Windshield Washer Fluid (Canada
only) [CXC-37-(A, B, D or F)]
Motorcraft Premium Windshield Wash
Concentrates (U.S. only) (ZC-32-A1
or ZC-32-B1)
Motorcraft Professional Strength
Carpet & Upholstery Cleaner (ZC-54)
Motorcraft Spot and Stain Remover
(U.S. only) (ZC-14)Motorcraft Ultra-Clear Spray Glass
Cleaner (ZC-23)
Motorcraft Vinyl Cleaner (Canada
only) (CXC-93)
Motorcraft Wheel and Tire Cleaner
(ZC-37-A)
CLEANING THE EXTERIOR
Wash your vehicle regularly with cool
or lukewarm water and a neutral pH
shampoo, such as Motorcraft® Detail
Wash.
• Never use strong household
detergents or soap, such as dish
washing or laundry liquid. These
products can discolor and spot
painted surfaces.
• Never wash a vehicle that is “hot to the touch” or during exposure
to strong, direct sunlight.
• Dry your vehicle with a chamois or soft terry cloth towel in order to
eliminate water spotting.
• Immediately remove items such as gasoline, diesel fuel, bird
droppings and insect deposits
because they can cause damage
to your vehicle’s paintwork and
trim over time. Use Motorcraft Bug
and Tar Remover.
• Remove any exterior accessories, such as antennas, before entering
a car wash.
Note: Suntan lotions and insect
repellents can damage any painted
surface; if these substances come in
contact with your vehicle, wash off as
soon as possible.
288
Vehicle Care
Page 293 of 468
When washing and waxing, park your
vehicle in a shaded area out of direct
sunlight. Always wash your vehicle
before applying wax.
• Use a quality wax that does notcontain abrasives.
• Follow the manufacturer’s instructions to apply and remove
the wax.
• Apply a small amount of wax in a back-and-forth motion, not in
circles.
• Do not allow wax to come in contact with any non-body
(low-gloss black) colored trim.
The wax will discolor or stain the
parts over time.
• Roof racks.
• Bumpers.
• Grained door handles.
• Side mouldings.
• Mirror housings.
• Windshield cowl area.
• Do not apply wax to glass areas.
• After waxing, your car's paint should feel smooth, and be free of
streaks and smudges.
CLEANING THE ENGINE
Engines are more efficient when they
are clean because grease and dirt
buildup keep the engine warmer than
normal. When washing:
• Take care when using a power
washer to clean the engine. The
high-pressure fluid could penetrate
the sealed parts and cause
damage.
• Do not spray a hot engine with cold water to avoid cracking the engine
block or other engine components.
• Spray Motorcraft® Engine Shampoo and Degreaser on all
parts that require cleaning and
pressure rinse clean. In Canada,
use Motorcraft® Engine Shampoo.
• Never wash or rinse the engine while it is hot or running; water in
the running engine may cause
internal damage.
• Never wash or rinse any ignition coil, spark plug wire or spark plug
well, or the area in and around
these locations.
• Cover the battery, power distribution box, and air filter
assembly to prevent water
damage when cleaning the engine.
CLEANING THE WINDOWS
AND WIPER BLADES
Clean your windows and wiper blades
regularly. If the wipers do not wipe
properly, substances on the vehicle’s
glass or the wiper blades may cause
squeaking or chatter noise from the
blades, and streaking and smearing
of the windshield.
290
Vehicle Care