check engine light LINCOLN MKZ 2014 Owners Manual
[x] Cancel search | Manufacturer: LINCOLN, Model Year: 2014, Model line: MKZ, Model: LINCOLN MKZ 2014Pages: 468, PDF Size: 4.49 MB
Page 58 of 468
This feature allows you to start your
vehicle from outside the vehicle. The
transmitter has an extended operating
range.
Vehicles with automatic climate
control can be configured to operate
when the vehicle is remote started.
See Climate Control (page 128). A
manual climate control system will
run at the setting it was set to when
you switched the vehicle off.
Many states and provinces have
restrictions for the use of remote start.
Check your local and state or
provincial laws for specific
requirements regarding remote start
systems.
The remote start system will not work
if:
• the ignition is on
• the alarm system is triggered
• you disable the feature
• the hood is open
• the transmission is not in P
• the vehicle battery voltage is too low
• the service engine soon light is on.
Remote Control Feedback
An LED on the remote control
provides status feedback of remote
start or stop commands.
Status
LED
Remote start or
extension
successful
Solid green
Remote stopsuccessful;engine off
Solid red
Remote start orstop failed
Blinking red
Waiting for
status update
Blinking green
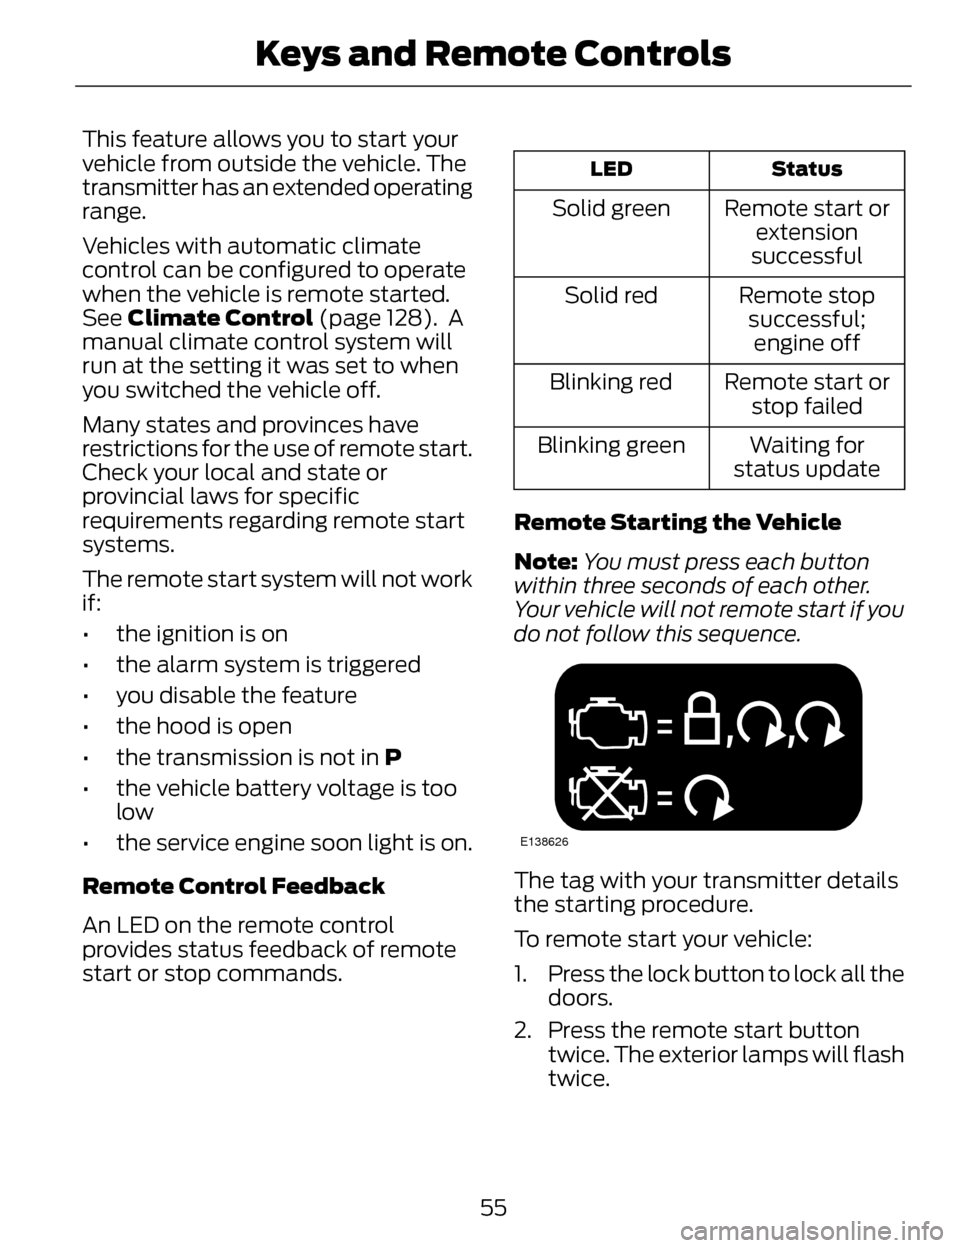
Remote Starting the Vehicle
Note: You must press each button
within three seconds of each other.
Your vehicle will not remote start if you
do not follow this sequence.
E138626
The tag with your transmitter details
the starting procedure.
To remote start your vehicle:
1. Press the lock button to lock all the doors.
2. Press the remote start button twice. The exterior lamps will flash
twice.
55
Keys and Remote Controls
Page 101 of 468
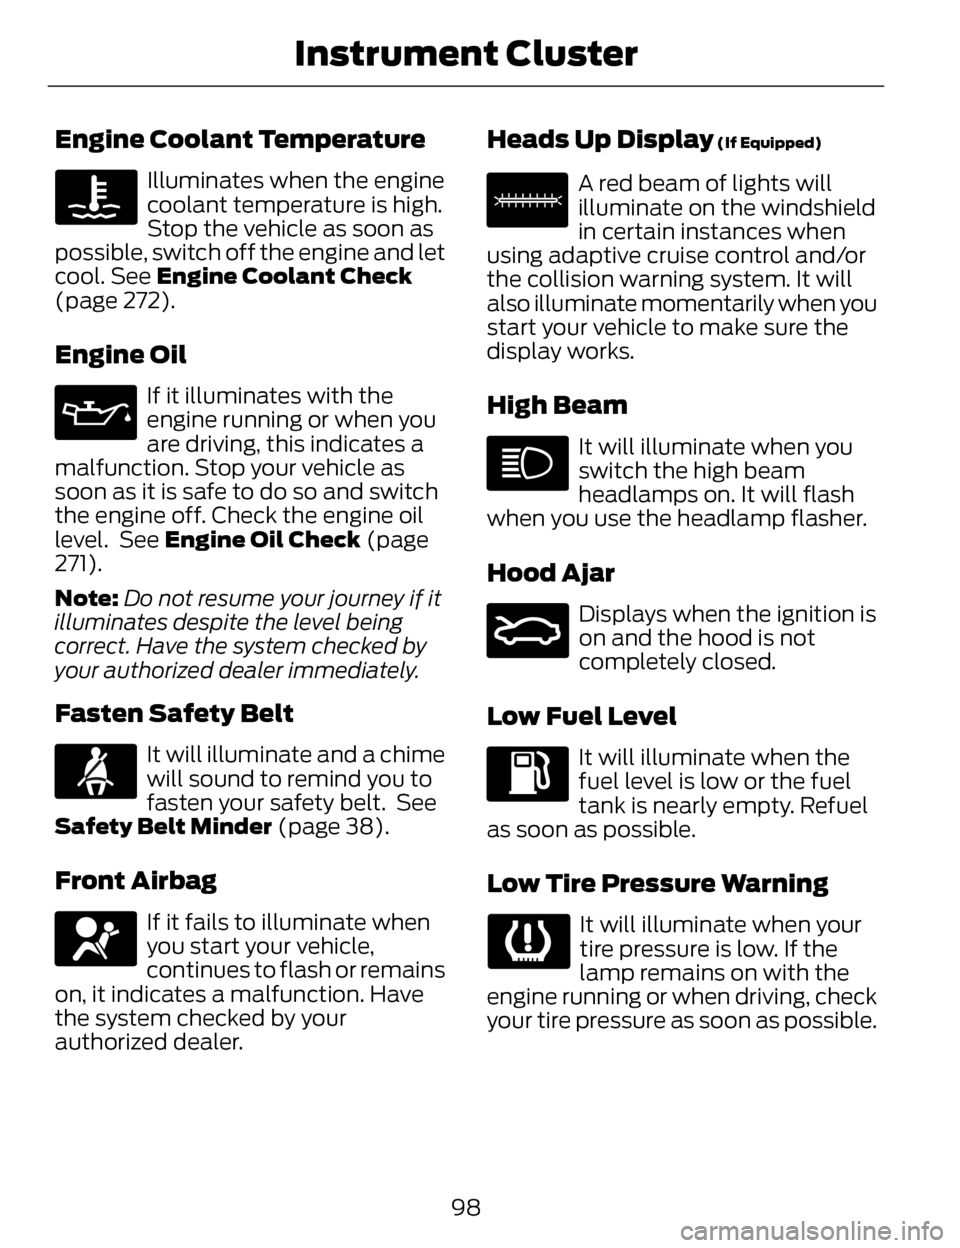
Engine Coolant Temperature
Illuminates when the engine
coolant temperature is high.
Stop the vehicle as soon as
possible, switch off the engine and let
cool. See Engine Coolant Check
(page 272).
Engine Oil
If it illuminates with the
engine running or when you
are driving, this indicates a
malfunction. Stop your vehicle as
soon as it is safe to do so and switch
the engine off. Check the engine oil
level. See Engine Oil Check (page
271).
Note: Do not resume your journey if it
illuminates despite the level being
correct. Have the system checked by
your authorized dealer immediately.
Fasten Safety Belt
It will illuminate and a chime
will sound to remind you to
fasten your safety belt. See
Safety Belt Minder (page 38).
Front Airbag
If it fails to illuminate when
you start your vehicle,
continues to flash or remains
on, it indicates a malfunction. Have
the system checked by your
authorized dealer.
Heads Up Display (If Equipped)
E156133
A red beam of lights will
illuminate on the windshield
in certain instances when
using adaptive cruise control and/or
the collision warning system. It will
also illuminate momentarily when you
start your vehicle to make sure the
display works.
High Beam
It will illuminate when you
switch the high beam
headlamps on. It will flash
when you use the headlamp flasher.
Hood Ajar
E159324
Displays when the ignition is
on and the hood is not
completely closed.
Low Fuel Level
It will illuminate when the
fuel level is low or the fuel
tank is nearly empty. Refuel
as soon as possible.
Low Tire Pressure Warning
It will illuminate when your
tire pressure is low. If the
lamp remains on with the
engine running or when driving, check
your tire pressure as soon as possible.
98
Instrument Cluster
Page 102 of 468
It will also illuminate momentarily
when you switch the ignition on to
confirm the lamp is functional. If it
does not illuminate when you switch
the ignition on, or begins to flash at
any time, have the system checked by
your authorized dealer.
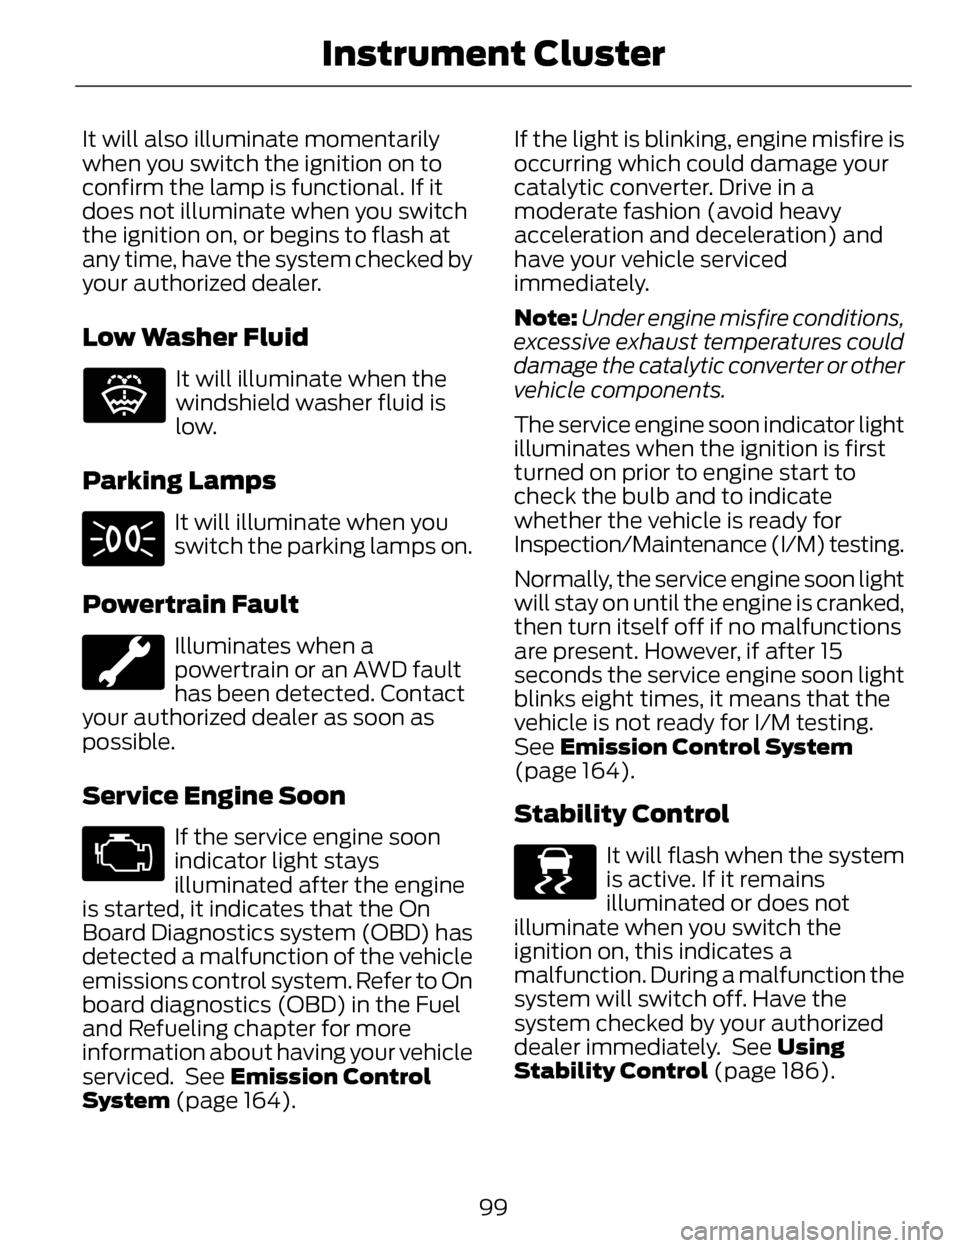
Low Washer Fluid
E132353
It will illuminate when the
windshield washer fluid is
low.
Parking Lamps
It will illuminate when you
switch the parking lamps on.
Powertrain Fault
Illuminates when a
powertrain or an AWD fault
has been detected. Contact
your authorized dealer as soon as
possible.
Service Engine Soon
If the service engine soon
indicator light stays
illuminated after the engine
is started, it indicates that the On
Board Diagnostics system (OBD) has
detected a malfunction of the vehicle
emissions control system. Refer to On
board diagnostics (OBD) in the Fuel
and Refueling chapter for more
information about having your vehicle
serviced. See Emission Control
System (page 164). If the light is blinking, engine misfire is
occurring which could damage your
catalytic converter. Drive in a
moderate fashion (avoid heavy
acceleration and deceleration) and
have your vehicle serviced
immediately.
Note:
Under engine misfire conditions,
excessive exhaust temperatures could
damage the catalytic converter or other
vehicle components.
The service engine soon indicator light
illuminates when the ignition is first
turned on prior to engine start to
check the bulb and to indicate
whether the vehicle is ready for
Inspection/Maintenance (I/M) testing.
Normally, the service engine soon light
will stay on until the engine is cranked,
then turn itself off if no malfunctions
are present. However, if after 15
seconds the service engine soon light
blinks eight times, it means that the
vehicle is not ready for I/M testing.
See Emission Control System
(page 164).Stability Control
E138639
It will flash when the system
is active. If it remains
illuminated or does not
illuminate when you switch the
ignition on, this indicates a
malfunction. During a malfunction the
system will switch off. Have the
system checked by your authorized
dealer immediately. See Using
Stability Control (page 186).
99
Instrument Cluster
Page 106 of 468
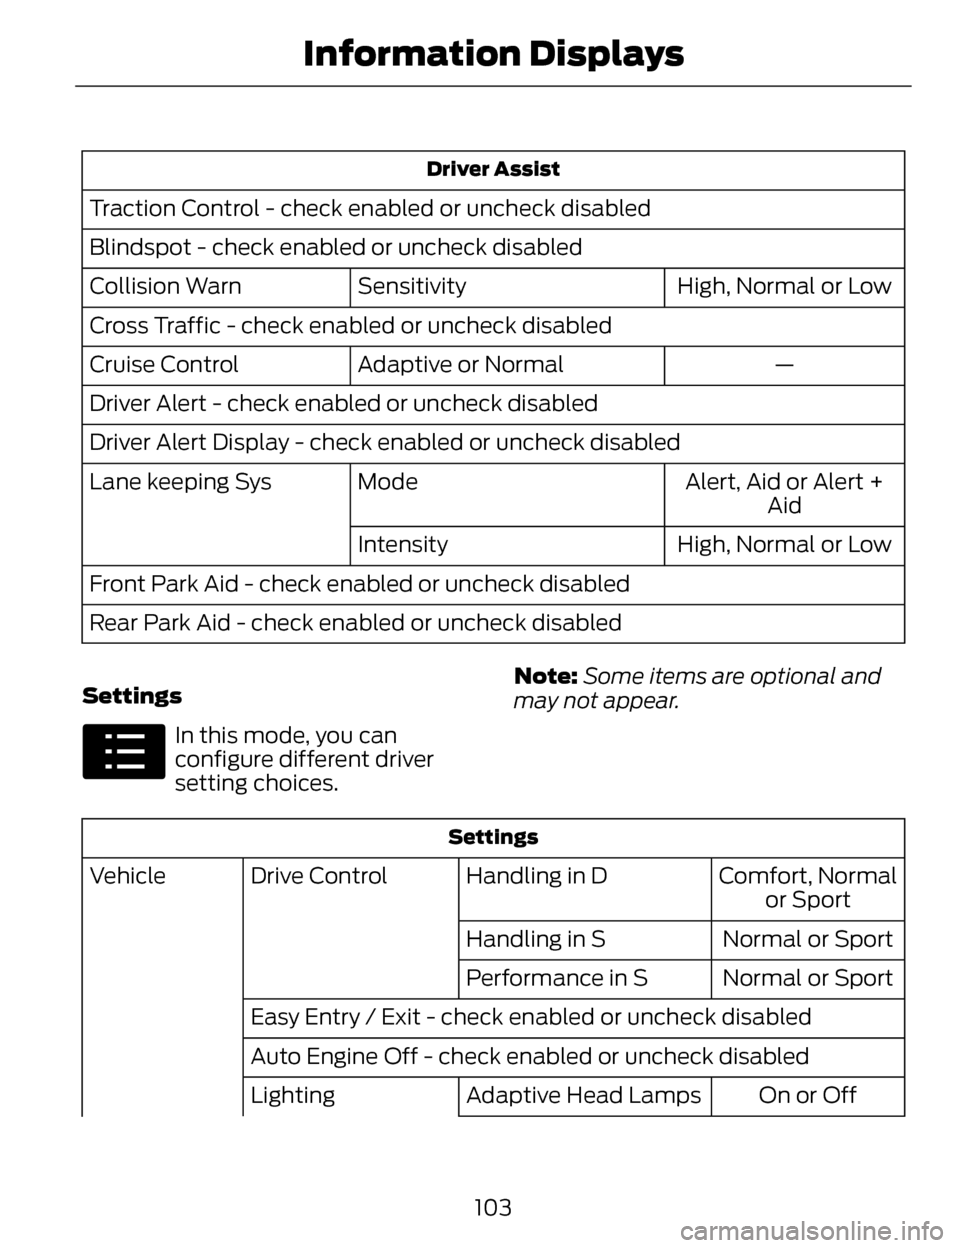
Driver Assist
Traction Control - check enabled or uncheck disabled
Blindspot - check enabled or uncheck disabledHigh, Normal or Low
Sensitivity
Collision Warn
Cross Traffic - check enabled or uncheck disabled
—
Adaptive or Normal
Cruise Control
Driver Alert - check enabled or uncheck disabled
Driver Alert Display - check enabled or uncheck disabled
Alert, Aid or Alert +Aid
Mode
Lane keeping Sys
High, Normal or Low
Intensity
Front Park Aid - check enabled or uncheck disabled
Rear Park Aid - check enabled or uncheck disabled
Settings
E100023
In this mode, you can
configure different driver
setting choices. Note:
Some items are optional and
may not appear.
Settings
Comfort, Normal or Sport
Handling in D
Drive Control
Vehicle
Normal or Sport
Handling in S
Normal or Sport
Performance in S
Easy Entry / Exit - check enabled or uncheck disabled
Auto Engine Off - check enabled or uncheck disabled On or Off
Adaptive Head Lamps
Lighting
103
Information Displays
Page 155 of 468
The keyless starting system has three
modes:
•Off: Turns the ignition off.
• Without applying the brake
pedal, press and release the
button once when the ignition
is in the on mode, or when the
engine is running but the
vehicle is not moving.
• On: All electrical circuits are
operational and the warning lamps
and indicators illuminate.
• Without applying the brake
pedal, press and release the
button once.
• Start: Starts the engine.
• Press the brake pedal, and then
press the button for any length
of time. An indicator light on the
button illuminates when then
ignition is on and when the
engine starts.
STARTING A GASOLINE
ENGINE
When you start the engine, the idle
speed increases, this helps to warm
up the engine. If the engine idle speed
does not slow down automatically,
have your vehicle checked by an
authorized dealer.
Before starting the engine, check the
following:
• Make sure all occupants havefastened their safety belts.
• Make sure the headlamps and electrical accessories are off. • Make sure the parking brake is on.
• Put the transmission in P.
Note:
Do not touch the accelerator
pedal.
1. Fully press the brake pedal.
2. Press the button.
The system does not function if:
• The key frequencies are jammed.
• The key battery has no charge.
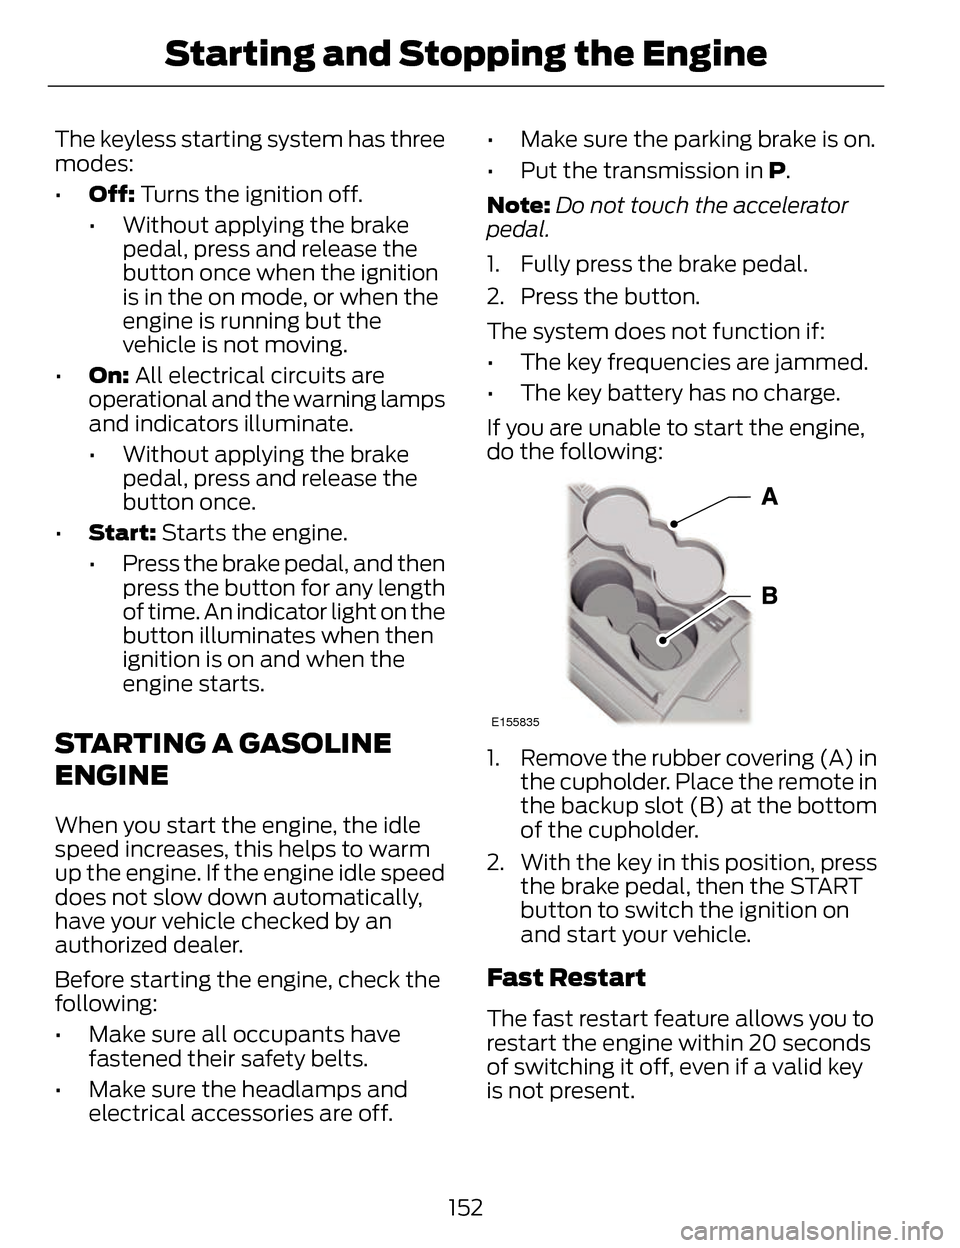
If you are unable to start the engine,
do the following:
E155835
1. Remove the rubber covering (A) in the cupholder. Place the remote in
the backup slot (B) at the bottom
of the cupholder.
2. With the key in this position, press the brake pedal, then the START
button to switch the ignition on
and start your vehicle.
Fast Restart
The fast restart feature allows you to
restart the engine within 20 seconds
of switching it off, even if a valid key
is not present.
152
Starting and Stopping the Engine
Page 179 of 468
Under severe operating conditions,
the A/C may cycle on and off to
protect overheating of the engine.
Avoid excessive speed because
vehicle momentum can work against
you and cause the vehicle to become
stuck to the point that assistance may
be required from another vehicle.
Remember, you may be able to back
out the way you came if you proceed
with caution.
Mud and Water
If you must drive through high water,
drive slowly. Traction or brake
capability may be limited.
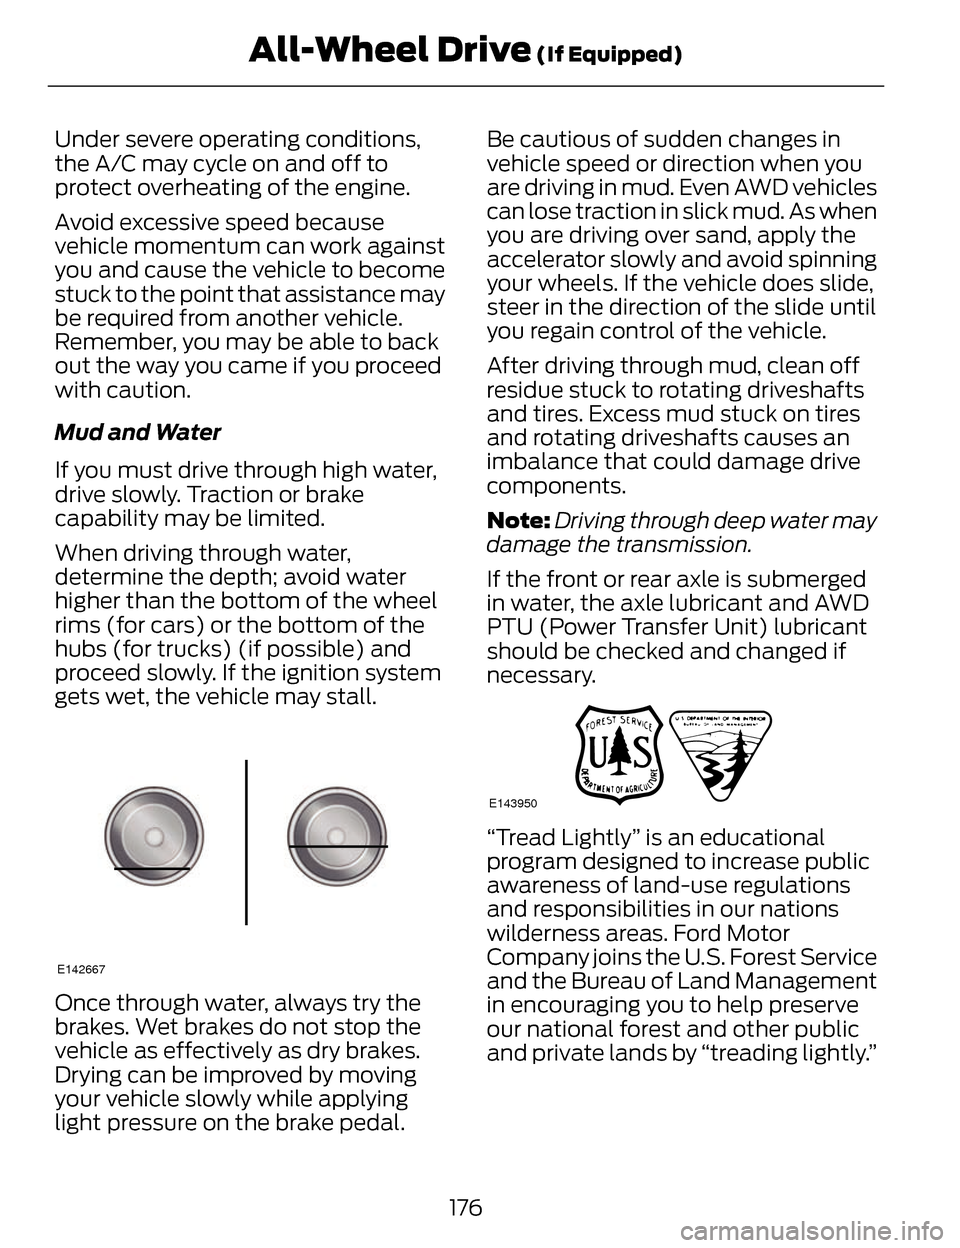
When driving through water,
determine the depth; avoid water
higher than the bottom of the wheel
rims (for cars) or the bottom of the
hubs (for trucks) (if possible) and
proceed slowly. If the ignition system
gets wet, the vehicle may stall.
E142667
Once through water, always try the
brakes. Wet brakes do not stop the
vehicle as effectively as dry brakes.
Drying can be improved by moving
your vehicle slowly while applying
light pressure on the brake pedal.Be cautious of sudden changes in
vehicle speed or direction when you
are driving in mud. Even AWD vehicles
can lose traction in slick mud. As when
you are driving over sand, apply the
accelerator slowly and avoid spinning
your wheels. If the vehicle does slide,
steer in the direction of the slide until
you regain control of the vehicle.
After driving through mud, clean off
residue stuck to rotating driveshafts
and tires. Excess mud stuck on tires
and rotating driveshafts causes an
imbalance that could damage drive
components.
Note:
Driving through deep water may
damage the transmission.
If the front or rear axle is submerged
in water, the axle lubricant and AWD
PTU (Power Transfer Unit) lubricant
should be checked and changed if
necessary.
E143950
“Tread Lightly” is an educational
program designed to increase public
awareness of land-use regulations
and responsibilities in our nations
wilderness areas. Ford Motor
Company joins the U.S. Forest Service
and the Bureau of Land Management
in encouraging you to help preserve
our national forest and other public
and private lands by “treading lightly.”
176
All-Wheel Drive (If Equipped)
Page 182 of 468
GENERAL INFORMATION
Note:Occasional brake noise is
normal. If a metal-to-metal,
continuous grinding or continuous
squeal sound is present, the brake
linings may be worn-out. Have the
system checked by an authorized
dealer. If your vehicle has continuous
vibration or shudder in the steering
wheel while braking, have it checked
by an authorized dealer.
Note: Brake dust may accumulate on
the wheels, even under normal driving
conditions. Some dust is inevitable as
the brakes wear and does not
contribute to brake noise. See
Cleaning the Alloy Wheels (page 293).
E144522
See Warning Lamps and
Indicators (page 96).
Wet brakes result in reduced braking
efficiency. Gently press the brake
pedal a few times when driving from
a car wash or standing water to dry
the brakes.
Brake Over Accelerator
In the event the accelerator pedal
becomes stuck or entrapped, apply
steady and firm pressure to the brake
pedal to slow the vehicle and reduce
engine power. If you experience this
condition, apply the brakes and bring
your vehicle to a safe stop. Move the
transmission selector lever to position P,
switch the engine off and apply the
parking brake. Inspect the accelerator
pedal for any interference. If none are
found and the condition persists, have
your vehicle towed to the nearest
authorized dealer.
Brake Assist
Brake assist detects when you brake
rapidly by measuring the rate at which
you press the brake pedal. It provides
maximum braking efficiency as long
as you press the pedal, and can
reduce stopping distances in critical
situations.
Anti-lock Brake System
This system helps you maintain
steering control during emergency
stops by keeping the brakes from
locking.
This lamp momentarily
illuminates when you turn
the ignition on. If the light
does not illuminate during start up,
remains on or flashes, the system may
be disabled. Have the system checked
by an authorized dealer.
E144522
If the system is disabled,
normal braking is still
effective. If the brake
warning lamp illuminates when you
release the parking brake, have the
system checked by an authorized
dealer.
179
Brakes
Page 238 of 468
Trailer Lamps
WARNING
Never connect any trailer lamp
wiring to the vehicle's tail lamp
wiring; this may damage the electrical
system resulting in fire. Contact your
authorized dealer as soon as possible
for assistance in proper trailer tow
wiring installation. Additional
electrical equipment may be required.
Trailer lamps are required on most
towed vehicles. Make sure all running
lights, brake lights, turn signals and
hazard lights are working.
Before Towing a Trailer
Practice turning, stopping and backing
up to get the feel of your
vehicle-trailer combination before
starting on a trip. When turning, make
wider turns so the trailer wheels clear
curbs and other obstacles.
When Towing a Trailer
• Do not drive faster than 70 mph (113 km/h) during the first 500
miles (800 kilometers).
• Do not make full-throttle starts.
• Check your hitch, electrical connections and trailer wheel lug
nuts thoroughly after you have
traveled 50 miles (80 kilometers).
• When stopped in congested or heavy traffic during hot weather,
place the gearshift in position P to
aid engine and transmission
cooling and to help A/C
performance. • Turn off the speed control with
heavy loads or in hilly terrain. The
speed control may turn off
automatically when you are towing
on long, steep grades.
• Shift to a lower gear when driving down a long or steep hill. Do not
apply the brakes continuously, as
they may overheat and become
less effective.
• If your transmission is equipped with a Grade Assist or Tow/Haul
feature, use this feature when
towing. This provides engine
braking and helps eliminate
excessive transmission shifting for
optimum fuel economy and
transmission cooling.
• Allow more distance for stopping with a trailer attached. Anticipate
stops and brake gradually.
• Avoid parking on a grade. However, if you must park on a grade:
• Turn the steering wheel to pointyour vehicle tires away from
traffic flow.
• Set your vehicle parking brake.
• Place the automatic transmission in position P.
• Place wheel chocks in front and back of the trailer wheels.
(Chocks not included with
vehicle.)
Launching or Retrieving a Boat
or Personal Watercraft (PWC)
Note: Disconnect the wiring to the
trailer before backing the trailer into
the water.
235
Towing
Page 302 of 468
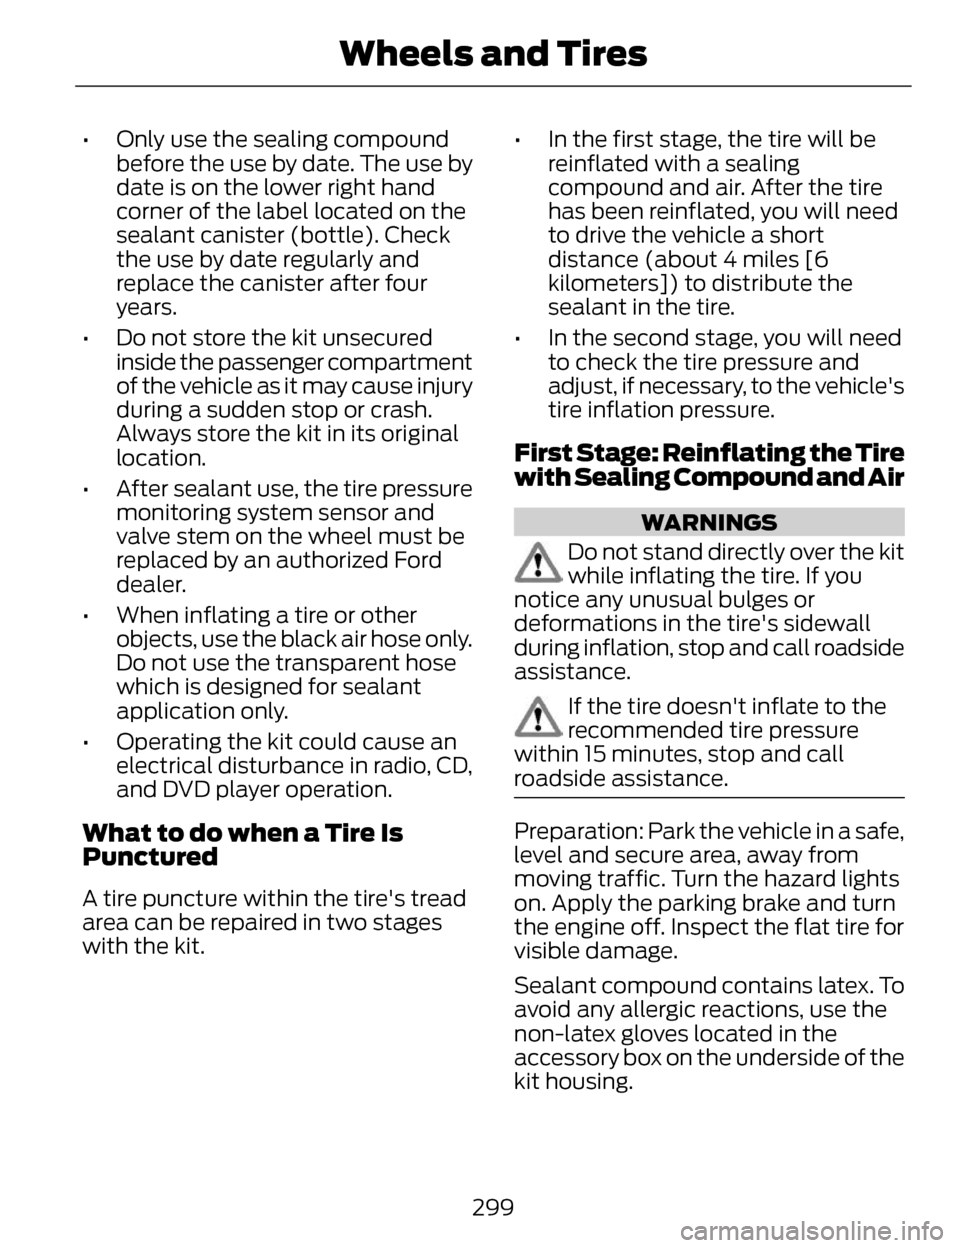
• Only use the sealing compoundbefore the use by date. The use by
date is on the lower right hand
corner of the label located on the
sealant canister (bottle). Check
the use by date regularly and
replace the canister after four
years.
• Do not store the kit unsecured inside the passenger compartment
of the vehicle as it may cause injury
during a sudden stop or crash.
Always store the kit in its original
location.
• After sealant use, the tire pressure monitoring system sensor and
valve stem on the wheel must be
replaced by an authorized Ford
dealer.
• When inflating a tire or other objects, use the black air hose only.
Do not use the transparent hose
which is designed for sealant
application only.
• Operating the kit could cause an electrical disturbance in radio, CD,
and DVD player operation.
What to do when a Tire Is
Punctured
A tire puncture within the tire's tread
area can be repaired in two stages
with the kit. • In the first stage, the tire will be
reinflated with a sealing
compound and air. After the tire
has been reinflated, you will need
to drive the vehicle a short
distance (about 4 miles [6
kilometers]) to distribute the
sealant in the tire.
• In the second stage, you will need to check the tire pressure and
adjust, if necessary, to the vehicle's
tire inflation pressure.
First Stage: Reinflating the Tire
with Sealing Compound and Air
WARNINGS
Do not stand directly over the kit
while inflating the tire. If you
notice any unusual bulges or
deformations in the tire's sidewall
during inflation, stop and call roadside
assistance.
If the tire doesn't inflate to the
recommended tire pressure
within 15 minutes, stop and call
roadside assistance.
Preparation: Park the vehicle in a safe,
level and secure area, away from
moving traffic. Turn the hazard lights
on. Apply the parking brake and turn
the engine off. Inspect the flat tire for
visible damage.
Sealant compound contains latex. To
avoid any allergic reactions, use the
non-latex gloves located in the
accessory box on the underside of the
kit housing.
299
Wheels and Tires
Page 441 of 468
Oils, Fluids and Flushing
In many cases, fluid discoloration is a
normal operating characteristic and,
by itself, does not necessarily indicate
a concern or that the fluid needs to be
changed. However, a qualified expert,
such as the factory-trained
technicians at your dealership, should
inspect discolored fluids that also
show signs of overheating or foreign
material contamination immediately.Make sure to change your vehicle’s
oils and fluids at the specified
intervals or in conjunction with a
repair. Flushing is a viable way to
change fluid for many vehicle
sub-systems during scheduled
maintenance. It is critical that systems
are flushed only with new fluid that is
the same as that required to fill and
operate the system or using a
Ford-approved flushing chemical.
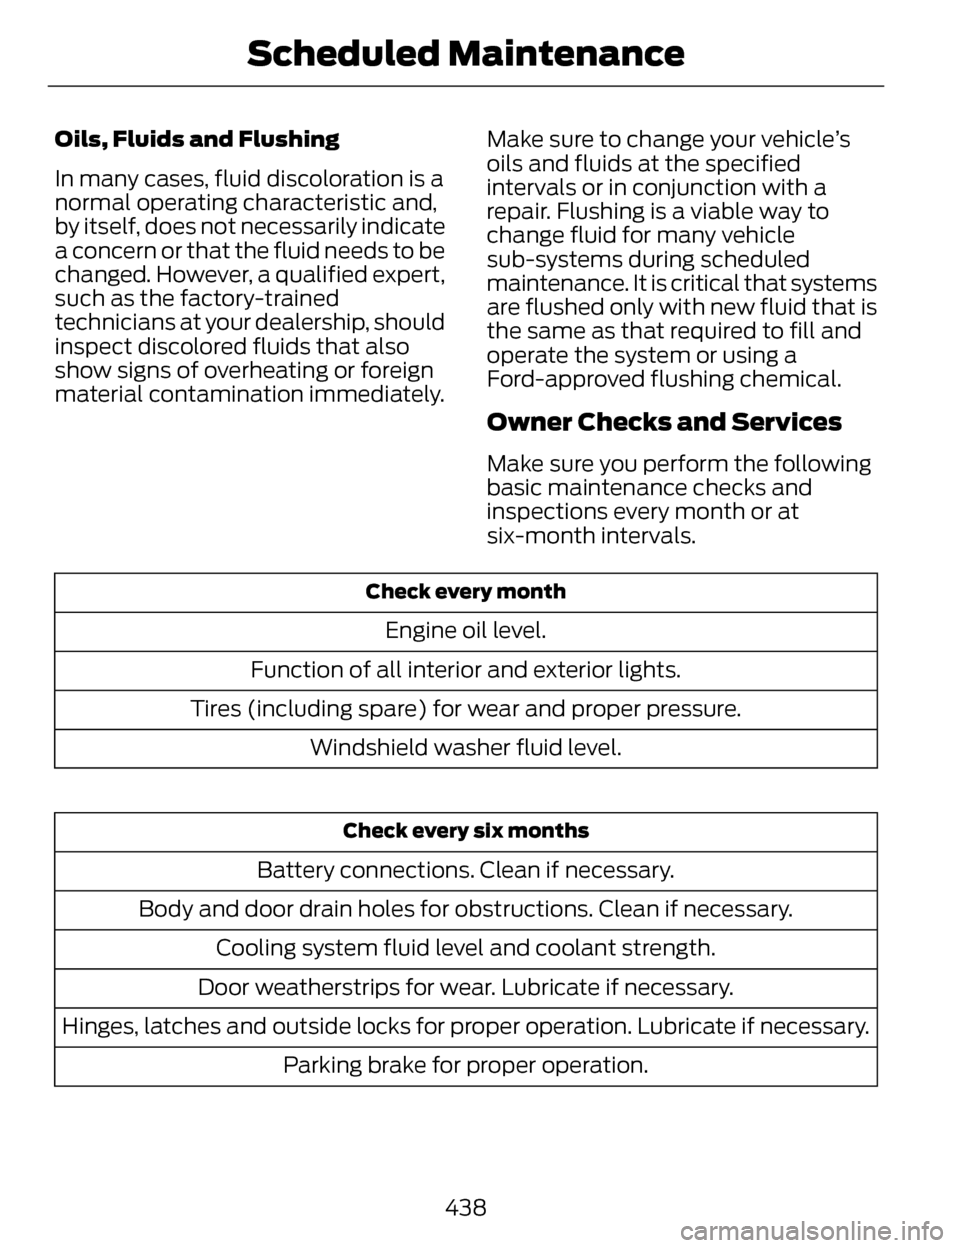
Owner Checks and Services
Make sure you perform the following
basic maintenance checks and
inspections every month or at
six-month intervals.
Check every month
Engine oil level.
Function of all interior and exterior lights.
Tires (including spare) for wear and proper pressure. Windshield washer fluid level.
Check every six months
Battery connections. Clean if necessary.
Body and door drain holes for obstructions. Clean if necessary. Cooling system fluid level and coolant strength.
Door weatherstrips for wear. Lubricate if necessary.
Hinges, latches and outside locks for proper operation. Lubricate if necessary. Parking brake for proper operation.
438
Scheduled Maintenance