LINCOLN NAUTILUS 2021 Owners Manual
Manufacturer: LINCOLN, Model Year: 2021, Model line: NAUTILUS, Model: LINCOLN NAUTILUS 2021Pages: 579, PDF Size: 6.9 MB
Page 351 of 579
If you disconnect or replace the battery and
your vehicle has an automatic transmission,
it must relearn its adaptive strategy. Because
of this, the transmission may shift firmly when
first driven. This is normal operation while
the transmission fully updates its operation
to optimum shift feel.
Remove and Reinstall the Battery
To disconnect or remove the battery, do the
following:
1. Apply the parking brake and switch the
ignition off.
2. Switch all electrical equipment off, for example lights and radio.
3. Wait a minimum of two minutes before disconnecting the battery.
Note: The engine management system has
a power hold function and remains powered
for a period of time after you switch the
ignition off. This is to allow diagnostic and
adaptive tables to be stored. Disconnecting
the battery without waiting can cause
damage not covered by the vehicle
Warranty. 4. Disconnect the negative battery cable
terminal.
5. Disconnect the positive battery cable terminal.
6. Remove the battery securing clamp.
7. Remove the battery.
8. To install, reverse the removal procedure.
Note: Before reconnecting the battery, make
sure the ignition remains switched off.
Note: Make sure the battery cable terminals
are fully tightened.
Note: After cleaning or replacing the battery,
make sure you reinstall the battery cover or
shield.
If you disconnect or replace the vehicle
battery, you must reset the following
features:
• Window bounce-back. See Windows
(page 130).
• Clock Settings.
• Pre-set radio stations.
• Steering Angle Sensor. Note:
To calibrate the steering angle sensor,
drive the vehicle above
30 mph (50 km/h)
for a minimum of 1.2 mi (2 km). Make sure to
drive straight ahead for a minimum of 30
seconds. Several vehicle functions are
disabled and a warning light could appear
until the sensor is calibrated.
Battery Management System
The battery management system monitors
battery conditions and takes actions to
extend battery life. If excessive battery drain
is detected, the system temporarily disables
some of the following features:
• Heated rear window.
• Heated seats.
• Climate control.
• Heated steering wheel.
• Audio unit.
• Navigation system.
A message may appear in the information
display to alert you that battery protection
actions are active.
347
2021 Nautilus (CD9) Canada/United States of America, enUSA, Edition date: 202011, First-Printing Maintenance
Page 352 of 579
After battery replacement, or in some cases
after charging the battery with an external
charger, the battery management system
requires eight hours of vehicle sleep time to
relearn the battery state of charge. During
this time your vehicle must remain fully
locked with the ignition off.
Note:
If you add electrical accessories or
components to the vehicle, it may adversely
affect battery performance and durability.
This may also affect the performance of
other electrical systems in the vehicle.
Battery Disposal Make sure that you dispose of old
batteries in an environmentally
friendly way. Seek advice from
your local authority about recycling old
batteries. ADJUSTING THE HEADLAMPS
Vertical Aim Adjustment
The headlamps on your vehicle are properly
aimed at the assembly plant. If your vehicle
has been involved in a crash, have the aim
of the headlamp beam checked by an
authorized dealer.
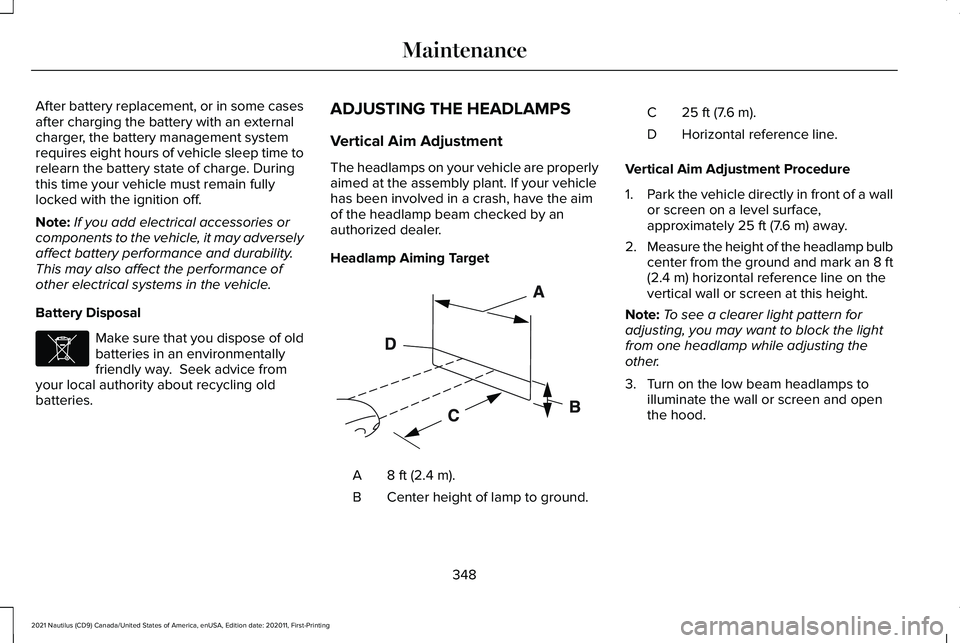
Headlamp Aiming Target
8 ft (2.4 m).
A
Center height of lamp to ground.
B 25 ft (7.6 m).
C
Horizontal reference line.
D
Vertical Aim Adjustment Procedure
1. Park the vehicle directly in front of a wall
or screen on a level surface,
approximately 25 ft (7.6 m) away.
2. Measure the height of the headlamp bulb
center from the ground and mark an 8 ft
(2.4 m)
horizontal reference line on the
vertical wall or screen at this height.
Note: To see a clearer light pattern for
adjusting, you may want to block the light
from one headlamp while adjusting the
other.
3. Turn on the low beam headlamps to illuminate the wall or screen and open
the hood.
348
2021 Nautilus (CD9) Canada/United States of America, enUSA, Edition date: 202011, First-Printing MaintenanceE107998 E142592
Page 353 of 579
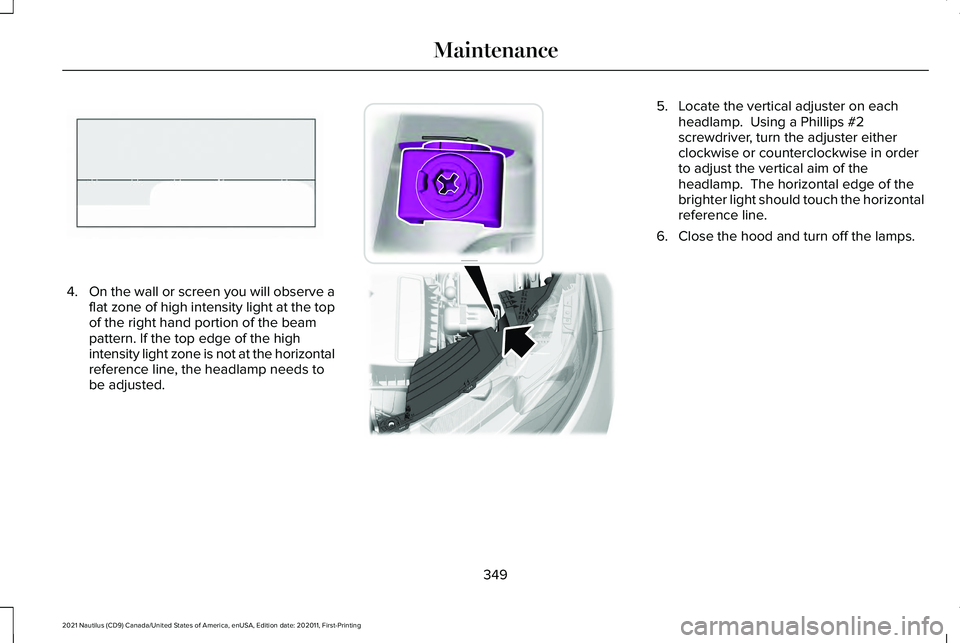
4.
On the wall or screen you will observe a
flat zone of high intensity light at the top
of the right hand portion of the beam
pattern. If the top edge of the high
intensity light zone is not at the horizontal
reference line, the headlamp needs to
be adjusted. 5. Locate the vertical adjuster on each
headlamp. Using a Phillips #2
screwdriver, turn the adjuster either
clockwise or counterclockwise in order
to adjust the vertical aim of the
headlamp. The horizontal edge of the
brighter light should touch the horizontal
reference line.
6. Close the hood and turn off the lamps.
349
2021 Nautilus (CD9) Canada/United States of America, enUSA, Edition date: 202011, First-Printing MaintenanceE142465 E194757
Page 354 of 579
EXTERIOR BULBS
Exterior Bulb Specification Chart
Power (Watt)
Specification
Lamp
LED
LED
Brake and rear lamp.
LED
LED
Central high mounted brake lamp.
PWM/LED
H15/LED
Daytime running lamps.
LED
LED
Front fog lamp.
21
WY21W
Front turn signal lamp.
LED
LED
Front side marker lamp.
LED
LED
Front signature lamp.
LED
LED
Headlamp high beam.
LED
LED
Headlamp low beam.
LED
LED
High-intensity discharge headlamps.
5
W5W
License plate lamp.
LED
LED
Rear turn signal lamp.
LED
LED
Rear side marker lamp.
350
2021 Nautilus (CD9) Canada/United States of America, enUSA, Edition date: 202011, First-Printing Maintenance
Page 355 of 579
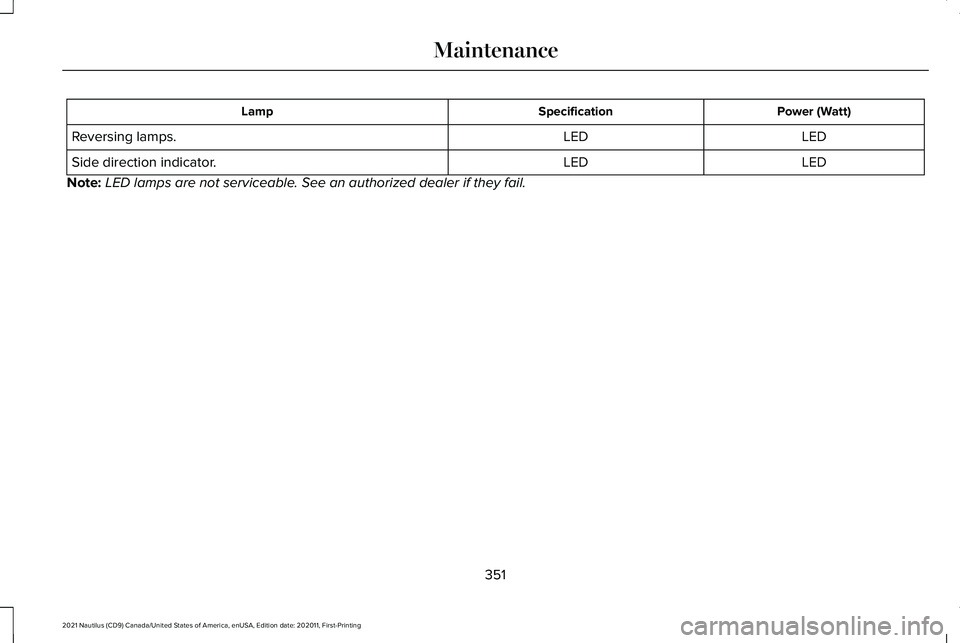
Power (Watt)
Specification
Lamp
LED
LED
Reversing lamps.
LED
LED
Side direction indicator.
Note: LED lamps are not serviceable. See an authorized dealer if they fail.
351
2021 Nautilus (CD9) Canada/United States of America, enUSA, Edition date: 202011, First-Printing Maintenance
Page 356 of 579
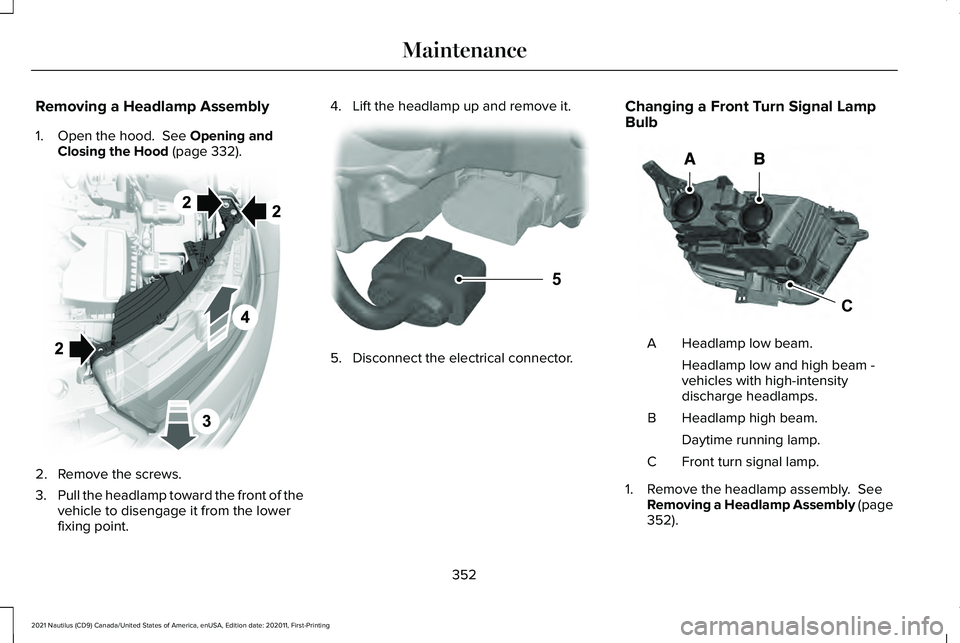
Removing a Headlamp Assembly
1. Open the hood. See Opening and
Closing the Hood (page 332). 2. Remove the screws.
3.
Pull the headlamp toward the front of the
vehicle to disengage it from the lower
fixing point. 4. Lift the headlamp up and remove it.
5. Disconnect the electrical connector.Changing a Front Turn Signal Lamp
Bulb Headlamp low beam.
A
Headlamp low and high beam -
vehicles with high-intensity
discharge headlamps.
Headlamp high beam.
B
Daytime running lamp.
Front turn signal lamp.
C
1. Remove the headlamp assembly.
See
Removing a Headlamp Assembly (page
352
).
352
2021 Nautilus (CD9) Canada/United States of America, enUSA, Edition date: 202011, First-Printing Maintenance E194758 5E133750 CE188959
Page 357 of 579
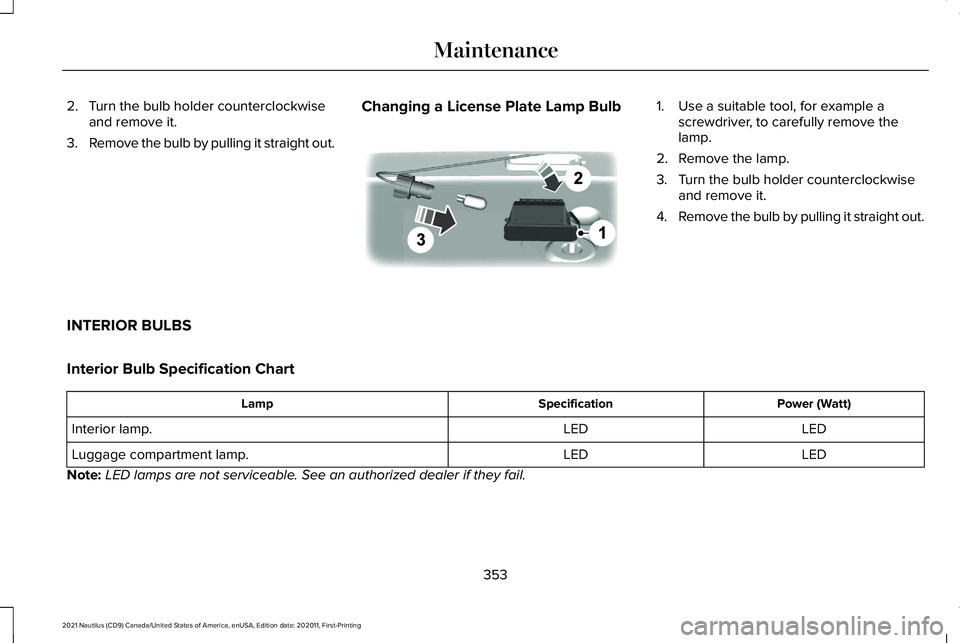
2. Turn the bulb holder counterclockwise
and remove it.
3. Remove the bulb by pulling it straight out. Changing a License Plate Lamp Bulb 1. Use a suitable tool, for example a
screwdriver, to carefully remove the
lamp.
2. Remove the lamp.
3. Turn the bulb holder counterclockwise and remove it.
4. Remove the bulb by pulling it straight out.
INTERIOR BULBS
Interior Bulb Specification Chart Power (Watt)
Specification
Lamp
LED
LED
Interior lamp.
LED
LED
Luggage compartment lamp.
Note: LED lamps are not serviceable. See an authorized dealer if they fail.
353
2021 Nautilus (CD9) Canada/United States of America, enUSA, Edition date: 202011, First-Printing Maintenance E72789
Page 358 of 579
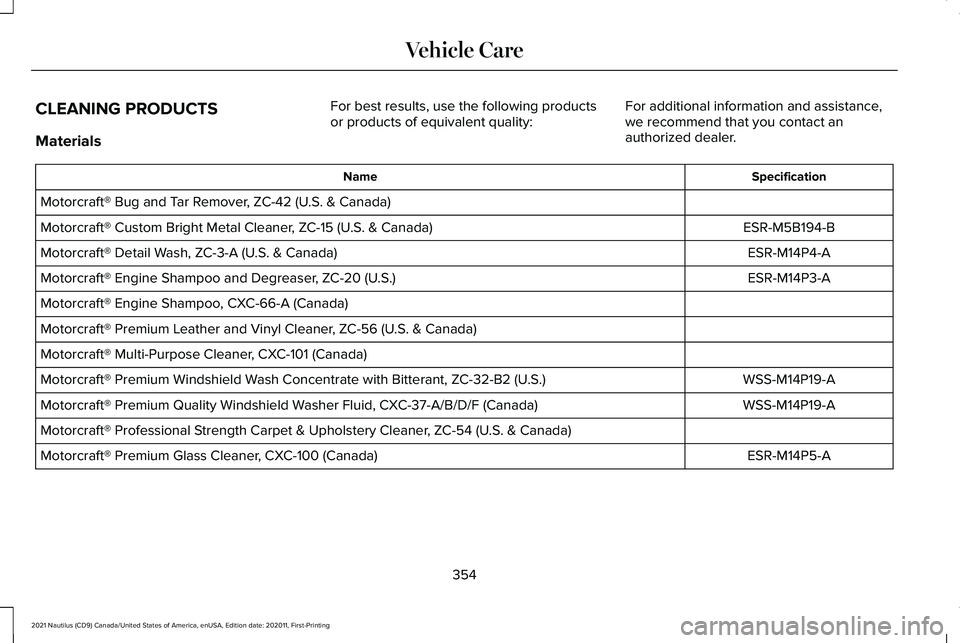
CLEANING PRODUCTS
Materials
For best results, use the following products
or products of equivalent quality:
For additional information and assistance,
we recommend that you contact an
authorized dealer. Specification
Name
Motorcraft® Bug and Tar Remover, ZC-42 (U.S. & Canada) ESR-M5B194-B
Motorcraft® Custom Bright Metal Cleaner, ZC-15 (U.S. & Canada)
ESR-M14P4-A
Motorcraft® Detail Wash, ZC-3-A (U.S. & Canada)
ESR-M14P3-A
Motorcraft® Engine Shampoo and Degreaser, ZC-20 (U.S.)
Motorcraft® Engine Shampoo, CXC-66-A (Canada)
Motorcraft® Premium Leather and Vinyl Cleaner, ZC-56 (U.S. & Canada)
Motorcraft® Multi-Purpose Cleaner, CXC-101 (Canada)
WSS-M14P19-A
Motorcraft® Premium Windshield Wash Concentrate with Bitterant, ZC-32-B2 (U.S.)
WSS-M14P19-A
Motorcraft® Premium Quality Windshield Washer Fluid, CXC-37-A/B/D/F (Canada)
Motorcraft® Professional Strength Carpet & Upholstery Cleaner, ZC-54 (U.S. & Canada)
ESR-M14P5-A
Motorcraft® Premium Glass Cleaner, CXC-100 (Canada)
354
2021 Nautilus (CD9) Canada/United States of America, enUSA, Edition date: 202011, First-Printing Vehicle Care
Page 359 of 579
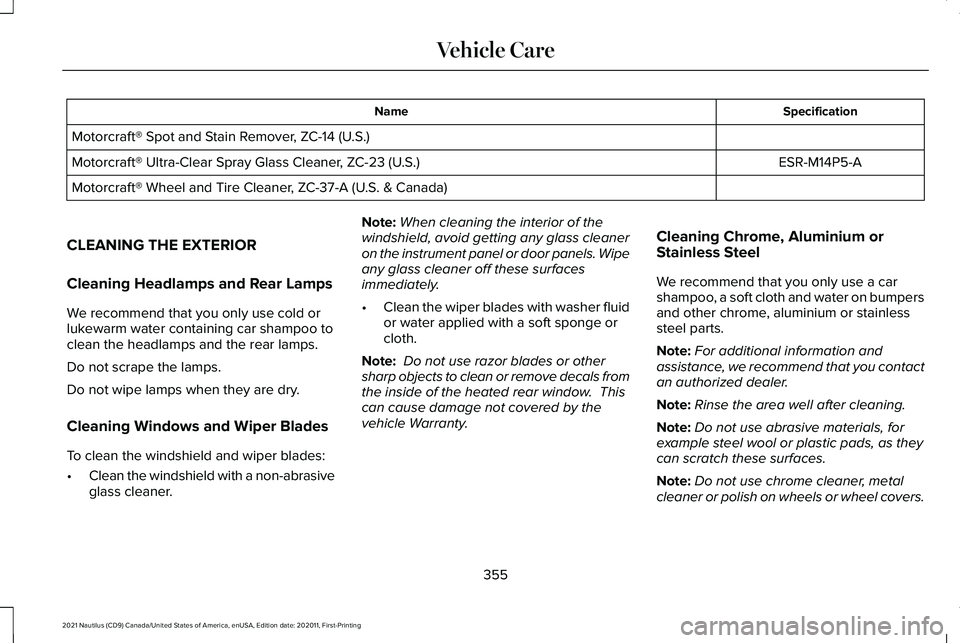
Specification
Name
Motorcraft® Spot and Stain Remover, ZC-14 (U.S.) ESR-M14P5-A
Motorcraft® Ultra-Clear Spray Glass Cleaner, ZC-23 (U.S.)
Motorcraft® Wheel and Tire Cleaner, ZC-37-A (U.S. & Canada)
CLEANING THE EXTERIOR
Cleaning Headlamps and Rear Lamps
We recommend that you only use cold or
lukewarm water containing car shampoo to
clean the headlamps and the rear lamps.
Do not scrape the lamps.
Do not wipe lamps when they are dry.
Cleaning Windows and Wiper Blades
To clean the windshield and wiper blades:
• Clean the windshield with a non-abrasive
glass cleaner. Note:
When cleaning the interior of the
windshield, avoid getting any glass cleaner
on the instrument panel or door panels. Wipe
any glass cleaner off these surfaces
immediately.
• Clean the wiper blades with washer fluid
or water applied with a soft sponge or
cloth.
Note: Do not use razor blades or other
sharp objects to clean or remove decals from
the inside of the heated rear window. This
can cause damage not covered by the
vehicle Warranty. Cleaning Chrome, Aluminium or
Stainless Steel
We recommend that you only use a car
shampoo, a soft cloth and water on bumpers
and other chrome, aluminium or stainless
steel parts.
Note:
For additional information and
assistance, we recommend that you contact
an authorized dealer.
Note: Rinse the area well after cleaning.
Note: Do not use abrasive materials, for
example steel wool or plastic pads, as they
can scratch these surfaces.
Note: Do not use chrome cleaner, metal
cleaner or polish on wheels or wheel covers.
355
2021 Nautilus (CD9) Canada/United States of America, enUSA, Edition date: 202011, First-Printing Vehicle Care
Page 360 of 579
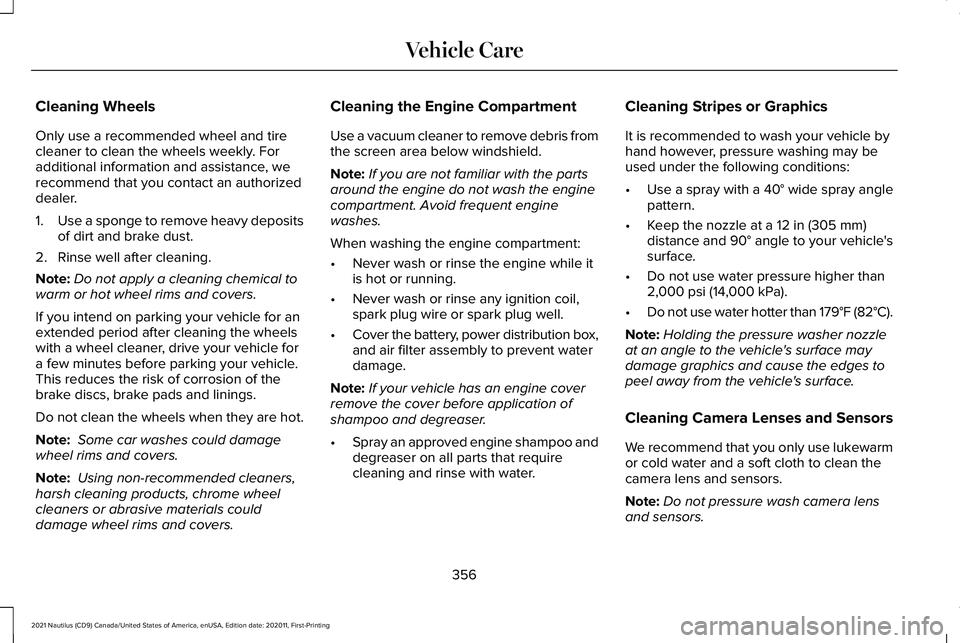
Cleaning Wheels
Only use a recommended wheel and tire
cleaner to clean the wheels weekly. For
additional information and assistance, we
recommend that you contact an authorized
dealer.
1.
Use a sponge to remove heavy deposits
of dirt and brake dust.
2. Rinse well after cleaning.
Note: Do not apply a cleaning chemical to
warm or hot wheel rims and covers.
If you intend on parking your vehicle for an
extended period after cleaning the wheels
with a wheel cleaner, drive your vehicle for
a few minutes before parking your vehicle.
This reduces the risk of corrosion of the
brake discs, brake pads and linings.
Do not clean the wheels when they are hot.
Note: Some car washes could damage
wheel rims and covers.
Note: Using non-recommended cleaners,
harsh cleaning products, chrome wheel
cleaners or abrasive materials could
damage wheel rims and covers. Cleaning the Engine Compartment
Use a vacuum cleaner to remove debris from
the screen area below windshield.
Note:
If you are not familiar with the parts
around the engine do not wash the engine
compartment. Avoid frequent engine
washes.
When washing the engine compartment:
• Never wash or rinse the engine while it
is hot or running.
• Never wash or rinse any ignition coil,
spark plug wire or spark plug well.
• Cover the battery, power distribution box,
and air filter assembly to prevent water
damage.
Note: If your vehicle has an engine cover
remove the cover before application of
shampoo and degreaser.
• Spray an approved engine shampoo and
degreaser on all parts that require
cleaning and rinse with water. Cleaning Stripes or Graphics
It is recommended to wash your vehicle by
hand however, pressure washing may be
used under the following conditions:
•
Use a spray with a 40° wide spray angle
pattern.
• Keep the nozzle at a 12 in (305 mm)
distance and 90° angle to your vehicle's
surface.
• Do not use water pressure higher than
2,000 psi (14,000 kPa)
.
• Do not use water hotter than 179°F (82°C).
Note: Holding the pressure washer nozzle
at an angle to the vehicle's surface may
damage graphics and cause the edges to
peel away from the vehicle's surface.
Cleaning Camera Lenses and Sensors
We recommend that you only use lukewarm
or cold water and a soft cloth to clean the
camera lens and sensors.
Note: Do not pressure wash camera lens
and sensors.
356
2021 Nautilus (CD9) Canada/United States of America, enUSA, Edition date: 202011, First-Printing Vehicle Care