rear LINCOLN NAVIGATOR 2004 Owner's Manual
[x] Cancel search | Manufacturer: LINCOLN, Model Year: 2004, Model line: NAVIGATOR, Model: LINCOLN NAVIGATOR 2004Pages: 368, PDF Size: 8.21 MB
Page 89 of 368
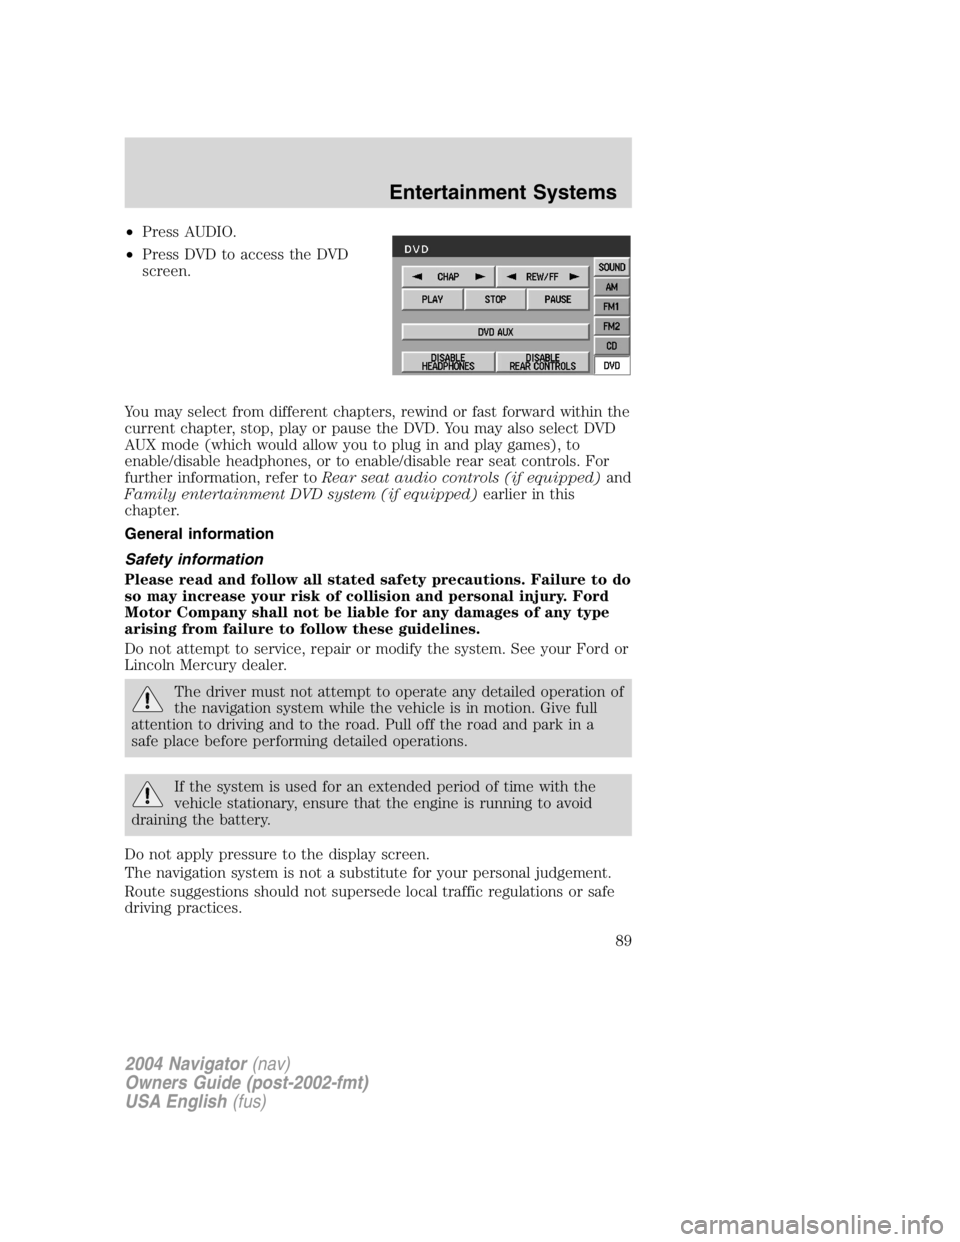
• Press AUDIO.
• Press DVD to access the DVD
screen.
You may select from different chapters, rewind or fast forward within the
current chapter, stop, play or pause the DVD. You may also select DVD
AUX mode (which would allow you to plug in and play games), to
enable/disable headphones, or to enable/disable rear seat controls. For
further information, refer to Rear seat audio controls (if equipped) and
Family entertainment DVD system (if equipped) earlier in this
chapter.
General information
Safety information
Please read and follow all stated safety precautions. Failure to do
so may increase your risk of collision and personal injury. Ford
Motor Company shall not be liable for any damages of any type
arising from failure to follow these guidelines.
Do not attempt to service, repair or modify the system. See your Ford or
Lincoln Mercury dealer.
The driver must not attempt to operate any detailed operation of
the navigation system while the vehicle is in motion. Give full
attention to driving and to the road. Pull off the road and park in a
safe place before performing detailed operations.
If the system is used for an extended period of time with the
vehicle stationary, ensure that the engine is running to avoid
draining the battery.
Do not apply pressure to the display screen.
The navigation system is not a substitute for your personal judgement.
Route suggestions should not supersede local traffic regulations or safe
driving practices.
2004 Navigator (nav)
Owners Guide (post-2002-fmt)
USA English (fus) Entertainment Systems
89
Page 92 of 368
Limited GPS reception
System performance may be adversely affected if GPS reception is
interrupted or interference occurs over a distance of several miles. The
following are possible causes for GPS reception being interrupted. If the
vehicle is:
• in multi-story parking garages
• in tunnels and under bridges
• inside or in between buildings
• by forests or tree-lined avenues
• in heavy rain showers and thunderstorms
• in valleys and in mountainous regions
• roads under cliffs
Ensure that you do not have any metal objects on the rear parcel shelf.
If your windows are tinted, ensure that you use non-metal tinting instead
of metal oxide tinting. Both of these factors can interrupt GPS reception.
Cleaning the display
Do not spray cleaning fluid directly onto the unit. Instead, spray onto a
soft cloth and gently wipe the unit. Only recommended products should
be used.
• Recommended products- Rubbing alcohol based cleaner (i.e., methyl
alcohol) or a damp clean cloth.
• Not harmful but not recommended- ammonia cleaner, neutral
detergent.
• Harmful to system and not recommended- acid cleaner, alkali cleaner,
benzene cleaner.
Do not clean any part of the system with benzene, paint thinner or any
other solvent.
Do not spill liquids of any kind onto the unit.
Loading the map DVD
• Your navigation DVD unit is located in the front lower center stack
area by the passenger ’ s feet (access door).
• Ensure that the vehicle ignition is ON.
• If a DVD is already loaded in the Navigation unit, push the eject
button.
• Load the DVD with the printed side up. Do not allow moisture or
foreign objects to enter the slot.
2004 Navigator (nav)
Owners Guide (post-2002-fmt)
USA English (fus)Entertainment Systems
92
Page 94 of 368
DUAL ELECTRONIC AUTOMATIC TEMPERATURE CONTROL
(DEATC) SYSTEM
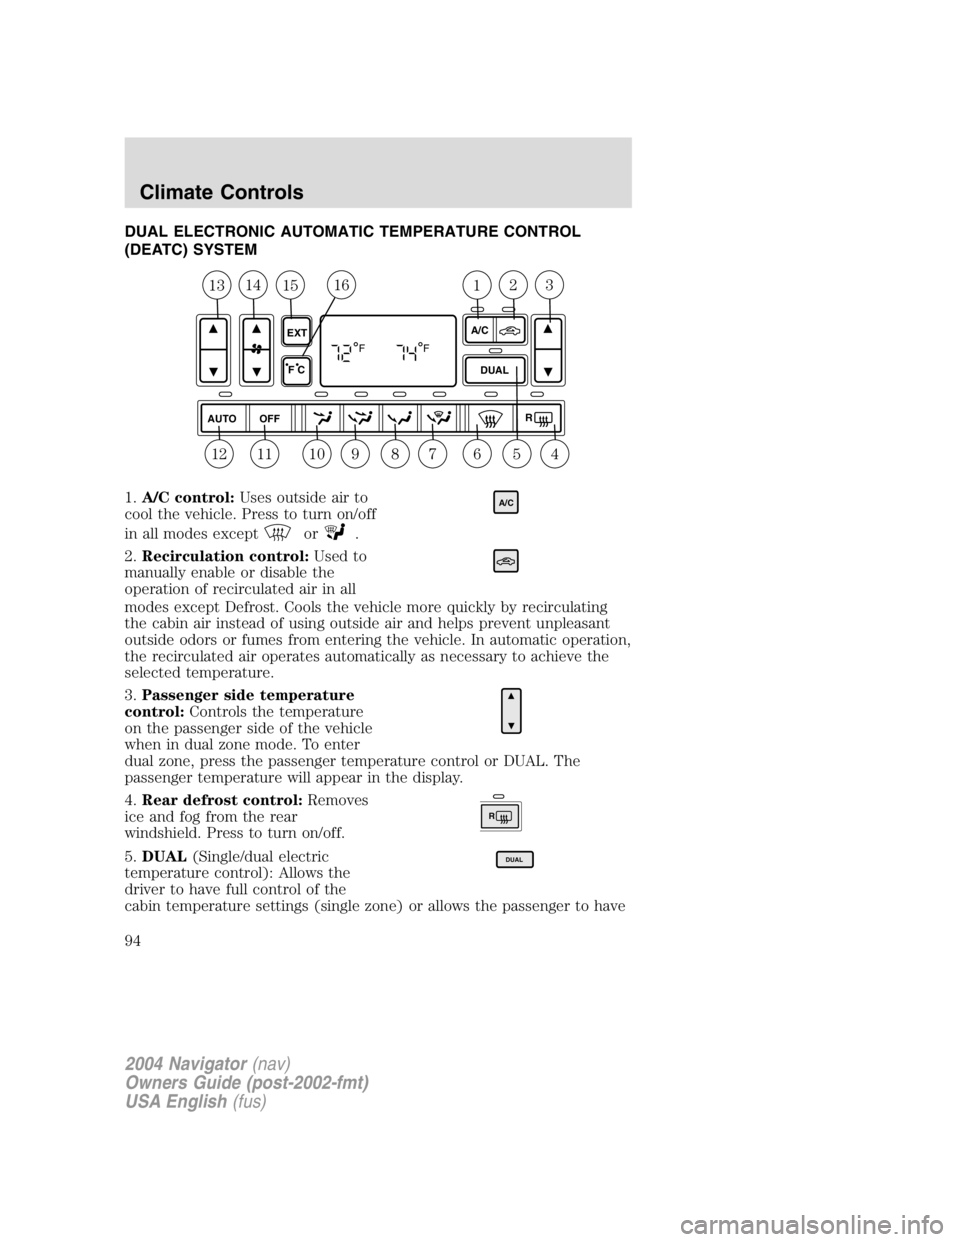
1. A/C control: Uses outside air to
cool the vehicle. Press to turn on/off
in all modes except or .
2. Recirculation control: Used to
manually enable or disable the
operation of recirculated air in all
modes except Defrost. Cools the vehicle more quickly by recirculating
the cabin air instead of using outside air and helps prevent unpleasant
outside odors or fumes from entering the vehicle. In automatic operation,
the recirculated air operates automatically as necessary to achieve the
selected temperature.
3. Passenger side temperature
control: Controls the temperature
on the passenger side of the vehicle
when in dual zone mode. To enter
dual zone, press the passenger temperature control or DUAL. The
passenger temperature will appear in the display.
4. Rear defrost control: Removes
ice and fog from the rear
windshield. Press to turn on/off.
5. DUAL (Single/dual electric
temperature control): Allows the
driver to have full control of the
cabin temperature settings (single zone) or allows the passenger to have 1 2
13 14
56
789101112 43
15 16AUTO
OFF DUALA/C
RF F
EXT
F C A/C
R DUAL
2004 Navigator (nav)
Owners Guide (post-2002-fmt)
USA English (fus)Climate Controls
Climate Controls
94
Page 97 of 368
AUXILIARY A/C-HEATER CONTROLS (IF EQUIPPED)
Your vehicle may be equipped with auxiliary climate controls. These
allow the front or rear seat passengers to control airflow direction,
temperature and fan level of the rear compartment to quickly heat or
cool the vehicle.
Auxiliary climate controls are located in the first row overhead console
and in the floor console on the back of the front row console.
If the main climate control system is in the OFF position, the auxiliary
climate control will not operate.
The auxiliary unit can be controlled either by the front seat occupant(s)
using the front auxiliary control or by the rear seat passenger(s) using
the rear auxiliary control but not both. To control the auxiliary unit using
the rear control, the front auxiliary blower control must be in the REAR
position.
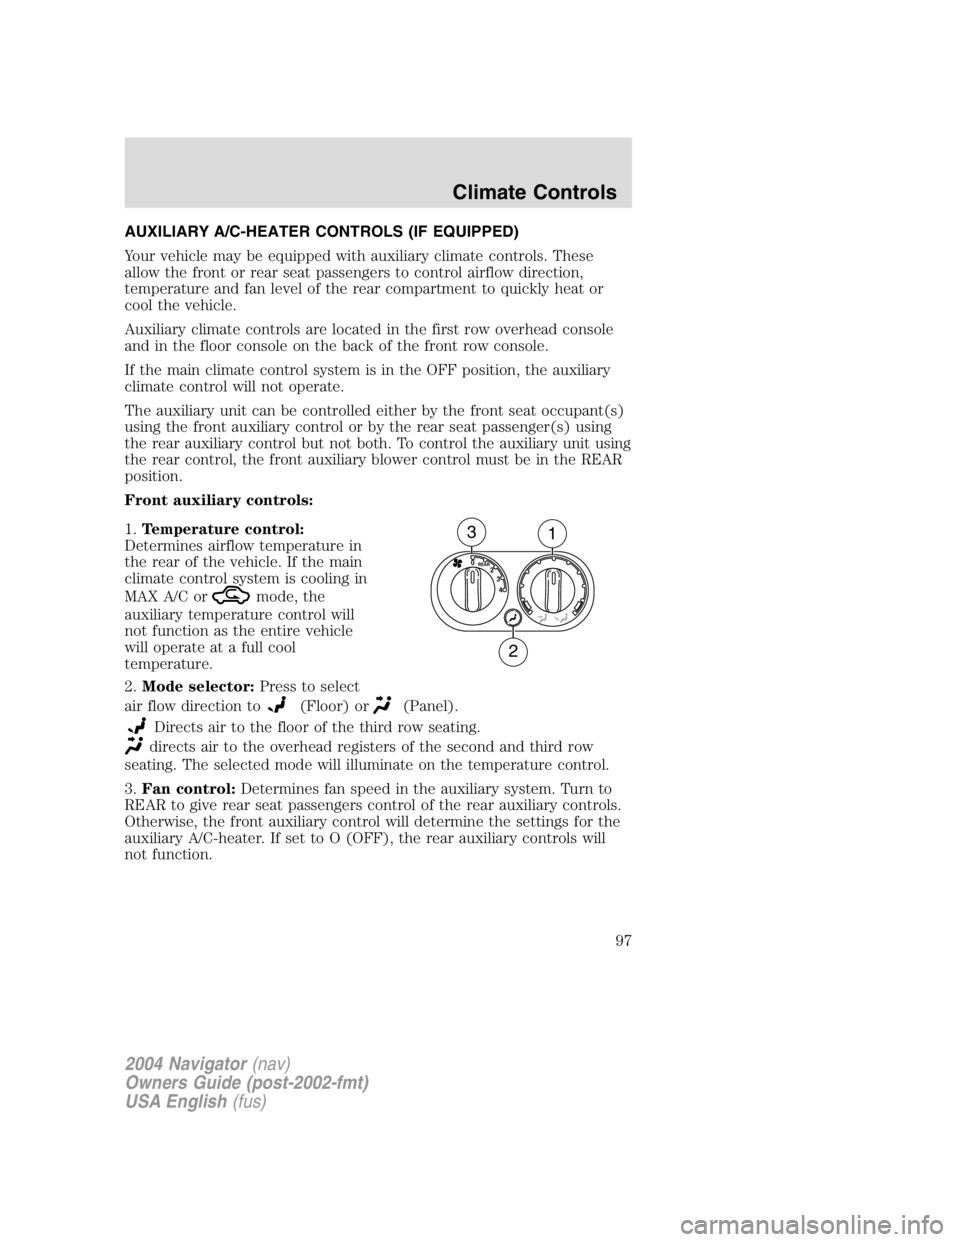
Front auxiliary controls:
1. Temperature control:
Determines airflow temperature in
the rear of the vehicle. If the main
climate control system is cooling in
MAX A/C or
mode, the
auxiliary temperature control will
not function as the entire vehicle
will operate at a full cool
temperature.
2. Mode selector: Press to select
air flow direction to (Floor) or (Panel).
Directs air to the floor of the third row seating.
directs air to the overhead registers of the second and third row
seating. The selected mode will illuminate on the temperature control.
3. Fan control: Determines fan speed in the auxiliary system. Turn to
REAR to give rear seat passengers control of the rear auxiliary controls.
Otherwise, the front auxiliary control will determine the settings for the
auxiliary A/C-heater. If set to O (OFF), the rear auxiliary controls will
not function. 432 REAR
0
3
1
2
2004 Navigator (nav)
Owners Guide (post-2002-fmt)
USA English (fus) Climate Controls
97
Page 98 of 368
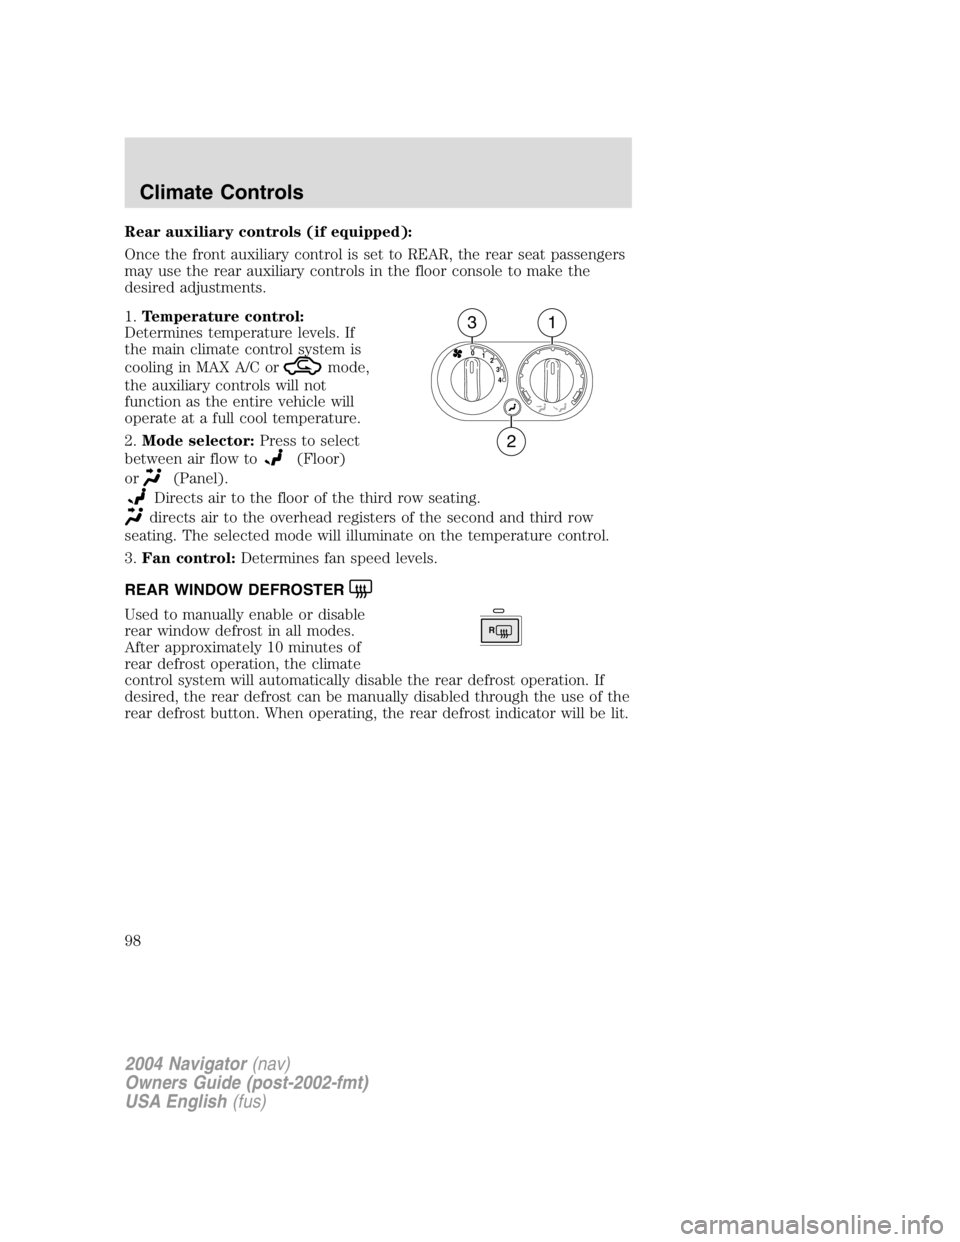
Rear auxiliary controls (if equipped):
Once the front auxiliary control is set to REAR, the rear seat passengers
may use the rear auxiliary controls in the floor console to make the
desired adjustments.
1. Temperature control:
Determines temperature levels. If
the main climate control system is
cooling in MAX A/C or
mode,
the auxiliary controls will not
function as the entire vehicle will
operate at a full cool temperature.
2. Mode selector: Press to select
between air flow to (Floor)
or (Panel).
Directs air to the floor of the third row seating.
directs air to the overhead registers of the second and third row
seating. The selected mode will illuminate on the temperature control.
3. Fan control: Determines fan speed levels.
REAR WINDOW DEFROSTER
Used to manually enable or disable
rear window defrost in all modes.
After approximately 10 minutes of
rear defrost operation, the climate
control system will automatically disable the rear defrost operation. If
desired, the rear defrost can be manually disabled through the use of the
rear defrost button. When operating, the rear defrost indicator will be lit. 43210
3 1
2 R
2004 Navigator (nav)
Owners Guide (post-2002-fmt)
USA English (fus)Climate Controls
98
Page 103 of 368
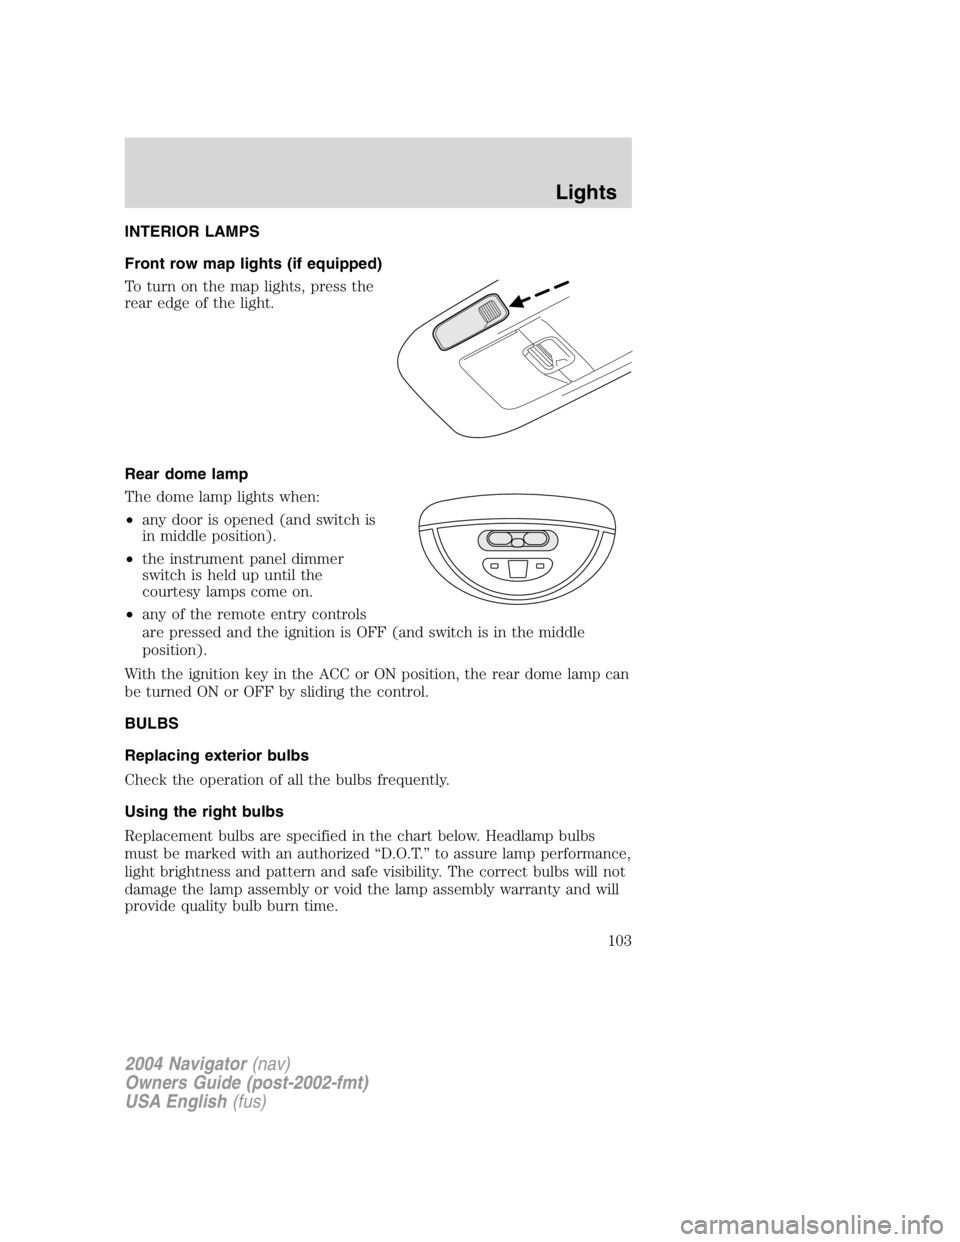
INTERIOR LAMPS
Front row map lights (if equipped)
To turn on the map lights, press the
rear edge of the light.
Rear dome lamp
The dome lamp lights when:
• any door is opened (and switch is
in middle position).
• the instrument panel dimmer
switch is held up until the
courtesy lamps come on.
• any of the remote entry controls
are pressed and the ignition is OFF (and switch is in the middle
position).
With the ignition key in the ACC or ON position, the rear dome lamp can
be turned ON or OFF by sliding the control.
BULBS
Replacing exterior bulbs
Check the operation of all the bulbs frequently.
Using the right bulbs
Replacement bulbs are specified in the chart below. Headlamp bulbs
must be marked with an authorized “ D.O.T. ” to assure lamp performance,
light brightness and pattern and safe visibility. The correct bulbs will not
damage the lamp assembly or void the lamp assembly warranty and will
provide quality bulb burn time.
2004 Navigator (nav)
Owners Guide (post-2002-fmt)
USA English (fus) Lights
103
Page 105 of 368
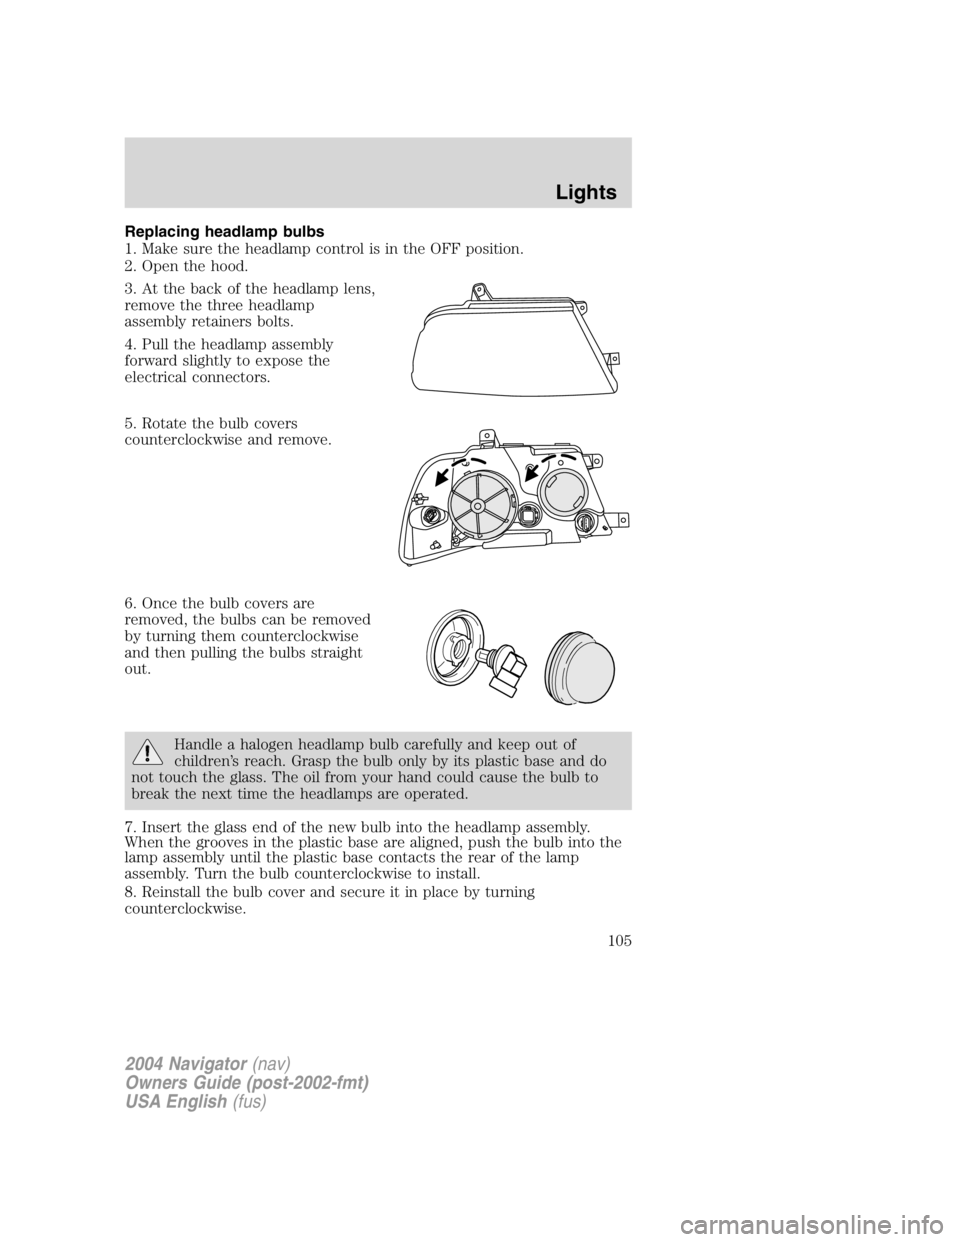
Replacing headlamp bulbs
1. Make sure the headlamp control is in the OFF position.
2. Open the hood.
3. At the back of the headlamp lens,
remove the three headlamp
assembly retainers bolts.
4. Pull the headlamp assembly
forward slightly to expose the
electrical connectors.
5. Rotate the bulb covers
counterclockwise and remove.
6. Once the bulb covers are
removed, the bulbs can be removed
by turning them counterclockwise
and then pulling the bulbs straight
out.
Handle a halogen headlamp bulb carefully and keep out of
children ’ s reach. Grasp the bulb only by its plastic base and do
not touch the glass. The oil from your hand could cause the bulb to
break the next time the headlamps are operated.
7. Insert the glass end of the new bulb into the headlamp assembly.
When the grooves in the plastic base are aligned, push the bulb into the
lamp assembly until the plastic base contacts the rear of the lamp
assembly. Turn the bulb counterclockwise to install.
8. Reinstall the bulb cover and secure it in place by turning
counterclockwise.
2004 Navigator (nav)
Owners Guide (post-2002-fmt)
USA English (fus) Lights
105
Page 107 of 368
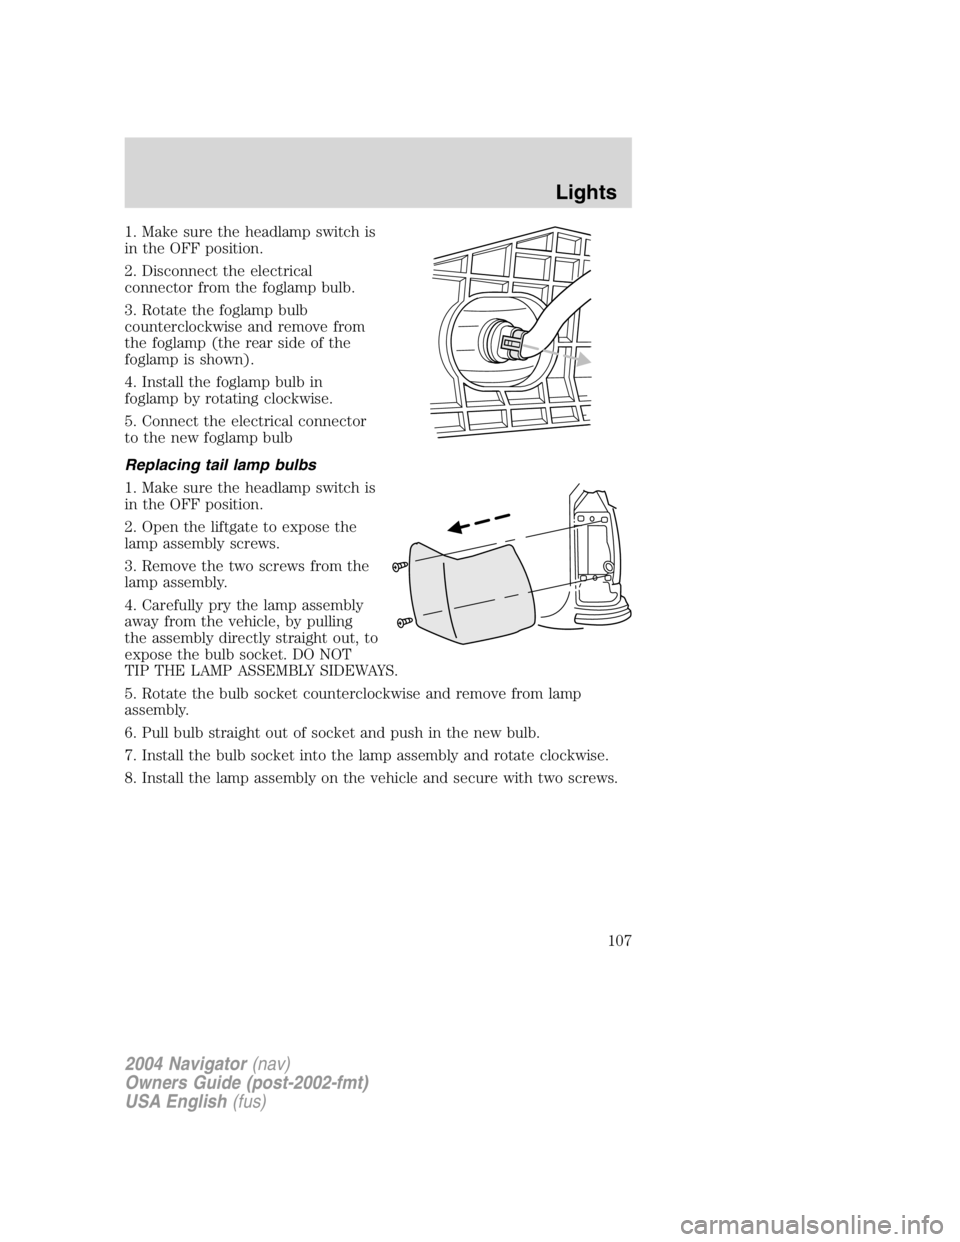
1. Make sure the headlamp switch is
in the OFF position.
2. Disconnect the electrical
connector from the foglamp bulb.
3. Rotate the foglamp bulb
counterclockwise and remove from
the foglamp (the rear side of the
foglamp is shown).
4. Install the foglamp bulb in
foglamp by rotating clockwise.
5. Connect the electrical connector
to the new foglamp bulb
Replacing tail lamp bulbs
1. Make sure the headlamp switch is
in the OFF position.
2. Open the liftgate to expose the
lamp assembly screws.
3. Remove the two screws from the
lamp assembly.
4. Carefully pry the lamp assembly
away from the vehicle, by pulling
the assembly directly straight out, to
expose the bulb socket. DO NOT
TIP THE LAMP ASSEMBLY SIDEWAYS.
5. Rotate the bulb socket counterclockwise and remove from lamp
assembly.
6. Pull bulb straight out of socket and push in the new bulb.
7. Install the bulb socket into the lamp assembly and rotate clockwise.
8. Install the lamp assembly on the vehicle and secure with two screws.
2004 Navigator (nav)
Owners Guide (post-2002-fmt)
USA English (fus) Lights
107
Page 112 of 368
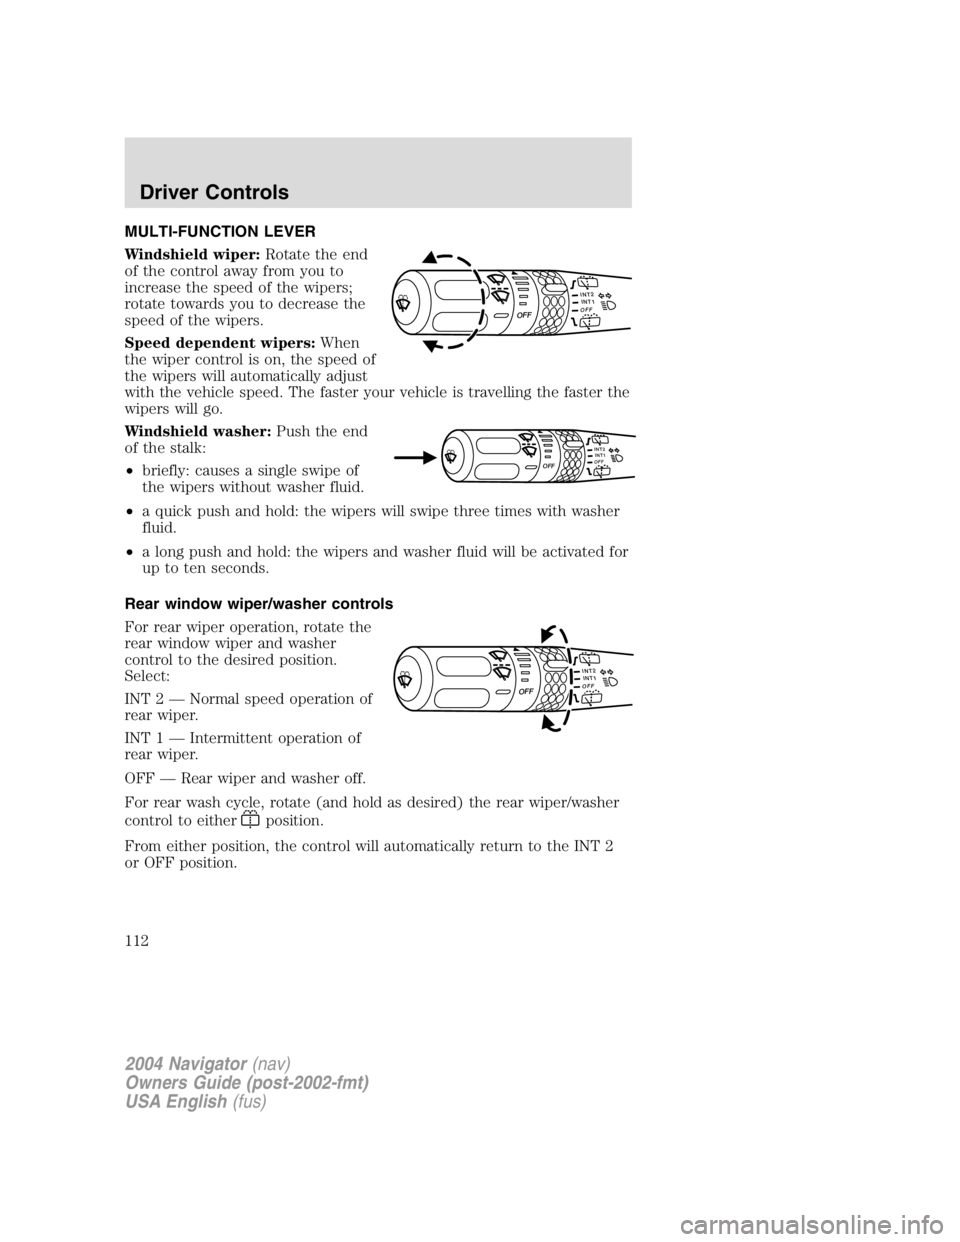
MULTI-FUNCTION LEVER
Windshield wiper: Rotate the end
of the control away from you to
increase the speed of the wipers;
rotate towards you to decrease the
speed of the wipers.
Speed dependent wipers: When
the wiper control is on, the speed of
the wipers will automatically adjust
with the vehicle speed. The faster your vehicle is travelling the faster the
wipers will go.
Windshield washer: Push the end
of the stalk:
• briefly: causes a single swipe of
the wipers without washer fluid.
• a quick push and hold: the wipers will swipe three times with washer
fluid.
• a long push and hold: the wipers and washer fluid will be activated for
up to ten seconds.
Rear window wiper/washer controls
For rear wiper operation, rotate the
rear window wiper and washer
control to the desired position.
Select:
INT 2 — Normal speed operation of
rear wiper.
INT 1 — Intermittent operation of
rear wiper.
OFF — Rear wiper and washer off.
For rear wash cycle, rotate (and hold as desired) the rear wiper/washer
control to either
position.
From either position, the control will automatically return to the INT 2
or OFF position. INT2
OFF
OFF INT1 INT1 INT2
OFF
OFF
INT2
OFF
OFF INT1
2004 Navigator (nav)
Owners Guide (post-2002-fmt)
USA English (fus)Driver Controls
Driver Controls
112
Page 113 of 368
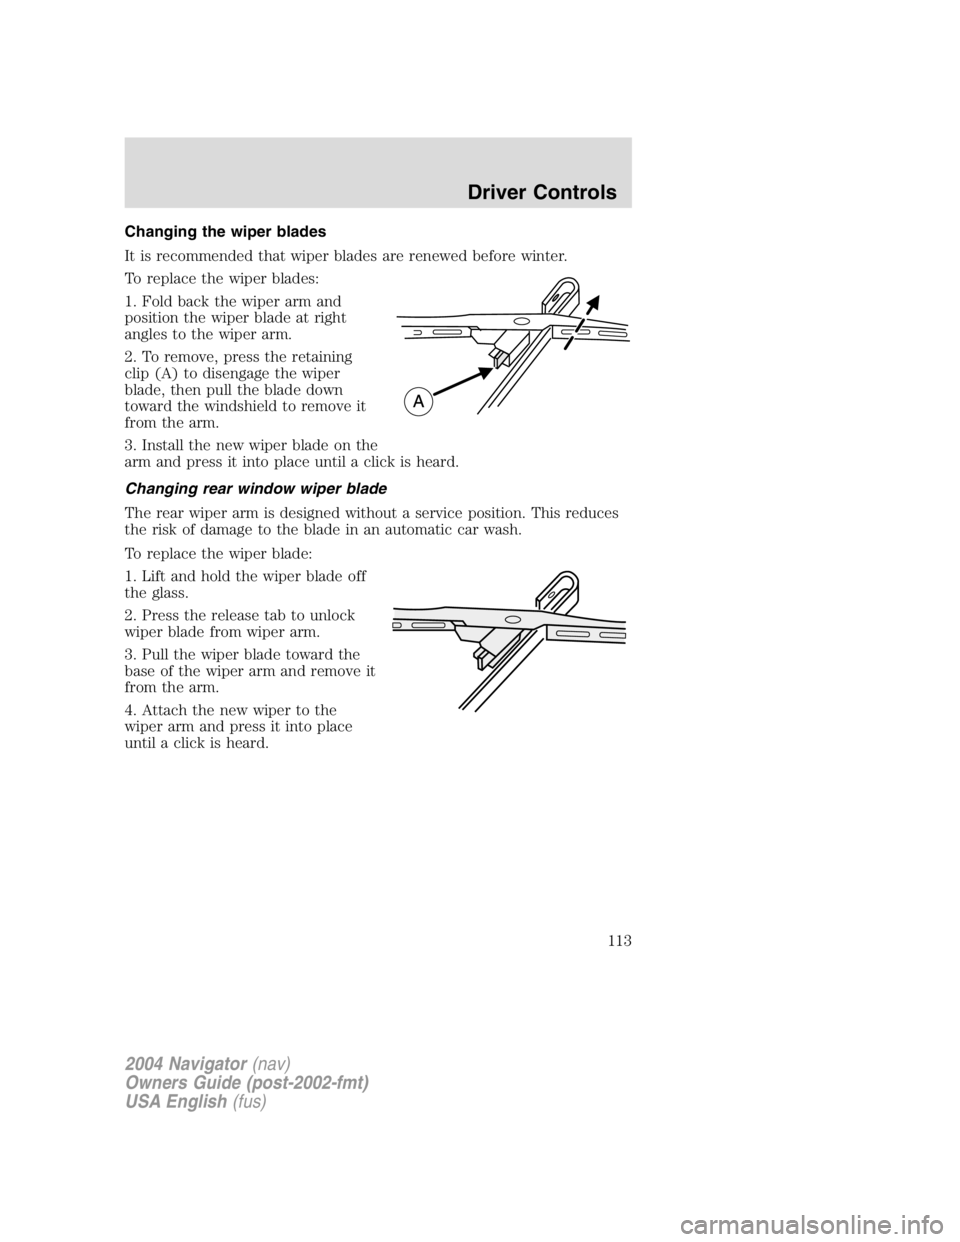
Changing the wiper blades
It is recommended that wiper blades are renewed before winter.
To replace the wiper blades:
1. Fold back the wiper arm and
position the wiper blade at right
angles to the wiper arm.
2. To remove, press the retaining
clip (A) to disengage the wiper
blade, then pull the blade down
toward the windshield to remove it
from the arm.
3. Install the new wiper blade on the
arm and press it into place until a click is heard.
Changing rear window wiper blade
The rear wiper arm is designed without a service position. This reduces
the risk of damage to the blade in an automatic car wash.
To replace the wiper blade:
1. Lift and hold the wiper blade off
the glass.
2. Press the release tab to unlock
wiper blade from wiper arm.
3. Pull the wiper blade toward the
base of the wiper arm and remove it
from the arm.
4. Attach the new wiper to the
wiper arm and press it into place
until a click is heard.
2004 Navigator (nav)
Owners Guide (post-2002-fmt)
USA English (fus) Driver Controls
113