ignition LINCOLN NAVIGATOR 2014 Workshop Manual
[x] Cancel search | Manufacturer: LINCOLN, Model Year: 2014, Model line: NAVIGATOR, Model: LINCOLN NAVIGATOR 2014Pages: 506, PDF Size: 5.72 MB
Page 172 of 506
3. Open the fuel filler door and remove any visible debris from the fuel
fill opening.
4. Insert either the fuel fill nozzle or the fuel fill funnel provided with the
vehicle several times to dislodge any debris and/or allow the inlet to
close properly.
If this action corrects the problem, the message may not reset
immediately. It may take several driving cycles for the message to turn
off. A driving cycle consists of an engine start-up (after four or more
hours with the engine off) followed by city/highway driving. Continuing
to drive with the message on may cause the service engine soon lamp to
turn on as well.
FUEL CONSUMPTION
Filling the Tank
The advertised capacity is the indicated capacity and the empty reserve
combined. Indicated capacity is the difference in the amount of fuel in a
full tank and a tank when the fuel gauge indicates empty. Empty reserve
is the amount of fuel in the tank after the fuel gauge indicates empty.
Note:The amount of usable fuel in the empty reserve varies and should
not be relied upon to increase driving range. When refueling your vehicle
after the fuel gauge indicates empty, you might not be able to refuel the
full amount of the advertised capacity of the fuel tank due to the empty
reserve still present in the tank.
For consistent results when filling the fuel tank:
•Turn the ignition off before fueling; an inaccurate reading results if the
engine is left running.
•Use the same fill rate (low–medium–high) each time the tank is filled.
•Allow no more than two automatic click–offs when filling.
Results are most accurate when the filling method is consistent.
Fuel and Refueling171
2014 Navigator(nav)
Owners Guide gf, 1st Printing, June 2013
USA(fus)
Page 174 of 506
Your vehicle is equipped with various emission control components
and a catalytic converter which will enable your vehicle to comply with
applicable exhaust emission standards. To make sure that the catalytic
converter and other emission control components continue to work
properly:
•Use only the specified fuel listed.
•Avoid running out of fuel.
•Do not turn off the ignition while your vehicle is moving, especially at
high speeds.
•Have the items listed inScheduled Maintenance Information
performed according to the specified schedule.
The scheduled maintenance items listed inScheduled Maintenance
Informationare essential to the life and performance of your vehicle
and to its emissions system.
If other than Ford, Motorcraft® or Ford-authorized parts are used
for maintenance replacements or for service of components affecting
emission control, such non-Ford parts should be equivalent to genuine
Ford Motor Company parts in performance and durability.
Illumination of the service engine soon indicator, charging system
warning light or the temperature warning light, fluid leaks, strange odors,
smoke or loss of engine power could indicate that the emission control
system is not working properly.
An improperly operating or damaged exhaust system may allow exhaust
to enter the vehicle. Have a damaged or improperly operating exhaust
system inspected and repaired immediately.
Do not make any unauthorized changes to your vehicle or engine. By
law, vehicle owners and anyone who manufactures, repairs, services,
sells, leases, trades vehicles, or supervises a fleet of vehicles are not
permitted to intentionally remove an emission control device or prevent
it from working. Information about your vehicle’s emission system is on
the Vehicle Emission Control Information Decal located on or near the
engine. This decal also lists engine displacement.
Please consult your warranty information for complete emission warranty
information.
Fuel and Refueling173
2014 Navigator(nav)
Owners Guide gf, 1st Printing, June 2013
USA(fus)
Page 176 of 506
Readiness for Inspection/Maintenance (I/M) Testing
Some state, provincial and local governments may have
Inspection/Maintenance (I/M) programs to inspect the emission control
equipment on your vehicle. Failure to pass this inspection could prevent
you from getting a vehicle registration.
If the service engine soon indicator is on or the bulb does not
work, the vehicle may need to be serviced. SeeOn-board
Diagnostics (OBD-II)in this chapter.
Your vehicle may not pass the I/M test if the service engine soon
indicator is on or not working properly (bulb is burned out), or if the
OBD-II system has determined that some of the emission control systems
have not been properly checked. In this case, the vehicle is considered
not ready for I/M testing.
If the vehicle’s engine or transmission has just been serviced, or the
battery has recently run down or been replaced, the OBD-II system may
indicate that the vehicle is not ready for I/M testing. To determine if the
vehicle is ready for I/M testing, turn the ignition key to the on position
for 15 seconds without cranking the engine. If the service engine soon
indicator blinks eight times, it means that the vehicle is not ready for I/M
testing; if the service engine soon indicator stays on solid, it means that
the vehicle is ready for I/M testing.
The OBD-II system is designed to check the emission control system
during normal driving. A complete check may take several days. If the
vehicle is not ready for I/M testing, the following driving cycle consisting
of mixed city and highway driving may be performed:
15 minutes of steady driving on an expressway or highway followed
by 20 minutes of stop-and-go driving with at least four 30-second idle
periods.
Allow the vehicle to sit for at least eight hours without starting the
engine. Then, start the engine and complete the above driving cycle.
The engine must warm up to its normal operating temperature. Once the
engine is started, do not turn off the engine until the above driving cycle
is complete. If the vehicle is still not ready for I/M testing, the above
driving cycle will have to be repeated.
Fuel and Refueling175
2014 Navigator(nav)
Owners Guide gf, 1st Printing, June 2013
USA(fus)
Page 177 of 506
AUTOMATIC TRANSMISSION
WARNING:Always set the parking brake fully and make sure
the gearshift is latched in P (Park). Turn the ignition to the
LOCK position and remove the key whenever you leave your vehicle.
WARNING:Do not use the Tow/Haul feature when driving in icy
or slippery conditions as the increased engine braking can cause
the rear wheels to slide and the vehicle to swing around with the
possible loss of vehicle control.
Your vehicle has been designed to improve fuel economy by reducing
fuel usage while coasting or decelerating. When you take your foot off
the accelerator pedal and the vehicle begins to slow down, the torque
converter clutch locks up and aggressively shuts off fuel flow to the
engine while decelerating. This fuel economy benefit may be perceived
as a light to medium braking sensation when removing your foot from
the accelerator pedal.
This vehicle is equipped with an Adaptive Transmission Shift Strategy.
The Adaptive Transmission Shift Strategy offers the optimal transmission
operation and shift quality. When the engine is turned off, the shift data
which includes the adaptive information will be stored automatically in
the Powertrain Control Module. If the battery is disconnected for any
reason, the stored information from the last time the key was turned to
off will be read. This way, no information will be lost with any battery
removal or battery disconnect.
176Transmission
2014 Navigator(nav)
Owners Guide gf, 1st Printing, June 2013
USA(fus)
Page 180 of 506
1 (First)
•Transmission operates in 1st gear only.
•Provides maximum engine braking.
•Allows upshifts by moving gearshift lever.
•Will not downshift into 1 (First) at high speeds; allows for 1 (First)
when vehicle reaches slower speeds.
Forced downshifts
•Allowed in D (Drive) only.
•Press the accelerator to the floor.
•Allows transmission to select an appropriate gear.
Automatic Transmission Adaptive Learning
This feature is designed to increase durability and provide consistent
shift feel over the life of the vehicle. A new vehicle or transmission may
have firm shifts, soft shifts or both. This operation is considered normal
and will not affect function or durability of the transmission. Over time,
the adaptive learning process will fully update transmission operation.
Additionally, whenever the battery is disconnected or a new battery
installed, the strategy must be relearned.
Brake-Shift Interlock – Floor-Shift Transmission
WARNING:Do not drive your vehicle until you verify that the
brake lamps are working.
WARNING:When doing this procedure, you will be taking
the vehicle out of park which means the vehicle can roll freely.
To avoid unwanted vehicle movement, always fully set the parking
brake prior to doing this procedure. Use wheel chocks if appropriate.
WARNING:If the parking brake is fully released, but the brake
warning lamp remains illuminated, the brakes may not be
working properly. See your authorized dealer.
This vehicle is equipped with a brake-shift interlock feature that prevents
the gearshift lever from being moved from P (Park) when the ignition is
in the on position unless the brake pedal is pressed.
Transmission179
2014 Navigator(nav)
Owners Guide gf, 1st Printing, June 2013
USA(fus)
Page 181 of 506
If you cannot move the gearshift lever out of P (Park) with ignition in
the on position and the brake pedal pressed, it is possible that a fuse has
blown or the vehicle’s brake lamps are not operating properly. Refer to
Fuseschapter for more information.
If the fuse is not blown and the brake lamps are working properly, the
following procedure will allow you to move the gearshift lever from P
(Park):
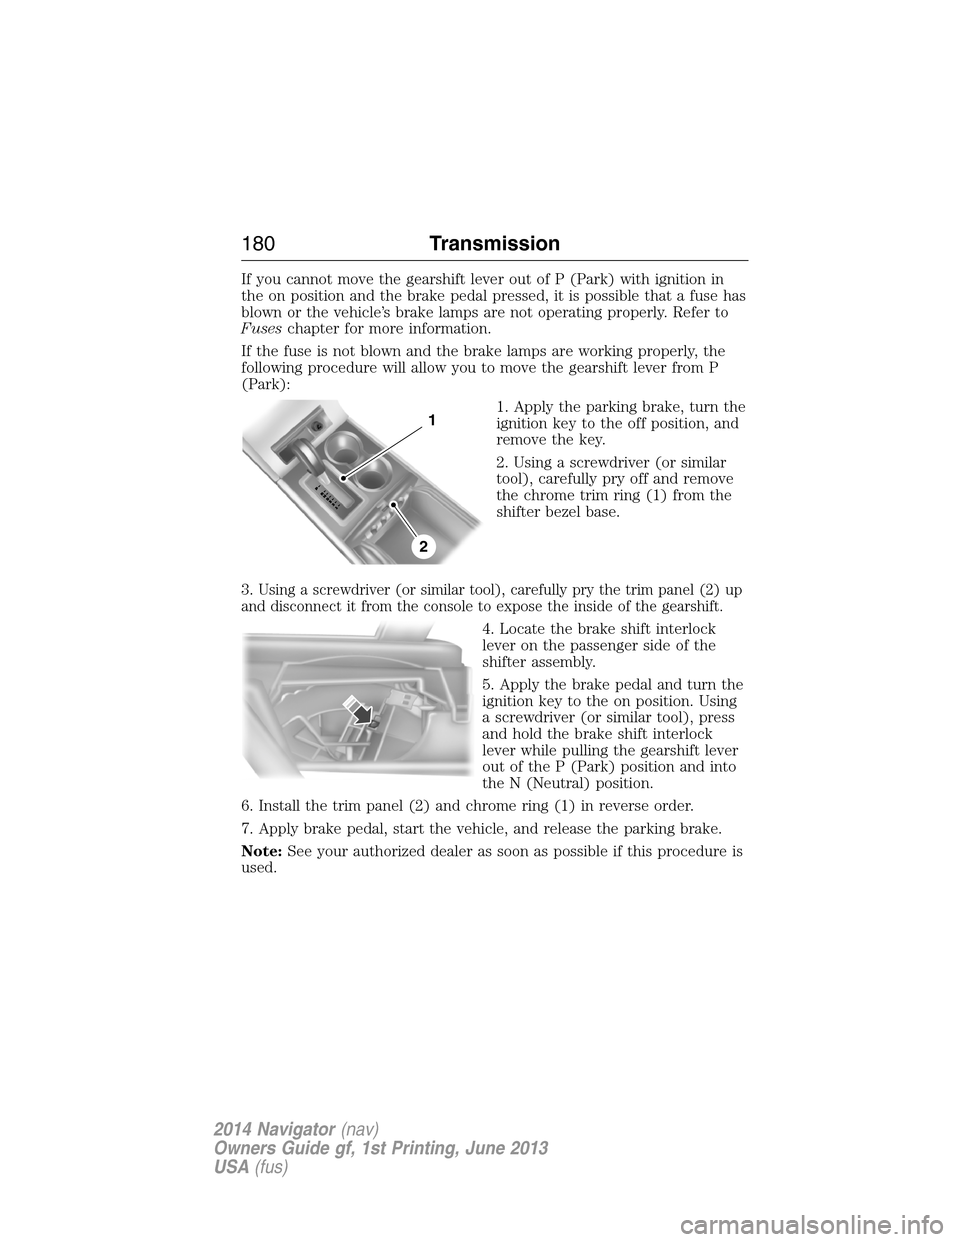
1. Apply the parking brake, turn the
ignition key to the off position, and
remove the key.
2. Using a screwdriver (or similar
tool), carefully pry off and remove
the chrome trim ring (1) from the
shifter bezel base.
3.
Using a screwdriver (or similar tool), carefully pry the trim panel (2) up
and disconnect it from the console to expose the inside of the gearshift.
4. Locate the brake shift interlock
lever on the passenger side of the
shifter assembly.
5. Apply the brake pedal and turn the
ignition key to the on position. Using
a screwdriver (or similar tool), press
and hold the brake shift interlock
lever while pulling the gearshift lever
out of the P (Park) position and into
the N (Neutral) position.
6. Install the trim panel (2) and chrome ring (1) in reverse order.
7. Apply brake pedal, start the vehicle, and release the parking brake.
Note:See your authorized dealer as soon as possible if this procedure is
used.
1
2
180Transmission
2014 Navigator(nav)
Owners Guide gf, 1st Printing, June 2013
USA(fus)
Page 188 of 506
Mud and water
Note:Driving through deep water may damage the vehicle.
If you must drive through high water, drive slowly. Traction or brake
capability may be limited.
When driving through water, determine the depth; avoid water higher
than the bottom of the hubs (if possible) and proceed slowly. If the
ignition system gets wet, the vehicle may stall.
Once through water, always try the brakes. Wet brakes do not stop the
vehicle as effectively as dry brakes. Drying can be improved by moving
your vehicle slowly while applying light pressure on the brake pedal.
Be cautious of sudden changes in vehicle speed or direction when you
are driving in mud. Even 4WD vehicles can lose traction in slick mud.
As when you are driving over sand, apply the accelerator slowly and
avoid spinning your wheels. If the vehicle does slide, steer in the
direction of the slide until you regain control of the vehicle.
If the transmission, transfer case or front axle are submerged in water,
their fluids should be checked and changed, if necessary.
If the front or rear axle is submerged in water, the axle lubricant should
be replaced.
After driving through mud, clean off residue stuck to rotating driveshafts
and tires. Excess mud stuck on tires and rotating driveshafts causes an
imbalance that could damage drive components.
“Tread Lightly” is an educational
program designed to increase public
awareness of land-use regulations
and responsibilities in our nations
wilderness areas. Ford Motor
Company joins the U.S. Forest
Service and the Bureau of Land Management in encouraging you to help
preserve our national forest and other public and private lands by “treading
lightly.”
Four-Wheel Drive (If Equipped)187
2014 Navigator(nav)
Owners Guide gf, 1st Printing, June 2013
USA(fus)
Page 191 of 506
GENERAL INFORMATION
Note:Occasional brake noise is normal. If a metal-to-metal, continuous
grinding or continuous squeal sound is present, the brake linings may be
worn out. Have them inspected by an authorized dealer. If your vehicle
has continuous vibration or shudder in the steering wheel while braking,
have your vehicle inspected by an authorized dealer.
Note:Brake dust may accumulate on the wheels, even under normal
driving conditions. Some dust is inevitable as the brakes wear and does
not contribute to brake noise. See theVehicle Carechapter for wheel
cleaning instructions.
See theInstrument Clusterchapter for information on the
brake system warning light.
Wet brakes result in reduced braking efficiency. Gently press the brake
pedal a few times when driving from a car wash or standing water to dry
the brakes.
Brake Over Accelerator
In the event the accelerator pedal becomes stuck or entrapped, apply
steady and firm pressure to the brake pedal to slow your vehicle and
reduce engine power. If you experience this condition, apply the brakes
and bring your vehicle to a safe stop. Turn the engine off, shift to
positionPand apply the parking brake, then inspect the accelerator
pedal for any interferences. If none are found and the condition persists,
have your vehicle towed to the nearest authorized dealer.
Anti-Lock Brake System
This system helps you maintain steering control during emergency stops
by keeping the brakes from locking.
This lamp momentarily illuminates when you turn the ignition
on. If the light does not illuminate during start-up, remains on
or flashes, the anti-lock brake system may be disabled and may
need to be serviced.
If the anti-lock brake system is disabled, normal braking is still
effective. If the brake warning lamp illuminates with the parking
brake released, have your brake system serviced immediately.
190Brakes
2014 Navigator(nav)
Owners Guide gf, 1st Printing, June 2013
USA(fus)
Page 196 of 506
SENSING SYSTEM (IF EQUIPPED)
WARNING:To help avoid personal injury, please read and
understand the limitations of the system as contained in this
section. Sensing is only an aid for some (generally large and fixed)
objects when moving in reverse on a flat surface at parking speeds.
Traffic control systems, inclement weather, air brakes, and external
motors and fans may also affect the function of the sensing system;
this may include reduced performance or a false activation.
WARNING:To help avoid personal injury, always use caution
when in R (Reverse) and when using the sensing system.
WARNING:This system is not designed to prevent contact with
small or moving objects. The system is designed to provide a
warning to assist the driver in detecting large stationary objects to
avoid damaging the vehicle. The system may not detect smaller objects,
particularly those close to the ground.
WARNING:Certain add-on devices such as large trailer hitches,
bike or surfboard racks and any device that may block the normal
detection zone of the system, may create false beeps.
Note:Keep the sensors (located on the bumper/fascia) free from snow,
ice and large accumulations of dirt. If the sensors are covered, the
system’s accuracy can be affected. Do not clean the sensors with sharp
objects.
Note:If your vehicle sustains damage to the bumper/fascia, leaving it
misaligned or bent, the sensing zone may be altered causing inaccurate
measurement of obstacles or false alarms.
Note:If your vehicle is equipped with MyKey®, it is possible to prevent
turning the sensing system off. Refer to theMyKey®chapter.
The sensing system warns the driver of obstacles within a certain range
of the bumper area. The system turns on automatically whenever the
ignition is switched on.
When receiving a detection warning, the radio volume is reduced to a
predetermined level. After the warning goes away, the radio volume
returns to the previous level.
Parking Aids195
2014 Navigator(nav)
Owners Guide gf, 1st Printing, June 2013
USA(fus)
Page 203 of 506
Setting a Speed
1. Accelerate to the desired speed.
2. Press and releaseSET+.
3. Take your foot off the accelerator pedal.
The indicator will turn on in the instrument cluster.
Changing the Set Speed
•Press and holdSET+orSET–. Release the button when you reach
the desired speed.
•Press and releaseSET+orSET–. The set speed will change in
approximately 1 mph (2 km/h) increments.
•Press the accelerator pedal or brake pedal until you reach the desired
speed. Press and releaseSET+.
Canceling a Set Speed
Tap the brake pedal. The set speed will not be erased.
Resuming a Set Speed
Press and releaseRESUME.
Switching Off Cruise Control
Note:The set speed is erased when you turn off cruise control.
PressOFFor turn off the ignition.
202Cruise Control
2014 Navigator(nav)
Owners Guide gf, 1st Printing, June 2013
USA(fus)